Go Back
- 4 cups fresh strawberries, hulled and diced - 2 cups fresh cranberries, rinsed and sorted - 1 large orange, zested and juiced Fresh fruits give your Christmas jam its bright flavor. Strawberries add sweetness, while cranberries provide a nice tartness. The orange zest and juice bring warmth and depth to the mix. Always use ripe, fresh ingredients for the best taste. - 1 cup granulated sugar - 1/4 cup honey - 1 tablespoon freshly squeezed lemon juice - 1 teaspoon ground cinnamon - 1/2 teaspoon ground nutmeg - 1/4 teaspoon ground allspice The sugar and honey sweeten the jam. They balance the tartness of the fruits. Lemon juice helps the flavors pop and adds acidity. Spices like cinnamon, nutmeg, and allspice bring warmth and a festive touch. Adjust these spices to fit your taste. - Use one package (1.75 oz) of fruit pectin (like Sure-Jell) Pectin is key for making your jam thicken. It helps form the gel that holds the jam together. Without it, your jam could end up runny. Following the pectin instructions ensures perfect results every time. Remember, the right amount is crucial for good texture. {{ingredient_image_2}} Sterilizing jars is very important. It keeps your jam safe to eat. If jars aren't clean, germs can spoil your jam. To sterilize your jars, fill a large pot with water. Place your jars and lids in the pot. Boil the water for 10 minutes. Use tongs to remove them carefully. Let them dry on a clean towel. In a large pot, mix the diced strawberries and rinsed cranberries. Add the orange zest and juice, granulated sugar, honey, lemon juice, cinnamon, nutmeg, and allspice. Stir well to combine. Cook this mix over medium heat. Keep stirring often. This helps prevent sticking and burning. Once the mixture boils, add the fruit pectin. Stir it in slowly and well. Let the mix return to a full rolling boil. Boil for 1 to 2 minutes. Keep stirring to avoid burning. You want to see big bubbles pop up. This shows it is cooking well. Carefully ladle the hot jam into your clean jars. Leave about 1/4 inch of space at the top. This space is called headspace. It helps the jam seal properly. Wipe the rims of the jars with a clean cloth. This step removes any sticky bits that can affect the seal. Place the sterilized lids on the jars. Screw on the metal bands until they are just tight. Do not over-tighten. To seal the jars, process them in a boiling water bath. This should last about 10 to 15 minutes. The boiling water helps create a good seal. After processing, carefully remove the jars from the water. Let them cool on a clean towel. You should hear a popping sound. This noise means the jars sealed well. Once cool, check the seals by pressing the center of each lid. If it stays down, the jar is sealed. Store the jars in a cool, dark place. Mistakes while sterilizing Do not skip sterilizing your jars. This step keeps your jam safe. Place the jars in boiling water for 10 minutes. Make sure they are fully submerged. If you leave them in for too little time, they may not be safe. Overcooking the jam Watch your jam closely while it cooks. Overcooking can ruin the taste and texture. Once it reaches a boil, stir continuously. This keeps it from sticking and burning. If you cook too long, your jam may become too thick. Testing for doneness To check if your jam is ready, drop a spoonful on a cold plate. Wait a minute, then run your finger through the jam. If it holds its shape, it’s ready! If it runs back together, boil it for another minute and test again. Adjusting thickness Want your jam thicker? Add a little more pectin. Stir it in and let it boil again. If it’s too thick, add a bit of water or juice. Remember to test it again after adjustments. Creative spice additions Spice can elevate your jam. Try adding a pinch of ginger or cloves for a twist. You can also play with citrus zest. Lemon or lime zest adds bright notes to your jam. Suggestions for higher fruit ratios Want more fruit flavor? Increase the amount of strawberries or cranberries. Use 5 cups of fruit instead of 4 cups of strawberries. This can make your jam fruitier and more vibrant. Just keep the sugar the same for balance. Pro Tips Choose the Right Fruit: For the best flavor, select ripe strawberries and fresh cranberries. Overripe or damaged fruit can affect the taste and texture of your jam. Adjust Sweetness: Feel free to modify the amount of sugar and honey according to your taste preference. You can also substitute with natural sweeteners if desired. Test for Consistency: Always perform the cold plate test to check if your jam has reached the right consistency. If it’s too runny, continue boiling for a few more minutes. Store Properly: After sealing the jars, store them in a cool, dark place. Properly sealed jam can last up to a year, but once opened, refrigerate and consume within a few weeks. {{image_4}} You can get creative with your Christmas jam by using other seasonal fruits. If you like, try adding pears, apples, or even figs. Each fruit brings its own taste. Mixing different fruits helps create unique flavor profiles. For example, combine cranberries with pears for a sweet and tart mix. You can also use frozen fruits if fresh ones are not available. If you want a healthier option, there are many natural sweetener alternatives. You can use maple syrup or agave nectar instead of sugar. Honey is great too! Just remember to adjust the amount to match your taste. Natural sweeteners can change the jam's flavor, so taste as you go. Adding spices can elevate your jam to a new level. Ground cinnamon, nutmeg, and allspice work wonders in this recipe. You can also try using cardamom or ginger for a warm, inviting taste. For a fresh twist, consider incorporating herbs like rosemary or thyme. These herbs add a unique flavor that surprises the palate. Store your Christmas jam in a cool, dark place. The best temperature is around 50-70°F. A pantry or cupboard works well. If kept this way, your jam can last up to one year. After opening, refrigerate it. Use the opened jar within three weeks for best taste. Check for signs of spoilage before using jam. Look for a bulging lid or any leaks. If you see mold on top, do not eat it. If the jam smells off or has a strange texture, it's best to throw it out. When in doubt, throw it out. You can reuse jam jars for other foods. First, wash them in hot soapy water. Rinse well to remove all soap. Sterilize jars again before using them. Boil them in water for ten minutes. Make sure the lids are also clean and fit properly. Homemade Christmas jam can last up to one year if stored well. For best results, keep it in a cool, dark place. Once opened, use it within three weeks. Store it in the fridge after opening. Always check for signs of spoilage before use. Yes, you can replace sugar with other sweeteners. For example, honey or agave syrup works well. Use about 3/4 cup of honey for every cup of sugar. Keep in mind, sweeteners may alter the taste and texture. Adjust the amount of pectin if needed, as some sweeteners have different properties. The best way to sterilize jars is by boiling them. Place the jars and lids in a pot of water. Boil for ten minutes to kill germs. Remove the jars carefully and let them dry on a clean towel. This step is crucial for safe canning. Yes, you can freeze Christmas jam. Freezing is a great option if you have extra jam. Just leave some headspace in the jar to allow for expansion. However, canned jam has a longer shelf life. Canning keeps it safe and ready for use. If your jam doesn't set, don't worry. You can fix it easily. Return the jam to a pot and bring it back to a boil. Add more pectin if needed. Boil for a few minutes and test again. If it still doesn’t set, you may need to repeat this process. In this post, we explored how to make delicious homemade Christmas jam. We covered key ingredients, including fresh fruits and spices, and detailed every step, from sterilizing jars to canning techniques. I shared valuable tips to avoid common mistakes and perfect your jam's taste and texture. Making jam can be fun and rewarding. With these steps, you can create unique flavors and enjoy your treat all year long. Happy jamming!

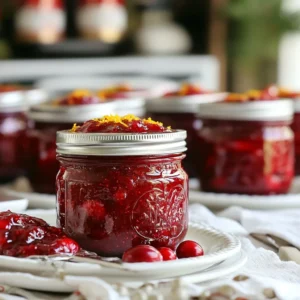
Festive Christmas Jam

A delightful jam made with strawberries and cranberries, perfect for the holiday season.
Prep Time 20 minutes
Cook Time 1 hour 10 minutes
Total Time 1 hour 30 minutes
Course Dessert
Cuisine American
Servings 5
Calories 50 kcal

Ingredients
  

  • 4 cups fresh strawberries, hulled and diced
  • 2 cups fresh cranberries, rinsed and sorted
  • 1 large orange, zested and juiced
  • 1 cup granulated sugar
  • 1 4 cup honey
  • 1 tablespoon freshly squeezed lemon juice
  • 1 teaspoon ground cinnamon
  • 1 2 teaspoon ground nutmeg
  • 1 4 teaspoon ground allspice
  • 1 package (1.75 oz) fruit pectin (like Sure-Jell)

Instructions
 

  • Prepare the Jars: Begin by sterilizing your canning jars and their lids. Place them in a large pot of boiling water for 10 minutes. This step is crucial to preventing contamination and ensuring safe canning practices.
  • Cook the Fruits: In a spacious pot, combine the diced strawberries and rinsed cranberries. Add in the orange zest, orange juice, granulated sugar, honey, lemon juice, ground cinnamon, ground nutmeg, and ground allspice. Mix the ingredients thoroughly and bring the mixture to a boil over medium heat, stirring frequently to prevent sticking.
  • Add Pectin: Once the mixture reaches a vigorous boil, gradually stir in the fruit pectin. Allow the mixture to return to a full rolling boil, maintaining this boil for 1-2 minutes. Stir continuously to ensure even cooking and to avoid burning.
  • Check for Doneness: To determine if your jam is ready, drop a spoonful onto a cold plate. Allow it to sit for a minute. If it holds its shape after cooling, your jam is done! If it remains too runny, continue boiling for another minute, then test again.
  • Fill the Jars: Carefully ladle the hot jam into the prepared, sterilized jars. Leave approximately 1/4 inch of headspace at the top of each jar. Wipe the rims of the jars with a clean cloth to remove any sticky residues before placing the lids.
  • Seal and Process: Place the sterilized lids onto the jars and screw on the metal bands until they are fingertip-tight. To properly seal the jars, process them in a boiling water bath for about 10-15 minutes.
  • Cool and Store: Once processed, carefully remove the jars from the boiling water bath and allow them to cool on a clean kitchen towel. Listen for the delightful popping sound of the lids sealing, indicating a successful canning. After they’ve cooled, check the seals by pressing down in the center of each lid; it should remain firm and not pop back.

Notes

Consider labeling each jar with festive tags to enhance their gift potential. Store in a cool, dark place.
Keyword Christmas, cranberry, holiday, jam, strawberry