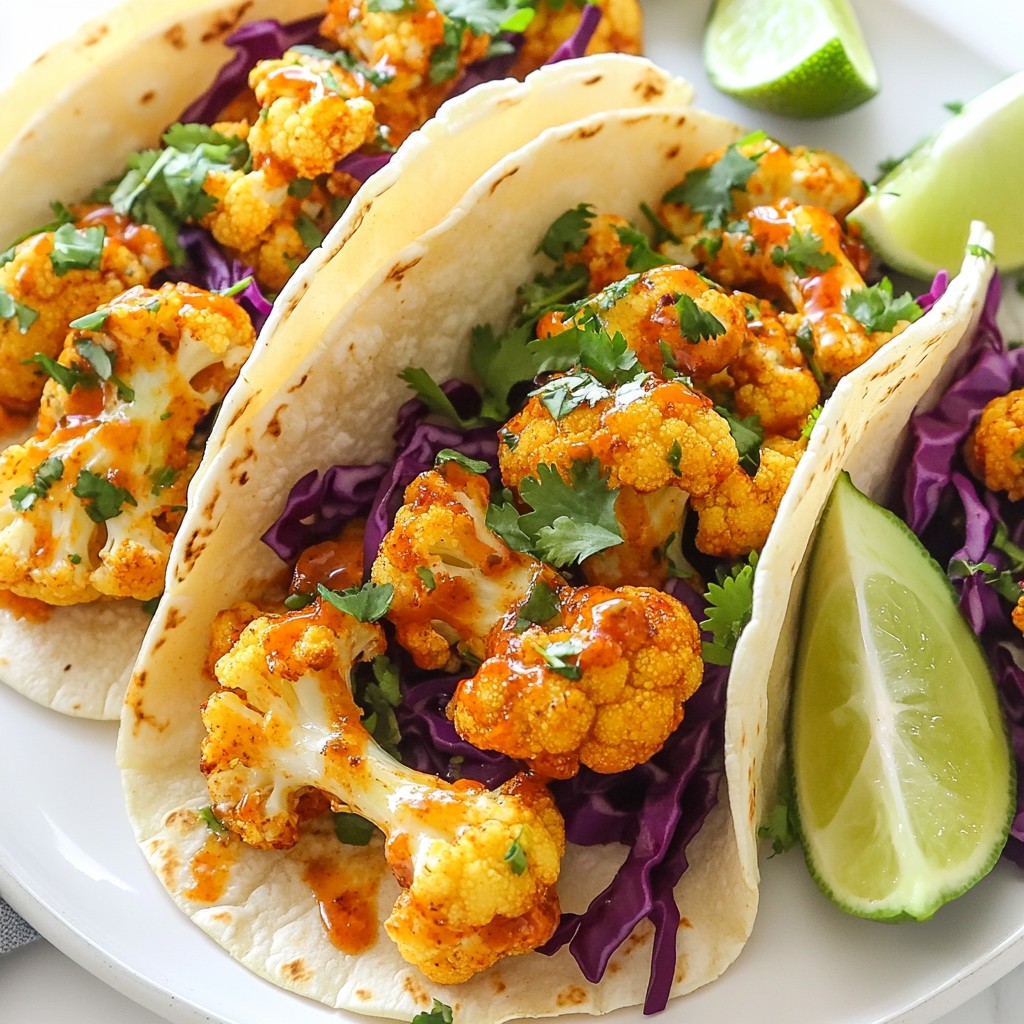
Are you ready to spice up your taco night? These Vegan Buffalo Cauliflower Tacos pack bold flavors and crispy goodness in every bite! I'm excited to share a fun and tasty recipe that proves plant-based meals can be packed with zest. Whether you’re a seasoned vegan or just exploring new flavors, these tacos are sure to impress. Let’s dive into the ingredients and get started on this delicious dish!
Why I Love This Recipe
- Deliciously Spicy: The combination of buffalo sauce and crispy cauliflower creates a mouthwatering flavor explosion that satisfies spicy cravings.
- Healthy Alternative: These tacos are a guilt-free indulgence, packed with nutrients from cauliflower and topped with fresh veggies.
- Quick and Easy: With minimal prep time and simple ingredients, these tacos come together quickly for a weeknight dinner or a party treat.
- Customizable: Feel free to add your favorite toppings, such as vegan cheese or pickled onions, to make these tacos your own!
Ingredients
Main Ingredients for Vegan Buffalo Cauliflower Tacos
To make these tasty tacos, you'll need:
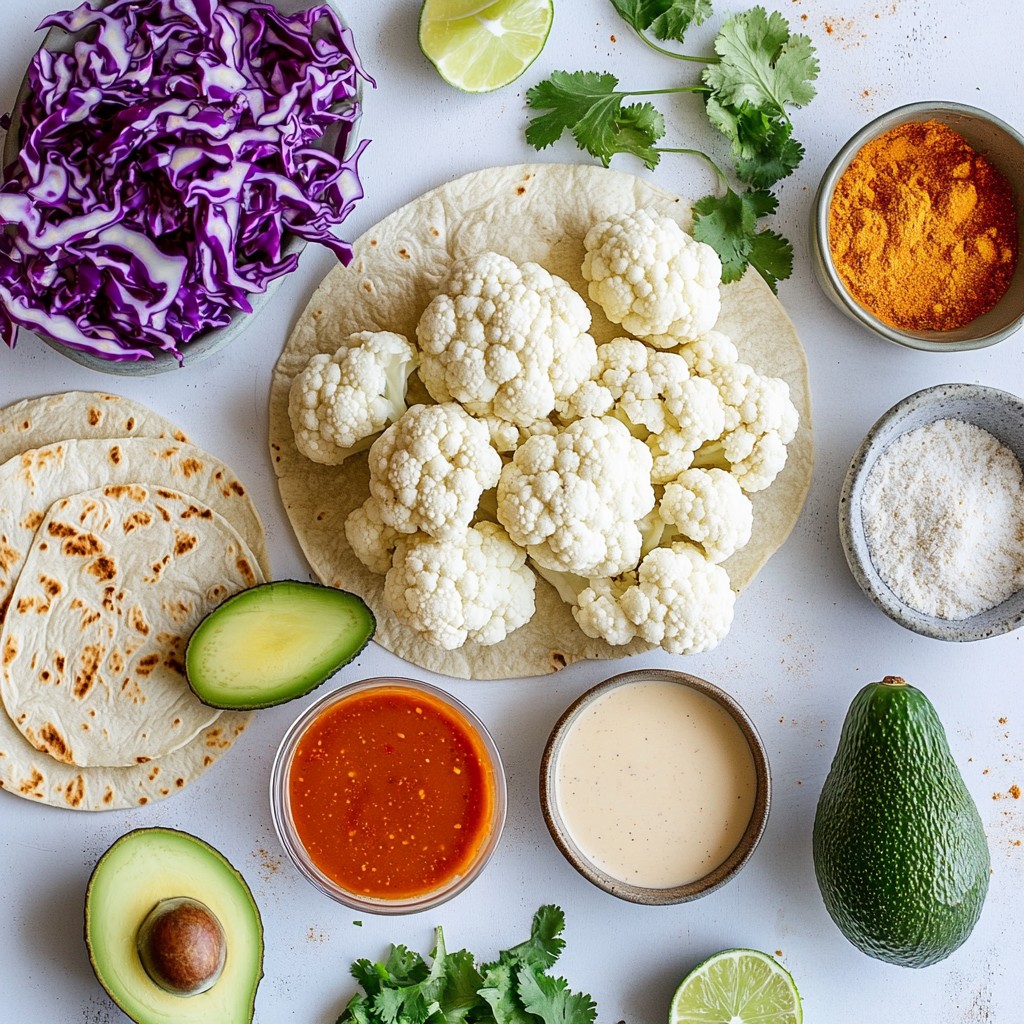
- 1 medium head of cauliflower, trimmed and cut into bite-sized florets
- 1 cup all-purpose flour (can substitute with gluten-free flour if desired)
- 1 cup almond milk (or your preferred plant-based milk)
- 1 tablespoon garlic powder
- 1 tablespoon onion powder
- 1 teaspoon smoked paprika
- 1 teaspoon salt
- 1 teaspoon freshly ground black pepper
- 1 cup buffalo sauce (store-bought or homemade)
- 8 small corn tortillas
- 1 ripe avocado, thinly sliced
- 1 cup finely shredded red cabbage
- Fresh cilantro leaves, for garnish
- Lime wedges, for serving
These ingredients create bold and delicious flavors. The cauliflower is the star, while the buffalo sauce adds a spicy kick.
Optional Ingredients for Customization
You can change these tacos to fit your taste. Here are some fun options:
- Replace corn tortillas with flour tortillas for a softer bite.
- Add sliced jalapeños for extra heat.
- Include diced tomatoes or corn for added texture and sweetness.
- Use a different sauce like BBQ or ranch for a unique twist.
Feel free to mix and match to make it your own!
Dietary Substitutions and Alternatives
If you want to adapt the recipe for different diets, here are some ideas:
- Use gluten-free flour to keep it gluten-free.
- Swap almond milk for oat, soy, or coconut milk if you have allergies.
- For a nut-free option, choose soy or rice milk instead of almond milk.
- You can skip the buffalo sauce and use a milder sauce for kids or those who prefer less spice.
These options keep the dish tasty while fitting various needs. Enjoy making these tacos your own!
Step-by-Step Instructions
Preparation of Cauliflower and Batter
Start by preheating your oven to 450°F (230°C). This high heat will help crisp your cauliflower. Next, line a baking sheet with parchment paper. This step makes cleanup easy and prevents sticking.
In a large mixing bowl, combine 1 cup of all-purpose flour, 1 cup of almond milk, 1 tablespoon of garlic powder, 1 tablespoon of onion powder, 1 teaspoon of smoked paprika, 1 teaspoon of salt, and 1 teaspoon of black pepper. Whisk these ingredients until the batter is smooth. It should look like pancake batter.
Take a medium head of cauliflower and cut it into bite-sized florets. Dip each floret into the batter, making sure it gets coated well. Let any extra batter drip back into the bowl. Place the coated florets on your lined baking sheet in a single layer.
Baking the Cauliflower to Perfection
Bake the cauliflower in the preheated oven for 20 minutes. Flip the florets halfway through. This helps them cook evenly and get crispy. Once the timer goes off, pull the baking sheet from the oven. Drizzle 1 cup of buffalo sauce over the crispy cauliflower. Toss gently to coat each piece evenly.
Return the baking sheet to the oven and bake for another 10 minutes. This additional time helps the buffalo sauce stick and caramelize.
Assembling the Tacos
While the cauliflower is baking, warm 8 small corn tortillas in a skillet over medium heat. Heat each tortilla for about 1-2 minutes on both sides. They should become soft and flexible.
To assemble the tacos, place a few pieces of buffalo cauliflower on each warm tortilla. Top them with sliced avocado and shredded red cabbage for some crunch.
Finish by adding fresh cilantro leaves for a burst of flavor. Serve your tacos with lime wedges on the side. A squeeze of lime juice adds a nice touch. Enjoy your bold and flavorful dish!
Tips & Tricks
Expert Tips for the Crispiest Cauliflower
To get the crispiest cauliflower, follow these tips:
- Choose a fresh head of cauliflower. Look for firm florets with no brown spots.
- Cut the florets into even sizes. This helps them cook evenly.
- Make sure to coat each floret well in the batter. A good coating helps create a crispy shell.
- Bake at a high temperature. The 450°F setting gives the best crunch.
- Flip the florets halfway through baking. This ensures all sides get crispy.
How to Adjust Spiciness Level
You can easily change the spice level in these tacos. Here’s how:
- For mild tacos, use less buffalo sauce. You can add a bit of water to thin it.
- For extra heat, mix in cayenne pepper or hot sauce into the buffalo sauce.
- If you want a smoky flavor, try adding smoked paprika to the batter.
- Pair with creamy toppings like avocado. They help cool down the heat.
Best Practices for Taco Assembly
Assembling your tacos right makes a big difference. Here are my best tips:
- Warm your corn tortillas before filling. This makes them soft and easy to fold.
- Start with the buffalo cauliflower as the base. This adds a bold flavor.
- Layer on the avocado for creaminess. It balances the spicy cauliflower well.
- Add shredded cabbage last. This gives a nice crunch and fresh flavor.
- Don’t forget the cilantro! It adds a pop of color and freshness.
- Serve with lime wedges. A squeeze of lime lifts all the flavors.
Pro Tips
- Perfectly Crispy Cauliflower: For an extra crispy texture, you can double-coat the cauliflower florets by dipping them in the batter again after the first bake.
- Buffalo Sauce Variations: Experiment with different levels of heat by mixing in a bit of maple syrup or honey to the buffalo sauce for a sweet and spicy twist.
- Warm Tortillas: To ensure your tortillas stay warm and pliable, wrap them in a clean kitchen towel while you prepare the rest of the tacos.
- Garnishing Options: Enhance the flavor and presentation by adding pickled red onions or a drizzle of vegan ranch dressing on top of your tacos.
Variations
Different Sauces to Use
You can change the flavor with different sauces. If you want a milder taste, try BBQ sauce. It adds a sweet and smoky touch. For a spicy kick, use a hot sauce like sriracha. You can mix these sauces with some vegan mayo for a creamy twist. This will give your tacos a whole new vibe.
Alternative Fillings and Toppings
Switch up your fillings for fun! Instead of red cabbage, try shredded carrots or kale. Both add crunch and color. You can also use black beans for protein. Add some diced tomatoes or corn for extra flavor. Top with a drizzle of vegan ranch for a creamy finish. Avocado is always a great choice too.
Gluten-Free and Low-Carb Modifications
To make these tacos gluten-free, use gluten-free flour for the batter. Corn tortillas are naturally gluten-free, making them a perfect choice. For a low-carb option, skip the tortillas and use lettuce wraps instead. They are fresh and crunchy, and they hold the filling well. You can enjoy all the flavors without the carbs.
Storage Info
How to Store Leftover Tacos
To store leftover tacos, first separate the components. Keep the cauliflower, tortillas, and toppings apart. This helps keep everything fresh. Place the cauliflower in an airtight container. Store it in the fridge for up to three days. Wrap the tortillas in foil or plastic wrap. They also last about three days in the fridge. For toppings like avocado and cabbage, use small containers. This keeps them crisp and fresh.
Reheating Instructions for Best Results
When you’re ready to enjoy your leftover tacos, reheat the cauliflower first. Preheat your oven to 350°F (175°C). Spread the cauliflower on a baking sheet. Heat for about 10-15 minutes until warm. This keeps the crunch. For tortillas, warm them in a skillet over medium heat. Heat each side for about 30 seconds. This brings back their softness. Assemble your tacos just before serving for the best taste.
Meal Prep Tips for Busy Days
If you’re busy, meal prep makes life easier. Prepare the cauliflower batter ahead of time. Store it in the fridge for up to two days. You can also bake the cauliflower in advance. Just reheat it when you’re ready to eat. Chop the avocado and cabbage beforehand. Keep them in separate containers. This way, you can whip up tasty tacos in minutes. Enjoy quick meals without losing the flavor!
FAQs
Can I make these tacos ahead of time?
Yes, you can prep these tacos in advance. You can bake the cauliflower ahead of time and store it in the fridge. Just reheat it in the oven when you are ready to serve. You can also prepare the toppings, like avocado and cabbage, ahead of time. Just keep them in separate containers in the fridge. This way, you can enjoy fresh, hot tacos in no time.
What can I substitute for buffalo sauce?
If you want a different flavor, you can use hot sauce, barbecue sauce, or even teriyaki sauce. For a milder taste, try using sweet chili sauce. You can mix sauces too for a unique flavor. Just remember to adjust the heat level to your liking. A good balance makes all the difference.
Are these tacos gluten-free?
Yes, they can be gluten-free! Simply swap the all-purpose flour for gluten-free flour. Make sure to use gluten-free tortillas as well. Many brands offer tasty corn tortillas that work great. Always check labels to ensure they meet your needs. Enjoy these tacos without worry!
Vegan Buffalo Cauliflower Tacos are a tasty choice for any meal. We covered key ingredients, step-by-step instructions, and helpful tips to make your tacos shine. You learned how to customize the recipe to fit your diet and taste. Remember, you can swap ingredients and change spices to make the dish your own. Store leftovers properly for later meals. Enjoy this recipe, and create a meal that you and your friends will love. Happy cooking!