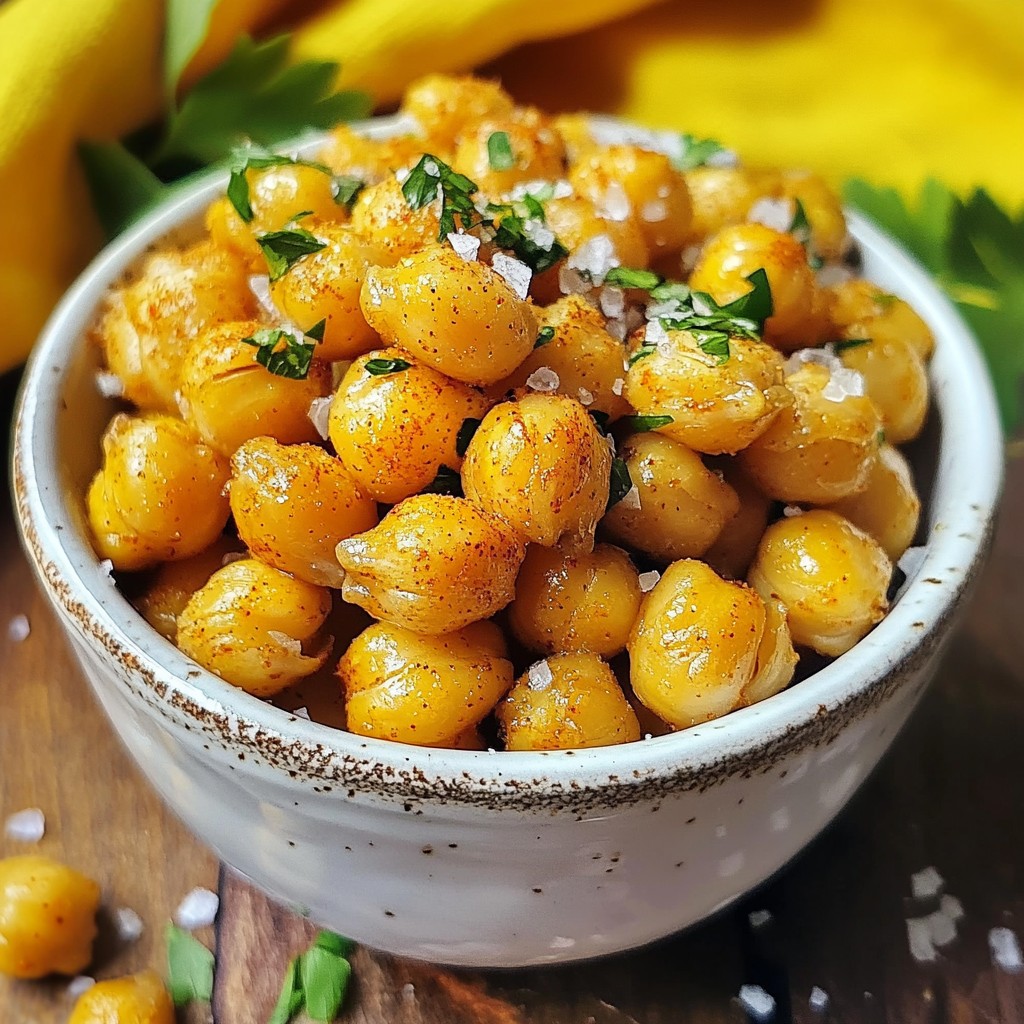
Looking for a crunchy snack that packs a punch? Try these Salt & Vinegar Roasted Chickpeas! They're easy to make and full of flavor. With a crisp texture and a tangy kick from vinegar, these chickpeas are a healthier alternative to chips. In this post, I’ll guide you through simple steps to create this delightful snack that will please your taste buds. Let’s dive in and get roasting!
Why I Love This Recipe
- Healthy Snack: These crunchy chickpeas are a nutritious alternative to traditional snacks, packed with protein and fiber.
- Simple Ingredients: With just a few pantry staples, you can whip up this delicious treat without any fuss.
- Customizable Flavors: You can easily adjust the seasoning to suit your taste preferences or try different flavor combinations.
- Perfect for Meal Prep: These chickpeas store well, making them an ideal snack for busy days or a crunchy addition to salads.
Ingredients
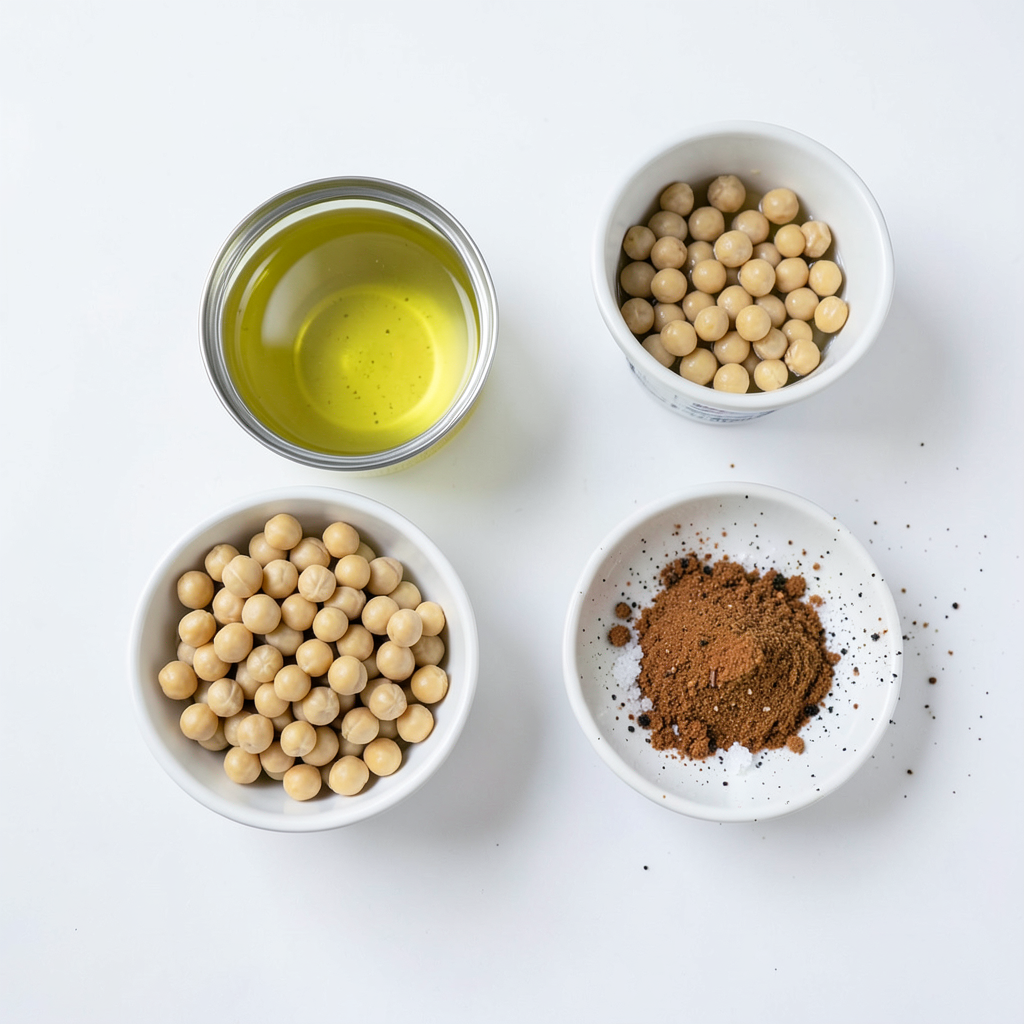
To make Salt & Vinegar Roasted Chickpeas, you will need a few simple items. Here is the list of ingredients:
- 1 can (15 oz) chickpeas, drained and rinsed
- 2 tablespoons olive oil
- 2 tablespoons apple cider vinegar
- 1 teaspoon sea salt
- 1/2 teaspoon garlic powder
- 1/2 teaspoon onion powder
- 1/4 teaspoon smoked paprika
- 1/4 teaspoon black pepper
Each ingredient plays a role in creating the perfect crunch. Chickpeas are the main star. They provide protein and fiber. Olive oil helps them crisp up in the oven. Apple cider vinegar brings that tangy flavor that makes this snack fun.
Sea salt adds taste, while garlic and onion powder give depth. Smoked paprika adds a hint of smokiness, and black pepper gives warmth. Together, these ingredients create a snack that is both tasty and satisfying.
Make sure to gather everything before you start. This way, you will have a smooth cooking process. Enjoy the process of making this crunchy treat!
Step-by-Step Instructions
Preheat the Oven
Set your oven to 400°F (200°C) for optimal roasting temperature. A hot oven helps the chickpeas get crispy.
Prepare the Chickpeas
Drain the chickpeas from the can and rinse them well under cold water. Spread them on a clean towel and pat them dry. This step is key. Removing moisture helps the chickpeas crunch up nicely.
Season the Chickpeas
In a large mixing bowl, add the dried chickpeas. Pour in the olive oil and apple cider vinegar. Sprinkle the sea salt, garlic powder, onion powder, smoked paprika, and black pepper on top. Use a spoon or spatula to gently toss. Ensure every chickpea gets coated in the tasty mixture.
Arrange for Roasting
Line a baking sheet with parchment paper or a silicone mat. Spread the seasoned chickpeas in a single layer. This allows them to roast evenly and become crunchy.
Roast the Chickpeas
Place the baking sheet in your preheated oven. Roast for about 25-30 minutes. Make sure to stir the chickpeas halfway through. This step promotes even cooking and helps them crisp up all around.
Cool and Serve
Once golden brown and crispy, take the chickpeas out of the oven. Allow them to cool on the baking sheet for a few minutes. They will get even crispier as they cool down. Enjoy them as a snack or use them to add crunch to meals!
Tips & Tricks
Achieving Maximum Crunchiness
To make your chickpeas super crunchy, start by drying them well. After rinsing, spread them on a clean towel and pat them dry. The less moisture, the better the crunch. Preheat your oven to 400°F (200°C). This hot temperature is key for roasting. Roast the chickpeas for 25 to 30 minutes. Stir them halfway to help them cook evenly.
Enhancing Flavor
Want more flavor? Try adding cayenne pepper for heat or nutritional yeast for a cheesy taste. These extras can make a big difference. You can also mix and match spices to find your perfect blend. Don’t be afraid to get creative!
Troubleshooting Common Issues
If your chickpeas come out soggy, you may not have dried them enough. Next time, be sure to pat them dry well. For even roasting, spread the chickpeas in one layer. If you notice some are still soft, give them a bit more time in the oven. Just keep an eye on them so they don’t burn.
Pro Tips
- Dry Chickpeas Thoroughly: Ensure the chickpeas are completely dry before seasoning. This step is key to achieving the perfect crunch.
- Experiment with Flavors: Feel free to customize the spices! Try adding cayenne pepper for heat or nutritional yeast for a cheesy flavor.
- Check for Crispiness: Keep an eye on the chickpeas towards the end of the roasting time. Oven temperatures can vary, so adjust cooking time as needed.
- Storage Tips: Store leftover chickpeas in an airtight container at room temperature. They are best enjoyed within a few days for optimal crunch.
Variations
Different Seasoning Blends
You can get creative with your seasoning blends. Try adding different spices to change the flavor. Here are some great ideas:
- Cayenne pepper for heat.
- Nutritional yeast for a cheesy taste.
- Curry powder for a warm and earthy flavor.
- Italian herbs like oregano and basil for a fresh twist.
Mix and match these to find your favorite blend!
Spice Level Adjustments
Want your chickpeas spicier? Add more cayenne pepper or chili powder. For a milder snack, reduce the amount of garlic or onion powder. You can also leave out the smoked paprika. Start with a little spice and taste as you go. Adjusting spice levels is easy and fun!
Serving Suggestions
Roasted chickpeas are great on their own, but you can do more!
- Toppings for salads: Add crunch to your greens.
- Snack mix: Combine with nuts and dried fruit for a tasty trail mix.
- Soups: Sprinkle on top of your favorite soups for added texture.
- Dips: Enjoy them with hummus or guacamole for a tasty pairing.
Get creative and enjoy your crunchy chickpeas in different ways!
Storage Info
Best Storage Practices
To keep your salt and vinegar roasted chickpeas fresh, store them in an airtight container. You can use a glass jar or a plastic container with a tight lid. Make sure they are completely cool before sealing. This helps to avoid moisture, which can make them soggy.
Shelf Life
Roasted chickpeas last about 3 days at room temperature. Keep them in a cool, dry place away from sunlight. If you store them in the fridge, they can last up to a week. However, cold storage can soften them a bit, so be mindful of that.
Reheating and Refreshing
To reheat your chickpeas and bring back their crunch, use the oven. Preheat it to 350°F (175°C). Spread the chickpeas on a baking sheet and heat for about 10 minutes. This will help restore their crispy texture. You can also toss them in the oven for a few minutes if they start to lose their crunch after a few days.
FAQs
Can I use dried chickpeas instead of canned?
Yes, you can use dried chickpeas. First, soak them overnight in water. Then, cook them until tender. This can take about 1 to 1.5 hours. After cooking, drain and rinse them. Dry them well before seasoning. This way, you'll have great results!
How can I make these chickpeas healthier?
To make your chickpeas healthier, try using less oil. You can cut the olive oil to 1 tablespoon. Or, replace it with vegetable broth. You can also use herbs and spices for flavor instead of salt. This keeps it tasty and lower in calories.
Can I make these in an air fryer?
Absolutely! To air fry chickpeas, start by preheating the air fryer to 400°F (200°C). Then, prepare your seasoned chickpeas as usual. Place them in the air fryer basket in a single layer. Cook for about 15-20 minutes. Shake the basket halfway through for even crispiness.
What other recipes can I use chickpeas in?
Chickpeas are very versatile! You can add them to salads for extra protein. They work great in soups and stews. Try making hummus for a tasty dip. You can also blend them into smoothies for added nutrition. The options are endless!
Roasting chickpeas is simple and rewarding. With just a few ingredients, you can create a crunchy snack. We discussed how to prepare, season, and roast chickpeas for the best flavor and texture. Remember to dry them well for that perfect crunch. You can customize them with different spices or use them in various dishes. Enjoy experimenting with your chickpeas, whether you want a snack or a topping. Freshly roasted chickpeas will delight your taste buds every time.