Warm up your kitchen with my Roasted Butternut Squash Bisque! This comforting soup is rich, creamy, and packed with flavor. With just a few simple steps, you’ll learn how to roast butternut squash to perfection and blend it into a velvety bisque. Whether you want a cozy dinner or a healthy meal, this recipe has something for everyone. Dive in to discover how to make this delightful soup!
Why I Love This Recipe
- Comforting Flavor: This bisque is the perfect blend of sweet and savory, making it incredibly comforting, especially on chilly days.
- Easy to Prepare: With simple ingredients and straightforward steps, this recipe is perfect for both novice and experienced cooks.
- Healthy and Nutritious: Butternut squash is packed with vitamins, and using coconut milk adds a creamy texture without dairy.
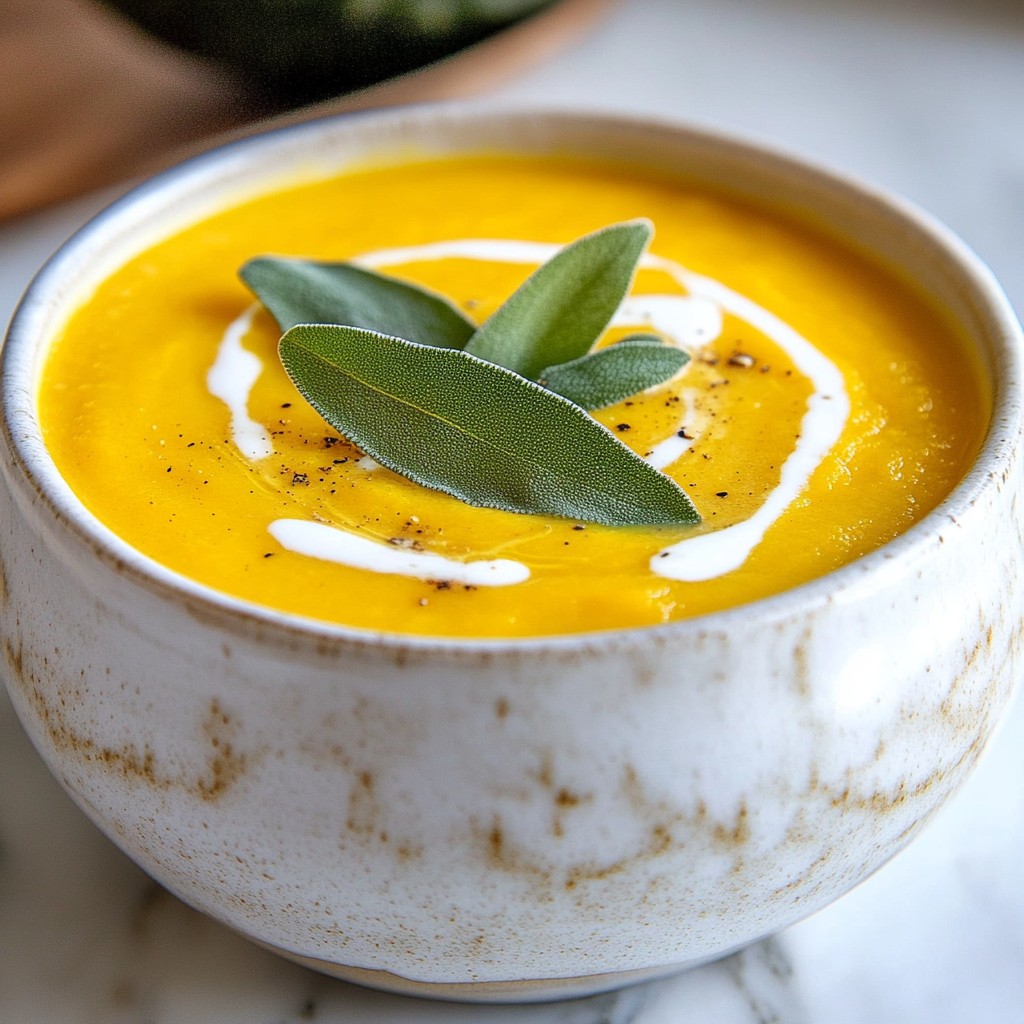
- Versatile Garnish: Top it off with fresh sage or a drizzle of coconut milk for an elegant presentation that impresses any guest.
Ingredients
List of Ingredients
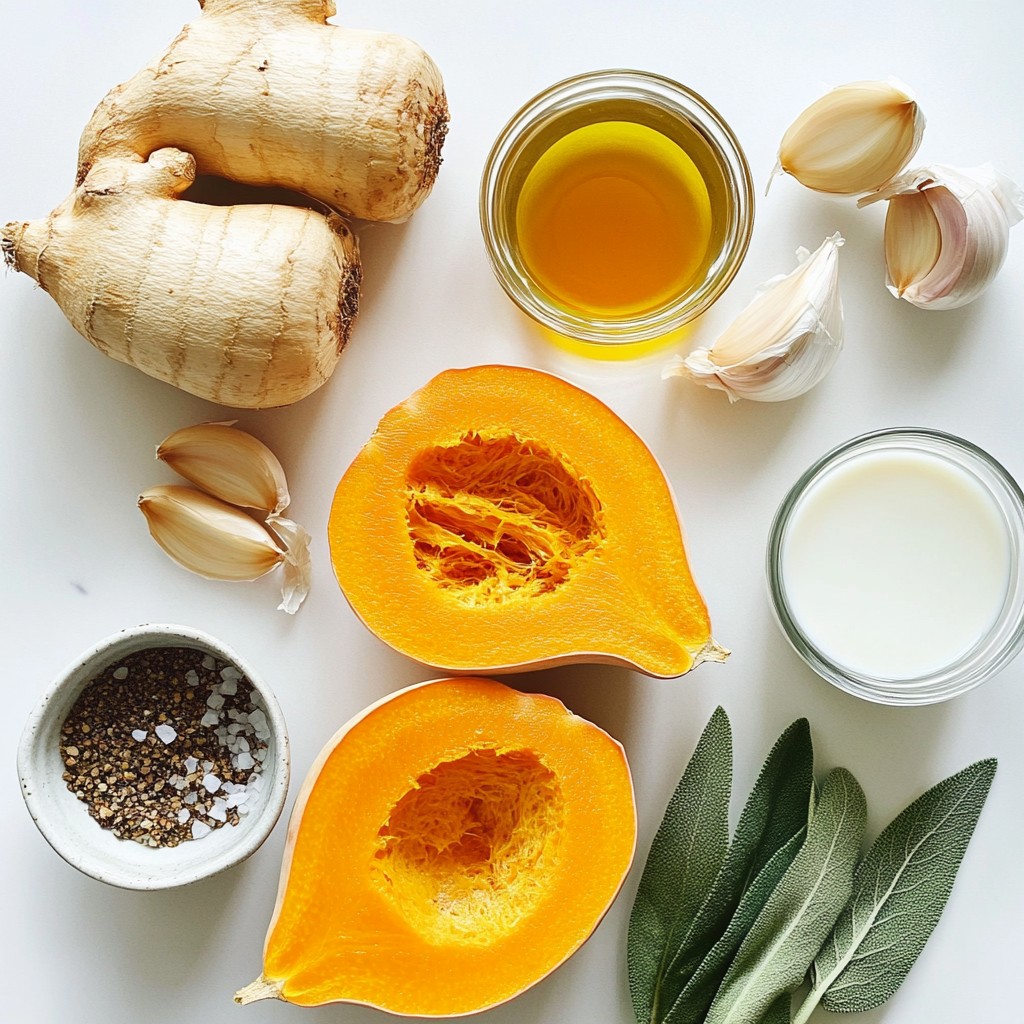
- 1 medium butternut squash, halved with seeds removed
- 1 tablespoon olive oil, plus extra for drizzling
- Sea salt and freshly cracked black pepper, to taste
- 1 medium onion, finely chopped
- 2 cloves garlic, minced
- 1 teaspoon ground ginger
- 1 teaspoon ground cinnamon
- 4 cups vegetable broth
- 1 cup full-fat coconut milk
- 2 tablespoons maple syrup (optional but recommended)
- Fresh sage leaves for garnishing
Description of Key Ingredients
Butternut squash is the star of this bisque. It has a sweet and nutty flavor. When roasted, it caramelizes and becomes soft. This adds a lovely depth to the soup.
Onions and garlic bring a base of flavor. They form the aromatic foundation of this dish. Sautéing them makes the kitchen smell amazing.
The spices, ginger and cinnamon, add warmth. They give the bisque a cozy feel. Ground ginger enhances the squash's natural sweetness. Cinnamon adds a hint of spice.
Coconut milk creates a rich and creamy texture. It also adds a subtle sweetness. If you want a touch more sweetness, the maple syrup does the trick.
Fresh sage leaves are perfect for garnishing. They add a pop of color and earthy flavor. This makes the dish even more inviting.
Recommended Tools and Equipment
You will need a few tools to make this bisque. Here’s what I recommend:
- A sharp knife for cutting the squash.
- A baking sheet for roasting.
- A large stockpot for cooking the soup.
- A stirring spoon for mixing.
- An immersion blender for pureeing. If you don’t have one, a regular blender works great too.
- Serving bowls for the finished bisque.
These tools will help you create the perfect roasted butternut squash bisque. Happy cooking!
Step-by-Step Instructions
Preheating and Roasting the Butternut Squash
First, preheat your oven to 400°F (200°C). This helps to create the perfect roast. Cut the butternut squash in half and scoop out the seeds. Place the squash cut-side up on a baking sheet. Drizzle it with olive oil. Sprinkle some sea salt and black pepper on top. Roast the squash for about 40-50 minutes. You want it to be fork-tender. Once done, let it cool a bit. Use a spoon to scoop out the soft flesh into a bowl, and toss the skin.
Preparing the Soup Base
In a large pot, heat one tablespoon of olive oil over medium heat. Add the chopped onion, and cook for 5-7 minutes. Stir often, and watch for the onions to turn translucent. Next, stir in the minced garlic, ground ginger, and ground cinnamon. Cook this for about one minute. The spices will start to smell great. Now, add the roasted squash to the pot along with the vegetable broth. Mix everything well. Bring this to a gentle boil. Reduce the heat to low and let it simmer for about 10 minutes. This step helps all the flavors blend together.
Blending and Finishing the Bisque
Now, it’s time to blend the soup. Use an immersion blender to puree the bisque until it’s smooth. If you don’t have one, you can use a regular blender. Just be careful and do it in batches. After blending, stir in the creamy coconut milk and maple syrup, if you want extra sweetness. Taste your bisque and add more salt or pepper if you like. Let it heat through for another 5 minutes, then you’re ready to serve. Enjoy your warm, creamy bisque!
Tips & Tricks
Tips for Perfectly Roasted Squash
To get the best flavor from your butternut squash, follow these steps:
- Choose the Right Squash: Look for a squash that feels heavy and has smooth skin.
- Cut Evenly: Slice the squash in half to ensure even cooking.
- Season Generously: Use enough olive oil, sea salt, and pepper to coat the squash well.
- Watch the Time: Roast for 40-50 minutes at 400°F. The squash should be fork-tender when done.
These tips will help you create a sweet and rich base for your bisque.
Best Practices for Sautéing Aromatics
Sautéing aromatics adds depth to your bisque. Here’s how to do it right:
- Heat the Oil: Make sure your oil is hot before adding the onions. This helps them cook evenly.
- Stir Often: Keep the onions moving for 5-7 minutes until they are soft and translucent.
- Add Garlic and Spices Last: Stir in garlic, ginger, and cinnamon for just a minute. This keeps their flavors bright and fresh.
Sautéing correctly will enhance the taste of your soup.
How to Achieve the Creamiest Consistency
A creamy bisque is key to its charm. Here are some easy methods:
- Use Full-Fat Coconut Milk: This gives a rich and velvety texture.
- Blend Thoroughly: Use an immersion blender for a smooth finish. If using a regular blender, blend in small batches.
- Simmer After Blending: Heat the bisque again after blending. This melds all the flavors together beautifully.
These steps ensure your bisque is creamy and delightful.
Pro Tips
- Choose the Right Squash: Select a butternut squash that feels heavy for its size and has a smooth, unblemished skin for the best flavor and texture.
- Enhance Flavor with Spices: Feel free to experiment with additional spices like nutmeg or turmeric for a unique flavor profile that complements the butternut squash.
- Texture Matters: For an ultra-smooth bisque, ensure you blend the soup thoroughly. Using an immersion blender is the easiest way to achieve a velvety texture.
- Serving Suggestions: Pair your bisque with crusty bread or a light salad to make a complete meal. A sprinkle of toasted pumpkin seeds can add a delightful crunch!
Variations
Vegan Alternatives
If you want to keep this bisque vegan, the recipe is already vegan-friendly. Use full-fat coconut milk for creaminess. It gives a rich flavor without dairy. You can also add a splash of almond milk or oat milk for a lighter touch. Both options will work well for a creamy texture.
Flavor Enhancements
You can boost the flavor of your bisque easily. Try adding a pinch of nutmeg for warmth. A dollop of vegan sour cream can add tanginess. You might also add a squeeze of fresh lemon juice to brighten the taste. For more depth, consider adding a dash of smoked paprika. It adds a nice twist.
Serving Suggestions
Serve your bisque in warm bowls for comfort. Drizzle a bit of coconut milk on top for a lovely finish. Garnish with fresh sage leaves to add a pop of color. You can also pair it with crusty bread or a light salad. Both make great sides to enjoy with the bisque.
Storage Info
How to Store Leftover Bisque
After making this roasted butternut squash bisque, you might have some left. To store it, let the bisque cool down. Pour it into an airtight container. Keep it in the fridge for up to five days. Always label the container with the date. This way, you know when it was made.
Reheating Instructions
When you are ready to enjoy the bisque again, reheating is simple. Pour the bisque into a pot over medium heat. Stir often to avoid sticking. Heat until it is warm, which takes about 5-10 minutes. If it is too thick, add a splash of vegetable broth or water. You can also microwave it. Transfer the bisque to a microwave-safe bowl. Heat it in short bursts, stirring in between. This keeps the heat even.
Freezing Tips for Long-Term Storage
If you want to store the bisque for longer, freezing is a great option. First, let the bisque cool completely. Pour it into freezer-safe containers, leaving some space at the top for expansion. Seal tightly and freeze for up to three months. When you want to eat it, thaw it in the fridge overnight. Reheat as directed above. Enjoy the warm, comforting flavors again!
FAQs
Can I use canned butternut squash?
Yes, you can use canned butternut squash. It saves time and effort. Choose a brand with no added sugar or salt. Use about 2 cups of canned squash. Drain it well before adding to the pot. Canned squash is softer, so you can skip the roasting step. Just skip to sautéing the onions and spices. This change makes the recipe quicker and still tasty.
How do I make this bisque spicier?
To add spice, use fresh chili peppers. You can add chopped jalapeños or serranos. Start with half a pepper and adjust to taste. For a milder heat, add a pinch of cayenne pepper. Stir it in with the spices for a warm kick. You can also add a dash of hot sauce before serving. This step makes the bisque exciting and full of flavor.
What can I substitute for coconut milk?
If you want to replace coconut milk, use heavy cream or almond milk. Heavy cream gives a rich texture, while almond milk keeps it light. For a dairy-free option, try cashew cream. Blend soaked cashews with water until smooth. This option adds a creamy texture without the coconut taste. Choose what fits your taste and dietary needs best.
This blog post covered making a delicious butternut squash bisque. We discussed key ingredients, tools, and preparation steps. You learned the importance of roasting squash and blending for a creamy finish. With tips for perfecting your bisque and exciting variations, you can customize this dish to your taste. Remember to store leftovers properly and follow reheating tips to enjoy every drop. Now you have the skills to impress anyone with your bisque!