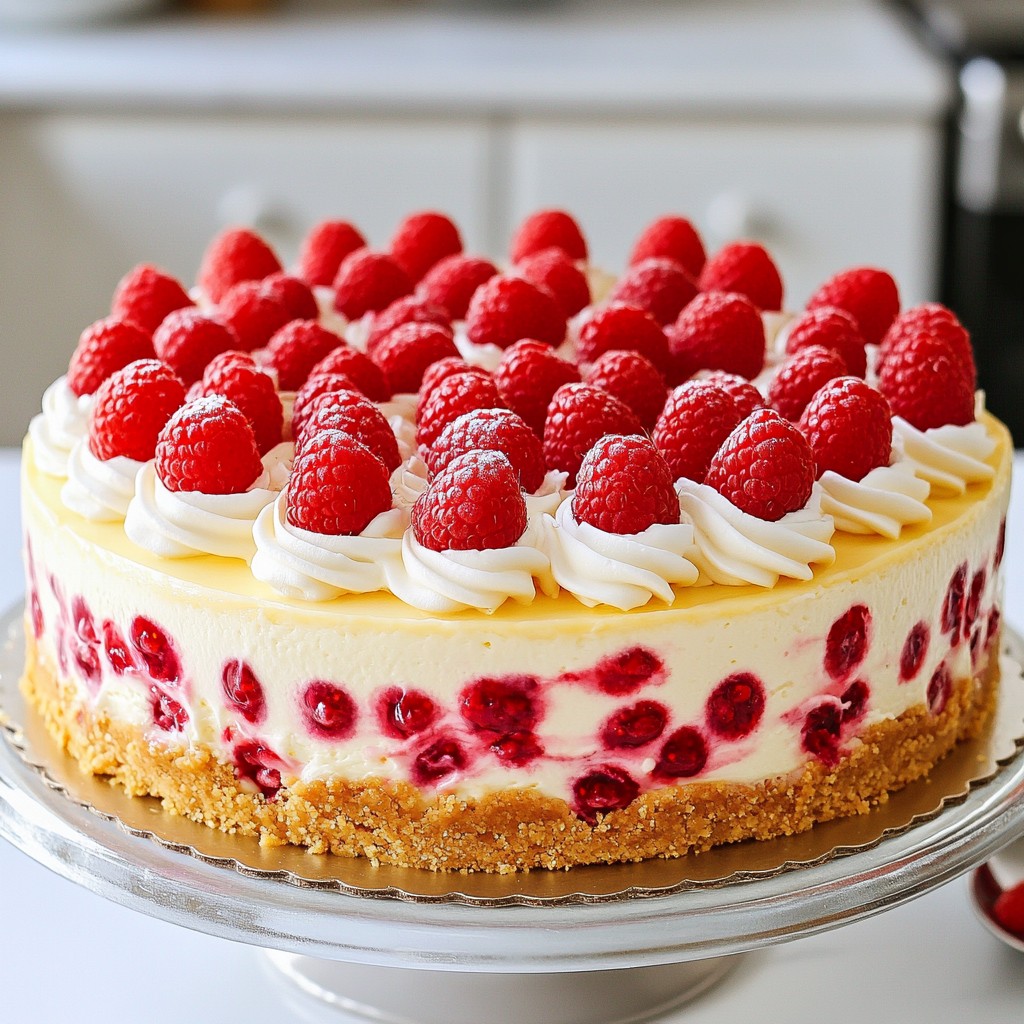
Are you ready to indulge in a dessert that combines sweet and tart flavors? My Raspberry White Chocolate Cheesecake is creamy, delicious, and simple to make. With each bite, you’ll enjoy the smooth texture of cream cheese paired with fresh raspberries and rich white chocolate. Let's dive into this delightful recipe that will impress your friends and family. Trust me, your taste buds will thank you!
Why I Love This Recipe
- Decadent Flavor: This cheesecake combines the rich creaminess of cream cheese and white chocolate with the tartness of fresh raspberries, creating a delightful contrast that tantalizes the taste buds.
- Beautiful Presentation: The vibrant color of raspberries against the creamy white filling makes for an eye-catching dessert that is perfect for any occasion.
- Make-Ahead Friendly: This cheesecake can be prepared in advance, allowing flavors to develop and making it a stress-free option for gatherings.
- Customizable Toppings: You can easily enhance the cheesecake with various toppings, such as a raspberry drizzle or additional whipped cream, for a personalized touch.
Ingredients
Main Ingredients List
- 1 ½ cups graham cracker crumbs
- ½ cup unsalted butter, melted
- 16 oz cream cheese, softened
- ¾ cup granulated sugar
- 2 large eggs
- ⅓ cup sour cream
- 6 oz white chocolate, melted
- 1 cup fresh raspberries
Garnishing Ingredients
- Extra raspberries for garnish
- Whipped cream for serving
Alternative Ingredient Options
- Use gluten-free graham crackers for a gluten-free crust.
- Try dairy-free cream cheese for a non-dairy option.
In this delightful recipe, the ingredients come together to create a creamy and rich cheesecake. The graham cracker crumbs form a perfect base, while the melted butter binds them together. Using softened cream cheese helps to achieve that smooth and luscious texture.
For sweetness, I suggest using granulated sugar, which blends easily into the cream cheese. Eggs add structure, while sour cream gives a nice tang. The melted white chocolate brings a sweet, creamy flavor that pairs perfectly with the tart berries.
When it comes to garnishes, fresh raspberries add a pop of color and flavor. A dollop of whipped cream on top makes each slice even more tempting. If you're feeling creative, you can also drizzle some raspberry puree over the cheesecake for an elegant touch.
For those who need alternatives, gluten-free graham crackers can work well for the crust. You can also swap dairy cream cheese for a dairy-free option if needed. These suggestions help everyone enjoy this tasty treat!
Step-by-Step Instructions
Preparing the Crust
- Preheat the oven to 325°F (163°C): This helps the crust bake evenly.
- Combine crust ingredients: In a bowl, mix 1 ½ cups graham cracker crumbs, ½ cup melted unsalted butter, and 1 tablespoon granulated sugar until well blended.
- Press and bake the crust: Firmly press the mixture into the bottom of a 9-inch springform pan. Bake for 10 minutes, then let it cool slightly.
Making the Cheesecake Filling
- Beat cream cheese and sugar: In a large bowl, beat 16 oz softened cream cheese with ¾ cup granulated sugar until smooth.
- Incorporate eggs one at a time: Add 2 large eggs, mixing well after each addition. This keeps the filling creamy.
- Blend in sour cream and white chocolate: Stir in ⅓ cup sour cream and 6 oz melted white chocolate until the mixture is smooth and creamy.
Final Assembly and Baking
- Fold in raspberries gently: Carefully mix in 1 cup fresh raspberries with a spatula. Be gentle to keep the berries whole.
- Pour filling into crust and smooth the top: Carefully pour the cheesecake filling over the cooled crust. Use a spatula to smooth the top.
- Bake and cool the cheesecake: Bake in the oven for 50-60 minutes. The edges should be set, and the center should jiggle slightly. After baking, turn off the oven and let the cheesecake cool inside for about 1 hour. Then, chill it in the refrigerator for at least 4 hours or overnight.
Tips & Tricks
Perfecting the Cheesecake
To avoid cracks in the cheesecake, bake it slowly. A low oven temp helps. Keep the oven door closed while it bakes. If you see cracks, don’t worry too much; they still taste great.
Using room temperature ingredients is key. Let your cream cheese, eggs, and sour cream sit out for about an hour. This step helps them mix smoothly. If they’re cold, your filling may be lumpy.
Serving Suggestions
When slicing the cheesecake, use a clean knife. Wipe the knife after each cut. This keeps your slices neat and pretty. A hot knife works best, so dip it in warm water.
For a tasty boost, add a raspberry drizzle. Simply puree fresh raspberries with a little sugar. Drizzle it on each slice for a pop of flavor. Whipped cream also makes a great topping.
Common Mistakes to Avoid
Be careful not to overmix the filling. Mix just until smooth. Overmixing can add air and cause cracks.
Allow the cheesecake to rest after baking. Let it cool in the oven with the door ajar for an hour. This helps it set nicely. Then, chill it in the fridge for at least four hours. The longer, the better!
Pro Tips
- Room Temperature Ingredients: Allow the cream cheese and eggs to come to room temperature before mixing. This ensures a smooth and creamy filling without lumps.
- Prevent Cracking: To minimize cracks on the cheesecake surface, avoid overmixing the filling and bake it in a water bath. This helps maintain moisture and even heat distribution.
- Cooling Tips: After baking, let the cheesecake cool gradually in the oven with the door ajar. This helps prevent sudden temperature changes that can cause cracks.
- Chill Overnight: For the best flavor and texture, allow the cheesecake to chill overnight in the refrigerator. This allows the flavors to meld and the cheesecake to firm up perfectly.
Variations
Flavor Additions
You can make this cheesecake even better with some fun flavors! Adding citrus zest gives a fresh twist. Try using lemon or lime zest for a bright taste. You can also swap out the raspberries. Choose strawberries or blueberries instead. Both fruits work well and add their own unique flavor.
Crust Variations
Not a fan of the graham cracker crust? No problem! You can make a no-bake cheesecake crust. Just mix melted butter with crushed cookies, like Oreos. For a healthier option, use nuts. Almonds or pecans can create a tasty nut-based crust that adds crunch and flavor.
Dietary Modifications
Have special diet needs? You can still enjoy this cheesecake! For a keto-friendly version, use a low-carb sweetener and an almond flour crust. If you want a vegan cheesecake, replace the cream cheese with a dairy-free option. Use cashews blended with coconut milk for a creamy base. Both of these options keep the delicious flavor while meeting your dietary needs.
Storage Info
Recommended Storage Practices
To keep your Raspberry White Chocolate Cheesecake fresh, store it in the fridge. Place it in an airtight container. If you don’t have one, cover it tightly with plastic wrap. This prevents it from absorbing other smells. You can also freeze the cheesecake. Slice it first for easy serving later. Wrap each piece in plastic wrap, then foil. This helps keep it fresh for months.
Shelf Life
Raspberry White Chocolate Cheesecake lasts about 5-7 days in the fridge. Make sure to check for signs of spoilage. Look for any off smells or changes in texture. If the surface has a dry or cracked look, it’s time to toss it. When frozen, it can last up to 3 months.
Reheating Instructions
To reheat, set the oven to 300°F (150°C). Place the cheesecake slices on a baking tray. Heat for about 10-15 minutes. This keeps the texture nice and creamy. Avoid using the microwave, as it can make the cheesecake rubbery. Always check to ensure it’s warmed through, but not too hot. Enjoy every delicious bite!
FAQs
What can I substitute for white chocolate?
You can use several tasty options instead of white chocolate.
- Milk chocolate: It adds sweetness and a creamy texture.
- Dark chocolate: This gives a richer flavor.
- Cocoa butter: It maintains the smoothness without added sugar.
- Butterscotch chips: They bring a sweet and buttery taste.
These alternatives can change the taste and texture a bit. Experiment to find what you like best!
Can I make this cheesecake ahead of time?
Yes, you can prep this cheesecake ahead of time!
- Make it a day or two before your event.
- Store it in the refrigerator, covered with plastic wrap.
- This helps the flavors blend better.
- Just remember to add toppings right before serving.
This planning makes hosting easier and more fun!
How long should I let the cheesecake cool before serving?
Letting the cheesecake cool is key for the best taste.
- After baking, turn off the oven and leave the door ajar.
- Cool it for about an hour in the oven.
- Then chill it in the fridge for at least 4 hours.
- Overnight chilling is even better!
This cooling time helps the cheesecake set and enhances the flavors.
This blog post shared how to make a delicious Raspberry White Chocolate Cheesecake. We covered the key ingredients, from graham cracker crumbs to fresh raspberries. You learned step-by-step instructions for making and baking the cheesecake.
I also shared tips to perfect your cheesecake and avoid common mistakes. You can even explore variations to fit different diets. By following these steps, your cheesecake will impress everyone. Enjoy your baking journey and the smiles it brings!