Looking for a delightful holiday treat that’s easy to make? Try my No-Bake Peppermint Oreo Bars! These sweet, creamy bars combine rich cream cheese and crunchy Oreo cookies, creating a perfect festive bite. With just a few simple ingredients and no baking required, you’ll have a crowd-pleaser ready in no time. Join me as I guide you through this delicious recipe that will make your holiday gatherings truly special!
Why I Love This Recipe
- Irresistible Flavor: The combination of chocolate and peppermint creates a delightful and festive flavor that is perfect for any occasion.
- No Baking Required: This recipe is a breeze to prepare since it requires no baking, making it ideal for busy days or last-minute gatherings.
- Easy to Customize: You can easily swap out Oreos for different cookie flavors or adjust the level of peppermint to suit your taste.
- Perfect for Sharing: With 16 bars in one batch, these treats are perfect for sharing with friends and family during the holidays.
Ingredients
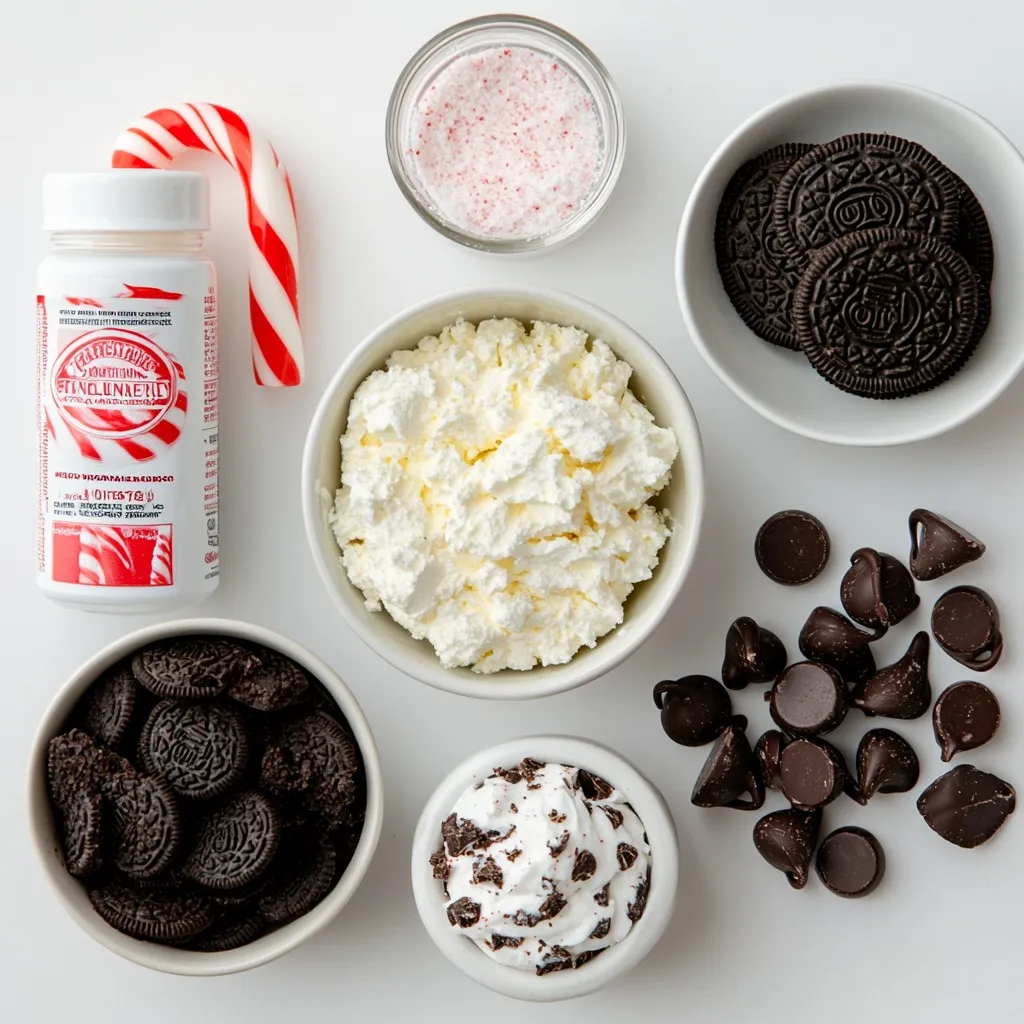
List of Ingredients
– 24 Oreo cookies, finely crushed
– 1/2 cup unsalted butter, melted
– 1 cup cream cheese, softened
– 1 cup powdered sugar
– 1 teaspoon peppermint extract
– 1 cup whipped topping (like Cool Whip)
– 1/2 cup chocolate chips (for topping)
– 1/2 teaspoon vegetable oil
– Crushed peppermint candies or candy canes (for garnish)
To make these no-bake peppermint Oreo bars, you need simple ingredients. Start with 24 Oreo cookies. You will crush them into fine crumbs. The crumbs create a tasty crust that holds everything together.
Next, you will need unsalted butter. The melted butter binds the cookie crumbs. This helps form a solid base for the bars.
For the creamy filling, grab cream cheese. Make sure it’s soft, so it mixes well. You also need powdered sugar. It sweetens the cream cheese and gives it a nice texture.
Add one teaspoon of peppermint extract. This gives the filling its minty flavor. You can’t have peppermint bars without this key ingredient!
You will also use whipped topping like Cool Whip. This makes the filling light and fluffy.
For the topping, gather half a cup of chocolate chips. You will melt these for a rich finish. Add half a teaspoon of vegetable oil to help the chocolate melt smoothly.
Finally, you can use crushed peppermint candies or candy canes to garnish. They add a festive touch and extra crunch.
With these ingredients, you’ll create a delicious holiday treat that is sure to impress!
Step-by-Step Instructions
Preparing the Oreo Crust
– First, take 24 finely crushed Oreo cookies and place them in a bowl.
– Melt 1/2 cup of unsalted butter in the microwave or on the stove.
– Pour the melted butter over the crushed Oreo cookies.
– Mix these together until the crumbs are fully coated with butter.
– Grab an 8-inch square pan and transfer the Oreo mixture.
– Press the mixture down firmly using your hands or a measuring cup.
Making the Cream Cheese Filling
– In a mixing bowl, beat 1 cup of softened cream cheese.
– Keep mixing until it is smooth and creamy.
– Gradually add in 1 cup of powdered sugar and 1 teaspoon of peppermint extract.
– Continue mixing until it is well combined and fluffy.
– Gently fold in 1 cup of whipped topping using a spatula.
– Make sure it mixes well, creating a light and airy filling.
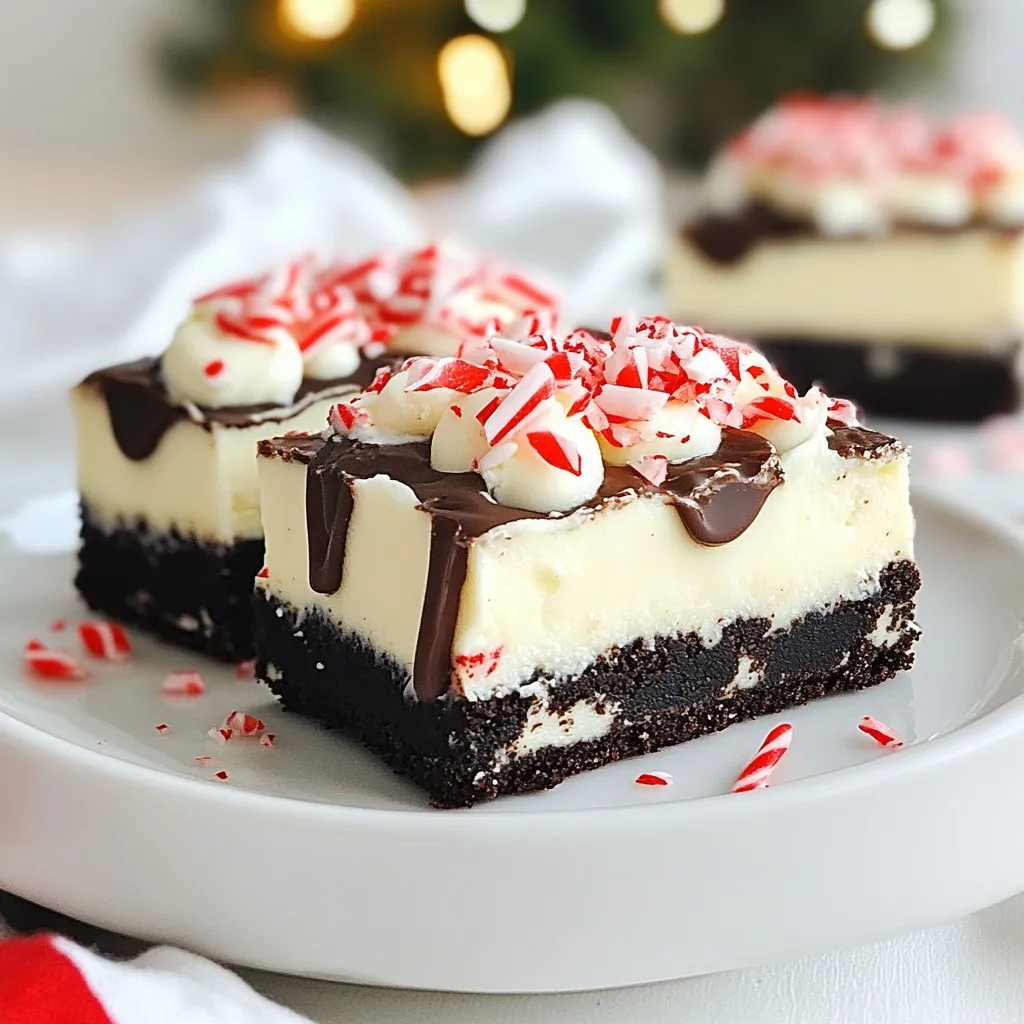
Assembling the Bars
– Carefully spread the cream cheese mixture over the Oreo crust.
– Use a spatula to smooth it out evenly.
– In a microwave-safe bowl, combine 1/2 cup of chocolate chips with 1/2 teaspoon of vegetable oil.
– Heat in the microwave for 30 seconds, stirring until melted and glossy.
– Drizzle the melted chocolate generously over the cream cheese layer.
– For a festive touch, sprinkle crushed peppermint candies on top.
– Cover the pan with plastic wrap and refrigerate for at least 4 hours.
– Once set, cut into 16 bars and serve chilled for the best flavor.
Tips & Tricks
Serving Suggestions
– Serve the bars chilled for the best taste.
– Cut into 16 bars for easy sharing.
– For a festive look, arrange them on a colorful platter.
– Garnish with extra crushed peppermint candies for added flair.
Dietary Adjustments
– For gluten-free options, use gluten-free Oreo cookies.
– Substitute the cream cheese with a vegan cream cheese for a vegan option.
– Use a plant-based whipped topping to keep it dairy-free.
Common Mistakes to Avoid
– Do not overmix the cream cheese mixture; it can become too soft.
– Make sure to let the bars set in the fridge for at least 4 hours.
– If they are too soft, they may fall apart when you cut them.
– Always check that the chocolate is fully melted before drizzling.
Pro Tips
- Use Room Temperature Ingredients: Make sure your cream cheese is softened to room temperature before mixing. This helps create a smoother and creamier filling without lumps.
- Chill for Best Results: For the best flavor and texture, allow the bars to chill for a full 6 hours if possible. This helps the layers set perfectly and enhances the taste.
- Customize Your Toppings: Feel free to get creative with toppings! Try adding different crushed candies or even drizzling white chocolate for a festive touch.
- Perfect Cutting Technique: To achieve clean cuts when slicing the bars, run a sharp knife under hot water, then dry it before cutting. This will help prevent sticking.
Variations
Flavor Variations
You can mix things up with different extracts. Try using vanilla or almond extract instead of peppermint. This change can give your bars a new twist. You can also switch the cookie base. Using Gingerbread Oreos instead of regular ones adds a warm, spicy flavor. This is great for holiday gatherings.
Toppings and Garnishes
For toppings, feel free to get creative. Instead of chocolate, you can use white chocolate or dark chocolate. Melt it just like you do with the regular chocolate. You can also add sprinkles or colorful candies on top. This makes your bars look festive and fun.
Scaling the Recipe
Need a smaller or larger batch? It’s easy! To make smaller bars, cut the recipe in half. This works well for a quick treat. For a larger batch, simply double the ingredients. Just be sure to use a bigger pan. Adjust your chilling time if needed.
Storage Info
Refrigeration Tips
To keep your No-Bake Peppermint Oreo Bars fresh, store them in the fridge. Place the bars in an airtight container. If you don’t have one, wrap the pan tightly with plastic wrap. This helps prevent odors from other foods. The bars will stay fresh for about 5 to 7 days in the fridge.
Freezing Instructions
Want to enjoy these treats later? You can freeze them! Cut the bars into pieces and place them in a single layer on a baking sheet. Freeze until solid, then transfer them to a freezer-safe container. They can last for up to 3 months in the freezer. To thaw, take them out and place them in the fridge for a few hours. This helps keep the texture nice and smooth.
Signs of Spoilage
Check your bars before eating them. If they smell off or have a strange texture, they may be spoiled. Look for any mold or discoloration. If you see any of these signs, it’s best to toss them. Always trust your nose and eyes!
FAQs
Can I use low-fat cream cheese?
Yes, you can use low-fat cream cheese. However, it will change the texture. Low-fat cream cheese can be thinner and less rich. Your bars may not be as creamy. If you prefer a lighter option, this is a good choice. Just know that the flavor may not be as full.
How long can I keep these bars?
You can keep these bars in the fridge for up to a week. Store them in an airtight container. They stay fresh and tasty for several days. If you want to keep them longer, they can last in the freezer for about three months. Just make sure to wrap them tightly.
Can I make these ahead of time?
Yes, you can make these bars ahead of time. They are great for meal prep or parties. I suggest making them at least one day before you plan to serve them. This allows the flavors to blend well. Just remember to let them chill in the fridge for at least four hours before serving.
This recipe guide covered all you need to create delicious peppermint Oreo bars. You learned about the needed ingredients, easy steps, and helpful tips. Remember to adjust for dietary needs and avoid common mistakes to ensure success. These bars are perfect for any celebration. Whether you freeze leftovers or make variations, you’ll enjoy every bite. Keep them chilled, and watch for signs of spoilage. These treats are sure to impress friends and family, making your gatherings sweeter. Enjoy making these tasty bar