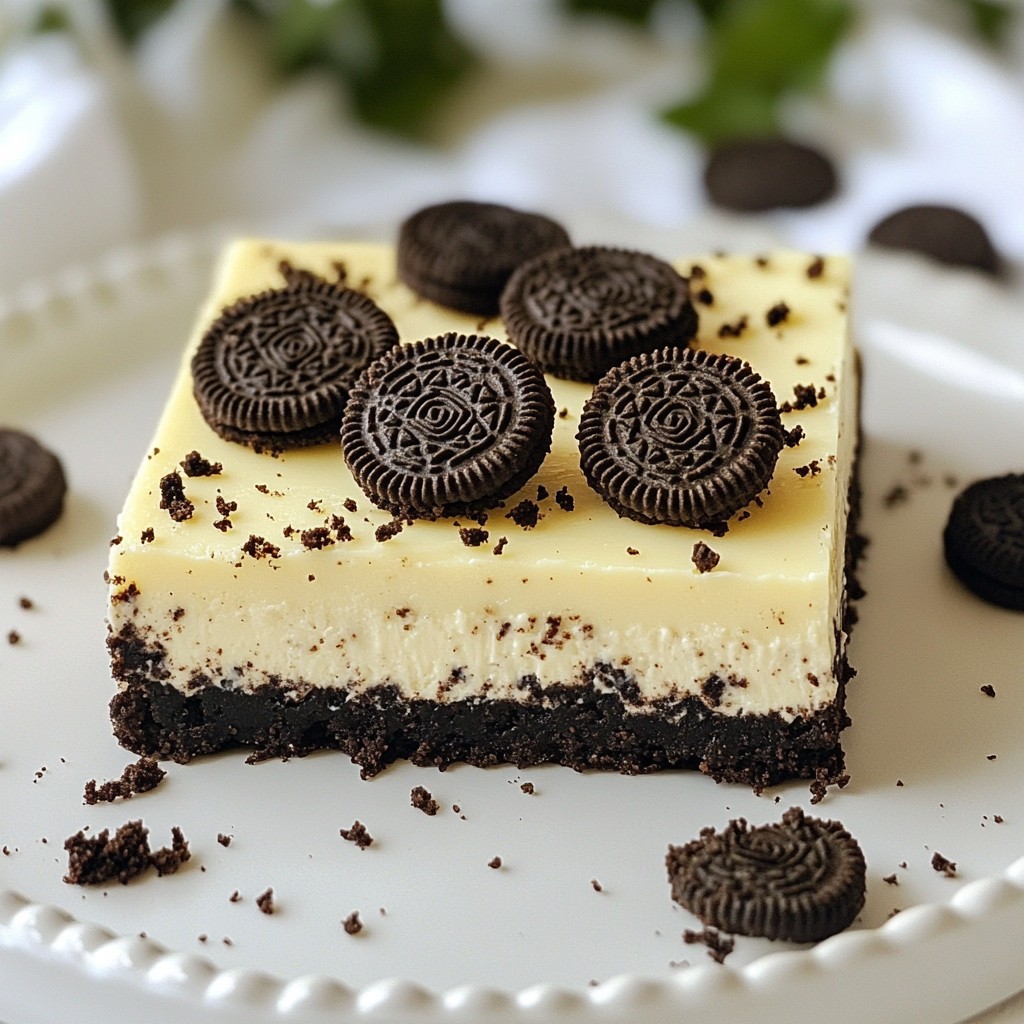
Craving a simple dessert that’s both creamy and crunchy? Look no further! In this blog, I’ll show you how to make No Bake Oreo Cheesecake Bars. You’ll love the mix of sweet cream cheese and crunchy Oreo goodness. Plus, there’s no oven required! Get ready to impress your family and friends with this easy, decadent treat that’s perfect for any occasion. Let’s dive into the delicious world of no-bake desserts!
Why I Love This Recipe
- Indulgent Flavor: The combination of rich cream cheese and chocolatey Oreos creates a decadent flavor experience that is irresistible.
- No Baking Required: This recipe is perfect for those hot days when you want a sweet treat without turning on the oven.
- Easy to Make: With simple steps and minimal ingredients, anyone can whip up these delicious cheesecake bars in no time.
- Perfect for Sharing: Cut them into squares and serve at parties or gatherings; these bars are sure to impress and please a crowd.
Ingredients
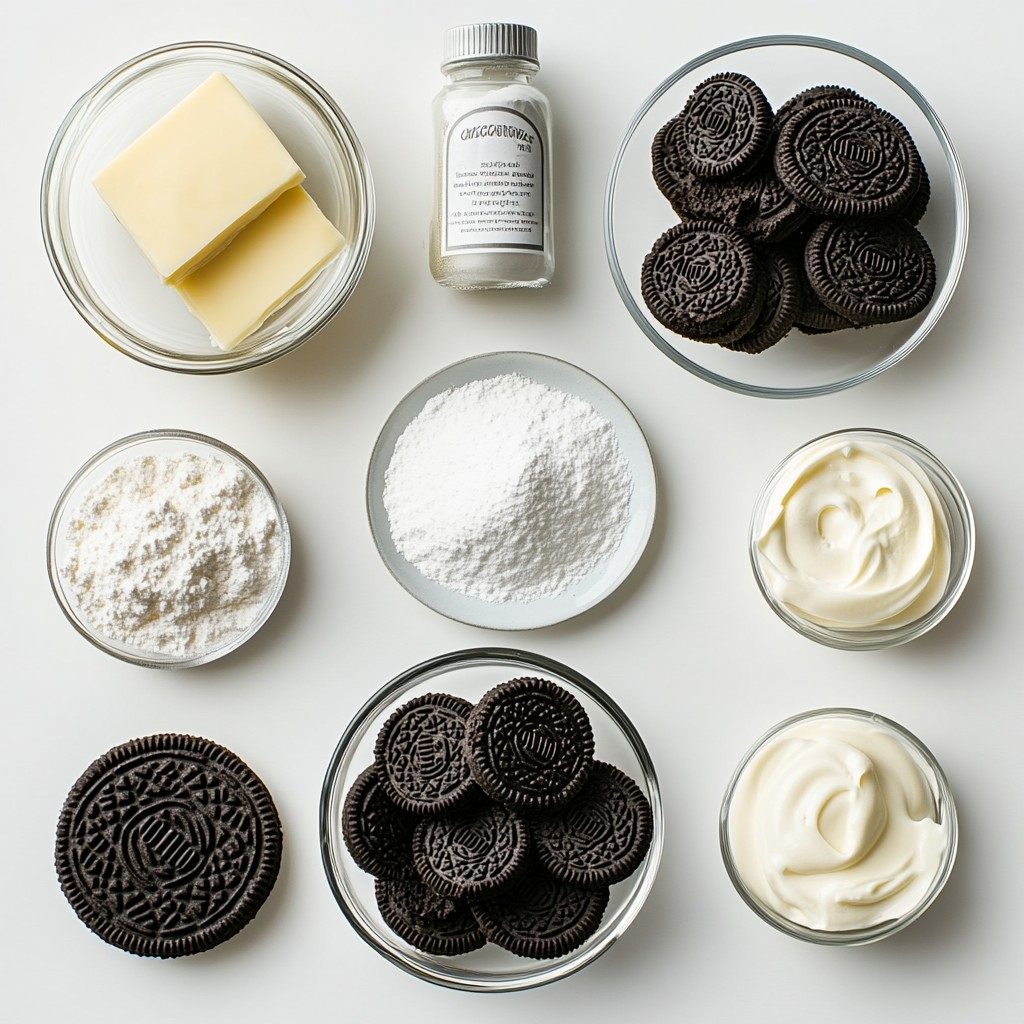
To make No Bake Oreo Cheesecake Bars, you need a few simple ingredients. Here’s what you'll need:
- 24 Oreo cookies (finely crushed)
- 1/4 cup unsalted butter (melted)
- 16 oz cream cheese (softened to room temperature)
- 1 cup powdered sugar
- 1 teaspoon pure vanilla extract
- 2 cups heavy whipping cream
- 16 Oreo cookies (coarsely chopped for layering and finishing)
You will also need some tools and equipment:
- An 8x8 inch baking pan
- Parchment paper or non-stick cooking spray
- Medium mixing bowls
- Electric mixer
- Rubber spatula
- Cutting board for serving
These ingredients come together to create a rich and creamy dessert that everyone will love. Each component plays a key role, from the crunchy crust to the smooth filling. The Oreo cookies add a delightful flavor and texture, making this treat truly special.
Step-by-Step Instructions
Preparing the Crust
1. Combining Oreo crumbs and melted butter: Start by crushing 24 Oreo cookies into fine crumbs. You can use a food processor or place them in a bag and smash them with a rolling pin. Then, add 1/4 cup of melted unsalted butter. Mix until the crumbs are coated well. They should look like wet sand.
2. Pressing the crust into the baking pan: Line an 8x8 inch baking pan with parchment paper. Leave some overhang to help lift the bars out later. Use your hands or a flat tool to press the Oreo mixture evenly into the bottom of the pan. The crust should be firm and compact.
3. Chilling the crust: Place the pan in the fridge for about 30 minutes. This step firms up the crust and makes it easier to add the filling later.
Making the Cheesecake Filling
1. Beating cream cheese until smooth: In a large mixing bowl, add 16 oz of softened cream cheese. Using an electric mixer, beat it for 2-3 minutes. The cream cheese should be smooth and free of lumps.
2. Adding powdered sugar and vanilla: Gradually mix in 1 cup of powdered sugar and 1 teaspoon of pure vanilla extract. Continue to beat until everything is well combined. The mixture should be creamy and smooth.
3. Whipping the heavy cream to stiff peaks: In a separate bowl, pour in 2 cups of heavy whipping cream. Use an electric mixer to whip it. Whip until stiff peaks form, which usually takes 3-5 minutes. The cream should hold its shape when lifted.
4. Folding whipped cream into cream cheese mixture: Gently fold the whipped cream into the cream cheese mixture. Use a rubber spatula for this. Be careful not to deflate the whipped cream. You want a light and fluffy filling.
Assembling and Chilling the Bars
1. Incorporating chopped Oreo cookies into the filling: Take 16 coarsely chopped Oreo cookies and add them to the cheesecake filling. Fold them in gently. This adds texture and flavor to the filling.
2. Pouring and spreading filling onto the crust: Pour the creamy filling over the chilled crust in the baking pan. Use a spatula to spread the filling evenly. Make sure it covers the crust completely.
3. Covering and chilling the cheesecake bars: Cover the pan with plastic wrap. Place it back in the fridge for at least 4-6 hours. This chilling time helps the cheesecake set properly. Once firm, you can lift it out and slice it into bars.
Tips & Tricks
Perfecting Your Cheesecake Texture
Using room temperature ingredients is key. It makes your cheesecake smooth and creamy. Cold cream cheese can lead to lumps. Let your cream cheese sit out for 30 minutes before mixing. This small step helps a lot.
Whipping the cream correctly is also important. Use a clean bowl and beaters. Start on low speed, then increase to high. Whip until stiff peaks form. This means the cream holds its shape well. If you overmix, it can turn grainy.
Presentation and Serving Suggestions
To cut the bars, use a sharp knife. Dip the knife in hot water for clean slices. Wipe the knife between cuts for neat edges. This keeps the bars looking great.
For garnish, consider crumbled Oreos on top. A sprinkle creates a nice look. Fresh mint leaves also add color. You can serve these on a fun platter. It makes your dessert even more inviting.
Common Mistakes to Avoid
One big mistake is overmixing the whipped cream. This can ruin the light texture. Stop mixing as soon as you see stiff peaks.
Another mistake is skipping the chilling step. Chilling is essential for the bars to set. Without it, the cheesecake will be too soft. Plan for at least 4-6 hours in the fridge. This wait is worth it for the best results.
Pro Tips
- Use Room Temperature Cream Cheese: Ensuring your cream cheese is at room temperature allows for a smoother and creamier filling, preventing lumps in your cheesecake.
- Chill the Mixing Bowls: Chill your mixing bowls and beaters before whipping the cream. This helps the cream whip up faster and achieve a better volume.
- Don’t Overmix the Whipped Cream: When folding the whipped cream into the cream cheese mixture, be gentle. Overmixing can deflate the whipped cream, resulting in a denser cheesecake.
- Let It Set Overnight: For the best flavor and texture, consider letting your cheesecake bars chill overnight. This allows the flavors to meld beautifully.
Variations
Flavor Variations
You can change the taste of your No Bake Oreo Cheesecake Bars easily. Try adding a few drops of different flavored extracts. Almond extract adds a nice twist. You can also mix in mint or orange extracts for fun flavors.
Using different cookies for the crust can also change the taste. Instead of Oreos, you can use chocolate wafer cookies or graham crackers. Each option gives a unique flavor and texture. Experiment and find your favorite!
Dietary Substitutions
If you need vegan options, swap the cream cheese with cashew cream or coconut cream. Use coconut whipped cream as a substitute for heavy whipping cream. These options still give you a tasty dessert without dairy.
For a gluten-free version, choose gluten-free Oreo cookies for the crust. You can also look for gluten-free cookie alternatives. This way, everyone can enjoy the bars!
Seasonal Twists
You can add seasonal ingredients to keep things fresh and exciting. For winter, mix in crushed peppermint candies or chocolate peppermint cookies. In spring, lemon zest or fresh berries can brighten the flavor.
Think about holiday themes too. For Halloween, you could add orange food coloring and decorate with spooky designs. For Christmas, top with festive sprinkles or red and green candies. These ideas make your dessert fun and seasonal!
Storage Info
How to Store Cheesecake Bars
To keep your cheesecake bars fresh, store them in an airtight container. Use parchment paper to separate layers if needed. This helps avoid sticking. The bars stay fresh in the fridge for up to five days. Always remember to cover them well. This keeps the flavors intact and prevents them from drying out.
Freezing Recommendations
If you want to save some for later, you can freeze the cheesecake bars. Cut them into squares first. Wrap each piece tightly in plastic wrap. Then place them in a freezer-safe container or bag. They can last in the freezer for up to three months. When you’re ready to eat, take them out and let them thaw in the fridge overnight. This keeps their texture nice and creamy.
Reheating or Refreshing Tips
These bars are best served chilled, so no need to reheat them. If they seem a bit soft after thawing, you can chill them for an hour before serving. For a fun twist, top them with fresh whipped cream or extra crushed Oreos before serving. This adds a nice touch and makes them look fancy!
FAQs
Can I make No Bake Oreo Cheesecake Bars in advance?
Yes, you can make these bars in advance. They chill well in the fridge. I often prepare them a day ahead. This gives them time to set properly. Just cover them well with plastic wrap. This keeps them fresh and tasty.
What can I substitute for cream cheese?
If you want a different taste, use mascarpone cheese. It gives a creamy texture too. You can also try Greek yogurt for a lighter option. Just note that the flavor will change slightly.
How long do these bars last in the fridge?
These bars stay fresh for about 5 days in the fridge. Store them in an airtight container. This helps keep their flavor and texture intact. I recommend enjoying them within this timeframe for the best taste.
Can I use homemade whipped cream instead of store-bought?
Yes, homemade whipped cream works great in this recipe! Use heavy whipping cream and whip it until stiff peaks form. I love using homemade cream for a fresh flavor. Just make sure it is stable enough to hold its shape.
Can I make these bars in a different-sized pan?
Absolutely! You can use a larger or smaller pan. Just adjust the amount of filling. If you use a larger pan, the bars may be thinner. For a smaller pan, they will be thicker. Keep an eye on the chilling time, as it might change.
In this post, we covered how to make No Bake Oreo Cheesecake Bars. We detailed the ingredients, step-by-step instructions, tips for the best texture, and fun variations. Remember to use room temperature ingredients and chill your bars for a perfect finish. These bars are easy to store and freeze well for later treats. Enjoy experimenting with flavors and garnishes. No matter your choice, these cheesecake bars are sure to impress. Happy baking!