Who says holiday treats must be baked? In No-Bake Christmas Treats: Simple and Joyful Delights, I’ll show you how to create festive sweets without turning on the oven. You’ll learn about key ingredients, fun variations, and easy instructions that make this a joyful project for the whole family. Plus, I’ll share tips to ensure your treats shine bright this holiday season. Let’s dive into the world of no-bake joy!
Why I Love This Recipe
- Easy to Make: This no-bake recipe requires minimal effort and can be prepared in just 20 minutes, making it perfect for busy holiday schedules.
- Customizable: You can easily switch up the nut butter or sweeteners to fit dietary preferences, allowing everyone to enjoy these treats.
- Deliciously Decadent: The combination of cocoa, coconut, and chocolate chips creates a rich flavor that satisfies your sweet tooth.
- Festive Presentation: Adding colorful sprinkles gives these treats a cheerful holiday look, making them great for parties and gatherings.
Ingredients
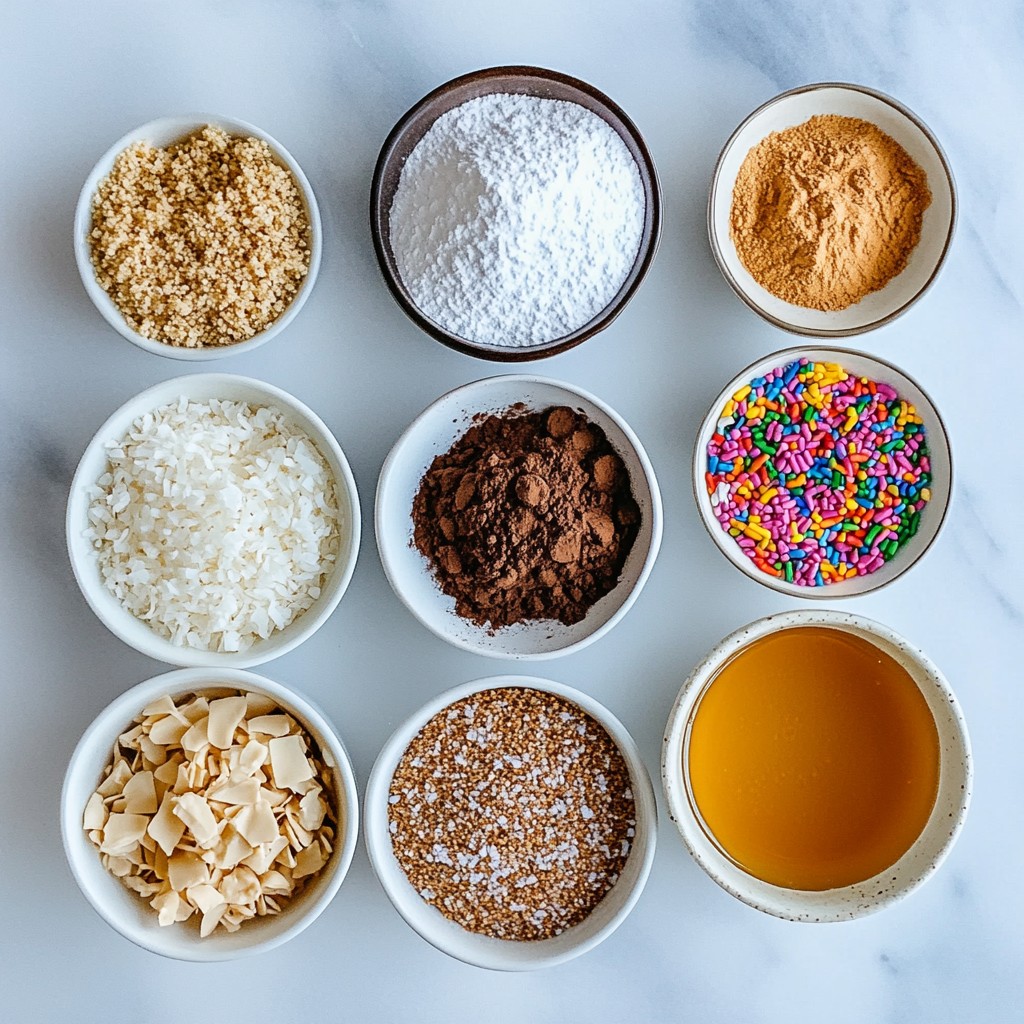
List of Key Ingredients
To make no-bake Christmas treats, gather these key ingredients:
- 2 cups graham cracker crumbs
- 1 cup shredded coconut
- 1 cup powdered sugar
- 1/2 cup unsweetened cocoa powder
- 1 cup unsweetened almond butter (or your preferred nut butter)
- 1/2 cup honey or maple syrup
- 1 teaspoon vanilla extract
- 1/4 teaspoon salt
Optional Add-ins
You can enhance these treats with some fun add-ins:
- 1/2 cup mini chocolate chips
- Festive sprinkles for decoration
Substitutions for Common Ingredients
Not all ingredients may be on hand. Here are some easy swaps:
- Swap almond butter for peanut or cashew butter.
- Use agave syrup instead of honey or maple syrup.
- Replace graham cracker crumbs with crushed cookies or oats for a different taste.
Step-by-Step Instructions
Initial Mixing of Dry Ingredients
First, take a large bowl. Add 2 cups of graham cracker crumbs. Next, mix in 1 cup of shredded coconut. Then, pour in 1 cup of powdered sugar. Finally, add 1/2 cup of unsweetened cocoa powder. Stir with a whisk or spoon. Make sure to mix until there are no dry spots left. This blend creates a tasty base for our treats.
Combining Wet Ingredients
Now, grab another bowl. In it, add 1 cup of unsweetened almond butter. If you prefer, you can use any nut butter you like. Next, pour in 1/2 cup of honey or maple syrup. Add 1 teaspoon of vanilla extract. Lastly, sprinkle in 1/4 teaspoon of salt. Whisk everything together until it is smooth. This mixture will bring your treat to life.
Assembling and Chilling the Treats
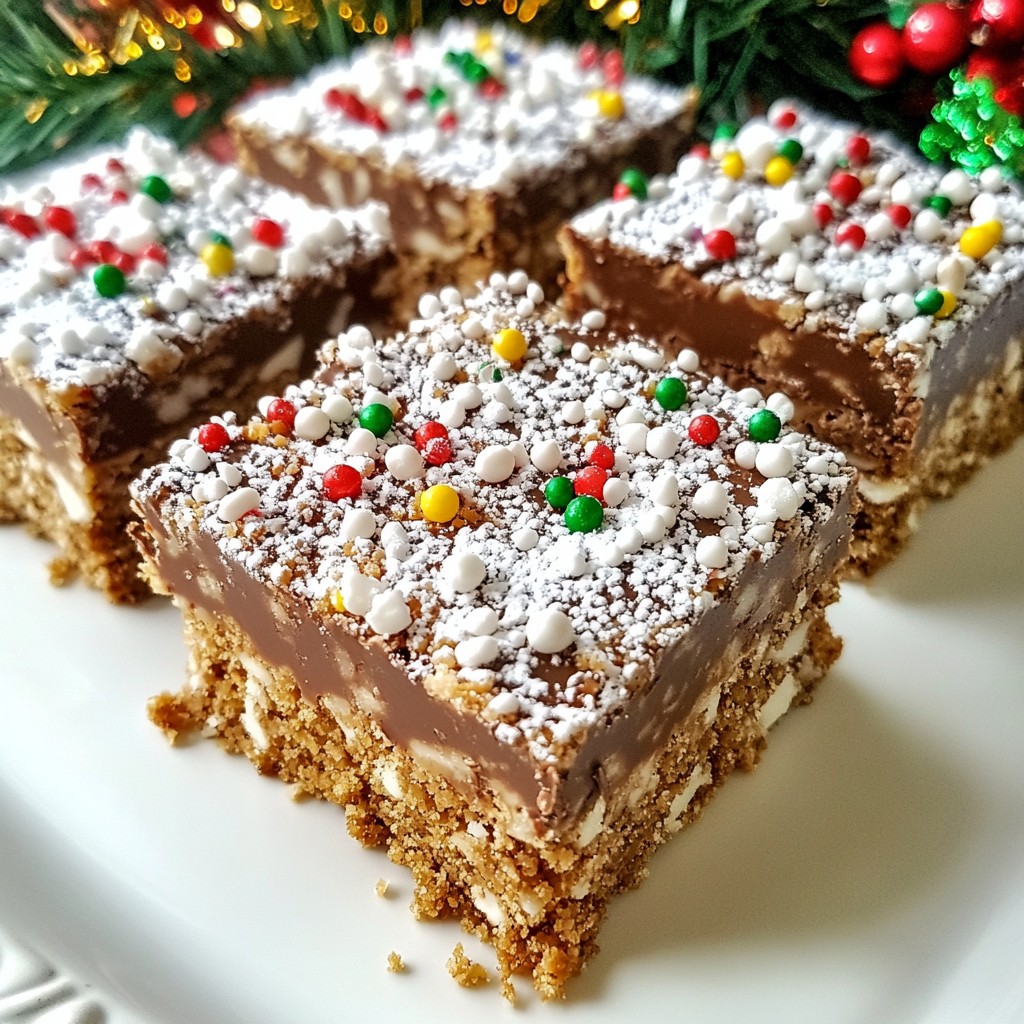
Pour the wet mix into the dry mix bowl. Stir well until the two mixtures are fully combined. If you want extra sweetness, fold in 1/2 cup of mini chocolate chips. Next, take an 8x8-inch baking dish. Line it with parchment paper, leaving some overhang. This will help lift out the treats later. Transfer the mixture into the dish. Press it down firmly and evenly. Cover the dish with plastic wrap or foil. Chill it in the fridge for at least 1 hour. After it sets, lift the treats out using the parchment paper. Cut them into squares. If you like, roll them in festive sprinkles for fun!
Tips & Tricks
Best Practices for Mixing and Chilling
To make great no-bake treats, start with dry ingredients. Mix the graham cracker crumbs, coconut, powdered sugar, and cocoa powder in a large bowl. This helps blend the flavors well. Use a whisk or spoon to ensure there are no dry bits left.
For the wet ingredients, combine almond butter, honey, vanilla, and salt in a separate bowl. Whisk until it's smooth and creamy. Pour this mixture into the dry mix and stir well. This step is key to getting a uniform flavor.
After mixing, press the mixture firmly into your lined baking dish. This makes sure the treats hold together well. Chill the dish in the fridge for at least an hour. This helps the treats set properly, giving you a perfect texture.
Decorating Ideas for Festive Touch
Adding a festive touch makes these treats even more special. After cutting the chilled mixture into squares, roll them in sprinkles. Use bright, colorful sprinkles for a holiday vibe. You can also drizzle melted chocolate on top for a fancy look.
If you want to go a bit further, use cookie cutters to shape your treats. Stars or Christmas trees are great options. These shapes make the treats fun and eye-catching.
Ensuring the Perfect Texture
Texture is crucial for no-bake treats. The mix should be soft but firm after it sets. If it's too crumbly, add a bit more almond butter or honey. This will help bind everything together.
Before cutting, allow the treats to chill fully. This gives them a nice, firm texture. Use a sharp knife to cut them into even squares. If they stick, warm the knife with hot water before slicing. This simple trick keeps your treats looking neat and pretty.
Pro Tips
- Use fresh ingredients: Always opt for fresh almond butter and high-quality cocoa powder to enhance the flavor of your treats.
- Customize your mix-ins: Feel free to add nuts, dried fruits, or seeds to the mixture for extra texture and nutrition.
- Chill longer for firmer treats: If you prefer a firmer texture, let the mixture chill in the refrigerator for a longer period, up to 2 hours.
- Experiment with flavors: Try adding peppermint extract or orange zest for a unique twist that matches the holiday spirit.
Variations
Flavor Variations (e.g., Peanut Butter, Mint)
You can change the flavor of these treats easily. Swap almond butter for peanut butter. This adds a rich, nutty taste. You can also use cookie butter for a sweet twist. For a minty version, mix in mint extract. Just a few drops can give a fun holiday vibe.
Additives (e.g., Nuts, Dried Fruits)
Adding extras makes these treats even better. Try mixing in chopped nuts like almonds or walnuts. They add crunch and flavor. You can also toss in dried fruits like cranberries or raisins. These add sweetness and a chewy texture. Just keep the total add-ins to about one cup.
Different Shapes and Presentation Styles
Making these treats fun to look at is easy. Cut them into squares or bars for a classic look. Use cookie cutters to create fun shapes, like stars or trees. You can also roll them into balls for a playful touch. To make them festive, add colorful sprinkles on top. This makes each bite feel special!
Storage Information
How to Store No-Bake Treats
To keep your no-bake Christmas treats fresh, store them in an airtight container. This keeps them moist and tasty. You can stack the squares in layers, adding parchment paper between each layer. If you have festive sprinkles, they may stick, so keep that in mind. Place the container in the fridge. The cool air helps maintain their shape and flavor.
Freezing Options
You can freeze these treats if you want to save some for later. Cut the squares before freezing. Wrap each piece tightly in plastic wrap. Then, put them in a freezer-safe bag. This way, they stay fresh and tasty. When you want to eat them, simply take out a piece and let it thaw in the fridge. They will taste just as good as fresh!
Shelf Life and Best Practices
These treats last for about a week in the fridge. For the best taste, eat them within the week. If you freeze them, they can last up to three months. Just remember to label your container so you know when you made them. Always check for any changes in color or smell before eating. This way, you ensure you enjoy the best flavors.
FAQs
Can I use other nut butters?
Yes, you can use other nut butters. Peanut butter works well and adds a nice taste. Cashew butter is also a great choice for a creamy texture. Just make sure your nut butter is smooth. This helps mix well with the other ingredients.
How can I make these vegan?
To make these treats vegan, swap honey for maple syrup. This keeps the sweetness without using animal products. Use plant-based nut butter like almond or cashew. Check that your chocolate chips are dairy-free. These small changes keep the treats yummy and vegan-friendly.
What can I substitute for graham cracker crumbs?
If you don’t have graham cracker crumbs, use crushed cookies. Vanilla wafers or digestive biscuits work great too. You can also use oats for a healthier twist. Just blend the oats to a fine crumb. This keeps the texture while changing the flavor a bit.
In this article, I shared key ingredients and tips for making no-bake treats. I detailed easy steps for mixing and assembling, while also offering flavor variations and creative decorations. You can store these treats effectively or freeze them for later use. Remember, you can easily adjust ingredients to suit your taste or dietary needs. Have fun experimenting with flavors and shapes to make these treats your own! Enjoy creating delicious snacks that anyone can love.