Welcome to the sweet world of No-Bake Caramel Peanut Butter Pie Cups! If you’re hunting for a quick, fun dessert to impress friends, you’ve come to the right place. These creamy, rich cups are easy to make and packed with flavor. Using simple ingredients, you’ll create a delightful treat that skips the oven but not the taste. Let’s dive into how you can whip up these tasty delights!
Ingredients
List of Ingredients
– 1 cup graham cracker crumbs
– 1/4 cup unsalted butter, melted
– 1/3 cup granulated sugar
– 1/2 cup creamy peanut butter
– 1 cup cream cheese, softened
– 1 cup powdered sugar
– 1 teaspoon vanilla extract
– 1/2 cup whipped topping
– 1/3 cup caramel sauce
– Crushed peanuts for garnish
Ingredient Substitutions
– If you want to switch things up, try almond or cashew butter instead of peanut butter. They still give a nice flavor.
– For a gluten-free crust, use gluten-free graham crackers or crushed nuts.
– You can use dairy-free cream cheese and whipped topping for a dairy-free version. Just make sure they are suitable for your needs.
These ingredients make the pie cups rich and creamy. The combination of peanut butter and caramel gives a sweet twist. Enjoy your baking adventure!
Step-by-Step Instructions
Preparation of the Graham Cracker Crust
To make the crust, start by combining the graham cracker crumbs, melted butter, and sugar in a large bowl. Mix well until the crumbs feel like wet sand. This ensures a good texture for the crust. Next, line a standard muffin tin with paper cupcake liners. Take the crust mixture and evenly distribute it into the bottom of each liner. Press down firmly to create a compact base. This step is key for a sturdy crust.
Making the Peanut Butter Filling
Now, let’s move on to the filling. In a separate medium bowl, beat the softened cream cheese until it is smooth. I find using a hand mixer makes this easy. After it’s creamy, mix in the peanut butter, powdered sugar, and vanilla extract. Keep mixing until everything is well combined and fluffy. This is where the magic happens!
Assembling the Pie Cups
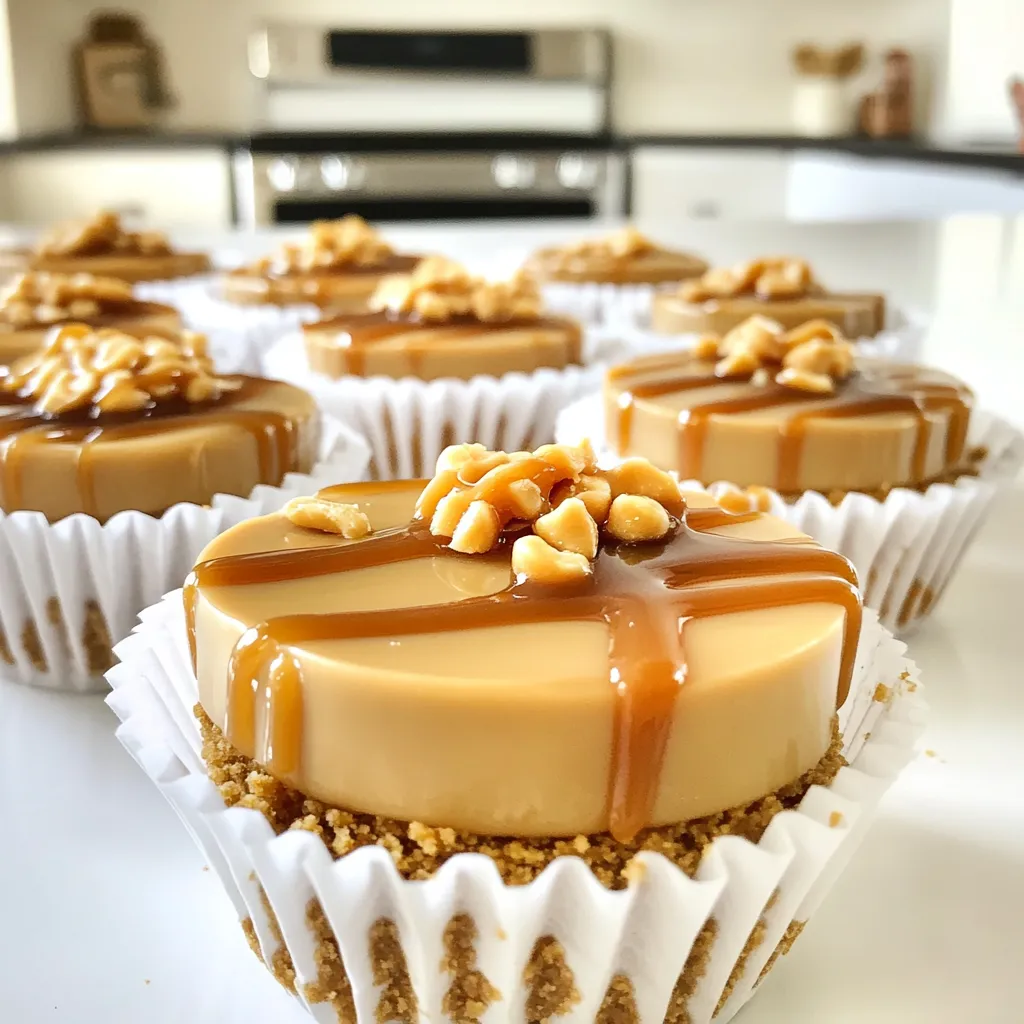
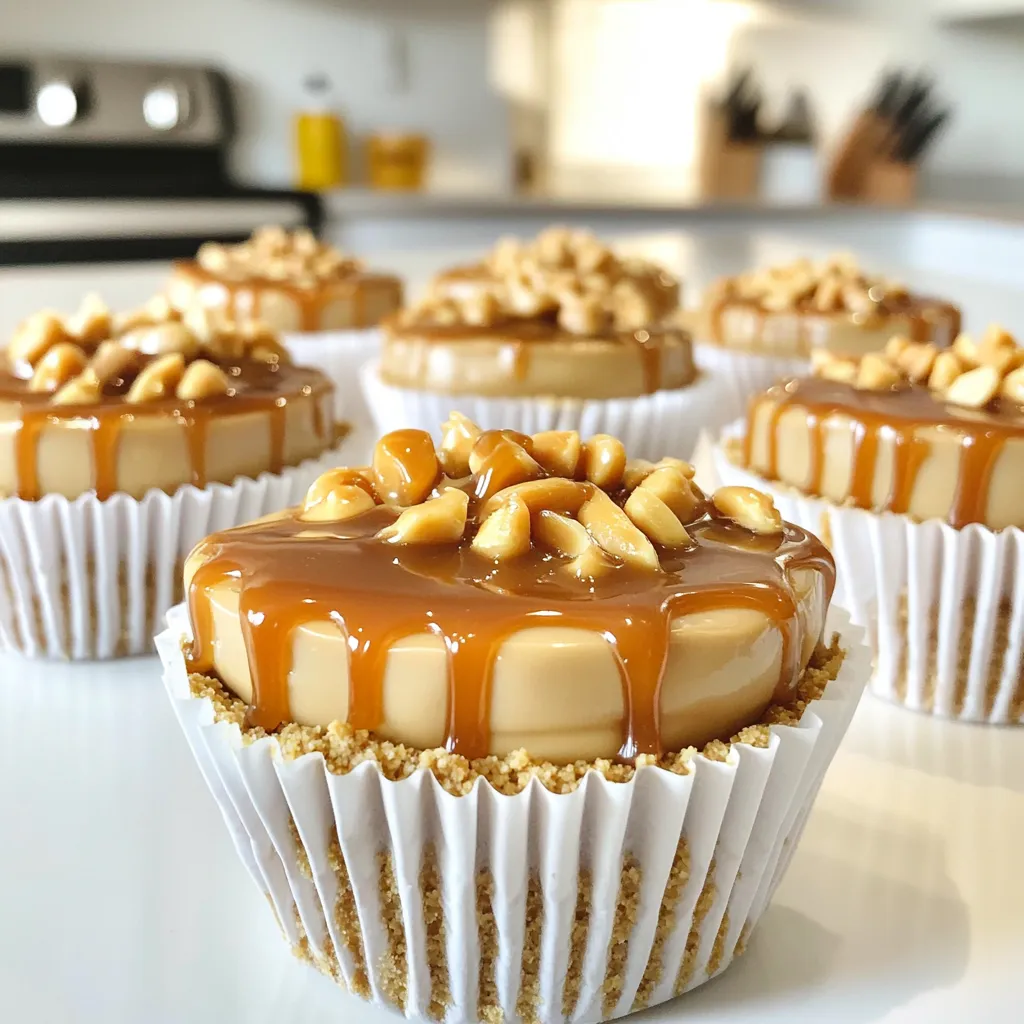
Next, carefully fold in the whipped topping. This step gives the filling a light and airy texture. Then, spoon the peanut butter cream filling into the crusts. Smooth the tops with the back of a spoon. It should look inviting! Now, drizzle caramel sauce over each cup, allowing it to cascade down the sides. This adds a lovely touch. Finally, place the muffin tin in the refrigerator to set for at least 2 hours. Once they are firm to the touch, remove the muffin tin and peel off the cupcake liners.
For a fun finish, sprinkle crushed peanuts over the top of each pie cup. This not only adds crunch but also makes them look amazing!
Tips & Tricks
Tips for Perfect Texture
To get the best texture for your peanut butter filling, use creamy peanut butter. It blends smoothly and helps create a light filling. Make sure your cream cheese is at room temperature. This step helps avoid lumps and keeps the filling fluffy.
Chilling time is key. After you fill the cups, place them in the fridge for at least 2 hours. This allows the filling to firm up nicely. If you skip this step, your pie cups may fall apart when you serve them.
Presentation Techniques
For a stunning visual appeal, serve the pie cups on a decorative platter. Arrange them in a circle or a fun pattern. Drizzle extra caramel sauce around the base of the cups. This adds flair and entices your guests even more.
Using garnishes effectively enhances the look. Sprinkle crushed peanuts on top of each pie cup. This adds a nice crunch and gives a rustic touch. You can also add a dollop of whipped topping on each cup for a creamy finish.
Variations
Flavor Variations
You can easily change this recipe to suit your taste. One fun way is by adding chocolate. You could mix in chocolate chips when you make the peanut butter filling. This gives the cups a rich and creamy taste. You can also drizzle some melted chocolate on top. It adds a nice touch and makes the cups even more tempting.
Another idea is to use flavored toppings. Try adding crushed Oreos, sprinkles, or even fresh berries. Each topping gives a new taste and look. So feel free to get creative with what you have at home!
Dietary Modifications
If you want a vegan version, it is simple! Use coconut cream instead of cream cheese. Swap peanut butter with almond or cashew butter. You can also use maple syrup in place of granulated sugar. For the crust, try using crushed nuts or oats instead of graham crackers.
For those watching their sugar intake, consider low-sugar alternatives. You can use a sugar substitute like stevia or erythritol. These options keep the pie cups sweet but lower in calories. Always check labels to ensure they fit your diet. Adjust the caramel sauce as well by choosing a low-sugar version.
Storage Info
Best Practices for Storing
To keep your No-Bake Caramel Peanut Butter Pie Cups fresh, store them in the refrigerator. Place the pie cups in an airtight container. Make sure they are covered well. This helps them stay tasty for longer. You can also keep them in the muffin tin covered with plastic wrap.
If you want to save them for later, freezing is a great option. Wrap each pie cup in plastic wrap, then place them in a freezer-safe bag. This will protect them from freezer burn. They can last up to three months in the freezer.
How Long They Last
When stored properly in the fridge, these pie cups last about five days. If you see any signs of spoilage, it’s best to throw them out. Look for changes in texture or an off smell. If the graham crust becomes soggy or the filling separates, those are signs they are past their prime. Always trust your senses when deciding if food is still good!
FAQs
Can I make these pie cups ahead of time?
Yes, you can make these pie cups ahead of time. They store well in the fridge. I suggest making them a day before your event. After they set, cover the muffin tin with plastic wrap. This keeps them fresh. You can also place them in an airtight container. They will last up to three days in the fridge.
What can I substitute for whipped topping?
If you want a substitute for whipped topping, try freshly whipped cream. You can whip heavy cream until it’s fluffy. Another option is Greek yogurt for a tangy twist. Just keep in mind that this will change the taste slightly. For a dairy-free option, use coconut whipped cream. Each option gives a nice texture.
How can I add more caramel flavor?
To enhance the caramel taste, drizzle more caramel sauce on top. You can also mix a bit of caramel sauce into the filling. Adding a pinch of sea salt can boost the flavor too. If you love caramel, consider using caramel-flavored cream cheese. It brings a richer taste and makes it more decadent.
You learned how to make tasty peanut butter pie cups with easy steps and tips. From the crust to the filling, each part is simple and fun. You can change up ingredients to fit your needs, like making it gluten-free or vegan. Store them correctly to keep them fresh longer. Enjoy these little pie cups at any event or snack time. With the right care, they can bring joy to your table. Try this recipe and share your thoughts on your creations!