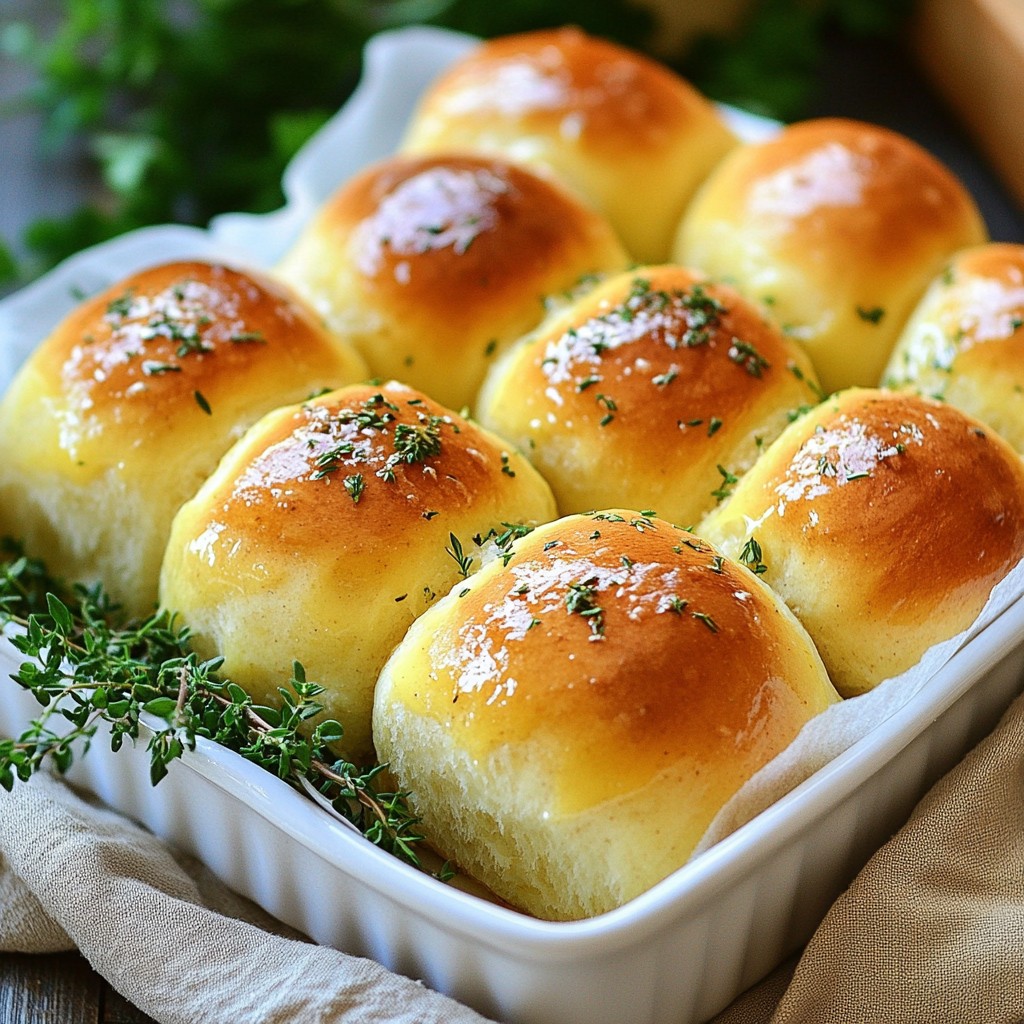
Are you ready to bake soft and flavorful Garlic Herb Dinner Rolls? These rolls are not just any bread; they burst with rich garlic and herb goodness. Perfect for any meal, they’ll impress your family and friends. In this post, I’ll guide you through the simple steps, share helpful tips, and explore tasty variations. Let’s dive in and create rolls that everyone will love!
Why I Love This Recipe
- Fresh Flavor: The combination of garlic and fresh herbs creates a delightful aroma and taste that elevates any meal.
- Soft and Fluffy: These rolls are soft on the inside with a slightly crisp exterior, making them irresistible.
- Perfect for Sharing: With 12 rolls in a batch, they are ideal for family gatherings or dinner parties.
- Easy to Make: This recipe is straightforward, perfect for both novice and experienced bakers.
Ingredients
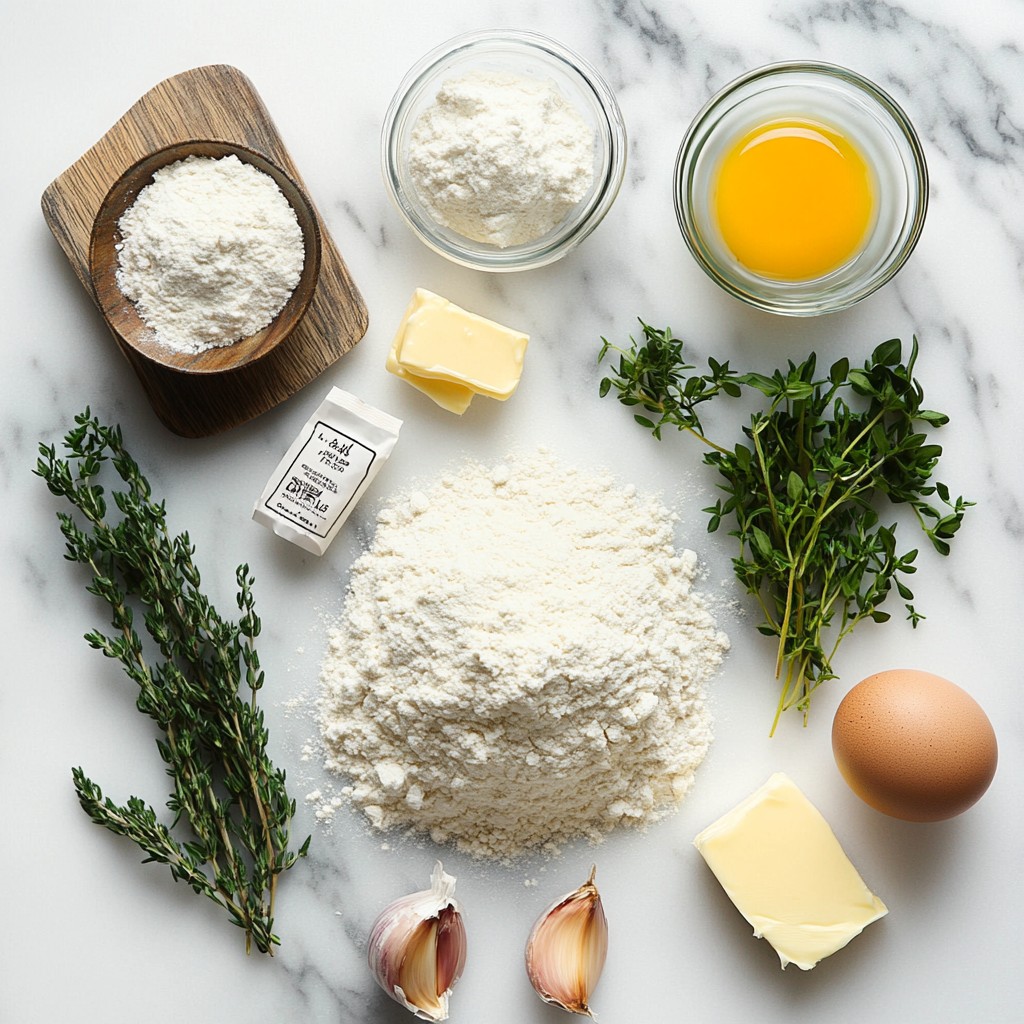
List of Ingredients
- 3 ½ cups all-purpose flour, plus extra for dusting
- 1 packet (2 ¼ teaspoons) instant yeast
- 1 tablespoon granulated sugar
- 1 teaspoon sea salt
- 1 cup warm milk (about 110°F)
- 1/4 cup unsalted butter, melted
- 2 cloves garlic, finely minced
- 1 tablespoon fresh parsley, finely chopped
- 1 tablespoon fresh rosemary, finely chopped
- 1 tablespoon fresh thyme, finely chopped
- 1 egg, beaten (for egg wash)
Measurement Details
You will need to measure your ingredients carefully. Start with the flour. Use a spoon to scoop it into the cup and level it off. This helps avoid too much flour in your dough. The yeast should be fresh for best results. Use warm milk, not hot, to help the yeast grow. Melt the butter, but let it cool a bit before mixing. This keeps the dough soft.
Substitutions and Alternatives
You can swap all-purpose flour with bread flour for chewier rolls. If you lack fresh herbs, use dried herbs instead. Use one teaspoon of dried herbs for each tablespoon of fresh. For a dairy-free option, use almond milk or oat milk. You can also use olive oil instead of butter for a different flavor. If you need to skip the egg wash, brush the rolls with milk for a nice shine.
Step-by-Step Instructions
Preparing the Dough
To start, grab a large mixing bowl. Combine 2 cups of all-purpose flour, instant yeast, sugar, and sea salt. Whisk them well to mix. In a separate bowl, whisk together warm milk and melted butter. This should be around 110°F. Slowly pour this mixture into the dry ingredients. Use a spatula to stir until a shaggy dough forms.
Next, add minced garlic, parsley, rosemary, and thyme to the dough. Stir in the remaining flour little by little until the dough is soft and holds together. Now, turn the dough out onto a floured surface. Knead it for about 8-10 minutes. You want it to be smooth and elastic. If it sticks, add a bit more flour.
Shape the kneaded dough into a ball. Place it in a greased mixing bowl. Cover it with a clean kitchen towel. Let it rise in a warm spot for about 1 hour, or until it doubles in size.
Shaping the Rolls
After the dough has risen, gently punch it down. This lets out some of the air. Divide the dough into 12 equal pieces. Roll each piece into a ball by rolling it between your palms. Place each ball in a greased 9x13-inch baking dish, leaving space between them.
Cover the rolls loosely with a kitchen towel again. Allow them to rise for another 30 minutes, or until they look puffy.
Baking the Rolls
While the rolls rise, preheat your oven to 375°F (190°C). After the second rise, brush the tops of the rolls with a beaten egg. This gives them a shiny, golden finish.
Now, place the rolls in the oven. Bake for 20-25 minutes. They should turn golden brown and sound hollow when tapped on the bottom.
Once baked, remove the rolls from the oven. If you want more flavor, brush the tops with melted butter. Enjoy the warm, soft, and flavorful garlic herb dinner rolls!
Tips & Tricks
Achieving the Perfect Texture
To get soft and fluffy rolls, kneading is key. Knead the dough for 8 to 10 minutes. This builds gluten, giving the rolls a nice rise. If the dough feels too sticky, add a bit more flour. Remember, a little flour goes a long way. After the first rise, make sure to punch down the dough gently. This step lets out excess air, helping the rolls rise better the second time.
Enhancing Flavor with Additional Ingredients
Want to boost the flavor? Try adding different herbs! Basil, dill, or oregano work great in this recipe. You can also mix in some cheese. Grated parmesan or mozzarella adds a savory touch. For a twist, consider adding sun-dried tomatoes or olives. These ingredients make your rolls even more special. Don’t be afraid to experiment. Your taste buds will thank you!
Troubleshooting Common Issues
Sometimes rolls don’t rise as expected. This can happen if your yeast is old. Always check the expiration date. If your rolls are dense, you might have added too much flour. Aim for a soft, slightly tacky dough. If your rolls are too dry, brush them with melted butter after baking. This adds moisture and flavor. Finally, if they overbake, keep an eye on them in the oven. Every oven is a little different. Aim for a golden color and a hollow sound when tapped.
Pro Tips
- Use Fresh Herbs: Fresh herbs enhance the flavor profile of your dinner rolls. For the best results, use freshly chopped parsley, rosemary, and thyme rather than dried herbs.
- Temperature Matters: Make sure your milk is warm but not hot (around 110°F) to activate the yeast effectively without killing it.
- Knead for Texture: Knead the dough thoroughly for 8-10 minutes to develop gluten, which gives the rolls their soft and chewy texture.
- Don’t Skip the Egg Wash: Brushing the rolls with a beaten egg before baking gives them a beautiful golden-brown color and a glossy finish.
Variations
Herb Combinations
You can switch up the herbs for different tastes. Try using basil, oregano, or dill instead of parsley, rosemary, and thyme. Each herb adds its own flavor. Mix and match to find your favorite blend. Fresh herbs give the best taste, but dried herbs work too. Use about one-third of the amount if you choose dried. Experimenting with herbs makes the rolls unique and fun.
Cheese-Stuffed Garlic Herb Rolls
For a cheesy twist, add cheese to your rolls. Before shaping the dough into balls, place a small cube of cheese in the center of each piece. Mozzarella, cheddar, or feta work great. Seal the dough around the cheese and shape it. This surprise will melt during baking. When you tear open a roll, the gooey cheese will delight everyone at the table.
Gluten-Free Adaptation
You can make these rolls gluten-free too! Use a gluten-free all-purpose flour blend instead of regular flour. Make sure the blend has xanthan gum for better texture. Follow the same steps as the original recipe. The rolls may be slightly denser, but they will still taste great. Enjoy warm, gluten-free rolls with your meals without missing out on flavor.
Storage Info
Storing Leftover Rolls
After enjoying your garlic herb dinner rolls, store any leftovers in an airtight container. Keep them at room temperature for up to three days. If you want to keep them longer, consider freezing them. This helps maintain their soft texture and flavor.
Reheating Instructions
To reheat the rolls, preheat your oven to 350°F (175°C). Place the rolls on a baking sheet and cover them loosely with foil. Heat for about 10-15 minutes, or until warm. This method keeps the rolls soft. You can also microwave them for 15-20 seconds, but they may not stay as fluffy.
Freezing for Long-Term Storage
If you want to freeze your garlic herb dinner rolls, do so after they cool completely. Wrap each roll in plastic wrap, then place them in a freezer bag. They can last for up to three months in the freezer. When you're ready to enjoy them, thaw in the fridge overnight and reheat as mentioned above. This way, you can savor the fresh taste anytime you want!
FAQs
Can I use active dry yeast instead of instant yeast?
Yes, you can use active dry yeast. Just remember to proof it first. Mix the yeast with warm milk and sugar. Let it sit for about 5 to 10 minutes until it gets frothy. Then, use it in the same way as instant yeast. This process wakes up the yeast and helps the dough rise well.
How can I make these rolls ahead of time?
To make these rolls ahead of time, prepare the dough and let it rise. After the first rise, shape the rolls and place them in the baking dish. Cover them tightly with plastic wrap and refrigerate. When ready to bake, let them sit at room temperature for about 30 minutes. This allows them to rise again before baking. You’ll enjoy fresh rolls without the last-minute rush.
What dishes pair well with garlic herb dinner rolls?
Garlic herb dinner rolls go well with many dishes. They are perfect with soups and stews. Try them with a rich chicken soup or a hearty beef stew. They also pair nicely with salads, especially Caesar or garden salads. Serve them alongside roasted meats, like chicken or pork, for a great dinner. These rolls add a warm, comforting touch to every meal.
You now have all the steps to make garlic herb rolls. From the ingredient list to baking tips, I covered it all. Remember to adjust for your tastes. Use the variations to inspire new flavors. Don't forget about storage and reheating options for fresh rolls later. With these ideas, you’ll impress at dinner. Enjoy your baking and the tasty results!