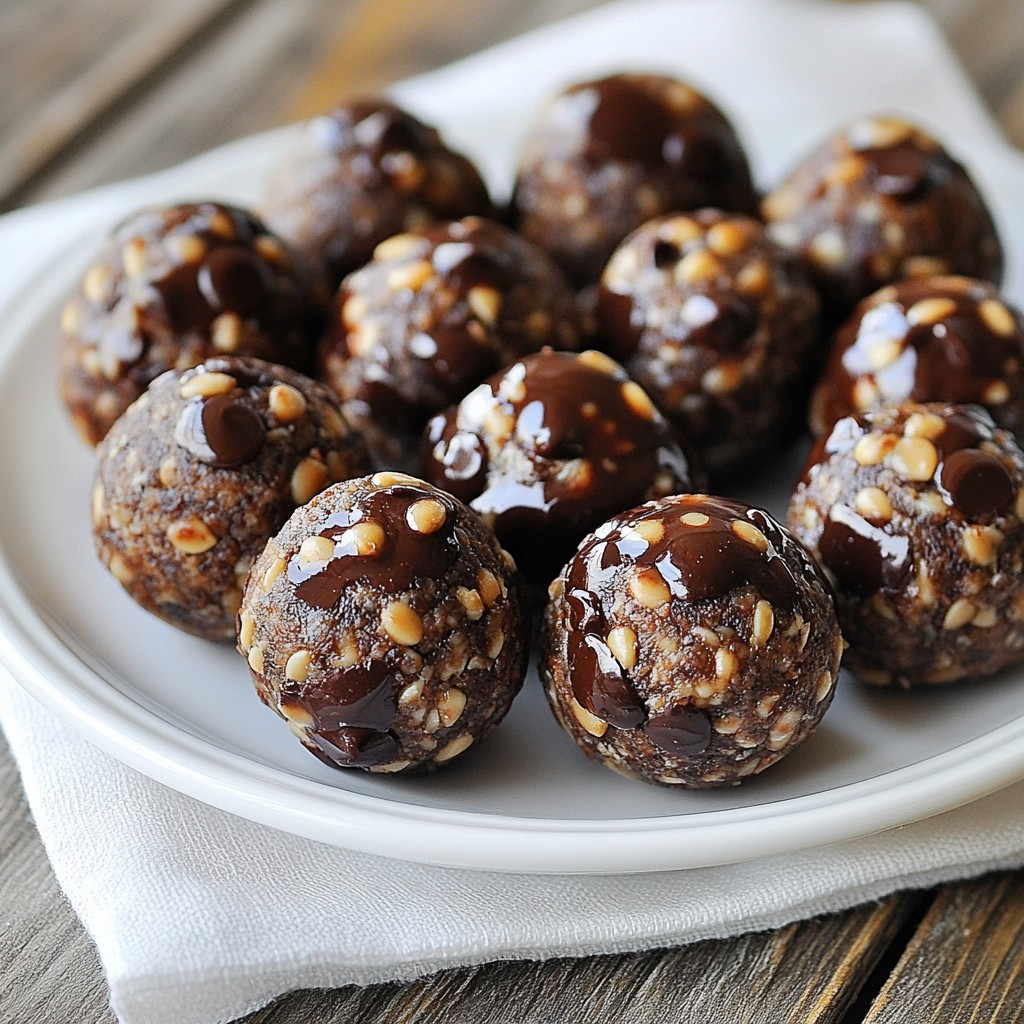
Are you looking for a quick, healthy snack that satisfies your sweet tooth? Look no further! Chocolate Peanut Butter Energy Balls are packed with taste and nutrition. With just a few simple ingredients like oats, peanut butter, and dark chocolate, you can whip up these delicious bites in no time. Join me as I guide you through the steps and share tips to make the best energy balls you've ever had!
Why I Love This Recipe
- Quick and Easy: This recipe takes just 10 minutes to prepare, making it a perfect snack option when you're short on time.
- Healthy Ingredients: Made with wholesome oats, peanut butter, and flaxseed, these energy bites are packed with nutrients and good fats.
- Customizable: You can easily swap out ingredients like honey for maple syrup or add nuts and seeds to suit your taste.
- Perfect for Meal Prep: These energy bites store well in the fridge, making them a great grab-and-go snack for busy days.
Ingredients
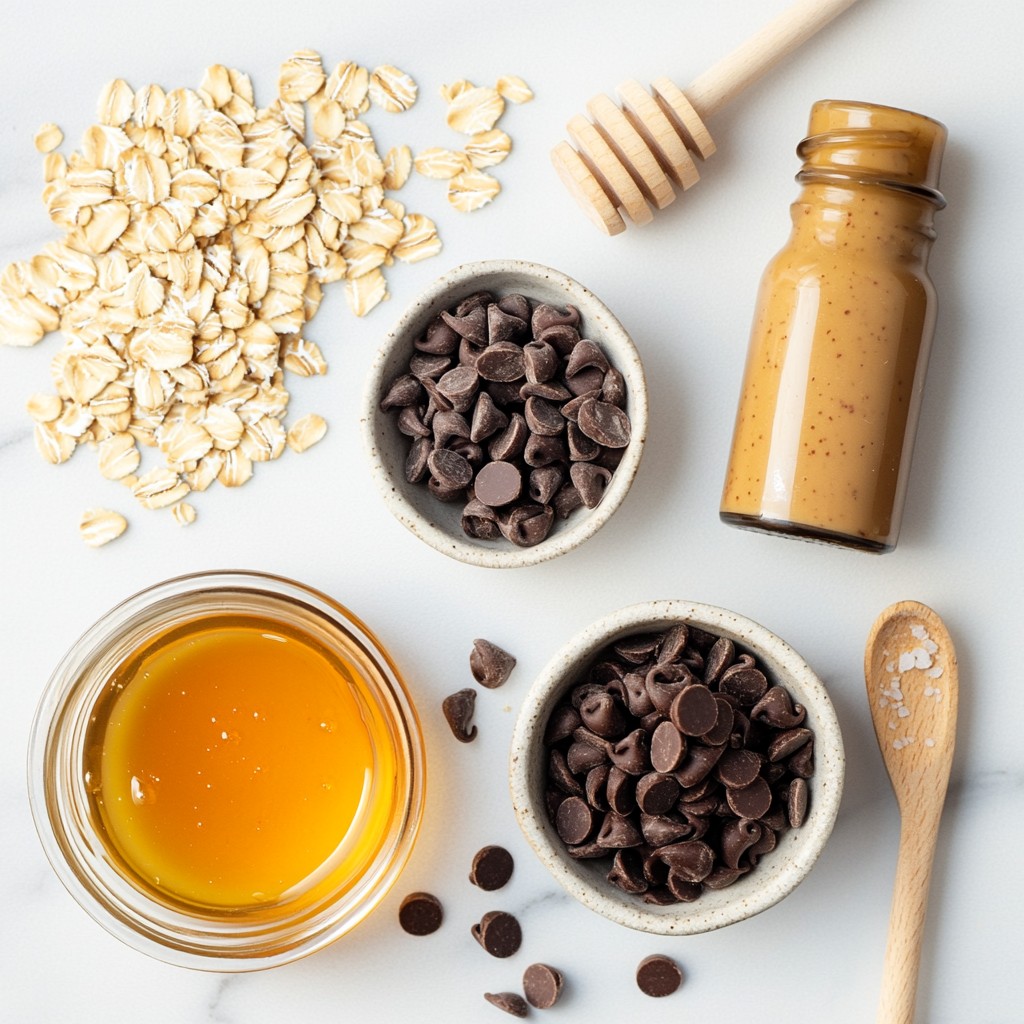
List of ingredients
- 1 cup rolled oats
- 1/2 cup creamy peanut butter
- 1/3 cup honey or maple syrup
- 1/2 cup semi-sweet dark chocolate chips
- 1/4 cup ground flaxseed meal
- 1/2 teaspoon pure vanilla extract
- Pinch of sea salt
To make these tasty energy balls, gather your ingredients first. Rolled oats form the base. They give texture and fiber. Creamy peanut butter adds protein and flavor. Honey or maple syrup sweetens the mix. Semi-sweet dark chocolate chips make it rich and fun. Ground flaxseed meal boosts nutrition and gives a nutty taste. Pure vanilla extract enhances all the flavors. A pinch of sea salt balances the sweetness.
Each ingredient plays a role. The oats keep you full. Peanut butter gives you energy. The sweetener adds a nice touch. Chocolate makes it a treat. Flaxseed offers omega-3 fats, which are great for your heart. Vanilla adds warmth. Sea salt brings out the best in all these flavors.
If you want to change things up, consider using different nut butters. You can also swap honey for agave nectar. This way, you can make the recipe your own!
Step-by-Step Instructions
Mixing the Ingredients
Start by taking a large mixing bowl. Add 1 cup of rolled oats, 1/2 cup of creamy peanut butter, 1/3 cup of honey (or maple syrup), and 1/2 teaspoon of pure vanilla extract. Use a wooden spoon or spatula. Mix everything well until it forms a thick dough. Make sure all ingredients blend together nicely. This step is vital for a rich flavor.
Adding Chocolate and Flaxseed
Now, gently fold in 1/2 cup of semi-sweet dark chocolate chips and 1/4 cup of ground flaxseed meal. Stir the mixture until the chocolate chips spread evenly throughout. This balance gives your energy balls a great taste and extra nutrition. Flaxseed adds fiber, making these snacks even healthier.
Shaping the Energy Balls
Once everything is mixed, take about 1 tablespoon of dough. Use your hands to roll it into a ball. Repeat this until you shape all of the dough into bite-sized balls. Arrange these energy balls on a parchment-lined baking sheet. This keeps them from sticking and makes for easy cleanup.
Chilling for Firmness
Next, place the baking sheet in the refrigerator. Chill the energy balls for at least 30 minutes. Chilling is essential for keeping their shape. If you skip this step, your energy balls might flatten or fall apart. After chilling, they will be firm and ready to enjoy!
Tips & Tricks
Perfecting the Texture
To make your energy balls just right, try using different types of nut butter. Almond butter or cashew butter can add a fun twist. Each nut butter has its own flavor and texture. You can also adjust the sweetness to fit your taste. If you want a sweeter treat, add more honey or maple syrup. For a less sweet option, use less.
Presentation and Serving
Presentation matters! Store your energy balls in glass jars or rustic plates. This makes them look great on your kitchen counter. You can also add toppings for visual appeal. A sprinkle of extra dark chocolate chips or some crushed nuts on top can make a big difference. Fresh berries next to the jar can add a nice pop of color too.
Enhancing Flavor
Want to boost the flavor? Use flavored extracts like almond or coconut. Just a little can change the whole taste. You can also add spices like cinnamon or a pinch of sea salt. These ingredients can elevate your energy balls and make them even more delicious.
Pro Tips
- Use Natural Sweeteners: Opt for raw honey or pure maple syrup for a more healthful sweetener that adds rich flavors without refined sugars.
- Experiment with Nut Butters: Try almond or cashew butter instead of peanut butter for a unique twist on flavor and nutrition.
- Customize with Add-Ins: Feel free to add nuts, seeds, or dried fruits to the mixture for extra texture and taste.
- Perfect Storage: Store energy bites in an airtight container in the fridge for maximum freshness, and consider freezing them for longer storage.
Variations
Alternative Sweeteners
You can switch honey for agave nectar or stevia. Agave adds a mild sweetness. Stevia is more potent, so use less. Both options keep your energy balls tasty and lower in sugar. Experiment with these sweeteners to find the right balance for your taste.
Flavor Add-Ins
Want to spice things up? Try adding shredded coconut or dried fruit. Both add texture and flavor. You can also mix in protein powder or superfoods like chia seeds. These add nutrients and make your energy balls even better for you. Just keep in mind to adjust your wet ingredients if you add dry ones.
Diet-Specific Variations
If you're gluten-free, use certified gluten-free oats. This way, you can enjoy these snacks without worry. For vegans, swap honey for maple syrup. This simple change keeps the recipe plant-based while still delivering that sweet flavor. These options let everyone enjoy delicious energy balls, no matter their diet.
Storage Info
Best Practices for Freshness
To keep your chocolate peanut butter energy balls fresh, store them in airtight containers. This method helps avoid moisture and keeps the flavors rich. I recommend placing a layer of parchment paper between the balls to prevent sticking. For the best taste, keep these treats in the refrigerator. This will help the energy balls stay firm and enjoyable for longer.
Freezing for Extended Shelf Life
If you want to save energy balls for later, freezing works great. First, let them chill in the fridge for at least 30 minutes. Once firm, place them in a single layer on a baking sheet. Freeze until solid, then transfer them to an airtight container or freezer bag. When you want to enjoy one, just take it out and let it thaw at room temperature. This way, you maintain their tasty texture and flavor.
Shelf Life Information
In the refrigerator, chocolate peanut butter energy balls generally last about one week. To check for freshness, look for any changes in smell or texture. If they seem dry or have an off smell, it's time to toss them. Always trust your senses; they are your best tools. Keeping an eye on these details will help you enjoy every bite!
FAQs
How long do chocolate peanut butter energy balls last?
These energy balls stay fresh in the fridge for about a week. If you want to keep them longer, you can freeze them. In the freezer, they can last for up to three months. Just be sure to use an airtight container. This helps keep them tasty and prevents freezer burn.
Can I use crunchy peanut butter instead of creamy?
Yes, you can use crunchy peanut butter. Just know that it will change the texture a bit. You will get some delightful chunks in each bite. This adds a fun crunch and a different flavor. It may also make the balls a bit harder to shape, but they’ll still be delicious.
Are these energy balls gluten-free?
Yes, these energy balls can be gluten-free! Just make sure to use certified gluten-free rolled oats. Always check the labels on your ingredients. This ensures no gluten sneaks in. You can enjoy these tasty bites without worry if you choose the right products.
You learned how to make chocolate peanut butter energy balls from simple ingredients. Mixing rolled oats and peanut butter gives a tasty base. Adding chocolate chips and flaxseed boosts the flavor and nutrition. You can customize these bites with your favorite flavors and sweeteners.
For freshness, store them in airtight containers. They last well in the refrigerator and can even be frozen. Enjoy making these snacks that fit your diet and taste!