Indulge your sweet tooth with this delightful Chocolate Hazelnut Crepe Cake! Whether you're hosting a party or enjoying a quiet evening, this easy recipe will impress everyone. With layers of tender crepes and rich hazelnut spread, each bite bursts with flavor. I’ll walk you through the simple steps, share helpful tips, and suggest tasty variations. Get ready to whip up a dessert that will become your new favorite!
Error: Connection error.
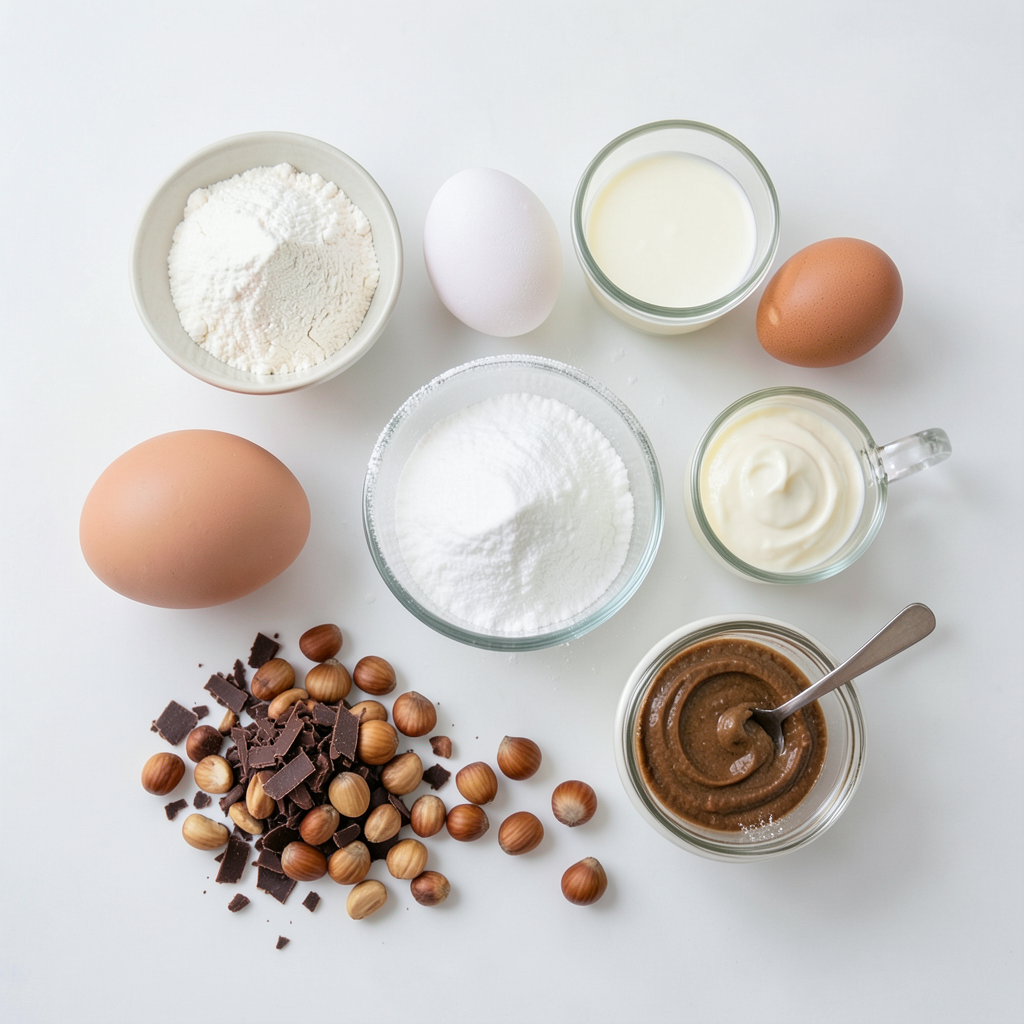
Ingredients
Main Ingredients for the Crepes
To make the crepes, you will need:
- 2 cups all-purpose flour
- 4 large eggs
- 3 cups milk
- 1/4 cup granulated sugar
- 1/4 teaspoon salt
- 4 tablespoons melted butter (plus extra for cooking)
These ingredients create a smooth batter. The flour gives structure, and the eggs add richness. Milk keeps the crepes soft and tender. Sugar adds a touch of sweetness, and salt balances the flavors.
Ingredients for the Whipped Cream
For the whipped cream layer, gather:
- 1 cup heavy cream
- 1/4 cup powdered sugar
- 1 teaspoon vanilla extract
The heavy cream whips up light and fluffy. Powdered sugar sweetens it, while vanilla adds a warm flavor. This creamy layer complements the chocolate hazelnut spread perfectly.
Garnishing Ingredients
To finish your cake, you will need:
- 1/2 cup toasted hazelnuts, chopped
- Chocolate shavings
Toasted hazelnuts add a lovely crunch. Chocolate shavings look beautiful on top. They also enhance the rich chocolate flavor. These garnishes make your cake look and taste special.
Step-by-Step Instructions
Preparing the Crepe Batter
To make the crepe batter, gather your ingredients: flour, eggs, milk, sugar, salt, and melted butter. In a large bowl, mix the flour, eggs, milk, sugar, and salt. Whisk until smooth. Add in the melted butter and stir. Let the batter rest for about 30 minutes at room temperature. This resting time helps make tender crepes.
Cooking the Crepes
Next, heat a non-stick skillet or crepe pan over medium heat. Lightly grease the pan with melted butter. Pour about 1/4 cup of batter into the center of the skillet. Quickly swirl the pan to spread the batter evenly. Cook for about 2 minutes until the edges lift. Flip the crepe with a spatula and cook for another minute. Place the cooked crepe on a plate. Repeat this until you use all the batter. You should get around 15 to 18 crepes stacked.
Assembling the Crepe Cake
Now it’s time to assemble your cake! Take the first crepe and spread a thin layer of hazelnut spread on top. Add a layer of whipped cream, using a separate bowl to whip the cream first. Place another crepe on top and repeat this layering. Keep alternating between hazelnut spread and whipped cream until you have stacked all the crepes. Make sure the last layer is just a crepe.
Final Touches and Serving Instructions
After stacking, cover the cake with plastic wrap. Chill it in the refrigerator for at least 2 hours, or overnight for best results. This helps the layers blend together well. Before serving, sprinkle the top with chopped toasted hazelnuts and chocolate shavings. To serve, slice the cake like a regular cake. Enjoy it chilled for the best taste and texture!
Tips & Tricks
How to Achieve Perfect Crepes
To make great crepes, start with a smooth batter. Mix flour, eggs, milk, sugar, and salt well. Let the batter rest for 30 minutes. This helps the gluten relax. Use a non-stick pan and heat it to medium. Grease it lightly with melted butter. Pour 1/4 cup of batter in the center. Quickly swirl the pan to spread the batter evenly. Cook for about 2 minutes. The edges should lift, and the center should set. Flip the crepe gently and cook for another minute. Stack each crepe on a plate as you cook them. You should have around 15 to 18 crepes.
Whipping Cream to the Right Consistency
Whipping cream transforms into a light and airy delight. Start with cold heavy cream for best results. Use a mixing bowl and a whisk or an electric mixer. Beat the cream until it thickens slightly. Gradually add powdered sugar and vanilla. Continue to whip until soft peaks form. Soft peaks should bend slightly but hold their shape. Be careful not to overwhip. Overwhipped cream can become grainy and butter-like. You want a fluffy texture that pairs well with crepes.
Stacking Crepes Without Breaking
Stacking crepes can be tricky, but it’s easy with care. Start with a cooled crepe on a flat surface. Spread a thin layer of hazelnut spread on top. Next, add a thin layer of whipped cream. Place another crepe on top and repeat. Make sure the layers are even. This keeps the crepes from sliding. After stacking, cover the cake with plastic wrap. Chill in the fridge for at least 2 hours. This helps the layers stick together and keeps them intact. When ready to serve, slice gently with a sharp knife to avoid breaking.
Error: Connection error.
Variations
Alternative Spreads
You can mix it up with different spreads. Try almond butter or peanut butter. Both give a nutty flavor. You can also use chocolate spread or berry jams. Each option adds a new taste and texture.
Gluten-Free Option
For a gluten-free version, swap all-purpose flour for a gluten-free blend. Make sure your hazelnut spread is gluten-free too. This keeps the cake tasty for everyone, even those with gluten sensitivities.
Creative Garnish Ideas
Garnishing can make your cake pop. Consider adding fresh berries like strawberries or raspberries. You could also use crushed cookies for a crunchy touch. Another idea is to drizzle melted chocolate over the top. These options make your cake look as good as it tastes.
Storage Info
Best Way to Store Crepe Cake
To keep your chocolate hazelnut crepe cake fresh, wrap it tightly. Use plastic wrap or foil. This helps prevent the cake from drying out. Place it in the fridge. The cool air keeps it tasty and safe.
Reheating Tips
If you want to enjoy your crepe cake warm, here’s how. Slice a piece and place it on a plate. Heat it in the microwave for just 10-15 seconds. This warms it without making it soggy. You can also enjoy it cold for a refreshing treat.
Shelf Life and Freezing Instructions
Your crepe cake will stay fresh in the fridge for up to 3 days. If you need more time, freeze it! Wrap the whole cake or slices tightly in plastic wrap. Then, place it in a freezer-safe bag. It can last up to 2 months in the freezer. When you’re ready, thaw it in the fridge overnight before serving.
FAQs
Can I make the crepes ahead of time?
Yes, you can make the crepes ahead of time. Just store them in the fridge. Use parchment paper between the crepes to keep them from sticking. They can stay fresh for up to two days. When you are ready, layer them with the hazelnut spread and whipped cream.
How do I prevent my crepes from sticking?
To prevent sticking, use a non-stick skillet or crepe pan. Make sure to grease the pan lightly with melted butter before each crepe. Let the pan heat up before pouring in the batter. This helps create a nice, easy-to-flip crepe.
What can I substitute for hazelnut spread?
If you can't find hazelnut spread, try using chocolate spread or almond butter. You can also make a homemade version. Blend roasted hazelnuts with cocoa powder and a sweetener for a tasty option.
Can this recipe be made vegan?
Yes, you can make a vegan version of this crepe cake. Use plant-based milk and a flax egg instead of regular eggs. For the hazelnut spread, choose a vegan brand. Make sure the whipped cream is made from coconut cream or a plant-based alternative.
How long does the crepe cake last in the fridge?
The crepe cake lasts about four days in the fridge. Keep it covered with plastic wrap or foil to maintain freshness. The flavors will meld together nicely as it sits, making it even more delicious!
In this blog post, I covered everything you need to know about making a crepe cake. We explored the main ingredients, step-by-step instructions, and tips for perfect crepes. Variations showed how to customize your cake, and I included storage tips to keep it fresh. You can easily make this dessert your own. Don't hesitate to try different flavors and garnishes. Enjoy your baking, and wow your friends with this delicious treat!