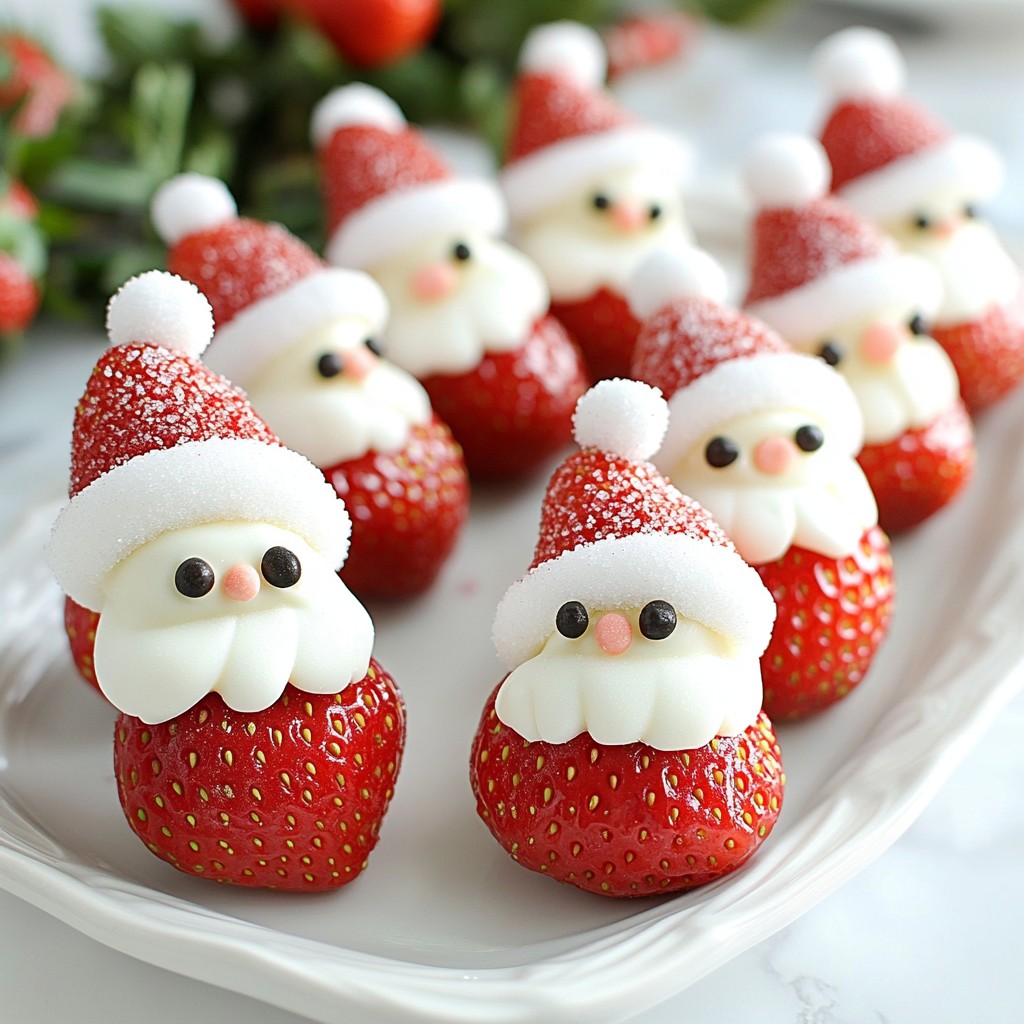
Get ready to make a fun and festive treat with Chocolate Covered Strawberry Santas! These delightful and jolly snacks will brighten up your holiday gatherings. With just a few simple ingredients and easy steps, you can create adorable Santa faces that everyone will love. Let’s dive into how to turn fresh strawberries into tasty holiday cheer that is sure to impress!
Why I Love This Recipe
- Festive Presentation: These Chocolate Covered Strawberry Santas are not only delicious but also visually appealing, making them a perfect holiday treat.
- Easy to Make: This recipe requires minimal ingredients and straightforward steps, making it accessible for bakers of all skill levels.
- Customizable: You can personalize these Santas with different toppings or chocolate types, allowing for creativity in your presentation.
- Fun Activity: Making these with family or friends can be a fun and engaging holiday activity, creating lasting memories together.
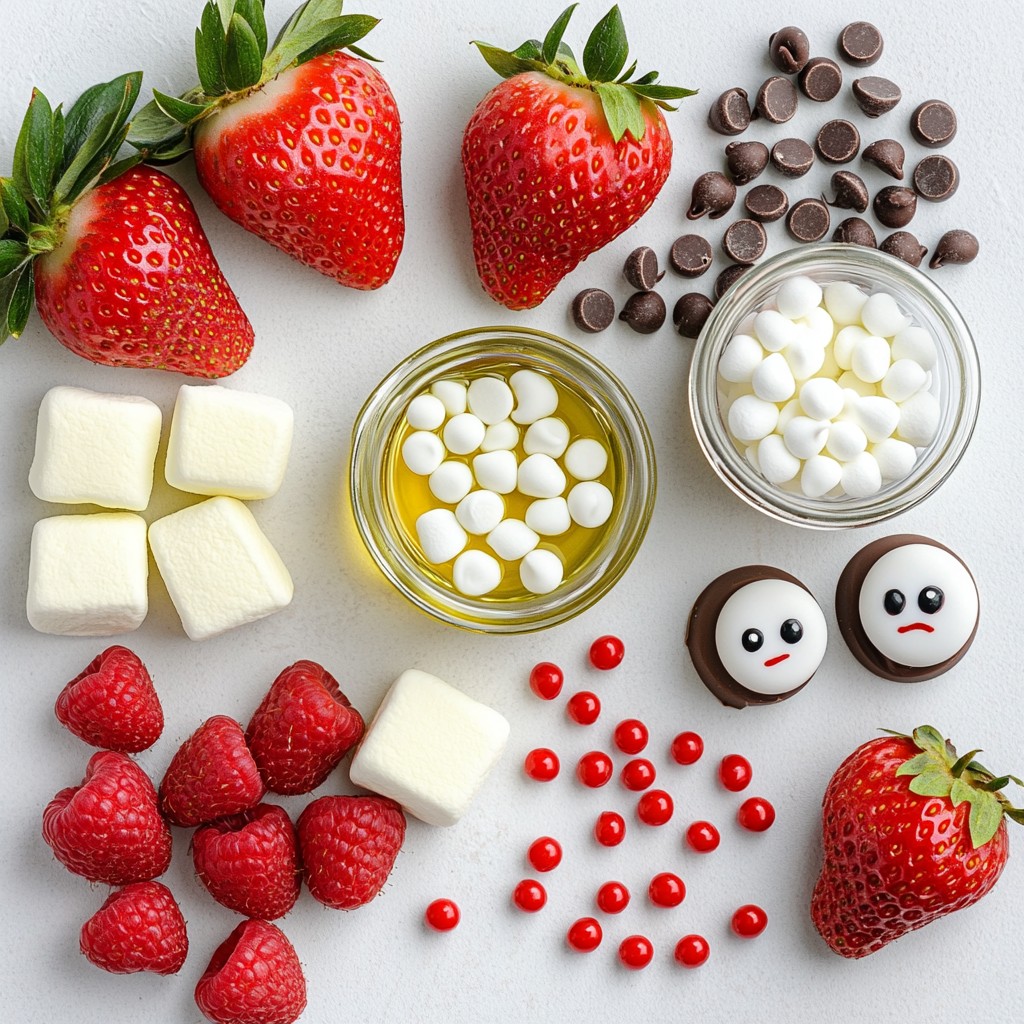
Ingredients
Fresh Strawberries
You will need 1 pound of fresh strawberries. Make sure they are hulled and clean. Look for bright red berries with no bruises. Fresh strawberries add the best flavor and look great as Santa's body.
Chocolate Varieties (White and Semi-Sweet)
You will use 8 ounces of white chocolate chips and 4 ounces of semi-sweet chocolate chips. White chocolate gives a fun Santa look, while semi-sweet chocolate works well for the face. You can add 1 tablespoon of coconut oil to thin the chocolate if needed. This helps with smooth melting.
Additional Decorating Supplies
For decoration, you will need mini marshmallows, edible eyes, and red sugar sprinkles. The mini marshmallows will serve as Santa's hats. Edible eyes bring life to Santa's face. Red sugar sprinkles add a festive touch to the hats. All these details make your Chocolate Covered Strawberry Santas fun and festive!
Step-by-Step Instructions
Preparing the Strawberries
First, wash your strawberries under cool water. Make sure to keep the green tops, or hulls, intact. After washing, pat them dry with paper towels. This helps the chocolate stick better. Let the strawberries sit at room temperature. This step makes sure the chocolate won’t set too fast.
Melting the White Chocolate
Next, take a microwave-safe bowl. Add the white chocolate chips and coconut oil if you like. Microwave on low power. Do this in 30-second bursts. Stir in between to help it melt evenly. Stop when the chocolate is smooth and melted. Be careful not to burn it!
Coating and Creating Santa Hats
Now, it’s time to dip! Take each strawberry and dip it into the melted white chocolate. Cover about two-thirds of the berry. Let the extra chocolate drip off back into the bowl. Place the dipped strawberries onto a baking sheet lined with parchment paper. To make Santa's hat, put a mini marshmallow on top of each strawberry. Press it down gently so it sticks.
Decorating the Faces and Adding Finishing Touches
For the next step, melt the semi-sweet chocolate in a separate bowl. Use the same microwave method as before. Once melted, let the white chocolate set a little. It should still feel sticky. Use a toothpick or piping bag to add two small dots of melted semi-sweet chocolate for eyes. Carefully place the edible eyes on these dots.
Chilling for Set
Finally, it’s chill time! Put your decorated strawberries in the fridge. Let them sit for about 30 minutes. This will help the chocolate harden completely. After chilling, your Chocolate Covered Strawberry Santas are ready to serve!
Tips & Tricks
Best Practices for Melting Chocolate
To melt chocolate smoothly, use a microwave-safe bowl. Place your chocolate chips in the bowl. If you want, add coconut oil to make it thinner. Heat in the microwave on low power. Use 30-second bursts, stirring after each time. This keeps the chocolate from burning. If it still feels thick, add a bit more coconut oil. Remember, patience is key!
Enhancing the Presentation of Your Santas
To make your Chocolate Covered Strawberry Santas stand out, use a pretty platter. Arrange the Santas in a circle or in rows. Add festive greens around them for color. You can even sprinkle edible glitter for some sparkle. The key is to make them look cheerful and fun. Personal touches, like a small sign saying "Merry Christmas," can make it even better!
Ideal Storage Conditions
Store your Santas in the fridge to keep them fresh. Use an airtight container to protect them. They can last about 2-3 days in the fridge. If you want to keep them longer, you can freeze them. Just make sure to wrap them well in plastic wrap. When ready to eat, let them thaw in the fridge, not at room temp. This keeps the chocolate nice and smooth.
Pro Tips
- Choose the Right Strawberries: Select strawberries that are bright red and firm, as they hold up better when dipped in chocolate and provide the best flavor.
- Chill the Strawberries: For a smoother coating, refrigerate the strawberries for about 30 minutes before dipping them in chocolate. This helps the chocolate adhere better.
- Use Quality Chocolate: Invest in high-quality chocolate chips for a richer taste. This makes a significant difference in flavor and texture.
- Experiment with Flavors: Try adding a splash of peppermint extract to the white chocolate for a festive twist, or use colored melting chocolates for a fun variation!
Variations
Alternate Chocolate Options
You can explore different chocolate types for your Santas. Use dark chocolate or milk chocolate for a rich taste. If you want a fun twist, try using colored chocolate melts. These come in many colors and can make your Santas even more festive. Remember, each chocolate has its own melting point. Adjust your melting method to avoid burning.
Different Decorative Techniques
Get creative with your designs! Instead of using mini marshmallows for hats, try using whipped cream or frosting. You can also use chocolate drizzle to make fun patterns on the strawberries. For a playful touch, use crushed candy canes for the hats. They add flavor and a nice crunch. Use your imagination to make each Santa unique!
Flavorful Strawberry Alternatives
While classic strawberries are great, consider using other fruits too. Ripe raspberries or blueberries can also work well. They offer a different taste and look stunning. If you want something sweeter, try using peaches or plums. The key is to choose fruit that holds its shape. This will make your festive treats stand out!
Storage Info
How to Store Leftover Santas
To keep your Chocolate Covered Strawberry Santas fresh, place them in an airtight container. Line the container with parchment paper to avoid sticking. You can stack the Santas carefully, but separate layers with more parchment. Keep them in a cool place, away from sunlight.
Best Duration for Freshness
These Santas are best enjoyed within two days of making them. They will taste great and look fresh. After two days, the strawberries may start to lose their firmness and flavor. If you need to store them longer, consider freezing.
Freezing Tips for Longer Storage
If you have extras, freezing is a good option. First, let the Santas set completely. Then, place them on a baking sheet in a single layer. Freeze them for about two hours. After that, move them to an airtight freezer bag. They can last up to two months in the freezer. To enjoy, thaw them in the fridge for a few hours before serving.
FAQs
Can I use different fruits instead of strawberries?
Yes, you can use other fruits! Ripe bananas, grapes, or even orange segments work well. Make sure the fruit is firm and able to hold the chocolate coating. Each fruit gives a unique taste, so feel free to experiment. Just remember to keep the flavors festive!
How can I make these chocolate-covered strawberries gluten-free?
This recipe is naturally gluten-free! The ingredients listed do not contain gluten. Just ensure that the chocolate chips you choose are labeled gluten-free. Most brands are safe, but always check the packaging to be sure.
What can I use if I don’t have edible eyes?
If you lack edible eyes, try using small chocolate chips or candy dots. You can also use tiny pieces of fruit or nuts to create faces. Get creative! The goal is to make them fun and festive, so enjoy the process!
You learned how to make cute Santa strawberries. We covered ingredients like fresh strawberries, chocolate choices, and decorating supplies. I guided you through steps, from preparing the strawberries to adding faces. You found helpful tips for melting chocolate and storing leftovers. Plus, you discovered variations and answered common questions.
Get creative with your Santa strawberries. They add fun to any holiday treat table. Enjoy making these with family or friends!