FREE DINNER EBOOK! Get your copy!
  • Cookie Policy
  • GDPR Policy
  • Disclaimer
  • Terms Of Use
  • Visit my other site: Fun Cookie Recipes
yummybiterecipes
  • Home
  • Dinner
  • Desserts
  • Drinks
  • Appetizers
  • Contact
  • About
  • Privacy Policy
  • Home
  • Dinner
  • Desserts
  • Drinks
  • Appetizers
  • Contact
  • About
  • Privacy Policy
  • Cookie Policy
  • GDPR Policy
  • Disclaimer
  • Terms Of Use
Visit my other site: Fun Cookie Recipes

HOME / CATEGORIES /

Latest

- 1 pound boneless, skinless chicken breasts - 1 cup orzo pasta - 1 cup heavy cream - 1 cup prepared basil pesto - 3 cups low-sodium chicken broth - 1 tablespoon extra virgin olive oil - 1 medium onion - 2 cloves garlic - 1 teaspoon Italian seasoning blend - Salt and black pepper to taste - 1 cup cherry tomatoes - 1 cup fresh baby spinach - Fresh basil leaves for garnish - Grated Parmesan cheese for serving The main ingredients in this dish create a rich and creamy meal. The chicken adds protein, while the orzo gives it heartiness. Heavy cream makes it smooth, and basil pesto provides a burst of flavor. For seasonings, the olive oil helps to cook the chicken and brings out flavors in the onion and garlic. The Italian seasoning adds depth, and salt and pepper enhance everything. Lastly, the fresh add-ins brighten the dish. Cherry tomatoes add sweetness, and spinach adds color and nutrients. You can top it with fresh basil and Parmesan for extra taste. These ingredients come together to make a delicious one-pot meal that is easy to prepare and full of flavor. 1. Heat one tablespoon of olive oil in a large pot over medium heat. 2. Add one pound of diced chicken breasts. Season it well with salt, black pepper, and Italian seasoning. 3. Sear the chicken for about 5-7 minutes. Stir occasionally until it is golden brown and cooked through. 4. Once done, move the chicken to a plate and set it aside. 1. In the same pot, add one finely chopped medium onion. 2. Sauté the onion for about 3-4 minutes until it becomes soft and translucent. 3. Next, add two minced garlic cloves and cook for one more minute. You want the garlic to be fragrant but not burnt. 1. Toss in one cup of orzo pasta. Stir it continuously for about 1-2 minutes. This toasts the pasta and adds flavor. 2. Pour in three cups of low-sodium chicken broth. Raise the heat to bring it to a boil. 3. Once boiling, reduce heat to a gentle simmer. Cover the pot and cook for about 10-12 minutes. Stir occasionally until the orzo is al dente. 1. After the orzo is cooked, stir in one cup of heavy cream and one cup of prepared basil pesto. Mix well to combine everything. 2. Return the cooked chicken to the pot. Add one cup of halved cherry tomatoes and one cup of fresh baby spinach. 3. Stir gently and let it cook for another 2-3 minutes until the spinach wilts. 1. Taste the dish and adjust seasoning with more salt and freshly cracked black pepper if needed. 2. Remove the pot from heat and let it sit for a minute to thicken slightly. 3. To serve, dish the creamy orzo into bowls. Garnish with fresh basil leaves and a sprinkle of grated Parmesan cheese. How to ensure chicken stays tender To keep your chicken tender, do not overcook it. Sear the chicken just until it turns golden brown. Use a meat thermometer to check if it reaches 165°F. This ensures it is safe to eat and still juicy. Tips for a creamier sauce For a creamier sauce, add the heavy cream slowly. Stir it in after the orzo cooks. This helps the sauce mix well with the other ingredients. You can also add more basil pesto for extra creaminess and flavor. Importance of toasting orzo Toasting orzo before adding broth makes a big difference. It brings out its nutty flavor. Just stir it for 1-2 minutes in the pot. This simple step can elevate your dish. Stirring techniques for even cooking Stir the pot gently but often while cooking. This helps the orzo cook evenly and prevents it from sticking. Keep the heat at medium to avoid burning the bottom. Additional spices to consider Try adding a pinch of red pepper flakes for heat. You can also use a sprinkle of smoked paprika for a smoky flavor. These small adjustments can change the dish’s taste. Suggestions for homemade pesto Making your own pesto is easy and fun! Blend fresh basil, garlic, nuts, parmesan cheese, and olive oil. This gives you a fresh taste and allows you to control the flavors. Mix in a bit of lemon juice for brightness. {{image_4}} You can easily make this dish fit your needs. For gluten-free orzo, try using rice pasta or quinoa. Both options work great. They cook well and keep the creaminess intact. If you want a dairy-free version, swap heavy cream with coconut milk. This adds a nice flavor. For cheese lovers, use nutritional yeast instead of Parmesan. It gives a cheesy taste without dairy. Want to mix it up? Add sun-dried tomatoes or olives for a burst of flavor. Sun-dried tomatoes add sweetness, while olives give a salty kick. Both options elevate this dish. You can also incorporate different vegetables. Zucchini, bell peppers, or asparagus work nicely. Just chop them small and add them when you add the spinach. They cook quickly and add color. For a twist on the protein, try shrimp or tofu. Shrimp cooks fast and adds a seafood flair. Tofu is a great choice if you want a vegan option. Just press it to remove water and cube it before cooking. You can also explore other vegan-friendly proteins. Chickpeas or lentils are tasty and filling. They add protein without meat, making this dish satisfying for everyone. To store your leftovers, let the dish cool first. Once cooled, place it in an airtight container. This keeps the dish fresh and tasty. In the fridge, it will last for about 3 to 4 days. Make sure to check for any signs of spoilage before eating. If you want to freeze the dish, let it cool completely. Then, transfer it to a freezer-safe bag or container. Squeeze out as much air as possible. This helps prevent freezer burn. The dish can be frozen for up to 2 months. When you're ready to eat, thaw it overnight in the fridge. Reheat in a pot over low heat, stirring gently. You may need to add a splash of chicken broth or cream to restore creaminess. For meal prep, I suggest storing components separately. Keep the cooked orzo, chicken, and veggies in different containers. This way, everything stays fresh longer. You can cook the chicken and orzo ahead of time. On busy weeknights, just reheat and mix everything together. This saves time and keeps your meals fun! How long does it take to make One Pot Creamy Pesto Chicken Orzo? It takes about 30 minutes to prepare. You spend 10 minutes prepping and 20 minutes cooking. This quick time makes it perfect for busy nights. Can I use other types of pasta in this recipe? Yes, you can use other small pasta shapes. Options include ditalini, small shells, or even farfalle. Just adjust the cooking time based on the pasta type. Caloric content per serving Each serving contains about 600 calories. This count can vary based on added ingredients or portion sizes. Breakdown of macronutrients - Protein: 35 grams - Carbohydrates: 50 grams - Fat: 30 grams These numbers help track your daily intake and balance your meals. What can I do if my orzo clumps together? If your orzo clumps, add a splash of broth or water. Stir gently to break it apart. Make sure to stir the pasta while it cooks to prevent sticking. How can I make this dish spicier? To spice it up, add red pepper flakes or a splash of hot sauce. You can also include diced jalapeños for a fresh kick. Adjust to your taste for the perfect heat level. This article covered how to make a delicious One Pot Creamy Pesto Chicken Orzo. We explored key ingredients, cooking steps, and helpful tips. Each section aimed to make your cooking experience easier and tastier. In final thoughts, enjoy experimenting with flavors and add-ins. This meal is simple yet full of options. Whether you make it classic or try new spins, it’s sure to impress. Happy cooking!

One Pot Creamy Pesto Chicken Orzo Easy Dinner Delight

- 3 ½ cups all-purpose flour - ½ cup warm milk - ½ cup pumpkin puree - 1 large egg - 1/4 cup unsalted butter The main ingredients create a soft, fluffy roll. The all-purpose flour gives structure. Warm milk activates the yeast, helping the dough rise. Pumpkin puree adds moisture and flavor. The egg binds everything together, while the unsalted butter enriches the taste. - 1/3 cup packed brown sugar - 2 tablespoons ground cinnamon - 2 tablespoons unsalted butter, softened The filling makes the rolls sweet and aromatic. Brown sugar brings a deep, caramel flavor. Ground cinnamon adds warmth and spice. Softened butter helps the filling stick to the dough, creating a gooey center. - 1 cup powdered sugar - 3 tablespoons pure maple syrup - A pinch of sea salt The maple icing brings a sweet finish. Powdered sugar creates a smooth texture. Pure maple syrup adds a rich, natural flavor. A pinch of sea salt balances the sweetness and enhances the taste. To make perfect pumpkin cinnamon rolls, first, we need to activate the yeast. Use warm milk heated to 110°F (43°C). If it’s too hot, it can kill the yeast. If it's too cold, the yeast won't wake up. Check if the yeast is active by mixing it with the warm milk. Let it sit for about 5 minutes. You should see bubbles form on top. This froth means your yeast is ready to go. Next, we prepare the dough. In a large bowl, whisk together the dry ingredients. Combine the flour, sugar, cinnamon, nutmeg, allspice, and salt. Mix them well so every bite has flavor. In another bowl, mix the wet ingredients. Blend the pumpkin puree, melted butter, egg, and vanilla until smooth. Then, add the frothy yeast mixture to the pumpkin mix. Stir well to combine. Now, slowly mix the dry ingredients into the wet mixture. Keep stirring until a dough forms. Knead the dough on a floured surface for about 5 to 7 minutes. Push and fold it until it feels smooth and elastic. After kneading, place the dough in a greased bowl and cover it with a cloth. Let it rise in a warm spot for about 1 hour, or until it doubles in size. Once the dough has risen, punch it down to release air. Roll it out on a floured surface, shaping it into a rectangle about 16x12 inches. Next, prepare the filling. Spread the softened butter on the dough, then sprinkle the brown sugar and cinnamon evenly over it. Roll the dough tightly from one long edge to the other. Pinch the seam to seal it, then cut it into 12 equal rolls. Place the rolls in a greased baking dish. Cover them with a cloth and let them rise again for 30 minutes. They should look puffy when ready. Preheat your oven to 350°F (175°C). Bake the rolls for 25 to 30 minutes until golden brown. The smell will be amazing while they bake! To make sure your dough rises well, keep it warm. Place it in a sunny spot or use a warm oven. The yeast needs warmth to work its magic. Let the dough rise until it doubles in size. This step is key for fluffy rolls. Using fresh spices boosts flavor. Ground spices lose their punch over time. Buy whole spices and grind them yourself for the best taste. Trust me, it makes a huge difference in your rolls. Adjust the maple icing thickness by adding more milk. Start with two tablespoons, then add more as needed. You want it creamy but not runny. If it’s too thick, it won’t drizzle well. Store leftover icing in an airtight container. Keep it in the fridge for up to a week. When you’re ready to use it, just stir until smooth again. Serve warm cinnamon rolls on a pretty plate. Drizzle extra maple icing on top for a sweet touch. A sprinkle of ground cinnamon adds a nice look as well. To enhance flavor, add chopped pecans or walnuts as a garnish. They add crunch and pair well with the sweet icing. Enjoy these cozy treats with friends or family! {{image_4}} For those with special diets, I have some great options. - Gluten-free flour alternatives: You can use a 1:1 gluten-free flour blend. This works well and keeps the texture light. - Vegan substitutes: Swap the egg with a flax egg. Mix one tablespoon of ground flaxseed with three tablespoons of water. Let it sit until thick. Use almond milk instead of regular milk and coconut oil instead of butter. You can make these rolls even more exciting with simple tweaks. - Adding nuts or chocolate: Toss in chopped pecans or walnuts for crunch. You can also add chocolate chips for a sweet twist. - Spice blend variations: Try using cardamom or ginger to change the flavor. A bit of pumpkin pie spice works well, too. Make your rolls fit the season with these fun additions. - Incorporating cranberries or white chocolate: Dried cranberries add a tart bite. White chocolate chips give a sweet contrast. - Adapting for holiday flavors: During the holidays, add nutmeg or cloves for a warm touch. A dash of orange zest can also brighten up the rolls. These ideas can help you create your own unique version of pumpkin cinnamon rolls. Enjoy experimenting! To keep your pumpkin cinnamon rolls fresh, store them in an airtight container. Placing parchment paper between the rolls helps prevent sticking. Refrigerate them to keep them safe for up to four days. If you want to save them for later, freezing is a great option. To freeze your rolls, let them cool completely first. Wrap each roll in plastic wrap, then place them in a freezer bag. They can last up to three months in the freezer. Remember to label the bags with the date, so you know when you made them! When you are ready to enjoy your cinnamon rolls again, reheating them properly is key. You can use the microwave, but be careful not to make them tough. Heat them for about 15 to 20 seconds. This method works best for just a few rolls. For a larger batch, use the oven. Preheat it to 350°F (175°C). Place the rolls on a baking sheet and cover them with foil. Heat for about 10 to 15 minutes until warm. This way, they stay soft and fluffy. Serve your reheated rolls with a drizzle of maple icing on top. You can add a sprinkle of cinnamon or some chopped pecans for extra flavor. Enjoy every bite! Pumpkin cinnamon rolls last about 3 to 4 days when stored properly. To keep them fresh, place the rolls in an airtight container. You can also wrap them in plastic wrap and store them in the fridge. This method helps to maintain their taste and moisture. Yes, you can make these rolls ahead of time! For overnight preparation, follow these steps: - Prepare the dough and let it rise as usual. - After rolling and cutting the dough, place the rolls in a greased baking dish. - Cover them tightly with plastic wrap and store them in the fridge overnight. - In the morning, let the rolls sit at room temperature for about 30 minutes before baking. If you don't have pumpkin puree, you can use several alternatives: - Sweet potato puree: It has a similar texture and flavor. - Butternut squash puree: This also works well and adds a nice taste. - Applesauce: For a different flavor, use unsweetened applesauce. Adjust sugar in the recipe as needed. In this post, we explored the key ingredients and simple steps to make pumpkin cinnamon rolls. We discussed how to activate yeast and prepare the dough. I shared tips for perfecting your rolls and explained tasty variations. With these methods, you can bake delicious treats that everyone will love. Remember to store any extras properly, so they stay fresh. I hope you enjoy this recipe and make it your own!

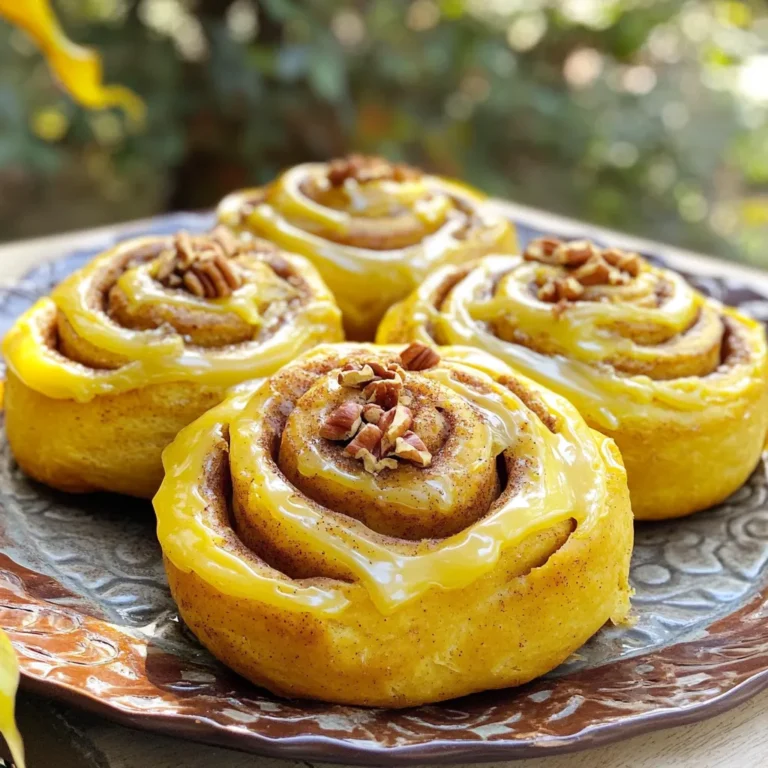
Pumpkin Cinnamon Rolls with Maple Icing Delight

To make these delicious cookies, you need a few key ingredients: - 1 cup unsalted butter, melted - 1 cup granulated sugar - 1 cup packed brown sugar - 2 large eggs - 2 teaspoons vanilla extract - 1 cup all-purpose flour - 1/2 cup unsweetened cocoa powder - 1/4 teaspoon salt - 1/4 teaspoon baking powder - 12 Oreo cookies (regular or double-stuffed) - 1/2 cup semi-sweet chocolate chips (optional) These ingredients come together to create a rich and fudgy cookie with a surprise inside. You can enhance your cookies with some optional ingredients: - Chopped nuts like walnuts or pecans for crunch - Mini chocolate chips for extra sweetness - A sprinkle of sea salt on top after baking for contrast - Crushed Oreos to mix into the dough or to top the cookies These add-ins can give your cookies a personal touch. To bake these cookies, gather the following equipment: - Mixing bowls (one large and one medium) - Electric mixer or whisk for mixing - Measuring cups and spoons for accurate measurements - Spatula or wooden spoon for folding - Baking sheet lined with parchment paper - Wire rack for cooling Having the right tools makes baking easier and more fun. {{ingredient_image_2}} First, set your oven to 350°F (175°C). This is the perfect temperature for baking. Next, take a large baking sheet and line it with parchment paper. This helps the cookies not stick and makes cleanup easy. In a large bowl, pour in 1 cup of melted unsalted butter. Add 1 cup of granulated sugar and 1 cup of packed brown sugar. Use a whisk or electric mixer to blend these ingredients until smooth and creamy. Then, crack in 2 large eggs and add 2 teaspoons of vanilla extract. Beat the mixture well until it’s fluffy and fully combined. In another bowl, whisk together 1 cup of all-purpose flour, 1/2 cup of unsweetened cocoa powder, 1/4 teaspoon of salt, and 1/4 teaspoon of baking powder. Make sure everything is mixed well to avoid any clumps. This step is key for a nice, smooth cookie. Now it's time to form the cookies. Take about 1 tablespoon of brownie batter and shape it into a disc in your palm. Place an Oreo cookie in the center of the disc. Wrap the brownie batter around the cookie, sealing it well. Repeat this with all the batter and Oreos until you have a tray full of cookie balls. Put the cookie balls on the prepared baking sheet. Leave enough space between each one for spreading. Bake them in the oven for 10-12 minutes. They are done when the edges feel set and the tops have slight cracks. Watch them closely to avoid overbaking. After baking, let the cookies cool on the sheet for 5 minutes. Then, move them to a wire rack to cool completely. Enjoy the delicious smells as they cool! To get that soft and chewy texture, follow these tips: - Use melted butter. It makes the cookies rich and moist. - Don’t overmix the batter. Mix just until combined for softness. - Bake until the edges feel set, but the tops are slightly soft. Let the cookies cool on the baking sheet for a few minutes. This helps them firm up just right. Store your Oreo stuffed brownie cookies in an airtight container. This keeps them fresh and chewy. - For best taste, enjoy them within three days. - To reheat, pop them in the microwave for about 10 seconds. This warms them up and softens them. You can also warm them in the oven at 350°F (175°C) for about 5 minutes. Here are some common pitfalls to avoid when making these cookies: - Don’t skip the parchment paper. It helps prevent sticking. - Make sure your oven is preheated. An unheated oven can lead to uneven baking. - Don’t pack the flour. Spoon it into the cup and level it off. This keeps cookies from being too dense. Following these tips will help you bake perfect Oreo stuffed brownie cookies every time! Pro Tips Chill the Dough: For even chewier cookies, chill the brownie batter in the refrigerator for about 30 minutes before shaping the cookie balls. Use Parchment Paper: Always line your baking sheet with parchment paper to prevent sticking and ensure easy cleanup. Don’t Overbake: Keep a close eye on the cookies while baking; they should be slightly underbaked to maintain a soft, fudgy center. Experiment with Fillings: Feel free to experiment with different types of cookies, such as peanut butter or mint Oreos, for a unique flavor twist. {{image_4}} You can have fun with different Oreos. Try using mint, peanut butter, or even birthday cake Oreos. Each choice will change the flavor and make your cookies unique. For example, mint Oreos give a fresh taste. Peanut butter Oreos add a creamy touch. Mix and match to find your favorite combo! While semi-sweet chocolate chips are great, you can switch things up. Dark chocolate chips will add a rich taste. Milk chocolate chips make the cookies sweeter. You can also use white chocolate for a fun twist. Experimenting with different chocolates can help you find the perfect balance. You can add more fun to your cookies by mixing in extras. Chopped nuts give a nice crunch. Walnuts or pecans work well. If you love caramel, drizzle some into the brownie batter. This adds a gooey surprise inside. Think about adding mini marshmallows or toffee bits too. Each extra makes the cookies even more special! To keep your Oreo stuffed brownie cookies fresh, store them in an airtight container. This prevents air from making the cookies dry. You can place parchment paper between layers to avoid sticking. Keep the container in a cool, dry place, away from heat. You can freeze these cookies for later. First, let them cool completely. Then, wrap each cookie in plastic wrap. Place the wrapped cookies in a freezer bag or container. They can last up to three months in the freezer. When you're ready to eat, simply thaw them at room temperature. Oreo stuffed brownie cookies stay fresh for about a week at room temperature. To maintain their softness, try to eat them within the first few days. If you notice them starting to harden, a quick warm-up in the microwave for 10-15 seconds can bring back their gooey goodness. Enjoy every bite! Yes, you can use gluten-free flour. It works well in this recipe. Just choose a good blend meant for baking. This swap keeps the cookie texture nice and chewy. Always check the package for measurement tips, as gluten-free flour can be denser. To stop cookies from spreading, chill the cookie dough for at least 30 minutes. This makes the butter firmer, helping the cookies hold their shape. Also, don’t skip the parchment paper; it helps with even baking. If you shape the dough balls well, they will stay thick. The best way to melt chocolate is in a microwave-safe bowl. Heat it in short bursts of 20 seconds. Stir after each burst until smooth. You can also use a double boiler, but the microwave is easier. Just be careful; chocolate can burn quickly. Oreo stuffed brownie cookies are a fun and tasty treat. We discussed key ingredients, mix-ins, and important baking tools. I shared step-by-step instructions for perfect cookies, plus tips to avoid mistakes. You can customize them with different Oreos and chocolate too. Store cookies properly to keep them fresh, or freeze some for later. Enjoy making these cookies and explore flavor options. Happy baking, and make it your own!

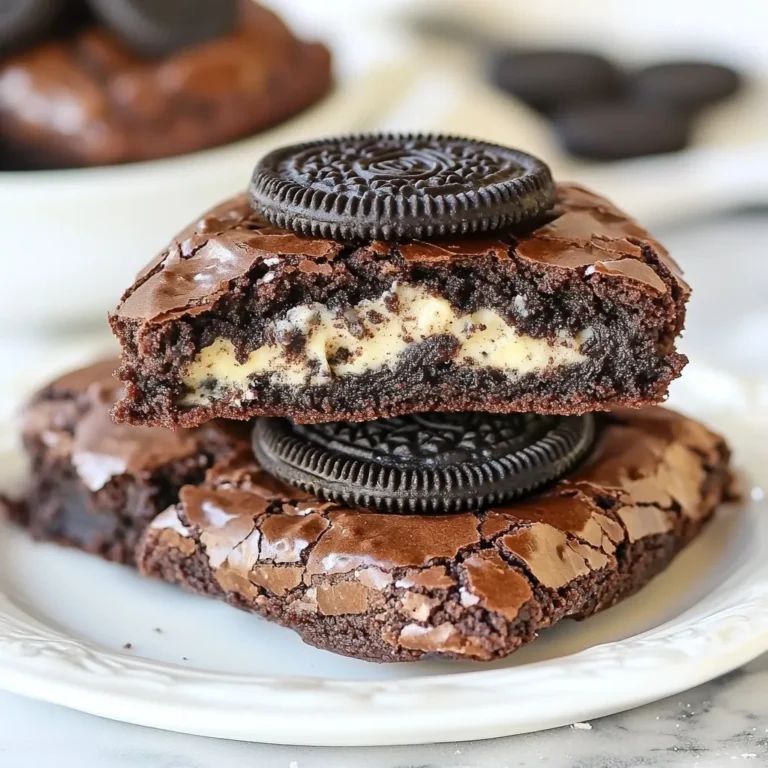
Oreo Stuffed Brownie Cookies Irresistible and Easy

- Dried egg noodles: I often use 200g of dried egg noodles. You can substitute with rice noodles or whole wheat noodles if needed. - Soy sauce: This adds depth and saltiness to the dish. One tablespoon is perfect. - Chili sauce: A tablespoon of chili sauce, like Sriracha, gives it that spicy kick. - Garlic: Six cloves, minced well, are key for flavor. - Red chilies: Use one to two red chilies, sliced thin. Adjust for your spice level. - Green onions: Two green onions, finely sliced, add freshness and a crunch. - Fresh cilantro: Leaves from fresh cilantro brighten the dish. - Toasted sesame seeds: A sprinkle of toasted sesame seeds gives a nice crunch. - Salt and pepper: Add these to taste for balance. These ingredients make garlic chili noodles easy and tasty. They come together quickly. Each item plays an important role. You get heat, flavor, and crunch all in one bowl. - Bring a large pot of salted water to a boil. - Add 200g of dried egg noodles. - Cook according to the package until al dente. - Drain the noodles in a colander. - Set them aside to cool slightly. - In a small bowl, whisk together: - 1 tablespoon soy sauce - 1 tablespoon chili sauce - 1 teaspoon sesame oil - 1 teaspoon sugar - Mix until the sugar dissolves. - Set the sauce aside to blend flavors. - Heat 2 tablespoons of olive oil in a large pan. - Add 6 minced garlic cloves and 1-2 sliced red chilies. - Sauté for 1-2 minutes. - Watch closely to avoid burning the garlic. - You want a fragrant base, not bitterness. - Add the cooked noodles to the pan with garlic and chili. - Pour the prepared sauce over the noodles. - Toss everything together with tongs. - Make sure every noodle gets coated in sauce. - Cook for 2-3 more minutes to heat through. - Taste your noodles and adjust flavors. - Add salt and pepper to taste. - For more heat, toss in extra chili sauce. - Remove the pan from heat. - Stir in 2 finely sliced green onions. - Plate the noodles nicely. - Garnish with fresh cilantro and toasted sesame seeds. - Enjoy your colorful, tasty meal! To get noodles just right, ensure you follow these tips: - Use a large pot with plenty of water. This helps the noodles move freely. - Add salt to the water. This adds flavor to the noodles as they cook. - Stir the noodles often. This prevents them from sticking together. - Cook until they are al dente. They should be firm but not hard. - If using fresh noodles, cook them for a shorter time than dried ones. For variations, try different noodle types: - Rice noodles for a gluten-free option. - Soba noodles for a nutty flavor. - Udon for a thicker, chewier texture. To spice up your Garlic Chili Noodles, consider these ideas: - Add more spices like ginger or black pepper for extra warmth. - Experiment with sauces like hoisin or oyster sauce for depth. - For a sweeter touch, mix in some honey or maple syrup. - Try adding citrus juice for brightness. Lime or lemon works wonders. Balancing flavors is key: - Use sweet, salty, and spicy elements together. - Adjust to find your perfect mix of flavors. Making noodles ahead is easy: - Cook and cool the noodles. Store them in an airtight container. - Keep them in the fridge for up to three days. For the sauce: - Store it separately in a jar. This keeps flavors fresh. - It can last in the fridge for up to a week. When ready to eat, just combine and heat! {{image_4}} You can easily make this dish vegetarian or vegan. Start by swapping the egg noodles for plant-based noodles. Rice noodles or whole grain noodles work great. They hold up well to the sauce and add a nice taste. For meat substitutes, try using tofu or tempeh. Both soak up flavors well and add protein. You can also add hearty veggies like mushrooms for extra texture. To make your meal more filling, add vegetables. Bell peppers and broccoli add color and crunch. You can sauté them with the garlic and chili. This way, they become tender and flavorful. For protein, consider chicken, shrimp, or even beans. Cooked chicken can add a savory touch. Shrimp cooks quickly and pairs well with the spicy sauce. If you want a plant protein, toss in chickpeas or black beans. Not everyone loves the same spice level. You can adjust the heat to fit your taste. Start with fewer chilies if you prefer milder noodles. You can always add more later. Using milder sauces can also help. Instead of chili sauce, try a sweet soy sauce. Adding a squeeze of lime or lemon can brighten the dish and tone down the heat. This gives you a fresh, zesty flavor without overwhelming spice. To store your garlic chili noodles, cool them first. Place them in a bowl. Use a lid to cover the bowl. You can also use an airtight container. This helps keep them fresh. Store them in the fridge for up to three days. Make sure to keep them cool and dry for best results. When reheating, you can use a skillet. Heat it over medium-low heat. Add a splash of water or oil to keep them moist. Stir gently to warm them up. Avoid high heat, as it can overcook the noodles. You want them hot, not mushy. If you want to freeze them, do it in parts. Freeze the noodles and sauce separately. This keeps the flavors fresh. Use freezer-safe bags or containers. When ready to eat, thaw them in the fridge overnight. Reheat them gently in the skillet as mentioned before. Enjoy your quick meal anytime! Garlic chili noodles are a quick and tasty dish that packs a punch. You get rich flavors from garlic and chili. The noodles soak up the spicy sauce, making every bite delightful. This dish is easy to make and perfect for busy nights. The mix of soy sauce, chili sauce, and garlic gives it a unique taste. Yes, you can! To make garlic chili noodles gluten-free, use rice noodles or gluten-free pasta. For soy sauce, choose a gluten-free version. You can also skip the soy sauce and use coconut aminos for a similar flavor. These swaps keep the dish tasty and safe for gluten-free diets. Adjusting the spice level is simple! To decrease heat, use fewer red chilies and skip the chili sauce. You can also add a bit of sugar to balance the flavors. If you want more heat, add extra chilies or more chili sauce. Taste as you go to find your perfect balance. Garlic chili noodles go well with many dishes. Try pairing them with a fresh cucumber salad for crunch. A light soup, like miso, complements the noodles nicely. For drinks, serve it with iced tea or a light beer. These pairings enhance the meal and make it even more enjoyable. Garlic Chili Noodles are simple and delicious. You learned about the key ingredients, cooking steps, and garnishing essentials. I shared tips on making it your own with flavors and variations. Don’t shy away from adjusting spice levels or trying new ingredients. This dish is perfect for weeknight meals or meal prep. Enjoy your cooking adventure and create a bowl that reflects your taste!

Garlic Chili Noodles Tasty and Quick Weeknight Meal

- 1 pound ground beef or turkey - 1/2 cup breadcrumbs - 1/4 cup finely chopped onion - 2 cloves garlic, minced - 1/4 cup fresh parsley, chopped - 1 large egg - 1 teaspoon salt - 1/2 teaspoon black pepper - 1 cup cranberry sauce - 1/4 cup barbecue sauce - 1 tablespoon soy sauce - 1 teaspoon ground ginger - 1/2 teaspoon red pepper flakes These ingredients create a tasty dish that shines at any gathering. You can use ground turkey for a lighter version. The breadcrumbs help the meatballs stay together while adding flavor. Onions and garlic give your meatballs a great base. Fresh parsley adds a pop of color and freshness. The egg binds everything, making each bite moist. For the sauce, you’ll mix cranberry sauce, barbecue sauce, and soy sauce. This blend gives a sweet and tangy taste. Ground ginger adds warmth, and red pepper flakes can give a little kick. Feel free to adjust these ingredients to match your taste. If you want it sweeter, add more cranberry sauce. For a bolder flavor, increase the ginger or soy sauce. - In a large bowl, mix together: - 1 pound ground beef or turkey - 1/2 cup breadcrumbs - 1/4 cup finely chopped onion - 2 cloves minced garlic - 1/4 cup fresh parsley - 1 beaten egg - 1 teaspoon salt - 1/2 teaspoon black pepper - Use your hands or a spoon to blend these ingredients well. Make sure the meat and spices mix completely. - Next, form the mixture into small meatballs. Aim for about 1 inch in size. Place them on a baking sheet or plate as you go. - In a medium bowl, combine: - 1 cup cranberry sauce - 1/4 cup barbecue sauce - 1 tablespoon soy sauce - 1 teaspoon ground ginger - 1/2 teaspoon red pepper flakes (if you want a little heat) - Whisk these ingredients together until they are smooth and well mixed. - Place the meatballs in the bottom of your slow cooker. Make sure not to crowd them. - Pour the sauce over the meatballs. Ensure each meatball is nicely covered with sauce. - Cover the slow cooker and set it to cook. Choose low for 4-6 hours or high for 2-3 hours. Check that the meatballs reach an internal temperature of 160°F. - When the meatballs are ready, use tongs to move them to a serving dish. Drizzle the sauce on top and sprinkle with extra parsley if you like. - To keep meatballs tender, do not overmix the ingredients. - Use a light touch when forming meatballs. This helps them stay soft. - Check seasoning by cooking a small meatball in a pan. Adjust as needed. - If you like spice, add more red pepper flakes to the mix. - For garnish, sprinkle fresh parsley on top before serving. - Serve the meatballs on a large platter with toothpicks. This makes it easy for guests. - Add fresh cranberries or parsley around the meatballs for a festive look. - Consider pairing with rice or mashed potatoes for a hearty meal. - To make it healthier, substitute ground turkey for ground beef. - Use whole wheat breadcrumbs for extra fiber. - For a gluten-free option, choose gluten-free breadcrumbs. - Check your sauces to ensure they are gluten-free if needed. {{image_4}} You can switch ground beef for ground chicken or pork. Both options keep the meatballs juicy. Ground chicken makes a lighter dish. It has a mild flavor that pairs well with the sauce. Ground pork adds a bit of sweetness. This choice gives a fun twist to the recipe. Try mixing meats for a unique taste! You can add herbs and spices to boost flavor. Fresh thyme or rosemary brings a nice touch. You might also try adding cumin or smoked paprika for warmth. Each adds depth to the meatballs. You can also change up the sauces. Swap the barbecue sauce for sweet chili sauce. A spicy twist can make your dish exciting. You could even use a fruity sauce like apricot for a sweeter flavor. Pair these meatballs with sides for a complete meal. Rice or mashed potatoes work well. You could also serve them over a bed of greens. For a fun party dish, transform meatballs into appetizers. Use toothpicks for easy serving. Present them on a platter with extra sauce for dipping. This makes them perfect for gatherings. To store your leftover cranberry meatballs, let them cool first. Place them in an airtight container. They will stay fresh in the fridge for about three to four days. If you want to enjoy them later, make sure to cover them well. This keeps all the flavors intact. If you want to save your meatballs for longer, freezing is a great option. First, let the meatballs cool completely. Then, place them in a single layer on a baking sheet. Freeze them for about an hour. Once they are firm, transfer them to a freezer-safe bag. Remove as much air as you can. This helps prevent freezer burn. You can freeze them for up to three months. When you're ready to eat the meatballs again, there are safe ways to reheat them. You can use the microwave, oven, or stovetop. For the microwave, place them on a plate and cover with a damp paper towel. Heat them in short bursts until warm. For the oven, preheat to 350°F. Place the meatballs in a baking dish and cover with foil. Heat for about 15 minutes. To keep the meatballs tasty, avoid overheating. This can dry them out. Adding a splash of water or extra sauce while reheating helps maintain the moisture. Enjoy that sweet and savory flavor again! Yes, you can use frozen meatballs. Just add them straight to the slow cooker. They will cook well in the sauce. Adjust the cooking time to about 6-8 hours on low. This gives them enough time to heat through and soak up the sauce. You can keep leftovers for up to three days. Store them in an airtight container in the fridge. If you want to keep them longer, freeze them. They will last for about three months in the freezer. Cranberry meatballs pair well with many sides. Here are some ideas: - Rice or quinoa - Mashed potatoes - Fresh salad - Steamed vegetables - Warm crusty bread These sides complement the sweet and savory flavors of the meatballs. Yes, you can make the meatballs a day ahead. Prepare them and store them in the fridge. You can also freeze them before cooking. When ready to cook, just add them to the slow cooker with the sauce. To check if the meatballs are fully cooked, use a meat thermometer. The internal temperature should reach 160°F. If you don’t have a thermometer, cut one open. The meat should be no longer pink, and the juices should run clear. This blog post explained how to make delicious cranberry meatballs. You learned about the important ingredients, from ground beef to unique sauces. I also shared tips for cooking and serving them. You discovered variations to suit your tastes and dietary needs. Finally, I covered how to store and reheat your meatballs. Enjoy trying this recipe. It blends flavor and simplicity. Happy cooking!

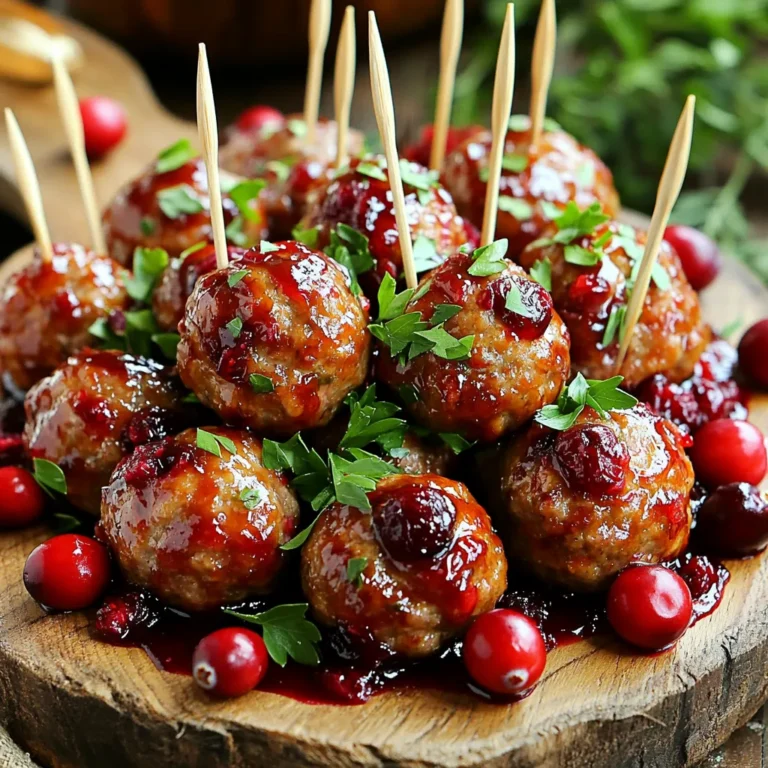
Slow Cooker Cranberry Meatballs Tasty and Simple Dish

- 2 cups gluten-free all-purpose flour - 1 teaspoon instant yeast - 1 tablespoon sugar - 1 teaspoon salt - 1 cup warm water (around 110°F or 45°C) - 2 tablespoons olive oil - 1 tablespoon apple cider vinegar - 1 large egg - 1 teaspoon garlic powder (optional) - Non-stick cooking spray or parchment paper To make these extra soft gluten-free dinner rolls, you need a few key ingredients. First, gluten-free all-purpose flour is a must. It gives the rolls their structure. Next, we add instant yeast for the rise. Sugar adds a hint of sweetness, while salt brings balance. Warm water plays a crucial role. It activates the yeast. Aim for a temperature around 110°F. Olive oil adds moisture and a nice flavor. Apple cider vinegar helps with texture. Don't forget the egg for binding. If you want to boost flavor, consider garlic powder. It's optional but tasty. Finally, you'll need either non-stick cooking spray or parchment paper to prevent sticking during baking. With these ingredients ready, you can create rolls that are soft, fluffy, and perfect for any meal. {{ingredient_image_2}} Start by taking a large bowl. Add 2 cups of gluten-free all-purpose flour. Then, mix in 1 teaspoon of instant yeast, 1 tablespoon of sugar, and 1 teaspoon of salt. Whisk these dry ingredients well. This step helps to blend everything evenly. In another bowl, take 1 cup of warm water. Make sure the water is about 110°F (45°C). Add 2 tablespoons of olive oil, 1 tablespoon of apple cider vinegar, and 1 large egg. Whisk until everything is mixed well. This creates a smooth mixture that helps the rolls rise. Now, slowly pour the wet mixture into the dry ingredients. Use a spatula to mix them. Keep mixing until you see a thick and sticky dough. If you like garlic, add 1 teaspoon of garlic powder here. This gives the rolls a tasty twist. Cover the bowl with a clean kitchen towel. Place it in a warm spot. Let the dough rise for about 30-45 minutes. You want it to grow in size. This rising time is key for soft rolls. Once the dough has risen, wet your hands. This helps prevent sticking. Scoop out portions of dough, about the size of a golf ball. Place them on a baking sheet, leaving space between each piece. First, preheat your oven to 375°F (190°C). While the oven heats, let the rolls rise again for 15-20 minutes, covered. After that, bake the rolls for 20-25 minutes. They should turn golden brown. Check with a toothpick to see if they are done. Enjoy the smell! To make your rolls extra soft, use gluten-free all-purpose flour that has xanthan gum. This helps bind the dough. Mix the dry ingredients well to ensure even flavor. The warm water should be around 110°F. This temperature activates the yeast. Olive oil adds moisture, making the rolls tender. For an extra soft bite, don't skip the egg, as it enriches the dough. Rising is key to fluffy rolls. After mixing, cover the bowl with a towel and place it in a warm spot. A sunny window or a warm kitchen works well. Let the dough rise for 30-45 minutes until it doubles in size. This step allows the yeast to work and adds air to the dough. For the second rise, cover the shaped rolls for 15-20 minutes. This gives them that light and airy texture. Serve these rolls warm for the best taste. You can spread herb-infused butter on top for added flavor. Drizzling olive oil also works great. For a beautiful touch, garnish with fresh herbs like rosemary or thyme. These add color and aroma to your serving plate. Pair these rolls with soups or salads for a complete meal. You can prepare the dough a day in advance. After mixing, place the dough in the fridge instead of letting it rise. When ready to bake, let it come to room temperature and rise. This extra time can enhance the flavor. You can also freeze the baked rolls. Just wrap them well and store them. When ready to enjoy, thaw and warm them in the oven. Pro Tips Use Fresh Ingredients: Ensure your yeast is active by checking the expiration date; fresh yeast leads to better rising and fluffier rolls. Water Temperature Matters: Use a thermometer to check your water temperature; too hot can kill the yeast, while too cold may not activate it properly. Humidity Consideration: If your kitchen is humid, reduce the amount of water slightly as gluten-free flours absorb moisture differently. Experiment with Flavors: Try adding herbs or spices to the dough for unique flavor profiles; rosemary, oregano, or even cheese can elevate your rolls. {{image_4}} You can easily enhance your gluten-free rolls. Adding herbs and spices gives them a fresh twist. For example, try adding one tablespoon of dried rosemary or thyme. You can also use fresh herbs if you have them. Mix these into the dry ingredients before adding the wet mix. This will give your rolls an amazing aroma and taste. You can even add garlic powder for an extra kick. Just one teaspoon adds great depth. The options are endless, so feel free to get creative! Cheese-stuffed rolls make a tasty treat. You can add cheese to the dough for a cheesy surprise. Try using shredded mozzarella or cheddar. Simply scoop out some dough and place a bit of cheese inside. Then, seal the dough around the cheese and shape it into a ball. This will give you soft rolls with a gooey center. Bake as directed, and enjoy the melted cheese when you bite in! Sweet variations can make these rolls perfect for breakfast or dessert. To make cinnamon rolls, mix in sugar and cinnamon. Use two tablespoons of sugar and one tablespoon of cinnamon. After the first rise, roll the dough out on a floured surface. Spread melted butter on the dough, then sprinkle the sugar mixture. Roll it up tightly and cut it into pieces. Place the pieces on a baking sheet and let them rise again. Bake until they are golden brown. Drizzle with icing for a sweet finish! To keep your leftover rolls fresh, store them in an airtight container. Place a piece of parchment paper between layers if stacking. This helps prevent them from sticking together. You can keep them at room temperature for 2 to 3 days. If you want to keep them longer, move on to freezing. To freeze your rolls, first let them cool completely. Then, wrap each roll tightly in plastic wrap. Place the wrapped rolls in a freezer bag or airtight container. You can freeze them for up to 3 months. When you’re ready to eat, just thaw them in the fridge overnight. To reheat frozen rolls, preheat your oven to 350°F (175°C). Unwrap the rolls and place them on a baking sheet. Heat them for about 10 to 15 minutes. This warms them through and restores their soft texture. If you want a crispy outside, you can broil them for 1-2 minutes after baking. Enjoy your warm, soft rolls again! Yes, you can make these rolls dairy-free. Just use a dairy-free milk, like almond or oat milk, instead of regular milk. It will keep the rolls soft and fluffy. Use plant-based butter or olive oil for a great flavor. You can easily replace eggs in this recipe. Use 1 tablespoon of ground flaxseed mixed with 2.5 tablespoons of water. Let it sit for a few minutes to thicken. You could also use unsweetened applesauce, about 1/4 cup, for each egg. The rolls are done when they are golden brown on top. You can also insert a toothpick into the center. If it comes out clean, the rolls are ready. Trust your eyes and nose; they should smell amazing! Yes, you can use other gluten-free flours, but results may vary. Mixes with xanthan gum can work well. Always check if the flour blend is suitable for baking. This can change the texture and taste of the rolls. These rolls stay fresh for about 2-3 days at room temperature. Store them in an airtight container to keep them soft. You can also freeze them. They last up to 3 months in the freezer. Just thaw before serving! You now have a guide to make tasty gluten-free rolls at home. We covered the important ingredients and detailed steps to mix, rise, and bake. I shared tips for texture, serving ideas, and creative variations. You also learned how to store leftovers for later. Remember, great rolls need patience and practice. Enjoy baking and sharing these rolls with friends and family. Trust me, they’ll love them!

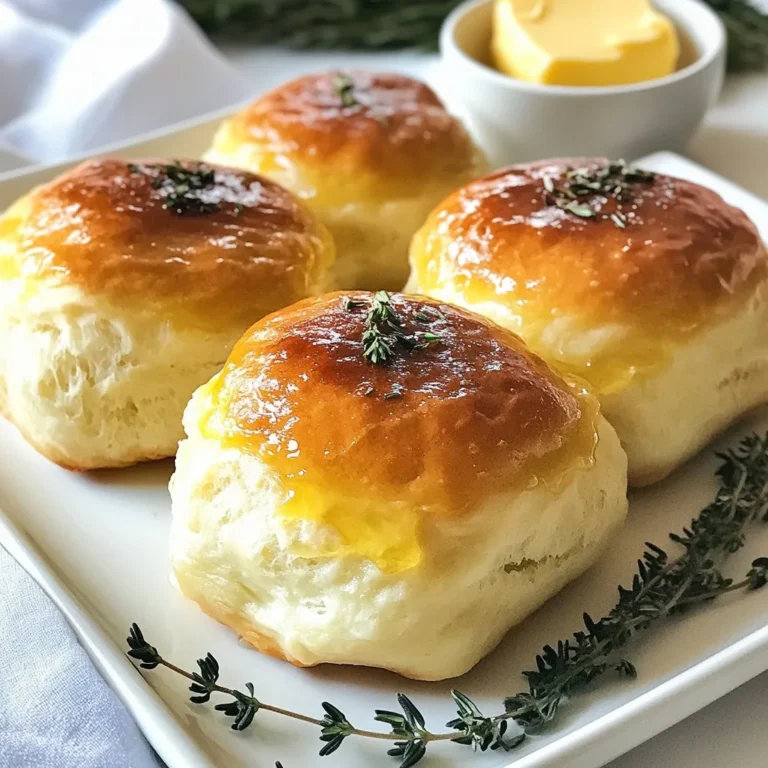
Extra Soft Gluten Free Dinner Rolls Simple Recipe

For this vibrant salad, you need fresh corn and colorful veggies. Here’s what you’ll need: - 4 ears of fresh corn, husked - 1 medium red bell pepper, diced into small pieces - 1/4 cup fresh cilantro, finely chopped (plus extra for garnish) Fresh corn brings sweetness and crunch. Red bell pepper adds a nice color and crisp texture. Cilantro gives a fresh taste that brightens the dish. Creaminess makes this salad rich and satisfying. Gather these dairy ingredients: - 1/2 cup crumbled cotija cheese (plus extra for garnish) - 1/4 cup creamy mayonnaise - 2 tablespoons sour cream Cotija cheese offers a salty, crumbly texture. Mayonnaise and sour cream blend together to create a creamy base that coats the corn and veggies. Spices are key to making your salad flavorful. Here’s what you need: - 1 tablespoon freshly squeezed lime juice - 1 tablespoon chili powder (adjust to taste) - 1/2 teaspoon garlic powder - Salt and pepper to taste Lime juice adds zing, while chili powder brings heat. Garlic powder enhances the overall flavor. Remember to adjust salt and pepper to suit your taste. {{ingredient_image_2}} First, heat your grill to medium-high. Place the husked corn on the grill. Grill for 10-15 minutes. Turn the corn every few minutes. Look for charred kernels. If you can’t grill, boil the corn instead. Use a large pot of salted water. Boil for 5-7 minutes until tender. Let the corn cool for a few minutes after cooking. Use a sharp knife to cut off the kernels. Be careful not to waste any juicy bits! Transfer the kernels to a large mixing bowl. In the bowl with corn, add the diced red bell pepper. Sprinkle in the crumbled cotija cheese. Next, stir in the mayonnaise and sour cream. Add the lime juice, chili powder, garlic powder, and chopped cilantro. Gently toss the mixture until all ingredients combine well. Taste the salad and adjust the seasoning. Add salt and pepper as needed for flavor. Cover your salad bowl with plastic wrap or a lid. Chill it in the fridge for about 30 minutes. This helps the flavors blend nicely. Before serving, give the salad a final toss to mix any settled ingredients. For a special touch, garnish with extra cotija cheese and fresh cilantro. Serve the salad in a colorful bowl for a bright look! When you pick corn, look for fresh ears. The kernels should be plump and bright. Check for firm husks that are tightly closed. This shows the corn is fresh. Sweet corn is always the best choice for this salad. If you can, buy corn from a local farm or market. It tastes better and is often fresher. Spices can elevate your salad's taste. I love using chili powder for a kick. Start with one tablespoon and adjust to your taste. Garlic powder adds depth, but don’t overdo it. A little goes a long way. Lime juice brightens the dish and balances the flavors. Don’t skip this step! Presentation matters when serving food. Use a bright, colorful bowl to show off your salad. Add a sprinkle of cilantro on top for color. Extra cotija cheese creates a nice visual appeal, too. For a fun touch, serve with lime wedges on the side. This adds freshness and a pop of color to your meal. Pro Tips Choose Fresh Corn: Always opt for the freshest corn available, as it will provide the best sweetness and tenderness in your salad. Look for ears with bright green husks and plump kernels. Customize the Heat: Adjust the amount of chili powder to suit your taste. If you prefer a milder version, start with a small amount and gradually increase until it reaches your desired spice level. Add Extra Flavor: For an additional depth of flavor, consider adding a sprinkle of smoked paprika or a dash of hot sauce to the salad mixture. Perfect Serving Temperature: While this salad is delicious chilled, serving it slightly at room temperature can enhance the flavors. Allow it to sit out for about 10-15 minutes before serving for the best taste. {{image_4}} You can add protein to your Mexican Street Corn Salad easily. Grilled chicken or shrimp tastes great. Simply chop them into bite-sized pieces and mix them in. You can also use canned black beans for a quick and filling option. Just rinse and drain them before adding. This gives the salad a heartier feel. If you want a vegan version, swap cotija cheese for a plant-based cheese. You can also replace the mayonnaise and sour cream with vegan alternatives. There are many brands that offer creamy vegan mayo and yogurt. Use lime juice for a fresh twist and add avocado for creaminess without dairy. If you love heat, add jalapeños or hot sauce to your salad. You can chop fresh jalapeños and mix them in or use pickled jalapeños for a tangy bite. A pinch of cayenne pepper can also elevate the spice level. Remember to start small and taste as you go! To keep your Mexican street corn salad fresh, place it in an airtight container. This helps lock in the flavors and moisture. If you plan to eat it within a couple of days, this method works great. For longer storage, you can divide the salad into smaller portions. This way, you can grab just what you need. You can enjoy this salad cold or at room temperature. If you prefer it warm, heat it gently in a pan over low heat. Stir occasionally to ensure even warming. Avoid using a microwave, as it may make the salad soggy. When stored properly, this salad stays fresh for 3 to 5 days in the fridge. After that, the veggies may lose their crunch, and flavors can fade. Always trust your senses—if it smells off or looks strange, it’s best to toss it out. If you can’t find cotija cheese, try feta cheese. Feta has a similar salty taste. You can also use queso fresco if you want a milder flavor. Both options work well in this salad. Yes, you can make this salad ahead of time. Prepare it a few hours before serving. Just keep it in the fridge. The flavors will blend nicely as it chills. Yes, you can grill corn in the oven. Wrap the corn in foil and place it on a baking sheet. Set your oven to broil and cook for about 10-15 minutes, turning every few minutes. This gives it a nice char. To add heat, increase the chili powder. You can also add diced jalapeño or hot sauce. Start small, taste, and adjust until it’s as spicy as you like. Yes, you can serve this salad warm. Just mix the ingredients right after grilling the corn. It tastes great warm, but it’s best chilled for the full flavor experience. This blog post covers everything you need for a corn salad. We explored fresh corn, spices, and dairy to create tasty combinations. I shared step-by-step instructions to grill corn and prepare the salad. You now have tips for choosing the best corn and ideas for variations. Storage advice helps keep leftovers fresh. Remember, simple swaps like cheese alternatives can cater to different diets. With practice, you’ll impress everyone with your skills. Enjoy making this fun and colorful dish!

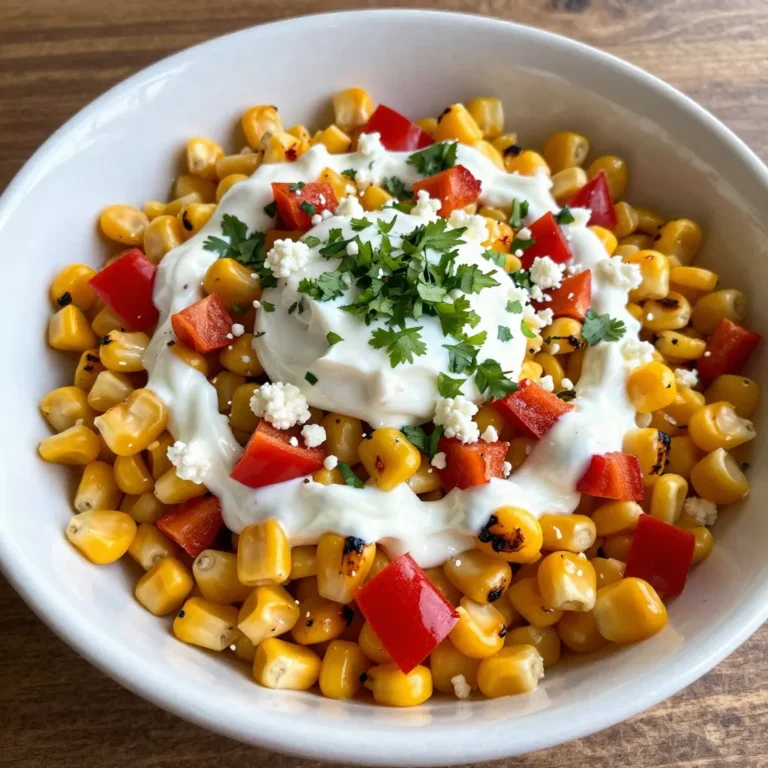
Mexican Street Corn Salad Fresh and Flavorful Dish

- 1 cup orzo pasta - 2 tablespoons olive oil - 1 medium onion, finely diced - 3 cloves garlic, minced - 1 bell pepper, chopped - 1 cup mushrooms, sliced - 1 teaspoon Cajun seasoning - 1 teaspoon smoked paprika - 1/2 teaspoon cayenne pepper (optional) - 3 cups vegetable broth - 1 cup heavy cream (or substitute coconut cream for a lighter, dairy-free version) - 1 cup frozen peas - Salt and freshly cracked black pepper to taste - Fresh parsley, chopped (for garnish) If you want a dairy-free dish, use coconut cream instead of heavy cream. Coconut cream adds creaminess and a hint of sweetness. For the broth, you can use vegetable or chicken broth. Choose what you prefer for flavor. When picking vegetables, look for bright colors and firm textures. Fresh onions should be dry and hard. For bell peppers, choose ones with no blemishes. For mushrooms, select those that feel firm and have a nice smell. For orzo, use regular or whole wheat types. Avoid broken pieces for the best texture. First, heat 2 tablespoons of olive oil in a large pot over medium heat. When the oil shimmers, add 1 finely diced onion. Sauté the onion for 2-3 minutes. You want it to turn soft and translucent. Next, stir in 3 minced cloves of garlic, 1 chopped bell pepper, and 1 cup of sliced mushrooms. Cook for another 4-5 minutes. Stir occasionally until all the vegetables are tender and fragrant. Now it's time for the spices! Sprinkle in 1 teaspoon of Cajun seasoning, 1 teaspoon of smoked paprika, and 1/2 teaspoon of cayenne pepper if you like heat. Mix well to coat all the veggies with these flavors. Next, add in 1 cup of uncooked orzo pasta. Stir it in until the orzo is well mixed with the seasoned vegetables. This step is key to building a rich flavor. Pour in 3 cups of vegetable broth, stirring gently. Bring this mixture to a gentle boil. Once it boils, lower the heat and cover the pot. Let it simmer for about 10-12 minutes. Stir occasionally until the orzo is cooked and has absorbed most of the liquid. When the orzo is just right, mix in 1 cup of heavy cream and 1 cup of frozen peas. Let this cook for another 2-3 minutes. Everything should be heated through and creamy. Give it a taste. Add salt and freshly cracked black pepper to your liking. After you take it off the heat, let the creamy orzo rest for a few minutes. This helps it thicken. Serve warm in bowls and garnish with fresh parsley for a beautiful touch. To boost the taste of your One-Pot Creamy Cajun Orzo, try adding a few extra spices. Here are some ideas: - A pinch of thyme gives a nice herbal touch. - A dash of onion powder adds depth. - Consider some crushed red pepper for more heat. Pair the dish with toppings like: - Grated Parmesan for a salty kick. - Fresh cilantro for a bright flavor. - A squeeze of lemon juice for added zest. Use a heavy-bottom pot for cooking orzo. A Dutch oven works great, as it heats evenly. Avoid thin pots that can burn the bottom. To prevent overcooking the orzo, keep an eye on the timer. Stir the pasta every few minutes. This helps it cook evenly and not stick together. Pair your creamy orzo with a light salad. A simple green salad with vinaigrette works well. You can also serve it with garlic bread for a hearty meal. For drinks, consider a crisp white wine. A chilled Sauvignon Blanc complements the Cajun spices nicely. To present your dish, serve it in shallow bowls. Top with fresh parsley for color. You can also sprinkle some extra spices on top for a pop of flavor. {{image_4}} You can easily make this dish vegetarian or vegan. Start by swapping the heavy cream. Use coconut cream for a dairy-free version. This adds a hint of sweetness and keeps it rich. You can also add more veggies. Try spinach, zucchini, or even kale. This boosts the flavor and nutrition. Adding protein makes this dish heartier. Consider chicken, shrimp, or sausage. If you use chicken, cook it first. For shrimp, add them during the last few minutes. Sausage can be sliced and added with the veggies. Adjust cooking times based on the protein you choose. Ensure everything cooks through while keeping the orzo creamy. Experimenting with spices can elevate your dish. Add more Cajun seasoning or try different spices like cumin or chili powder. Fresh herbs also add great flavor. Basil, cilantro, or thyme can brighten up the dish. Don’t hesitate to get creative! Mixing these flavors makes every bite exciting. To keep your creamy Cajun orzo fresh, cool it first. Store it in an airtight container. Make sure to use a container that seals well. Glass or plastic containers work great. Refrigerate it within two hours to avoid spoilage. This dish stays good in the fridge for about three to four days. When you reheat the orzo, do it gently. Use a saucepan or microwave to warm it. Add a splash of vegetable broth or cream. This helps keep the dish creamy. Stir often while heating. If it seems dry, add more liquid. You can freeze creamy orzo for later. Place it in a freezer-safe container. Leave some space at the top for expansion. It lasts in the freezer for up to three months. When ready to eat, thaw it in the fridge overnight before reheating. Yes, you can prepare One-Pot Creamy Cajun Orzo ahead of time. Cook the dish and let it cool. Store it in an airtight container in the fridge for up to three days. When ready to eat, gently reheat it on the stove. You may need to add a splash of broth or cream to keep it creamy. This dish pairs well with many sides. Here are a few ideas: - Grilled chicken: Adds protein and complements the flavors. - Garlic bread: A great way to soak up the creamy sauce. - Simple salad: A fresh side with greens balances the richness. - Roasted vegetables: Adds color and nutrition to your meal. Adjusting the spiciness is simple. To make it milder, skip the cayenne pepper or use less Cajun seasoning. If you like heat, add more cayenne or a splash of hot sauce. Taste as you go to find your perfect spice level. This blog post covered the ingredients, steps, and tips for making creamy Cajun orzo. You learned about ingredient options and cooking techniques, plus ways to enhance flavor. Whether you want to make it vegan or add protein, there are many choices. Store leftovers correctly to enjoy this dish later. Remember, cooking is about trying new things. Don’t hesitate to experiment! Follow these guidelines, and you’ll impress with your one-pot meal. Enjoy making your creamy orzo dish!

One-Pot Creamy Cajun Orzo Flavorful and Simple Meal

- 1 cup rolled oats - 1 cup almond milk (or any milk of your choice) - 1/2 cup canned pumpkin puree - 2 tablespoons maple syrup (or honey for sweetness) - 1 teaspoon pure vanilla extract - 1/2 teaspoon pumpkin pie spice - 1/4 teaspoon ground cinnamon - Pinch of salt - 1/4 cup Greek yogurt (optional, for added creaminess) - Chopped pecans or walnuts, for topping (optional) - Whipped cream or coconut whipped cream (optional, for garnish) You will need just a few simple ingredients for this tasty dish. Start with rolled oats. They provide a great base. Almond milk, or any milk you prefer, gives creaminess. Canned pumpkin puree is key for that rich flavor. Sweeten with maple syrup or honey to your liking. Don’t forget pure vanilla extract. It adds a nice depth. Pumpkin pie spice and ground cinnamon bring warm, cozy flavors. A pinch of salt boosts all the tastes. Greek yogurt is optional, but it makes your oats creamy. For a delightful crunch, top with chopped pecans or walnuts. If you want to indulge, add whipped cream or coconut whipped cream on top. This mix of ingredients makes for a comforting and filling breakfast. Enjoy making these pumpkin latte overnight oats! - In a medium mixing bowl, combine 1 cup of rolled oats with 1 cup of almond milk and 1/2 cup of canned pumpkin puree. - Next, mix in 2 tablespoons of maple syrup, 1 teaspoon of pure vanilla extract, 1/2 teaspoon of pumpkin pie spice, 1/4 teaspoon of ground cinnamon, and a pinch of salt. If you like it creamy, add 1/4 cup of Greek yogurt. - Stir the mixture until well blended. Make sure the oats get coated with the pumpkin mixture. - Carefully transfer the oat mixture into jars or containers. - Seal each jar tightly to keep everything fresh. - Place the jars in the refrigerator overnight or for at least 4 hours. This helps the oats absorb the liquid and gain flavor. - The next morning, stir the oats well. If the oats seem too thick, just add a splash of almond milk to get your desired texture. To make your Pumpkin Latte Overnight Oats even better, try adding spices. A dash of nutmeg or a hint of ginger can add warmth. Using high-quality ingredients also matters. Fresh pumpkin puree and pure maple syrup will boost the taste. Look for brands without added sugars to keep it natural. Layer your oats in a clear glass jar for a stunning look. Start with oats, then some yogurt, and top with nuts. This way, you create a beautiful visual appeal. For garnish, a dollop of whipped cream or a sprinkle of pumpkin pie spice makes it pop. You can even add a few chocolate chips if you want. The oats may thicken overnight. If you prefer a creamier texture, add almond milk or yogurt. Stir in a little at a time until you find the right balance for you. Everyone likes their oats differently, so adjust it to your taste! {{image_4}} You can use different types of milk for your overnight oats. Almond milk is great, but don't stop there! Try coconut milk for a creamy texture. Soy milk adds protein, while oat milk has a mild flavor. Each milk gives a unique taste to your oats. Want to mix it up? You can add chocolate or caramel flavors for a sweet twist. Just stir in a spoonful of cocoa powder or caramel sauce. You can also explore seasonal flavors beyond pumpkin. Think of using apple pie spice in fall or fresh berries in summer. Each season brings new tastes to enjoy! Toppings can take your oats to the next level. Use chopped nuts like almonds or hazelnuts for crunch. Seeds like pumpkin or sunflower seeds add texture too. For a fresh burst, add slices of banana or berries on top. These toppings not only look good but also taste great! For the best results, store your pumpkin latte overnight oats in glass jars. They keep the oats fresh and let you see the pretty layers. Make sure to seal each jar tightly. This helps keep air out and flavors in. You can also use plastic containers if glass isn’t handy. Just ensure they are airtight. These oats last about 3 to 5 days in the fridge. This makes them great for meal prep. If you want to store them longer, you can freeze them. Just remember to use freezer-safe jars. They can stay fresh for up to 3 months in the freezer. To thaw, place them in the fridge overnight. You can eat these oats cold right from the fridge. If you prefer them warm, heat them in the microwave. Just add a splash of almond milk to keep them creamy. For busy mornings, top your oats with nuts and whipped cream. This adds flavor and makes breakfast fun! You can use steel-cut oats, but the texture will change. Steel-cut oats are chewier and take longer to soak. They need more liquid and time to soften. If you prefer a creamier texture, stick with rolled oats. They are quicker to soak and absorb flavors well. Yes, you can easily make this recipe vegan. Use almond milk or any plant-based milk. Replace Greek yogurt with a dairy-free yogurt. Use maple syrup for sweetness instead of honey. These swaps keep the rich flavor while making it dairy-free. Yes, eating overnight oats daily can be great! They are packed with fiber, vitamins, and minerals. You can mix in different toppings to keep it interesting. Just be mindful of portion sizes and add variety to your ingredients for well-rounded nutrition. This blog post showed you how to make delicious overnight oats with pumpkin. You learned about the key ingredients, the preparation steps, and tips for flavor and storage. Remember, you can adjust the recipe with different milks or toppings. Feel free to experiment and find what you love. Overnight oats are an easy, healthy choice for busy mornings. Enjoy your tasty creations!

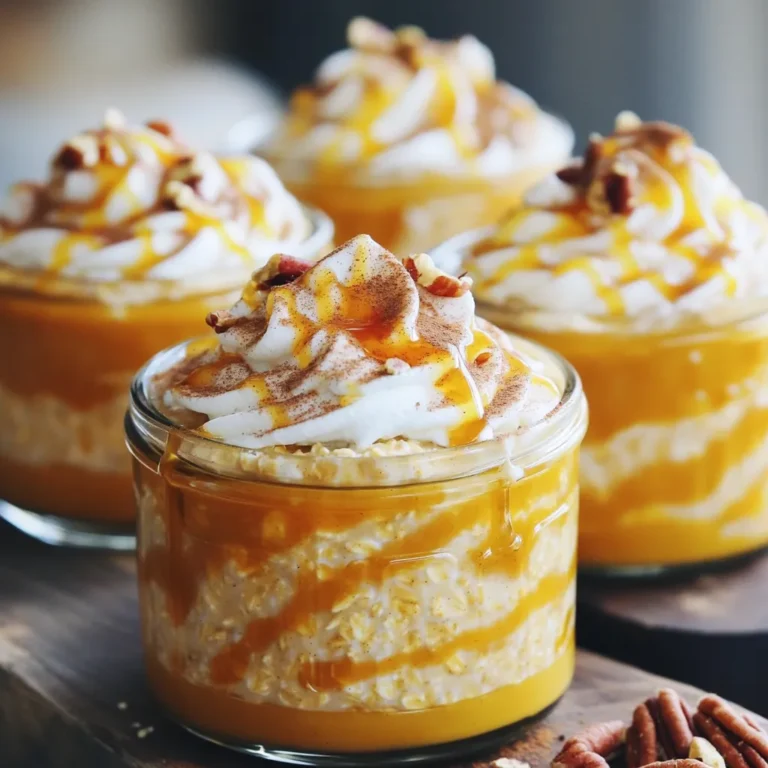
Pumpkin Latte Overnight Oats Simple and Tasty Recipe

To make the Apple Cider Sangria Mocktail, gather these key ingredients: - 3 cups apple cider - 1 cup sparkling water - 1 orange, thinly sliced - 1 lemon, thinly sliced - 1 lime, thinly sliced - 1 cup strawberries, hulled and diced - 1 cup green apples, cored and diced - Fresh mint leaves for garnish These ingredients mix to create a tasty drink that feels fresh and fun. The apple cider serves as a sweet base. The sparkling water adds a nice fizz. The fruits give color and flavor with every sip. If you like your drink sweeter, consider adding a touch of maple syrup. Use about 1 tablespoon for a gentle sweetness. This step is optional. If you like the natural taste of the cider and fruit, skip it. To make your drink look special, add fresh mint leaves as a garnish. They add a bright green color and a fresh scent. You can also use extra slices of orange or lemon on the rim of the glass. This makes the drink even more inviting and fun. Start by gathering your ingredients. You will need three cups of apple cider and one cup of sparkling water. Pour the apple cider into a large pitcher. Next, add the sparkling water. Gently stir them together. This creates a tasty base for your mocktail. The cider brings sweetness, while the sparkling water adds fizz. Now, it's time to add some zest! Thinly slice one orange, one lemon, and one lime. Place the citrus slices into the pitcher. Let them float on top. This adds fresh flavors and bright colors to your drink. Next, take one cup of strawberries, hulled and diced, and one cup of green apples, cored and diced. Gently fold these into the mixture. This fruity addition makes every sip exciting. If you like your drinks cold, cover the pitcher. Chill it in the fridge for at least 30 minutes. This helps the flavors blend well. When ready to serve, fill tall glasses with ice. Pour the chilled sangria over the ice. For a final touch, garnish each glass with fresh mint leaves. This adds a lovely aroma and a pop of color. Enjoy your refreshing Apple Cider Sangria Mocktail! To boost the taste of your apple cider sangria mocktail, think about adding spices. A pinch of cinnamon or nutmeg can warm up the drink. You might also try adding sliced ginger for a zesty kick. Fresh herbs, like basil or thyme, can add a unique twist. Don’t be afraid to mix and match flavors. Each option brings a new layer to your drink. Make your mocktail stand out with vibrant colors. Use a clear pitcher to show off the fruits and herbs. Fill your serving glasses with ice before pouring the drink. This keeps it cold and adds a nice visual. Garnish each glass with mint leaves for a pop of green. You could also place a slice of fruit on the rim for extra flair. Choose tall glasses for a refreshing look. These glasses highlight the colorful layers of your mocktail. They also hold more ice and drink, making it perfect for sharing. If you want a cozy vibe, use mason jars. They’re charming and easy to hold. No matter the glass, ensure it’s clean and clear for the best experience. {{image_4}} You can add different fruits to your Apple Cider Sangria Mocktail. Consider using pears or cranberries for a fun twist. Sliced pears give a soft, sweet flavor. Cranberries add a tart bite and bright color. Use what is fresh and in season for the best taste. You can also mix in pomegranate seeds for crunch and a pop of flavor. While orange, lemon, and lime are great, you can switch them out for other citrus. Try using grapefruit for a slightly bitter note. You could also use blood oranges for a stunning color and unique taste. Each type of citrus brings its own charm, so feel free to experiment. Herbs can elevate your mocktail. Fresh mint is a classic choice, but you can also use basil or rosemary. Simply bruise the herbs before adding them to release their oils. This adds a fresh aroma and an unexpected taste. You only need a few sprigs to make a big difference in flavor. Mix and match to find your favorite herb blend! To store any leftover Apple Cider Sangria Mocktail, pour it into a clean container. Use a glass jar or pitcher with a tight lid. This helps keep it fresh and tasty. Make sure to keep it in the fridge. Avoid using metal containers, as they can change the drink's flavor. For best results, chill the mocktail before serving. You can chill it for at least 30 minutes. If you want it colder, let it sit longer. Keeping it covered helps the flavors mix well while it cools. Always serve the mocktail over ice for a refreshing sip. This drink tastes best within two days. After that, the flavors may change. The fruits can become mushy and lose their crunch. If you notice any signs of spoilage, it’s best to discard it. Enjoy the vibrant taste while it's fresh! Yes, you can make this mocktail ahead of time. I suggest mixing the apple cider and fruits a few hours before serving. This allows the flavors to blend well. Chill it in the fridge for at least 30 minutes. If you plan to serve it the next day, wait to add the sparkling water. Adding it too soon will make it go flat. If you don’t have apple cider, you can use apple juice. Choose a high-quality juice for the best flavor. You can also mix apple juice with a bit of lemon juice for extra tang. This will mimic the taste of cider nicely. Yes, this mocktail is perfect for kids! It has sweet fruits and no alcohol. They will love the fruity flavors. You can even let them help make it. It’s a fun way to get them involved in the kitchen. You can use club soda or tonic water to add fizz. Both options will keep your drink bubbly and refreshing. If you want a sweeter twist, try ginger ale. Just remember to add it right before serving for the best bubbles. You’ve learned about the main ingredients, step-by-step instructions, and useful tips for your drink. Remember to experiment with flavors and presentation to make it unique. Storage is easy, and you can keep leftovers fresh for days. Answering your questions helps you enjoy this mocktail more. Now, get creative and serve up a delicious drink that everyone will love. Enjoy your mixology journey!

Apple Cider Sangria Mocktail Refreshing Fall Treat

PREV 1 … 6 7 8 … 44 NEXT
yummybiterecipes

explore

DessertsDinnerAppetizersDrinks

Our Policies

  • Cookie Policy
  • Copyright Policy
  • Disclaimer
  • GDPR Policy
  • Terms Of Use
Back to Top
  • About
  • Contact Us
  • Privacy Policy
© 2025 yummybiterecipes