FREE DINNER EBOOK! Get your copy!
  • Cookie Policy
  • GDPR Policy
  • Disclaimer
  • Terms Of Use
  • Visit my other site: Fun Cookie Recipes
yummybiterecipes
  • Home
  • Dinner
  • Desserts
  • Drinks
  • Appetizers
  • Contact
  • About
  • Privacy Policy
  • Home
  • Dinner
  • Desserts
  • Drinks
  • Appetizers
  • Contact
  • About
  • Privacy Policy
  • Cookie Policy
  • GDPR Policy
  • Disclaimer
  • Terms Of Use
Visit my other site: Fun Cookie Recipes

HOME / CATEGORIES /

Latest

For this salad, you will need: - 1 lb Brussels sprouts, trimmed and halved - 1/2 cup pecans, roughly chopped - 1/4 cup dried cranberries These fresh ingredients form the base of the salad. The Brussels sprouts give it a nice crunch. The pecans add a nutty taste, while the cranberries bring a sweet touch. To make the dressing, gather: - 1/4 cup extra virgin olive oil - 3 tablespoons Dijon mustard - 2 tablespoons apple cider vinegar - 1 tablespoon honey - Salt and freshly cracked black pepper, to taste This dressing is simple yet flavorful. The Dijon mustard gives it a tangy kick. The honey balances that with sweetness. You can add: - 1/4 cup grated Parmesan cheese (for garnish) If you like cheese, sprinkle some Parmesan on top. It adds creaminess and extra flavor. This salad is all about mixing tastes and textures for a delightful bite. Start by washing the Brussels sprouts. Trim off the hard stem end and cut each sprout in half. This helps them cook evenly. Place the halved sprouts on a baking sheet. Preheat your oven to 400°F (200°C). Drizzle olive oil over the Brussels sprouts. Sprinkle salt and black pepper on top. Toss them well to ensure even coating. Roast for 20-25 minutes. Stir halfway through to allow even browning. They should be golden and tender when done. While the sprouts roast, prepare the dressing. In a small bowl, whisk together Dijon mustard, apple cider vinegar, and honey. Add a pinch of salt and pepper. Whisk until smooth. This dressing adds great flavor. Once the Brussels sprouts are roasted, let them cool for a few minutes. In a large bowl, combine the sprouts, chopped pecans, and dried cranberries. Drizzle the dressing over the mix and gently toss. If you like, sprinkle grated Parmesan on top for extra flavor. To roast Brussels sprouts well, start with fresh ones. Look for bright green, firm sprouts. Trim off the ends and cut them in half. This step helps them cook evenly. Preheat your oven to 400°F (200°C). This hot temperature gives them a nice crisp. Spread the halved sprouts on a baking sheet. Drizzle olive oil over them and sprinkle salt and pepper. Toss them so they are coated well. Roast for 20-25 minutes. Stir them halfway through to help them brown evenly. They are ready when they feel tender and have golden edges. A beautiful salad makes the meal feel special. Use a large wooden bowl to serve. This adds warmth and charm. Place the roasted Brussels sprouts in the bowl first. Then, add the chopped pecans and cranberries. For a nice touch, sprinkle grated Parmesan on top. This adds color and flavor. You can also add extra pecans for crunch. Arrange everything nicely so it looks inviting. This salad is a great side dish. It pairs well with roasted chicken or grilled fish. You can also enjoy it as a light meal on its own. Serve it warm or at room temperature. If you want to add protein, consider grilled chicken or chickpeas. This makes it a complete meal. Don't forget to offer extra dressing on the side for those who love a little more flavor! {{image_4}} You can make this salad a full meal by adding protein. Grilled chicken or shrimp pairs well. If you want a meat-free option, try chickpeas or lentils. They add texture and flavor. Simply toss them in with the Brussels sprouts and nuts. This makes the dish hearty and satisfying. If you want to change the flavor, try different dressings. A balsamic vinaigrette gives it a sweet and tangy taste. A creamy ranch dressing adds a rich touch. You can even use a citrus dressing for a fresh twist. Mix and match until you find your favorite. Feel free to swap ingredients based on the season. In fall, add roasted squash for sweetness. In winter, toss in pomegranate seeds for a pop of color. In spring, try fresh herbs like mint or basil. These changes keep the salad exciting and fresh. To store leftover salad, place it in an airtight container. Make sure to cover it well. Put the container in the fridge. This keeps it fresh for up to three days. However, the Brussels sprouts may lose some crunch. If you like them crispy, eat the salad soon after making it. I do not recommend freezing this salad. Freezing changes the texture of Brussels sprouts. They can become mushy when thawed. The pecans and cranberries also lose their good crunch. It’s best to enjoy this salad fresh. If you want to reheat the salad, do so gently. You can warm it in a pan over low heat. Add a splash of olive oil to help it warm evenly. Stir gently to avoid overcooking. Serve it warm with a sprinkle of fresh cheese on top for added flavor. Yes, you can use frozen Brussels sprouts if fresh ones are not available. However, they may not have the same texture. Frozen sprouts can become mushy when cooked. For best results, thaw them first and pat them dry before roasting. This helps them crisp up nicely. If you don’t have Dijon mustard, you can use yellow mustard. It has a milder taste, so add a little extra for flavor. Another option is to mix equal parts of mustard powder and vinegar. This gives a similar taste with a bit of a kick. The salad stays fresh for about three days in the fridge. Store it in an airtight container. However, the texture may change as the dressing soaks in. For the best taste, enjoy it within the first two days. Yes, this salad is gluten-free. All the ingredients are safe for a gluten-free diet. Just make sure to check your Dijon mustard for any hidden gluten. Most brands are fine, but it’s always best to look at the label. In this blog post, we explored fresh ingredients for a tasty salad. I shared steps for prepping Brussels sprouts, roasting them perfectly, and making a delightful dressing. You learned how to present and serve the salad beautifully. We also discussed variations to suit your taste and how to store any leftovers. Enjoy making this salad your own. Experiment with flavors and ingredients. You’ll create a dish that everyone loves!

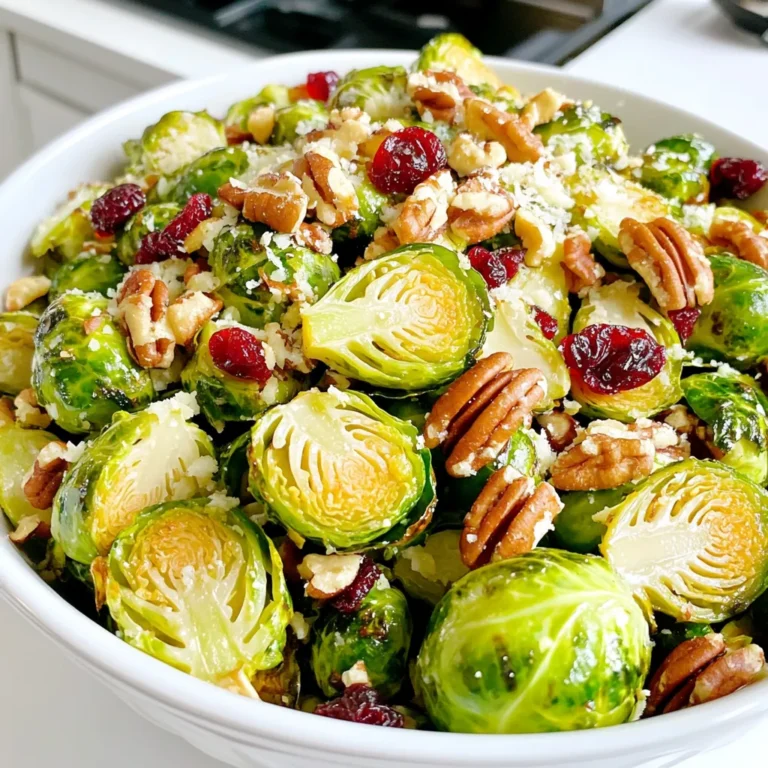
Dijon Brussels Sprouts Salad with Pecans Delightful Mix

- 1 medium butternut squash, peeled, seeded, and cut into 1-inch cubes - 2 cups Brussels sprouts, trimmed and halved lengthwise - 2 large carrots, sliced into thin rounds (about 1/4 inch thick) - 1 medium red onion, cut into wedges - 1 cup cherry tomatoes, halved - 1/4 cup balsamic vinegar - 3 tablespoons extra virgin olive oil - 2 tablespoons pure maple syrup - 1 teaspoon dried thyme - 1 teaspoon garlic powder - Salt and freshly ground black pepper to taste - Fresh parsley, finely chopped for garnish These ingredients combine to create a colorful and tasty dish. The butternut squash adds a sweet and nutty flavor. Brussels sprouts bring a nice crunch and a bit of bitterness. Carrots add a natural sweetness. Red onion gives a touch of sharpness, while cherry tomatoes burst with juiciness. The balsamic vinegar is key for a tangy kick. Extra virgin olive oil ensures the veggies roast nicely. Pure maple syrup sweetens the mix and balances the flavors. Dried thyme adds an earthy note, and garlic powder gives warmth. Salt and pepper enhance every bite. Finally, fresh parsley brightens the dish and makes it look inviting. When you gather these ingredients, think about how they will come together in the oven. Each one plays a role in making this dish a fall favorite. Whether you are hosting a dinner or just cooking for yourself, these ingredients will shine. 1. Preheat your oven to 425°F (220°C). Line a large baking sheet with parchment paper for easy cleanup. 2. Get your veggies ready. Cut the butternut squash into 1-inch cubes. Trim and halve the Brussels sprouts. Slice the carrots into thin rounds. Cut the red onion into wedges. Halve the cherry tomatoes. 3. In a separate bowl, whisk together 1/4 cup balsamic vinegar, 3 tablespoons extra virgin olive oil, 2 tablespoons pure maple syrup, 1 teaspoon dried thyme, 1 teaspoon garlic powder, and a sprinkle of salt and pepper. 4. Drizzle the balsamic dressing over the veggies. Toss gently to coat each piece well. 5. Spread the veggies in a single layer on the lined baking sheet. This helps them roast evenly. 1. Place the baking sheet in the preheated oven. Roast the veggies for 25-30 minutes. 2. Halfway through, toss the veggies with a spatula to promote even browning. 3. When they are tender and caramelized, remove the sheet from the oven. 1. Let the veggies cool for a few minutes. This enhances the flavors. 2. Just before serving, sprinkle with finely chopped fresh parsley for color. 3. Serve the roasted veggies in a large, shallow bowl. A light drizzle of balsamic glaze on top looks great. Even spreading of the veggies is key. When you place the vegetables on the baking sheet, make sure they lie flat. This helps them roast well. If they sit on top of each other, they will steam instead of roast. Toss the veggies halfway through cooking. This step promotes even browning. Use a spatula to turn them gently. This keeps them intact while helping them cook evenly. You can change the herbs and spices to fit your taste. Try rosemary or oregano instead of thyme. Each herb gives the dish a different flavor. Adding balsamic glaze at the end boosts the taste. It adds a sweet, tangy finish. Just drizzle it over the veggies before serving for a nice touch. I recommend using a heavy-duty baking sheet. A thicker sheet helps distribute heat evenly. This prevents burning and ensures even cooking. Line your baking sheet with parchment paper. It makes cleanup simple and helps the veggies not stick. You can enjoy this dish without worrying about a messy kitchen! {{image_4}} You can switch up the veggies to keep things fresh. Try adding sweet potatoes, parsnips, or cauliflower. These veggies roast well and add different tastes. You can also use seasonal greens like kale or spinach. They bring a nice touch to your dish. Using root vegetables adds a hearty feel. They are rich and sweet. Carrots work great, but you can also try beets or turnips. These veggies pair well with balsamic flavors. Each swap changes the dish just enough to keep it exciting. This recipe can fit many diets. For a vegan option, skip the maple syrup and use agave instead. You can also use coconut aminos for a soy-free option. To make it gluten-free, ensure your balsamic vinegar is certified gluten-free. If you want a low-carb dish, cut out the carrots and use zucchini instead. To add more sweetness, increase the maple syrup or add a touch of honey. For a spicy kick, mix in some red pepper flakes. These changes help meet different needs while keeping it tasty. You can also cook these veggies in an air fryer. Set the temperature to 375°F (190°C) and cook for about 15-20 minutes. Shake the basket halfway through to ensure even cooking. If you prefer grilling, toss the veggies in a grill basket. Cook them over medium heat for about 10-15 minutes. Stir often to avoid burning. For stovetop cooking, sauté the veggies in a large pan. Use a bit of olive oil. Cook on medium heat until they are tender, about 15 minutes. This method gives a nice caramelization. Each method brings out different flavors and textures in your dish. Let your veggies cool to room temp first. This helps keep them fresh. After cooling, place the veggies in airtight containers. This choice keeps moisture out and flavors in. You can also use freezer bags. They save space and make it easy to grab portions. For the best taste, reheat in the oven. Set it to 350°F (175°C) for about 10-15 minutes. This keeps the veggies crispy. You can also use the microwave. If you do, check every 30 seconds to avoid sogginess. Adding a splash of water helps keep the veggies moist. To freeze, prepare your veggies first. Cut and roast them as you normally would. Let them cool completely before freezing. Use airtight containers or freezer bags. When you're ready to eat, thaw them in the fridge overnight. Reheat in the oven to restore the texture. To cut butternut squash, start by peeling it. Use a sharp vegetable peeler. Cut off the ends. Then, slice the squash in half lengthwise. Scoop out the seeds with a spoon. Cut each half into 1-inch thick slices. Finally, cube the slices into 1-inch pieces. This method ensures even cooking and great texture. Yes, you can use other vinegars! Each type brings a unique taste. Apple cider vinegar adds a fruity twist. Red wine vinegar gives a deeper flavor. White wine vinegar is lighter and zestier. Experiment with these options to find your favorite. Just remember, the flavor will change slightly. Roasted veggies can last in the fridge for 3 to 5 days. Store them in an airtight container. If you plan to freeze them, they can last for up to 3 months. Just cool them completely before freezing. This helps keep their taste and texture. Absolutely! Adding proteins makes this dish more filling. Grilled chicken or turkey pairs well with roasted veggies. For a plant-based option, try chickpeas or tofu. You can also sprinkle some nuts for added crunch. This way, you can enjoy a balanced meal. This post covers how to make a delicious roasted vegetable dish using simple ingredients. You learned about the best veggies to use, how to prepare them, and tips for cooking. I shared variations to adapt the recipe for different diets and cooking methods. Remember, you can easily store leftovers and reheat them well. Enjoy experimenting with flavors and textures in your meals. Roasted veggies are both tasty and healthy, making them a great addition to any dish.

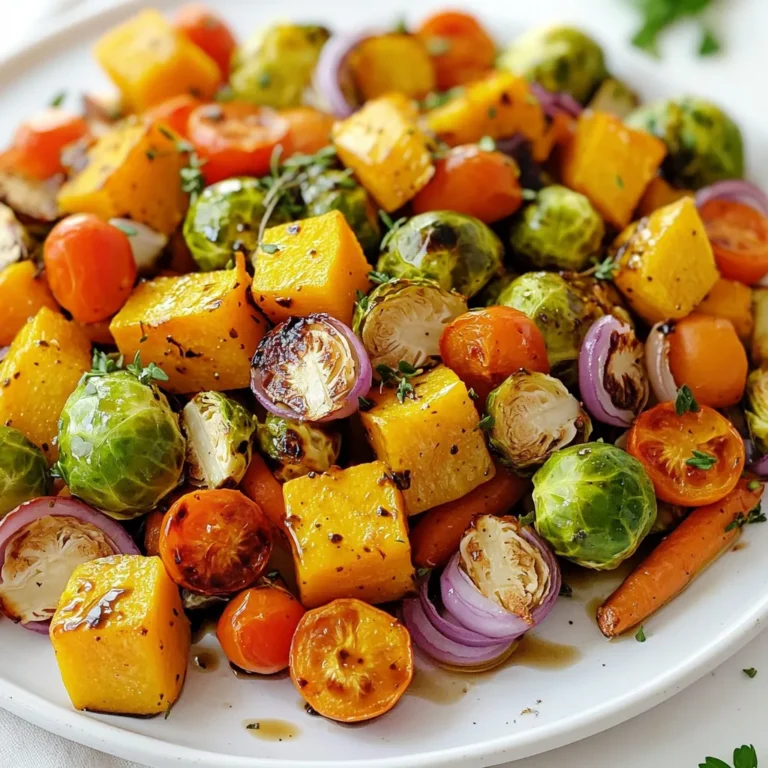
Balsamic Roasted Fall Veggies Sheet-Pan Delight

- 1 cup rolled oats - 1/2 cup canned pumpkin puree - 1/2 cup almond butter (or peanut butter for a different flavor) The base of these bites starts with rolled oats. They provide fiber and energy. The canned pumpkin puree adds moisture and flavor. It also gives a nice orange color. Almond butter or peanut butter adds creaminess and healthy fats. You can pick either nut butter based on your taste. - 1/4 cup honey or maple syrup (adjust to taste) - 1 teaspoon pumpkin pie spice - 1/2 teaspoon vanilla extract For sweetness, you can use honey or maple syrup. Both add a rich flavor. Adjust the amount to your liking. Pumpkin pie spice brings warmth and depth. It makes these bites feel like fall. The vanilla extract adds a sweet aroma that makes them more inviting. - 1/4 cup ground flaxseed - 1/4 cup mini chocolate chips (optional, for extra sweetness) - A pinch of salt Ground flaxseed boosts nutrition with omega-3 fatty acids. It also helps bind the mixture. Mini chocolate chips are optional but add extra sweetness. A small pinch of salt enhances all the flavors. These ingredients come together to make a balanced and tasty snack. 1. Mixing the Base Ingredients In a large bowl, combine 1 cup of rolled oats, 1/2 cup of canned pumpkin puree, and 1/2 cup of almond butter. Add 1/4 cup of honey or maple syrup. Use a spatula to mix until smooth and well combined. 2. Adding Spices and Flaxseed Next, sprinkle in 1 teaspoon of pumpkin pie spice, pour in 1/2 teaspoon of vanilla extract, and add 1/4 cup of ground flaxseed. Don't forget a pinch of salt! Stir well until everything is evenly mixed. 3. Incorporating Optional Chocolate Chips If you want some extra sweetness, fold in 1/4 cup of mini chocolate chips. This step is optional but adds a fun twist! 1. Rolling the Mixture into Balls With clean hands, scoop out about 1 tablespoon of the mixture. Roll it into a small ball. Repeat this until you shape all the mixture into 14-16 energy bites. 2. Placing on the Baking Sheet Place each ball on a parchment-lined baking sheet. Make sure they are spaced apart so they don’t stick together. 3. Refrigerating for Firmness Put the baking sheet in the fridge for at least 30 minutes. This helps the bites firm up and hold their shape. 1. Transferring to an Airtight Container Once firm, carefully move the energy bites to an airtight container. This keeps them fresh longer. 2. Storing Options (fridge vs freezer) You can store these bites in the fridge for up to one week. If you want to keep them longer, freeze them. They can last for a few months in the freezer! - Alternative Nut Butters: You can use any nut butter you prefer. Almond butter adds creaminess. Peanut butter gives a richer flavor. Sunflower seed butter works well too if you need a nut-free option. Each choice changes the taste a bit. - Adjusting Sweetness Levels: I suggest starting with 1/4 cup of honey or maple syrup. You can add more if you want it sweeter. Try tasting as you mix. This helps you find the perfect balance for your palette. - Incorporating Superfoods or Seeds: Feel free to add chia seeds or hemp seeds for extra nutrition. These add fiber and protein. You can also mix in dried fruits like cranberries or raisins for a chewy texture. - Plating Ideas for Serving: Arrange the energy bites in a small bowl or on a colorful plate. You can create a fun display by stacking them. This makes them look inviting and ready to eat. - Garnishing Tips: A sprinkle of cinnamon on top adds a nice touch. You can also place a few mini chocolate chips on each bite. This makes them even more appealing and tasty. - Health Benefits of Key Ingredients: Rolled oats provide fiber and keep you full. Pumpkin adds vitamins A and C, helping your immune system. Flaxseed brings omega-3 fatty acids, which are great for heart health. - Energy-boosting Attributes: These bites offer a quick energy boost. The mix of oats and nut butter gives you lasting energy. They are perfect for a snack before a workout or as a midday pick-me-up. {{image_4}} You can spice up your pumpkin spice energy bites with fun flavors! - Chocolate Pumpkin Spice Energy Bites: Add 1/4 cup of mini chocolate chips to the mix. These chips give a sweet surprise. You can also melt dark chocolate and drizzle it over the bites for a fancy touch. - Nut-Free Version: Swap almond butter for sunflower seed butter. This keeps it nut-free while still being tasty. You can use tahini too, which adds a unique flavor. Not all ingredients work for everyone. Here are some swaps: - Gluten-Free Options: Use gluten-free oats. Make sure the oats are certified gluten-free to avoid cross-contamination. This keeps your bites safe for those with gluten issues. - Vegan Adjustments: Replace honey with maple syrup or agave nectar. Both sweeteners work well and keep the bites vegan-friendly. These energy bites are great on their own but can be paired with other items: - Pairing with Beverages: Serve them with warm apple cider or a pumpkin spice latte. The flavors match perfectly, making your snack cozy. - Creative Snack Combinations: Try pairing them with yogurt or fruit slices. They make a wonderful addition to a snack platter for parties. To keep your Pumpkin Spice Energy Bites fresh, store them in the fridge. Place them in an airtight container. This helps prevent moisture loss. You can also freeze them for longer storage. Freezing keeps the bites tasty for a longer time. In the fridge, these energy bites last about one week. If you freeze them, they can last up to three months. This is great for meal prep or busy days. When you're ready to eat frozen bites, thaw them in the fridge overnight. This keeps them soft and tasty. For containers, clean them well before reuse. This helps avoid any old flavors mixing in. Making Pumpkin Spice Energy Bites is quick and easy. The prep time is just 10 minutes. Rolling the bites takes about another 10 minutes. After that, you need to chill them for at least 30 minutes. In total, you spend about 40 minutes from start to finish. Yes, you can make these energy bites ahead of time. They are perfect for meal prep. Just prepare a batch and store them in the fridge. They stay fresh for up to one week. You can also freeze them for longer storage. If you freeze them, just thaw them before enjoying. Pumpkin Spice Energy Bites are a healthy snack option. They use whole ingredients like oats and pumpkin puree. Oats provide fiber, which is great for digestion. Pumpkin is rich in vitamins, especially vitamin A. Almond butter gives you healthy fats and protein. These bites are sweetened with honey or maple syrup, which is better than refined sugar. Overall, they make a nutritious and tasty treat. In this post, I discussed how to make Pumpkin Spice Energy Bites. We covered key ingredients like oats, pumpkin puree, and nut butter. I shared step-by-step instructions for preparation and storage. You learned tips for customizing your bites and their nutritional benefits. These tasty snacks offer energy and can fit into many diets. Try them as a quick treat or boost for your day. Enjoy experimenting with flavors and ingredients to make them your own!

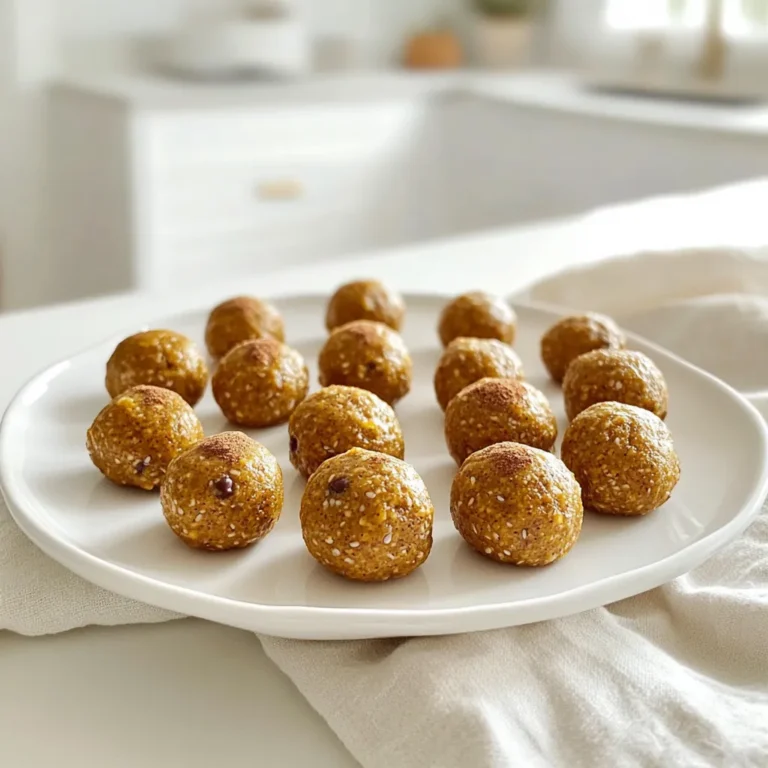
Pumpkin Spice Energy Bites Simple and Tasty Snack

- 4 cups apple cider - 1 cup sparkling water - 1 cup cranberry juice - 2 cups fresh cranberries - 2 apples (1 green and 1 red), cored and sliced - 1 orange, thinly sliced - 2 cinnamon sticks - 1 teaspoon vanilla extract - Fresh mint leaves for garnish Using fresh and high-quality ingredients makes a big difference. Choose organic apple cider when you can. Fresh fruits add great taste and color. Look for firm apples and vibrant cranberries. The orange should be juicy, ensuring a bright flavor. For apple cider, I recommend brands like Martinelli's or Tree Top. They offer rich flavors. For cranberry juice, try Ocean Spray or Lakewood Organic. These brands provide pure juice without added sugars. Always check labels for the best choices. Start by gathering all your ingredients. You need 4 cups of apple cider, 1 cup of cranberry juice, and 1 cup of sparkling water. Slice 2 apples, 1 orange, and grab 2 cups of fresh cranberries. In a large pitcher, pour in the apple cider and cranberry juice. Stir well with a spoon until mixed. Next, add the sliced apples, orange, and fresh cranberries. This mix brings color and taste to your sangria. Now, add 2 cinnamon sticks and 1 teaspoon of vanilla extract. Stir gently. This helps blend all the flavors. After mixing, cover the pitcher and place it in the fridge. Chill it for about 1 hour. This step is key for great flavor. Chilling helps the fruit infuse its taste into the juices. You want all the flavors to get cozy together. When ready to serve, pour in 1 cup of sparkling water. This adds fizz to your drink. Stir lightly to keep the bubbles. Fill glasses with ice and pour in the sangria. Remember to add slices of fruit from the pitcher for a pretty look. Finally, garnish with fresh mint leaves. This adds a nice aroma and a pop of green. Enjoy your warm cranberry apple cider sangria! To make a bright and tasty sangria, use fresh fruits. Crisp apples and plump cranberries add color and flavor. I love mixing a tart green apple with a sweet red variety. This gives great contrast. Use seasonal fruits for the best taste. Fresh orange slices brighten the drink. Don’t rush the chilling process. Let the sangria sit in the fridge for at least an hour. This step helps the flavors mix well. Avoid adding sparkling water too early. If you do, it loses its fizz. Also, don’t skip the vanilla extract; it adds a lovely depth. Taste your sangria before serving. If it’s too tart, add a touch of honey or maple syrup. For more spice, extra cinnamon sticks work wonders. You can also try a splash of brandy for warmth. Always remember to balance flavors for the best drink experience. {{image_4}} You can switch up the fruits in your sangria. Try adding pears or pomegranates. These fruits bring unique flavors and textures. You can also use spices like nutmeg or cloves for a warm twist. They add a cozy feel to your drink. Mixing fruits and spices keeps the drink fresh and exciting. To make a non-alcoholic sangria, simply skip the alcohol. Use extra sparkling water or ginger ale for fizz. This keeps the fun without the booze. You can also add more fruit juice, like grape or pineapple juice. This version is great for kids or anyone who prefers not to drink alcohol. For fall gatherings, add pumpkin spice to your sangria. It gives a warm, festive flavor. During summer, switch to tropical fruits like mango or pineapple. This makes your drink feel refreshing and bright. You can even try a holiday version with cranberries and peppermint for a winter treat. Each season brings new chances to enjoy this drink! To store leftover sangria, first, pour it into an airtight container. This helps keep the flavors fresh. Make sure to include the fruit slices in the container for added taste. If you have any leftover mint, add that too. Avoid using a glass pitcher, as it may not seal well. You can store your sangria in the fridge for up to three days. After three days, the fruit may start to get mushy. The flavors can also fade over time. For the best taste, try to drink it within two days. To refresh your sangria, add more fresh fruit before serving. You can also pour in a splash of sparkling water. If you want to reheat it, do so gently on the stove. Heat it slowly and avoid boiling. This keeps the flavors intact and warm, perfect for cozy nights. Yes, you can use different types of alcohol in your sangria. White wine, red wine, or even rum work well. Each type brings its own unique flavor. For a richer taste, consider using brandy or flavored liqueurs. Just remember to balance the sweetness with your chosen juice. This way, you create a drink that suits your taste perfectly. Sangria can sit for up to 24 hours in the fridge. However, I find it best to serve it within a few hours. This timeframe allows the flavors to mix well. If it sits too long, the fruit may become mushy, affecting the texture. For the best taste, mix your sangria a few hours before serving. Yes, chilling the mixture is important for sangria. It helps the flavors meld together nicely. I recommend chilling your sangria for at least one hour. This enhances the taste and makes the drink refreshing. You want it to be cool when you serve it over ice. A chilled sangria is the best way to enjoy this warm, cozy drink. Now you know how to make delicious sangria. We covered the key ingredients, the mixing process, and clever tips to avoid mistakes. You also learned about fun variations, proper storage, and answers to common questions. Experiment with flavors and find what you love best. Sangria brings joy to gatherings, so enjoy crafting your version. With the right ingredients and techniques, your sangria will impress everyone. Cheers to tasty drinks!

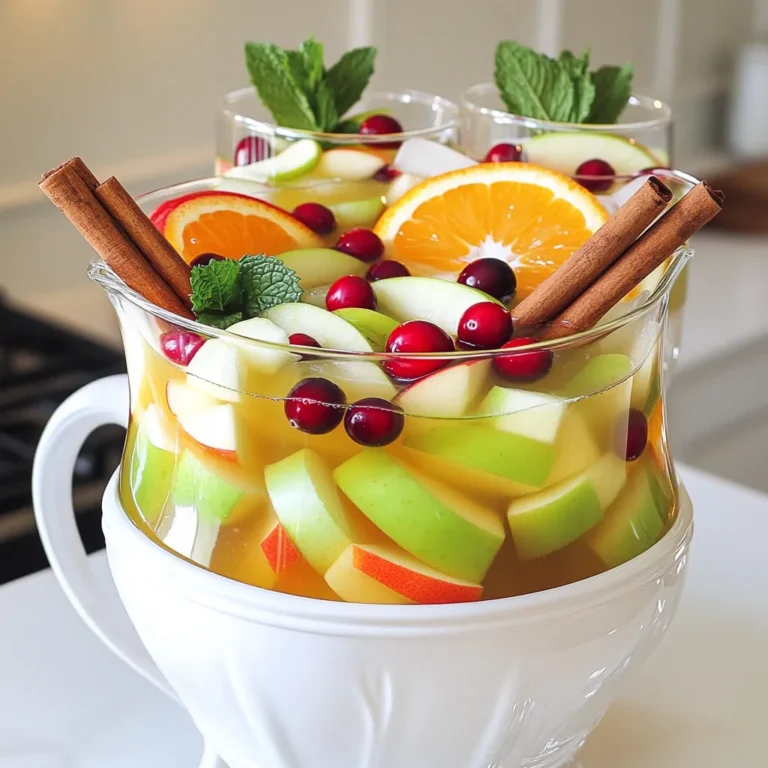
Warm Cranberry Apple Cider Sangria Recipe Delight

- 1 cup graham cracker crumbs - 1/4 cup unsalted butter, melted - 1/3 cup granulated sugar - 1/2 cup creamy peanut butter - 1 cup cream cheese, softened - 1 cup powdered sugar - 1 teaspoon vanilla extract - 1/2 cup whipped topping - 1/3 cup caramel sauce - Crushed peanuts for garnish - If you want to switch things up, try almond or cashew butter instead of peanut butter. They still give a nice flavor. - For a gluten-free crust, use gluten-free graham crackers or crushed nuts. - You can use dairy-free cream cheese and whipped topping for a dairy-free version. Just make sure they are suitable for your needs. These ingredients make the pie cups rich and creamy. The combination of peanut butter and caramel gives a sweet twist. Enjoy your baking adventure! To make the crust, start by combining the graham cracker crumbs, melted butter, and sugar in a large bowl. Mix well until the crumbs feel like wet sand. This ensures a good texture for the crust. Next, line a standard muffin tin with paper cupcake liners. Take the crust mixture and evenly distribute it into the bottom of each liner. Press down firmly to create a compact base. This step is key for a sturdy crust. Now, let’s move on to the filling. In a separate medium bowl, beat the softened cream cheese until it is smooth. I find using a hand mixer makes this easy. After it’s creamy, mix in the peanut butter, powdered sugar, and vanilla extract. Keep mixing until everything is well combined and fluffy. This is where the magic happens! Next, carefully fold in the whipped topping. This step gives the filling a light and airy texture. Then, spoon the peanut butter cream filling into the crusts. Smooth the tops with the back of a spoon. It should look inviting! Now, drizzle caramel sauce over each cup, allowing it to cascade down the sides. This adds a lovely touch. Finally, place the muffin tin in the refrigerator to set for at least 2 hours. Once they are firm to the touch, remove the muffin tin and peel off the cupcake liners. For a fun finish, sprinkle crushed peanuts over the top of each pie cup. This not only adds crunch but also makes them look amazing! To get the best texture for your peanut butter filling, use creamy peanut butter. It blends smoothly and helps create a light filling. Make sure your cream cheese is at room temperature. This step helps avoid lumps and keeps the filling fluffy. Chilling time is key. After you fill the cups, place them in the fridge for at least 2 hours. This allows the filling to firm up nicely. If you skip this step, your pie cups may fall apart when you serve them. For a stunning visual appeal, serve the pie cups on a decorative platter. Arrange them in a circle or a fun pattern. Drizzle extra caramel sauce around the base of the cups. This adds flair and entices your guests even more. Using garnishes effectively enhances the look. Sprinkle crushed peanuts on top of each pie cup. This adds a nice crunch and gives a rustic touch. You can also add a dollop of whipped topping on each cup for a creamy finish. {{image_4}} You can easily change this recipe to suit your taste. One fun way is by adding chocolate. You could mix in chocolate chips when you make the peanut butter filling. This gives the cups a rich and creamy taste. You can also drizzle some melted chocolate on top. It adds a nice touch and makes the cups even more tempting. Another idea is to use flavored toppings. Try adding crushed Oreos, sprinkles, or even fresh berries. Each topping gives a new taste and look. So feel free to get creative with what you have at home! If you want a vegan version, it is simple! Use coconut cream instead of cream cheese. Swap peanut butter with almond or cashew butter. You can also use maple syrup in place of granulated sugar. For the crust, try using crushed nuts or oats instead of graham crackers. For those watching their sugar intake, consider low-sugar alternatives. You can use a sugar substitute like stevia or erythritol. These options keep the pie cups sweet but lower in calories. Always check labels to ensure they fit your diet. Adjust the caramel sauce as well by choosing a low-sugar version. To keep your No-Bake Caramel Peanut Butter Pie Cups fresh, store them in the refrigerator. Place the pie cups in an airtight container. Make sure they are covered well. This helps them stay tasty for longer. You can also keep them in the muffin tin covered with plastic wrap. If you want to save them for later, freezing is a great option. Wrap each pie cup in plastic wrap, then place them in a freezer-safe bag. This will protect them from freezer burn. They can last up to three months in the freezer. When stored properly in the fridge, these pie cups last about five days. If you see any signs of spoilage, it’s best to throw them out. Look for changes in texture or an off smell. If the graham crust becomes soggy or the filling separates, those are signs they are past their prime. Always trust your senses when deciding if food is still good! Yes, you can make these pie cups ahead of time. They store well in the fridge. I suggest making them a day before your event. After they set, cover the muffin tin with plastic wrap. This keeps them fresh. You can also place them in an airtight container. They will last up to three days in the fridge. If you want a substitute for whipped topping, try freshly whipped cream. You can whip heavy cream until it’s fluffy. Another option is Greek yogurt for a tangy twist. Just keep in mind that this will change the taste slightly. For a dairy-free option, use coconut whipped cream. Each option gives a nice texture. To enhance the caramel taste, drizzle more caramel sauce on top. You can also mix a bit of caramel sauce into the filling. Adding a pinch of sea salt can boost the flavor too. If you love caramel, consider using caramel-flavored cream cheese. It brings a richer taste and makes it more decadent. You learned how to make tasty peanut butter pie cups with easy steps and tips. From the crust to the filling, each part is simple and fun. You can change up ingredients to fit your needs, like making it gluten-free or vegan. Store them correctly to keep them fresh longer. Enjoy these little pie cups at any event or snack time. With the right care, they can bring joy to your table. Try this recipe and share your thoughts on your creations!

No-Bake Caramel Peanut Butter Pie Cups Delight

- 1 cup rolled oats - 1 cup unsweetened almond milk - 1/2 cup canned pumpkin puree The rolled oats form the base of our dish. They soak up all the flavors while keeping their chewy texture. Unsweetened almond milk adds creaminess without extra sugar. Canned pumpkin puree gives you that rich, pumpkin taste and is easy to use. - 1 tablespoon chia seeds - 1 tablespoon maple syrup - 1 teaspoon vanilla extract Chia seeds boost nutrition and help with texture. They soak up liquid and make the oats thicker. Maple syrup adds sweetness; you can adjust it to fit your taste. Vanilla extract gives a warm, cozy flavor that blends beautifully. - 1/2 teaspoon pumpkin pie spice - 1/4 teaspoon ground cinnamon - A pinch of salt Pumpkin pie spice is key for that classic fall taste. It brings in notes of nutmeg and ginger. Ground cinnamon adds warmth and richness. A pinch of salt balances all the sweet flavors, making each bite pop. - Whipped cream - Crushed graham crackers - Cinnamon dusting Topping your oats makes them festive and fun. Whipped cream adds a creamy layer on top. Crushed graham crackers give a nice crunch. A light dusting of cinnamon finishes the dish, making it look pretty and inviting. First, grab a large bowl. Add 1 cup of rolled oats. Pour in 1 cup of unsweetened almond milk. Then, add 1/2 cup of canned pumpkin puree. This will give the oats a creamy texture. Next, sprinkle in 1 tablespoon of chia seeds. Chia seeds add fiber and protein. Now, add 1 tablespoon of maple syrup for sweetness. If you want it sweeter, feel free to add more. Finally, pour in 1 teaspoon of vanilla extract. This adds a nice flavor depth. Now it’s time to add some spice! Sprinkle in 1/2 teaspoon of pumpkin pie spice. This mix brings that classic fall flavor. Next, add 1/4 teaspoon of ground cinnamon. Mixing spices helps the flavors blend well. Use a spatula or spoon to mix everything thoroughly. You want all the ingredients to combine nicely. Once your mixture is ready, cover the bowl with plastic wrap. You can also transfer it to jars for easy storage. Make sure the jars have lids. Place the bowl or jars in the fridge. Let the oats soak for at least 6 hours or overnight. This soaking time allows the oats to absorb all the flavors. When it’s time to eat, give the oats a good stir. This helps mix any settled ingredients. Taste the mixture and add more maple syrup if needed. Now, portion the oats into bowls or jars. For extra fun, add toppings! Whipped cream is a great choice. You can also sprinkle crushed graham crackers for crunch. A light dusting of cinnamon on top adds a festive touch. Enjoy your delicious breakfast! To get the best texture, soak the oats for at least six hours. This time lets them absorb the liquid. If you can, leave them overnight. It makes a big difference! When mixing, use a spatula to combine the ingredients well. Make sure every oat gets soaked. This helps them soften and blend the flavors. You can adjust the sweetness by adding more or less maple syrup. If you want a richer taste, try adding honey or agave syrup. For a unique twist, use brown sugar or coconut sugar. Each option gives a different flavor, so feel free to experiment! Serving in clear jars is a fun way to show off the layers. It makes breakfast look pretty! If you prefer, you can also use colorful bowls. Top the oats with whipped cream for a treat. Crushed graham crackers add crunch, and a sprinkle of cinnamon gives a warm touch. Mix and match toppings to make it your own! {{image_4}} You can use several milk options besides almond milk. Coconut milk adds a rich, creamy taste. Oat milk is also a great choice, as it blends well. If you are lactose-sensitive, choose lactose-free milk or any nut milk. These options keep your oats tasty and gentle on the stomach. Want to make your oats even more exciting? Try adding chocolate chips for a sweet touch. Nut butter, like almond or peanut butter, gives creaminess and protein. Adjust the spices according to your taste. If you love warmth, add more cinnamon or nutmeg. If you prefer a milder flavor, reduce the spice amounts. Fall is a great time to explore other flavors. Caramel drizzles can add a sweet layer. Nutmeg brings a cozy warmth that pairs well with pumpkin. For the holidays, try adding peppermint extract. This makes a festive treat that feels special. These variations keep your breakfast fresh and fun all season long. To keep your pumpkin spice latte overnight oats fresh, store them in the refrigerator. Use airtight containers or mason jars. These containers help keep the oats moist and flavorful. Make sure to cover the mixture well to avoid any odors from the fridge. Pumpkin spice latte overnight oats stay fresh for up to five days in the fridge. Check for signs of spoilage, like an off smell or changes in texture. If the oats become too dry or clumpy, it’s best to toss them. Always trust your senses; if it doesn’t smell or look right, don’t eat it. Yes, you can freeze overnight oats! This option is great for meal prep. To freeze, portion the oats into freezer-safe containers. Leave some space at the top, as the oats will expand. When you’re ready to eat, move the container to the fridge to defrost overnight. For a quicker method, you can microwave the oats straight from the freezer. Just add a splash of milk to help soften them. Yes, you can use rolled oats. They offer a chewy texture and rich flavor. Rolled oats soak up liquid well, making them perfect for overnight oats. They keep their shape and provide a hearty bite. Instant oats can become mushy, which may not give you the best taste. Overnight oats stay fresh for about 3 to 5 days. Store them in a sealed container. This helps keep them tasty and safe to eat. After a few days, check for any changes in smell or texture. If they look or smell off, it's best to toss them. Yes, this recipe is easy to make vegan. Use almond milk or any other plant-based milk. Make sure the maple syrup is pure and not mixed with honey. All other ingredients are also vegan-friendly. Enjoy this tasty treat without any animal products. You can use several alternatives for almond milk. Options include soy milk, oat milk, or coconut milk. Each milk gives a unique flavor. Choose one that fits your taste or dietary needs. If you are nut-free, soy or oat milk works great. Yes, you can heat overnight oats. To warm them up, place them in a bowl and microwave for about 30 seconds. Stir and check the temperature. If you want them warmer, heat for another 15 to 30 seconds. Enjoy them warm if that's your style! This blog post covered making delicious overnight oats with pumpkin. We explored ingredients like rolled oats, almond milk, pumpkin puree, and spices such as cinnamon. You learned how to mix, refrigerate, and serve your oats, plus tips for adjusting sweetness and texture. Remember, you can customize flavors, try new toppings, and even store oats for later use. Enjoy your tasty, healthy breakfasts. Making overnight oats is easy and fun!

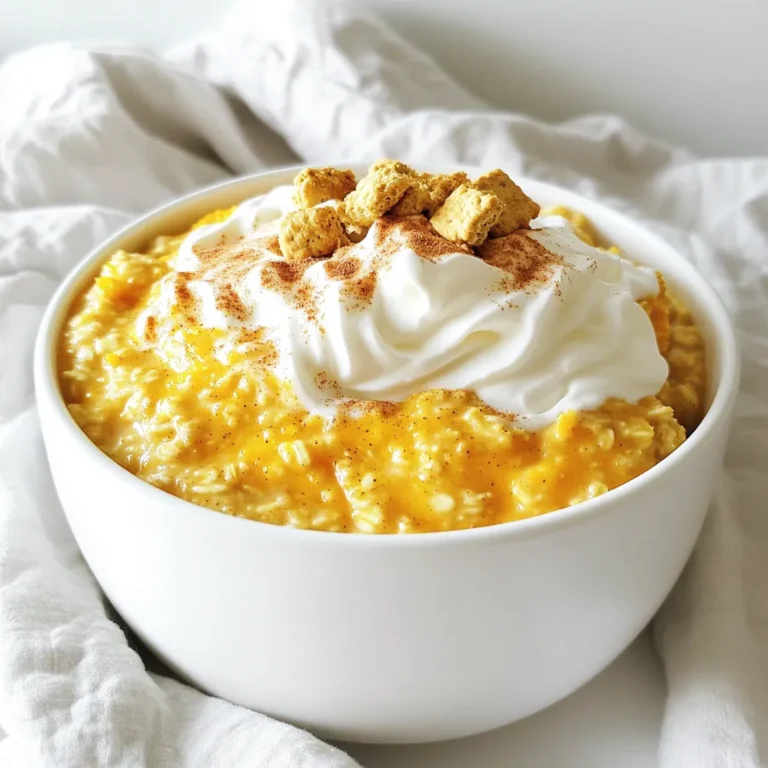
Pumpkin Spice Latte Overnight Oats Flavors Packed Delight

For the best Caramel Apple Upside Down Cake, gather these key ingredients: - 4 medium apples (e.g., Granny Smith or Honeycrisp), peeled and sliced - 1 cup packed brown sugar - 1/2 cup unsalted butter (1 stick), plus more for greasing - 1 teaspoon pure vanilla extract - 1 teaspoon ground cinnamon - 1 1/2 cups all-purpose flour - 1 1/2 teaspoons baking powder - 1/2 teaspoon fine salt - 3/4 cup granulated sugar - 3 large eggs, at room temperature - 1/2 cup whole milk, at room temperature Apples bring sweetness and tartness. Brown sugar adds depth to the caramel. Butter gives richness. Vanilla and cinnamon add warm flavors to the cake. You can try these optional ingredients to change things up: - Chopped nuts (like walnuts or pecans) for crunch - Dried fruits, like raisins or cranberries, for added sweetness - A splash of apple cider for extra apple flavor These additions can make your cake more exciting and unique. If you have dietary needs, here are some substitutions: - Use coconut oil instead of butter for a dairy-free option. - Swap all-purpose flour with almond flour for gluten-free needs. - Use egg replacements like flax eggs for a vegan option. These swaps help you enjoy the cake without worry. To start, preheat your oven to 350°F (175°C). This will ensure our cake bakes evenly. Next, take a medium skillet and melt 1/2 cup of unsalted butter over medium heat. Once melted, add 1 cup of packed brown sugar. Stir it continuously until it dissolves and begins to bubble. This takes about 2-3 minutes. Now, add the sliced apples, 1 teaspoon of pure vanilla extract, and 1 teaspoon of ground cinnamon. Stir everything well. Cook this mixture for 5-7 minutes. The apples should soften but still hold their shape. After that, remove the skillet from heat and let it cool slightly. In a medium bowl, whisk together 1 1/2 cups of all-purpose flour, 1 1/2 teaspoons of baking powder, and 1/2 teaspoon of fine salt. Set this aside for later. In a large mixing bowl, combine 3/4 cup of granulated sugar and the remaining 1/2 cup of softened butter. Beat them together with an electric mixer on medium speed. Mix until it looks light and creamy, which takes about 3-4 minutes. Add 3 large eggs one at a time, mixing well after each addition. Gradually pour in 1/2 cup of whole milk, stirring until it's well mixed. Slowly add the dry ingredients to the wet mixture. Use a spatula to gently combine. A few lumps are okay; don’t overmix. Now, it’s time to combine our layers. Grease a 9-inch round cake pan with butter. Pour the cooled apple mixture into the bottom of the pan. Spread it evenly, then arrange the apple slices in a circular pattern. Carefully pour the batter over the apples, spreading it evenly with a spatula. Place the cake in the preheated oven and bake for 30-35 minutes. To check if it's done, insert a toothpick into the center. It should come out clean or with just a few moist crumbs. Once baked, let the cake cool in the pan for about 10 minutes. Run a knife around the edges to loosen it. Place a serving plate upside down on top of the pan and flip it over. The apple layer will rest on top. Allow the cake to cool slightly before you slice and serve. For this cake, I love using Granny Smith or Honeycrisp apples. - Granny Smith: They are tart and hold their shape well. - Honeycrisp: They add sweetness and crunch. These apples balance the rich caramel flavor perfectly. To keep the bottom of your cake from getting soggy, follow these tips: - Cook the apples lightly: Only cook them until they soften a bit. - Use a non-stick pan: This helps the cake release better. - Cool slightly before flipping: Let the cake rest for 10 minutes. These steps keep the cake fluffy and light. Serve this cake warm or at room temperature for the best taste. Here are some fun serving ideas: - Top with whipped cream: This adds a creamy touch. - Pair with vanilla ice cream: The cold ice cream contrasts well. - Drizzle extra caramel sauce: This enhances the sweet flavor. These options make the cake even more tempting! {{image_4}} You can make your caramel apple cake even more special by adding nuts. Chopped walnuts or pecans add a great crunch. Just sprinkle them on top of the apples before pouring in the cake batter. The nuts will toast as the cake bakes, giving you a lovely texture and flavor. This small change makes a big difference. To make a gluten-free version, you can swap out the all-purpose flour. Use a 1:1 gluten-free flour blend instead. Make sure the blend contains xanthan gum for binding. This way, everyone can enjoy the cake without gluten. Follow the same steps for the recipe, and you will have a moist cake that tastes just as good. You can change up the fruits based on the season. In the fall, use pears or figs. In the summer, peaches or berries work well. Just slice them thinly and follow the same steps as with the apples. Each fruit brings its own unique flavor to the cake. This keeps your dessert fresh and fun all year round. Store leftover caramel apple upside down cake in an airtight container. This helps keep it fresh. Place the container in the fridge. The cake stays good for about three days. If you want to keep it longer, consider freezing it. To freeze the cake, let it cool completely first. Wrap it tightly in plastic wrap. Then, place it in a freezer-safe bag or container. Label it with the date. You can freeze it for up to three months. When you're ready to eat it, thaw it in the fridge overnight. To reheat, preheat your oven to 350°F (175°C). Place the cake on a baking sheet. Cover it loosely with foil. Heat for about 15-20 minutes, or until it's warm. You can also use the microwave. Heat a slice for about 30 seconds on high. Enjoy it warm for the best taste! Yes, you can use other fruits! Pears, peaches, or even berries work well. Just make sure they are ripe. Each fruit brings its own taste and texture. Experiment to find your favorite combo! Check the cake at 30 minutes. Insert a toothpick into the center. If it comes out clean or with a few moist crumbs, the cake is ready. Overbaking can dry it out, so keep an eye on it! This cake pairs well with whipped cream or vanilla ice cream. You can also add a drizzle of caramel sauce. For a twist, serve with a scoop of cinnamon ice cream. Enjoy it warm for the best taste! You learned how to make a tasty Caramel Apple Upside Down Cake. We discussed the key ingredients, step-by-step instructions, and helpful tips. You also discovered fun variations and how to store leftovers. This cake is simple and can fit many tastes. Whether you try nuts or go gluten-free, the choices are endless. Enjoy making this treat for yourself or loved ones. Happy baking!

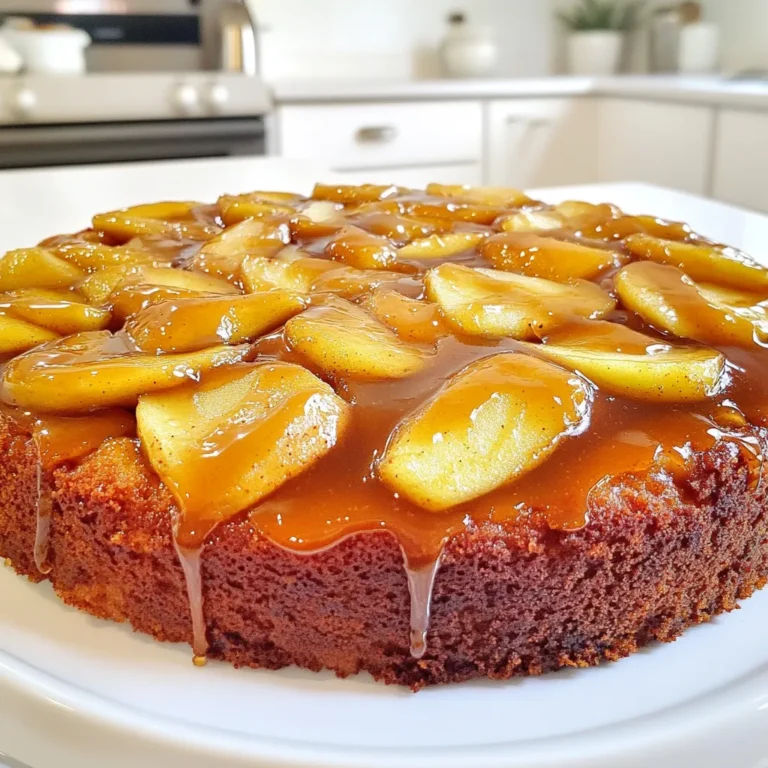
Caramel Apple Upside Down Cake Tempting and Sweet Treat

- 1 cup quinoa, thoroughly rinsed under cold water - 2 cups water or vegetable broth (for extra flavor) - 1 ripe mango, peeled and diced into bite-sized cubes - 1 can (15 oz) black beans, drained and thoroughly rinsed - 1 red bell pepper, finely diced - 1 small red onion, finely chopped - 1 cup corn (can use fresh kernels, frozen, or canned) - 1/4 cup fresh cilantro, chopped coarsely - Juice of 2 limes (about 1/4 cup) - 2 tablespoons extra virgin olive oil - 1 teaspoon ground cumin - Sea salt and freshly ground black pepper, to taste In this salad, quinoa stands out as the main ingredient. It adds a nice texture and a boost of protein. The bright mango adds sweetness, while black beans provide fiber and protein. Fresh veggies like bell pepper and onion give crunch and flavor. Corn adds a pop of sweetness and color. The dressing ties everything together. It combines lime juice, olive oil, cumin, salt, and pepper. This mix brightens the salad and enhances all the flavors. If you want to switch things up, try different grains. Brown rice or farro work well in this recipe. You can also use other beans, like chickpeas or kidney beans. Feel free to add more veggies. Chopped cucumber or shredded carrots can add more crunch. You might like to toss in some grilled chicken or shrimp for extra protein. You can change the dressing too. Swap lime juice for lemon juice or add some honey for sweetness. A dash of hot sauce can add a kick! {{ingredient_image_2}} First, rinse the quinoa. This step removes the bitter coating called saponin. Use a fine mesh strainer. Rinse it under cold water for about a minute. Next, choose your cooking method. You can use water or vegetable broth. Using broth adds more flavor to the quinoa. In a medium saucepan, add 1 cup of rinsed quinoa and 2 cups of your choice of liquid. Bring it to a boil on medium-high heat. Once boiling, reduce the heat to low. Cover the pan with a lid and let it simmer. Cook for 15-20 minutes until all the liquid absorbs. Once done, remove it from the heat and let it cool slightly. While the quinoa cools, prepare the salad ingredients. Start by dicing the ripe mango into small cubes. Next, finely dice the red bell pepper and chop the red onion. Open the can of black beans and drain them. Rinse the beans under cold water. Then, measure out 1 cup of corn. You can use fresh, frozen, or canned corn. In a large mixing bowl, combine the diced mango, black beans, corn, red bell pepper, red onion, and chopped cilantro. Gently toss these ingredients to mix them well. Now, let’s make the dressing. In a small bowl, whisk together the juice of 2 limes, 2 tablespoons of olive oil, and 1 teaspoon of ground cumin. Add a pinch of sea salt and black pepper to taste. Mix until all the ingredients are combined. Once the quinoa has cooled to room temperature, use a fork to fluff it. Break apart any clumps. Add the fluffed quinoa to the bowl with the other salad ingredients. Drizzle the dressing over the salad and gently toss everything together. Make sure all the ingredients are coated well. Now, taste the salad. Adjust the seasoning if needed, adding more salt, pepper, or lime juice for extra flavor. For the best taste, cover the salad and chill it in the fridge for at least 30 minutes. This time helps the flavors blend and develop. To get quinoa just right, rinse it well. Rinsing removes the bitter coating. Use a fine mesh strainer for this. Cook the quinoa in water or vegetable broth for taste. To avoid mushy quinoa, stick to the 2:1 ratio of water to quinoa. Bring it to a boil, then reduce the heat. Cover and let it simmer for 15-20 minutes. After cooking, let it cool a bit. Fluff it with a fork gently. This helps to separate any clumps. Marinating adds depth to your salad. You can soak the black beans in lime juice for 30 minutes. This gives them a bright flavor. When mixing the dressing, taste as you go. If it’s too tart, add a pinch of sugar. If you need more heat, add a dash of cayenne. Adjust salt and pepper to suit your taste too. For a stunning presentation, use a large, colorful bowl. This makes your salad pop! Garnish with extra cilantro leaves for freshness. Add lime wedges for a splash of color. This makes each serving look inviting and fresh. Enjoy the vibrant mix of flavors and colors! Pro Tips Perfectly Cooked Quinoa: Rinse the quinoa thoroughly before cooking to remove the bitter saponins. This ensures a fluffy and delicious texture. Fresh Mango Selection: Choose a ripe mango that gives slightly when pressed. This indicates it is sweet and ready to be diced. Flavor Boost: For an extra flavor kick, consider adding a pinch of cayenne pepper or diced jalapeños to the salad for a spicy twist. Meal Prep Friendly: This salad stores well in the fridge for up to 3 days, making it a perfect option for meal prep. Just give it a good stir before serving. {{image_4}} You can add grilled chicken or shrimp to this salad. This makes the dish heartier and adds a nice flavor. Simply cook the meat until it's golden, then slice or cube it. Toss it in with the salad right before serving. If you're looking for a plant-based option, try tofu or tempeh. Both options soak up flavors well. For tofu, use firm or extra-firm types. Cut them into cubes and pan-fry until crispy. For tempeh, steam it first, then slice and sauté. This adds a great crunch and protein boost. Fresh seasonal fruits or vegetables can change the salad's taste. In summer, add diced peaches or strawberries for a sweet twist. In fall, roasted sweet potatoes or butternut squash work well. They add warmth and earthiness. You can get creative with each season. In winter, try adding pomegranate seeds for a pop of color. In spring, fresh herbs like basil or mint can brighten the dish. This keeps your salad exciting all year round. You can switch up the dressing for different flavors. Try using balsamic vinegar instead of lime juice for a tangy twist. Apple cider vinegar also adds a nice zing. For oils, swap olive oil for avocado oil or sesame oil. Each oil brings its own unique taste. You can also experiment with spices. Adding chili powder or smoked paprika can give the dressing a nice kick. Store your Mango Black Bean Quinoa Salad in an airtight container. This keeps it fresh longer. Make sure to seal it well to prevent air from getting in. The salad should stay in a cool, dark place like your fridge. The salad lasts about 3 to 5 days in the fridge. After that, the ingredients may lose their taste and texture. If you want to freeze it, keep in mind that quinoa can change texture. To freeze, place the salad in a freezer-safe container. It will stay good for about 1 month. When ready to eat, thaw it in the fridge overnight. You can use several grains instead of quinoa. Some great options include: - Brown rice - Farro - Couscous - Bulgur wheat These grains all have a nice texture and flavor. Brown rice is chewy and hearty. Farro has a nutty taste. Couscous cooks quickly and is light. Bulgur wheat is quick and tasty. Each choice brings its charm to the salad. Yes, you can make this salad ahead of time. Here are some best practices: - Prepare the quinoa and let it cool. - Mix the salad ingredients without the dressing. - Store it in the fridge for up to 24 hours. - Add the dressing just before serving. This keeps the salad fresh and crunchy. The flavors will blend nicely overnight. You can enjoy a quick meal on busy days. Yes, Mango Black Bean Quinoa Salad is vegan. It contains no animal products. The main ingredients are fruits, veggies, and grains. You can enjoy it without worry. It’s a perfect dish for everyone. This blog post covered the delicious Mango Black Bean Quinoa Salad. We explored key ingredients, substitutions, and preparation steps. I shared tips for perfecting quinoa and dressing variations. You can customize your salad with extra protein or seasonal produce. Remember, proper storage keeps it fresh for later. Enjoy experimenting with flavors and variations. This salad is versatile and healthy, a great choice for any meal.

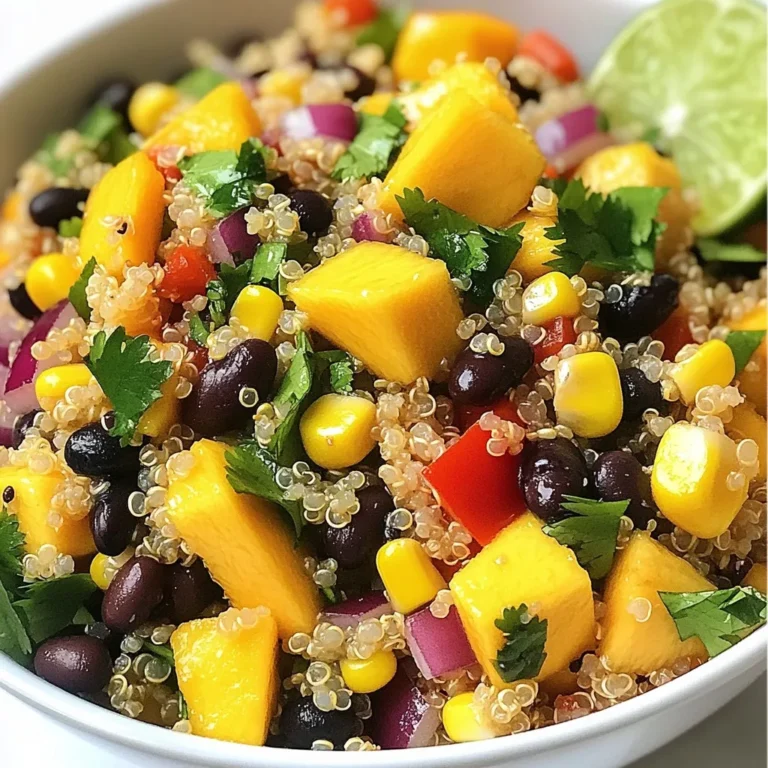
Mango Black Bean Quinoa Salad Fresh and Flavorful Dish

- 2 pounds beef ribs - 1/2 cup honey - 1/4 cup soy sauce - 4 cloves garlic, minced - 1 tablespoon fresh ginger, grated - 1 teaspoon black pepper - 1 teaspoon red chili flakes (optional) - 1/2 cup beef broth - 1 tablespoon cornstarch mixed with 1 tablespoon water - Garnishes: 2 green onions, chopped, sesame seeds To make Slow Cooker Honey Garlic Beef Ribs, you will need a few key items. First, choose 2 pounds of beef ribs. Look for well-marbled meat for the best flavor. Next, gather your sweet and savory ingredients. You need 1/2 cup of honey and 1/4 cup of soy sauce. These create the base of your sauce. Add some aromatics to the mix. You will use 4 cloves of minced garlic and 1 tablespoon of grated ginger. These will give your dish depth and warmth. For seasoning, grab 1 teaspoon of black pepper. If you want heat, add 1 teaspoon of red chili flakes. Don't forget the liquid! You need 1/2 cup of beef broth to keep the ribs moist. For a thick sauce, mix 1 tablespoon of cornstarch with 1 tablespoon of water. Finally, chop up 2 green onions and sprinkle some sesame seeds. These will make your dish look and taste great! Start by trimming any excess fat from the beef ribs. This helps enhance the flavor. Pat the ribs dry using paper towels. Then, season them generously with black pepper. If you like some heat, sprinkle red chili flakes over the ribs for added spice. In a mixing bowl, combine 1/2 cup honey, 1/4 cup soy sauce, minced garlic, and grated ginger. Whisk the mixture well until it’s smooth. This sauce gives the ribs their tasty flavor. Place the seasoned ribs in the slow cooker. Try to arrange them in a single layer if you can. Pour the honey garlic sauce over the ribs. Make sure each rib is coated. Then, add 1/2 cup beef broth to keep the ribs moist while cooking. Cover the slow cooker and set it to cook on low for 6-8 hours. If you need them faster, set it to high for 3-4 hours. The ribs are done when the meat is tender and pulls away from the bones easily. Once cooked, carefully take the ribs out of the slow cooker. Place them on a plate. Strain the cooking liquid into a saucepan. Heat it gently over medium heat. Stir in cornstarch mixed with water. Cook for 1-2 minutes until the sauce thickens. Transfer the tender beef ribs to a serving platter. Drizzle them with the thickened sauce. For a beautiful touch, garnish with chopped green onions and a sprinkle of sesame seeds. Enjoy your meal! Cooking ribs low and slow makes them soft and juicy. This method breaks down tough fibers in the meat. Aim for 6-8 hours on low heat. If you’re short on time, 3-4 hours on high will work too. For best results, marinate the ribs for at least 2 hours, or overnight. This adds flavor and helps tenderize the meat. Want to kick it up a notch? Try adding spices like smoked paprika or cumin. You can also swap in sauces like hoisin or barbecue for a unique twist. Different cuts of beef ribs can change the flavor and texture too. Spare ribs are meaty and flavorful, while short ribs are rich and tender. Adjust the sweetness by adding more honey or using brown sugar. To add heat, increase the red chili flakes or add hot sauce. If you have dietary needs, swap honey for maple syrup or agave. You can also use a gluten-free soy sauce for a safe option. Feel free to experiment! {{image_4}} You can choose different cuts for this recipe. Short ribs are rich and flavorful. They have a nice amount of fat, which makes them tender. Spare ribs are leaner and can be a bit tougher. If you want a lighter option, try using beef chuck or brisket. For a vegetarian or vegan twist, consider using jackfruit or tofu. Both can absorb the honey garlic sauce well. You can change the flavor of the dish with some simple swaps. For an Asian twist, add hoisin sauce or sriracha. This gives the dish a nice kick and depth. You can also mix in sesame oil for extra flavor. If you prefer a Mediterranean vibe, use herbs like rosemary or thyme. Adding olive oil will enhance the taste and keep it fresh. For a complete meal, pair the ribs with sides that balance the sweetness. Some great options are steamed rice or mashed potatoes. You can also serve roasted vegetables for color and crunch. If you want a dipping sauce, try a spicy chili sauce or a garlic aioli. These will complement the sweet and savory flavors of the ribs. To keep your leftover ribs fresh, use an airtight container. Make sure to let them cool first. This helps prevent moisture loss. Store them in the fridge. They are best eaten within three days. You can also wrap them tightly in foil or plastic wrap. If you want to freeze ribs, wrap them in plastic wrap, then foil. This helps keep the flavor locked in. Write the date on the wrap. You can freeze them for up to three months. When ready to eat, thaw the ribs in the fridge overnight. To reheat, the oven works great. Preheat it to 300°F (150°C). Place the ribs on a baking sheet. Cover them with foil to keep them moist. Heat for about 20 to 30 minutes. You can also use a microwave. Just add a splash of broth to keep them juicy. Heat them on medium power for 2 to 3 minutes. Always check to make sure they are hot all the way through. You can cook ribs on low for 6-8 hours. If you are in a hurry, set your slow cooker to high for 3-4 hours. The meat should be tender and pull away from the bones easily. Yes, you can use pork ribs or even chicken. Pork ribs cook in about 4-5 hours on low. Chicken thighs will take about 3-4 hours on low as well. Adjust the sauce if needed to match the meat's flavor. Thickening the sauce is optional but adds a nice touch. If you want a rich, sticky glaze, use cornstarch mixed with water. This step makes the sauce cling better to the ribs. Great sides include mashed potatoes, rice, or steamed veggies. You can also try coleslaw or cornbread, which complement the sweet and savory flavors of the ribs. Yes, you can prep the ribs and sauce a day early. Store the ribs in the fridge. You can also freeze cooked ribs for later. Just thaw them before reheating in the oven or microwave. This blog post covered how to make delicious honey garlic beef ribs in a slow cooker. You learned about the key ingredients, preparation steps, and cooking techniques for tender meat. I shared tips to enhance flavors and variations for diverse preferences. Proper storage and reheating methods help keep your ribs tasty. Enjoy experimenting with these recipes and making them your own. Cooking can be fun and rewarding. So, grab your ingredients and let’s start making mouthwatering ribs!

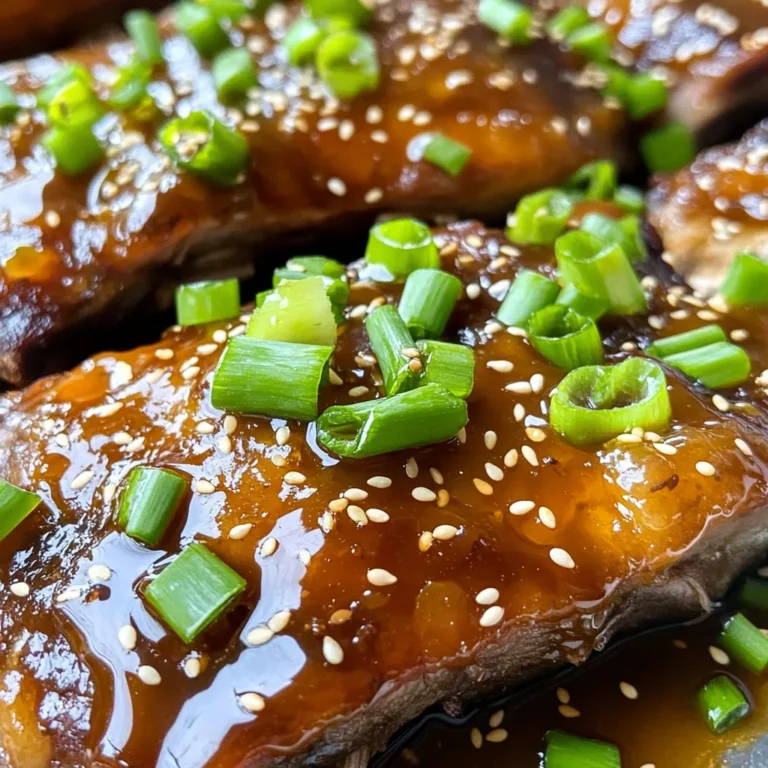
Slow Cooker Honey Garlic Beef Ribs Simple and Tasty

- Zucchini: Use 2 medium zucchinis, trimmed and cut into thick sticks. Choose firm zucchinis for the best texture. - Panko Breadcrumbs: I love using panko because it gives a great crunch. It’s lighter and crispier than regular breadcrumbs, making your fries perfect. - Seasonings and Cheese: Garlic powder, onion powder, and smoked paprika add flavor. Freshly grated Parmesan cheese gives a rich taste and helps with browning. Using a mix of these is key for a tasty snack. - Eggs and Cooking Spray: Two large eggs help the crumbs stick well to the zucchini. A light spray of cooking oil enhances crispiness as they cook in the air fryer. This step is crucial for getting that golden finish. Preheating the air fryer is key for great texture. This step makes sure the fries cook evenly and get crispy. Set your air fryer to 400°F (200°C) and let it heat for about 5 minutes. This short wait is worth it for that perfect crunch. In a shallow bowl, mix the dry ingredients. Combine 1 cup of panko breadcrumbs, 1/2 cup of grated Parmesan, 1 teaspoon of garlic powder, 1 teaspoon of onion powder, and 1/2 teaspoon of smoked paprika. Add sea salt and black pepper to taste. Stir well to spread the spices evenly. This mix gives the fries flavor and crunch. Coating the zucchini fries is easy. First, take a zucchini stick and dip it into the beaten eggs. Let any extra egg drip off. Next, roll it in the breadcrumb mix. Press gently to make sure the crumbs stick well. This step is important for a tasty, even coating. Place the coated zucchini fries in the air fryer basket. Make sure they’re in a single layer. Avoid overcrowding to help them cook evenly. Lightly spray the tops with cooking spray for extra crispiness. Cook them for 10-12 minutes, flipping halfway through. They should look golden brown and crunchy when done. Remove them carefully and let them cool slightly on a wire rack. Enjoy your healthy snack! To get that perfect crisp, use a light spray of cooking spray. This helps the fries turn golden brown and crunchy. Make sure to spray the tops after you arrange them in the air fryer. Avoid overcrowding the basket. If you place too many fries at once, they won’t cook evenly. Each fry needs space to breathe, so work in batches if needed. For dips, marinara sauce is a classic choice. It adds a nice tangy flavor. You might also try creamy ranch for a cool contrast. Garnish with freshly chopped parsley. This adds vibrant color and a fresh taste. A sprinkle of sea salt right before serving can enhance the flavor too. Don’t over-bread your zucchini. If you add too much coating, it can taste heavy. Under-baking is another common mistake. Keep an eye on the time to ensure they cook fully. When selecting zucchini, choose medium-sized ones. They hold their shape well and are easier to handle. Avoid oversized zucchini, as they can be watery and less tasty. {{image_4}} To switch up your zucchini fries, try different spices. You can add cayenne for heat or Italian herbs for a fresh taste. A mix of cumin and chili powder can give a Mexican twist. Feel free to play and find what you love! If you have dietary needs, you can swap ingredients. For a gluten-free option, use gluten-free breadcrumbs. If you want a vegan version, skip the eggs and use a flaxseed mixture instead. Just mix one tablespoon of ground flaxseed with three tablespoons of water. Let it sit for a few minutes to thicken, then use it to coat your zucchini. If you don’t have an air fryer, you can bake or pan-fry your zucchini fries. Baking is easy and healthier, but it may take longer. Preheat your oven to 425°F (220°C) and place the fries on a baking sheet. Bake for about 20-25 minutes, flipping halfway through. Stovetop frying is another option. Heat oil in a pan over medium heat. Fry the zucchini fries in batches for about 3-4 minutes on each side until golden brown. This method gives a nice crunch but requires more oil. Just be careful not to overcrowd the pan, or they won’t cook evenly. To keep your crispy air fryer zucchini fries fresh, store them in an airtight container. Place a paper towel at the bottom to absorb moisture. This helps keep them crispy. If you want to freeze them, wrap each fry in plastic wrap and place them in a freezer bag. When reheating, I suggest using the air fryer again. Set it to 350°F (175°C) for about 5-7 minutes. This method revives their crunch. If you use a microwave, the fries may turn soggy. In the fridge, these zucchini fries last for about 3-4 days. In the freezer, they can stay good for up to 2 months. Always check for signs of spoilage. If you see any mold or an off smell, it’s best to throw them away. Keeping an eye on your food ensures you enjoy the best flavors and textures. Air fryer zucchini fries last about 3 to 4 days in the fridge. Store them in an airtight container to keep them fresh. You can also freeze them for up to 3 months. To freeze, place them in a single layer on a baking sheet. Once frozen, transfer them to a freezer bag. This keeps them from sticking together. Yes, you can easily make these zucchini fries gluten-free. Instead of panko breadcrumbs, use gluten-free breadcrumbs or almond flour. Both options work well and still give you that crispy texture. Just check the labels to ensure they are certified gluten-free. Air fryer zucchini fries pair perfectly with several dips. Try marinara sauce for a classic taste. Ranch dressing adds a creamy touch. You can also serve them with a yogurt-based dip for a fresh flavor. These fries complement salads or grilled meats, adding crunch to your meal. Yes, you can prepare zucchini fries ahead of time. Cut and bread the zucchini sticks, then store them in the fridge for up to 2 hours. For longer storage, freeze the un-cooked fries. When you’re ready to cook, just pop them in the air fryer from the freezer. Adjust the cooking time, adding a few extra minutes to ensure they are fully cooked. In this post, we explored how to make crispy air fryer zucchini fries. We discussed key ingredients, cooking techniques, and serving ideas. I shared tips to avoid common mistakes and how to achieve that perfect crisp. Remember, the right preparation makes all the difference. Try new flavors or cooking methods to find what you love. Enjoy your crispy fries, and don’t forget to share your favorite dips and ideas!

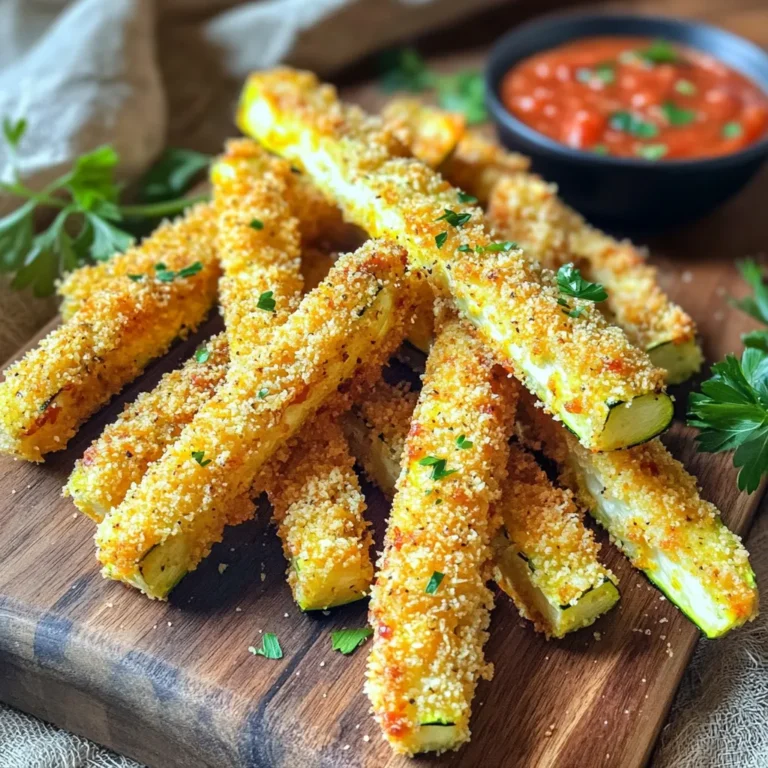
Crispy Air Fryer Zucchini Fries Healthy Snack Option

PREV 1 … 5 6 7 … 44 NEXT
yummybiterecipes

explore

DessertsDinnerAppetizersDrinks

Our Policies

  • Cookie Policy
  • Copyright Policy
  • Disclaimer
  • GDPR Policy
  • Terms Of Use
Back to Top
  • About
  • Contact Us
  • Privacy Policy
© 2025 yummybiterecipes