FREE DINNER EBOOK! Get your copy!
  • Cookie Policy
  • GDPR Policy
  • Disclaimer
  • Terms Of Use
  • Visit my other site: Fun Cookie Recipes
yummybiterecipes
  • Home
  • Dinner
  • Desserts
  • Drinks
  • Appetizers
  • Contact
  • About
  • Privacy Policy
  • Home
  • Dinner
  • Desserts
  • Drinks
  • Appetizers
  • Contact
  • About
  • Privacy Policy
  • Cookie Policy
  • GDPR Policy
  • Disclaimer
  • Terms Of Use
Visit my other site: Fun Cookie Recipes

HOME / CATEGORIES /

Latest

- 2 medium sweet potatoes, peeled and diced into bite-sized cubes - 1 cup dried green or brown lentils, thoroughly rinsed and drained - 1 can (14 oz) full-fat coconut milk - 1 can (14.5 oz) diced tomatoes, with juices included - 1 medium onion, finely chopped - 3 cloves garlic, minced - 1-inch piece of fresh ginger, grated - 2 cups vegetable broth or stock - 2 tablespoons curry powder - 1 teaspoon ground turmeric - 1 teaspoon ground cumin - 1 teaspoon red chili flakes (adjust according to your spice preference) - Salt and pepper to taste - 2 cups fresh spinach or kale, roughly chopped - Fresh cilantro, for garnish - Juice of 1 fresh lime You can use any sweet potato, but I love the orange-fleshed ones. They add a nice sweetness. If you want a creamier texture, swap coconut milk for cashew cream. For lentils, green or brown work best. You can even use red lentils for a quicker cook time. If you don’t have fresh ginger, ground ginger can work too, but use less. This curry is vegan and gluten-free. It fits many diets and is packed with nutrients. If you’re nut-free, stick to coconut milk. This dish is hearty and filling, making it a great option for everyone. Start by gathering all your ingredients. You need: - 2 medium sweet potatoes, peeled and diced into bite-sized cubes - 1 cup dried green or brown lentils, rinsed and drained - 1 can (14 oz) full-fat coconut milk - 1 can (14.5 oz) diced tomatoes, with juices - 1 medium onion, finely chopped - 3 cloves garlic, minced - 1-inch piece of fresh ginger, grated - 2 cups vegetable broth or stock - 2 tablespoons curry powder - 1 teaspoon ground turmeric - 1 teaspoon ground cumin - 1 teaspoon red chili flakes - Salt and pepper to taste - 2 cups fresh spinach or kale, roughly chopped - Fresh cilantro, for garnish - Juice of 1 fresh lime Once you have everything, chop the sweet potatoes and onion. Mince the garlic and grate the ginger. This step makes the cooking process smooth and quick. In your slow cooker, add the sweet potatoes, lentils, onion, garlic, and ginger. Stir these ingredients together well. Next, pour in the coconut milk and diced tomatoes. Don't forget to include the juices from the tomatoes. This adds depth to your curry. Add the vegetable broth next. Then, sprinkle in the curry powder, turmeric, cumin, and red chili flakes. Season with salt and pepper to your taste. Mix everything until it is well combined. Cover the slow cooker and set it to low for 6-8 hours or high for 3-4 hours. The curry is done when the sweet potatoes and lentils are tender. About 15 minutes before serving, gently stir in the chopped spinach or kale. This adds a nice color and nutrients. Cover the slow cooker again to let the greens wilt. Just before you serve, squeeze the fresh lime juice over the curry. This brightens the flavors. Taste the dish and adjust seasoning as needed. Serve hot, garnished with fresh cilantro on top. Enjoy the warm, inviting aroma of this delightful curry! To boost the flavor of your curry, try adding a few key ingredients. A splash of lime juice brightens the dish. You can also add a spoonful of almond or peanut butter for creaminess. Fresh herbs like cilantro add a burst of freshness. If you want more heat, toss in extra chili flakes or fresh chopped chili peppers. For texture, consider adding a handful of nuts or seeds before serving. They offer a nice crunch and richness. Different slow cookers cook at different speeds. If your slow cooker cooks faster, check your curry after 3 hours on high or 5 hours on low. You want the sweet potatoes and lentils to be tender but not mushy. If your cooker runs slower, it may need the full 8 hours on low. Always taste it before serving to make sure it’s just right. This curry pairs well with several sides. Serve it over fluffy rice or with warm naan bread. You can also enjoy it with a side salad for freshness. For a complete meal, top it with a dollop of yogurt or a vegan alternative. Garnish with lime wedges and fresh cilantro for a lovely touch. Enjoy your delicious, vibrant meal! {{image_4}} You can swap sweet potatoes for other veggies. Carrots add a nice crunch. Butternut squash gives a sweet twist. Cauliflower florets work well too, soaking up the flavor nicely. You can even add peas for a pop of color. Feel free to mix and match your favorites. This way, you keep the dish fresh and exciting. While green or brown lentils are great, you can try red lentils too. They cook faster and make the curry creamier. If you want a different texture, use chickpeas instead. They add protein and a hearty bite. Any legumes you prefer can fit in this recipe. Just adjust the cooking time as needed. To change the spice level, play with red chili flakes. Start low if you're unsure, then add more as you taste. If you want new flavors, try adding garam masala or smoked paprika. A dash of cinnamon can bring warmth. Experimenting with spices lets you create your own signature curry. Trust your taste buds and have fun! To store leftover curry, let it cool first. Use an airtight container for best results. This keeps the curry fresh and tasty. Place it in the fridge if you plan to eat it soon. It can stay good for up to 4 days. When you're ready to reheat, you have a few options. You can use the microwave or the stove. If using a microwave, place the curry in a bowl. Heat it in short bursts, stirring in between. For the stove, warm it over low heat in a pot. Stir often to prevent it from sticking. Make sure it gets hot all the way through. Freezing is a great way to keep your curry longer. Use freezer-safe containers or bags. Leave some space for expansion as it freezes. Your curry can last up to 3 months in the freezer. When you're ready to eat it, thaw it overnight in the fridge. Reheat it as mentioned above, and enjoy! Yes, you can change the flavor. Try using Thai red or green curry paste. These pastes give a bright taste. You can also use a jarred curry sauce for ease. Just check the spice level to match your taste. If you want to mix flavors, add a bit of garam masala or curry leaves. This keeps it fun and fresh. To add heat, use more red chili flakes. Start with one extra teaspoon and taste as you go. You can also add sliced jalapeños or serrano peppers. For a smokier flavor, try adding smoked paprika. If you want intense heat, consider using fresh chili peppers. Remember, spice builds over time, so adjust slowly. Definitely! This curry tastes even better the next day. You can prepare it 1-2 days ahead. Just follow the recipe and store it in the fridge. When ready to eat, just reheat on the stove or microwave. If you freeze it, let it cool first, then put it in an airtight container. Reheat slowly to keep the flavors intact. This blog post covered how to make a Slow Cooker Sweet Potato Lentil Curry. We explored all the ingredients, including notes on swaps and dietary needs like vegan and gluten-free options. You learned easy steps for prep and cooking. I shared tips to boost flavor and adjust cooking times. In the end, don't be afraid to experiment with different veggies or spices. This curry is just as flexible as it is tasty. Enjoy your cooking!

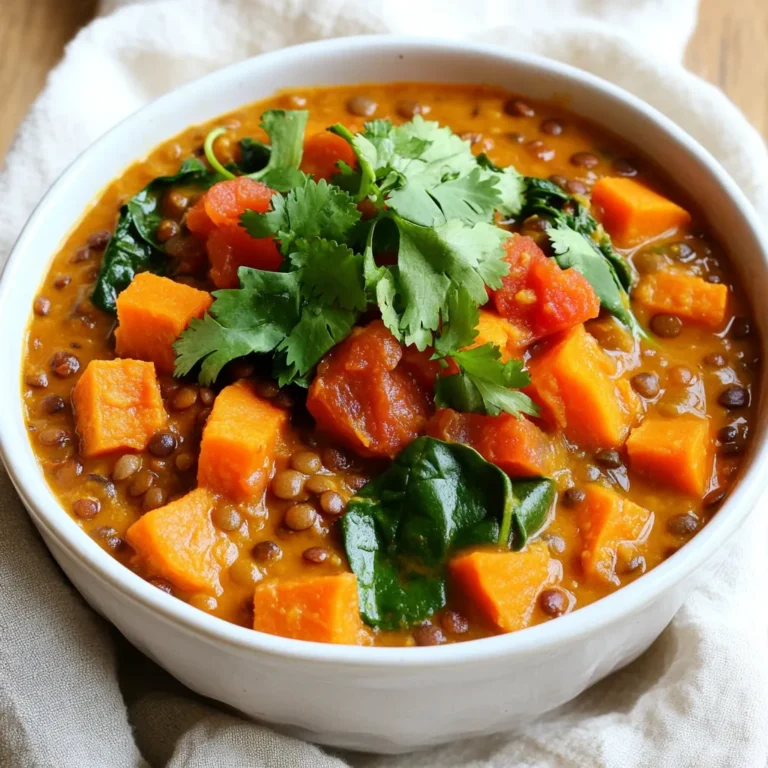
Slow Cooker Sweet Potato Lentil Curry Flavor Boost

- All-purpose flour: 2 1/4 cups - Baking soda: 1 teaspoon - Salt: 1 teaspoon - Unsalted butter: 3/4 cup, softened - Brown sugar: 1 cup, packed - Granulated sugar: 1/2 cup - Pure vanilla extract: 1 tablespoon - Large eggs: 2, at room temperature - Semisweet chocolate chips: 2 cups - Optional: Chopped walnuts: 1 cup Gathering the right ingredients makes all the difference. Start with all-purpose flour. It gives the cookies structure. Use 2 1/4 cups. Next, grab baking soda and salt. They add lift and flavor, each in a teaspoon. Unsalted butter is key. Use 3/4 cup, softened. It helps the cookies mix well. For sweetness, you need brown sugar. Use 1 cup packed for that rich flavor. Then, add 1/2 cup of granulated sugar for balance. Don’t forget the pure vanilla extract. One tablespoon adds a lovely aroma. You will also need two large eggs. Make sure they are at room temperature. This helps the batter mix smoothly. Now let’s talk about chocolate. Use 2 cups of semisweet chocolate chips. They melt beautifully and add sweetness. If you like nuts, add 1 cup of chopped walnuts. This is optional, but they add a nice crunch. These ingredients come together to make thick and chewy cookies that everyone loves. {{ingredient_image_2}} - Preheat the oven to 350°F (175°C). - Line baking sheets with parchment paper to prevent sticking. - In a medium bowl, whisk together 2 1/4 cups of all-purpose flour, 1 teaspoon of baking soda, and 1 teaspoon of salt. This mix is key for cookie structure. Set this aside for later. - In a large bowl, add 3/4 cup of softened unsalted butter, 1 cup of packed brown sugar, and 1/2 cup of granulated sugar. Beat these together until fluffy, about 2 to 3 minutes. - Add 1 tablespoon of pure vanilla extract and 2 large eggs, one at a time. Mix until creamy and smooth. - Gradually mix the dry ingredients into the wet mix. Use a spatula to stir gently until the flour is just combined. - Fold in 2 cups of semisweet chocolate chips and 1 cup of chopped walnuts, if you like. This adds great flavor and crunch. - Scoop generous portions of dough onto the lined baking sheets, leaving about 2 inches between each scoop. - Bake in the preheated oven for 10 to 12 minutes. The edges should be golden brown, and the centers should stay soft. - Let the cookies cool on the baking sheet for 5 minutes before moving them to a wire rack. This helps them set up nicely. Use room temperature ingredients. This helps your butter and eggs mix well. Cold ingredients can lead to tough cookies. Mix the dough just until combined. Overmixing makes cookies flat and hard. To stop cookies from spreading too much, chill the dough for 30 minutes. This cools the fat, helping the cookies hold their shape. Check for doneness by looking at the edges. They should be golden brown, while the center stays soft. These cookies pair well with cold milk or hot coffee. They also taste great warm from the oven. Store extras in an airtight container for up to one week. You can freeze them for up to three months. Just let them cool before you freeze. Pro Tips Chill the Dough: For even thicker cookies, chill the dough for at least 30 minutes before baking. This helps to solidify the fat, preventing the cookies from spreading too much in the oven. Quality Chocolate Chips: Use high-quality semisweet chocolate chips for a richer flavor. You can also mix in dark chocolate or milk chocolate for a variety of tastes. Don’t Overmix: Mix the dry ingredients into the wet just until combined. Overmixing can lead to tough cookies, so be gentle! Storage Tips: Store cookies in an airtight container at room temperature for up to a week. For longer freshness, freeze them in a single layer and then transfer to a freezer-safe bag. {{image_4}} You can boost your cookies' flavor easily. Try using different types of chocolate. Milk chocolate offers a sweet taste. Dark chocolate gives a rich, bold flavor. White chocolate adds a creamy touch. You can mix and match these chocolates for a fun twist. Another way is to add spices. A pinch of cinnamon warms up the taste. Nutmeg adds a cozy, festive feel. Just a little goes a long way! If you want a nut-free cookie, you have choices. Use seeds like sunflower or pumpkin seeds. These add crunch without nuts. Dried fruits like raisins or cranberries are sweet and chewy. They also bring in more flavor and texture. You don’t have to miss out on these cookies if you follow a vegan diet. Replace the butter with vegan butter. It works just like the regular kind. For eggs, you can use flaxseed meal or chia seeds mixed with water. This gives your cookies the right texture and keeps them delicious! To keep your thick and chewy chocolate chip cookies fresh, store them in an airtight container. Room temperature works best, as it helps maintain their soft texture. Place a slice of bread in the container to help keep cookies moist. Avoid stacking them too high to prevent squishing. You can also refrigerate your cookies. This can help them last longer, but it may change their texture. They might become a bit firmer. If you choose this method, let the cookies sit at room temperature for a few minutes before serving. Freezing is a great way to save cookies for later. To freeze raw cookie dough, scoop it into balls and place them on a baking sheet. Freeze them for about an hour, then transfer them to a freezer bag. This method keeps them fresh and ready to bake whenever you want. If you freeze baked cookies, let them cool completely first. Wrap each cookie in plastic wrap and place them in a freezer bag. They can last up to three months. When you’re ready to enjoy them, just take out what you need and let them thaw at room temperature. For a warm treat, pop them in the oven for a few minutes. Enjoy! Cookies become thick and chewy due to the right mix of ingredients. The butter adds fat, while the sugars keep them moist. Using more brown sugar than white sugar helps create chewiness. Also, chilling the dough before baking makes a big difference. This cooling time allows the dough to firm up, preventing the cookies from spreading too thin. Yes, you can use gluten-free flour! Look for a blend that works well for baking. Many brands offer one-to-one substitutes that replace regular flour perfectly. Just make sure to check the packaging for any special instructions. This way, you can enjoy these thick and chewy cookies without gluten. You can tell cookies are done when the edges are golden brown. The centers should still look soft and puffy. If you insert a toothpick, it should come out with a few moist crumbs. Remember, the cookies will continue to bake a bit after you take them out of the oven. Absolutely! You can add a variety of mix-ins. Try using white chocolate chips, peanut butter chips, or dried fruit. Nuts like pecans or macadamia nuts add a nice crunch too. Feel free to get creative and make these cookies your own! If your dough is too sticky, don’t worry! You can add a little more flour, one tablespoon at a time. Mix it in until the dough reaches a better consistency. You can also chill the dough in the fridge for about 30 minutes. This makes it easier to scoop and shape. This blog post covered the key steps to make delicious cookies. We detailed the ingredients, from flour to chocolate chips. I shared tips for perfect texture and baking. You learned about fun variations, from vegan options to nut-free ideas. Proper storage helps keep cookies fresh. Baking is fun and easy with these steps. Try these tips and enjoy tasty cookies anytime. Happy baking!

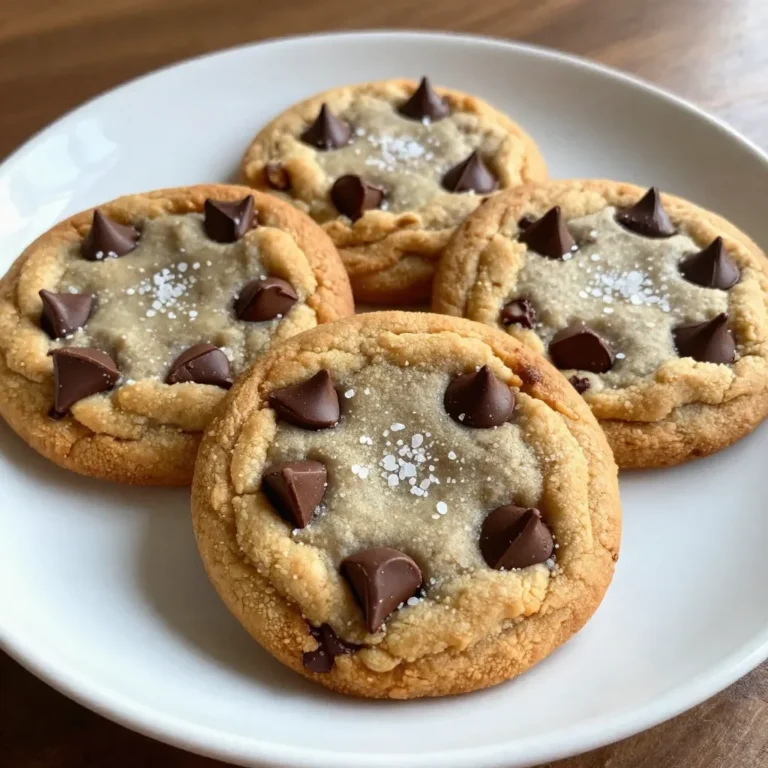
Thick & Chewy Chocolate Chip Cookies Delight Recipe

To make these Cake Mix Cranberry Orange Muffins, gather the following ingredients: - 1 box of vanilla cake mix - 1 cup fresh or frozen cranberries, rinsed and drained - Zest of 1 large orange, finely grated - 1/2 cup fresh orange juice, preferably freshly squeezed - 1/3 cup vegetable oil - 2 large eggs - 1 teaspoon vanilla extract - Optional mix-ins: 1/2 cup chopped walnuts or pecans - Optional flavor enhancement: 1/2 teaspoon ground cinnamon - Optional garnish: Powdered sugar for dusting You will love how simple these ingredients come together. The vanilla cake mix serves as a great base. The tartness of cranberries pairs perfectly with the bright, zesty orange. This combo creates a delightful flavor explosion. Using fresh orange juice and zest makes the muffins taste bright and fresh. The vegetable oil keeps them moist and tender. If you like a little crunch, you can add walnuts or pecans. The ground cinnamon adds warmth and spice, making these muffins perfect for any time of year. Lastly, a dusting of powdered sugar on top makes them look fancy, even though they are easy to make. These ingredients are not just tasty; they come together quickly. You can whip up a batch in no time. {{ingredient_image_2}} - Preheat oven to 350°F (175°C). - Prepare muffin tin with liners or cooking spray. - In a bowl, combine vanilla cake mix and optional cinnamon. - Whisk together orange juice, vegetable oil, eggs, and vanilla extract until smooth. - Gradually pour the wet mixture into the dry. Stir until just combined. - Carefully fold in cranberries, orange zest, and optional nuts. - Fill muffin cups about two-thirds full. Bake for 18-22 minutes. - Cool muffins in the pan for 5 minutes. Transfer to a wire rack. Dust with powdered sugar if desired. To get the best texture for your muffins, avoid overmixing. When you mix the batter, stop when it looks just combined. You can leave some lumps in the batter. This keeps the muffins light and fluffy. Overmixing can make them dense, and we want a soft bite, not a brick! When filling your muffin cups, do it evenly. Each cup should be about two-thirds full. This gives the muffins room to rise nicely while baking. If you fill them too high, they may spill over. If you fill them too low, they won't rise as high. Finding that sweet spot is key! For a flavor kick, consider adding spices or more zest. A sprinkle of cinnamon can add warmth. You can also try adding lemon or lime zest along with the orange. These small touches can elevate your muffins to a new level. Don't be afraid to experiment! Pro Tips Fresh Ingredients Matter: Using fresh cranberries and freshly squeezed orange juice will enhance the flavor and texture of your muffins. Don’t Overmix: Mix the batter until just combined to ensure your muffins remain light and fluffy. Overmixing can lead to dense muffins. Adjust Sweetness to Taste: If you prefer a sweeter muffin, consider adding a bit of sugar or using a sweeter cake mix for a delightful treat. Cooling Tip: Allow muffins to cool completely on a wire rack to maintain their texture and prevent sogginess from trapped steam. {{image_4}} You can use gluten-free cake mix if you need a gluten-free option. This swap keeps the muffins tasty and light. Just make sure to check the box for baking instructions. Different brands may vary slightly. Try other berries like blueberries or raspberries for a fun twist. You can also use lemon or lime juice for a zesty kick. Mixing and matching flavors keeps every batch unique. If you want a nut-free option, swap nuts for seeds. Pumpkin seeds and sunflower seeds add a nice crunch. Plus, they keep the muffins safe for those with nut allergies. Enjoy experimenting with these options! You can store your muffins in an airtight container. Keep them at room temperature for up to three days. This keeps them fresh and tasty. For longer freshness, refrigerate the muffins. They can stay good for about a week. If you want to save them for later, freeze them. Just put them in a freezer-safe bag. They will last for about three months. To enjoy warm muffins, simply microwave them for a few seconds. This revives their soft texture and flavor. If you prefer, you can also reheat them in the oven at a low temperature. Enjoy every bite! Yes, you can use other cake mixes. Chocolate cake mix adds a rich taste. Spice cake mix brings warmth and depth. Both options give a unique twist to the muffins. You can get creative and mix flavors. Just remember, choose a mix that pairs well with cranberries and oranges. No, you do not need to thaw frozen cranberries. You can use them straight from the freezer. This makes the process quick and easy. Frozen cranberries work well in the batter. They will bake nicely and keep the muffins moist. Just rinse and drain them before adding. To make these muffins healthier, consider some simple swaps. Use whole wheat cake mix for added fiber. You can replace vegetable oil with applesauce for moisture. Reducing sugar will also help cut calories. Adding nuts boosts protein and healthy fats. These small changes can keep the flavor while improving nutrition. These muffins combine sweet cranberries and fresh orange for a tasty treat. You learned how to mix easy ingredients, bake them, and cool for a delicious snack. Remember to avoid overmixing, so they stay fluffy. Feel free to experiment with different flavors and add-ins. Storing them properly keeps them fresh for longer. Enjoy making these muffins for yourself and your friends. Happy baking!

Cake Mix Cranberry Orange Muffins Flavorful Delight

High-protein soups are great for meals. They give you energy and help your body. My favorite is the Chickpea and Quinoa Stew. This stew is easy to make and packed with flavor. It uses hearty ingredients that fill you up. The chickpeas and quinoa are both rich in protein. Eating high-protein soups can help you feel full longer. They can boost muscle growth and keep you healthy. Here are some benefits: - Weight Management: High-protein meals may help control your appetite. - Muscle Repair: Protein is key for recovery after exercise. - Nutrient-Rich: These soups often include vegetables, adding vitamins and minerals. - Versatile: You can change the ingredients to suit your taste. This stew is not just tasty; it's healthy too. Here’s what you get per serving: - Calories: About 240 - Protein: 10 grams - Fiber: 8 grams - Fat: 7 grams - Carbohydrates: 36 grams These numbers show that the stew is well-balanced. It has protein, fiber, and healthy fats. You can enjoy a bowl knowing it’s good for you! {{ingredient_image_2}} - 1 cup cooked chickpeas (canned or boiled) - 1/2 cup quinoa, thoroughly rinsed - 4 cups vegetable broth (homemade or store-bought) - 1 medium onion, finely diced - 2 cloves garlic, minced - 1 medium carrot, diced - 1 celery stalk, diced - 1 cup fresh spinach, roughly chopped - 1 teaspoon ground cumin - 1 teaspoon smoked paprika - 1 tablespoon extra virgin olive oil - Salt and black pepper to taste These ingredients work together to create a hearty and filling stew. Chickpeas and quinoa provide protein, while veggies add fiber and nutrients. - Fresh parsley, chopped (for garnish) Garnishes can elevate your dish. Fresh parsley adds color and a burst of flavor. - Use any canned beans if chickpeas are unavailable. - Substitute quinoa with brown rice or bulgur for a different texture. - If you don’t have vegetable broth, water works fine, but add more spices. These swaps keep the dish flexible and fun. You can always mix it up based on what you have at home. 1. Start by gathering your ingredients. You will need: - 1 cup cooked chickpeas - 1/2 cup quinoa - 4 cups vegetable broth - 1 medium onion - 2 cloves garlic - 1 medium carrot - 1 celery stalk - 1 cup fresh spinach - 1 teaspoon ground cumin - 1 teaspoon smoked paprika - 1 tablespoon extra virgin olive oil - Salt and black pepper - Fresh parsley (for garnish) 2. Rinse the quinoa well under cold water. This step removes the bitter coating called saponin. 3. Dice the onion, carrot, and celery into small pieces. Mince the garlic. 1. In a large pot, heat the olive oil over medium heat. Wait until it shimmers. 2. Add the diced onion, carrot, and celery to the pot. Sauté for 5-7 minutes. Stir often. Cook until the vegetables are tender and onions are clear. 3. Add the minced garlic to the pot. Cook for one more minute. This step brings out the garlic's great flavor. 4. Now, add the rinsed quinoa and vegetable broth. Stir everything to mix well. 5. Increase the heat. Bring the mixture to a boil. Once boiling, lower the heat to a gentle simmer. 6. Add the cooked chickpeas, ground cumin, and smoked paprika. Cover the pot and let it cook for 15-20 minutes. The quinoa will become fluffy. 7. When the quinoa is done, turn off the heat. Gently fold in the chopped spinach. The heat will help it wilt nicely. 8. Taste the stew. Add salt and black pepper to your liking. 1. Serve the stew warm in deep bowls. 2. Garnish with freshly chopped parsley for a pop of color. 3. Drizzle some olive oil on top for extra flavor. 4. Pair with crusty bread for a hearty meal. Enjoy your nutritious dish! Pro Tips Tip Title: Use Fresh Ingredients: Whenever possible, opt for fresh vegetables and herbs to enhance the flavor and nutritional value of your stew. Tip Title: Adjust the Spices: Feel free to adjust the amount of cumin and smoked paprika according to your taste preferences for a customized flavor profile. Tip Title: Make it Creamy: For a creamier texture, stir in a splash of coconut milk or a dollop of yogurt just before serving. Tip Title: Leftover Magic: This stew tastes even better the next day! Store leftovers in the fridge for an easy, delicious meal. {{image_4}} To boost the taste, use fresh herbs. Try basil or cilantro. They add a bright note. Squeeze in lemon juice for zing. You can also add a dash of hot sauce for heat. Toast spices like cumin and paprika in the pot for deeper flavor. Use a large pot for even cooking. A wooden spoon helps mix ingredients well. A sharp knife is key for chopping veggies. Also, a measuring cup ensures you add the right amount of quinoa and broth. A ladle is great for serving. Don’t skip rinsing the quinoa; it removes bitterness. Avoid overcooking the veggies; they should stay crisp. Make sure to season well, but taste as you go. If you add salt too early, it can overpower the stew. Lastly, let the stew sit after cooking; it helps flavors meld. You can easily swap chickpeas for other proteins. Try lentils, black beans, or white beans. Each option brings a unique taste and texture. You can also add diced chicken or turkey for a meatier dish. If you want a vegan option, tofu works well too. Just cube it and stir it in during the last few minutes of cooking. This adds more protein and keeps it healthy. This stew is great for adding different vegetables. You can use zucchini, bell peppers, or even sweet potatoes. Just chop them up and add them with the other veggies. If you like greens, kale or Swiss chard can replace spinach. They add color and extra nutrients. You can also stir in frozen peas or corn for a sweet touch. These changes make your stew colorful and full of flavor. If you love spice, you can kick up the heat! Add chopped jalapeños or red pepper flakes for a fiery twist. A dash of hot sauce can also bring warmth. You might even want to try a bit of curry powder for a whole new flavor. Just remember to start with a little and taste as you go. Adjust the spice level to suit your taste. These spicy changes will keep your taste buds excited! You can boost protein in your soup easily. First, try adding more chickpeas or quinoa. Both are great sources of protein. You can also mix in lentils or beans for extra protein. If you like meat, consider adding cooked chicken or turkey. For a plant-based option, toss in some tofu or tempeh. Using a protein-rich broth can also help. Yes, you can freeze high-protein soups. Just make sure to cool the soup first. Use airtight containers or freezer bags. Leave some space at the top for expansion. Soups can last up to three months in the freezer. When ready to eat, thaw the soup in the fridge overnight. Reheat it on the stove or in the microwave. For quick soups, use a pressure cooker or an Instant Pot. These methods cut down cooking time a lot. You can also use a slow cooker for a hands-off approach. Just set it and forget it! If you need something fast, try using canned beans and pre-cooked grains. This makes your soup ready in under 30 minutes. High-protein soups, like chickpea and quinoa stew, are tasty and healthy. They boost your meals with protein and essential nutrients. You learned about the benefits, ingredients, and cooking steps for this hearty dish. Remember to play with flavors and make it your own. Use the tips and variations to improve your cooking. For a quick meal, don't hesitate to freeze leftovers. Enjoy making and sharing these soups!

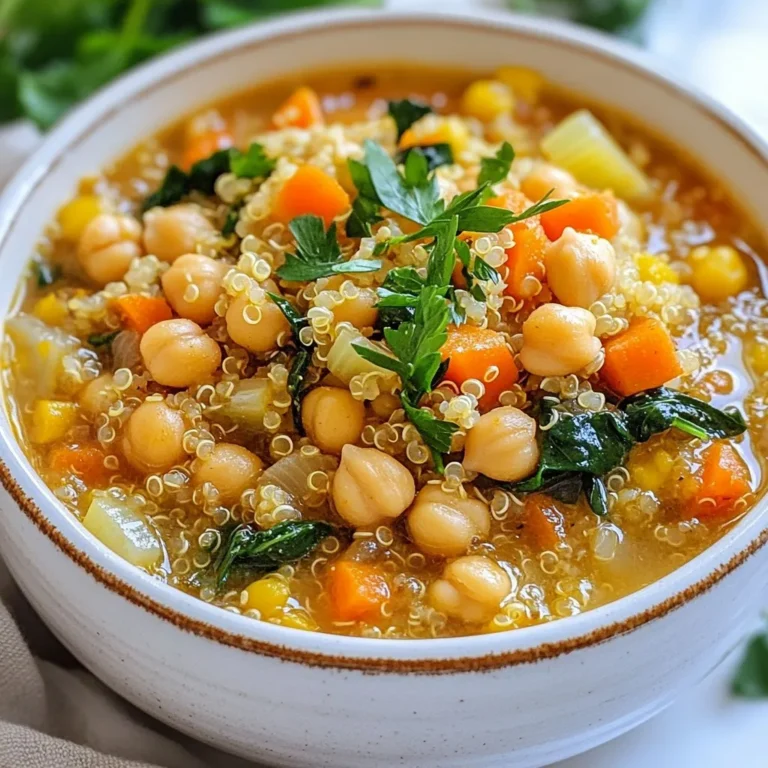
High-Protein Soup Collection for Nutritious Meals

For this dish, you need 2 cups of fresh tortellini. You can buy it at the store or make it at home. Fresh tortellini cooks quickly, making it perfect for this salad. Add 1 cup of halved cherry tomatoes for sweetness. Next, include 1 cup of roughly chopped fresh spinach leaves for color and nutrition. These veggies bring life to the dish and balance the flavors. You’ll want 1/4 cup of toasted pine nuts for a nice crunch. They add a rich, nutty taste. Use 1/3 cup of pesto sauce to tie everything together. You can opt for store-bought or make your own. Finally, sprinkle in 2 tablespoons of crumbled feta cheese for tang and creaminess. Season with salt and freshly cracked black pepper to taste. A drizzle of 1 tablespoon of extra virgin olive oil is optional but adds a lovely finish. Start by boiling water in a large pot. Make sure to add a good amount of salt. This helps the tortellini taste great. Once the water is boiling, add 2 cups of fresh tortellini. Cook for about 3-5 minutes. You know they are done when they float to the top. Then, drain the tortellini and let them cool. Cooling them at room temperature helps them mix better later. While the tortellini cooks, grab a small skillet. Heat it over medium heat. Add 1/4 cup of pine nuts to the skillet. Stir the nuts often to avoid burning. Toast them for about 3-4 minutes. They should turn a nice golden brown. Once done, remove from heat and let them cool. Toasted pine nuts add a rich flavor and nice crunch. In a large mixing bowl, combine the cooled tortellini, 1 cup of halved cherry tomatoes, and 1 cup of roughly chopped spinach. Gently mix these ingredients together. Be careful not to mash the tortellini. Next, drizzle 1/3 cup of pesto sauce over the mixture. Toss everything together gently. Ensure all ingredients are coated with the pesto. Season with salt and freshly ground black pepper to taste. For a touch of luxury, drizzle with 1 tablespoon of extra virgin olive oil if you like. Finally, fold in 2 tablespoons of crumbled feta cheese and the toasted pine nuts. This makes the salad even more delightful. To coat your tortellini with pesto, start with cooled tortellini. This helps the pesto stick better. Pour the pesto over the tortellini in a large bowl. Use a gentle hand to toss everything. Make sure each piece gets a nice coat. If your pesto is thick, add a splash of olive oil. This helps it spread evenly. Seasoning makes or breaks a dish. I suggest starting with salt and black pepper. Taste your salad before serving. If it needs a kick, add more salt or pepper. You can also toss in a squeeze of lemon juice. This adds brightness and balances the flavors. To toast pine nuts, heat a small skillet over medium heat. Add the nuts and stir them often. This takes about 3-4 minutes. Watch closely to avoid burning. Once golden brown, remove them from heat right away. Let them cool before adding to your salad. Toasted nuts will give your dish a nice crunch and extra flavor. {{image_4}} You can add cooked chicken, shrimp, or chickpeas to this salad. Each adds great flavor and makes the dish more filling. For chicken, use rotisserie or grilled pieces. For shrimp, quickly sauté them in olive oil. Chickpeas are a tasty, plant-based option. They add protein and fiber while keeping it light. Spinach is great, but you can switch it up. Try arugula for a peppery taste or kale for a hearty crunch. If you want something milder, use mixed greens or romaine. Each green brings a unique taste and texture, making your salad exciting. Feta adds a nice tang, but other cheeses work too. Try mozzarella for a creamy bite or goat cheese for a rich flavor. Parmesan can add a salty touch when grated on top. Mixing different cheeses can enhance the dish, giving you more flavor options. To store your Minute Pesto Tortellini Salad, place it in an airtight container. This keeps it fresh longer. If you store it promptly, it will stay tasty. You can keep it in the fridge for up to three days. Make sure to seal it tightly to avoid drying out. When you want to eat leftovers, take your salad out. If you prefer warm tortellini, gently reheat it. Use a microwave on low power for short bursts. Stir it in between to ensure even heating. Avoid overheating, as this can change the texture. Each ingredient in your salad has a different shelf life. Fresh tortellini lasts about 2-3 days in the fridge after opening. Cherry tomatoes and spinach can stay fresh for about a week. Pine nuts should be used within one month for the best flavor. Pesto sauce can last up to a week after opening. Keep track of dates to enjoy the best taste! Yes, you can make this salad ahead of time. It tastes great chilled. For best results, prepare the tortellini and mix in the other ingredients. Add the pesto just before serving for the best flavor. Store it in the fridge for up to two days. This keeps the salad fresh and tasty. Both store-bought and homemade pesto work well. If you want a fresh taste, I recommend making your own. Use basil, garlic, pine nuts, Parmesan, and olive oil. This gives a bright flavor to the tortellini salad. Store-bought pesto is quick and still delicious. Choose a brand with fresh ingredients for the best flavor. Making homemade tortellini is fun and easy. Start with flour and eggs. Mix them to form a dough. Roll out the dough thinly. Cut it into small squares. Place a small amount of filling in each square. Fold and seal the edges to form a triangle or circle. Cook the tortellini in boiling water until they float. It usually takes about 3-5 minutes. Enjoy your fresh tortellini in the salad! This blog post covered making a fresh tortellini salad with vibrant veggies and delicious pesto. We explored step-by-step cooking, flavorful tips, and fun variations. You now have ideas for proteins, greens, and cheese options to enhance your dish. Remember, this salad is simple to store and reheat. Whether you make it ahead or enjoy it fresh, you have the tools for tasty meals. Enjoy experimenting and making this dish your own. Happy cooking!

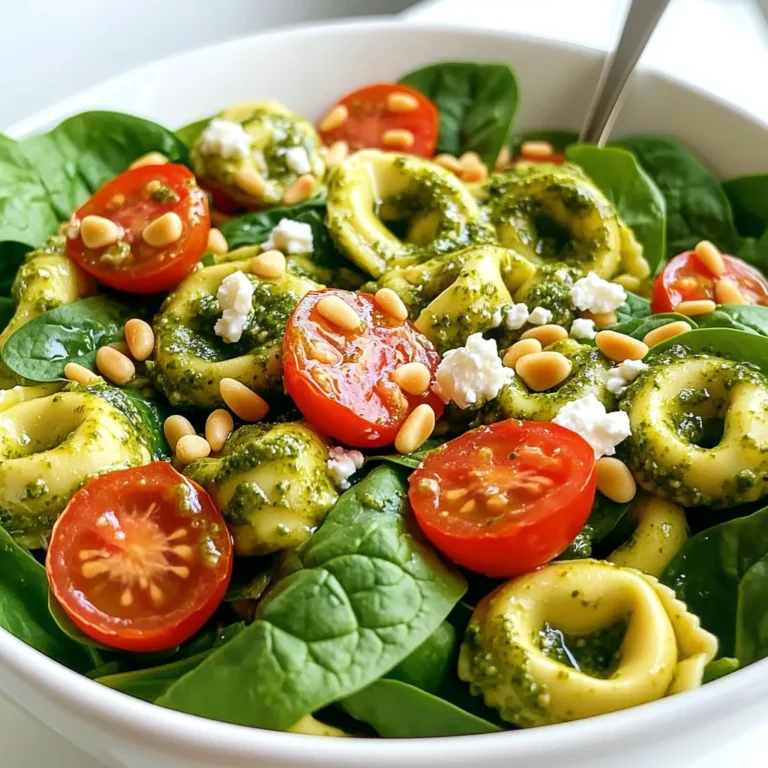
Minute Pesto Tortellini Salad Fresh and Flavorful Dish

- 4 salmon fillets - 1 cup teriyaki sauce (homemade or store-bought) - 2 cups broccoli florets - 1 red bell pepper, sliced into thin strips - 1 cup snap peas - 2 cups cooked jasmine rice - 2 tablespoons sesame oil, divided - 2-3 green onions, chopped for garnish - 1 tablespoon sesame seeds, for garnish - Salt and pepper, to taste When making teriyaki salmon bowls, I like to keep it fresh and simple. You will need salmon fillets, which are rich in flavor and healthy fats. Teriyaki sauce adds a sweet and savory punch. You can use store-bought or make your own for a personal touch. For vegetables, I choose broccoli florets, red bell pepper strips, and snap peas. They provide a nice crunch and color. Plus, they roast beautifully and stay tender-crisp. The base of the bowl is jasmine rice. It cooks fluffy and pairs well with the salmon and veggies. I use sesame oil to enhance the flavor and add richness. Green onions and sesame seeds make great garnishes. They add flavor and a pop of color. Don't forget to season with salt and pepper to taste. Gather these ingredients, and you are ready to create a delicious meal. This recipe is quick, easy, and satisfying. - Preheat the oven to 400°F (200°C). - In a bowl, mix 1 cup of teriyaki sauce with 1 tablespoon of sesame oil. - Set aside half of the sauce for later use. - Line a large sheet pan with parchment paper. - Place 4 salmon fillets on the pan, skin-side down. - Brush the salmon with the teriyaki sauce mixture. - In another bowl, toss 2 cups of broccoli florets, 1 sliced red bell pepper, and 1 cup of snap peas with 1 tablespoon of sesame oil. - Add salt and pepper to taste. - Spread the seasoned veggies around the salmon on the sheet pan. - Place the sheet pan in the oven. - Bake for 12-15 minutes. - Check if the salmon flakes easily with a fork. - Ensure the veggies stay tender-crisp. - While baking, prepare 2 cups of jasmine rice as per package instructions. - Once cooked, evenly distribute the rice into 4 bowls. - Place a salmon fillet on top of each bowl of rice. - Add a generous serving of the roasted vegetables. - Drizzle each bowl with the reserved teriyaki sauce. - For a final touch, garnish with chopped green onions and sesame seeds. To get the best flavor, marinate the salmon for at least 30 minutes. This step helps the fish soak up the teriyaki sauce. Using homemade teriyaki sauce gives you full control over the taste. You can adjust the sweetness and saltiness to fit your preference. Plus, homemade sauce is fresh and free from preservatives. When choosing vegetables, pick ones that roast well. Broccoli, bell peppers, and snap peas are great for this dish. They add color and crunch. To keep the veggies tender-crisp, don't overcook them. Toss them lightly with sesame oil, salt, and pepper before roasting. This enhances their natural flavors. For fluffy jasmine rice, rinse it under cold water until the water runs clear. This removes excess starch. Cook it with a rice-to-water ratio of 1:1.5 for perfect texture. If you want a change, try brown rice or quinoa. Both are healthy alternatives that add a nutty flavor. {{image_4}} You can easily swap salmon for chicken or tofu. Chicken breasts work well, but remember to cook them longer. If you choose tofu, use firm tofu and press it to remove excess water. Cook it for about 20-25 minutes to get a nice texture. Feel free to mix in seasonal veggies. Carrots, zucchini, or asparagus are great choices. Use colorful vegetables to make your bowl pop. This not only looks good but also adds different flavors and nutrients. You can change the teriyaki sauce for sweet chili or soy sauce. If you want some heat, add chili flakes or sriracha to the teriyaki mix. This gives your dish an exciting twist. Experimenting with sauces is a fun way to create new flavors. After enjoying your teriyaki salmon bowls, store leftovers properly. Let the bowls cool down to room temperature. Place each component in separate containers to keep flavors fresh. Use airtight containers to prevent moisture loss. Refrigerate the salmon, veggies, and rice within two hours of cooking. This keeps your meal safe and tasty. Choose glass or BPA-free plastic containers. Glass containers do not absorb odors and are microwave safe. Plastic containers are lightweight and easy to stack. Make sure the lids fit snugly to keep your food fresh. Label the containers with dates to track freshness easily. To reheat your leftovers, use the oven or microwave. For the oven, preheat it to 350°F (175°C). Place the salmon and veggies on a baking sheet, covered with foil. Heat for about 10 minutes or until warm. This keeps the salmon moist and prevents it from drying out. Do not overheat the salmon. Overcooking can make it tough and dry. Always check the internal temperature. It should be around 145°F (63°C) when warmed. If using a microwave, heat in 30-second intervals. Stir the vegetables to ensure even heating. Yes, you can freeze teriyaki salmon bowls! This is a great way to save time. However, fish is best when fresh. If you need to freeze, separate the salmon, rice, and veggies. Wrap the salmon tightly in plastic wrap, then place it in a freezer bag. For veggies, blanch them quickly in boiling water, then cool in ice water before freezing. This helps keep their color and texture. Store cooked rice in a freezer-safe container. Label everything with the date for easy tracking. Making teriyaki salmon bowls is quick! The prep time is just 10 minutes. Cooking takes about 12-15 minutes. So, in total, you can have this meal ready in about 25 minutes. This makes it perfect for a weeknight dinner. Yes, you can use frozen salmon! Just make sure to thaw it first. You can leave it in the fridge overnight or place it in cold water for a faster thaw. Cook it for 15-20 minutes to ensure it cooks through. Keep an eye on it while it bakes. You can add many tasty sides! Here are some ideas: - Steamed asparagus - Edamame - Cucumber salad - Pickled ginger - Lime wedges for a zesty touch These sides will complement the salmon bowls nicely. Yes, this recipe is healthy! Salmon is rich in omega-3 fatty acids, which are good for your heart. Broccoli, bell pepper, and snap peas provide vitamins and fiber. Jasmine rice adds energy with its carbs. Overall, it's a balanced meal full of nutrients. This article showed you how to create tasty teriyaki salmon bowls. You learned about key ingredients like salmon, teriyaki sauce, and fresh veggies. I shared step-by-step instructions for prep, cooking, and assembling your dish. Tips helped you marinate salmon, choose the best veggies, and cook fluffy jasmine rice. You can even switch proteins and vegetables for fun variations. These bowls are not only easy to make but also delicious and nutritious. Enjoy experimenting with this recipe!

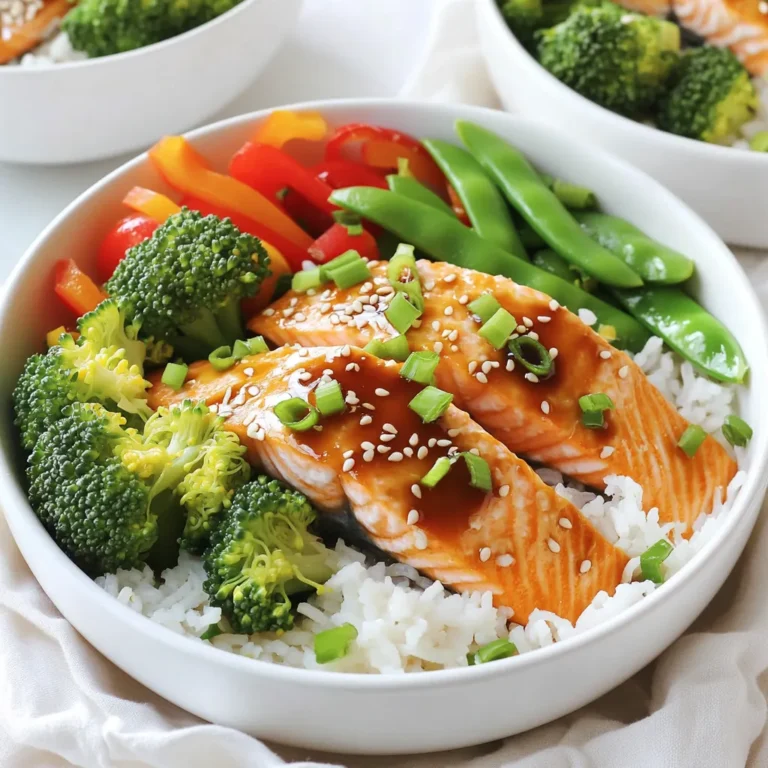
Teriyaki Salmon Bowls Sheet Pan Simple and Quick Meal

- 2 cups butternut squash, peeled and cut into 1-inch cubes - 1 cup carrots, peeled and diced into small pieces - 1 red bell pepper, diced - 1 large onion, chopped into chunks - 4 cloves garlic, finely minced - 4 cups vegetable broth (homemade or store-bought) - 1 cup creamy coconut milk (canned for best texture) These ingredients create the base for a rich and tasty soup. The butternut squash adds natural sweetness. Carrots also bring a lovely flavor and color. Red bell pepper gives a pop of freshness. Onion and garlic add depth, while vegetable broth makes it hearty. Coconut milk makes it creamy and comforting. - Fresh basil, torn or whole, for garnish - 2 tablespoons extra virgin olive oil - 1 teaspoon ground cumin - 1 teaspoon smoked paprika - Salt and freshly ground black pepper to taste Adding fresh basil brightens the soup. Olive oil enhances flavor and richness. Ground cumin gives a warm note, while smoked paprika adds a hint of smokiness. Adjust salt and pepper to your taste for the perfect balance. - Mixing bowl - Baking sheet - Immersion blender or traditional blender - Large pot You will need a mixing bowl to toss the veggies. A baking sheet helps roast them evenly. An immersion blender makes it easy to achieve a silky texture. If you use a traditional blender, blend in small batches. A large pot is essential for combining everything into a comforting soup. {{ingredient_image_2}} 1. Preheat your oven to 400°F (200°C). This heat helps to caramelize the veggies. 2. In a large mixing bowl, add 2 cups of butternut squash, 1 cup of diced carrots, 1 diced red bell pepper, and 1 large chopped onion. 3. Now, add 4 minced garlic cloves, 2 tablespoons of extra virgin olive oil, 1 teaspoon of ground cumin, and 1 teaspoon of smoked paprika. 4. Sprinkle in salt and freshly ground black pepper. Toss until the veggies are well coated. 1. Spread the seasoned vegetables evenly on a baking sheet lined with parchment paper. 2. Roast them for 25-30 minutes. Stir halfway through to ensure even cooking. 3. Check for caramelization. The veggies should be tender and have a nice golden color. 1. Once roasted, carefully transfer the veggies to a large pot. 2. Pour in 4 cups of vegetable broth. Bring this to a gentle boil over medium-high heat. 3. After boiling, lower the heat and let it simmer for about 10 minutes. This helps the flavors meld together. 4. Blend the soup until smooth. Use an immersion blender directly in the pot or blend in batches in a traditional blender. 5. Stir in 1 cup of creamy coconut milk. Taste and adjust seasoning with salt and pepper if needed. 6. Warm the soup through over low heat for a few minutes. 7. Serve in bowls and top with fresh basil leaves for a lovely touch. Roasting brings out the best in vegetables. I always preheat my oven to 400°F. This high heat helps caramelize the veggies. Caramelization adds depth and sweetness. Spread the vegetables out on the baking sheet. This ensures they cook evenly. If they overlap, they may steam instead of roast. For a silky texture, blending is key. I prefer using an immersion blender. It keeps everything in one pot, making cleanup easy. If you use a regular blender, do it in batches. Leave space at the top for steam. Blend until the soup is smooth and creamy. Fresh herbs make a big difference. I love adding basil for brightness. You can also use other herbs like thyme or cilantro. Spices can change the flavor profile too. Ground cumin and smoked paprika add warmth. Try adding a splash of lemon juice for zest. Experiment with unusual add-ins like ginger for a twist. Pro Tips Choose Fresh Vegetables: For the best flavor and texture, use fresh, seasonal vegetables. Look for vibrant colors and firm textures when selecting your produce. Don’t Rush the Roasting: Allow the vegetables to fully caramelize during roasting. This step enhances the natural sweetness and adds depth to your soup. Adjust Consistency: If you prefer a thicker soup, reduce the amount of broth added after blending. For a thinner consistency, simply add more broth or coconut milk until desired. Flavor Enhancements: Experiment with additional spices such as nutmeg or ginger for a unique twist. A splash of lime or lemon juice just before serving can brighten the flavors too! {{image_4}} You can easily adapt this soup to fit different diets. To make it vegan, just check your broth. Some brands have animal products. Use coconut milk for creaminess. For gluten-free options, ensure the broth is gluten-free. If you want a low-fat version, swap the coconut milk with unsweetened almond milk. This keeps the taste light but still creamy. Feel free to mix up the vegetables. Sweet potatoes are a great swap for butternut squash. Zucchini can add a nice texture too. Try adding leeks or parsnips for unique flavors. Cauliflower works well and adds creaminess when blended. Broccoli can also give a nice green touch. You can enhance the flavor in many ways. Add a pinch of cayenne for heat. A dash of nutmeg can bring warmth to the soup. If you like herbs, try thyme or rosemary. For a cream substitute, use cashew cream instead of coconut milk. This adds a rich flavor and keeps it rich. You can also toss in some lemon juice for brightness. To store your leftover silky roasted vegetable soup, let it cool first. Then, pour it into an airtight container. Seal it tightly and place it in the fridge. This keeps your soup fresh for later. Make sure to eat it within three to five days for the best taste. If you want to save your soup for a longer time, freezing is a great option. Use a freezer-safe container or heavy-duty freezer bags. Leave some space at the top to allow for expansion. Label the container with the date. When you want to eat it, thaw it overnight in the fridge. Reheat it on the stove over low heat. Stir well to get a creamy texture again. In the fridge, your silky roasted vegetable soup lasts about three to five days. In the freezer, it can stay good for up to three months. Just remember to check for any signs of freezer burn. If you see any, it’s better to toss it out. Enjoy your soup while it’s fresh for the best flavor! Yes, you can use fresh vegetables. However, roasting adds flavor. Roasting caramelizes the sugars and enhances taste. If you skip roasting, boil or steam the veggies instead. This keeps some flavor but lacks the depth of roasted ones. To change the soup's thickness, you have a few options. If you want it thicker, add less broth. You can also blend in more roasted vegetables. If it is too thick, stir in more vegetable broth or coconut milk. Adjust until you find your perfect texture. Yes, you can make this soup ahead of time. It tastes even better the next day, as flavors meld. Store it in the fridge for up to three days. Just reheat it on the stove before serving. You can also freeze it for up to three months. Silky Roasted Vegetable Soup pairs well with many sides. I love to serve it with crusty bread. A fresh salad or grilled cheese also complements it nicely. You can add toppings like croutons, fresh herbs, or a drizzle of olive oil for extra flavor. In this article, we explored the essential ingredients and step-by-step instructions for creating a delicious Silky Roasted Vegetable Soup. We discussed roasting techniques and tips for achieving a creamy texture. You can adjust flavors and make dietary substitutions easily. Remember, proper storage ensures this soup stays fresh for days. Enjoy experimenting with variations and serving it with your favorite sides. This recipe is not only tasty but also flexible, making it a great addition to your kitchen. With these tools and steps, you can create a comforting meal any time.

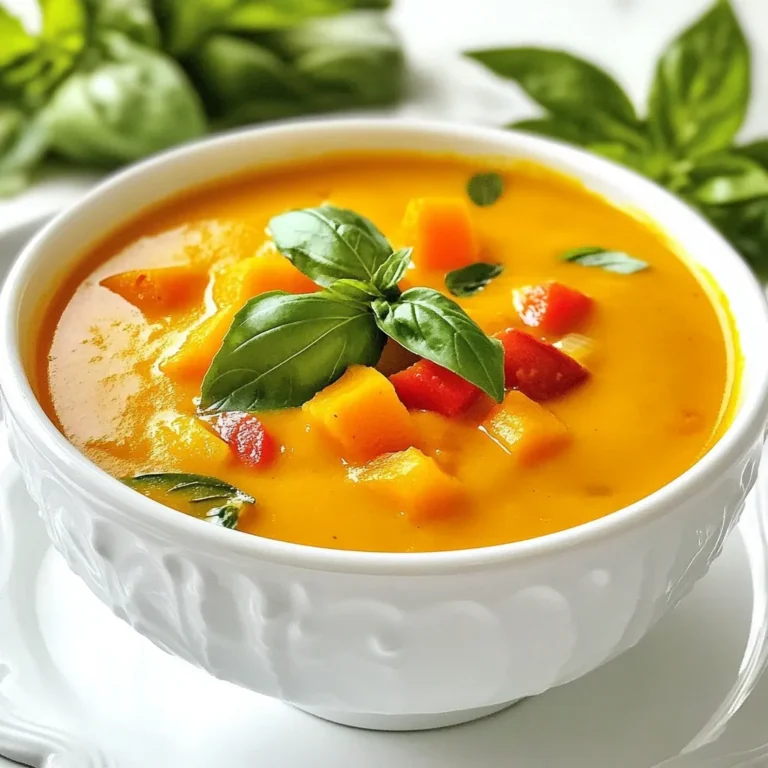
Silky Roasted Vegetable Soup Comforting and Simple Recipe

To make Slow Cooker White Chicken Chili, you need a few simple ingredients. Each one adds a special touch to the dish. Here is the list of ingredients: - 2 boneless, skinless chicken breasts - 1 can (15 oz) white beans (cannellini or great northern), rinsed and drained - 1 can (4 oz) diced green chilies - 1 medium onion, finely diced - 2 cloves garlic, minced - 1 cup corn (fresh, frozen, or canned) - 4 cups low-sodium chicken broth - 1 teaspoon ground cumin - 1 teaspoon chili powder - 1/2 teaspoon smoked paprika - Salt and pepper to taste - 1 cup sour cream or Greek yogurt - 1 cup shredded Monterey Jack cheese - Fresh cilantro, chopped, for garnish - Lime wedges for serving Each ingredient plays a role. The chicken provides a juicy base. The white beans add creaminess and protein. Diced green chilies bring heat and flavor. Onion and garlic give a nice aroma. Corn adds sweetness and texture. Using low-sodium chicken broth keeps the dish healthy. Seasonings like cumin, chili powder, and smoked paprika create depth. Sour cream or Greek yogurt makes it creamy. Finally, fresh cilantro and lime add brightness. I love how this chili is both simple and satisfying. You can easily find all these ingredients at the store. Feel free to swap some based on what you prefer or have at home. Enjoy cooking! 1. Layering the Chicken at the Bottom Start by placing the two boneless, skinless chicken breasts at the bottom of your slow cooker. This forms the base of your chili and helps keep the meat tender. 2. Adding Beans, Chilies, and Vegetables Next, add the rinsed white beans, the can of diced green chilies, and the finely diced onion. Don't forget the minced garlic and corn! Layer these ingredients right on top of the chicken. This keeps the flavors rich and balanced. 3. Pouring in Broth and Seasoning Now, pour in the four cups of low-sodium chicken broth. This adds moisture and flavor. Season with one teaspoon of ground cumin, one teaspoon of chili powder, and half a teaspoon of smoked paprika. Add salt and pepper to taste. Give everything a gentle stir to mix well. 1. Setting the Slow Cooker Secure the lid on the slow cooker. Set it to cook on low for 6 to 8 hours. You can also choose high for 3 to 4 hours if you’re short on time. 2. Cooking Time and Temperature Let the slow cooker do its magic. The chicken should be tender and fully cooked when time is up. You can check it by cutting into the chicken. It should be white all the way through. 1. Shredding the Chicken Once cooked, carefully take out the chicken breasts. Place them on a cutting board. Use two forks to shred them into bite-sized pieces. Return the shredded chicken to the pot. 2. Incorporating Dairy Now, mix in one cup of sour cream or Greek yogurt. Add one cup of shredded Monterey Jack cheese. Stir until the cheese melts and the chili becomes creamy. 3. Adjusting Seasoning for Taste Taste your chili. Add more salt, pepper, or spices if needed. This step helps you get the flavor just right. Let the chili cook for an extra 15 minutes. This lets all the flavors blend together. Ladle the hot chili into bowls and enjoy! - Adding Fresh Herbs and Spices: Fresh herbs like cilantro can elevate your chili. Their bright taste adds depth. You can mix them in at the end for a fresh burst. Spices like cumin and smoked paprika bring warmth. Adjust these to match your taste. - Options for Extra Creaminess: Sour cream or Greek yogurt makes this chili rich. You can blend it in for smoothness. For a twist, try adding cream cheese or a splash of heavy cream. This will enhance the texture, making it feel luxurious. - Recommended Slow Cooker Type: A 6-quart slow cooker works best for this recipe. It gives enough space for all your ingredients. Look for one with a non-stick insert for easy cleanup. - Essential Cooking Tools for Preparation: A good knife and cutting board are key for prepping. Use measuring cups and spoons for accuracy. A can opener is a must for beans and chilies. Keep a pair of tongs handy for shredding chicken too. - Bowl Presentation Ideas: Serve your chili in warm bowls for comfort. Garnish with chopped cilantro and a lime wedge. This adds color and freshness. For crunch, offer crispy tortilla chips on the side. - Best Sides to Serve with Chili: Cornbread is a classic side. It pairs well with the chili's creaminess. A simple salad can balance the meal too. Try a light green salad with a citrus dressing. {{image_4}} You can change the meat if you want. Instead of chicken, use turkey. This keeps the dish leaner. For a vegetarian option, try using hearty mushrooms or lentils. They add great texture and flavor. You can also switch the beans. Use black beans or pinto beans if you prefer. Both add a nice taste and color to your chili. You can make the chili as mild or spicy as you like. For a milder taste, skip the green chilies or use fewer spices. Adding more sour cream can help reduce heat too. To spice it up, add jalapeños or more chili powder. If you want more depth, try adding cayenne pepper. Just a pinch can go a long way. If you're looking for gluten-free tips, this recipe is already safe. All the ingredients are gluten-free, so enjoy without worry. For low-fat alternatives, choose skinless chicken thighs instead of breasts. You can also use low-fat yogurt instead of sour cream. These swaps keep flavor while cutting fat. To store leftover chili, let it cool first. Use an airtight container for storage. Place the chili in the fridge within two hours of cooking. It will stay fresh for three to four days. Always label the container with the date. This helps you keep track of how long it’s been stored. If you have more chili than you can eat, freezing is a great option. Allow the chili to cool completely before freezing. Use freezer-safe containers or bags. Leave some space for the chili to expand. It can last up to three months in the freezer. When ready to eat, thaw it overnight in the fridge. You can reheat chili on the stovetop or in the microwave. For the stovetop, heat on medium until warm, stirring often. This method helps keep the texture nice. In the microwave, use a microwave-safe bowl. Heat in short bursts, stirring in between. This prevents hot spots and keeps it creamy. Always check if it's hot throughout before serving. You can store Slow Cooker White Chicken Chili in the fridge for up to four days. Make sure you keep it in an airtight container. This helps keep the flavors fresh. If you want to store it longer, consider freezing it. In the freezer, it can last for about three months. Cooking frozen chicken in a slow cooker is not safe. The chicken may not reach a safe temperature quickly. This can allow harmful bacteria to grow. Instead, thaw the chicken first. You can do this in the fridge overnight or in cold water for a faster option. Once thawed, you can add it to the slow cooker with the other ingredients. To make your meal complete, serve it with warm tortilla chips or cornbread. You can also add a fresh salad on the side. For an extra touch, top the chili with chopped cilantro and a squeeze of lime. This adds freshness and flavor to each bite! This blog post shared a simple recipe for Slow Cooker White Chicken Chili. We covered key ingredients, step-by-step cooking, tips for flavor, and variations. You now know how to store leftovers and what to serve with this dish. I hope this guides you in making a tasty meal that everyone will love. Enjoy your cooking journey!

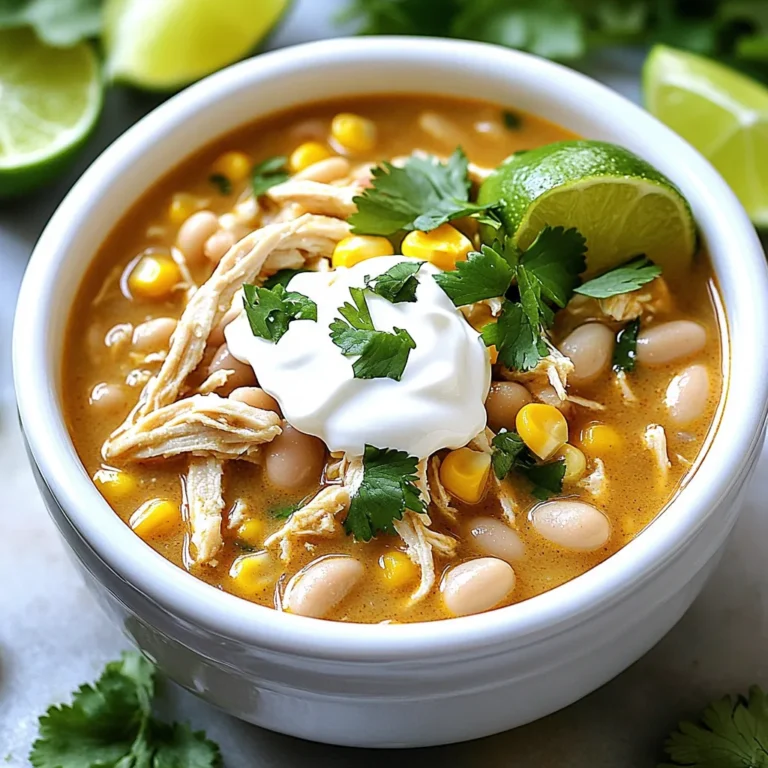
Slow Cooker White Chicken Chili Simple and Satisfying

- 1 pound boneless, skinless chicken thighs, sliced into strips - 2 bell peppers (1 red and 1 yellow), cut into thin slices - 1 medium red onion, sliced into rings - 3 cloves garlic, finely minced - 2 tablespoons extra-virgin olive oil - 1 tablespoon chili powder - 1 teaspoon ground cumin - 1 teaspoon smoked paprika - 1/2 teaspoon sea salt - 1/2 teaspoon freshly cracked black pepper - Juice of 1 fresh lime - Fresh cilantro, chopped, for garnish - Soft tortillas, for serving - Toppings for serving: creamy avocado, tangy sour cream, zesty salsa - Variations in spices: try adding cayenne pepper for heat or oregano for earthiness In this dish, chicken thighs bring a juicy, tender texture. The bell peppers and onions add vibrant colors and sweetness. Garlic and spices create a warm, savory taste. You can mix and match toppings to suit your mood. Each bite can be unique! Feel free to switch out the spices based on what you love. If you want a kick, add more chili powder or a dash of hot sauce. If you prefer mild flavors, skip the heat. This flexibility makes the dish fun and personal. Preheating the oven is key for roasting. Set your oven to 400°F (200°C). This temperature cooks the chicken and peppers evenly and quickly. In a big bowl, mix the following ingredients well: - 2 tablespoons extra-virgin olive oil - 3 cloves garlic, minced - 1 tablespoon chili powder - 1 teaspoon ground cumin - 1 teaspoon smoked paprika - 1/2 teaspoon sea salt - 1/2 teaspoon freshly cracked black pepper - Juice of 1 fresh lime Whisk these until they blend well. This mix adds great flavor to your chicken. Add 1 pound of chicken thighs, sliced into strips, to the marinade. Make sure each piece gets coated. Let it sit for at least 15 minutes. If you can, refrigerate for up to 2 hours. This makes the chicken more tasty. Slice 2 bell peppers (1 red and 1 yellow) and 1 medium red onion. Cut the peppers into thin slices and the onion into rings. Spread them on a large sheet pan. Drizzle with olive oil and sprinkle with salt and black pepper. Toss gently to coat. After marinating, layer the chicken strips on top of the veggies. Spread them out evenly. This helps everything cook well. Avoid overcrowding the pan to keep the chicken juicy. Put the sheet pan in your oven and roast for 20-25 minutes. Stir the mixture halfway through. This ensures even cooking. You’ll know it’s done when the chicken is no longer pink and the veggies are soft and slightly brown. Once roasted, take the pan out of the oven. Let it cool for a moment. Sprinkle chopped fresh cilantro on top. This adds a burst of color and flavor. Serve the fajita mix in warm soft tortillas. You can also add toppings like creamy avocado, tangy sour cream, or zesty salsa for extra taste. Enjoy your meal! - To ensure even cooking, spread the chicken and vegetables in a single layer. - Avoid overcrowding the pan. This helps the heat circulate. - Stir the mixture halfway through cooking for uniform roasting. - Use parchment paper to prevent sticking and for easy cleanup. - Add extra spices like cayenne for more heat or oregano for a fresh taste. - Marinade the chicken longer than 15 minutes for deeper flavor. Aim for 2 hours if possible. - Consider using a splash of orange juice for a sweet twist. - Serve the fajitas in warm tortillas with a side of lime wedges. - Try adding toppings like fresh avocado, crumbled queso, or pico de gallo. - Pair your fajitas with rice, beans, or a simple green salad for a full meal. {{image_4}} You can switch out the chicken thighs for chicken breasts if you prefer. Chicken breasts are leaner, so they cook faster. They may lack the rich flavor of thighs, but they still taste great. If you want a vegetarian or vegan option, try using firm tofu or tempeh. Just cut them into strips and marinate like the chicken. This way, you keep the flavor, and it's a healthy choice. Feel free to mix in seasonal vegetables. Zucchini, mushrooms, or corn can add a fun twist. You can also use any bell pepper color you like. If you want to customize based on taste, try broccoli or asparagus. Just remember to cut them into similar sizes for even cooking. You can adjust the spice level easily. If you like it spicy, add diced jalapeños or a pinch of cayenne. For a milder taste, skip the chili powder or reduce it. Always start small, then taste and adjust as needed. This way, everyone can enjoy the dish at their own heat level. To store leftovers, place the fajita chicken and peppers in an airtight container. Make sure to cool them down before sealing. This keeps moisture in and helps maintain freshness. You can store them in the fridge for up to 3 days. After that, the taste and texture might decline. For freezing fajitas, let them cool completely before placing them in freezer bags. Squeeze out as much air as possible. This prevents freezer burn. You can freeze them for up to 3 months. When ready to enjoy, thaw in the fridge overnight. This helps them keep their flavor. To reheat, use an oven or skillet. An oven keeps the chicken and peppers crispy. Preheat the oven to 350°F (175°C) and bake for about 10-15 minutes. If using a skillet, add a splash of water to keep moisture. Cover it to retain heat and warmth. Avoid using a microwave, as it can dry out the food. It takes about 45 minutes in total. You spend 15 minutes prepping and 25 minutes cooking. This makes it quick for a weeknight meal. Yes, you can use frozen chicken. Just be sure to thaw it first. You can do this overnight in the fridge. If you're short on time, use the microwave. Cook the chicken right away after thawing to keep it safe. Soft flour tortillas work great for fajitas. They are flexible and easy to wrap. If you prefer a healthier option, corn tortillas are also good. Warm the tortillas before serving for the best taste. Yes, you can prepare it ahead. Marinate the chicken and store it in the fridge for up to 2 hours. You can also cook the fajitas and keep them in the fridge for 3 days. Just reheat before serving. This blog covered how to make delicious sheet pan fajitas. We explored key ingredients like chicken, vegetables, and seasonings. You learned step-by-step instructions for marinating, roasting, and garnishing. I shared cooking tips and fun variations to fit your tastes. Fajitas are versatile, fun, and easy to customize. Try different proteins and veggies for new flavors. With these tips, you can impress family and friends at your next meal. Enjoy your cooking!

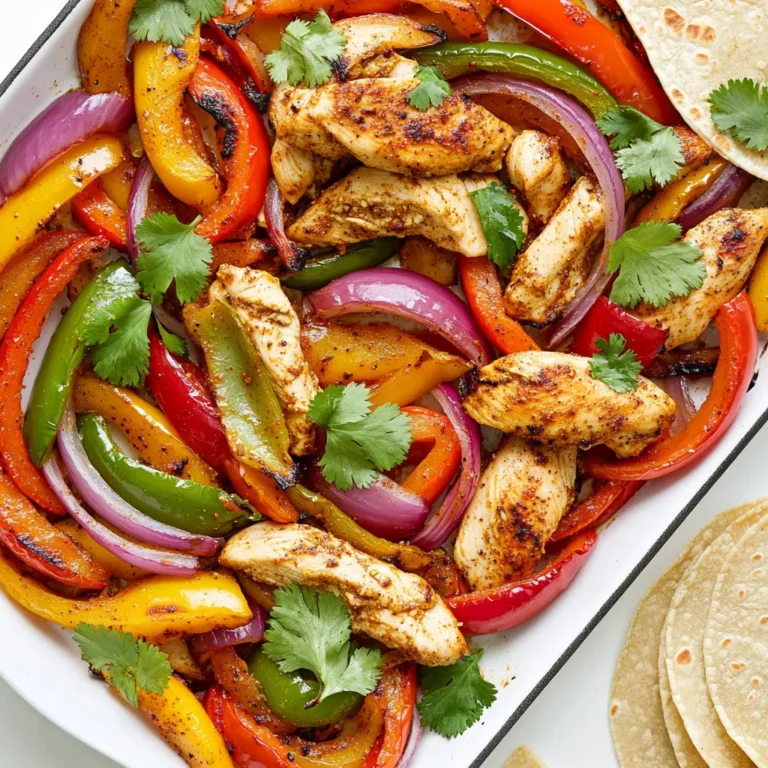
Savory Sheet Pan Fajita Chicken Peppers Delight

- 4 medium russet potatoes - 4 tablespoons extra virgin olive oil - 4 cloves garlic, finely minced - 1 teaspoon dried oregano - 1 teaspoon dried thyme - 1 teaspoon sweet paprika - Salt and freshly cracked black pepper to taste - Fresh parsley, finely chopped To make these garlic herb potato wedges, you'll need some key items. Start with four medium russet potatoes. Russets give the best crispiness. You also need four tablespoons of extra virgin olive oil for coating. This oil adds great flavor and helps with the crunch. You can't forget about garlic! Four cloves, finely minced, will add a wonderful aroma. For the spices, grab dried oregano, dried thyme, and sweet paprika. Each spice brings its own taste to the dish. Finally, have salt and freshly cracked black pepper ready to season your wedges just right. Once you gather all these ingredients, you'll see how simple it is to create delicious potato wedges. Don't skip the fresh parsley at the end. It adds a lovely touch of color. To start, cut your russet potatoes into wedges. Next, soak the wedges in cold water for at least 30 minutes. This soaking removes extra starch and helps create crispy edges. While the potatoes soak, preheat your air fryer to 400°F (200°C). Allow it to heat for about 5 minutes. After soaking, drain the potato wedges. Use paper towels to dry them well. This step is key for getting that perfect crunch. In a large bowl, add the dried wedges. Pour in 4 tablespoons of olive oil. Then, sprinkle in the minced garlic, oregano, thyme, paprika, salt, and pepper. Toss the wedges gently to coat each one with the tasty mix. Now it's time to cook! Arrange the seasoned potato wedges in a single layer in the air fryer basket. If your fryer is small, cook in batches. Air fry the wedges for 15-20 minutes. Remember to shake the basket halfway through cooking. This helps them brown evenly. When they look golden brown and crispy, they are ready! Carefully take them out and garnish with fresh parsley for a nice touch. To get crispy potato wedges, start by soaking them. Soak the wedges in cold water for at least 30 minutes. This step is key. It removes extra starch, which helps the wedges turn out crispy. After soaking, drain the wedges well. Dry them thoroughly with paper towels. Moisture on the surface will make them soggy. Feel free to get creative with spices. Try adding some cayenne pepper for heat or garlic powder for extra flavor. You can also mix in fresh herbs like rosemary or dill. Different oils can change the taste too. Instead of olive oil, use avocado oil for a lighter note or coconut oil for a unique twist. Make your wedges look great on the plate. Serve them in a rustic bowl or on a wooden board. Add a sprinkle of fresh parsley to brighten the dish. Dipping sauces can elevate your meal. Consider creamy ranch dressing or zesty garlic aioli. These sauces pair perfectly with the garlic herb flavors. {{image_4}} You can switch up the potatoes for a new twist. Sweet potatoes make a great choice. They add a sweet flavor and a lovely color. Just cut them into wedges like the russets. Yukon gold potatoes are another option. They have a creamy texture and a buttery taste. This gives your wedges a different flavor that many love. Want to take your wedges to the next level? Try adding cheese or bacon. Sprinkle some shredded cheese on top before they finish cooking. Bacon bits give a nice crunch and savory taste. Using fresh herbs instead of dried can also make a big difference. Fresh parsley, chives, or rosemary can brighten the dish and add a fresh aroma. If you want to bake these potato wedges, it’s easy. Preheat your oven to 425°F (220°C). Spread the seasoned wedges on a baking sheet in a single layer. Bake them for about 25-30 minutes, flipping halfway through. If you have a convection oven, use it! It cooks evenly and can make the wedges even crispier. Just reduce the temperature by 25°F (about 15°C) and check for doneness sooner. To keep your garlic herb potato wedges fresh, use an airtight container. Glass or plastic containers work well. Make sure the wedges cool to room temperature before sealing. This prevents steam from making them soggy. Store them in the fridge for up to three days. To reheat and keep the crispiness, use your air fryer again. Set it to 350°F (175°C). Heat the wedges for about 5-7 minutes. Shake the basket halfway through. This helps them regain that crunchy texture. Avoid using a microwave, as it can make them soggy. Freezing your garlic herb potato wedges is easy. First, let them cool completely. Then, place them in a single layer on a baking sheet. Freeze until solid, about 1-2 hours. After that, transfer the wedges to a freezer bag. They can stay frozen for about a month. To thaw, place them in the fridge overnight. Reheat them in the air fryer at 350°F (175°C) for 7-10 minutes. This helps them taste fresh and crispy again. Soak the potato wedges for at least 30 minutes. This time helps remove extra starch, making them crispier. If you have more time, soaking for an hour is even better. Just remember to keep them in cold water. This simple step makes a big difference in texture. Yes, you can play with seasonings! Try adding chili powder for heat or Parmesan cheese for a cheesy twist. You can also use fresh herbs like rosemary or basil instead of dried ones. Mix and match flavors to find your favorite combination. The options are endless. Set your air fryer to 400°F (200°C). This temperature helps the potato wedges cook evenly and get that crispy finish. Make sure to preheat the air fryer for about 5 minutes before adding the wedges. This quick step ensures even cooking from the start. In this post, we explored making crispy air-fried potato wedges. You learned about key ingredients, including russet potatoes and olive oil, and how to prepare and cook them perfectly. Tips offered insights for enhancing flavor and achieving crispiness. Remember, you can try different potatoes and spices to personalize your dish. With proper storage methods, these wedges stay tasty even as leftovers. Embrace your creativity in the kitchen, and enjoy each crispy bite!

Garlic Herb Potato Wedges Air Fryer Crispy Treat

PREV 1 … 4 5 6 … 44 NEXT
yummybiterecipes

explore

DessertsDinnerAppetizersDrinks

Our Policies

  • Cookie Policy
  • Copyright Policy
  • Disclaimer
  • GDPR Policy
  • Terms Of Use
Back to Top
  • About
  • Contact Us
  • Privacy Policy
© 2025 yummybiterecipes