FREE DINNER EBOOK! Get your copy!
  • Cookie Policy
  • GDPR Policy
  • Disclaimer
  • Terms Of Use
  • Visit my other site: Fun Cookie Recipes
yummybiterecipes
  • Home
  • Dinner
  • Desserts
  • Drinks
  • Appetizers
  • Contact
  • About
  • Privacy Policy
  • Home
  • Dinner
  • Desserts
  • Drinks
  • Appetizers
  • Contact
  • About
  • Privacy Policy
  • Cookie Policy
  • GDPR Policy
  • Disclaimer
  • Terms Of Use
Visit my other site: Fun Cookie Recipes

HOME / CATEGORIES /

Latest

- 1 cup rolled oats - 2 cups almond milk (or your choice of milk) - 1 medium apple, finely grated (about 1 cup) The main ingredients for apple cinnamon overnight oats are simple. Rolled oats form the base. They soak up liquid and become soft overnight. Almond milk adds creaminess and flavor. You can also use other milk like cow's or oat milk. Grated apple gives natural sweetness and a lovely texture. - 1 tablespoon chia seeds - 1/4 cup Greek yogurt (optional, for added creaminess) - 2 tablespoons maple syrup (or honey, according to preference) Optional ingredients can enhance your dish. Chia seeds add fiber and help thicken the oats. Greek yogurt makes it creamier and adds protein. Maple syrup or honey sweetens the oats. Adjust the amount based on your taste. - Chopped nuts (such as walnuts or pecans) - Ground cinnamon Garnishes finish off your oats. Chopped nuts add crunch and healthy fats. Walnuts or pecans work best. A sprinkle of ground cinnamon boosts flavor and aroma. These toppings make your meal even more delicious and appealing. {{ingredient_image_2}} To make Apple Cinnamon Overnight Oats, start by gathering your ingredients. You will need rolled oats, almond milk, a grated apple, chia seeds, cinnamon, maple syrup, Greek yogurt, and salt. 1. In a large mixing bowl, combine all these ingredients. 2. Mix everything well. Make sure the oats soak up the liquid. This helps them become soft and tasty. Now it’s time to store your oats. - Spoon the oat mixture into jars or airtight containers. - Seal each jar tightly to keep them fresh. - Place the jars in the fridge overnight. Let them chill for at least six hours. This allows the flavors to blend well. When morning comes, your oats will be ready! - Take the jars out of the fridge and give them a good stir. - If you want a creamier texture, add a splash of almond milk and mix again. - Finally, top your oats with chopped nuts and a sprinkle of cinnamon. This adds a lovely crunch and extra flavor. Enjoy your delicious breakfast! Soaking time is key for creamy overnight oats. I suggest letting the oats soak for at least six hours. This allows them to absorb the almond milk fully, giving them a soft texture. If you want an even creamier mix, add a splash of almond milk right before serving. This small step makes a big difference in how they feel in your mouth. Feel free to experiment with spices. Nutmeg pairs well with cinnamon and adds a warm touch. You can also swap out the sweetener to fit your taste. Try honey if you want a floral note, or use maple syrup for a rich flavor. This flexibility helps you create a dish you truly love. Layer your oats in clear jars for a stunning look. It shows off the colors and textures, making your breakfast feel special. For an added touch, top your oats with chopped nuts and a light sprinkle of cinnamon. You can even add a slice of apple on top for a fresh and inviting look. This simple trick makes your meal more appealing and fun to eat. Pro Tips Use Fresh Ingredients: Always opt for fresh apples and high-quality oats to enhance the flavor and texture of your overnight oats. Customize Sweetness: Adjust the amount of maple syrup or honey according to your taste preference, and consider adding a splash of vanilla extract for extra flavor. Experiment with Toppings: Feel free to mix and match toppings like dried fruits, seeds, or coconut flakes to add variety and nutritional benefits. Make Ahead: Prepare a larger batch and store in the fridge for up to 5 days for a quick breakfast option throughout the week. {{image_4}} You can change up the fruit in your overnight oats. While apples are great, bananas and berries also work well. Bananas add a creamy texture. Berries bring a burst of flavor. You can even mix different fruits. Try apples with blueberries for a tasty twist. This adds a fun mix and makes breakfast more exciting. If you follow a vegan diet, swap almond milk for oat or coconut milk. You can skip the Greek yogurt or use a plant-based version. For those needing gluten-free options, use certified gluten-free oats. This way, everyone can enjoy the meal without worry. Want to add a unique flavor? Try mixing in cocoa powder for a chocolatey treat. It makes your oats rich and indulgent. If you love nutty flavors, add a scoop of almond or peanut butter. This gives your oats creaminess and healthy fats. These twists keep breakfast interesting and fun! To keep your apple cinnamon overnight oats fresh, use airtight containers. Glass jars work best. They do not absorb smells and keep the oats safe. You can also use plastic containers if they seal well. Store the oats in the fridge for up to five days. This makes meal prep easy for busy mornings. Yes, you can freeze overnight oats! This is a great way to save leftovers. Just make sure to use freezer-safe containers. Leave some space at the top for expansion. To thaw, place the oats in the fridge overnight. You can also use the microwave in short bursts. Stir well before serving. For easy reheating, use the microwave or stovetop. If using the microwave, heat in 30-second intervals. Stir between each interval to heat evenly. On the stovetop, add a splash of almond milk to the pan. Heat over low heat while stirring. This keeps the texture creamy and smooth. Rolled oats are the best choice for overnight oats. They soak up liquid well and create a nice texture. Quick oats can work too, but they may become mushy. Rolled oats keep a good bite and blend with flavors better. Using rolled oats gives your Apple Cinnamon Overnight Oats a hearty feel. Yes, you can prepare overnight oats for more than one day. Batch prepping is easy and saves time. Make multiple jars at once and store them in the fridge. They stay fresh for up to five days. Just remember to keep the jars sealed. This way, you always have a tasty breakfast ready to go. You can easily adjust the sweetness of your overnight oats. Use maple syrup or honey, depending on what you like. Start with two tablespoons of maple syrup. If it's not sweet enough, add a little more. You could also try adding fruits like bananas or berries for natural sweetness. This way, you can customize each jar to match your taste. This post covered creating delicious overnight oats with simple ingredients. We explored the main and optional components, preparation steps, storage tips, and fun variations. Remember, you can mix things up with fruits and flavors. Always adjust sweetness to match your taste. Enjoy this quick and healthy breakfast whenever you want. Now, challenge yourself to try new combinations. Be creative and enjoy every bite!

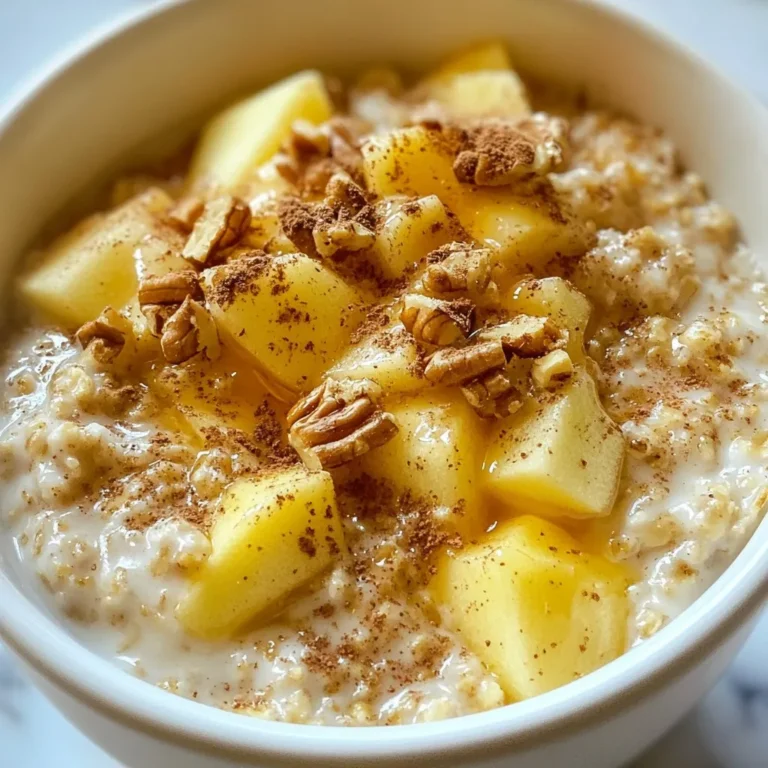
Apple Cinnamon Overnight Oats Tasty and Simple Meal

- 1 pound carrots, peeled and cut into large chunks - 2 tablespoons extra virgin olive oil - 1 tablespoon pure maple syrup - 1 teaspoon smoked paprika - 1 teaspoon ground cumin - Salt to taste - Freshly ground black pepper to taste - 2 tablespoons fresh parsley, finely chopped (for garnish) Carrots are rich in beta-carotene. This helps with vision and skin health. They also provide fiber, which aids digestion. Olive oil adds healthy fats that support heart health. It can reduce inflammation too. Maple syrup gives a natural sweetness. It contains antioxidants that help fight free radicals. Smoked paprika adds flavor and can boost metabolism. Ground cumin aids digestion and has anti-inflammatory properties. Fresh parsley is packed with vitamins A, C, and K. It can also help freshen your breath. If you need a different flavor, try using honey instead of maple syrup. For a spicy kick, use chili powder instead of smoked paprika. You can swap olive oil with avocado oil for a different taste. If you want a milder flavor, use ground coriander instead of cumin. For a fresh herb twist, try cilantro in place of parsley. {{ingredient_image_2}} Start by peeling and cutting 1 pound of carrots into large chunks. This size helps them cook evenly. Next, fill a large pot with water and add a pinch of salt. Bring the water to a rolling boil. Once it boils, carefully add the carrot chunks. This step cooks the carrots until they are soft. Cook the carrots for 15 to 20 minutes. Check them with a fork. They should be tender and easy to pierce. When they are done, drain the carrots in a colander. This helps remove excess water and keeps the flavor strong. After draining, place the carrots in a large mixing bowl. This gives you space to mash them easily. While the carrots are still warm, add 2 tablespoons of extra virgin olive oil and 1 tablespoon of pure maple syrup. Then, sprinkle in 1 teaspoon of smoked paprika and 1 teaspoon of ground cumin. Add salt and freshly ground black pepper to taste. Use a fork or potato masher to smash the carrots. Mix gently to keep some texture. Taste the mixture and adjust the seasoning if needed. Serve the smashed carrots warm and top with 2 tablespoons of chopped fresh parsley for a fresh touch. To make soft and tender smashed carrots, start by cutting the carrots into large chunks. This helps them cook evenly. Use a large pot and fill it with water. Add a good pinch of salt to boost the flavor. Boil the water before adding the carrots. Cook them for 15-20 minutes. They should be easy to pierce with a fork. If you overcook them, they may turn mushy. For a tasty flavor, I use olive oil and maple syrup. These add a nice sweetness. Spices like smoked paprika and ground cumin give a warm, earthy taste. Adjust the salt and pepper to suit your taste. If you want a little kick, try adding chili powder or cayenne pepper. Fresh herbs like parsley brighten the dish. They add color and freshness. When mashing, use a fork or potato masher gently. You want to mix well but still keep some chunks. Over-mashing can make the carrots too smooth. If you like a bit of bite, stop mashing when they are combined. Taste the mixture and adjust seasoning before serving. This way, you ensure the perfect balance of flavors and texture. Pro Tips Choose Fresh Carrots: Selecting vibrant, firm carrots will enhance the flavor and texture of your dish. Perfect Boiling Time: Keep an eye on the boiling time; overcooked carrots can become mushy and lose their flavor. Experiment with Spices: Feel free to add your favorite spices or herbs to customize the flavor profile to your liking. Serving Suggestions: These smashed carrots pair beautifully with grilled meats or as a colorful side dish at your next gathering. {{image_4}} You can mix up the flavor of smashed carrots easily. For a sweet twist, add a touch more maple syrup. This will make your dish taste like candy! If you want spice, try adding a dash of chili powder or cayenne. This will give your carrots a nice kick! You can also add other ingredients to make your smashed carrots special. Try mixing in a spoonful of honey or brown sugar for added sweetness. Want more texture? Toss in some roasted garlic or finely chopped nuts. These add crunch and flavor. Fresh herbs like thyme or dill can also boost the taste! Smashed carrots go well with many meals. Serve them alongside grilled chicken or fish for a balanced plate. They also pair nicely with roasted vegetables or a fresh salad. For a cozy meal, enjoy them with a warm bowl of soup. You can even use smashed carrots as a base for a hearty stew. The options are endless! To store your leftover smashed carrots, let them cool to room temperature. Then, transfer them to an airtight container. Make sure to seal the lid tightly. You can keep them in the fridge for up to five days. If you want to save them for longer, consider freezing them. When you're ready to enjoy your smashed carrots again, take them out of the fridge. If they are frozen, thaw them in the fridge overnight. To reheat, you can use a microwave or a pot on the stove. If using a microwave, heat them in short bursts, stirring in between. If using a pot, add a splash of water to keep them moist. Heat them gently until warm. Smashed carrots stay good in the fridge for about five days. If you freeze them, they can last up to three months. To freeze, scoop the carrots into a freezer-safe bag or container. Press out excess air for better results. When ready to eat, thaw and reheat as described above. To make smashed carrots vegan, simply swap the maple syrup with agave nectar or another plant-based sweetener. You can also use vegetable broth instead of water for boiling. This change adds more flavor while keeping the dish vegan-friendly. Yes, you can use baby carrots! They will work well in this recipe. Just cut them in half for even cooking. Baby carrots may cook a bit faster, so check their tenderness after 10-15 minutes. Carrots are packed with vitamins and minerals. They are high in vitamin A, which is great for your eyes. Carrots also contain fiber, which helps digestion. Their antioxidants may support heart health and lower cancer risk. Enjoying carrots can enhance your overall health. We explored how to make delicious smashed carrots. We looked at key ingredients and their benefits. I shared steps for preparing and cooking your carrots to perfection. You learned tips for great texture and flavor. There are also easy variations to try. Proper storage keeps leftovers fresh and tasty. Remember, smashed carrots are not only simple but also healthy. Enjoy creating this dish in your kitchen!

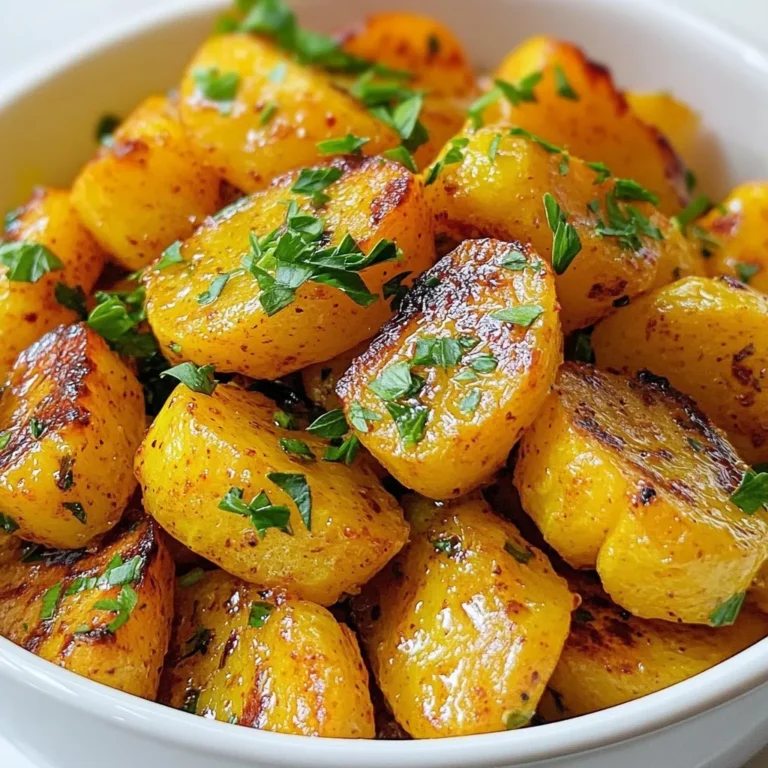
Healthy Smashed Carrots Comforting and Flavorful Dish

- 200g beef sirloin, thinly sliced - 200g egg noodles - 1 bell pepper, sliced (any color) - 1 cup broccoli florets - 3 tablespoons soy sauce - 1 tablespoon oyster sauce (optional) - 1 tablespoon sesame oil - 2 cloves garlic, minced - 1 inch ginger, grated - 1 teaspoon chili flakes (adjust to taste) - Salt and pepper to taste - 2 green onions, chopped Gather these ingredients before you start cooking. Having everything ready helps the cooking process flow smoothly. The beef sirloin is the star here, so make sure to slice it thinly. This allows it to cook quickly and evenly. The egg noodles provide a nice base for the dish, soaking up all the tasty sauces. Don’t skimp on the vegetables! Bell pepper adds color and crunch, while broccoli gives a nice texture. The sauce ingredients bring flavor that ties everything together. Soy sauce is key, and you can add oyster sauce for more depth. Sesame oil gives a lovely aroma and richness. The seasonings like garlic and ginger bring warmth and zest. Chili flakes let you control the heat, so adjust them to your taste. Green onions add a fresh, crisp finish, making your meal not just tasty but also pretty. This combination of fresh ingredients ensures each bite is packed with flavor. You’ll create a dish that’s quick, easy, and satisfying! {{ingredient_image_2}} 1. Begin by cooking the egg noodles according to the package instructions. 2. Once cooked, drain the noodles in a colander. 3. Allow the noodles to cool slightly before using them in your stir fry. 1. Heat a large wok over medium-high heat. Add vegetable oil, letting it shimmer. 2. Carefully add the thinly sliced beef to the hot wok. 3. Season the beef with a pinch of salt and a dash of pepper. 4. Stir-fry the beef for about 2-3 minutes. Cook until it turns brown and is done to your liking. 5. Once cooked, remove the beef from the wok and place it on a plate. 1. In the same wok, add minced garlic and grated ginger. Stir for about 30 seconds. 2. Be sure to keep an eye on the garlic and ginger so they do not burn. 3. Next, add the sliced bell pepper and broccoli florets. 4. Stir-fry these veggies for an additional 2-3 minutes. Cook until they are tender yet still crisp. 1. Return the cooked beef to the wok with the vegetables. 2. Pour in the soy sauce, oyster sauce (if you choose to use it), and sesame oil. 3. Sprinkle in the chili flakes for some heat. 4. Toss all the ingredients together, cooking for one more minute. 5. Gently add the cooked egg noodles to the wok. 6. Mix everything together until the noodles are well coated with the sauce and heated through. 7. Finally, remove the wok from heat. Garnish with chopped green onions for a fresh touch. To make a great stir-fry, use high heat. A hot wok cooks food fast. This keeps veggies bright and crisp. Start with a little oil in the pan. When it shimmers, add your beef. Stir-fry it for just 2-3 minutes. This gives it a nice brown color. Then, take the beef out. Cook your garlic and ginger next for great flavor. If you find your stir-fry cooking too slowly, raise the heat. But watch closely! You want to avoid burning anything. If needed, add a splash of water to keep things moving. Good flavor starts with fresh ingredients. Your beef should be tender and thinly sliced. Use fresh garlic and ginger for the best taste. For seasonings, soy sauce is key. It adds saltiness and depth. If you like a bit of sweetness, try oyster sauce. A dash of sesame oil gives a nutty aroma. Chili flakes add heat. Start with a small amount. You can always add more if you like. Fresh herbs, like green onions, add a bright finish. Serve your stir-fry in deep bowls. This makes it look inviting. Top with chopped green onions and sesame seeds. They add color and a nice crunch. For a zesty touch, add lime wedges on the side. This lets your guests squeeze some juice over their dish. It’s a fun way to enjoy the meal! Pro Tips Slice Against the Grain: To ensure tender beef, always slice the sirloin against the grain. This breaks down the muscle fibers, making each bite easier to chew. Prep Ingredients Ahead: Stir-frying is a quick cooking method, so have all your ingredients prepped and ready to go before you start cooking to avoid overcooking. Use High Heat: For the best stir-fry, make sure your wok or pan is very hot before adding the ingredients. This helps to sear the beef quickly and retain its juices. Customize Your Veggies: Feel free to swap in your favorite vegetables, like snap peas or carrots, to add variety and nutrition to your stir-fry. {{image_4}} You can change the beef to chicken or tofu. Thinly slice chicken breast for a lighter option. Tofu works great for a vegetarian meal. Just use firm tofu for the best texture. You can also try different seafood options. Shrimp or scallops can add a tasty twist. Cook them quickly in the hot wok for the best flavor. Feel free to swap in other veggies based on what you have. Carrots, snap peas, or zucchini add nice colors and crunch. You can also use seasonal vegetables. In spring, add asparagus. In fall, try pumpkin or kale. This lets you enjoy fresh flavors all year. For gluten-free options, choose rice noodles or gluten-free soy sauce. This keeps the dish safe for those with gluten issues. If you follow a vegetarian or vegan diet, skip the beef and oyster sauce. Use mushrooms or tempeh for protein. Add more veggies for a hearty meal. This way, everyone can enjoy a delicious dish! After you cook your Minute Beef Stir Fry Noodles, let them cool. This helps keep them fresh. Store them in a good container. I suggest using airtight containers. They keep moisture in and air out. This way, your noodles stay tasty. You can keep them in the fridge for up to three days. When it’s time to eat your leftovers, you want them hot and yummy. The best way to reheat them is in a pan on the stove. Just add a little water or oil to keep them moist. Stir them over medium heat until hot. You can also use the microwave. Place them in a microwave-safe bowl and cover it. Heat for one to two minutes. Stir halfway for even warmth. If you have more leftovers, freezing is a great option. First, let the noodles cool completely. Then, place them in freezer bags. Make sure to squeeze out the air. This helps avoid freezer burn. You can freeze them for up to three months. When you want to eat them, take them out of the freezer. Thaw them in the fridge overnight. Reheat using the stove or microwave, and enjoy! You can make this dish in about 20 minutes. The prep time takes around 10 minutes, and cooking takes another 10 minutes. This means you can have a tasty meal ready quickly. Yes, you can use other noodles. Rice noodles, udon, or even whole wheat noodles work well. Just follow the cooking time on the package you choose. This gives you options based on what you have at home. You can serve beef stir fry noodles with a side of steamed rice or a fresh salad. A light cucumber salad adds a nice crunch. If you want a drink, iced tea or a light soda pairs well with the dish. To add heat, increase the chili flakes. You can also use fresh sliced chilies or hot sauce. Start small and taste as you go. This way, you can find the spice level that suits you best. This blog post detailed the making of Minute Beef Stir Fry Noodles, covering all essentials. We explored key ingredients like beef, egg noodles, and flavorful sauces. I also shared step-by-step instructions, from cooking noodles to combining everything perfectly. You learned useful tips on flavor, presentation, and even variations by swapping proteins or veggies. Finally, proper storage techniques helped ensure your meal lasts longer. Remember, with these guidelines and my expert insights, you can create a tasty dish tailored to your taste. Have fun cooking and enjoy your delicious stir-fry!

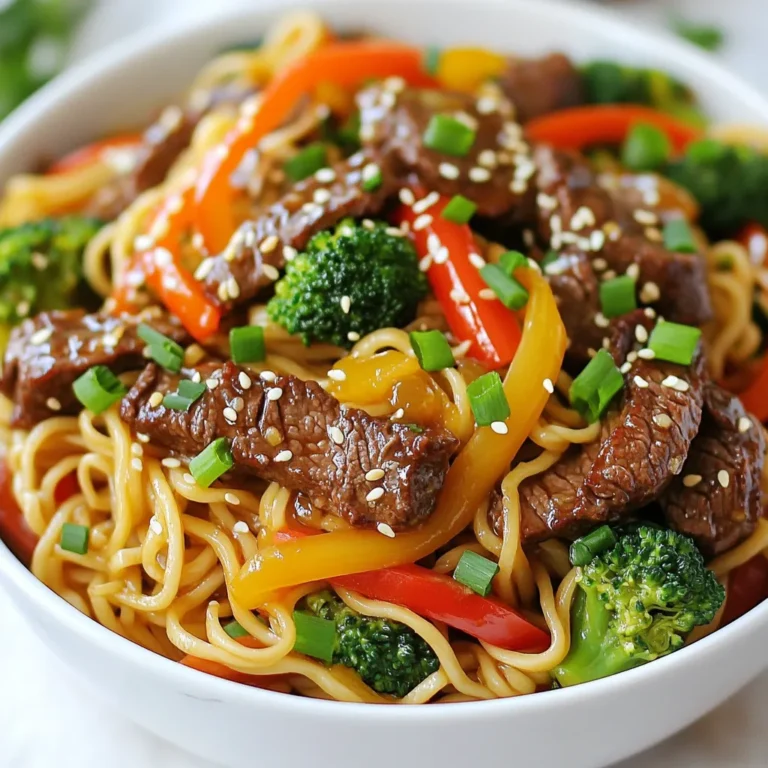
Minute Beef Stir Fry Noodles Quick and Easy Meal

- 3 cups all-purpose flour - 1 ½ teaspoons salt - 1 teaspoon sugar - 1 teaspoon instant yeast - 1 ¼ cups warm water - 2 tablespoons olive oil To make No-Knead Turkish Flatbread, gather your main ingredients first. You need all-purpose flour, salt, sugar, instant yeast, warm water, and olive oil. Each of these plays a key role in creating the dough. - Sesame seeds - Za'atar spice - Assorted fresh herbs Once your flatbread is baked, you can add toppings. Sesame seeds add crunch. Za'atar spice brings warmth. Fresh herbs give a tasty burst. You can mix and match these to create your favorite flavor. Don't be afraid to get creative! Each topping makes your flatbread unique. {{ingredient_image_2}} Start by gathering your dry ingredients. In a large mixing bowl, add: - 3 cups all-purpose flour - 1 ½ teaspoons salt - 1 teaspoon sugar - 1 teaspoon instant yeast Mix these well using a whisk. Then, gradually add in the wet ingredients. Pour in: - 1 ¼ cups warm water - 2 tablespoons olive oil Use a spatula or wooden spoon to stir everything together. Mix until you see no dry flour left. The dough will be sticky, and that’s okay! Now it’s time for the dough to rest. Cover the bowl with plastic wrap or a clean towel. Let it sit at room temperature for 12 to 18 hours. You will know it’s ready when it has doubled in size. Look for a bubbly surface on top. Once the dough has risen, generously flour your work surface. Carefully pour the dough onto it. With lightly floured hands, fold the dough over itself a few times. Shape it into a rough ball without deflating it too much. Let it rest for another 30 minutes. While the dough rests, preheat your oven to 450°F (232°C). Place a baking sheet or pizza stone inside to heat up. After 30 minutes, transfer the dough onto parchment paper. Gently stretch and shape it into an oval or round shape that is about ½ inch thick. If you want extra flavor, sprinkle optional toppings like sesame seeds, za'atar spice, or chopped fresh herbs on top. Carefully transfer the parchment paper with the dough onto the hot baking sheet or pizza stone. Bake for 15 to 20 minutes. Look for a puffed and golden brown flatbread. Once done, remove it from the oven. Drizzle a little olive oil on top while it’s warm. Let it cool on a wire rack before slicing. Enjoy your homemade no-knead Turkish flatbread! Water temperature matters. Use warm water around 110°F (43°C). This helps activate the yeast quickly. If the water is too hot, it can kill the yeast. If it’s too cold, the dough won't rise well. Resting conditions are also key. Cover the dough with plastic wrap or a clean towel. Let it sit at room temperature for 12 to 18 hours. This time allows the dough to grow and get bubbly. Avoid overworking the dough. This can make your flatbread tough. The dough should remain sticky and shaggy. A gentle touch is best when folding it. Never skip the resting phase. This step is vital for a good rise. If you rush it, your flatbread won't puff up. You can enjoy No-Knead Turkish Flatbread in many ways. Serve it warm with olive oil and vinegar for dipping. It’s great as a side to soups or salads. Pair it with dips like hummus or tzatziki. For spreads, try feta cheese or spicy harissa. Add fresh herbs on top for extra flavor. Enjoy your flatbread with friends and family! Pro Tips Hydration is Key: For a lighter and airier flatbread, ensure the dough is sticky enough. The higher hydration helps achieve that perfect texture. Flavor Boost: Experiment with different toppings like garlic powder or herbs before baking to create unique flavors that complement the bread. Resting Time Matters: Don’t rush the resting period after shaping the dough. This allows the gluten to relax, making it easier to stretch and shape. Oven Temperature: Make sure your oven is fully preheated before baking. A hot oven ensures proper puffing and browning of the flatbread. {{image_4}} You can easily make this flatbread your own. Try adding different herbs and spices. Rosemary or thyme works great. You can also use garlic powder or chili flakes for extra kick. Infused olive oils can also boost flavor. Try rosemary-infused olive oil for a nice touch. It adds a warm, herby taste that pairs well with the bread. Drizzle it on or brush it before baking. You don't need an oven to cook this bread. You can cook it on a stovetop. Just heat a non-stick pan over medium heat. Cook each side for about 3 to 4 minutes. This method gives it a nice, crispy texture. A cast-iron skillet is another great option. Preheat it on the stove. Place the dough inside and cover with a lid. This traps steam and helps the bread rise while cooking. If you need a gluten-free version, there are great substitutes. Almond flour or a gluten-free all-purpose blend works well. Make sure it has xanthan gum for the right texture. Adjust the method slightly. Gluten-free dough can be thicker. You might need to add a bit more water. Just keep an eye on the dough as it rises. It should still puff and bubble nicely. To keep your no-knead Turkish flatbread fresh, follow these tips: - Let it cool. Always cool the flatbread completely before storing. - Wrap in plastic. Use plastic wrap to cover the flatbread tightly. This keeps moisture in. - Use airtight containers. Place the wrapped flatbread in an airtight container. This prevents it from drying out. These steps ensure your flatbread stays soft and tasty for longer. When it’s time to eat your flatbread again, reheating is easy: - Use an oven. Preheat your oven to 350°F (175°C). Wrap the flatbread in foil. Heat for about 10 minutes. This keeps it soft. - Try a skillet. Heat a non-stick skillet over medium heat. Place the flatbread in the pan for about 2-3 minutes on each side. This restores the crispiness. - Freezing flatbread. If you need to store it for longer, freeze it. Wrap it tightly in plastic wrap and then in foil. It can last for up to three months in the freezer. These methods help keep your flatbread delicious and enjoyable! Yes, you can make the dough in advance. If you want to prepare it ahead of time, mix the dough as usual. After the first rise, cover it well and place it in the fridge. It can stay there for up to three days. When you're ready to bake, let it sit at room temperature for about an hour. This pre-baking rise helps the dough get fluffy and ready for shaping. You can use active dry yeast instead of instant yeast. If you choose this, first, dissolve it in warm water for about five minutes. This will wake up the yeast. You can also use fresh yeast. For fresh yeast, use 0.5 ounces for every teaspoon of instant yeast. Adjust the water slightly, as fresh yeast has more moisture. To prevent sticking, generously flour your work surface before placing the dough. Use plenty of flour on your hands as well. When shaping the dough, gently stretch it instead of pulling. If you notice it sticking, sprinkle more flour underneath. When transferring to the baking surface, use parchment paper to make the move easier. Making No-Knead Turkish Flatbread is simple and fun. We covered key ingredients, from flour to olive oil. I shared easy steps for mixing, rising, shaping, and baking. Plus, we explored tips to get that perfect texture and avoid common mistakes. You can also try different flavors and adaptations, like gluten-free options. Finally, proper storage helps keep your bread fresh for longer. Overall, this flatbread is a versatile addition to any meal. Enjoy experimenting and sharing your tasty creations!

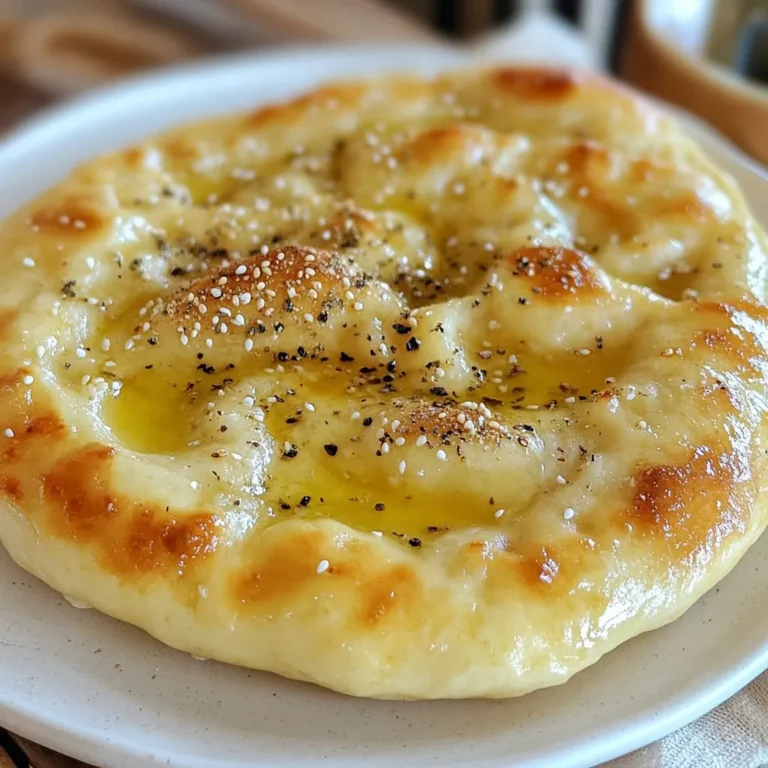
No-Knead Turkish Flatbread Simple and Delicious Recipe

- 1 lb boneless, skinless chicken thighs - 1/4 cup soy sauce - 2 tablespoons gochujang (Korean chili paste) - 2 tablespoons honey - 1 tablespoon sesame oil - 2 cloves garlic, minced - 1 teaspoon fresh ginger, finely grated - 1 tablespoon rice vinegar - 2 cups cooked jasmine rice - 1 cup broccoli florets, steamed until bright green - 1 cup shredded carrots - 1/2 cucumber, thinly sliced - 1 tablespoon sesame seeds, toasted - 2 green onions, finely chopped - Salt and pepper to taste These ingredients come together to make a vibrant dish. The chicken thighs bring juiciness and taste. The marinade adds a burst of flavor. I love the balance of salty soy sauce and sweet honey. Gochujang gives it a spicy kick, while sesame oil adds warmth. Fresh garlic and ginger round out the sauce perfectly. For the base, I use jasmine rice. It has a fragrant, soft texture. Then, I add colorful vegetables. Broccoli, carrots, and cucumber not only look great but also add crunch. This dish is all about balance and flavor. Each bite offers a mix of savory chicken, fluffy rice, and fresh veggies. When you gather these ingredients, you set the stage for a tasty meal. They work together to create something special that everyone will enjoy. {{ingredient_image_2}} To make the marinade, grab a medium bowl. Add 1/4 cup soy sauce, 2 tablespoons gochujang, 2 tablespoons honey, and 1 tablespoon sesame oil. Then, add 2 cloves minced garlic and 1 teaspoon finely grated fresh ginger. Finally, mix in 1 tablespoon rice vinegar. Use a whisk to blend these ingredients. Make sure the marinade is smooth and fully combined. A smooth texture helps the chicken soak up all the flavors. Now, take your 1 lb of boneless, skinless chicken thighs. Place them in the bowl with the marinade. Make sure each piece is well-coated. Once coated, cover the bowl with plastic wrap or a lid. Refrigerate the chicken for at least 30 minutes. For the best flavor, let it marinate for up to 2 hours. This time allows the flavors to seep into the chicken. When you're ready to cook, preheat your grill or cast-iron skillet over medium-high heat. Once hot, take the chicken out of the marinade. Let any extra marinade drip off. Cook the chicken for about 5-7 minutes on each side. Keep an eye on it to avoid burning. The chicken should reach an internal temperature of 165°F (75°C). This ensures it’s safe to eat. Once the chicken is cooked, let it rest for 5 minutes. Then, slice it into strips. To build your bowls, start with a scoop of jasmine rice as the base. Next, layer on your sliced chicken. Now, add colorful veggies like steamed broccoli, shredded carrots, and thinly sliced cucumber. If you like, drizzle some leftover marinade over the top for extra flavor. Finish with toasted sesame seeds and chopped green onions. Your bowls are now ready to enjoy! Marinating chicken is key for great taste. It helps the chicken absorb all the yummy flavors. Aim to marinate for at least 30 minutes. If you have more time, go for 2 hours. This extra time makes a big difference. When grilling chicken, keep these tips in mind: - Preheat your grill or skillet to medium-high heat. - Let the excess marinade drip off before cooking. - Cook for about 5-7 minutes on each side. - Check that the chicken reaches 165°F (75°C) for safety. Make your bowls bright and fun. Use colorful bowls to catch the eye. Arrange the veggies in sections. This adds a nice touch. For garnishing, try these: - Add slices of lime for a fresh kick. - Sprinkle toasted sesame seeds for crunch. - Top with chopped green onions for flavor. Avoid overcooking the chicken. It can become dry and tough. Always check the internal temperature for doneness. Never skip the marination step. It makes your chicken juicy and full of flavor. Skipping this step means losing out on taste. Pro Tips Marinate for Maximum Flavor: Allow the chicken to marinate for at least 2 hours, or overnight if possible, to enhance the depth of flavor in your dish. Temperature Check: Use a meat thermometer to ensure your chicken reaches an internal temperature of 165°F (75°C) for safe consumption. Customize Your Veggies: Feel free to swap in your favorite vegetables like bell peppers or snap peas for added color and nutrition in your bowls. Garnish with Freshness: Fresh herbs like cilantro or mint can elevate the dish with a burst of freshness and additional flavor. {{image_4}} You can swap chicken for tofu to make this dish vegetarian. Tofu absorbs flavors well. Press it first to remove extra water. This helps it soak up the marinade better. You can also grill or pan-fry the tofu for a crispy edge. If you want to use pork or beef, that's great too! Just choose cuts like pork loin or flank steak. Marinate them just like the chicken. Cook them until they reach a safe temperature. This keeps the flavors intact while adding variety. Feel free to change up the veggies. Use seasonal vegetables like bell peppers or snap peas. These add color and crunch. You can also try adding corn or radishes for a fresh twist. Mixing different colors makes your bowl more fun and appealing. To add more color, think about using purple cabbage or cherry tomatoes. These not only look great but also bring unique flavors. The variety keeps your meals exciting and healthy. Gochujang comes in different types. You can find mild, medium, or hot versions. Choose one based on your spice level. For a milder taste, go with the mild gochujang. If you like heat, try the hot version. You can also mix in other spices or herbs. Add sesame seeds for nuttiness or cilantro for freshness. Try using garlic powder or onion powder for extra flavor. These tweaks can elevate your Korean BBQ chicken bowls. To keep your Korean BBQ chicken bowls fresh, store them in the fridge. Use airtight containers to avoid spills and keep flavors intact. Make sure to let the chicken cool down before sealing the containers. This step helps prevent moisture buildup inside. Leftovers can last up to three days in the fridge. You can reheat the chicken bowls in two ways: microwave or stovetop. For the microwave, place the bowl in for about 1-2 minutes. Stir halfway through to heat evenly. If you use the stovetop, add a splash of water to a pan and heat over medium. Stir the chicken gently to keep it tender. Avoid overheating, as this can dry out the chicken. If you want to freeze the bowls, make sure to do it right. First, let the food cool completely. Then, use freezer-safe containers or bags. Squeeze out as much air as possible to prevent freezer burn. You can freeze the chicken bowls for up to three months. To thaw, place them in the fridge overnight, or use the microwave for a quicker option. Gochujang is a thick, spicy red chili paste from Korea. It adds heat and depth to dishes. This paste also has a hint of sweetness from the fermented ingredients. Look for gochujang in Asian grocery stores or the international aisle of your market. You can also find it online. Yes, you can make this recipe ahead of time. Marinate the chicken up to two hours before cooking. If you want to prep further, cook the chicken and store it in the fridge. Assemble the bowls before serving. This way, you can enjoy a quick meal on busy days. You can serve many sides with Korean BBQ chicken bowls. Some good options are: - Steamed dumplings - Kimchi - Pickled vegetables For drinks, try serving iced tea or a light beer. These pair nicely with the flavors of the dish. Enjoy experimenting with different sides! We explored how to make delicious Korean BBQ chicken bowls using chicken thighs and a tasty marinade. You learned how to marinate the chicken, cook it perfectly, and assemble your bowls with rice and fresh veggies. Remember, marinating is key to great flavor. Avoid common mistakes like overcooking. Mix things up with alternative proteins and different veggies. Proper storage helps keep your meal fresh. Enjoy customizing your bowls for any occasion!

Korean BBQ Chicken Bowls Flavorful and Easy Recipe

To make these crispy garlic tofu bites, you need: - 1 block (14 oz) firm tofu, thoroughly drained and pressed - 3 tablespoons cornstarch - 1 teaspoon garlic powder - 1 teaspoon onion powder - 1 teaspoon smoked paprika - Salt and freshly ground black pepper, to taste - 4 cloves garlic, finely minced - 2 tablespoons soy sauce - 2 tablespoons sesame oil These ingredients create a tasty and crunchy snack that everyone will love. The spices in this recipe are key to the flavor. Garlic powder adds a strong taste. Onion powder gives a nice sweetness. Smoked paprika brings a warm, smoky note. Salt and pepper add balance. Together, they make the tofu bites super tasty. For a finishing touch, consider these garnishes: - 2 green onions, finely chopped - A sprinkle of sesame seeds These add color and extra flavor. Garnishing makes your dish look appealing and inviting. {{ingredient_image_2}} First, gather your ingredients. You need firm tofu, cornstarch, garlic powder, onion powder, smoked paprika, soy sauce, sesame oil, and garlic. Make sure your tofu is drained and pressed well. This helps it become crispy. Preheat your oven to 425°F (220°C). Line a baking sheet with parchment paper to avoid sticking. This step is important for easy cleanup. Now, cut the tofu into bite-sized cubes, about 1 inch. Uniform pieces cook better. In a large mixing bowl, whisk together the cornstarch, garlic powder, onion powder, smoked paprika, and salt and pepper. Toss the tofu cubes in this mixture until they are fully coated. This coating adds crunch and flavor to your bites. Spread the coated tofu cubes in a single layer on your baking sheet. Leave space between each piece for even cooking. Bake in the oven for 25-30 minutes. Halfway through, flip the tofu to ensure all sides get golden brown. While it bakes, heat sesame oil in a skillet over medium heat. Add minced garlic and cook for 1-2 minutes. Stir often to avoid burning. Once the tofu is done, drizzle the garlic mixture and soy sauce over the bites. Toss gently to coat. Return the tofu to the oven for an extra 5 minutes. This step enhances the flavor and makes the bites even tastier. To get crispy tofu bites, start with firm tofu. Press it well to remove excess water. After cutting, coat each piece in cornstarch. This creates a nice crust. Bake at 425°F. Flip the tofu halfway to brown all sides. This method helps achieve a golden crunch. Cut tofu into uniform cubes. Aim for about 1 inch. This ensures even cooking. Avoid overcrowding the baking sheet. Space the cubes apart to allow air flow. This prevents steaming and keeps them crispy. You want each bite to have a nice, firm texture. Use fresh garlic for the best flavor. Mince it finely to release its oils. Sauté the garlic in sesame oil until fragrant. This step brings out its sweetness. Drizzle soy sauce over the baked tofu for a savory touch. Toss everything gently to coat. This method layers flavors beautifully, making each bite delightful. Pro Tips Press the Tofu Well: Ensure to press the tofu for at least 30 minutes to remove excess moisture, which helps achieve maximum crispiness when baked. Uniform Size Matters: Cut the tofu into uniform cubes to ensure even cooking. This avoids having some pieces overcooked while others remain soft. Experiment with Spices: Feel free to customize the spice mix based on your taste preferences. Adding a pinch of cayenne pepper can give a nice kick! Storage and Reheating: Store leftover tofu in an airtight container in the fridge. Reheat in the oven for a few minutes to regain its crispiness. {{image_4}} You can change the taste of your crispy garlic tofu bites easily. For a spicy kick, add cayenne pepper or chili flakes to the dry mix. If you prefer sweet flavors, mix in a little brown sugar with the soy sauce. A hint of honey or maple syrup can give a nice glaze. You can also try adding fresh herbs like basil or cilantro for a fresh twist. These changes allow you to explore flavors and find what you love best. You can cook these tofu bites in different ways. The air fryer gives a quick, crispy result. Just set your air fryer to 400°F (200°C) and cook for about 15 minutes, shaking the basket halfway through. If you prefer pan-frying, heat a bit of oil in a skillet over medium heat. Cook the tofu until golden brown and crispy on all sides. Both methods are great, so feel free to pick your favorite. These crispy tofu bites pair well with many dips and sides. Serve them with soy sauce or a spicy mayo for dipping. You can also add a side of steamed rice or a fresh salad for a full meal. Try mixing in some veggies like bell peppers or carrots to add color and flavor. These options make your dish more exciting and satisfying. After enjoying your crispy garlic tofu bites, store any leftovers in an airtight container. Make sure the container is sealed well to keep them fresh. Place it in the fridge. Your tofu bites will stay good for about 3 to 4 days. If you want to keep them longer, consider freezing. To reheat your tofu bites, preheat the oven to 375°F (190°C). Spread the tofu bites on a baking sheet lined with parchment paper. Bake them for about 10 minutes. This keeps them crispy. You can also use an air fryer. Set it to 350°F (175°C) and cook for about 5-7 minutes. This method also helps regain that crunch! If you want to freeze your tofu bites, let them cool first. Then, arrange them in a single layer on a baking sheet. Freeze them for about 1-2 hours until solid. After that, transfer the tofu bites to a freezer bag or container. They can last up to 3 months in the freezer. When ready to eat, just reheat them from frozen, and enjoy! No, soft tofu won't work well here. Firm tofu gives the best texture. It holds its shape better and gets crispy in the oven. Soft tofu may fall apart during cooking. Stick with firm tofu for the best bites. You can use arrowroot powder or potato starch instead of cornstarch. Both work well to create a crispy coating. They give a nice crunch to the tofu. If you don't have any of these, all-purpose flour is an option, but it may not be as crispy. This recipe is already vegan! All the ingredients are plant-based. Just ensure that the soy sauce you use is vegan, as some brands may add non-vegan ingredients. Enjoy your tasty, crispy garlic tofu bites guilt-free! You learned about making crispy garlic tofu bites today. We covered key ingredients, step-by-step cooking tips, and storage ideas. You can customize these bites with flavors and cooking methods. Feel free to experiment with spices and garnishes. Enjoy your healthy snack, knowing how to keep leftovers fresh. Now, it's time to try this tasty recipe. I can't wait for you to taste the results!

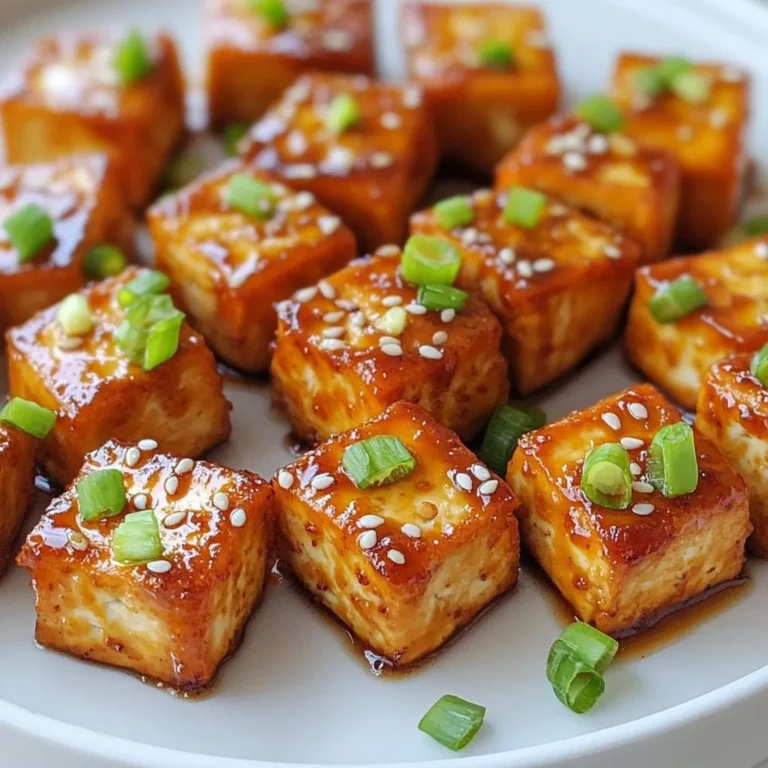
Crispy Garlic Tofu Bites Simple and Flavorful Recipe

- 250g halloumi cheese, sliced into 1cm thick pieces - 4 whole wheat wraps - 1 cup mixed salad greens (choose from spinach, arugula, or lettuce) - 1 red bell pepper, thinly sliced into strips - 1 ripe avocado, sliced - 1 medium carrot, julienned (cut into thin strips) These main ingredients create a tasty and colorful wrap. Halloumi cheese gives a nice salty flavor and a unique texture. The whole wheat wraps add fiber and nutrients. The mixed salad greens bring freshness and crunch. Red bell pepper adds sweetness and color. Avocado makes the wrap creamy and rich. Finally, the carrot adds a nice crunch and bright color. - Sweet chili sauce variations - Additional herbs for garnish You can change the sweet chili sauce to suit your taste. Try a spicy version or add a bit of lime. Fresh herbs like cilantro or parsley make great garnishes. They add flavor and make the dish look pretty. - Olive oil - Salt and black pepper Use olive oil to cook the halloumi. It adds flavor and helps it crisp up. Season with salt and black pepper for extra taste. Adjust the amount based on your preference. A little salt really brings out the flavor of the other ingredients. {{ingredient_image_2}} To cook halloumi cheese perfectly, start by heating a non-stick skillet over medium heat. Add one tablespoon of olive oil. Wait until the oil shimmers. Then, carefully place the halloumi slices in the skillet. Cook them for about 2-3 minutes on each side. You want them golden brown and crispy. For the best color and crispiness, avoid crowding the pan. This allows each slice to get enough heat. If the slices touch, they may steam instead of crisp. Keep an eye on them. The perfect halloumi should be golden and firm. Now, let’s layer the wraps. Lay out your whole wheat wraps on a clean surface. Start by spreading one tablespoon of sweet chili sauce evenly across each wrap. Use the back of a spoon for this. Next, add a handful of mixed salad greens on top of the sauce. Then, add the red bell pepper strips. Slice your ripe avocado and place it next. Finally, sprinkle the julienned carrot across each wrap. This creates a colorful display. After the halloumi is cooked, add a few crispy slices to each wrap. This adds a tasty flavor boost. Season each wrap with a pinch of salt and black pepper. Finish with fresh cilantro or parsley for an extra pop. To fold the wraps, start by folding in the sides. This keeps the fillings from falling out. Then, roll the wrap tightly from the bottom to the top. Make sure it is secure. If you want a warm wrap, return the assembled wraps to the skillet. Heat them for 1-2 minutes on each side. This warms them through and gives a slight crisp on the outside. For a great presentation, slice each wrap in half diagonally. Arrange them on a platter. Drizzle extra sweet chili sauce on top and sprinkle sesame seeds for added texture. Enjoy! Cook halloumi for about 2-3 minutes per side. You want it golden and crispy. This gives it a nice texture. To prevent sticking, use a non-stick skillet. Heat the olive oil until it shimmers. This helps the cheese cook evenly without sticking. To make your wraps even better, try adding sliced jalapeños for spice. You can also sprinkle sesame seeds for a nutty taste. For a homemade sweet chili sauce, mix 1/4 cup of honey, 1 tablespoon of soy sauce, and a dash of vinegar. This easy sauce adds a fresh kick. For a great look, slice each wrap diagonally. Arrange them on a plate to show the colorful filling. Drizzle some extra sweet chili sauce on top. A sprinkle of sesame seeds can add texture. Fresh herbs like cilantro or parsley make it pop. Pro Tips Choose Fresh Halloumi: For the best flavor and texture, select halloumi that is fresh and has a firm texture. This will ensure it holds its shape when cooking. Customize Your Veggies: Feel free to add or substitute any veggies you like! Cucumbers, radishes, or even shredded cabbage can add a nice crunch and flavor profile. Make It Spicy: If you enjoy a kick, add some sliced jalapeños or a dash of hot sauce to the wraps for added heat that pairs beautifully with the sweet chili sauce. Experiment with Sauces: While sweet chili sauce is delicious, you can also try tzatziki, hummus, or a spicy sriracha mayo for different flavor combinations. {{image_4}} You can switch halloumi cheese for other tasty proteins. Feta cheese works well for a salty kick. If you want a vegan choice, try grilled tofu. It absorbs flavors and adds protein. Another option is chickpeas. They are rich in protein and add a nice crunch. Each of these choices gives a different twist to your wraps. Feel free to mix up the veggies in your wraps. Instead of red bell pepper, you can use yellow or green peppers. Zucchini slices or cucumbers bring a fresh taste. For greens, try kale or romaine lettuce for a different bite. If you want a new sauce, try sriracha for heat or a yogurt sauce for creaminess. These swaps can change the whole feel of your meal. Pair your wraps with fresh fruit or a light salad. A side of sweet potato fries gives a nice contrast. For drinks, try a sparkling water with lime. A light iced tea also works well. These choices will make your meal feel special and well-rounded. To keep your Sweet Chili Halloumi Wraps fresh, wrap them tightly in plastic wrap. Place them in an airtight container. This helps keep the flavors locked in. Store them in the fridge for up to three days. If you want them to last longer, consider freezing. To reheat your wraps, preheat a skillet over medium heat. Place the wraps in the skillet for about 2-3 minutes on each side. This method keeps them crispy. Avoid using a microwave, as it can make them soggy. If you want a quick option, a toaster oven works well too. If you want to freeze the wraps, assemble them but skip the cooking step. Wrap each one in plastic wrap, then place them in a freezer-safe bag. This helps keep the halloumi and veggies fresh. They can last up to a month in the freezer. When you're ready to eat, thaw them in the fridge overnight and cook as usual. Yes, you can make these wraps ahead of time. Cook the halloumi and let it cool. Assemble the wraps fully, but do not add the sauce yet. Wrap them tightly in foil or plastic wrap. Store them in the fridge for up to 2 days. When ready to eat, drizzle the sweet chili sauce and warm them in a skillet. If you need a substitute for halloumi, try using feta cheese. Feta is crumbly but adds a great flavor. You can also use grilled tofu for a plant-based option. It has a nice texture and absorbs flavors well. Another choice is paneer, which has a similar texture but a milder taste. Yes, Sweet Chili Halloumi Wraps are great for meal prepping. You can prepare the halloumi and veggies ahead. Store them in separate containers. When ready to eat, just assemble the wraps and add sauce. This keeps everything fresh and tasty. You can mix and match ingredients for variety throughout the week. Sweet Chili Halloumi Wraps are a great meal. We explored key ingredients like halloumi, fresh veggies, and flavorful sauces. I shared simple steps to prepare, assemble, and serve these tasty wraps. We also covered tips for cooking halloumi, flavor ideas, and different variations to try. You can store and reheat these wraps easily, making them perfect for busy days. Enjoy creating this delicious dish and impressing your friends or family with your cooking skills!

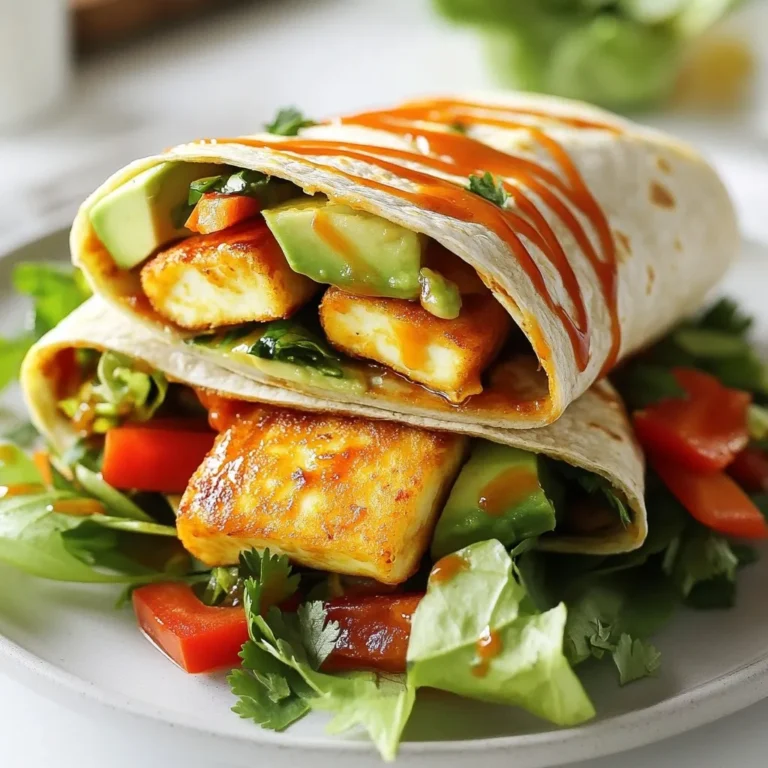
Sweet Chili Halloumi Wraps Healthy and Flavorful Meal

- 2 boneless, skinless chicken breasts - 1 cup fresh spinach, finely chopped - 1 cup artichoke hearts, drained and roughly chopped - 1 cup cream cheese, softened to room temperature - 1/2 cup sour cream - 1/2 cup mayonnaise In this dish, chicken serves as the main protein. I love using fresh spinach for its bright color and nutrients. Artichoke hearts add a lovely texture and unique flavor. Cream cheese, sour cream, and mayonnaise create a rich, creamy base that binds everything together. - 2 cloves garlic, minced - 1 teaspoon onion powder - 1/2 teaspoon salt (adjust to taste) - 1/4 teaspoon black pepper - 1/4 teaspoon crushed red pepper flakes (optional for a kick) Garlic brings a wonderful aroma and flavor. Onion powder adds depth to the dish. Salt and pepper help to balance the flavors. If you like some heat, the crushed red pepper flakes add a nice kick without overwhelming the dish. - 1 cup shredded mozzarella cheese - 1/2 cup grated Parmesan cheese Mozzarella cheese melts beautifully, creating a gooey texture. Parmesan cheese adds a sharp, salty taste that complements the other flavors well. Together, they form a delicious, cheesy topping that makes this dish irresistible. This combination of ingredients creates a meal that is both easy to prepare and packed with flavor. Each component plays a key role in making this spinach artichoke chicken bake a hit at your table. {{ingredient_image_2}} First, preheat your oven to 375°F (190°C). This step is key for even cooking. While the oven warms up, grab a baking dish and lightly grease it with olive oil. This helps prevent the chicken from sticking to the dish. You can use a paper towel or brush to spread the oil evenly. Now, let’s make the creamy mixture. In a large bowl, combine the softened cream cheese, sour cream, and mayonnaise. I like to use a hand mixer for a smooth blend, but a spatula works too. Mix until it’s creamy and well combined. Next, add the finely chopped spinach and artichoke hearts to the bowl. This adds great flavor and nutrition. Don’t forget to mix in the minced garlic, onion powder, salt, black pepper, and optional crushed red pepper flakes. Stir everything until it’s all combined and looks delicious. In another bowl, season the chicken breasts with salt and pepper. Make sure to coat both sides for great flavor. Take your greased baking dish and lay the seasoned chicken breasts inside. Then, spoon the creamy spinach-artichoke mixture over each breast. Spread it evenly to cover the chicken completely. Finally, sprinkle the shredded mozzarella and grated Parmesan cheese generously on top. This will create a tasty cheesy crust as it bakes. Now you’re ready to bake! Ensuring Proper Chicken Doneness Check the chicken's center for doneness. Use a meat thermometer to ensure it hits 165°F (75°C). This ensures the chicken is safe to eat and juicy. If you don’t have a thermometer, cut into the chicken. The juices should run clear, not pink. Achieving a Perfectly Golden Cheese Layer To get that beautiful, golden cheese layer, uncover the dish for the last 15 minutes of baking. This allows the cheese to bubble up and brown nicely. Keep an eye on it to avoid burning. If it browns too fast, cover it loosely with foil. Efficient Mixing Techniques When mixing your creamy ingredients, use a hand mixer for a smooth result. This saves time and helps blend everything evenly. If you don’t have one, a sturdy spatula works fine. Just mix until there are no lumps. How to Properly Layer Ingredients Layer your ingredients in this order: start with the seasoned chicken, then the creamy mixture, and finish with cheese on top. This helps all the flavors meld together. Spread the creamy mix evenly to cover the chicken completely. Presentation Enhancements For a lovely look, serve the chicken on individual plates. Add a sprinkle of freshly chopped basil or parsley on top. This adds color and freshness. A slice of lemon on the side can also brighten the dish. Ideal Side Dishes Pair this dish with a refreshing side salad. A simple green salad with a light vinaigrette works well. You could also serve it with roasted vegetables or garlic bread for a comforting meal. Pro Tips Use Fresh Ingredients: Fresh spinach and artichokes will enhance the flavor and texture of the dish compared to canned or frozen options. Spice It Up: Adjust the amount of crushed red pepper flakes according to your spice preference for an added kick! Check for Doneness: Use a meat thermometer to ensure the chicken reaches an internal temperature of 165°F (75°C) for safe consumption. Let It Rest: Allow the dish to rest for 5 minutes after baking to help the juices redistribute in the chicken for a juicier bite. {{image_4}} You can change the veggies in this dish. Try using broccoli or kale instead of spinach or artichokes. Both add great taste and color. Switching up the cheese is easy too. Feta or cheddar can replace mozzarella. Each cheese brings its own unique flavor and texture. To make this dish lighter, you can cut back on creamy ingredients. Try using Greek yogurt instead of sour cream and mayonnaise. This swap adds protein and reduces fat. Using grilled chicken is another option. Grilled chicken has great flavor and can save time. It also adds a nice char to the dish. Herbs can boost the taste of this meal. Adding fresh basil or thyme gives a nice aroma and depth. Just a little can make a big difference. If you like heat, consider spice level adjustments. Add crushed red pepper flakes or cayenne pepper. This adds a spicy kick that many will enjoy. - Storing Leftovers: Place any leftover Spinach Artichoke Chicken Bake in an airtight container. This keeps it fresh and tasty. You can store it in your fridge for up to 3 days. - Best Practices for Packaging: Use glass or plastic containers that seal well. Make sure it is cool before sealing to avoid moisture build-up. - How to Freeze Safely: To freeze, let the dish cool completely. Then, wrap it tightly in plastic wrap or foil. You can also use freezer-safe containers. This helps preserve its flavor. - Thawing and Reheating Tips: To thaw, move it to the fridge overnight. Reheat it in the oven at 350°F (175°C) until it’s hot all the way through. This usually takes about 20-30 minutes. - Duration for Best Quality: For the best taste, eat within 3 days when refrigerated. If frozen, it can last up to 3 months without losing quality. - Signs of Spoilage: Check for off smells or changes in texture. If it looks dry or has a strange color, it’s best to toss it out. Spinach Artichoke Chicken Bake is a creamy and cheesy dish. It features chicken breasts topped with a mix of spinach, artichokes, and cheese. This meal is loved for its rich flavors and easy prep. You can vary it by adding different cheeses or veggies. Some people use kale or even different types of cheeses like feta. Yes, you can make this dish ahead of time! Prepare the creamy mixture and season the chicken. Store them separately in the fridge for up to a day. Just before baking, layer the mixture over the chicken. This saves you time and keeps the dish fresh. Absolutely! Spinach Artichoke Chicken Bake works great for meal prep. You can portion the baked chicken into containers. It reheats well in the microwave or oven. Just keep the leftovers in the fridge for about 3-4 days. This makes it easy to enjoy during busy weeks. You learned how to make a delicious Spinach Artichoke Chicken Bake. We covered key ingredients, easy steps, and helpful tips for perfect results. Remember, you can swap ingredients to fit your taste and even store leftovers for later enjoyment. This dish is not only easy to make, but it also offers room for creativity. Try it yourself and enjoy a delightful meal that impresses!

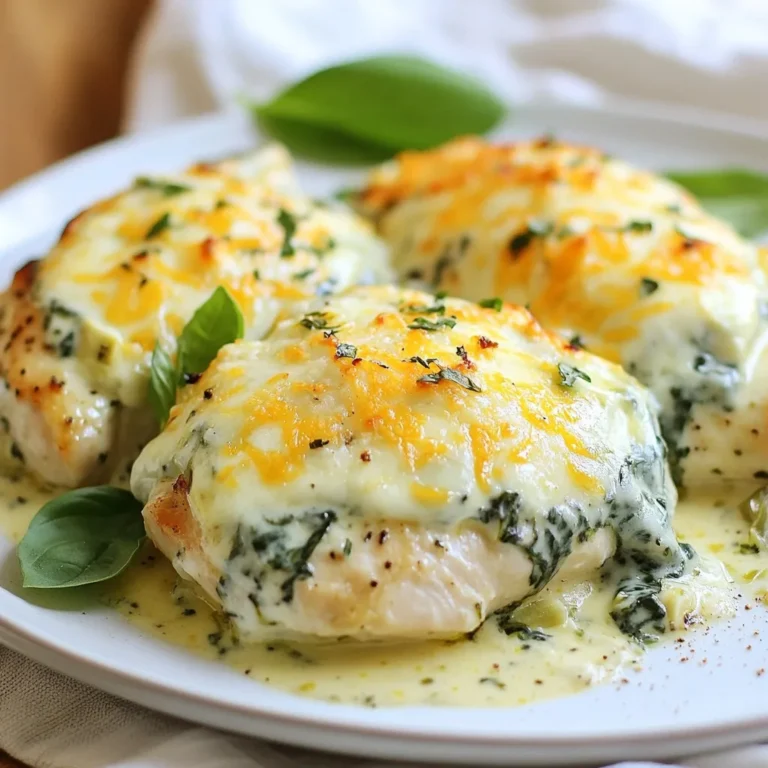
Spinach Artichoke Chicken Bake Easy and Flavorful Meal

- 4 boneless, skinless chicken breasts - 1 cup buttermilk Boneless, skinless chicken breasts are lean and cook quickly. They soak up flavors well. I love using buttermilk for marinating. It keeps the chicken moist and tender. The acidity helps break down proteins, which makes the chicken melt in your mouth. - 2 teaspoons garlic powder - 2 teaspoons onion powder - 1 teaspoon smoked paprika - 1 teaspoon dried thyme These seasonings bring a lot of flavors. Garlic and onion powder add depth. Smoked paprika gives a nice, smoky touch. Dried thyme adds warmth and earthiness. Combined, they make the chicken taste amazing. - 1 cup all-purpose flour - ½ cup cornmeal - 1 teaspoon baking powder - ½ cup grated Parmesan cheese The coating creates a great texture. All-purpose flour makes it crispy. Cornmeal adds crunch and a hint of sweetness. Baking powder helps it puff up and get golden. Parmesan cheese gives a salty, cheesy flavor that enhances every bite. {{ingredient_image_2}} Marinating the chicken is key to making it tender and tasty. The buttermilk adds moisture and flavor. It also helps break down the meat's fibers, making every bite juicy. I recommend marinating for at least 2 hours. For the best taste, let it sit overnight. This extra time lets the spices soak in fully. Now, let's make the coating. In a separate bowl, mix the all-purpose flour, cornmeal, baking powder, and grated Parmesan cheese. This mix gives the chicken a crunchy crust. Add salt and pepper to this mix for more flavor. Whisk it all together until well combined. This step is important to ensure every piece is evenly coated. For cooking, preheat your oven to 375°F (190°C). While it heats, line a baking sheet with parchment paper. This makes for easy cleanup later. Take the marinated chicken out and let the extra marinade drip off. Coat each piece in the flour mixture. Shake off any extra flour. Next, heat olive oil in a large skillet over medium heat. Once hot, add the coated chicken breasts. Sear them for 3-4 minutes on each side. This will give them a golden brown color. After searing, move the chicken to your baking sheet. Bake it in the oven for 20-25 minutes. Check for an internal temperature of 165°F (74°C). The chicken should be juicy and tender. When you pick chicken breasts, look for fresh ones. Choose breasts that are pink and firm. Avoid those that have a grayish color or any signs of bruising. If possible, buy organic or free-range chicken. They often have better flavor and texture. Marinating chicken in buttermilk makes it tender. The acidity helps break down the meat fibers. I recommend at least two hours for marinating. However, marinating overnight gives the best results. Add garlic powder, onion powder, smoked paprika, and thyme for flavor. Make sure each piece is well-coated. Searing adds a nice crust to your chicken. Heat olive oil in your skillet until it shimmers. Place the chicken in the skillet without crowding it. Sear for about 3-4 minutes on each side. You want a golden brown crust. This crust keeps the juices inside, making your chicken tender and moist. Pro Tips Marinate Longer for Flavor: For the most flavorful chicken, marinate the breasts overnight. This allows the spices to penetrate deeply, resulting in a more tender and flavorful dish. Don't Rush the Searing: Ensure your skillet is hot before adding the chicken. A good sear creates a crust that locks in juices, preventing dryness during baking. Use a Meat Thermometer: Check for doneness with a meat thermometer. Chicken should reach 165°F (74°C) for safe consumption while ensuring it remains juicy. Rest Before Slicing: Allow the chicken to rest for at least 5 minutes after baking. This helps the juices redistribute, ensuring every bite is succulent and tender. {{image_4}} For those who need gluten-free or dairy-free options, this recipe is easy to adjust. To make it gluten-free, swap the all-purpose flour with a gluten-free flour blend. Look for a blend that mimics regular flour well. You can also use gluten-free cornmeal if desired. For a dairy-free version, replace buttermilk with a plant-based milk, like almond or oat milk. Add a splash of vinegar or lemon juice to mimic that tangy taste. This substitution keeps the chicken moist while still delivering great flavor. You can change the spices to suit your taste. Want a kick? Add cayenne pepper or chili powder for heat. Prefer a fresh twist? Try fresh herbs like basil or oregano. For an Italian flair, use Italian seasoning instead of thyme. If you love a smoky flavor, consider adding chipotle powder. Each of these options gives you a new taste while keeping the chicken tender and juicy. You can cook chicken breasts in different ways. Baking is popular, as it gives even heat and helps the chicken cook through without drying out. If you choose slow cooking, it allows the chicken to absorb flavors over hours. This method makes the chicken very tender, but it might not get as crispy as baking. Both methods have their pros and cons. Baking takes less time and gives you a nice crust. Slow cooking is great for flavor but may require more time. Choose the method that fits your schedule and taste desires! To keep your chicken breasts fresh, let them cool first. Place them in an airtight container. This helps to avoid moisture loss and keeps them tender. Store the container in the fridge. Your chicken will stay good for 3 to 4 days. If you want to keep it longer, consider freezing. When it's time to enjoy leftovers, you want them juicy, not dry. Preheat your oven to 350°F (175°C). Place the chicken on a baking sheet and cover it with foil. This keeps the moisture in. Heat for about 15 to 20 minutes. You can also use a microwave, but be careful. Heat in short intervals and check often. For long-term storage, freezing is a great choice. Wrap each chicken breast tightly in plastic wrap. Then, put them in a freezer bag. Squeeze out the air to prevent freezer burn. They will last up to 3 months. When you're ready to eat, move them to the fridge overnight to defrost. Never refreeze thawed chicken. Marinating chicken in buttermilk makes it very tender. Buttermilk breaks down proteins. It adds flavor and moisture. The garlic powder, onion powder, smoked paprika, and thyme also help. They infuse the chicken with rich taste. Cooking techniques matter, too. Searing gives the chicken a nice crust. It locks in juices. Baking the chicken at 375°F ensures it cooks evenly. This method keeps the meat moist and tender. Yes, you can use bone-in chicken. It may take longer to cook. Bone-in chicken has more flavor. You should adjust the cooking time. Bake it for 30-40 minutes instead. Always check the internal temperature. It should reach 165°F for safety. To check if chicken is done, look for a few signs. The meat should no longer be pink inside. Juices should run clear when you cut it. Use a meat thermometer for accuracy. The internal temperature must be 165°F (74°C). This ensures it is safe to eat. This blog post covers key steps to make perfect chicken breasts. You learned about essential ingredients like buttermilk and spices. Marinating adds flavor and helps the chicken stay tender. I shared tips on selecting quality chicken and techniques for a great crust. Remember, variations exist to meet different diets and preferences. Store your leftovers properly and use reheating techniques to keep them juicy. With these insights, you can create a delicious meal that impresses anyone. Enjoy your cooking!

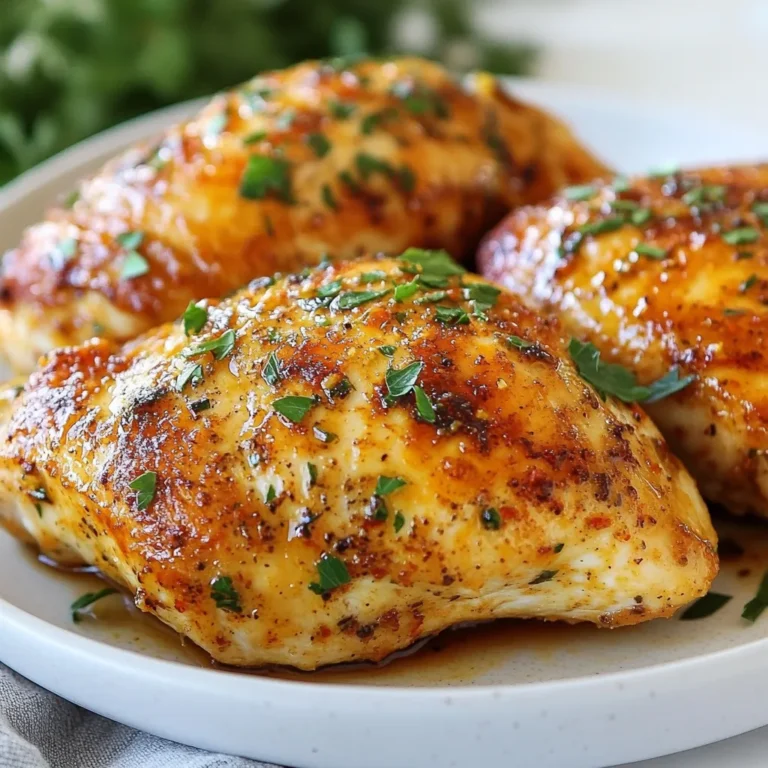
Melt-In-Your-Mouth Chicken Breasts Easy and Flavorful Recipe

- 8 oz elbow macaroni - 1 lb ground turkey or beef - 1 packet taco seasoning The base of this dish is elbow macaroni. It cooks quickly and holds flavors well. I often use ground turkey for a lighter option, but you can choose beef if you prefer. The taco seasoning adds a robust flavor that ties everything together. - 1 cup diced bell peppers - 1 small onion, finely chopped - 2 cloves garlic, minced - 1 can diced tomatoes with green chilies Diced bell peppers add color and crunch. I love using a mix of red, yellow, and green for a vibrant look. Onions and garlic bring sweetness and depth to the dish. The diced tomatoes with green chilies add freshness and a little kick. - 1 ½ cups shredded cheddar cheese - 1 cup sour cream - Fresh cilantro or green onions, chopped Shredded cheddar cheese makes this pasta creamy and rich. Sour cream adds tang and smoothness, making each bite delightful. Finally, fresh cilantro or green onions give a burst of color and flavor, making your meal look as good as it tastes. {{ingredient_image_2}} 1. Start by boiling salted water in a large pot. Use about 4 quarts of water. 2. When the water is boiling, add 8 oz of elbow macaroni. 3. Cook the macaroni as per the package instructions, stirring often. 4. Aim for al dente, which means it should be firm, not soft. 5. Once cooked, drain the pasta and set it aside for later. - In a large skillet, heat over medium heat. - Add 1 lb of ground turkey or beef to the skillet. - Cook for 5-7 minutes, breaking it apart with a spoon. - Look for a nice brown color on the meat. - Drain any excess fat from the skillet. This keeps the dish light and tasty. - Add 1 finely chopped onion and 1 cup of diced bell peppers to the skillet. - Sauté the veggies for 3-4 minutes until they soften. - Next, add 2 minced garlic cloves and cook for another minute. - The garlic should smell nice and golden. - Now, sprinkle the taco seasoning over the meat and veggies. - Stir in 1 can of diced tomatoes with juices and 1 cup of corn kernels. - Let the mix simmer for about 5 minutes. This helps all the flavors blend well. - Gently fold the cooked macaroni into the skillet with the meat mixture. - Stir until everything is well mixed. - Lower the heat and add 1 cup of sour cream and half of 1 ½ cups of shredded cheddar cheese. - Keep stirring until the cheese melts and mixes in well. - Taste and adjust seasoning with salt and pepper if needed. - Serve generous portions in bowls, and top with the remaining cheddar cheese. - Garnish with chopped cilantro or green onions for added flavor and color. To avoid overcooking pasta, follow these steps: - Use a timer. Set it for one minute less than the package says. - Taste test. Check if the pasta is tender but still firm, known as al dente. - Salt the water. This helps flavor the pasta while it cooks. After cooking, draining and rinsing is key: - Drain well. Let the pasta sit in the colander for a minute. - Rinse briefly. This stops cooking and helps prevent sticking. Fresh herbs can really boost the taste: - Cilantro and green onions add color and freshness. Sprinkle them on top before serving. You can adjust spice levels easily: - Add more taco seasoning or include diced jalapeños for heat. - Try chili powder or cayenne pepper for a different kick. Creative serving makes a big difference: - Use bright bowls. Colorful dishes make the meal more inviting. - Serve with lime wedges. Squeeze fresh lime juice for extra zest. For garnishing: - Top with extra cheese for a cheesy finish. - Add a sprinkle of fresh herbs for a pop of color and flavor. Pro Tips Cook Pasta Al Dente: Make sure to cook the elbow macaroni until al dente for a perfect texture that holds up in the creamy sauce. Use Fresh Ingredients: Incorporating fresh bell peppers and onions enhances the flavor and adds a vibrant color to your dish. Customize to Your Taste: Feel free to add your favorite veggies or adjust the amount of taco seasoning to suit your spice preference. Garnish for Flair: A sprinkle of fresh cilantro or green onions not only adds color but also a fresh flavor that balances the richness of the dish. {{image_4}} You can switch up the main protein in this dish. If you want to use chicken, ground chicken works great. It has a mild flavor that blends well with the spices. You can also try plant-based meat. There are many options available now that taste just like beef or turkey. Using different ground meats can change the taste too. If you prefer pork, use ground pork instead. Lamb can add a rich flavor, making it unique. Each meat brings its own taste and texture. Feel free to experiment and find what you like best. Making this dish vegetarian is easy. You can switch to non-dairy cheese. There are many brands that melt well and taste great. You can find them in most stores. If you're vegan, skip the sour cream too. Instead, try using coconut yogurt or cashew cream. These options add creaminess without dairy. You can still enjoy the same flavors without any animal products. Adding different types of cheese can elevate the flavor. Try mixing mozzarella or pepper jack with cheddar. Each cheese adds its own twist. You can also explore using a cheese blend for more taste. If you want some heat, incorporate spicy elements like jalapeños. Slice them thin and add them during the sauté step. You can also mix in some crushed red pepper flakes. Adjust the spice level based on your taste for a fun kick! To store your Cheesy Taco Pasta, use an airtight container. This keeps it fresh and safe. You can store it in the fridge for up to three days. Make sure it cools down before sealing. When reheating, the best method is using the stove. Heat it gently in a pan over low heat. Add a splash of milk or water to help keep it creamy. Stir often to prevent sticking. You can also use a microwave. Just heat it in short bursts, stirring in between. To freeze Cheesy Taco Pasta, let it cool completely. Then, place it in a freezer-safe container. Make sure to leave some space for expansion. It can stay frozen for up to three months. When you’re ready to eat it, thaw it overnight in the fridge. Reheat it on the stove or microwave until hot. Add a bit of sour cream or cheese for extra creaminess. Yes, you can make Cheesy Taco Pasta ahead of time. To do this, follow these best practices: - Prepare the pasta and meat mixture as directed. - Allow the dish to cool to room temperature. - Store it in an airtight container in the fridge. - Reheat on the stove or in the microwave before serving. This meal stays tasty for about 3-4 days. You can also prep the ingredients and store them separately. This way, you save time on busy evenings. If you love heat, there are many ways to spice up this dish: - Add diced jalapeños when cooking the meat. - Use a spicy taco seasoning blend. - Stir in some crushed red pepper flakes while mixing. - Top with hot sauce before serving. These options bring a fun kick to your cheesy taco pasta! If you need a substitute for sour cream, consider these options for creaminess: - Greek yogurt works great and adds protein. - Cream cheese gives a rich texture; just soften it first. - Silken tofu can be blended for a dairy-free option. Each of these choices keeps your dish creamy and delicious. You can easily make Cheesy Taco Pasta gluten-free. Just use gluten-free pasta instead of regular elbow macaroni. Here are some good options: - Brown rice pasta offers a similar texture. - Quinoa pasta adds a nutty flavor. - Lentil or chickpea pasta boosts protein. These alternatives allow everyone to enjoy this tasty meal! Cheesy Taco Pasta is an easy and tasty dish. You can use ground meat, pasta, veggies, and cheese. Don’t forget the tips for great flavor and presentation. You can mix things up with different proteins or spices to match your taste. This dish is perfect for meal prep and tastes great as leftovers. Enjoy making this cozy meal that your family will love!

Cheesy Taco Pasta Flavorful and Easy Weeknight Meal

PREV 1 … 41 42 43 NEXT
yummybiterecipes

explore

DessertsDinnerAppetizersDrinks

Our Policies

  • Cookie Policy
  • Copyright Policy
  • Disclaimer
  • GDPR Policy
  • Terms Of Use
Back to Top
  • About
  • Contact Us
  • Privacy Policy
© 2025 yummybiterecipes