FREE DINNER EBOOK! Get your copy!
  • Cookie Policy
  • GDPR Policy
  • Disclaimer
  • Terms Of Use
  • Visit my other site: Fun Cookie Recipes
yummybiterecipes
  • Home
  • Dinner
  • Desserts
  • Drinks
  • Appetizers
  • Contact
  • About
  • Privacy Policy
  • Home
  • Dinner
  • Desserts
  • Drinks
  • Appetizers
  • Contact
  • About
  • Privacy Policy
  • Cookie Policy
  • GDPR Policy
  • Disclaimer
  • Terms Of Use
Visit my other site: Fun Cookie Recipes

HOME / CATEGORIES /

Latest

- 1 lb beef sirloin, sliced thinly - 1/4 cup soy sauce - 2 tablespoons brown sugar - 1 tablespoon sesame oil - 2 cloves garlic, minced - 1-inch piece ginger, finely grated - 1/2 onion, sliced thin - 2 green onions, sliced - 1 tablespoon gochugaru (optional) To make a great bulgogi, you need quality beef sirloin. Choose a piece that is fresh and well-marbled. This will help keep your meat tender and juicy. Slice the beef against the grain. This means cutting the meat in the opposite direction of its fibers. You will also need soy sauce. It adds saltiness and depth. Brown sugar gives a sweet touch, balancing the salt. Sesame oil brings a nutty flavor that enhances the dish. Fresh garlic and ginger add zest, while onions give a sweet, mild crunch. Gochugaru is optional, but it adds a nice spicy kick. - Vegetables like carrots and green onions - Fresh lettuce leaves or steamed rice for serving - Flavor amplifiers: sesame seeds, salt, and black pepper You can add vegetables to your bulgogi for more color and taste. Carrots add sweetness, while green onions provide a fresh bite. Lettuce leaves are great for wrapping the beef. They create a nice, crunchy texture. If you prefer, serve bulgogi over steamed rice. This makes for a comforting meal. Don’t forget the finishing touches! Sprinkle sesame seeds for added crunch. Adjust the taste with salt and black pepper as needed. All these ingredients come together to create a delicious, authentic Korean beef bulgogi. {{ingredient_image_2}} To make beef bulgogi, start with the marinade. In a bowl, mix: - 1/4 cup soy sauce - 2 tablespoons brown sugar - 1 tablespoon sesame oil - 2 cloves garlic, minced - 1-inch piece ginger, grated - 1 tablespoon gochugaru (optional) Whisk these ingredients until smooth. This mix gives flavor and depth. Next, add your thinly sliced beef sirloin. Make sure every piece gets coated well. I find it helps to use your hands. Cover the bowl and place it in the fridge. Let it marinate for at least 30 minutes. For a richer taste, let it sit for up to 2 hours. Heat a large skillet or grill pan over medium-high heat. Pour in a splash of sesame oil to keep the beef from sticking. Once your pan is hot, add the marinated beef, sliced onion, and julienned carrot. Stir-fry for 4-5 minutes. You want the beef to turn brown and cook fully. Keep stirring to cook evenly. After that, mix in chopped green onions and sesame seeds. Stir for one more minute. Before serving, taste and adjust the seasoning with salt and black pepper if needed. You can serve bulgogi in two great ways. Wrap it in fresh lettuce leaves. This gives a nice crunch. Or, place it over a bed of steamed rice. Both ways are tasty! For a beautiful presentation, use a big platter. Sprinkle more sesame seeds and green onion on top. You can also arrange lettuce leaves around the dish. This makes for an interactive dining experience. Guests can build their own wraps or enjoy a hearty bowl of rice. - Choosing the right cut of beef: Use beef sirloin. It is tender and flavorful. Thinly slice the beef against the grain. This makes it easier to chew. - Marinating secrets for better flavor: Mix soy sauce, brown sugar, sesame oil, garlic, and ginger. Let the beef soak in this mix. Marinate for at least 30 minutes. For the best taste, try marinating for up to 2 hours. - Tips for achieving a perfect stir-fry: Heat your skillet on medium-high heat. Add sesame oil to keep the beef from sticking. Stir-fry the beef with onions and carrots for 4-5 minutes. Keep stirring to cook evenly. - Recommended cooking tools: A large skillet or grill pan works best. Use non-stick pans if you have them. They help prevent sticking. - Importance of the right heat settings: Start with medium-high heat. This cooks the beef quickly. Too low heat can make the beef tough. - Alternative cooking methods: You can grill or broil the bulgogi. Both methods add a nice char. They also enhance the flavor. Pro Tips Marinating Time: For the best flavor, marinate the beef for at least 2 hours or up to overnight. This allows the flavors to penetrate the meat more deeply. Cut Against the Grain: Always slice the beef against the grain. This ensures the meat is tender and easy to chew. Adjusting Spice Levels: If you're unsure about the spiciness, start with a small amount of gochugaru and taste as you go. You can always add more if needed. Serving Suggestions: For an authentic experience, serve bulgogi with kimchi and other banchan (side dishes) to complement the flavors. {{image_4}} You can swap beef for chicken or tofu. Chicken cooks fast and stays juicy. Tofu adds a nice texture and absorbs flavors well. Try using different veggies for a fresh take. You can add bell peppers, zucchini, or mushrooms. They give color and crunch. Adjust the spice level by adding more or less gochugaru. If you like heat, add more. If you prefer mild, skip it. Korean regions have their own styles of bulgogi. Some areas use different marinades or cooking methods. You can find variations with sweet and savory flavors. Authentic recipes often stay true to tradition, while modern takes mix in new tastes. Common side dishes served with bulgogi include kimchi and rice. They balance the flavors and textures of the dish. Explore these regional differences to expand your bulgogi experience! To store leftover bulgogi, let it cool first. Place the beef in an airtight container. This helps keep the flavors and prevents drying out. You can store it in the fridge for up to three days. Use glass or plastic containers with tight lids for the best results. If you want to save bulgogi for later, freezing works great. Place cooled bulgogi in a freezer-safe bag. Squeeze out all the air to prevent freezer burn. You can freeze it for up to three months. When you’re ready to eat, thaw the bulgogi in the fridge overnight. To reheat, use a skillet over medium heat. Add a splash of water to keep it moist. Stir often to heat evenly. To revitalize flavors, add a dash of soy sauce or sesame oil while reheating. This will boost the taste and make it extra yummy! Bulgogi is a famous Korean dish made from marinated beef. The name "bulgogi" means "fire meat" in Korean. It holds cultural importance in Korea, often served during celebrations. Unlike other Korean dishes, bulgogi stands out for its sweet and savory flavor. It uses a special marinade that makes the beef very tender. Other dishes may not have this same mix of flavors. Yes, you can use chicken, pork, or even tofu as alternatives. Each meat has its own unique taste. If you choose chicken, marinate it for about 30 minutes. For pork, use a similar marinade and cook until it reaches a safe temperature. Cooking times may change depending on the meat type. Chicken cooks faster than beef, so keep an eye on it. Adjust the marinating time to enhance flavors based on the meat you use. To find great bulgogi, seek out local Korean restaurants or markets. Look for places that have a good reputation for authentic dishes. Often, family-owned spots serve the best recipes passed down through generations. When choosing a restaurant, check if they offer traditional side dishes like kimchi or pickled vegetables. These side dishes can hint at the authenticity of the cuisine. You learned about authentic Korean beef bulgogi. We covered key ingredients, marinating tips, and cooking methods. I shared serving ideas, variations, and storage tips to enjoy later. Remember, you can swap beef for chicken or tofu and try new veggies. Authenticity is key, but don’t fear experimenting. Have fun making bulgogi your way. Enjoy each bite and create your own spin on this classic dish.

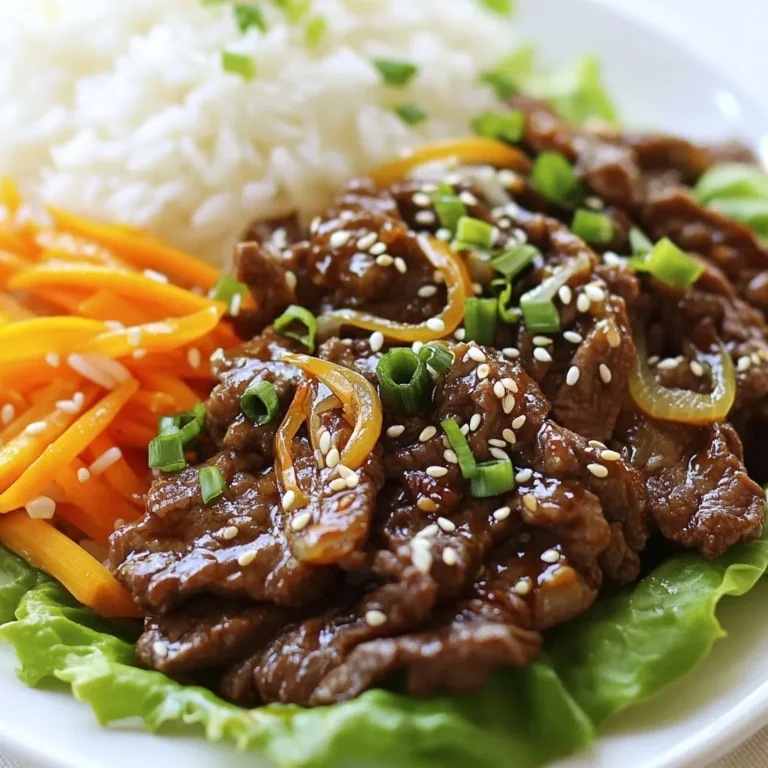
Authentic Korean Beef Bulgogi Flavorful Cooking Guide

- 2 cups all-purpose flour - 1 cup fresh cranberries, halved - 1 cup granulated sugar - 1/2 teaspoon baking soda - 1 tablespoon baking powder - 1/2 teaspoon salt - 1/2 cup unsalted butter, melted - 1 large egg, lightly beaten - 1 teaspoon vanilla extract - Zest of 1 large orange - 1/2 cup freshly squeezed orange juice - 1/2 teaspoon ground cinnamon - 1/4 cup chopped walnuts (optional) Gather these ingredients before you start. Fresh cranberries bring bright flavor. They add a tart kick to the sweet bread. The orange zest paired with juice gives a fresh taste, making every bite delightful. Use unsalted butter for better control over saltiness. The baking powder and baking soda work together to help the bread rise perfectly. Granulated sugar sweetens the bread and helps with its nice crust. The egg adds moisture and binds everything together. If you like nuts, walnuts add a nice crunch. You can skip them if you prefer a smoother texture. With these ingredients ready, you're set to create a delicious loaf of cranberry orange bread. Each component plays a part in making this recipe a treat for your taste buds. {{ingredient_image_2}} - Preheat the oven to 350°F (175°C). - Grease or line a 9x5-inch loaf pan. To start, you need to preheat your oven. This step helps the bread bake evenly. A hot oven makes a big difference. Next, prep your loaf pan. Greasing it or using parchment paper will help you remove the bread easily later. - Combine flour, sugar, baking powder, baking soda, salt, and cinnamon. In a large bowl, mix your dry ingredients. Add the flour, sugar, baking powder, baking soda, salt, and cinnamon. Use a whisk to combine them well. This step ensures that the baking soda and powder spread evenly. - Whisk melted butter, beaten egg, vanilla, orange zest, and orange juice. Now, you’ll mix the wet ingredients in a separate bowl. Whisk together melted butter, beaten egg, vanilla extract, orange zest, and orange juice. This creates a smooth mixture. The zest and juice add a bright flavor. - Mix wet and dry ingredients without overmixing. - Fold in cranberries and walnuts (if using). Time to combine! Pour the wet mixture into the dry bowl. Stir gently with a spatula. Be careful not to overmix; a few lumps are okay. Next, fold in the cranberries and walnuts if you want some crunch. This adds color and taste to your bread. - Pour batter into the prepared pan and smooth the top. - Bake for 60-70 minutes and check for doneness. Pour the batter into your prepared pan. Use a spatula to smooth the top. Then, place it in the oven. Bake for about 60 to 70 minutes. To check if it’s done, insert a toothpick into the center. It should come out clean when ready. - Allow to cool in the pan for 10 minutes. - Transfer to wire rack and slice for serving. Once baked, remove the pan from the oven. Let it cool in the pan for 10 minutes. After that, transfer the loaf to a wire rack to cool completely. When it’s cool, slice the bread and enjoy! - Avoid overmixing for a tender crumb: Mix gently. Overmixing makes the bread tough. Stir just until you see no dry flour. - Use fresh cranberries for best flavor: Fresh cranberries provide a bright taste. They burst with juice, adding moisture and tartness. - Dust with powdered sugar: A light dusting of sugar makes the bread look fancy. It adds a sweet touch without being too much. - Garnish with cranberries and orange zest: Use a few whole cranberries on top. A sprinkle of orange zest adds color and a pop of flavor. - Use an oven thermometer for accurate temperature: Ovens can be off by a lot. An oven thermometer ensures your bread bakes perfectly. - Check doneness with a toothpick: Insert a toothpick into the center. If it comes out clean, your bread is ready. If not, bake a bit longer. Pro Tips Use Fresh Cranberries: For the best flavor and texture, use fresh cranberries instead of dried ones. They provide a burst of tartness that complements the sweetness of the bread. Don't Overmix: When combining the wet and dry ingredients, mix just until combined. Overmixing can lead to a dense bread. Cool Completely: Allow the bread to cool completely on a wire rack before slicing. This helps to set the crumb and makes for cleaner slices. Add a Glaze: For an extra touch of sweetness, consider drizzling a simple orange glaze over the cooled bread. Mix powdered sugar with a bit of orange juice until smooth. {{image_4}} You can change some ingredients to fit your taste. - Use mixed nuts instead of walnuts for a crunchier bite. - Dried cranberries work well if fresh ones aren't available. Boost the taste of your bread with some fun additions. - Add more orange zest for a stronger citrus flavor. - Try spices like nutmeg or ginger for warmth and depth. If you have special dietary needs, here are some swaps. - For gluten-free bread, use a flour alternative like almond flour. - A sugar substitute can help make the bread healthier. To keep your cranberry orange bread fresh, store it in an airtight container. This helps keep the moisture in and prevents it from drying out. If you want to make it last longer, refrigerate it. The cool air will help maintain its freshness. If you want to freeze the bread, wrap each slice in plastic wrap. After wrapping, cover it with foil. This extra layer protects it from freezer burn. Then, place the slices in freezer-safe bags. Make sure to label the bags with the date. For the best taste, eat the bread within a week. It tastes amazing fresh! When you are ready to enjoy it, reheat the slices in the oven or microwave. This will bring back the soft texture and delicious flavor. To make this Cranberry Orange Bread vegan, simply replace the egg with a flax egg. Mix 1 tablespoon of ground flaxseed with 2.5 tablespoons of water. Let it sit for 5 minutes until it thickens. You can also swap the unsalted butter for coconut oil or vegan butter. This keeps the bread rich and moist while making it plant-based. Yes, you can use frozen cranberries! Just remember not to thaw them before adding them to the batter. This helps keep the bread moist. Frozen cranberries might make the batter a bit wetter, so you may need to add a few more minutes to the baking time. Cranberry Orange Bread pairs well with many items. Here are a few ideas: - Cream cheese or vegan cream cheese for spreading - A light drizzle of honey or maple syrup - A cup of herbal tea or coffee to enjoy with your slice To check if the bread is done, insert a toothpick into the center. If it comes out clean, your bread is ready. If it has batter on it, bake for a few more minutes. Keep an eye on it to avoid overbaking. Absolutely! Adding chocolate chips can add a rich twist to this recipe. You can use dark, semi-sweet, or even white chocolate chips. Simply fold in about 1/2 cup of chocolate chips along with the cranberries. This adds a sweet, decadent flavor that complements the tartness of the cranberries. In this post, we covered how to make a delicious Cranberry Orange Bread. We went through the needed ingredients, step-by-step instructions, and various tips to ensure your bread turns out great. Remember, using fresh cranberries enhances flavor, and simple tweaks can make it unique. Whether you share it or keep it all to yourself, this bread is sure to impress. Enjoy your baking journey and savor each bite!

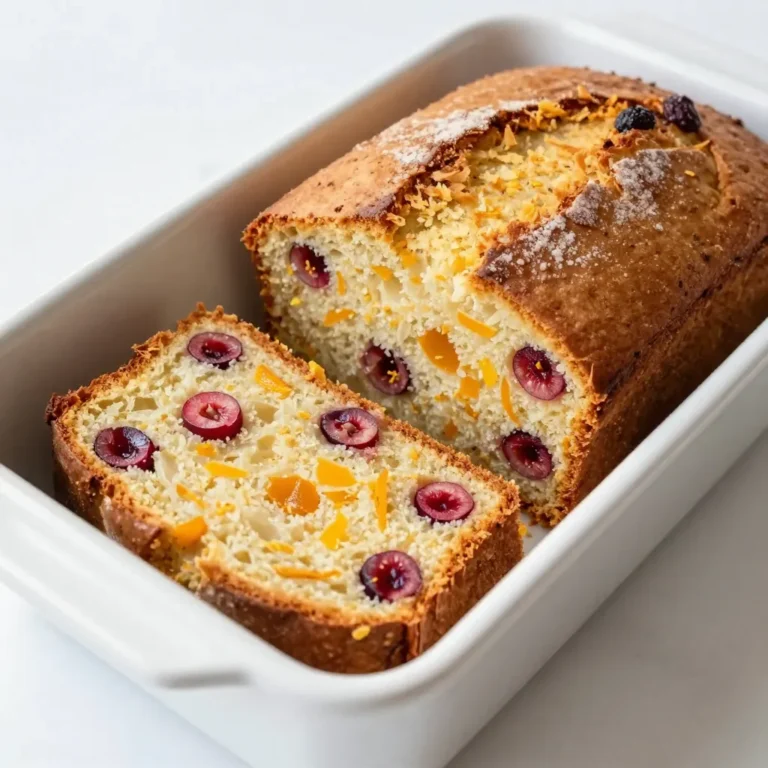
Cranberry Orange Bread Delightful and Simple Recipe

- 1 cup cold brew coffee - 1/2 cup milk of your choice - 3 tablespoons pumpkin puree - 2 tablespoons maple syrup - 1/2 teaspoon vanilla extract - 1/4 teaspoon pumpkin pie spice - Whipped cream for topping To make your Pumpkin Cream Cold Brew, gather these simple ingredients. I love using oat milk for a rich taste. You can use any milk you like, though. The pumpkin puree gives that cozy fall flavor. Maple syrup adds sweetness, but you can adjust it to your liking. The vanilla extract brings warmth, while the pumpkin pie spice adds that classic touch. Finally, whipped cream on top makes it feel like a treat. These ingredients work together to create a drink that is both creamy and refreshing. You’ll enjoy the balance of coffee and pumpkin flavors. Plus, it’s quick to make! {{ingredient_image_2}} - First, gather your ingredients: 3 tablespoons pumpkin puree, 2 tablespoons maple syrup, 1/2 teaspoon vanilla extract, and 1/4 teaspoon pumpkin pie spice. - In a medium bowl, combine the pumpkin puree, maple syrup, vanilla extract, and pumpkin pie spice. - Use a whisk to mix the ingredients until smooth. This creates a creamy pumpkin base. - Next, take a bowl or a pitcher. Pour in 1 cup of cold brew coffee and 1/2 cup of milk of your choice. - Stir gently to combine the coffee and milk. This step blends the flavors well. - Slowly pour the pumpkin mixture into the coffee and milk blend. - Whisk continuously until everything is fully combined and creamy. This makes the drink rich and smooth. - Take a small taste of your drink. If you want it sweeter, add more maple syrup. - Keep whisking until the syrup is well mixed in. - Fill two glasses with ice cubes. This keeps your drink cool. - Carefully pour the pumpkin cold brew over the ice in each glass. - Top each glass with whipped cream. - Finally, sprinkle some pumpkin pie spice on top for extra flavor. Now you have a delicious pumpkin cream cold brew to enjoy! When making your pumpkin cream cold brew, the type of milk you use matters. Oat milk works best for creaminess. It blends well and adds a rich texture. You can also use almond milk or soy milk as good alternatives. They keep the drink light and tasty. If you prefer dairy, whole milk is a solid choice. It brings a lovely creaminess to the drink. You can customize the sweetness to your liking. Start with two tablespoons of maple syrup. Taste it and add more if needed. If you want a healthier option, try honey or agave syrup. You can also use stevia or monk fruit sweetener for a low-calorie choice. These options let you enjoy your drink without too much sugar. Serving your cold brew in clear glasses makes it look great. You can see the layers of coffee and cream. For an extra touch, add a cinnamon stick as a stirrer. It not only looks nice but also gives a hint of spice with every sip. A sprinkle of extra pumpkin pie spice on top adds charm, too. These small touches make your drink feel special. Pro Tips Use Fresh Pumpkin Puree: For the best flavor, use homemade pumpkin puree or high-quality canned pumpkin. Fresh ingredients will elevate the taste of your drink. Choose Your Milk Wisely: Experiment with different types of milk, like almond or coconut milk, to find your preferred creaminess and flavor profile. Adjust the Spices: Feel free to increase the amount of pumpkin pie spice for a spicier kick, or add a dash of cinnamon for extra warmth. Presentation Matters: Serve in clear glasses to highlight the beautiful layers of your cold brew, and consider garnishing with a cinnamon stick for an appealing touch. {{image_4}} You can make this drink dairy-free by using plant-based creamers. Oat milk works great. It adds a creamy touch without dairy. Almond milk and coconut milk are also good choices. They change the taste and texture a bit, but they still taste fantastic. You can change the spices to fit your taste. If you love cinnamon, add a bit more. Want a kick? Try adding a pinch of nutmeg or cardamom. Each spice gives a new flavor twist. Mix and match to find your favorite blend! If you want to cut calories, try these tips. Use less maple syrup for sweetness. You can also swap it with a low-calorie sweetener like stevia. Choose unsweetened almond milk or coconut milk to reduce sugar. These small changes keep the flavor while making it lighter. To keep your leftover cold brew fresh, store it in an airtight container. This helps keep out air and light. You can use a glass jar or a plastic bottle. Place it in the fridge right after you finish your drink. The cold brew lasts for up to three days in the fridge. After that, the taste may change and become less fresh. If you want to enjoy your cold brew warm, here’s how to do it. Pour the cold brew into a small pot. Heat it on low heat to avoid burning. Stir gently while it warms up. Make sure it does not boil. Once it is warm, you can add more milk or sweetener if you like it sweeter. Yes, you can freeze cold brew! Pour the cold brew into ice cube trays. This way, you can use it later in smoothies or cold drinks. Once the cubes are frozen, pop them out and store them in a zip-top bag. They can last up to two months in the freezer. Just remember to use them in recipes where ice coffee is perfect! Yes, you can use regular brewed coffee. However, you should chill it first. Cold brew has a smooth taste, while hot coffee can be more bitter. If you use hot coffee, add ice cubes to cool it down quickly. You may also want to use less coffee. This helps balance the flavors. No, they are not the same. Pumpkin puree is pure pumpkin. It has no added sugar or spices. Pumpkin pie filling has sugar, spices, and other ingredients. Using puree gives you control over the flavor. It lets you make it just how you like it. To make this drink vegan, use plant-based milk. Oat milk works great for creaminess. You can also use almond or soy milk. Instead of whipped cream, try coconut whipped cream. It adds a nice touch and keeps it dairy-free. This post shared how to make a tasty pumpkin cold brew coffee. We covered ingredients, step-by-step instructions, tips, variations, and storage. You learned to combine flavors and create a creamy, refreshing drink. Customize the sweetness and choose the right milk for your taste. Enjoy your pumpkin cold brew! Check out the tips for serving and storing for the best results. You can make this drink your own with easy adjustments. Now, go enjoy a delicious cup to celebrate fall flavors!

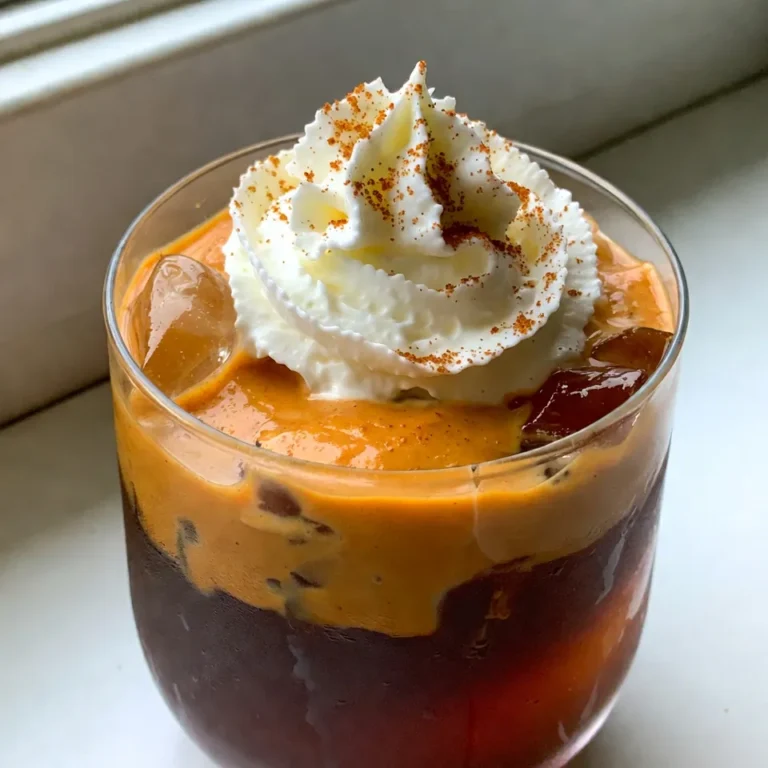
Pumpkin Cream Cold Brew Copycat Delicious Recipe

- 1 lb ground beef - 1 medium onion, finely diced - 2 cloves garlic, minced - 1 bell pepper (any color), diced - 1 cup corn kernels (fresh or frozen) - 1 can (15 oz) black beans, rinsed and drained - 1 can (15 oz) diced tomatoes with green chilies - 1 tablespoon chili powder - 1 teaspoon ground cumin - Salt and pepper to taste - 2 cups cooked rice (white or brown) - 2 cups shredded sharp cheddar cheese - Fresh cilantro, chopped (for garnish) You can change Cattle Drive Casserole to fit your taste. Here are some ideas: - Swap ground beef for ground turkey or chicken. - Use quinoa or cauliflower rice for a healthy twist. - Add jalapeños for some heat. - Top with sour cream or guacamole for extra creaminess. - Mix in different types of cheese, like pepper jack or mozzarella. Cattle Drive Casserole is hearty and filling. Here’s a simple breakdown of its nutrition per serving: - Calories: Approximately 450 - Protein: 25g - Carbohydrates: 45g - Fat: 20g - Fiber: 10g - Sugars: 5g This dish balances protein, carbs, and fats well. It can be a great meal for everyone. {{ingredient_image_2}} To make Cattle Drive Casserole, start with the right prep. Gather all your ingredients first. You need: - 1 lb ground beef - 1 medium onion, finely diced - 2 cloves garlic, minced - 1 bell pepper (any color), diced - 1 cup corn kernels (fresh or frozen) - 1 can (15 oz) black beans, rinsed and drained - 1 can (15 oz) diced tomatoes with green chilies - 1 tablespoon chili powder - 1 teaspoon ground cumin - Salt and pepper to taste - 2 cups cooked rice (white or brown) - 2 cups shredded sharp cheddar cheese - Fresh cilantro, chopped (for garnish) Next, preheat your oven to 350°F (175°C). This will help the casserole cook evenly. Now, let's cook the meat and veggies. In a large skillet over medium heat, add your ground beef. Cook it until it turns brown. Use a spatula to break it up as it cooks. Once it’s cooked, drain any extra fat from the pan. Add the finely diced onion, minced garlic, and diced bell pepper to the skillet. Sauté them for 5-7 minutes until the onion looks clear and the bell pepper is soft. This mix adds great flavor. Then, add the corn, rinsed black beans, and the can of diced tomatoes to the skillet. Don’t forget the juices! Sprinkle in the chili powder, ground cumin, and a bit of salt and pepper. Stir it well and let it simmer for 5 minutes. This helps all the flavors blend together. Now it’s time to put everything together. Fold in the cooked rice, making sure it mixes well with the meat and veggies. This will make your casserole hearty. Carefully transfer this mixture into the greased baking dish. Spread it out evenly. Then, sprinkle the shredded cheddar cheese on top. This cheese will melt and create a gooey finish. Place the baking dish in the oven and bake for 20-25 minutes. You want the cheese to be melted, bubbly, and slightly golden brown. Once it’s ready, take it out and let it cool for a few minutes. Before serving, add some freshly chopped cilantro on top for a burst of flavor. Enjoy your Cattle Drive Casserole! To make your Cattle Drive Casserole just right, start with fresh ingredients. Fresh veggies add great taste. Use a non-stick skillet to cook the meat. This helps prevent sticking and makes clean-up easy. Drain the fat well to keep the dish light. For even cooking, mix all ingredients well before adding them to the baking dish. Don’t skip the simmer time; it helps blend the flavors. When serving, scoop the casserole right from the dish. It looks great and keeps the heat. Pair it with a crisp green salad for a fresh contrast. Cornbread or tortilla chips are great sides too. For a zesty kick, add lime wedges. A dollop of sour cream or guacamole can also enhance the dish. Feel free to sprinkle more cilantro on top for extra flavor. You can prep this casserole a day in advance. Cook all the ingredients and let them cool. Then, cover the mix and store it in the fridge. When ready, spread it in the baking dish and top with cheese. Bake at 350°F until hot and bubbly. This makes dinner easy on busy nights. You can also freeze the casserole before baking. Just thaw it in the fridge overnight before cooking. Pro Tips Use Lean Ground Beef: Opt for lean ground beef (90% lean or higher) to reduce excess fat and make the casserole lighter without sacrificing flavor. Vegetarian Option: Substitute ground beef with a plant-based meat alternative or add more beans and vegetables for a delicious vegetarian version. Cheese Variations: Experiment with different cheeses like Monterey Jack or Pepper Jack for a unique flavor twist and extra kick. Make Ahead: Prepare the casserole in advance and refrigerate it overnight. Just pop it in the oven when you're ready to serve for a hassle-free meal. {{image_4}} You can make a great vegetarian version. Swap the ground beef for a mix of mushrooms and lentils. Use the same spices to keep it flavorful. Add more veggies like zucchini or spinach for extra nutrients. The black beans and corn will still add texture and taste. This way, you get all the hearty goodness without meat. If you want some heat, add diced jalapeños or crushed red pepper. Mix in a can of spicy diced tomatoes instead of regular ones. You can also use pepper jack cheese for a nice kick. This spicy twist makes the casserole exciting and fun to eat. Adjust the spice to fit your family's taste. Feeling creative? Try different cheeses like Monterey Jack or mozzarella. They melt well and add unique flavors. If you want to change the grain, use quinoa or barley instead of rice. These options bring new textures and tastes to your casserole. Experimenting with these swaps keeps the dish fresh and interesting. Once your casserole cools, store it in an airtight container. This keeps it fresh in the fridge. You can keep it for up to three days. If you want to save it longer, consider freezing it. To reheat, you can use a microwave or an oven. If you use the microwave, heat it in short bursts. Stir in between to warm it evenly. For the oven, preheat it to 350°F. Cover the casserole with foil to prevent drying out. Heat for about 15-20 minutes. To freeze, make sure the casserole is cool. Then, wrap it tightly in plastic wrap and foil. You can freeze it for up to three months. When ready to eat, thaw it in the fridge overnight. After thawing, reheat it as mentioned above. Enjoy your meal! Cattle Drive Casserole is a warm and filling dish. It blends ground beef, beans, corn, and rice. Topped with cheese, it provides a rich taste. The mix of spices adds depth and warmth. It’s a dish that makes you feel good inside. You can serve it as a main meal or at gatherings. Perfect for family dinners, it brings everyone together. Yes, you can make a meatless version. Just swap the ground beef for a plant-based option. Consider using lentils, mushrooms, or more beans. You can also add extra veggies for texture. This keeps the dish hearty and satisfying. The spices still work well, so the flavor remains strong. Cooking Cattle Drive Casserole takes about 45 minutes. Prep time is around 15 minutes. The baking time is 20 to 25 minutes. Just ensure the cheese is melted and bubbly. Let it cool for a few minutes before serving. This gives the dish time to set and makes serving easier. In this article, we explored the key ingredients needed for a tasty Cattle Drive Casserole. We covered how to prep, cook, and assemble this dish step by step. I shared helpful tips for creating the perfect casserole and options for custom variations. We also discussed storing and reheating leftovers and answered common questions. Cattle Drive Casserole is versatile and easy to make. I hope you enjoy cooking and sharing it with others. Keep experimenting to make it your own!

Cattle Drive Casserole Hearty and Comforting Meal

- 4 bone-in, skin-on chicken thighs - 1/4 cup honey - 3 tablespoons soy sauce - 4 cloves garlic, finely minced - 1 tablespoon sriracha (adjust according to desired heat level) - 1 tablespoon rice vinegar - 1 teaspoon freshly grated ginger - 1/2 teaspoon black pepper - 1/2 teaspoon salt - 2 tablespoons olive oil - Fresh cilantro leaves for garnish (optional) - Sesame seeds for garnish (optional) Gathering these ingredients is simple. First, you need bone-in, skin-on chicken thighs. This cut keeps the meat juicy and tender. Then, mix honey and soy sauce for a sweet and salty base. The minced garlic adds a rich flavor. Adjust the heat with sriracha; use more for a spicy kick. Rice vinegar gives a tangy touch, while ginger adds warmth. Black pepper and salt enhance all the flavors. Olive oil helps achieve that gorgeous crispy skin. Finally, fresh cilantro and sesame seeds are great for garnishing. They make your dish look vibrant and appealing. With these ingredients, you can create a tasty meal that impresses everyone at the table. The balance of sweet, spicy, and savory flavors makes this dish a true delight. {{ingredient_image_2}} 1. Prepare the marinade: In a bowl, mix 1/4 cup honey, 3 tablespoons soy sauce, 4 minced garlic cloves, 1 tablespoon sriracha, 1 tablespoon rice vinegar, 1 teaspoon grated ginger, 1/2 teaspoon black pepper, and 1/2 teaspoon salt. Whisk it well until smooth. 2. Coat the chicken thighs: Place 4 chicken thighs in a large zip-top bag or shallow dish. Pour the marinade over the chicken. Make sure each thigh gets a good coat. Seal the bag or cover the dish tightly. 3. Refrigeration time: Let the chicken marinate for at least 30 minutes. For a deeper flavor, you can leave it overnight. 1. Preheat the oven: Set your oven to 400°F (200°C). Preheating is key for even cooking. 2. Searing the chicken in a skillet: In a large oven-safe skillet, heat 2 tablespoons of olive oil over medium-high heat. Take the chicken out of the marinade and keep the marinade for later. Place the chicken skin-side down in the hot skillet. Sear for 5-7 minutes until the skin is golden and crispy. 3. Baking instructions: Flip the chicken skin-side up and pour the reserved marinade over it. Place the skillet in the oven and bake for 25-30 minutes. The chicken is done when it reaches 165°F (75°C) inside. 1. Glazing the chicken: For a nice finish, switch your oven to broil mode. Broil the chicken for 2-3 minutes. Watch closely so it doesn’t burn. 2. Resting before serving: Take the skillet out of the oven. Let the chicken rest for a few minutes. This makes it juicier. 3. Garnishing with cilantro and sesame seeds: Top the chicken with fresh cilantro and sesame seeds for a lovely touch. Enjoy your flavorful dish! To get that golden crust, heat your skillet well. Aim for medium-high heat before adding the chicken. This helps the skin get crispy. Timing is key here. Sear the chicken thighs skin-side down for 5 to 7 minutes. Watch for a nice golden color. This step seals in juices and adds flavor. Want more heat? Add extra sriracha to your marinade. This gives each bite a spicy kick. You can adjust the amount to fit your taste. Feel free to add more ingredients for depth. Try adding a splash of orange juice or a dash of smoked paprika. These can elevate the dish and surprise your taste buds. Serve your spicy honey garlic chicken with steamed jasmine rice. The rice absorbs the sauce well and balances the spice. Sautéed green vegetables also pair nicely, bringing color and nutrients to your plate. For visual appeal, present the chicken on a rustic wooden board or a sleek platter. Drizzle extra sauce from the skillet over the top. Garnish with fresh cilantro and sesame seeds. This makes the dish pop and look inviting. Pro Tips Marinate Longer for More Flavor: For the best flavor, marinate the chicken thighs overnight. This allows the spices and honey to deeply penetrate the meat, resulting in a more flavorful dish. Use a Meat Thermometer: To ensure your chicken is perfectly cooked, use a meat thermometer. The internal temperature should reach 165°F (75°C) for safe consumption. Adjust Heat to Your Preference: Customize the heat level by varying the amount of sriracha in the marinade. Start with less if you're unsure and add more for a spicier kick. Rest Before Serving: Allow the chicken to rest for at least 5-10 minutes after baking. This helps the juices redistribute, making the chicken more tender and juicy. {{image_4}} You can switch up the protein in this recipe. Here are two great options: - Using chicken breasts: Chicken breasts work well for a leaner meal. They cook faster, so check for doneness sooner. They still soak up the tasty marinade. - Substituting with tofu for a vegetarian version: Tofu is a fantastic choice for a vegetarian dish. Use firm or extra-firm tofu for the best texture. Just marinate it the same way as the chicken. Cook it in the oven or pan-fry it for extra crispiness. Feel free to get creative with flavors. Here are two fun ideas: - Southwest-style with chipotle: Add chipotle sauce instead of sriracha. This will give the dish a smoky kick. Pair it with corn and black beans for a full Southwest meal. - Asian-inspired with teriyaki: Swap the honey and soy sauce for a teriyaki sauce. This gives the chicken a sweet and salty taste. Serve it with steamed rice and stir-fried veggies for a complete Asian feast. These variations help you explore new tastes while keeping the dish fun and exciting. To keep your Spicy Honey Garlic Chicken Thighs fresh, start by refrigerating them. Place the cooked chicken in an airtight container. It stays good for up to four days in the fridge. For longer storage, freezing is the best option. Wrap each thigh tightly in plastic wrap, then place them in a freezer-safe bag. This way, the chicken can last for up to three months in the freezer. When you're ready to enjoy the leftovers, reheating in the oven is best. Preheat your oven to 350°F (175°C). Place the chicken on a baking sheet and cover it with foil to keep it moist. Heat for about 15-20 minutes, or until warm. If you're short on time, the microwave works too. Place the chicken on a microwave-safe plate and cover it with a damp paper towel. Heat in short bursts, checking every 30 seconds until warm. Enjoy your tasty chicken again! You can serve this dish with easy sides. Here are some great options: - Steamed jasmine rice - Sautéed green vegetables - Roasted sweet potatoes - Creamy mashed potatoes - Fresh garden salad These sides balance the chicken's sweetness and heat. They also add color to your plate. Yes, you can prepare this recipe in advance. Here are a few tips: - Marinate the chicken thighs the night before. - Store them in the fridge for up to 24 hours. - Cook them just before serving for the best taste. Meal prepping saves time and makes dinner easy. To check if the chicken is done, use a meat thermometer. The internal temperature should reach 165°F (75°C). - Insert the thermometer into the thickest part of the thigh. - Avoid touching the bone, as it can give a false reading. This ensures your chicken is safe and juicy. Yes, you can change the spice level. Here’s how: - Use less sriracha for a milder flavor. - Add more sriracha for extra heat. - Try a different hot sauce if you prefer. Adjusting the spice lets you customize the dish for your taste. In this post, we explored a tasty recipe for Spicy Honey Garlic Chicken Thighs. We discussed key ingredients, marinating techniques, and cooking steps. You learned tips for perfect searing and ways to enhance flavors. We also covered variations for different proteins and flavor profiles, along with storage and reheating advice. Remember, cooking with joy and creativity can lead to delicious meals. Try this recipe, and enjoy new flavors you create. You have the tools now to make this dish a hit!

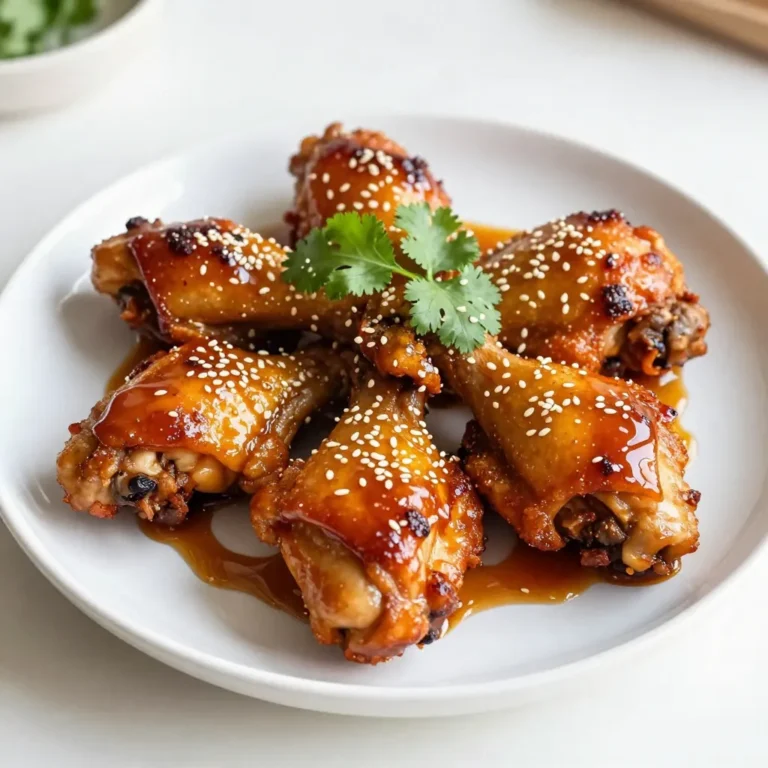
Spicy Honey Garlic Chicken Thighs Flavorful Delight

- 1 cup (2 sticks) unsalted butter - 1 cup packed brown sugar - 1/2 cup granulated sugar - 2 large eggs - 2 teaspoons vanilla extract - 2 cups all-purpose flour - 1 teaspoon baking powder - 1/2 teaspoon baking soda - 1/4 teaspoon salt - 1 cup chocolate chips (semi-sweet or milk chocolate) - 1/2 cup chopped nuts (optional; walnuts or pecans) Each ingredient plays a key role in making these blondies chewy and tasty. The unsalted butter gives a rich flavor, while browning it adds a nutty taste. Brown sugar adds moisture and chewiness. Granulated sugar balances sweetness. Eggs help bind the mixture and add structure. Vanilla extract gives a warm flavor that ties everything together. Flour gives the blondies structure. Baking powder and baking soda help them rise and become soft. Salt enhances all the flavors. Chocolate chips add sweetness and richness. Nuts, if you choose to add them, provide a nice crunch and depth of flavor. If you need to make swaps, here are some ideas: - Use salted butter instead of unsalted. Just skip the added salt. - Coconut sugar can replace brown and granulated sugars for a different taste. - Flax eggs work in place of regular eggs for a vegan option. Use 1 tablespoon of ground flaxseed mixed with 2.5 tablespoons of water for each egg. - For gluten-free blondies, try a gluten-free flour blend. - You can use white chocolate chips or butterscotch chips instead of chocolate chips. - Skip the nuts if you want a nut-free option but keep the texture in mind. {{ingredient_image_2}} First, preheat your oven to 350°F (175°C). This step is key for even baking. Grab a 9x13 inch baking pan. You can grease it or line it with parchment paper. This makes it easy to lift out the blondies after baking. Now, let’s brown the butter. In a medium saucepan, melt 1 cup of unsalted butter over medium heat. Stir it often for about 5 to 7 minutes. You want it to turn a deep golden brown and smell nutty. Keep an eye on it to stop burning. Once browned, take it off the heat and let it cool a bit. In a large bowl, mix the browned butter with 1 cup of packed brown sugar and 1/2 cup of granulated sugar. Whisk until it’s smooth. Next, add in 2 large eggs, one at a time. Mix well after each egg. Now pour in 2 teaspoons of vanilla extract. Stir until everything is blended. In another bowl, sift together 2 cups of all-purpose flour, 1 teaspoon of baking powder, 1/2 teaspoon of baking soda, and 1/4 teaspoon of salt. Gradually add this dry mix to your wet mix. Stir gently until just combined. Be careful not to overmix; this keeps your blondies chewy. Finally, fold in 1 cup of chocolate chips and 1/2 cup of chopped nuts if you want. Use a spatula to mix them in gently. Your batter is now ready to pour into the prepared pan! To get that perfect chewy texture in your blondies, use brown butter. Brown butter adds a nutty flavor and moisture. Make sure to mix the wet and dry ingredients just until combined. Overmixing creates a tough texture, which we want to avoid. Also, let the batter rest for a few minutes before baking. This helps the flour absorb moisture, leading to a denser and chewier blondie. One common mistake is not browning the butter enough. If it stays yellow, it won’t give that rich flavor. Another mistake is using cold eggs. Cold eggs can shock the batter and affect the texture. Always use room temperature eggs for a smooth mix. Lastly, avoid opening the oven door too soon. This can cause the blondies to sink in the middle. You can easily boost flavor with add-ins. Consider adding nuts like walnuts or pecans for crunch. If you want more sweetness, add extra chocolate chips. For a fun twist, try mixing in some toffee bits or coconut flakes. Each of these add-ins brings a new layer of taste and texture to your blondies. Pro Tips Choose the Right Chocolate: Select high-quality chocolate chips for a richer flavor. Semi-sweet or milk chocolate both work well, but the choice can dramatically affect the overall taste of your blondies. Don’t Overmix: When combining the wet and dry ingredients, mix just until combined. Overmixing can lead to tough blondies instead of the desired chewy texture. Let Them Cool: Allow the blondies to cool completely before slicing. This helps them set and makes for cleaner, more attractive squares. Experiment with Add-ins: Feel free to customize your blondies by adding in different mix-ins like dried fruits, toffee bits, or even a swirl of peanut butter for a unique twist. {{image_4}} You can switch up the chocolate in your blondies. I love using semi-sweet chocolate chips, but milk chocolate works well too. Dark chocolate adds a rich flavor. For a fun twist, try white chocolate chips or even butterscotch chips. You can mix different types for more depth. Choose what excites your taste buds! If you want nut-free blondies, just leave out the nuts. You can replace the butter with coconut oil for a vegan option. Use flax eggs instead of regular eggs. One flax egg is one tablespoon of ground flaxseed mixed with two and a half tablespoons of water. Let it sit for five minutes to thicken. This way, everyone can enjoy these treats! You can add spices to boost flavor. A pinch of cinnamon adds warmth and depth. Try adding a dash of nutmeg for a cozy touch. For a more unique flavor, mix in some espresso powder. It pairs well with chocolate. You can even add a hint of sea salt on top for a sweet and salty combo. Explore and find what you love! Store your chewy brown butter blondies in an airtight container. They stay fresh at room temperature for up to four days. For best results, place a piece of parchment paper between layers. This keeps them from sticking together. If you want to keep them longer, refrigeration is a good option. Blondies can last for about a week in the fridge. Just remember to let them come back to room temperature before serving. To freeze blondies, first cut them into squares. Wrap each square in plastic wrap tightly. Then place them in a freezer-safe bag or container. They can last in the freezer for up to three months. When you're ready to enjoy them, take them out and let them thaw for a few hours. You can also heat them in the oven for a few minutes to refresh their chewy texture. Reheating your blondies brings back that fresh-baked taste. Preheat your oven to 350°F (175°C). Place the blondies on a baking sheet. Heat them for about 5 to 10 minutes. You can also use a microwave. Heat for about 10-15 seconds per square. But watch closely to avoid overheating. Enjoy your warm blondies just like the day you made them! Blondies and brownies are both baked treats. The key difference lies in their flavors and ingredients. Blondies use brown sugar, giving them a rich caramel taste. Brownies use cocoa powder, which gives them a deep chocolate flavor. Blondies have a soft, chewy texture, while brownies can be fudgy or cakey. Yes, you can make these blondies ahead of time. They store well for a few days at room temperature. Just keep them in an airtight container. You can also freeze them for up to three months. This way, you can enjoy a sweet treat whenever you want. To check if the blondies are done, insert a toothpick into the center. If it comes out with a few moist crumbs, they are ready. If it comes out wet, they need more time. Keep an eye on them, as baking times can vary. They usually take about 25-30 minutes. This blog covered all you need for perfect blondies. We explored essential ingredients, their importance, and swap options. The step-by-step instructions guide you through the process. I shared tips for achieving the perfect chewy texture and common mistakes to avoid. You learned about variations, storage, and how to keep them fresh. In the end, you can create delicious blondies with ease. Enjoy baking and share your favorite twists!

Chewy Brown Butter Blondies Irresistible Dessert Treat

- 1 cup red lentils, rinsed under cold water until clear - 1 medium onion, finely diced - 2 cloves garlic, finely minced - 1 tablespoon fresh ginger, grated - 1 teaspoon ground turmeric - 1 teaspoon ground cumin - 4 cups vegetable broth (homemade or store-bought) - 1 medium carrot, peeled and diced - 1 medium potato, peeled and diced - 1 cup coconut milk (canned or carton) - Juice of 1 lemon - Salt and black pepper to taste These main ingredients create a rich base for your Golden Turmeric Lemon Lentil Soup. The red lentils cook quickly, making them perfect for a warm and comforting meal. The turmeric gives a lovely golden color and adds health benefits. The broth and coconut milk provide a creamy texture that balances the spices. - 1/2 teaspoon cayenne pepper (optional, adjust to taste for heat) If you enjoy a bit of spice, consider adding cayenne pepper. It brings warmth without overpowering the dish. You can adjust the amount based on your own taste. Just remember, a little goes a long way! - Fresh cilantro or parsley for garnish Garnishing is key for presentation and flavor. Chopped cilantro or parsley adds freshness and color. You might also serve a lemon wedge on the side for an extra zing. Adding these simple touches makes your soup look inviting and appetizing. {{ingredient_image_2}} First, I heat a splash of olive oil in a large pot over medium heat. When the oil is hot, I add the finely diced onion. I sauté the onion for about five minutes until it becomes soft and clear. Next, I stir in the minced garlic and grated ginger. I cook this for one more minute. I keep stirring to make sure the garlic does not burn. Once the aromatics are ready, I sprinkle in the ground turmeric, cumin, and cayenne pepper if I want some heat. I stir everything well to coat the onions with the spices. I let the spices bloom for about thirty seconds. This step brings out the best flavors. Now, I add the rinsed red lentils, diced carrot, and potato into the pot. I stir everything to mix well. Then, I pour in the vegetable broth and bring it to a rolling boil. Once it starts boiling, I lower the heat to let it simmer for about twenty minutes. I wait until the lentils are soft and the veggies are cooked through. After that, I stir in the coconut milk and the juice of one lemon. I let it simmer for another five minutes. Finally, I season with salt and black pepper to taste. To get the best flavor from your soup, use fresh spices. Fresh spices pack more punch than old ones. Toasting the spices in oil helps release their oils. This gives your soup a richer taste. When you add lemon juice, do it at the end. This keeps the bright flavor intact. For perfect lentils, rinse them well before cooking. This removes any dust or debris. Red lentils cook faster than other types. Keep an eye on them to avoid mushiness. If you want a thicker soup, let it simmer longer. For a thinner soup, add more broth or water. Make your soup look as good as it tastes. Serve it in bright bowls to catch the eye. Add a lemon wedge on the side for a pop of color. A sprinkle of fresh cilantro or parsley adds a nice touch. You can also serve the soup with crusty bread or a crisp salad for a complete meal. Enjoy your creation! Pro Tips Fresh Ingredients: Always use fresh produce and spices for the best flavor. Fresh ginger and garlic can significantly enhance the taste of your soup. Adjusting Consistency: If the soup is too thick, add more vegetable broth or water to reach your desired consistency. If it’s too thin, simmer it longer to reduce the liquid. Flavor Enhancements: For added depth, try incorporating a splash of soy sauce or tamari, which complements the flavors beautifully without overpowering them. Storage Tips: This soup stores well in the refrigerator for up to 4 days. Consider freezing leftovers in individual portions for a quick and easy meal later. {{image_4}} You can boost nutrition by adding more veggies. Try diced bell peppers or spinach. These add color and taste. You can also use green beans or zucchini. Just chop them small. They cook well and mix with the soup. Adding vegetables makes the soup even heartier and richer in nutrients. This soup is already vegetarian. To make it vegan, just check the broth. Some broths may have animal products. Use a vegetable broth with no dairy. The coconut milk keeps it creamy and rich. You can enjoy this soup while sticking to a vegan diet. You can change the spice level based on taste. If you like heat, add more cayenne pepper. Start with a little, then taste and add more. For a milder flavor, skip the cayenne altogether. You can also try adding smoked paprika for a different kick. Adjust the spices to fit your family's taste. After you enjoy your golden turmeric lemon lentil soup, store leftovers in an airtight container. Let the soup cool down to room temperature before sealing it. This helps keep the flavors fresh. You can keep it in the fridge for up to three days. Always check for any signs of spoilage before eating. If you want to save some soup for later, freezing is a great option. Pour the cooled soup into freezer-safe bags or containers. Leave some space at the top because soup expands when it freezes. Label the bags with the date. You can freeze the soup for up to three months. When ready to eat, simply thaw it in the fridge overnight. To reheat the soup, pour it into a pot. Heat it over medium heat, stirring occasionally. If it's too thick, add a splash of vegetable broth or water. You can also use a microwave. Place the soup in a microwave-safe bowl, cover it, and heat it in short bursts, stirring in between. Make sure it's hot all the way through before serving. Enjoy your warm, comforting bowl of soup! Yes, you can use other lentils. Green and brown lentils work well. Keep in mind that they take longer to cook. Red lentils break down more, making the soup creamier. If you choose green or brown, adjust the cooking time to ensure they become tender. This soup is already gluten-free! All the ingredients are safe for a gluten-free diet. Just double-check your vegetable broth. Some brands add gluten. Choose a broth that clearly states "gluten-free" on the label. Pair this soup with crusty bread for a hearty meal. A fresh salad can balance the richness of the soup. You might also enjoy it with a side of roasted vegetables. For a light option, serve with cucumber and tomato slices. This blog post covered key ingredients, step-by-step cooking, and useful tips for your lentil soup. You learned how to prep, combine, and serve your dish with flair. We explored flavorful variations and smart storage methods. Remember, cooking is about fun and creativity, so feel free to adjust to your taste. With practice, you’ll make a soup that shines every time. Enjoy the process and share your delicious results with friends!

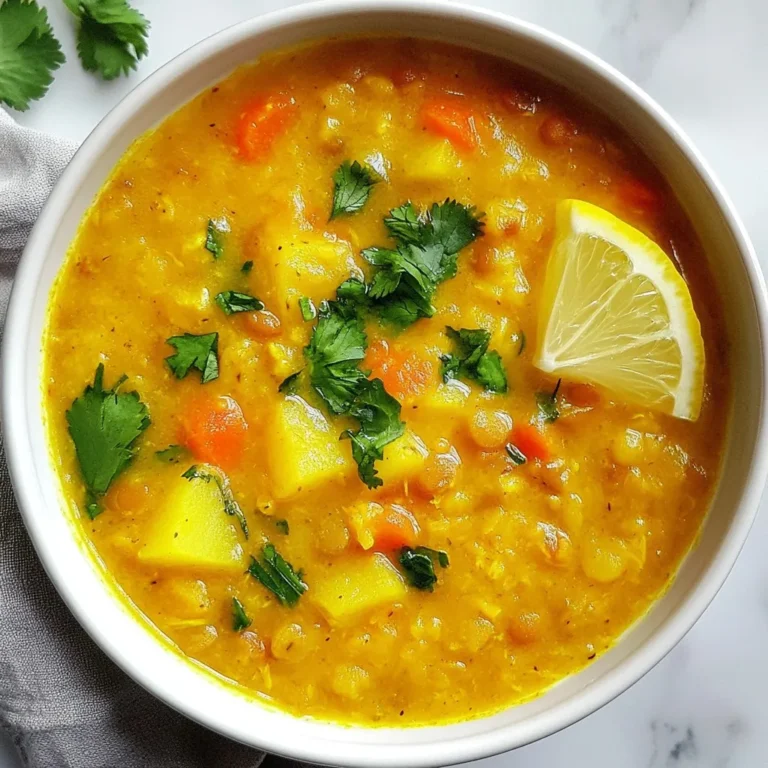
Golden Turmeric Lemon Lentil Soup Comforting and Healthy

- 1 lb boneless chicken thighs, cut into bite-sized pieces - 1 can coconut milk (13.5 oz) - 2 tablespoons curry paste (red or green) - 1 medium onion, finely chopped - 3 cloves garlic, minced - 1-inch piece fresh ginger, grated - 1 bell pepper, sliced (red or yellow) - 1 cup spinach (fresh or thawed frozen) - Fresh cilantro, roughly chopped - Lime wedges for serving These ingredients create a flavorful, quick meal. You can change the curry paste based on your spice level. Red curry paste gives a stronger heat, while green is milder. The coconut milk adds a rich creaminess that balances the spices. Sautéed onion, garlic, and ginger form a fragrant base. The bell pepper adds sweetness and color, while spinach brings a nice touch of freshness. Garnishing with cilantro and lime enhances the dish's appeal. You can enjoy this curry with rice or naan for a complete meal. {{ingredient_image_2}} 1. Sautéing onion: Start by heating 2 tablespoons of vegetable oil in a large skillet over medium heat. Once the oil is hot, add 1 finely chopped medium onion. Sauté it for 2 to 3 minutes until it turns soft and translucent. 2. Adding garlic and ginger: After the onion is ready, stir in 3 minced garlic cloves and 1 grated inch of fresh ginger. Cook this mixture for another minute. The smell will be amazing! 1. Seasoning and browning chicken: Next, add 1 pound of bite-sized chicken thighs to the skillet. Lightly sprinkle some salt over the chicken. Cook for about 5 to 7 minutes, stirring often. You want the chicken pieces to turn golden brown on all sides. 1. Incorporating curry paste: Now it’s time to add flavor! Stir in 2 tablespoons of curry paste of your choice. Mix well to coat the chicken evenly. Cook this for one more minute to let the spices bloom. 2. Adding coconut milk: Pour in a can of 13.5 ounces of coconut milk. Stir everything together and bring it to a gentle simmer. Let it cook for 5 to 10 minutes. This allows the chicken to cook fully and the sauce to thicken. 1. Mixing in vegetables: Stir in 1 sliced bell pepper and 1 cup of spinach. Continue cooking for 2 to 3 minutes. The bell pepper should be tender, and the spinach will wilt beautifully. 2. Adjusting seasoning: Finally, taste your curry. Add more salt if needed to balance the flavors. Enjoy the rich and tasty dish! Using pre-cut chicken saves time. You can find it in many grocery stores. This means no chopping is needed. Just open the package and start cooking. To chop quickly, use a sharp knife. Keep your fingers tucked in while cutting. This way, you stay safe and cut evenly. For onions, use a food processor for fast dicing. You can customize spice levels easily. If you like heat, choose red curry paste. For a milder taste, stick with green curry paste. You can also add chili flakes for more kick. Adding ingredients boosts flavor. Try bell peppers for sweetness. You can also add carrots or peas for extra color and crunch. Fresh herbs like basil or mint can brighten the dish. Serve the curry in shallow bowls. This makes it look nice. Add a sprinkle of fresh cilantro on top for color. Using lime wedges on the side adds a pop. It gives a zesty touch when you squeeze it over the curry. Colorful bowls can enhance the vibrant look of your dish. Pro Tips Choose Your Curry Paste Wisely: The type of curry paste you use can significantly affect the flavor of your dish. Red curry paste offers a spicy kick, while green curry paste provides a milder, aromatic flavor. Choose according to your heat preference! Don’t Skip the Garnish: Fresh cilantro and lime wedges not only enhance the visual appeal of your curry but also add layers of flavor. A squeeze of lime brightens the dish, making it more refreshing. Customize Your Veggies: Feel free to add other vegetables like zucchini, carrots, or peas to the curry. This not only boosts nutrition but also adds texture and color to your dish. Let It Simmer: Allowing the curry to simmer for a bit longer after adding the coconut milk helps the flavors meld together beautifully. Just be careful not to overcook the chicken! {{image_4}} You can easily swap chicken for tofu or shrimp. Tofu gives a nice texture. Use firm tofu for the best results. Press the tofu to remove excess water. Cut it into bite-sized cubes. Sauté it until golden before adding other ingredients. Shrimp cooks quickly, so add it later in the process. Cook shrimp until pink and opaque for the best taste. To make this dish gluten-free, check your curry paste. Many brands are gluten-free, but some may contain soy sauce. For a dairy-free option, this recipe is already safe since it uses coconut milk. Just ensure your curry paste is free of dairy ingredients too. Both options keep the dish tasty and enjoyable. You can easily adjust the spice levels to suit your taste. Use red curry paste for a spicier kick. Green curry paste offers a milder flavor. If you prefer no heat, skip the curry paste altogether. You can also add sugar to balance the spice. For a fun twist, add a pinch of chili flakes for heat or a squeeze of lime for brightness. To store leftovers safely, let the curry cool down first. Place it in an airtight container. Store it in the fridge for up to three days. When you want to eat it again, check for any off smells. If it smells fine, it’s good to go! For best practices in freezing coconut curry, use a freezer-safe container. Make sure to leave some space at the top, as the curry expands when it freezes. You can freeze it for up to three months. Label the container with the date, so you know when to use it. For reheating, the best method is on the stove. Pour the curry into a skillet over medium heat. Stir often to heat it evenly. You can also use a microwave. Place it in a microwave-safe bowl, cover it loosely, and heat for one minute. Stir and heat in 30-second bursts until hot. Always check the temperature before eating! Minute Coconut Chicken Curry lasts about 3 to 4 days in the fridge. Store it in an airtight container. Make sure it cools down before you store it. If you want to keep it longer, consider freezing it. Always check for signs of spoilage before eating. Yes, you can make this dish vegetarian! Use tofu or chickpeas instead of chicken. You can also use vegetable broth to add flavor. Replace the chicken with any veggies you like, such as carrots or cauliflower. This way, you keep the creamy coconut flavor while making it plant-based. Coconut Chicken Curry pairs well with several sides. Here are some tasty options: - Steamed rice - Quinoa - Naan bread - Roti - A fresh salad These sides will soak up the delicious curry sauce and add to your meal. Enjoy exploring different pairings! You learned the key ingredients, cooking steps, and helpful tips for making Coconut Chicken Curry. Remember, fresh flavors from aromatics and spices elevate your dish. You can easily adjust the recipe for your dietary needs or spice level. Store leftovers safely and reheat them well. Get creative with variations like tofu or shrimp for protein. Enjoy the delightful experience of cooking and sharing this meal. Your Coconut Chicken Curry will surely impress everyone at the table!

Minute Coconut Chicken Curry Quick and Easy Recipe

- 2 cups water - 1 cup freshly brewed green tea - 1 cup freshly brewed herbal tea (peach or chamomile) - 2 tablespoons honey - 1 tablespoon freshly squeezed lemon juice - 1 teaspoon freshly grated ginger (optional) - Lemon slices for garnish Gathering the right ingredients is key to making Copycat Medicine Ball Tea. Start with fresh water, as it lays the foundation for the drink. I like to use about 2 cups. Next, brew a cup of green tea. This adds a nice, smooth base. Choose between peach or chamomile herbal tea for the next cup. Both flavors work well and add a lovely twist. Honey is a must for sweetness. Two tablespoons will do the trick, but you can adjust this later. Fresh lemon juice brings brightness, so add one tablespoon. If you want a bit of spice, consider adding grated ginger. It's optional but gives a nice kick. Finally, don't forget the lemon slices for a pretty touch. This simple list makes a drink that is both warm and refreshing. {{ingredient_image_2}} 1. Boiling the water In a medium saucepan, heat 2 cups of water over medium heat. Wait until it gently boils. 2. Steeping the green tea Once the water boils, take it off the heat. Add 1 cup of green tea bags. Let it steep for about 3 minutes. After that, remove and discard the tea bags. 3. Adding and steeping the herbal tea Now, introduce 1 cup of your choice of herbal tea bags. Let them steep for 5 minutes. Then, remove the tea bags to keep the tea clear and smooth. 4. Incorporating honey and lemon juice Add 2 tablespoons of honey to the warm tea. Stir until the honey fully dissolves. This will make your drink sweet and tasty. Next, squeeze in 1 tablespoon of fresh lemon juice and stir again. 5. Optional: Adding grated ginger If you want a spicy kick, add 1 teaspoon of freshly grated ginger. Stir well to mix all the flavors. 6. Serving suggestions Pour your fragrant tea into mugs. Add a lemon slice on each cup for a pretty touch. Serve warm, perfect for a cozy afternoon or when you feel under the weather. This simple and refreshing drink is sure to warm you up and make you feel great! How to adjust sweetness You can easily change the sweetness of your tea. Start with two tablespoons of honey. After mixing, taste it. If you want it sweeter, add more honey a bit at a time. Remember, you can always add, but you can't take it out. Best practices for steeping Steeping tea correctly is key. For green tea, steep for about three minutes. This lets the flavor come out without making it bitter. For herbal tea, let it steep for five minutes. This creates a nice blend of flavors. Always remove the tea bags when done steeping. Choosing the right herbal tea You can choose between peach or chamomile herbal tea. Peach adds a fruity twist, while chamomile offers a calming effect. Both pair well with green tea and lemon. Think about what you like. Try both options to see which one you enjoy more! Pro Tips Choose Your Tea Wisely: Select high-quality green and herbal teas for the best flavor profile. Freshly brewed teas elevate the overall taste of your Medicine Ball Tea. Adjust Sweetness to Taste: Feel free to modify the amount of honey based on your preference. You can always add more after tasting the mixture. Add More Zing: If you love ginger, increase the amount of freshly grated ginger for a spicier kick. This enhances the soothing properties of the tea. Presentation Matters: Serve the tea in clear glass mugs to showcase its beautiful color, and don't forget to add a lemon slice for an elegant touch. {{image_4}} You can make Copycat Medicine Ball Tea just how you like it. Here are some fun options: - Different herbal tea options: You can switch up the herbal tea. Try peach for a fruity twist. Chamomile gives a soft, calming taste. You can even use mint or hibiscus for a unique flavor. - Alternative sweeteners: If you want to change the sweetness, use agave or maple syrup. These are great options if you prefer something different from honey. You can also skip the sweetener if you like it less sweet. - Additive options: Want more health benefits? Add a pinch of turmeric for its warm flavor and bright color. Cinnamon can add a cozy touch and a hint of spice. You can also try cayenne pepper for a kick. These options let you personalize your drink. Mix and match until you find your perfect blend! - Storing leftover tea: If you have extra tea, let it cool first. Pour it into a clean, airtight container. Store it in the fridge. It stays fresh for about 3 days. - Reheating methods: To reheat, pour the tea into a pot. Warm it on low heat until it's hot. You can use a microwave too. Heat it for 30 seconds at a time. Stir between each round to avoid hot spots. - Shelf life of ingredients: Green tea bags last about 6 months if stored properly. Herbal tea bags can last up to a year. Honey is good for a long time, but keep it sealed. Fresh lemon juice should be used within a week after squeezing. Grated ginger can stay fresh in the fridge for about a week too. Copycat Medicine Ball Tea is a warm drink that brings comfort. It mixes green tea with herbal tea. You can pick peach or chamomile. The drink also has honey, lemon juice, and ginger. It’s soothing and great when you feel under the weather. Yes, you can easily make this tea in larger batches. Just multiply the ingredients. For example, use four cups of water and double the tea bags. It works great for sharing with friends or family. Just make sure to adjust the cooking time based on how big your pot is. Copycat Medicine Ball Tea is quite healthy. Green tea has antioxidants that are good for you. The honey adds sweetness without refined sugar. Lemon juice gives you vitamin C. Ginger boosts your immune system, too. Overall, this drink is a tasty way to stay healthy. Absolutely! You can use any tea you like. Black tea or herbal blends work well, too. Just remember that the flavor will change based on your choice. Try different teas to find your favorite mix. To make this tea vegan, replace the honey with maple syrup or agave nectar. Both will give a sweet taste without using animal products. You can also skip the honey altogether if you prefer it less sweet. In this blog post, we explored how to create Copycat Medicine Ball Tea. You learned about the ingredients, the step-by-step preparation, and helpful tips for perfecting your drink. Variations allow you to customize your tea just how you like it. Proper storage ensures your tea lasts longer, and we answered common questions to guide you. Enjoy making this soothing tea at home. With your new knowledge, you can craft a warm drink that fits your taste.

Copycat Medicine Ball Tea Simple and Refreshing Drink

- 9 lasagna noodles - 1 pound ground beef (or ground turkey) - 2 cups marinara sauce (store-bought or homemade) These main ingredients form the base of your dish. The lasagna noodles hold the filling, while the ground meat adds protein. Marinara sauce brings rich flavor and moisture to the roll-ups. - 1/4 cup grated Parmesan cheese - 1/4 cup fresh parsley, chopped - 1 teaspoon Italian seasoning Adding these optional ingredients can elevate your meal. Grated Parmesan adds a salty, nutty taste. Fresh parsley gives a pop of color and freshness. Italian seasoning blends herbs for extra flavor. - Mixing bowl - Skillet - Baking dish Having the right tools helps you cook efficiently. A mixing bowl is needed for the meatball mix. A skillet is best for browning the meatballs. The baking dish holds everything as it bakes. {{ingredient_image_2}} To cook the lasagna noodles, start with a big pot of salted water. Bring it to a rolling boil. Add the noodles and cook them as per the package's guide. Aim for al dente texture. This means the noodles should be firm but cooked through. When done, drain the noodles. Lay them flat on a clean kitchen towel to cool. This keeps them from sticking together. For the meatball mixture, gather a large mixing bowl. In it, combine ground beef, bread crumbs, grated Parmesan cheese, half of the mozzarella, the egg, minced garlic, Italian seasoning, salt, and pepper. Use your hands or a spatula to mix everything well. Mixing thoroughly is key. This ensures all flavors blend together nicely. Next, shape the meatballs. Lightly grease your hands to prevent sticking. Take small portions of the mixture and roll them into balls about 1 inch wide. This size cooks evenly. For cooking, heat a drizzle of olive oil in a large skillet over medium heat. Add the meatballs carefully. Cook them until they turn golden brown on all sides, which takes about 5-7 minutes. Once done, place the meatballs on a plate and set them aside. Now it’s time to assemble the roll-ups. Preheat your oven to 375°F (190°C). In a 9x13 inch baking dish, spread 1/2 cup of marinara sauce evenly on the bottom. For each lasagna noodle, place one meatball on one end. Roll the noodle tightly around the meatball. Make sure the seam is on the bottom to keep it secure. Repeat this for the other noodles and meatballs, placing them side by side in the dish. After that, pour the remaining marinara sauce over the roll-ups. Sprinkle the rest of the mozzarella cheese on top. Add any extra grated Parmesan cheese and chopped parsley for a nice touch. - Preventing noodles from sticking: To keep your noodles from sticking, use a large pot of boiling salted water. Stir the noodles when you add them. After cooking, lay them flat on a clean kitchen towel. This will help them cool and stay separate. - Ensuring meatballs hold together: Use fresh bread crumbs and mix well. Make sure your hands are slightly greased when rolling. This helps shape the meatballs without them falling apart. - Ground beef alternatives: You can use ground turkey or chicken instead of beef. This gives a leaner option while still being tasty. - Low-carb or gluten-free options: For a low-carb dish, try zucchini strips instead of noodles. For gluten-free, use gluten-free lasagna noodles or rice paper. - Creative serving suggestions: Serve the roll-ups upright in bowls or plates. This shows off their layers and makes them look great. - Garnishing for visual appeal: Add fresh parsley on top for color. You can also sprinkle extra grated Parmesan for a nice touch. A side salad with vibrant greens adds more color and freshness to your meal. Pro Tips Chill the Meatball Mixture: Allowing your meatball mixture to chill for about 30 minutes before shaping can help it hold together better while cooking. Use Fresh Herbs: Fresh parsley not only adds a burst of flavor but also enhances the visual appeal of your dish. Feel free to experiment with other fresh herbs like basil or oregano. Layer Flavors: For a deeper flavor, consider adding sautéed onions or bell peppers to your meatball mixture. These additions can bring a unique twist to your roll-ups. Make Ahead: You can prepare and assemble the roll-ups a day in advance. Just cover them tightly and store them in the refrigerator, then bake when ready to serve. {{image_4}} If you want a meat-free option, try plant-based meatballs. You can use lentils, beans, or mushrooms. These options give you a hearty bite. You can also use store-bought veggie meatballs for quick prep. Just swap the ground beef with your choice! Don't feel stuck with marinara. Pesto brings a fresh twist. It adds nice herbal notes that mix well with cheese. You can also try Alfredo sauce for a creamy version. Mix it with a bit of marinara for a rich taste. Feel free to get creative with what you have. Want to boost nutrition? Add spinach, zucchini, or bell peppers. Chop them small so they mix well. These veggies add color and flavor, plus extra vitamins. You can even throw in some fresh basil for a pop of taste. Each addition makes your roll-ups even better! To keep your leftovers fresh, store them in an airtight container. Let the roll-ups cool first. Place wax paper between layers to avoid sticking. Store in the fridge for up to three days. For longer storage, freeze the roll-ups. Wrap each roll-up in plastic wrap, then place them in a freezer bag. Remove as much air as possible. They can stay frozen for up to three months. To reheat, thaw in the fridge overnight. Bake at 350°F (175°C) until hot. When stored properly, your roll-ups can last in the fridge for three days. If you freeze them, they are safe for three months. Always check for signs of spoilage, such as off smells or discoloration. Enjoy your meal! You can prepare many steps in advance. Start by cooking the lasagna noodles. Once cooled, lay them flat. Make your meatball mix and shape the meatballs. Cook them in olive oil until golden. You can store the meatballs in the fridge. Assemble the roll-ups the day you want to eat. Just pour the sauce and cheese on top before baking. Yes, you can use no-boil lasagna noodles. They save time since you skip the cooking step. However, ensure you add extra sauce. This keeps the noodles moist while baking. They will absorb some sauce, making them soft and tasty. Several side dishes pair well. A fresh green salad with a light dressing adds crunch. Garlic bread is another great choice. You could also serve roasted vegetables for color and flavor. Consider a side of steamed broccoli or green beans for a healthy option. To reheat leftovers, avoid the microwave if possible. Instead, use the oven. Preheat it to 350°F. Place the roll-ups in a baking dish. Cover with foil to keep them moist. Heat for about 15-20 minutes or until warm. This method helps keep the cheese gooey and the noodles soft. In this post, we explored Italian Meatball Lasagna Roll-Ups. We discussed the main and optional ingredients that add flavor. I walked you through tools needed to assemble this dish. We covered step-by-step cooking, tips for perfection, variations, and storage. These roll-ups are a fun twist on classic lasagna. They are easy to make and can fit any taste. Now, you have everything you need to create this tasty meal. Enjoy making them and sharing with others!

Italian Meatball Lasagna Roll-Ups Flavorful Family Meal

PREV 1 … 40 41 42 … 44 NEXT
yummybiterecipes

explore

DessertsDinnerAppetizersDrinks

Our Policies

  • Cookie Policy
  • Copyright Policy
  • Disclaimer
  • GDPR Policy
  • Terms Of Use
Back to Top
  • About
  • Contact Us
  • Privacy Policy
© 2025 yummybiterecipes