FREE DINNER EBOOK! Get your copy!
  • Cookie Policy
  • GDPR Policy
  • Disclaimer
  • Terms Of Use
  • Visit my other site: Fun Cookie Recipes
yummybiterecipes
  • Home
  • Dinner
  • Desserts
  • Drinks
  • Appetizers
  • Contact
  • About
  • Privacy Policy
  • Home
  • Dinner
  • Desserts
  • Drinks
  • Appetizers
  • Contact
  • About
  • Privacy Policy
  • Cookie Policy
  • GDPR Policy
  • Disclaimer
  • Terms Of Use
Visit my other site: Fun Cookie Recipes

HOME / CATEGORIES /

Latest

- 1 ½ cups all-purpose flour - 1 teaspoon baking soda - 1 teaspoon ground ginger - 1 teaspoon ground cinnamon - ½ teaspoon ground nutmeg - ¼ teaspoon ground cloves - ½ teaspoon salt - ½ cup unsalted butter, softened - ¾ cup packed brown sugar - 2 large eggs - ½ cup molasses - ½ cup milk - 1 teaspoon vanilla extract For these easy gingerbread cupcakes, gather all your ingredients first. This helps you stay organized. The flour gives structure, while the baking soda helps them rise. Ground ginger, cinnamon, nutmeg, and cloves add that warm, spicy flavor we love during the holidays. Use unsalted butter for a richer taste. Brown sugar adds sweetness and moisture. Eggs bind everything together. Molasses gives that classic gingerbread flavor. Milk keeps the cupcakes soft and tender. Finally, a splash of vanilla enhances the overall flavor. Make sure your butter and eggs are at room temperature. This helps everything mix evenly. Measuring your ingredients correctly is key. Even small changes can affect the final result. Happy baking! {{ingredient_image_2}} - Preheat your oven to 350°F (175°C). - Prepare a 12-cup muffin tray with cupcake liners. First, you need to heat the oven. This helps the cupcakes rise well. While it warms up, grab your muffin tray. Lining it with cupcake liners makes cleanup easy and adds a festive touch. - Whisk together dry ingredients in a bowl. Next, take a medium bowl. Add 1 ½ cups of all-purpose flour, 1 teaspoon of baking soda, 1 teaspoon of ground ginger, 1 teaspoon of ground cinnamon, ½ teaspoon of ground nutmeg, ¼ teaspoon of ground cloves, and ½ teaspoon of salt. Use a whisk to mix these well. This step adds flavor and helps the cupcakes rise. - Beat butter and brown sugar until fluffy. Now, grab a large bowl. Add ½ cup of softened unsalted butter and ¾ cup of packed brown sugar. Use an electric mixer to beat them together. Mix for about 2-3 minutes until it's light and fluffy. This makes the cupcakes soft and tasty. - Add eggs, molasses, and vanilla slowly. After that, it's time for the wet ingredients. Add 2 large eggs, one at a time. Make sure to mix well after each egg. Then, add ½ cup of molasses and 1 teaspoon of vanilla extract. Keep mixing until everything is smooth. This adds moisture and flavor to your batter. - Alternate adding dry ingredients and milk. Take your dry ingredients and add them to the wet mix. Do this gradually, alternating with ½ cup of milk. Start and end with the dry mix. Be gentle when you mix. Over-mixing can make the cupcakes tough. You want a soft batter, not a hard one. - Fill liners and bake until done. Now it’s time to bake! Fill each cupcake liner about two-thirds full with batter. Place the tray in your preheated oven. Bake for 18-20 minutes. To check if they are done, insert a toothpick in the center of a cupcake. If it comes out clean or with a few crumbs, they are ready. Let them cool for 5 minutes in the tray, then move them to a wire rack. This cooling step is key before frosting! To ensure even baking, start with a preheated oven at 350°F (175°C). Use an oven thermometer to check the temperature. Fill each cupcake liner about two-thirds full. This helps them rise evenly. Rotate the muffin tray halfway through baking. This step promotes uniform heat distribution. Avoiding over-mixing is key to soft cupcakes. After adding the flour mixture, mix gently. Stop as soon as you see no dry flour. Over-mixing makes cupcakes dense and tough. Use a rubber spatula to fold in ingredients carefully. For frosting, I recommend cream cheese frosting. It pairs well with gingerbread flavors. You can also use simple vanilla frosting for a lighter touch. Both options add sweetness without overpowering the ginger taste. For decoration, sprinkle crushed gingerbread cookies on top. This adds texture and looks festive. A dash of ground cinnamon also enhances the visual appeal. You can even place a tiny gingerbread cookie on each cupcake for a fun touch. Pro Tips Use Room Temperature Ingredients: Ensuring your eggs, milk, and butter are at room temperature helps create a smoother batter, resulting in lighter and fluffier cupcakes. Don't Overmix: When combining the wet and dry ingredients, mix just until incorporated. Overmixing can lead to dense cupcakes rather than light and fluffy ones. Check for Doneness: Oven temperatures can vary, so start checking your cupcakes a couple of minutes before the recommended baking time to avoid overbaking. Cool Completely Before Frosting: Allowing your cupcakes to cool completely before frosting them helps prevent the frosting from melting and ensures a beautiful presentation. {{image_4}} Want to change up the flavor of your gingerbread cupcakes? You can easily add a twist to your recipe. - Chocolate gingerbread cupcakes: Mix in ½ cup of cocoa powder with your dry ingredients. This adds a rich chocolate taste that pairs well with the spices. You’ll enjoy a unique blend of flavors. - Adding spices for extra flavor: Experiment with spices like cardamom or allspice. Just a pinch can enhance the warmth and depth of your cupcakes. Try adding ¼ teaspoon of either spice to the dry mix for a delightful kick. Making cupcakes for special diets? You can swap ingredients to fit various needs. - Gluten-free flour options: Use a gluten-free flour blend instead of all-purpose flour. This simple switch keeps the cupcakes light and fluffy. Just ensure it has a binding agent like xanthan gum. - Vegan ingredient alternatives: Replace eggs with flax eggs. Mix 1 tablespoon of ground flaxseed with 2.5 tablespoons of water for each egg. For butter, use coconut oil or vegan butter. This keeps your cupcakes moist and delicious without dairy. These variations let you enjoy gingerbread cupcakes while catering to different tastes and dietary needs! To keep your gingerbread cupcakes fresh, store them in an airtight container. This will help them stay moist and tasty. Place them at room temperature for up to three days. If you want them to last longer, refrigerate them. Just make sure to wrap them well to avoid drying out. Adding a slice of bread to the container helps keep the cupcakes soft. You can freeze gingerbread cupcakes to enjoy later. To freeze them properly, let them cool completely. Then, wrap each cupcake with plastic wrap. Place the wrapped cupcakes in a freezer bag or container. This prevents freezer burn. They can stay frozen for up to three months. When you're ready to eat them, take the cupcakes out of the freezer. Thaw them in the fridge overnight for best results. You can also leave them at room temperature for a few hours. Once thawed, frost them as you like! Gingerbread cupcakes last about 2 to 3 days at room temperature. Keep them in a sealed container to stay fresh. If you put them in the fridge, they can last up to a week. Just remember to cover them well to prevent dryness. Yes, you can make these cupcakes in advance. Bake them a day or two before your event. After they cool, store them in a sealed container. You can also freeze them for up to 3 months. Just thaw them in the fridge before serving. Frosting is key for gingerbread cupcakes. Cream cheese frosting is a favorite. It adds a sweet and tangy taste. Vanilla frosting works well too. For a fun touch, try crushed gingerbread cookies on top. A sprinkle of cinnamon also adds a nice flair. In this blog post, we covered everything you need to bake delicious gingerbread cupcakes. You learned about the key ingredients, step-by-step instructions, and helpful tips. Variations and storage advice ensure your treats stay fresh and tasty. Baking can be fun! With practice, you can create perfect cupcakes every time. Enjoy sharing your tasty creations with friends and family. Happy baking!

Easy Gingerbread Cupcakes Delightful Holiday Treat

- 2 cups all-purpose flour - 1 teaspoon baking powder - 1/2 teaspoon baking soda - 1/2 teaspoon salt - 1 teaspoon ground cinnamon - 1/2 cup granulated sugar - 1/2 cup packed brown sugar - 1/2 cup unsalted butter, softened - 2 large eggs - 1 teaspoon vanilla extract - 1/2 cup Greek yogurt or sour cream - 2 cups fresh apples, peeled and diced - 1/4 cup chopped walnuts (optional) These ingredients make a delightful cinnamon apple bread. The all-purpose flour gives the bread its structure. Baking powder and baking soda help it rise. Salt balances the sweetness while ground cinnamon adds warmth and spice. Using both granulated and brown sugar adds layers of flavor. The brown sugar brings a touch of caramel, while granulated sugar provides a nice sweetness. Softened unsalted butter makes the bread rich and moist. The eggs help bind everything together. Vanilla extract adds a warm aroma and flavor. Greek yogurt or sour cream keeps the bread moist and adds a slight tang. Fresh apples give it a juicy texture, and if you like some crunch, you can add walnuts. Each ingredient plays a key role in making this bread incredible. {{ingredient_image_2}} 1. Preheat and prepare the loaf pan: Start by preheating your oven to 350°F (175°C). This step is key for even baking. While the oven warms up, grease and flour a 9x5 inch loaf pan. This helps the bread slide out easily once baked. 2. Mix dry ingredients together: In a medium bowl, whisk together the following dry ingredients: - 2 cups all-purpose flour - 1 teaspoon baking powder - 1/2 teaspoon baking soda - 1/2 teaspoon salt - 1 teaspoon ground cinnamon Set this dry mix aside for now. 3. Cream butter and sugars: In a large mixing bowl, use an electric mixer to cream together: - 1/2 cup unsalted butter, softened - 1/2 cup granulated sugar - 1/2 cup packed brown sugar Mix these on medium speed for about 2-3 minutes. The goal is a light and fluffy mixture. 4. Incorporate eggs and flavors: Next, add in 2 large eggs, one at a time. Make sure to mix well after each egg. Then stir in 1 teaspoon vanilla extract and 1/2 cup Greek yogurt or sour cream until it’s smooth. 5. Combine wet and dry mixtures: Gradually add the dry mixture to the wet mixture. Stir gently until just combined. Avoid overmixing, as this keeps the bread tender. 6. Fold in apples and nuts: Carefully fold in: - 2 cups apples, peeled and diced - 1/4 cup chopped walnuts (if you like) Make sure these are evenly mixed into the batter. 7. Prepare for baking and sprinkle cinnamon sugar: Pour the batter into your prepared loaf pan. Smooth out the top with a spatula. In a small bowl, mix 1 tablespoon of cinnamon sugar. Sprinkle this mixture generously over the top for a tasty crust. 8. Bake bread and check doneness: Place the loaf pan in the oven. Bake for 55-65 minutes. To check if it's done, insert a toothpick into the center. If it comes out clean, your bread is ready! 9. Cooling process: Once baked, remove the bread from the oven. Allow it to cool in the pan for about 10 minutes. After that, carefully transfer the bread to a wire rack. Let it cool completely before slicing to enjoy! - Avoiding overmixing: When you combine the wet and dry ingredients, mix gently. Overmixing can make the bread tough. Just stir until you see no dry flour. The batter should look a bit lumpy. - Ensuring proper cooling for texture: After baking, let the bread cool in the pan for 10 minutes. Then, move it to a wire rack. This way, the air can flow around it. Cooling properly helps the bread stay soft and moist. - Using different apple varieties: Using sweet apples like Honeycrisp or Granny Smith adds great flavor. You can mix different types for a nice balance of sweet and tart. Each apple brings its own taste. - Optional additions, including nuts and spices: Chopped walnuts add a nice crunch. You can also sprinkle in more cinnamon or nutmeg for extra spice. If you love a caramel twist, try adding a bit of caramel sauce on top before baking. Pro Tips Choose the Right Apples: For the best flavor and texture, use a mix of sweet and tart apples like Granny Smith and Honeycrisp. Don’t Overmix: When combining the wet and dry ingredients, mix just until combined to ensure a tender bread. Storage Tips: Store the bread in an airtight container at room temperature for up to three days or freeze for longer storage. Experiment with Spices: Add a pinch of nutmeg or allspice to enhance the warm flavors of the cinnamon apple bread. {{image_4}} You can easily adapt this recipe for different diets. Here are two great options: - Gluten-free alternatives: Use a gluten-free flour blend instead of all-purpose flour. Look for a mix that includes xanthan gum to help with texture. This keeps your bread soft and fluffy. - Vegan substitutions: Swap eggs with flax eggs. Mix 1 tablespoon of ground flaxseed with 2.5 tablespoons of water, then let it sit for 5 minutes. Use coconut oil or vegan butter in place of regular butter. You can also replace Greek yogurt with a non-dairy yogurt. Adding new flavors can make your cinnamon apple bread even better: - Adding raisins or dried fruit: Toss in 1/2 cup of raisins or dried cranberries for a chewy texture. These will add a sweet and fruity burst to each bite. - Incorporating vanilla or almond extract: Try using almond extract instead of vanilla for a nutty flavor. Just use half the amount, since almond extract is stronger. It adds a lovely depth to the bread. To keep your cinnamon apple bread fresh, store it in an airtight container. A zip-top bag works great too. Place the bread in a cool, dry spot. Do not refrigerate it, as that can make the bread dry. If you plan to eat it within a few days, this method will maintain its soft texture and flavor. - Use parchment paper to separate slices for easy grabbing. - Keep it away from direct sunlight or heat sources. If you want to save your bread for later, freezing is a smart choice. Wrap the cooled bread tightly in plastic wrap. Then, place it in a freezer bag. This helps prevent freezer burn. The bread can last up to three months in the freezer. - Thaw the bread overnight in the fridge for the best taste. - Reheat slices in the oven for a warm treat, or enjoy them cold. This way, you can savor your incredible cinnamon apple bread whenever you wish! How to ensure my bread stays moist? To keep your bread moist, use softened butter and Greek yogurt. These ingredients add rich texture. Avoid overbaking. Check for doneness with a toothpick. If it comes out clean, it’s done! Can I use a different type of flour? Yes, you can use whole wheat flour or a gluten-free blend. Just note that the texture may change slightly. Whole wheat can make the bread denser, while gluten-free flour may require extra moisture. What if I don’t have Greek yogurt? If you don’t have Greek yogurt, use sour cream or buttermilk. Both options add creaminess and moisture. You can also use plain yogurt, but it may slightly alter the flavor. How long does this bread last? This bread stays fresh for about three days at room temperature. For longer freshness, wrap it in foil or plastic wrap. You can also store it in the fridge for up to a week. Can I make this recipe in a Bundt pan? Yes, you can! Just adjust the baking time. A Bundt pan may need 10-15 extra minutes. Keep an eye on it. Use a toothpick to check for doneness in the center. How can I make this recipe in advance? You can prepare the batter a day ahead. Store it in the fridge until you’re ready to bake. This will enhance the flavors. Just let the batter sit at room temperature for about 30 minutes before baking. In this post, we covered how to make delicious apple bread. We discussed the key ingredients, step-by-step instructions, and helpful tips to avoid mistakes. I shared variations for different diets and flavors, plus storage tips to keep your bread fresh. Remember, baking is a mix of art and science. Don’t hesitate to experiment with flavors and enjoy the process. Each loaf can be a new adventure, so have fun and get baking. Your kitchen awaits!

Incredible Cinnamon Apple Bread Easy Recipe Guide

- 1 pound ground beef or turkey - 1/2 cup breadcrumbs - 1/4 cup freshly grated Parmesan cheese - 1/4 cup finely chopped green onions - 1 large egg - 2 cloves garlic, minced - 1 teaspoon salt - 1/2 teaspoon freshly ground black pepper - 1/2 teaspoon Italian seasoning - 1/2 cup honey - 1/4 cup low-sodium soy sauce - 1 tablespoon sesame oil - 1 tablespoon rice vinegar - Sesame seeds and extra chopped green onions for garnish Gathering fresh ingredients is key. You want the best taste. Use ground beef or turkey based on your preference. Breadcrumbs add texture. Parmesan cheese gives a savory kick. The egg acts as a binder. For flavor, garlic is a must. It brings a great aroma and taste. Salt and pepper help to season the meatballs. Italian seasoning adds depth to the flavor. The sauce is what makes this dish special. Honey gives sweetness. Soy sauce adds a salty kick. Sesame oil brings a nutty flavor. Rice vinegar offers a touch of acidity. Finally, garnish with sesame seeds and green onions for color and crunch. Make sure to have everything ready before you start cooking. This way, you will create a tasty dish without any hassle. {{ingredient_image_2}} - Combine 1 pound of ground beef or turkey. - Add 1/2 cup of breadcrumbs. - Include 1/4 cup of freshly grated Parmesan cheese. - Toss in 1/4 cup of finely chopped green onions. - Pour in 1 large beaten egg. - Add 2 cloves of minced garlic. - Sprinkle 1 teaspoon of salt. - Add 1/2 teaspoon of black pepper. - Mix in 1/2 teaspoon of Italian seasoning. Mix all these ingredients in a large bowl. Use your hands or a spatula. Make sure everything blends well. This step is key for tasty meatballs. - Shape the mixture into 1-inch meatballs. - Place them on a plate for easy access. - Pour 1 cup of water into the Instant Pot. - Insert a trivet above the water. - Carefully arrange the meatballs on the trivet. - Drizzle the honey garlic sauce on top. This will keep the meatballs elevated while cooking. The sauce seeps in, adding flavor. - Close the lid of the Instant Pot tightly. - Set it to cook on high pressure for 10 minutes. - Once done, let the pressure release naturally for 5 minutes. - Use the quick-release method for any leftover pressure. Carefully remove the meatballs with tongs. They will be hot, so take care to keep their shape. If you want a thicker sauce, use 'Sauté' mode to simmer the sauce for a few minutes. To make great meatballs, start with even mixing. Make sure all ingredients blend well. This helps create a uniform texture. I like using my hands for mixing. It gives me better control over the consistency. Fresh ingredients matter too. Fresh garlic and green onions add vibrant flavor. They elevate the taste of your meatballs. If you want a thicker sauce, here’s what to do. After cooking, switch the Instant Pot to 'Sauté' mode. Let the sauce simmer for about 5 to 7 minutes. Stir it occasionally until it thickens to your liking. You can also adjust the sweetness. If it’s too sweet, add a dash of soy sauce. If it’s too salty, a bit of honey can balance it out. Cooking times may vary with different meats. If you use ground turkey, keep the cooking time the same. But, if you have larger meatballs, you may need an extra minute or two. For smaller batches, you can cut the time slightly. Just make sure to check the meatballs for doneness. They should have no pink inside, and a thermometer can help ensure they are fully cooked. Pro Tips Use Fresh Ingredients: Fresh garlic and green onions enhance the flavor profile of the meatballs significantly. Whenever possible, opt for fresh instead of pre-packaged to elevate your dish. Adjust the Sweetness: Depending on your preference, you can adjust the amount of honey in the sauce. Start with the recipe's amount and add more if you like it sweeter. Experiment with Proteins: Feel free to substitute ground beef with ground turkey or chicken for a leaner option. Each protein will impart a different flavor and texture. Thicken the Sauce to Taste: If you prefer a thicker sauce, let it simmer longer in 'Sauté' mode. This will concentrate the flavors and give you a richer coating for the meatballs. {{image_4}} You can easily change these meatballs to fit your needs. If you want a gluten-free option, just swap regular breadcrumbs for gluten-free ones. This keeps the meatballs tasty without the gluten. For a lower-fat choice, use ground turkey instead of ground beef. Turkey has less fat, but it still tastes great. This simple swap makes your meal lighter while keeping it delicious. To give your meatballs a new twist, try adding spices or herbs. A pinch of cumin or a dash of smoked paprika can change the taste. Fresh herbs like parsley or cilantro also add a nice touch. You can also experiment with different sauces or marinades. Instead of honey garlic, try a spicy barbecue sauce or teriyaki. Each option gives your meatballs a new flavor profile, keeping your meals exciting. These meatballs shine when served over rice or alongside stir-fried vegetables. The warm rice soaks up the honey garlic sauce, making every bite flavorful. If you have leftovers, don’t worry! You can use them in many meals. Try them in a sandwich, on top of a salad, or mixed into pasta. The options are endless, and they make meal prep easier. To store your leftover honey garlic meatballs, let them cool first. Place them in an airtight container. This keeps them fresh and safe. They can last in the fridge for about 3 to 4 days. If the meatballs smell or look off, throw them away. Always trust your senses! You can freeze both cooked and uncooked meatballs. For cooked meatballs, let them cool completely. Then, place them in a freezer-safe bag. Squeeze out the air and seal it tight. They can stay good for up to 3 months. For uncooked meatballs, freeze them in a single layer on a tray first. Once firm, transfer them to a bag. When you want to eat them, thaw the meatballs overnight in the fridge. You can also thaw them in the microwave if you're in a hurry. To heat, cook them in the Instant Pot for about 10 minutes on high. To reheat meatballs without drying them out, use the microwave or stovetop. If using the microwave, place them in a bowl with a little water. Cover it and heat in short bursts. For the stovetop, add a splash of sauce in a pan. Heat on low, stirring gently. Serve the reheated meatballs over rice or with fresh veggies. This keeps your meal vibrant and tasty. Enjoy your delicious honey garlic meatballs any way you like! To stop meatballs from falling apart, use binding agents. I like breadcrumbs and eggs. They help hold the meat together. Mix your ground beef or turkey well with these items. Use your hands for a good blend. This keeps everything tight and together. Yes, you can make these meatballs ahead of time. Store uncooked meatballs in the fridge for up to two days. You can also freeze them for longer storage. Just place them in a freezer bag. When ready to cook, just thaw them in the fridge overnight. Reheat them in the Instant Pot or oven. These meatballs go well with many sides. Serve them over steamed rice for a hearty meal. Stir-fried vegetables also add color and flavor. You can also pair them with noodles or a fresh salad. Each adds a nice touch to your meal. These meatballs are mild and not spicy. The garlic adds flavor, not heat. If you want some spice, add red pepper flakes. You can also mix in some chopped jalapeños. This lets you tailor the heat to your taste. These honey garlic meatballs are easy to make and full of flavor. You learned about the main and flavoring ingredients, how to prepare the mixture, and cooking tips. We also discussed variations and storage methods to keep them fresh. Try adding your own twist or serve them with sides you love. Enjoy making these tasty meatballs and impress your family and friends!

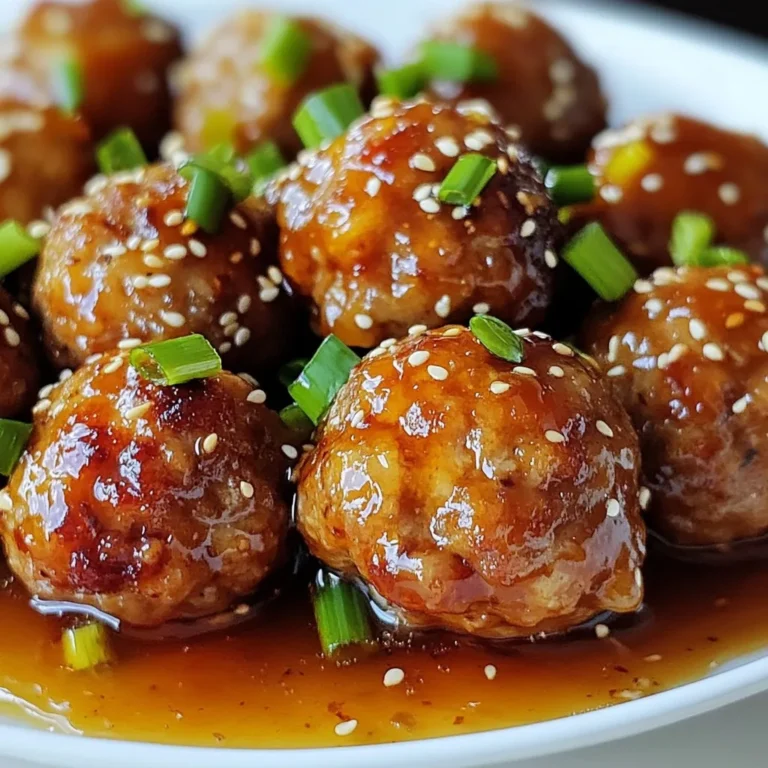
Instant Pot Honey Garlic Meatballs Tasty and Simple Recipe

This wrap is full of tasty and healthy ingredients. Here’s what you need: - Whole wheat tortilla - Cottage cheese - Ripe avocado - Fresh spinach leaves - Cucumber - Tomato - Lemon juice - Olive oil - Seasoning (salt, pepper, red chili flakes) Each ingredient plays an important role. The whole wheat tortilla adds fiber. Cottage cheese gives creaminess and protein. Ripe avocado adds healthy fats and flavor. Fresh spinach leaves give crunch and nutrients. Cucumber adds a cool, refreshing taste. Tomato brings a juicy burst. Lemon juice adds brightness. Olive oil enhances the flavor. Seasoning rounds it all off. Using fresh ingredients is key to a great wrap. I always choose ripe avocados. They should feel soft but not mushy. Fresh spinach should be vibrant and crisp. These choices make the wrap more delicious. Try to gather everything before you start. This way, you can work smoothly. Prepare the veggies by washing and slicing them. You’ll enjoy a tasty meal in no time! {{ingredient_image_2}} First, gather all your ingredients. This includes: - 1 large whole wheat tortilla - 1 cup cottage cheese - 1 ripe avocado, sliced - 1 cup fresh spinach leaves - 1 small cucumber, thinly sliced - 1 medium tomato, diced - 1 tablespoon lemon juice - Salt and pepper to taste - 1 tablespoon olive oil - Red chili flakes (optional) In a mixing bowl, combine the cottage cheese with lemon juice, salt, and pepper. Mix them well until everything is blended. This step makes the cottage cheese tasty and creamy. Next, lay the whole wheat tortilla flat on a clean surface. Use a spatula or the back of a spoon. Spread the cottage cheese mixture evenly on the tortilla. Leave about an inch of space at the edges. This helps keep the filling from spilling out. Now it’s time to add the veggies. Start with the fresh spinach leaves. Place them directly on the cottage cheese. Next, arrange the sliced avocado on top. This will add creaminess and flavor. After that, layer the thin cucumber slices and diced tomato. Make sure to spread them evenly. This ensures every bite is balanced. To wrap your tortilla, fold the sides in over the filling first. Then, roll it tightly from the bottom to the top. Make sure it is secure and all the filling is inside. This keeps everything together while you eat. Slice the wrap diagonally in half. This creates an eye-catching look that shows off the colorful filling. Serve it with fresh salsa or a handful of mixed greens. For a nice touch, add a few avocado slices or a sprinkle of sesame seeds on the plate. This makes the meal more appealing and fun to eat. Pick a ripe avocado for the best taste. When you press it gently, it should feel soft but not mushy. A good avocado will have a dark green to black skin, but not all dark avocados are ripe. If it feels hard, give it a few days to ripen. You can speed up ripening by placing it in a paper bag with a banana. You can boost the flavor of your wrap in many ways. Besides salt and pepper, try adding garlic powder or onion powder for more depth. A squeeze of lemon juice brightens the taste and helps keep the avocado fresh. If you like spice, sprinkle some red chili flakes on top. To make your wrap heartier, add protein. Grilled chicken, turkey slices, or chickpeas work well. You can also add more veggies like bell peppers or shredded carrots. This adds crunch and nutrition. If you want extra creaminess, try adding a little cream cheese or hummus. Serve your wrap with a side of fresh salsa or a handful of mixed greens. For a fun touch, make a small salad with diced tomatoes and cucumbers. You can also cut the wrap into bite-sized pieces for easy sharing. Adding a few avocado slices on the side makes for a colorful plate. Pro Tips Use Fresh Ingredients: Choose ripe avocados and fresh spinach for the best flavor and texture. Fresh produce will elevate your wrap significantly. Experiment with Spices: Don’t hesitate to customize the seasoning in your cottage cheese mixture. Try adding garlic powder, dill, or even a pinch of cumin for a unique twist. Keep It Tightly Wrapped: Ensure you roll the tortilla tightly to prevent the filling from spilling out. A snug wrap will make it easier to handle and eat. Make Ahead and Store: Prepare the cottage cheese mixture in advance and store it in the fridge. This can save time and make assembling the wrap a breeze when you’re ready to eat. {{image_4}} You can switch up the tortilla for a fun twist. Try a spinach or tomato wrap. These add color and taste. Another option is a lettuce wrap for a low-carb choice. The crisp leaves give a great crunch. Want to boost the veggies? Add roasted peppers or shredded carrots. You can also include sliced radishes for a zesty bite. If you like more greens, try arugula or kale. These options add flavor and nutrients. If you love heat, add jalapeños or sliced banana peppers. These will spice up your wrap fast. You can also mix in a dash of hot sauce with the cottage cheese. For a smoky kick, try smoked paprika. It will change the flavor profile in a yummy way. To keep your wrap fresh, store leftovers in an airtight container. This helps lock in moisture and flavor. If you have extra filling, keep it separate. This way, the tortilla won’t get soggy. When you want to eat the wrap again, reheat it in a pan. Heat it on low for about 2-3 minutes on each side. This warms it up without making it tough. You can also use a microwave, but it may lose some crunch. To maintain freshness, avoid adding tomatoes or cucumbers until ready to eat. These ingredients can make the wrap soggy. If you have leftover filling, use it within two days. Enjoy your wrap at its best! You can use Greek yogurt as a great substitute. It has a similar texture and taste. Plain cream cheese also works well if you want a richer flavor. Silken tofu is a good option for a dairy-free choice. Yes, this wrap is perfect for meal prep! You can make several wraps at once. Just store them in an airtight container in the fridge. They will stay fresh for up to three days. I do not recommend freezing these wraps. The avocado and cottage cheese can change texture when thawed. If you must freeze them, wrap tightly and consume within a month. To make this wrap vegan, swap cottage cheese for silken tofu or a vegan cream cheese. You can add fresh herbs for extra flavor. Feel free to add any veggies you like! Bell peppers, carrots, or sprouts add crunch. You can also toss in diced chicken or turkey for more protein. For a kick, try adding jalapeños or hot sauce. This blog post covered how to make a tasty cottage cheese avocado wrap. We explored the ingredients, including whole wheat tortillas, ripe avocados, and fresh veggies. You learned the steps to prepare and layer your wrap, plus tips to enhance flavor and keep it fresh. With a few simple swaps, you can customize your wrap to fit your taste. Experiment with different ingredients and make it your own. Enjoy your cooking and savor each bite!

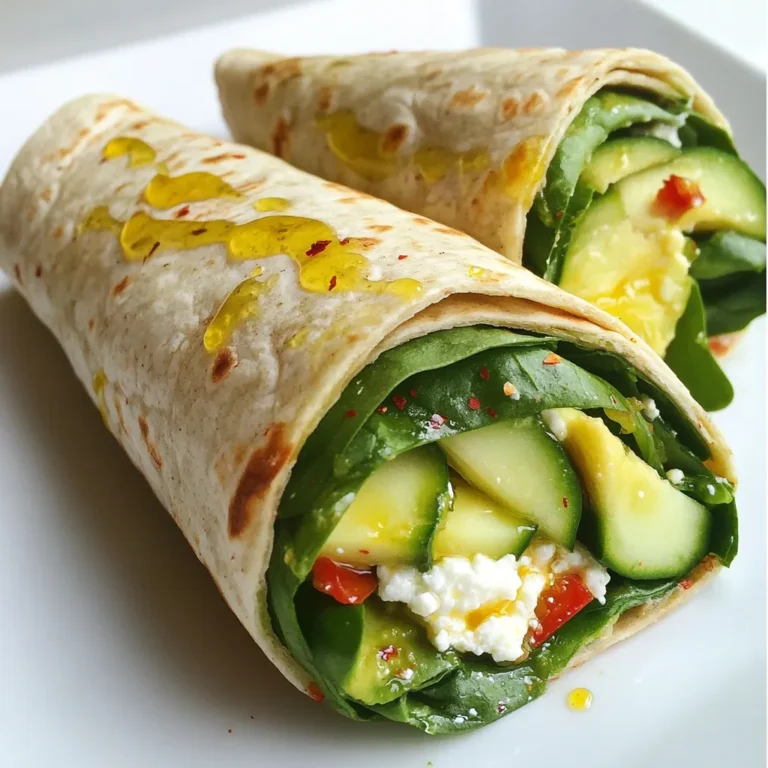
Cottage Cheese Avocado Wrap Healthy and Simple Recipe

To make spiced gingerbread blondies, you will need the following ingredients: - 1 cup unsalted butter, melted - 1 cup packed brown sugar - 1/2 cup granulated sugar - 2 large eggs, at room temperature - 1 teaspoon pure vanilla extract - 2 cups all-purpose flour - 1 teaspoon baking powder - 1/2 teaspoon baking soda - 1 teaspoon ground ginger - 1 teaspoon ground cinnamon - 1/2 teaspoon ground nutmeg - 1/4 teaspoon ground cloves - 1/2 teaspoon salt - 1/2 cup chopped walnuts (optional) - 1/2 cup dark chocolate chips (optional) Each ingredient plays a key role in creating the rich and warm flavors of these blondies. The melted butter adds moisture and richness. The brown sugar gives a deep, caramel-like flavor, while the granulated sugar adds sweetness. Eggs help bind the mixture and give it structure. The vanilla extract brings in a lovely aroma. The flour is the base, providing the right texture. Baking powder and baking soda help the blondies rise. The spices—ginger, cinnamon, nutmeg, and cloves—give them that warm, festive flavor. Salt balances the sweetness. You can add walnuts or dark chocolate chips for extra texture and flavor. They bring a delightful crunch and richness. Each bite is a cozy reminder of the holidays, making these blondies a perfect treat. {{ingredient_image_2}} 1. Preheat your oven to 350°F (175°C). Grease a 9x13 inch baking pan with non-stick spray or use parchment paper. 2. In a large bowl, mix 1 cup of melted butter, 1 cup of brown sugar, and 1/2 cup of granulated sugar. Stir until smooth and creamy. 3. Add 2 eggs, one at a time, mixing well after each. Pour in 1 teaspoon of vanilla extract and blend it all together. 4. In another bowl, whisk together 2 cups of all-purpose flour, 1 teaspoon of baking powder, 1/2 teaspoon of baking soda, 1 teaspoon of ground ginger, 1 teaspoon of ground cinnamon, 1/2 teaspoon of ground nutmeg, 1/4 teaspoon of ground cloves, and 1/2 teaspoon of salt. 5. Gradually add the dry mix to the wet mix. Stir gently using a spatula or wooden spoon until just combined. 6. If using, fold in 1/2 cup of chopped walnuts and 1/2 cup of dark chocolate chips. Make sure they are evenly mixed in the batter. 7. Pour the batter into the prepared pan. Use a spatula to smooth the top. 8. Bake for 25-30 minutes. To check if they are done, insert a toothpick in the center. It should come out clean or with a few moist crumbs. 9. Once baked, take the blondies out of the oven. Let them cool in the pan on a wire rack for at least 10 minutes before cutting them into squares. When making spiced gingerbread blondies, avoid overmixing. This helps keep them soft and chewy. Mix until you just combine the wet and dry ingredients. If you mix too much, they can become tough. To test doneness, insert a toothpick into the center. It should come out clean or with a few moist crumbs. If the toothpick has wet batter, they need more time. For a lovely finish, dust your blondies with powdered sugar. This adds a sweet touch and makes them look fancy. You can also garnish with extra chocolate chips or walnuts on top. This adds color and texture, making your treats even more appealing. You can replace walnuts with pecans or almonds if you prefer. If you want to skip chocolate chips, try adding dried fruits like cranberries or raisins. For a bolder flavor, increase the ginger or cinnamon. You can also try adding a pinch of allspice for a warm twist. Pro Tips Use Room Temperature Eggs: Ensuring your eggs are at room temperature helps them incorporate better into the batter, resulting in a smoother texture. Don’t Overmix: When combining the wet and dry ingredients, mix just until combined to avoid tough blondies. A few lumps are okay! Check for Doneness Early: Ovens vary, so start checking your blondies a few minutes before the minimum baking time to avoid overbaking. Storage Tips: Keep the blondies in an airtight container at room temperature for up to a week, or freeze for longer storage! {{image_4}} You can make these blondies even more special! Adding dried fruits or cranberries brings a sweet, tangy flavor. They also add bright color to your dish. Think about mixing in some chopped dried apricots or cherries for a unique taste. You can also experiment with different nuts. Walnuts are great, but you could try pecans or almonds too. These nuts add a nice crunch. Just chop them up and mix them in with the batter. If you need gluten-free options, use almond flour or a gluten-free blend. This swap keeps the blondies tasty and allows everyone to enjoy them. Just check that all your other ingredients are gluten-free too. For vegan adaptations, replace the eggs with flax eggs. To make a flax egg, mix one tablespoon of ground flaxseed with three tablespoons of water. Let it sit for five minutes until it thickens. Use coconut oil instead of butter for a rich flavor. Want to boost the flavor? Adding molasses or maple syrup can give your blondies a deeper taste. Just reduce some sugar in the recipe to balance the sweetness. You can also use different spices for a unique twist. Try adding cardamom or allspice to change up the flavor profile. Even a hint of black pepper can bring a fun surprise to your blondies. To keep your blondies fresh, use an airtight container. This helps them stay moist. Place a piece of parchment paper between layers if stacking. Blondies stay great for about four days at room temperature. For longer storage, keep them in the fridge. They will last up to a week when chilled. To warm your blondies, preheat your oven to 350°F (175°C). Place them on a baking sheet. Heat for about 5-10 minutes. This keeps them soft and chewy. You can also use the microwave. Heat for about 10-15 seconds. Check to make sure they do not get too hot or dry out. If you want to freeze your blondies, cut them into squares first. Wrap each piece tightly in plastic wrap. Then, place them in a freezer bag. They will stay fresh for up to three months. When you are ready to eat them, take them out. Let them thaw in the fridge overnight for the best results. Blondies and brownies both have a rich, chewy texture. The main difference is the flavor. Brownies have chocolate in them, while blondies use brown sugar and butter for a sweet, buttery flavor. Blondies often have spices or nuts, making them unique. You can think of blondies as the sweeter cousin to brownies. Yes! You can make these blondies a day or two ahead. After baking, let them cool completely. Then, store them in an airtight container at room temperature. This helps the flavors meld together. They taste even better after sitting for a while! To check if your blondies are done, insert a toothpick in the center. If it comes out clean or with a few moist crumbs, they are ready. They should look golden brown on the edges and a bit soft in the middle. Be careful not to overbake them, or they can become dry. Absolutely! You can adjust the spices to suit your taste. If you love ginger, add more ground ginger. You can also try adding cardamom or allspice for a different flavor. Just keep the total amount of spices the same to maintain the texture. Yes, there are egg substitutes! You can use unsweetened applesauce, mashed banana, or ground flaxseed mixed with water. Each substitute changes the flavor a bit, so choose one that you like. Try 1/4 cup of applesauce or 1/4 cup of mashed banana for each egg. In this blog post, we explored a delightful blondies recipe. We covered essential ingredients, step-by-step instructions, and useful tips. You learned how to store and reheat your blondies, ensuring they stay fresh. I shared fun variations to make your dessert unique and tasty. Baking is a fun way to be creative. With these tips, you can make amazing blondies every time. So grab your ingredients and get started!

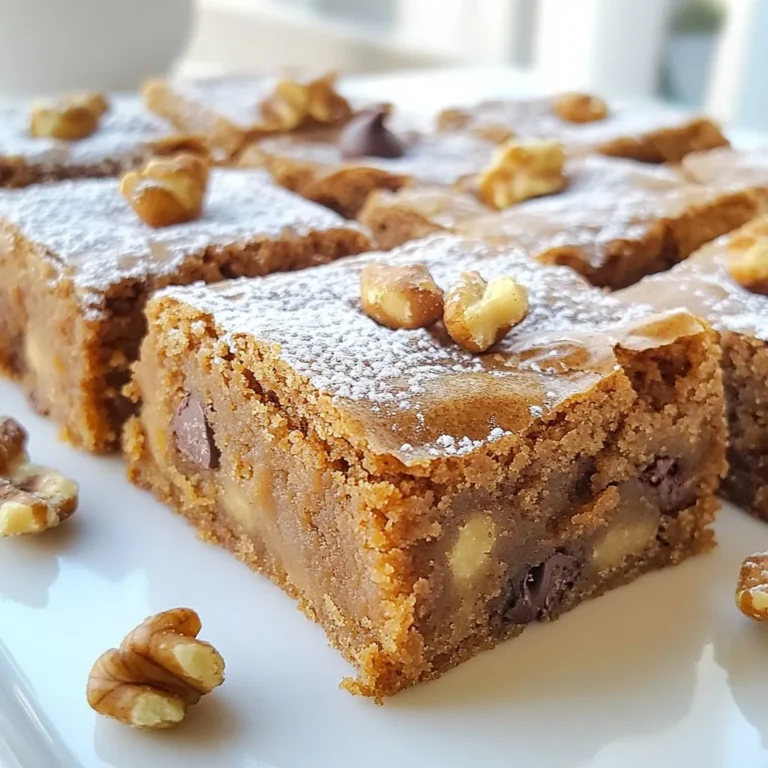
Spiced Gingerbread Blondies Flavorful Holiday Treat

To make the creamy vegan tomato white bean stew, gather these simple ingredients: - 1 tablespoon olive oil - 1 medium onion, finely chopped - 3 cloves garlic, minced - 1 medium carrot, diced - 1 celery stalk, diced - 1 teaspoon dried oregano - 1 teaspoon smoked paprika - 1 (28-ounce) can crushed tomatoes - 2 cups vegetable broth - 1 (15-ounce) can white beans, rinsed and drained - 1 cup coconut milk - 2 cups fresh spinach, roughly chopped - Salt and freshly ground black pepper to taste - Fresh basil leaves for garnish (optional) You might want to add these optional ingredients for even more flavor: - A dash of red pepper flakes for heat - A squeeze of lemon juice for brightness - Nutritional yeast for a cheesy flavor - A bay leaf while simmering for depth If you need to swap some ingredients, here are a few ideas: - Use avocado oil instead of olive oil for a different taste. - Swap white beans for chickpeas or lentils if you prefer. - Coconut milk can be replaced with almond milk for a lighter stew. - If you don’t have fresh spinach, use kale or frozen spinach instead. These substitutions can help you customize the stew to your taste or what you have on hand. Enjoy creating your own version! {{ingredient_image_2}} Start by gathering your ingredients. You need olive oil, onion, garlic, carrot, celery, oregano, and smoked paprika. 1. In a large pot, heat 1 tablespoon of olive oil over medium heat until it shimmers. 2. Add 1 medium onion, finely chopped. Sauté for about 3 to 4 minutes. The onion should become soft and fragrant. 3. Next, add 3 minced garlic cloves, 1 diced carrot, and 1 diced celery stalk. Cook these for 5 minutes until they soften. You want the garlic to smell good. Now let’s add more flavor. 1. Sprinkle in 1 teaspoon each of dried oregano and smoked paprika. Stir for about 1 minute to mix the spices well. 2. Pour in 1 (28-ounce) can of crushed tomatoes and 2 cups of vegetable broth. Bring this mixture to a gentle simmer. 3. Let it simmer for about 15 minutes. This helps the flavors blend nicely. It’s time to finish your stew. 1. Add in 1 (15-ounce) can of rinsed white beans and 1 cup of coconut milk. Stir well to mix everything together. 2. Let it simmer for another 10 minutes. This will make your stew creamy and warm. 3. Finally, fold in 2 cups of roughly chopped fresh spinach. Cook for 2 to 3 more minutes until the spinach wilts. 4. Season with salt and freshly ground black pepper to fit your taste. Now, you have a deliciously creamy vegan tomato white bean stew ready to serve! To get the best flavor, start with fresh ingredients. Use ripe tomatoes and fresh herbs. Dried oregano and smoked paprika add depth. Sauté the onion and garlic until they are fragrant. This step helps build a strong base. Let your stew simmer for a while. This allows the flavors to blend well. Taste as you go, and adjust seasoning. A pinch of salt or pepper can make a big difference. For a creamier stew, use full-fat coconut milk. This gives a rich texture that enhances the dish. You can also blend a portion of the stew. This will create a thicker base without losing the chunky goodness. If you want even more creaminess, add a splash of plant-based cream. This small step can elevate the stew to new heights. Use a large, heavy-bottomed pot for even cooking. A Dutch oven works great for this recipe. It retains heat and helps with simmering. A wooden spoon is perfect for stirring. It prevents scratching and helps mix the ingredients well. Use a sharp knife for chopping vegetables. This makes prep work quicker and safer. Lastly, a good cutting board is essential. It keeps your workspace organized and clean. Pro Tips Use Fresh Herbs: Adding fresh basil or parsley just before serving enhances the flavor and aroma of the stew. Adjust Creaminess: For a richer texture, use full-fat coconut milk, or try a blend of coconut milk and cashew cream. Vegetable Variations: Feel free to add seasonal vegetables like zucchini or bell peppers for extra nutrition and flavor. Perfect Pairing: This stew pairs beautifully with crusty bread or over a bed of cooked quinoa for a complete meal. {{image_4}} You can add many vegetables to this stew. They will boost flavor and nutrition. Try bell peppers for a sweet crunch. Zucchini adds moisture and a nice texture. Mushrooms bring an earthy taste. You can also use kale or Swiss chard instead of spinach. They will add color and vitamins. If you want more protein, swap white beans for chickpeas or lentils. Both options are hearty and filling. Chickpeas add a nutty flavor. Lentils cook quickly and soak up the stew's taste. You can also try tofu. It adds protein and takes on the stew's flavor well. Changing herbs and spices can change the stew's taste. For a fresh zing, add thyme or rosemary. If you like heat, sprinkle in some red pepper flakes. A hint of curry powder gives it a warm vibe. Try adding fresh cilantro for a bright finish. These small changes will make your stew unique every time! After you enjoy your creamy vegan tomato white bean stew, store any leftovers in the fridge. Use an airtight container to keep it fresh. It will stay good for about 3 to 5 days. Before serving, check for any off smells or changes in texture. Proper storage keeps your stew safe and tasty. If you want to save the stew for later, freezing is a great option. Let the stew cool completely before transferring it to freezer-safe containers. Make sure to leave some space at the top, as the stew will expand when frozen. You can freeze it for up to 3 months. Label your containers with the date to keep track. To reheat your stew, the stovetop is the best method. Pour the stew into a pot and warm it over low heat. Stir it often to prevent sticking. If the stew seems too thick, add a splash of vegetable broth or water. You can also microwave it in a microwave-safe bowl. Heat it in short bursts, stirring in between. Enjoy your stew warm for the best flavor! Yes, you can easily make this stew nut-free. Instead of coconut milk, use a nut-free cream or extra vegetable broth. This keeps the creamy texture without using nuts. To thicken the stew, mash some of the white beans directly in the pot. You can also add a tablespoon of cornstarch mixed with water. This will help create a heartier stew. This stew pairs well with crusty bread for dipping. You can also serve it with a fresh salad or rice for a complete meal. For an extra touch, sprinkle fresh basil on top before serving. In this blog, we explored the key ingredients for a creamy vegan tomato white bean stew. We walked through the steps needed to prepare and cook the dish, ensuring rich flavors. I shared tips for the best results, variations to try, and important storage methods. Cooking should be fun and easy. With these tricks, you’ll create a tasty meal. Enjoy experimenting and making this stew your own. The joy of cooking lies in finding flavors that you love!

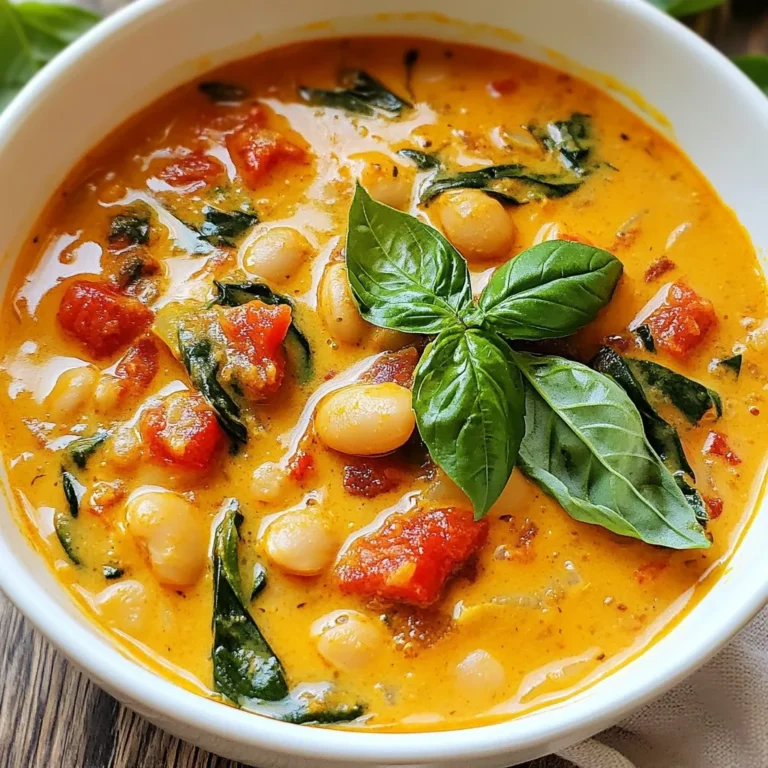
Creamy Vegan Tomato White Bean Stew Easy Recipe Guide

- 2 ripe avocados - 1 cup cherry tomatoes, halved - 1 cup fresh mozzarella balls, drained - 1/4 cup fresh basil leaves, finely chopped - 2 tablespoons balsamic glaze - 1 tablespoon extra virgin olive oil - Sea salt and black pepper to taste - Mixing bowl - Spoon or knife - Serving platter You need fresh and ripe avocados for this dish. They should be green and soft but not mushy. Cherry tomatoes add a sweet burst. Halved, they mix well with the creamy mozzarella balls. I love using fresh mozzarella because it gives a nice texture. The basil leaves add a fragrant touch that brightens the dish. Balsamic glaze adds a sweet and tangy flavor. You can find it in stores or make your own. Extra virgin olive oil adds richness and depth. You’ll also need sea salt and black pepper to enhance the taste. For tools, a mixing bowl is essential for combining ingredients. A spoon or knife helps with slicing the avocados and mixing. Finally, a serving platter makes the dish look appealing when presented. Gather these ingredients and tools, and you are ready to create a dish that is both simple and impressive! {{ingredient_image_2}} Start by slicing the ripe avocados in half lengthwise. Use a sharp knife and be careful. After slicing, gently twist the halves to separate them. Next, remove the pits carefully. You can use a spoon or knife to help pry them out. To make room for the filling, scoop out a small portion of the flesh from each half. Place this removed flesh into a mixing bowl and set it aside for later. Now, let’s make the tasty filling! In the bowl with the reserved avocado flesh, add the halved cherry tomatoes. Then, toss in the drained mozzarella balls and finely chopped basil leaves. Drizzle 1 tablespoon of extra virgin olive oil over the mixture. Season it well with sea salt and freshly ground black pepper. Gently fold the ingredients together, mixing until everything is well combined and coated. Time to fill those avocado halves! Take the Caprese mixture and carefully spoon it into each avocado half. Press down slightly to pack it full. This way, they will be bursting with flavor! To finish, drizzle balsamic glaze over the stuffed avocados. This adds a sweet and tangy touch that enhances the dish. Enjoy these fresh and colorful Caprese stuffed avocados right away for the best taste! To make your Caprese stuffed avocados look great, arrange them on a colorful platter. This adds fun and appeal to your dish. You can also use a rustic wooden board for a charming look. For extra freshness, garnish the plate with basil leaves. They add a nice green touch. A sprinkle of coarse sea salt on top gives texture and flavor. Using ripe avocados is key. They should feel soft but not mushy when you press them gently. If they are hard, let them ripen at room temperature for a few days. To enhance the flavor, use fresh mozzarella that is high quality. The balsamic glaze is great for adding sweetness and tang. Drizzle it just before serving to keep the glaze vibrant. Caprese stuffed avocados are great as a light main dish. Pair them with a fresh green salad or some crunchy breadsticks for a complete meal. For drinks, try a crisp white wine or sparkling water. Both will complement the flavors well. You can also serve them with a light lemonade for a refreshing twist. Pro Tips Choose Perfect Avocados: Look for avocados that yield slightly to gentle pressure; this indicates ripeness and creaminess ideal for stuffing. Balance Flavors: Adjust the amount of balsamic glaze to suit your taste; a little can go a long way in enhancing the dish's flavor profile. Fresh Ingredients Matter: Use the freshest mozzarella and basil for the best taste; the quality of these ingredients directly impacts the overall dish. Presentation is Key: Serve the stuffed avocados on a vibrant platter with additional basil and a drizzle of olive oil for a beautiful visual appeal. {{image_4}} If you want to change the cheese, try using burrata. It adds creaminess that pairs well with the other flavors. You can also use feta cheese for a tangy twist. Both cheeses give a different taste while keeping the dish fresh. For vinegar, balsamic glaze works great. However, you can use red wine vinegar for a sharper kick. Apple cider vinegar is another option. It brings a fruity note that adds depth to the dish. To add some crunch, include nuts or seeds. Pine nuts or sunflower seeds work best. They give a nice texture and extra flavor. Just toast them lightly for an even richer taste. Mixing in fresh herbs can also boost flavor. Try adding parsley or oregano for a new twist. You can even use a bit of mint if you want a refreshing change. For those on a low-carb or keto diet, skip the cheese or use a low-fat option. You can also add more veggies like cucumbers or bell peppers to keep it filling. These keep the carbs low while adding bulk. If you're looking for vegan options, swap the mozzarella for tofu or a vegan cheese. You can also add more veggies for a hearty filling. This way, you still enjoy the dish without animal products. To store leftover stuffed avocados, place them in an airtight container. This keeps them fresh and prevents browning. You can also squeeze a little lemon juice on the exposed avocado flesh. This helps slow down oxidation and keeps the color bright. For keeping avocados fresh, store them whole at room temperature if unripe. Once ripe, place them in the fridge. This slows the ripening process. If you have cut avocados, use plastic wrap to cover the flesh tightly. This protects them from air and keeps them from browning. Can you freeze stuffed avocados? No, freezing stuffed avocados is not ideal. The texture of the avocado changes when frozen. It becomes mushy when thawed. Best methods for freezing ingredients include separating items. Freeze the filling apart from the avocado. You can store the Caprese mixture in a freezer-safe bag. This way, you can enjoy the flavor without the texture loss. Just remember to eat it fresh for the best taste! Caprese stuffed avocados are a fresh and tasty dish. They combine ripe avocados with cherry tomatoes, mozzarella, and basil. This dish offers a tasty twist on the classic Caprese salad. You enjoy the creamy avocado with bright, juicy flavors from the other ingredients. Not only do they look great, but they also taste amazing! Stuffed avocados can last about one day in the fridge. After that, the avocados may turn brown. To keep them fresh longer, store them in an airtight container. You can also add lemon juice to slow down browning. Always check for any bad smells or changes in texture before eating. You can prepare some parts in advance. You can mix the filling of tomatoes, mozzarella, and basil ahead of time. However, fill the avocados just before serving. This helps keep them fresh and tasty. If you fill them early, they may become mushy quickly. These stuffed avocados pair well with many dishes. A light salad or grilled chicken works great. You can also serve them with crusty bread. For a fun twist, try them with a side of pesto pasta. The flavors complement each other nicely and make a lovely meal! You can create delicious Caprese stuffed avocados with simple ingredients. First, we prepared ripe avocados, cherry tomatoes, mozzarella, and fresh basil. Next, we mixed the filling and filled the avocado halves. With tips for presentation and flavor, you can impress guests or enjoy a healthy snack. Consider variations and storage options to keep your dish fresh. Try this tasty recipe, and it will quickly become a favorite!

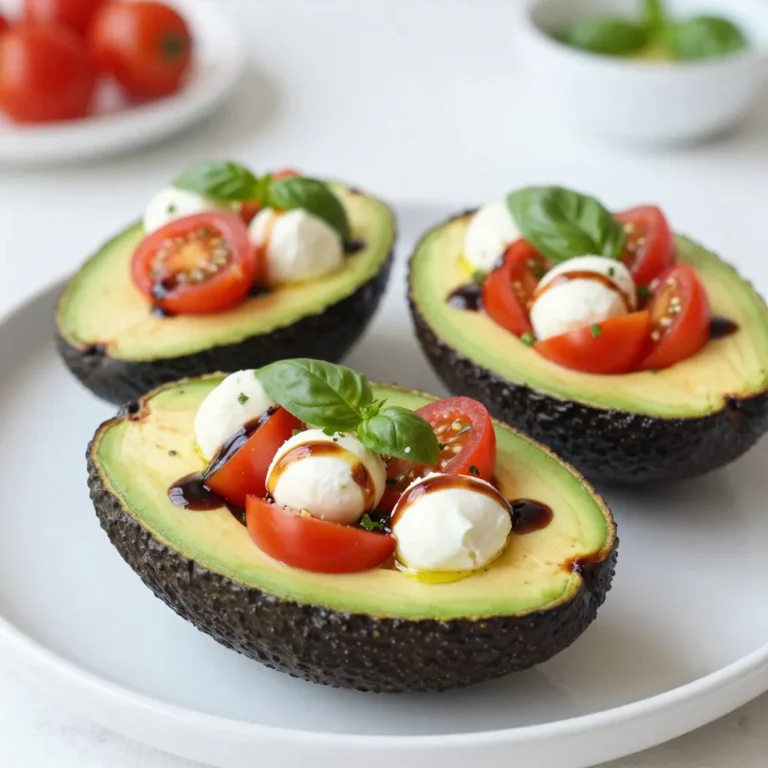
Caprese Stuffed Avocados Delicious and Simple Recipe

- 4 large onions, halved and thinly sliced - 4 tablespoons unsalted butter - 2 tablespoons olive oil - 1 teaspoon granulated sugar - 4 cups beef broth or vegetable broth - 1 teaspoon dried thyme or 1 tablespoon fresh thyme - 1 bay leaf - Salt and freshly ground black pepper - 1 baguette, sliced into 1-inch pieces - 1 ½ cups shredded Gruyère cheese - Fresh parsley, finely chopped, for garnish The key to a great French onion soup starts with the onions. Choose large, sweet onions for the best flavor. Their sweetness will shine through once they caramelize. The butter and olive oil blend gives a rich taste. Sugar helps the onions caramelize faster. You can use either beef broth or vegetable broth. Beef broth gives a deeper flavor, while vegetable broth works for a lighter taste. Thyme adds a lovely earthy note. Don't forget the bay leaf; it adds depth to the soup. For topping, a good baguette is essential. It should be crusty and chewy. Gruyère cheese melts beautifully, creating that signature cheesy layer. Fresh parsley not only adds color but also brightens the dish. Make sure you have all these ingredients ready. They come together to create a warm and comforting soup. {{ingredient_image_2}} - Melt butter and olive oil in a pot. - Add sliced onions and sprinkle with sugar. Start by heating your pot over medium heat. The butter and olive oil blend will add rich flavor to the soup. Once melted, toss in the thinly sliced onions. The sugar helps the onions become sweet and caramelized. Stir well to coat the onions evenly. - Cook onions slowly for 30-35 minutes. - Stir occasionally to avoid burning. Cook the onions slowly. This step takes about 30 to 35 minutes. Stir them often. This helps prevent burning and ensures even cooking. You want the onions to turn a deep, golden brown. Their sweet aroma will fill your kitchen. - Season onions and add broth with thyme and bay leaf. - Simmer uncovered for 20 minutes. Once caramelized, season your onions with salt and pepper. Next, add the broth along with thyme and a bay leaf. Stir the mixture to combine all the flavors. Increase the heat and let it simmer uncovered for about 20 minutes. This time allows all the flavors to meld together. - Toast baguette slices in a preheated oven. - Set aside for assembly. While your soup simmers, preheat your oven to 400°F (200°C). Arrange your baguette slices on a baking sheet. Toast them for 5 to 7 minutes. Flip them halfway through to ensure they brown evenly. Once done, set them aside for later. - Ladle soup into bowls and top with toasted baguette. - Broil with cheese until golden brown. Ladle the hot soup into oven-safe bowls. Place a toasted baguette slice on top of each bowl. Generously sprinkle shredded Gruyère cheese over the bread. Now, broil the bowls for 3 to 5 minutes. Watch closely as the cheese melts and turns golden brown. Enjoy the warm, comforting flavors of your French onion soup! - Use a mix of beef and vegetable broth. This adds depth and richness to the soup. The beef broth gives a meaty taste, while the vegetable broth adds a hint of sweetness. Mixing them creates a balanced flavor profile. - Experiment with different types of cheese. While Gruyère is classic, you can try Swiss, mozzarella, or even a sharp cheddar. Each cheese brings its own unique taste and texture to the soup. - Use a heavy-bottomed pot for even cooking. This helps distribute heat evenly, preventing hot spots that can burn the onions. A Dutch oven is a great choice for this task. - Stir regularly to achieve the desired color. Stir the onions every few minutes. This keeps them from sticking and ensures they caramelize evenly. You want a lovely golden-brown color, which takes time and patience. - Serve in individual French onion soup bowls. These bowls not only look nice but also allow for even cheese melting. They make each serving feel special and personal. - Garnish with fresh herbs for added flair. A sprinkle of chopped parsley on top adds a pop of color and a fresh taste. You can also use thyme or chives for a more herbal note. Pro Tips Caramelization is Key: Take your time with the onions. The longer they cook, the sweeter and more flavorful they become. Aim for a deep golden-brown color for the best results. Broth Choices Matter: For a richer flavor, use homemade beef broth. If you prefer a vegetarian option, opt for a high-quality vegetable broth that is well-seasoned. Cheese Variations: While Gruyère is traditional, you can experiment with other cheeses like Swiss or a sharp cheddar for a unique twist. Just make sure it melts well! Garnish for Freshness: Always finish with fresh herbs like parsley or chives. They add a vibrant touch and balance the richness of the soup. {{image_4}} You can easily make a vegetarian version of French onion soup. Simply substitute beef broth with vegetable broth. This swap keeps the flavor rich and satisfying. You can also add more vegetables for added texture. Try mushrooms or carrots to enhance the taste and nutrition. If you need a gluten-free option, use gluten-free bread for topping. This will ensure everyone can enjoy the soup. Also, make sure the broth is certified gluten-free. This small step helps avoid any gluten-related issues. Not everyone has Gruyère cheese on hand. If you don’t, try substitutes like mozzarella or Swiss cheese. These cheeses melt well and add a nice flavor. For extra depth, add a layer of parmesan on top. This will give your soup a delightful, cheesy crust. To keep your French onion soup fresh, cool it completely before storing. This step helps prevent moisture buildup. Use an airtight container to seal in flavors. Store the container in the refrigerator. This way, your soup can stay tasty for later. When you want to enjoy your soup again, you can reheat it easily. Use the stove for even heating or the microwave for quick warming. Just remember to cover the bowl while microwaving. For a tasty finish, toast fresh baguette slices before serving. This adds a nice crunch to your soup. If you want to save some soup for later, freezing is a great option. Make sure to freeze the soup without the bread and cheese. This helps keep the texture right when you thaw it. To reheat, thaw the soup in the refrigerator overnight. After that, you can warm it up on the stove or microwave. Enjoy it just like when it was fresh! Yes, it can be prepared ahead and reheated. Make the soup, then cool it. Store it in an airtight container in the fridge. When ready to eat, just heat it on the stove or in the microwave. This saves time for busy days. Gruyère is traditional, but others work well too. You can try Swiss or mozzarella for a different taste. The cheese melts beautifully and adds rich flavor. Feel free to mix cheeses for a unique twist. Use vegetable broth and skip the beef broth. This change makes the soup lighter but still tasty. You can also add more vegetables for a heartier dish. Think about mushrooms, leeks, or carrots for added depth. Stored properly, it can last 3-4 days in the fridge. Make sure to keep it in an airtight container. This way, you can enjoy it later without losing flavor. Reheat it gently to keep the taste fresh. French onion soup is a delicious classic. We covered its key ingredients, like onions, broth, and cheese. I shared step-by-step instructions to perfect this dish. You can enhance flavors with tricks like cheese swaps or using different broths. Remember, leftovers can be stored and reheated easily. This soup not only warms the belly but also allows for creativity. Enjoy making it your own, and share it with others who love good food!

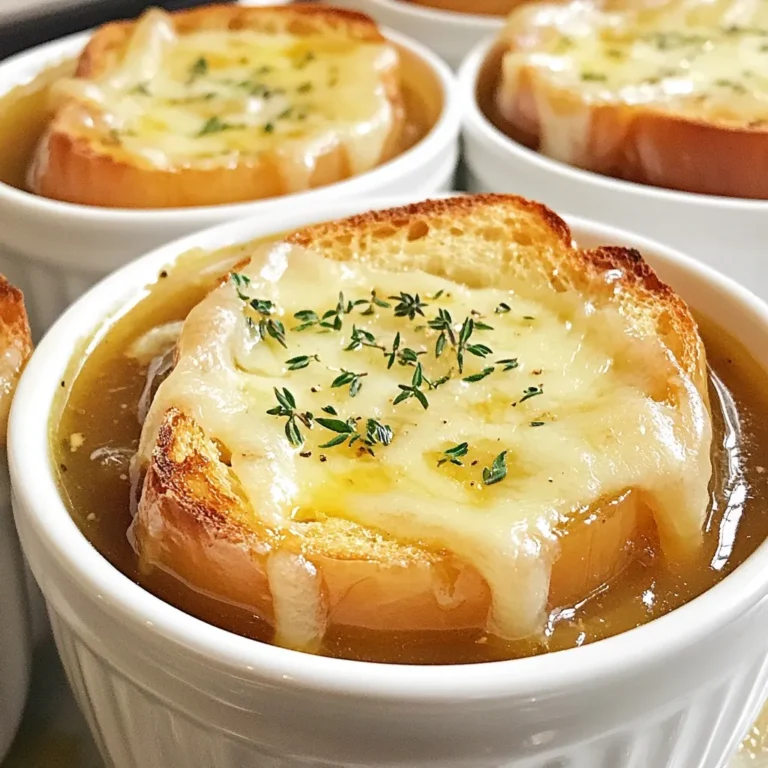
Easy French Onion Soup Simple and Delicious Recipe

- 4 cups eggnog (store-bought or homemade) - 1 cup peppermint-flavored syrup - 2 cups milk (whole or almond) - 1 teaspoon vanilla extract - 1 teaspoon peppermint extract - Crushed peppermint candies (for a festive garnish) - Whipped cream (for topping) - Fresh mint leaves (for garnish) Peppermint Eggnog Punch uses simple and festive ingredients. You can choose store-bought eggnog for convenience or make your own for a special touch. The peppermint-flavored syrup adds a sweet, minty kick that makes this drink stand out. You have options for milk, too. Whole milk gives a rich texture, while almond milk offers a lighter feel. Both work well in this recipe. The vanilla extract enhances the flavor, while the peppermint extract intensifies the minty taste. Don’t forget the garnishes! Crushed peppermint candies add a colorful, crunchy finish. Whipped cream makes the drink extra creamy and inviting. Fresh mint leaves bring a bright touch and aroma, making your punch look beautiful and festive. Gather these ingredients, and you're ready to create a holiday delight that everyone will love! {{ingredient_image_2}} Start by pouring 4 cups of eggnog into a large punch bowl. Add 1 cup of peppermint-flavored syrup and 2 cups of milk. You can use whole or almond milk based on your taste. Whisk these ingredients together gently until the mix is smooth. This base creates a creamy and sweet foundation for your punch. Next, it’s time to add some flavor. Pour in 1 teaspoon of vanilla extract and 1 teaspoon of peppermint extract. Stir the mixture slowly to blend these extracts in. Be careful not to lose the creaminess while mixing. These flavors really enhance the punch and give it a festive touch. Cover the punch bowl and place it in the refrigerator. Chill it for at least 30 minutes. This step allows all the flavors to meld together nicely. After chilling, stir the punch again to keep it frothy. Now, pour the punch into glasses or festive cups using a ladle. Top each glass with a generous amount of whipped cream. For a fun finish, sprinkle crushed peppermint candies on top and add a fresh mint leaf for extra color and aroma. Enjoy your delightful holiday treat! To make a smooth peppermint eggnog punch, start with cold ingredients. Use chilled eggnog and milk. This helps the punch blend well. Whisk the mixture gently to keep it creamy. Avoid overmixing, as it can create bubbles. A frothy punch looks nice but can be too airy. Chill the punch for at least 30 minutes. This lets the flavors blend. The longer it chills, the better it tastes. If time allows, chill it for an hour or more. This extra time makes the punch rich and flavorful. Serving the punch in a festive bowl adds to the holiday spirit. A clear glass bowl lets everyone see the beautiful layers. Place the bowl on a decorative tray for extra flair. Surround it with fresh mint leaves and crushed peppermint candies. Garnishes make the punch fun and festive. Top each glass with whipped cream for a fluffy look. Sprinkle crushed peppermint candies on top for a colorful touch. Adding a fresh mint leaf adds a pop of green. These simple touches make your punch stand out at any holiday gathering. Pro Tips Chill Your Ingredients: For the best flavor and texture, make sure all your ingredients, especially the eggnog and milk, are well-chilled before mixing. Customize the Sweetness: Feel free to adjust the amount of peppermint syrup based on your sweetness preference; start with less and add more to taste. Whipped Cream Alternative: For a healthier option, consider using a light whipped topping or coconut whipped cream as a substitute for traditional whipped cream. Make It a Cocktail: For an adult version, add a splash of rum or bourbon to each glass for a festive kick. {{image_4}} You can change the milk you use to make this punch. Almond milk gives a nutty taste. Oat milk adds creaminess without dairy. Both options are great for those who can't have regular milk. You can also choose between homemade eggnog and store-bought. Homemade eggnog tastes fresh and rich. Store-bought is quick and easy. Both work well for this recipe. To make your punch even better, try adding spices. A pinch of cinnamon or nutmeg can give it warmth. These spices add depth and flavor, making each sip more delightful. You can also explore other syrups. Try vanilla or caramel for a twist. This way, you can make the drink your own. To keep your leftover peppermint eggnog punch fresh, store it in the fridge. Use an airtight container or cover the punch bowl tightly with plastic wrap. The punch stays good for up to three days. After that, it loses its flavor and texture. You can freeze peppermint eggnog punch for long-term storage, but it may change in texture. Pour the punch into freezer-safe containers. Leave some space at the top since liquids expand when frozen. It can last for up to two months in the freezer. To use frozen punch, thaw it overnight in the fridge. Stir well before serving to mix the ingredients again. Enjoy a taste of the holidays anytime! Yes, you can easily make this punch non-alcoholic. The main ingredients are eggnog and peppermint syrup, which are already delicious. Just skip any alcohol. The punch will still taste great and be fun for all. To adjust the sweetness, you can add more or less peppermint syrup. If it’s too sweet, add a bit more milk. If you want it sweeter, just mix in a little more syrup. Taste as you go to find the right balance. If you don’t have peppermint extract, you can use mint extract. It gives a similar flavor. You can also crush fresh mint leaves and add them. This will give your punch a nice minty taste without the extract. This eggnog punch blends classic flavors with a peppermint twist. You mix eggnog, syrup, and milk for a smooth base. Adding vanilla and peppermint makes it rich and tasty. Don’t forget to chill it well before serving to boost flavor. You can customize with spices and different milk types too. For storage, keep it in the fridge for a few days or freeze it. Experiment with your recipe and enjoy this festive drink. Have fun sharing it with family and friends this season!

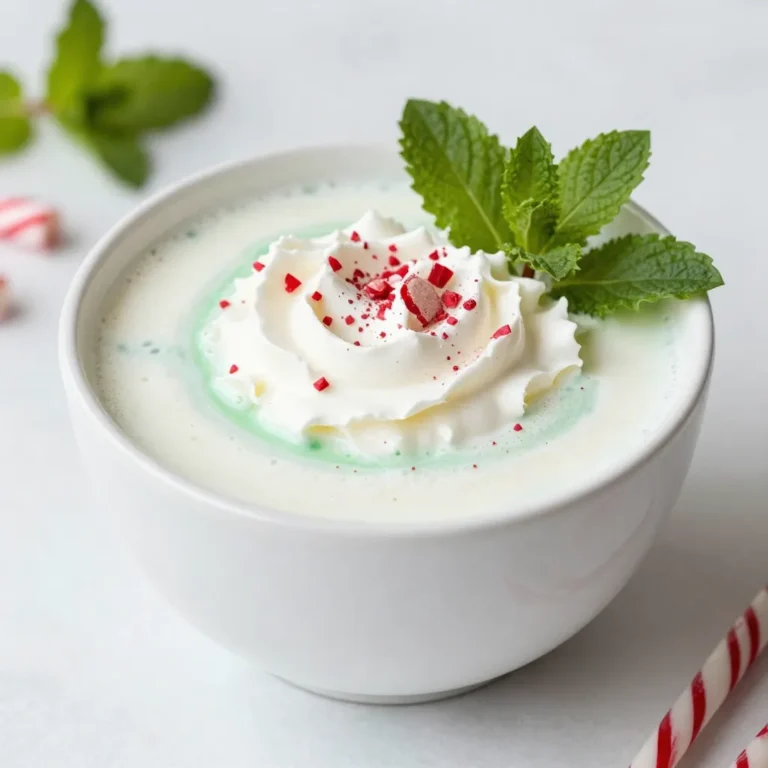
Peppermint Eggnog Punch Festive Holiday Delight

To make these veggie meatballs, you will need: - 1 cup cooked quinoa - 1 cup grated zucchini (squeeze out excess moisture) - 1 cup cooked green or brown lentils - 1/2 cup breadcrumbs (gluten-free option available) - 1/4 cup grated Parmesan cheese (or vegan alternative) - 1/2 teaspoon garlic powder - 1/2 teaspoon dried oregano - 1/2 teaspoon smoked paprika - Salt and pepper to taste - 1 large egg (or flax egg: 1 tablespoon ground flaxseed + 2.5 tablespoons water) - 2 tablespoons fresh parsley, finely chopped - Olive oil for brushing You can easily swap some ingredients based on your needs: - Use any cooked grain like rice or barley instead of quinoa. - For a nut-free option, skip the cheese or use nutritional yeast. - If you need a vegan recipe, replace the egg with a flax egg. - You can use chickpeas or black beans instead of lentils for a different flavor. - For gluten-free meatballs, choose gluten-free breadcrumbs or oat flour. These veggie meatballs are packed with nutrients: - Calories: About 180 per serving - Protein: 10 grams, thanks to quinoa and lentils - Fiber: 6 grams, which is great for digestion - Fat: 5 grams, mainly from olive oil and cheese - Vitamins: Rich in vitamins A and C from zucchini and parsley - Minerals: Good source of iron and magnesium Enjoy this healthy meal option that is both tasty and satisfying! {{ingredient_image_2}} First, preheat your oven to 400°F (200°C). This step is key for a good bake. Next, grab a baking sheet and line it with parchment paper. This will stop the meatballs from sticking. In a large bowl, combine these ingredients: - 1 cup cooked quinoa - 1 cup grated zucchini (squeeze out the water) - 1 cup cooked green or brown lentils - 1/2 cup breadcrumbs - 1/4 cup grated Parmesan cheese - 1/2 teaspoon garlic powder - 1/2 teaspoon dried oregano - 1/2 teaspoon smoked paprika - Salt and pepper to taste - 1 large egg (or flax egg) - 2 tablespoons fresh parsley, chopped Mix these well until they are fully blended. This is where the magic happens! Now, use slightly damp hands to scoop out the mixture. Form small balls, about 1 to 1.5 inches wide. Space them out on the baking sheet. To help them crisp, brush a little olive oil on top. Bake the meatballs for 25 to 30 minutes. Flip them halfway through to brown all sides. You want them golden and crispy. Enjoy them with marinara sauce or in a veggie sandwich! To make the best veggie meatballs, start with dry ingredients. Use cooked quinoa and lentils. This gives a strong base. Grate zucchini and squeeze out water. This keeps the meatballs from being soggy. Mix all ingredients well in a bowl. Make sure to combine them evenly. This helps each bite taste great. Use a light hand when forming balls. Too much pressure makes them dense. One common mistake is using too much moisture. Avoid adding extra water or liquid. This can ruin the texture. Another mistake is not seasoning enough. Always taste the mixture before baking. Adjust salt and spices to your liking. Don’t forget to flip the meatballs halfway. This ensures even cooking and browning. Lastly, not preheating the oven can lead to uneven cooking. Always set the right temperature ahead of time. For a great texture, balance is key. Use both grains and legumes. Quinoa adds fluffiness while lentils add heartiness. Breadcrumbs give structure, so don’t skip them. If you want a lighter option, use gluten-free breadcrumbs. To make them crispy, lightly brush olive oil on top. Bake until golden brown. The outside should be crisp, while the inside stays soft. Let them cool slightly before serving. This helps hold their shape. Pro Tips Moisture Management: Ensure to squeeze out excess moisture from the grated zucchini to prevent soggy meatballs. Binding Alternative: For a vegan option, use the flax egg as a binder; it works just as well as a regular egg. Even Cooking: Flip the meatballs halfway through baking to ensure they brown evenly on all sides. Flavor Boost: Experiment with different herbs and spices to customize the flavor of your veggie meatballs. {{image_4}} You can switch up the grains and legumes in veggie meatballs for fun. Try using cooked brown rice or farro instead of quinoa. Both add great texture. For legumes, black beans or chickpeas work well. They give a different flavor and are packed with protein. Mixing these options keeps your meals fresh and exciting. Boost the flavor of your veggie meatballs with simple tweaks. Add fresh herbs like basil or cilantro for a burst of taste. You can also mix in spices like cumin or chili powder for a kick. For a smoky taste, substitute regular paprika with smoked paprika, as the recipe suggests. A splash of soy sauce or Worcestershire sauce can add depth as well. Making these meatballs vegan or gluten-free is easy. To go vegan, replace the egg with a flax egg, as mentioned. You can use gluten-free breadcrumbs instead of regular ones. This allows everyone to enjoy the dish without worry. These small changes keep the meatballs tasty and healthy for all diets. Store leftover veggie meatballs in an airtight container. This keeps them fresh. Place a paper towel in the container to absorb moisture. You can keep them in the fridge for up to four days. If you want to eat them later, consider freezing them. To reheat, you can use the oven or a microwave. For the oven, preheat to 350°F (175°C). Place the meatballs on a baking sheet and heat for 10-15 minutes. This makes them crispy again. In the microwave, heat them on a plate for about 1-2 minutes. Make sure to cover them with a lid or a damp paper towel. If you want to freeze your meatballs, let them cool completely first. Then, place them in a single layer on a baking sheet. Freeze them for about an hour. Once frozen, move them to a freezer bag. Remove as much air as possible from the bag. You can store them in the freezer for up to three months. When ready to eat, thaw in the fridge overnight and reheat as mentioned. To make veggie meatballs stick, you need a binding agent. I recommend using an egg or a flax egg. The egg helps hold the mix together. If you use a flax egg, mix ground flaxseed with water. Let it sit for five minutes to thicken. This will keep your meatballs from falling apart. Yes, you can use frozen ingredients. Just make sure to thaw and drain them well. If you use frozen zucchini, squeeze out excess water. This keeps your meatballs from being too wet. Frozen lentils work well, too. Just cook them before mixing. Cooked veggie meatballs can last up to five days in the fridge. Store them in an airtight container. Make sure they cool completely before sealing. This helps keep them fresh and tasty for your next meal. In this blog post, we explored how to make delicious veggie meatballs. We covered key ingredients and their substitutes, plus nutritional info. I laid out step-by-step instructions for cooking, with tips for great texture. We talked about flavor variations and how to store leftovers. Remember, making veggie meatballs can be simple and fun. Enjoy experimenting with different flavors and ingredients to find your ideal meatball. Follow these steps, and you’ll impress your friends and family!

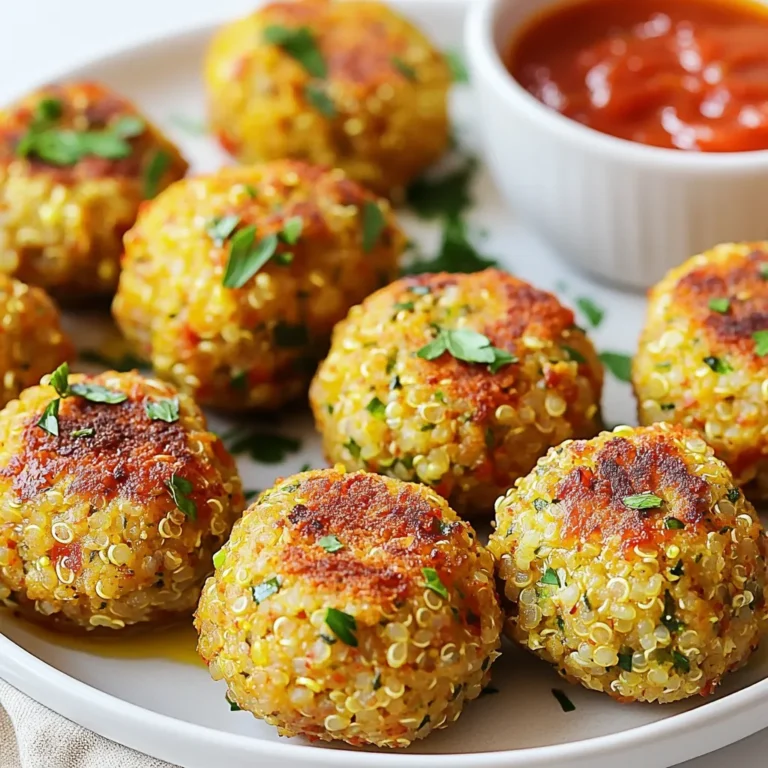
Veggie Meatballs Tasty and Healthy Dinner Option

PREV 1 … 39 40 41 … 44 NEXT
yummybiterecipes

explore

DessertsDinnerAppetizersDrinks

Our Policies

  • Cookie Policy
  • Copyright Policy
  • Disclaimer
  • GDPR Policy
  • Terms Of Use
Back to Top
  • About
  • Contact Us
  • Privacy Policy
© 2025 yummybiterecipes