FREE DINNER EBOOK! Get your copy!
  • Cookie Policy
  • GDPR Policy
  • Disclaimer
  • Terms Of Use
  • Visit my other site: Fun Cookie Recipes
yummybiterecipes
  • Home
  • Dinner
  • Desserts
  • Drinks
  • Appetizers
  • Contact
  • About
  • Privacy Policy
  • Home
  • Dinner
  • Desserts
  • Drinks
  • Appetizers
  • Contact
  • About
  • Privacy Policy
  • Cookie Policy
  • GDPR Policy
  • Disclaimer
  • Terms Of Use
Visit my other site: Fun Cookie Recipes

HOME / CATEGORIES /

Latest

- 1 box of Ritz crackers - 8 oz cream cheese, softened - 1/4 cup mayonnaise - 1 tablespoon Dijon mustard - 1 teaspoon onion powder - 1 teaspoon garlic powder - 1/2 cup finely diced celery - 1/2 cup diced cooked chicken or deli turkey - 1/4 cup fresh dill or parsley, chopped - Salt and pepper to taste - Optional: Thinly sliced cucumber or halved cherry tomatoes for garnish The Ritz crackers are the base for these sandwiches. They add a nice crunch. Cream cheese gives the filling a smooth and creamy texture. Mayonnaise adds moisture and richness. Dijon mustard brings a hint of tang. Onion and garlic powders boost the flavor. Celery adds crunch and freshness. You can use cooked chicken or deli turkey for protein. Fresh dill or parsley adds a bright taste. Salt and pepper round out the flavors. When choosing cream cheese, look for a brand that is rich and smooth. Softened cream cheese blends well with other ingredients. For mayonnaise, choose a brand with natural flavors. Fresh herbs should be vibrant and fragrant. When selecting celery, pick stalks that are crisp and green. If using chicken or turkey, make sure it’s fresh and well-cooked. For garnishes, choose cucumbers and tomatoes that are firm and ripe. Fresh ingredients will make your sandwiches taste their best! {{ingredient_image_2}} Start by gathering your ingredients. You need cream cheese, mayonnaise, Dijon mustard, onion powder, and garlic powder. Soften the cream cheese first. It should be at room temperature for easy mixing. In a medium bowl, combine the cream cheese, mayonnaise, Dijon mustard, onion powder, and garlic powder. Use a spatula or mixer to blend everything until smooth. This step is key for a creamy texture. Next, fold in the finely diced celery, diced chicken or turkey, and fresh dill or parsley. Make sure to mix well. Add salt and pepper to taste. This mixture should be flavorful and well-balanced. Now it’s time to build your sandwiches. Take a Ritz cracker and spread a generous layer of the cream cheese mixture on top. Don’t be shy with the filling! Place another Ritz cracker on top to form a sandwich. Repeat this process until you use up all the cream cheese mixture. You can create stacks of sandwiches for a fun look. For a decorative touch, top each sandwich with thin slices of cucumber or halved cherry tomatoes. This adds color and freshness to your snacks. To ensure even filling, use a small spatula. This tool helps spread the mixture smoothly. If you want a thicker filling, add more cream cheese. Just remember to keep the balance right with the other ingredients. Chilling the assembled sandwiches for about 30 minutes allows the flavors to meld together. It also helps the filling stick to the crackers. After chilling, you can cut the sandwiches in half for easy serving. Enjoy making these tasty treats! To make your Ritz Cracker Party Sandwiches pop, focus on fresh flavors. Use fresh herbs like dill or parsley for a bright taste. For a kick, add a pinch of cayenne pepper to the cream cheese mix. Adjust the Dijon mustard to your liking; more gives a tangy punch. Always taste the filling before spreading. This way, you can tweak it to suit your guests. How you present your sandwiches matters. Arrange them neatly on a large platter. Use a mix of whole and halved sandwiches for variety. For a fun touch, add garnishes like sliced cucumbers or cherry tomatoes. They not only look good but add freshness. Use colorful plates to make the food pop. Adding a small bowl of extra dip on the side can also impress your guests. These sandwiches are best served cold. Chill them for about 30 minutes before serving. This time allows flavors to meld and makes the filling firmer. If you’re in a hurry, a quick chill in the fridge works too. If serving at a party, keep them on ice to stay fresh. Eating them cold enhances the creamy texture, making every bite delightful. Pro Tips Chill for Better Flavor: Refrigerating the assembled sandwiches for about 30 minutes allows the flavors to meld together, enhancing the overall taste. Use Fresh Ingredients: Fresh dill or parsley significantly elevate the flavor of the cream cheese mixture, making the sandwiches more vibrant and delicious. Make Ahead: These sandwiches can be prepared in advance and stored in the refrigerator for a few hours or overnight, making them a convenient option for parties or gatherings. Customize Your Fillings: Feel free to get creative with the filling by adding ingredients like chopped nuts, dried cranberries, or different types of cheese for added texture and flavor. {{image_4}} You can mix up the flavors of your Ritz cracker party sandwiches. Try a spicy twist by adding a dash of hot sauce or cayenne pepper to the cream cheese mix. For an herb-infused version, add fresh basil or thyme. This gives a bright and fresh taste. You can even go sweet by mixing in a bit of honey and chopped apples. If you have guests with dietary needs, you can easily adapt the recipe. Use hummus instead of cream cheese for a vegan option. Swap out the chicken or turkey for black beans or chickpeas for a plant-based treat. You can also use gluten-free crackers for those who avoid gluten. This way, everyone can enjoy the sandwiches! Garnishing adds a fun touch to your sandwiches. Instead of cucumbers, use radish slices for a nice crunch. You can also top each sandwich with a small sprig of dill or parsley. Another idea is to use colorful toothpicks to hold the sandwiches together. This makes them look festive and adds a pop of color. After your party, you may have some Ritz Cracker sandwiches left. To keep them fresh, place them in an airtight container. Layer parchment paper between the sandwiches to prevent them from sticking together. Store the container in the fridge. This method helps keep the crackers from getting soggy. To ensure your sandwiches stay tasty, eat them within three days. The cream cheese can spoil over time. If you notice any odd smells or changes, it’s best to toss them. Keep the sandwiches covered to avoid drying out. If you plan on serving them later, avoid adding fresh veggies until just before serving. You can freeze these sandwiches for easy meals later. Assemble the sandwiches as usual. Wrap each sandwich tightly in plastic wrap. Place the wrapped sandwiches in a freezer bag. They can stay in the freezer for up to a month. When you want to eat them, thaw them in the fridge overnight. Enjoy your easy treat at any time! You can store Ritz Cracker Party Sandwiches in the fridge for up to three days. Keep them in an airtight container to ensure freshness. The crackers may become soft over time, so eat them soon for the best crunch. Yes, you can make these sandwiches a day ahead. Assemble them and chill in the fridge. This way, flavors blend well and save time on the event day. Just remember to keep them covered to stay fresh. These sandwiches pair well with a variety of sides. You can serve them with fresh veggies, chips, or a light salad. A fruit platter also adds a nice touch. For drinks, consider lemonade or iced tea to complete your spread. In this post, we explored how to make Ritz Cracker Party Sandwiches. We detailed the key ingredients and shared tips for choosing fresh items. I provided easy steps for preparing and assembling your sandwiches, along with best practices for flavor and presentation. With creative variations and storage tips, you can make these snacks your own. Enjoy making them for your next gathering! Simple, fun, and tasty, these sandwiches will surely impress your guests.

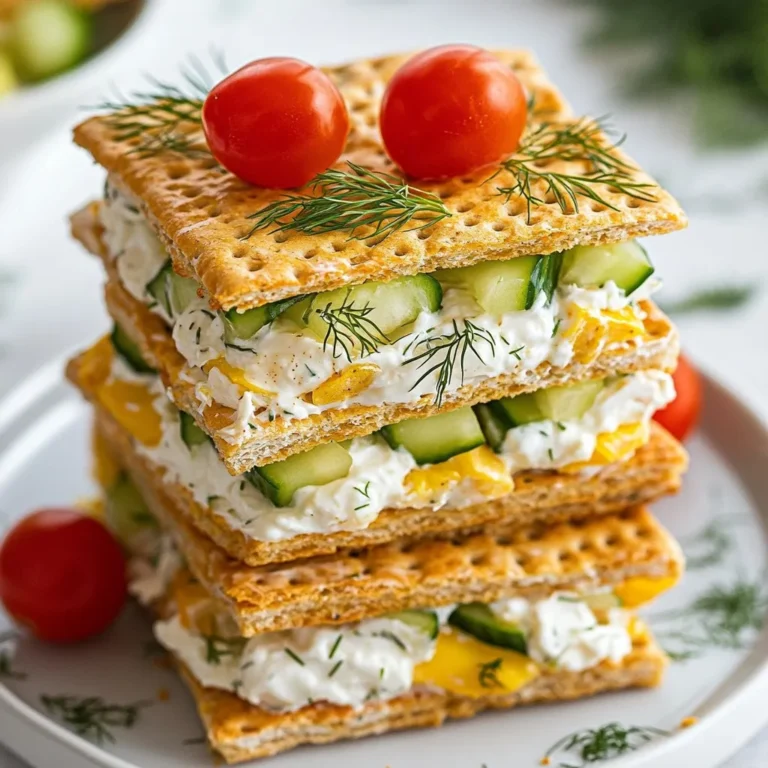
Ritz Cracker Party Sandwiches Easy and Tasty Treat

To make this dish shine, you'll need: - 300g linguine or fettuccine pasta - 500g shrimp, peeled and deveined - 1 tablespoon Cajun seasoning - 2 tablespoons olive oil - 1 medium onion, finely chopped - 2 cloves garlic, minced - 1 red bell pepper, sliced into thin strips - 1 cup heavy cream - 1 cup chicken broth - 1 cup cherry tomatoes, halved - Salt and freshly cracked black pepper to taste These ingredients create a rich, spicy flavor. The Cajun seasoning gives the shrimp a kick, while the cream makes it smooth. To make your dish look and taste even better, consider adding: - Fresh parsley, finely chopped (for garnish) - Grated Parmesan cheese (for serving) These add color and depth. The parsley brings freshness, while Parmesan adds a savory touch. You can customize this dish based on what you have. Here are some options: - For pasta, try penne or spaghetti if you prefer. - Swap heavy cream with half-and-half or coconut cream for a lighter sauce. - If you're out of shrimp, chicken or tofu work well. - Use vegetable broth instead of chicken for a vegetarian version. These swaps keep the dish tasty while catering to your needs. Feel free to experiment! {{ingredient_image_2}} Start by boiling a large pot of salted water. Add the linguine or fettuccine to the pot. Cook it according to the package instructions until it’s al dente. This usually takes about 8-10 minutes. Once done, drain the pasta. Make sure to save a small cup of that pasta water. It will help later on. Set the pasta aside while you prepare the rest. Next, grab a large mixing bowl. In this bowl, combine the peeled and deveined shrimp with one tablespoon of Cajun seasoning. Toss the shrimp well. You want them to be evenly coated in those spicy, flavorful spices. This step makes your shrimp pop with flavor! Now, take a large skillet and heat two tablespoons of olive oil over medium heat. Add the finely chopped onion first. Sauté it for about 3-4 minutes until it turns translucent and fragrant. Then, stir in two cloves of minced garlic and the sliced red bell pepper. Cook for another 2-3 minutes, stirring often. The bell pepper should soften, and the garlic will smell amazing! Move the sautéed vegetables to one side of the skillet. In the empty space, add the seasoned shrimp. Cook the shrimp for about 3-4 minutes. Turn them occasionally until they turn pink and opaque. Then, pour in one cup of chicken broth. Bring the mixture to a gentle simmer. Use a wooden spoon to scrape up any tasty bits from the bottom of the skillet. Next, reduce the heat to low. Stir in one cup of heavy cream and one cup of halved cherry tomatoes. Let the sauce simmer for about 5 minutes. Stir it occasionally until it thickens slightly. This sauce is rich and creamy, perfect for our pasta! Finally, add the cooked pasta to the skillet. Toss it well to coat every strand in that creamy Cajun sauce. If the sauce seems too thick, add a splash of the reserved pasta water. This will help loosen it up. Season with salt and freshly cracked black pepper to taste. Remove the skillet from heat. Serve the creamy pasta in bowls. Finish by garnishing with freshly chopped parsley and a sprinkle of grated Parmesan cheese on top. Enjoy your flavorful dinner delight! To cook shrimp well, start with fresh or frozen shrimp. If using frozen, thaw them first. Always peel and devein shrimp before cooking for the best flavor. When cooking, heat your pan well before adding shrimp. This helps them cook evenly and quickly. Cook shrimp for 3-4 minutes until they turn pink and opaque. Overcooking makes shrimp tough, so keep an eye on them. To make your sauce richer, use high-quality heavy cream. Adding a bit of chicken broth boosts flavor too. For a tangy twist, consider stirring in a splash of lemon juice. This brightens the dish. If you want extra spice, add more Cajun seasoning while the sauce simmers. Fresh herbs like parsley add color and freshness, making every bite bright and delicious. If you have leftovers, store them in an airtight container. This keeps the pasta fresh for up to three days. To reheat, add a splash of water or cream to keep the sauce creamy. Warm it gently on the stove or in the microwave. Avoid high heat, as this can dry out the pasta and shrimp. Enjoy your meal again without losing the flavor! Pro Tips Fresh Shrimp is Best: For the best flavor, use fresh shrimp instead of frozen. If using frozen, ensure they are thoroughly thawed and patted dry before seasoning. Customize the Spice Level: If you prefer a milder dish, reduce the amount of Cajun seasoning, or add it gradually until you reach your desired spice level. Use Starchy Pasta Water: When combining the pasta and sauce, add a splash of reserved pasta water to help the sauce adhere better and create a silkier texture. Garnish Generously: Don't skimp on the parsley and Parmesan. They not only enhance the flavor but also add a beautiful finishing touch to your dish. {{image_4}} You can make a tasty vegetarian version of this dish. Instead of shrimp, use hearty vegetables. Zucchini, mushrooms, and spinach work well. Just sauté them until tender. Use vegetable broth instead of chicken broth to keep it flavorful. The Cajun seasoning adds spice and depth. This option is just as creamy and delicious! You can switch out shrimp for various proteins. Chicken or sausage are great choices. If you choose chicken, cut it into bite-sized pieces. Cook it fully before adding the vegetables. For sausage, slice it thin and sauté it with the veggies. Each protein brings its own flavor, making the dish unique every time. Adjust the heat to fit your taste. If you like it spicy, add more Cajun seasoning. You can also add chopped jalapeños or red pepper flakes. For less heat, reduce the seasoning and skip the spicy extras. Taste as you go to find your perfect balance. This dish should feel right for you! You can store leftover creamy Cajun shrimp pasta in the fridge. Use an airtight container. Make sure it cools down before you seal it. This helps keep it fresh. It stays good for up to three days. When ready to eat, just reheat it. Freezing is a great option if you have a lot left. First, let the pasta cool completely. Then, place it in a freezer-safe container. Squeeze out any air before sealing. It can last in the freezer for up to three months. To enjoy, thaw it overnight in the fridge before reheating. To reheat, use a skillet for the best taste. Add a splash of chicken broth or cream to keep it creamy. Heat it over low to medium heat. Stir often to warm it evenly. You can also use the microwave. Just cover it with a damp paper towel to keep moisture. Heat in short bursts, stirring in between. This helps avoid dry pasta. Enjoy your tasty dish again! You can use milk and butter. Mix ¾ cup of milk with ¼ cup of melted butter. This mix gives a creamy texture without heavy cream. You can also try coconut milk for a dairy-free option. Cooked shrimp turn pink and opaque. They should curl slightly as they cook. If they look bright white or gray, they are not done. A good rule is to cook them for 3-4 minutes. Yes, you can prepare the sauce and shrimp a day early. Store them in the fridge. Cook the pasta fresh when ready to serve for the best taste. Mix everything just before eating. Serve a simple green salad or garlic bread. Roasted vegetables also work well. These sides balance the rich flavors of the pasta and keep your meal light. This blog post covers how to make creamy Cajun shrimp pasta from scratch. We talked about the main ingredients, options for garnishes, and substitutes. I shared simple steps to cook the pasta, season the shrimp, and make a smooth sauce. You also learned helpful tips for cooking shrimp and storing leftovers. Don’t forget the fun variations, like vegetarian options. With these ideas, you can enjoy this dish in many ways. Now, it's time to gather your ingredients and create your own delicious meal. Enjoy!

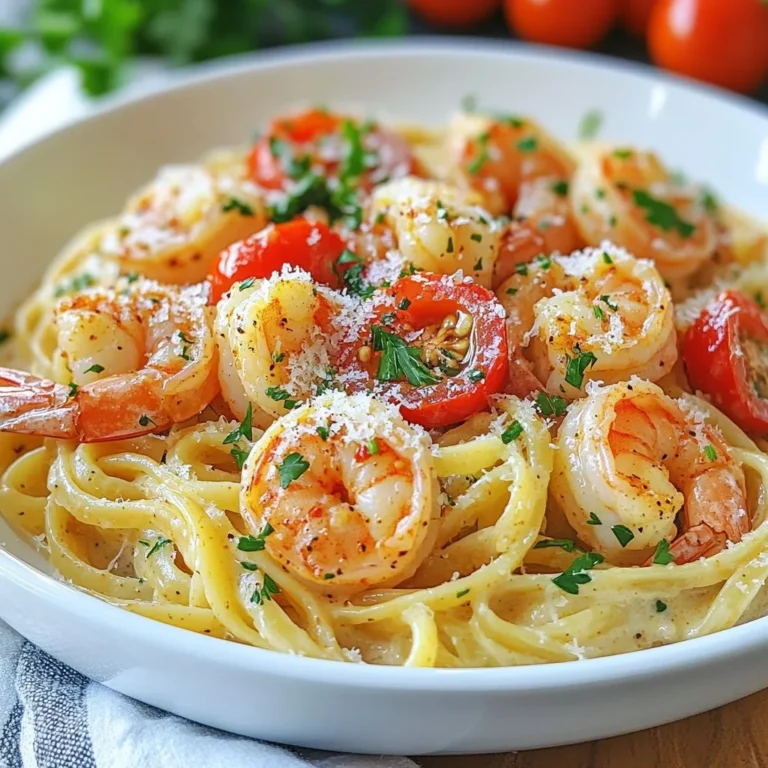
Creamy Cajun Shrimp Pasta Flavorful Dinner Delight

- 1 pound ground beef - 1/2 pound ground pork - 1/2 cup breadcrumbs - 1/4 cup grated parmesan cheese - 1/4 cup fresh parsley, finely chopped - 2 cloves garlic, minced - 1 teaspoon onion powder - Salt and pepper to taste - 1 cup beef broth - 1 cup non-alcoholic Guinness-flavored beef stock - 2 tablespoons brown sugar - 1 tablespoon Worcestershire sauce For my Guinness gravy stuffed meatballs, I use a mix of ground beef and pork. This combo gives the meatballs great flavor and texture. I add breadcrumbs to help bind the meat. It’s key for keeping them tender. Next, I enhance the taste with grated parmesan cheese, fresh parsley, minced garlic, and onion powder. These ingredients bring depth to the meatballs. Don't forget to season with salt and pepper. Taste as you go to find the right balance. For the rich gravy, I use beef broth and non-alcoholic Guinness-flavored beef stock. The Guinness adds a unique taste without the alcohol. Brown sugar and Worcestershire sauce add a touch of sweetness and umami. This gravy is what makes the dish shine. Gather these ingredients, and you'll be ready to make a comforting meal. Trust me, once you try these meatballs, you'll want to make them again and again! {{ingredient_image_2}} To start, you need to mix the meats. Combine 1 pound of ground beef and 1/2 pound of ground pork in a large bowl. This mix gives the meatballs great flavor and texture. Now, add 1/2 cup of breadcrumbs for binding. Then, include 1/4 cup of grated parmesan cheese and 1/4 cup of fresh parsley. These add taste and freshness. Next, crack in 1 large beaten egg and toss in 2 cloves of minced garlic. Don't forget 1 teaspoon of onion powder, salt, and pepper to your liking. Mix everything well with your hands until it forms a nice meatball mixture. Now comes the fun part: forming the meatballs. Take about 2 tablespoons of your meat mixture and flatten it in your palm. In the center, place a spoonful of the non-alcoholic Guinness-flavored beef stock. Carefully fold the meat around the filling. Make sure it is sealed tightly. This keeps the gravy inside while baking. Repeat this process until all the meatballs are formed. Preheat your oven to 400°F (200°C). Once it's ready, place the meatballs on a baking sheet lined with parchment paper. Bake them for 20-25 minutes. To check for doneness, look for a nice brown color. You can also use a meat thermometer. The internal temperature should reach 160°F (70°C). This ensures the meatballs are cooked through and safe to eat. To make the best meatballs, focus on the texture. You want them tender yet firm. Mixing ground beef and pork gives you a nice blend of flavors. The key is to mix well but not overwork the meat. Overmixing can make them tough. To avoid dryness, don’t skip the breadcrumbs and egg. They help keep moisture in. Adding herbs like parsley also adds moisture and flavor. Always season your mixture well with salt and pepper. A good gravy is smooth and thick. To thicken your gravy, mix cornstarch with water first. This helps avoid lumps. Stir this mixture into your simmering gravy slowly. Keep stirring for about 3 to 5 minutes until it thickens. Balancing flavors is key. The sweetness from brown sugar pairs well with the savory beef stock. Taste as you go. Adjust salt, pepper, or sweetness to make it just right. Pair your meatballs with creamy mashed potatoes or soft pasta. They soak up the gravy well, making each bite delicious. You can also serve them on a rustic wooden board for a nice touch. For presentation, garnish with fresh parsley. This adds color and freshness to the dish. A side of crusty bread is perfect for mopping up any leftover gravy. Enjoy! Pro Tips Use Fresh Ingredients: Always opt for fresh parsley and high-quality ground meats to enhance the flavor and texture of your meatballs. Customize Your Fillings: Feel free to experiment with different types of cheese or add chopped vegetables in the center of the meatballs for extra flavor and nutrition. Let Them Rest: After baking, allow the meatballs to rest for a few minutes before serving to help them retain their juices and stay tender. Thicken Your Gravy: For a richer gravy, consider adding a splash of heavy cream or a teaspoon of mustard along with the cornstarch mixture. {{image_4}} You can change the meats in this recipe for a new taste. Try ground turkey or chicken for a lighter option. Mixing different meats can give you unique flavors. If you want a vegetarian twist, use plant-based meat alternatives. For gluten-free options, use gluten-free breadcrumbs. This small change keeps the meatballs tasty and safe for gluten-sensitive folks. Check the labels on your ingredients to avoid hidden gluten. Spices and herbs can add new layers to your meatballs. Try adding dried oregano or thyme for a warm taste. A pinch of smoked paprika brings a nice kick. You can also mix in some crushed red pepper for heat. Experimenting with sauces can change your dish too. Instead of the usual gravy, try a mushroom sauce or a spicy tomato sauce. Each option gives a fresh twist to the classic meatball dish. You can make these meatballs in a slow cooker for a hands-off meal. Just place them in the cooker with the gravy, set it on low, and let it cook for 6-8 hours. This method makes the meatballs tender and flavorful. Grilling is another fun option. Shape the meatballs and place them on a hot grill. Cook until they are browned and cooked through. Grilled meatballs have a smoky flavor that pairs well with the rich gravy. To keep your cooked meatballs fresh, let them cool first. Place them on a wire rack for even cooling. Once cooled, transfer them to an airtight container. You can also use freezer bags for extra space-saving. Make sure to label your containers with the date. When you are ready to enjoy your meatballs again, choose the best reheating method. You can reheat them in the oven at 350°F (175°C) for about 15-20 minutes. This keeps them nice and warm without drying them out. Alternatively, you can use the microwave. Just cover the meatballs loosely with a damp paper towel. Heat in short bursts, checking often. Ensure the meatballs reach 165°F (74°C) for safety. If you want to store meatballs for a longer time, freezing is a great option. First, lay the meatballs on a baking sheet in a single layer. Freeze them for about 1-2 hours until they are firm. Once frozen, transfer them to a freezer bag. This helps prevent sticking. They can last up to 3 months in the freezer. When you are ready to use them, thaw overnight in the fridge. Reheat as needed for best flavor and texture. Yes, you can use regular Guinness if you prefer. The flavor will be richer. However, the non-alcoholic version keeps the dish family-friendly. The taste will remain close, but the alcohol cooks off in the regular kind. If you want to keep it light, stick with the non-alcoholic option. You can tell when the meatballs are done if they reach 160°F (70°C). A meat thermometer is best for this. The meatballs should also look nicely browned and firm to the touch. If you cut one open, it should be cooked through with no pink inside. Yes, you can make the gravy ahead of time. Just store it in an airtight container in the fridge. When you’re ready to use it, heat it on the stove. If it’s too thick, add a bit of water or broth to get the right consistency. Great sides include creamy mashed potatoes or pasta. Both soak up the gravy well. You might also serve it with crusty bread for dipping. A simple green salad adds freshness to balance the rich flavors. To serve more people, simply double the ingredients. You can mix the meat and other components in larger bowls. Just make sure to bake the meatballs in batches if your oven cannot fit them all at once. Adjust cooking time as needed, checking for doneness. In this blog post, we explored how to make delicious Guinness gravy stuffed meatballs. We covered key ingredients, from ground meats to flavor enhancers and gravy components. You learned step-by-step instructions on preparing, forming, and baking the meatballs. Tips helped perfect texture and gravy consistency. We also discussed variations and storage methods. Creating these meatballs brings a tasty twist to your dinner. Experiment with flavors and enjoy the process. Happy cooking!

Guinness Gravy Stuffed Meatballs Tasty and Savory Dish

- 12 oz linguine or fettuccine pasta - 1 lb large shrimp, peeled and deveined - 1 tablespoon Cajun seasoning - 2 tablespoons olive oil - 3 cloves garlic, minced - 1/2 cup diced bell peppers (a mix of red and green for color) - 1/2 cup diced onion - 1 cup heavy cream - 1/2 cup freshly grated Parmesan cheese - 1 tablespoon fresh lemon juice - Salt and black pepper, to taste - Fresh parsley, chopped (for garnish) For this dish, you need a mix of fresh and pantry staples. Start with the pasta. I love using linguine or fettuccine for this recipe. Both types hold the sauce well. Next, we have the shrimp. Make sure they are large, peeled, and deveined. They cook quickly and soak up all the Cajun flavors. The seasonings give this dish its kick. Cajun seasoning adds warmth, and a pinch of salt and black pepper enhances the taste. Now, let’s talk about the veggies. Garlic, bell peppers, and onions add color and texture. Use a mix of red and green bell peppers for a beautiful look. For the creamy sauce, heavy cream is key. It makes the dish rich and smooth. Add freshly grated Parmesan cheese for flavor. Don’t forget the olive oil! It helps sauté the veggies and shrimp. Finally, a splash of lemon juice brightens everything up. It balances the richness of the cream. Gather these ingredients, and you're ready to create a tasty Cajun shrimp pasta that’s perfect for any weeknight meal! {{ingredient_image_2}} To start, bring a large pot of salted water to a boil. Add 12 oz of linguine or fettuccine. Cook the pasta according to the package instructions until it's al dente, about 8-10 minutes. Once done, drain the pasta but save about 1 cup of the cooking water. This water will help with the sauce later. Next, take 1 lb of large shrimp that are peeled and deveined. In a medium bowl, add the shrimp and sprinkle 1 tablespoon of Cajun seasoning over them. Mix gently until every shrimp is coated well. This step infuses the shrimp with that bold Cajun flavor. Now, heat 2 tablespoons of olive oil in a large skillet over medium heat. When the oil shimmers, add 3 cloves of minced garlic, 1/2 cup of diced bell peppers, and 1/2 cup of diced onion. Sauté these for about 3-4 minutes. You want the vegetables to be tender and fragrant. Stir them occasionally to prevent burning. After the vegetables are ready, push them to one side of the skillet. Add the seasoned shrimp to the empty side. Cook the shrimp for about 2-3 minutes on each side. They should turn pink and opaque. Once cooked, mix the shrimp with the sautéed vegetables and remove the skillet from the heat for now. Lower the heat to low. Pour in 1 cup of heavy cream and add 1/2 cup of freshly grated Parmesan cheese. Stir the mixture continuously. The cheese will melt, and the sauce will start to thicken. Add 1 tablespoon of fresh lemon juice and season with salt and black pepper to taste. If the sauce gets too thick, gradually add some of the reserved pasta water until you get the right consistency. Now, return the skillet to medium heat. Add the drained pasta to the creamy sauce. Toss everything together until the pasta is coated evenly with the sauce. Heat through for about another minute to ensure everything is warm and blended. Finally, plate the pasta into shallow bowls. For a nice touch, sprinkle some chopped parsley on top. This adds freshness and color. You can also sprinkle more Parmesan cheese on top and add a slice of lemon on the side. Serve with crusty bread to soak up that delightful sauce! To get the right thickness for your sauce, use reserved pasta water. As you mix the heavy cream and cheese, the sauce may thicken too much. Slowly add a bit of the pasta water until the sauce is creamy but not runny. This method helps keep the sauce smooth and rich. You can boost the flavor of your Cajun shrimp pasta with a few extra spices. Consider adding a pinch of cayenne pepper for heat or smoked paprika for depth. Fresh herbs like thyme or basil can also brighten the dish. Experiment to find your perfect blend! Cooking shrimp and vegetables in separate stages is key. Start with the veggies to let them soften and release their flavors. Then, add the shrimp. This way, both elements cook perfectly. Shrimp needs less time, so this method ensures you don’t overcook it. Pro Tips Perfect Pasta: Always cook your pasta al dente to maintain its texture and prevent it from becoming mushy when mixed with the sauce. Freshness Counts: For the best flavor, use fresh shrimp instead of frozen. If frozen is all you have, ensure they are fully thawed and patted dry before cooking. Cajun Kick: Adjust the amount of Cajun seasoning to your spice tolerance. Start with less if you're unsure and add more to taste as you cook. Garnish Wisely: Fresh parsley not only adds color but also a bright flavor. Consider adding a squeeze of lemon juice just before serving for an extra zing. {{image_4}} You can swap shrimp for other proteins. Chicken works well in this dish. Just cut it into bite-sized pieces. Scallops are another great choice. They cook fast and are tasty. If you prefer a plant-based option, use tofu. Make sure to press and cube the tofu first for the best texture. If you need gluten-free options, try using gluten-free pasta. There are many brands that taste great. For those who avoid dairy, you can use almond milk or coconut cream. Nutritional yeast can replace Parmesan cheese for a cheesy flavor without dairy. Want to spice things up? Add sliced jalapeños or red pepper flakes. This will give your dish a nice kick. You can also mix in more veggies like spinach or zucchini. This adds color and nutrition. Experiment with different herbs, too, like cilantro or basil, to change the flavor profile. To store leftovers properly, first let the pasta cool down. This helps keep the texture nice. Place the pasta in an airtight container. If you can, separate the shrimp and pasta. This keeps everything fresh longer. Store the container in the fridge. It should last about three days. When you reheat, do it gently to keep the flavor. I like to use a skillet on low heat. Add a splash of water or cream to keep it moist. Stir often to warm it evenly. You can also use the microwave. Just cover it and heat in short bursts. Stir between each burst for the best results. If you want to freeze it, do so before adding the cream. Cook the pasta and shrimp, then let them cool. Place them in freezer-safe bags or containers. They can stay good for about three months. When you are ready to eat, thaw in the fridge overnight. Cook the creamy sauce fresh and mix it all just before serving. To change the spice level, use different amounts of Cajun seasoning. For a mild dish, use half a tablespoon. For medium spice, stick to one tablespoon. If you love heat, add a bit more. You can also add red pepper flakes or hot sauce to kick it up a notch. Always taste as you go. This lets you find the right heat for your taste. Yes, you can prep this dish ahead. Cook the pasta and shrimp, then cool them for later. Store them in airtight containers in the fridge. You can make the sauce too, but keep it separate. When you are ready to eat, warm the sauce and mix in the pasta and shrimp. This keeps everything fresh and tasty. For a full meal, serve with garlic bread or a fresh salad. A simple green salad with lemon vinaigrette pairs well. You might also consider roasted vegetables for extra nutrition. Another option is to serve it with crusty bread to soak up the creamy sauce. Mix and match to find what you enjoy best! Cajun Shrimp Pasta combines pasta, shrimp, and veggies for a delicious meal. We covered ingredients, step-by-step cooking, and tips for the best creamy sauce. Remember to store leftovers well and reheating them slowly keeps the flavor. You can also switch proteins or make it gluten-free. Enjoy making this dish for friends and family! It’s a simple way to impress. Now, get cooking and create your own Cajun masterpiece!

Cajun Shrimp Pasta Flavorful and Easy Weeknight Meal

- 1 cup orzo pasta - 2 tablespoons olive oil - 4 cloves garlic, minced - Zest and juice of 1 large lemon - 1 cup vegetable or chicken broth - 1/2 cup heavy cream - 1/2 cup grated Parmesan cheese - 2 fillets of salmon (about 6 oz each) - Salt and pepper to taste - Fresh parsley, chopped, for garnish - Lemon wedges, for serving - Spinach or kale for added greens - Cherry tomatoes for a sweet burst - Capers for a briny flavor - Fresh herbs like dill or basil - Baking sheet for the salmon - Large pot for boiling orzo - Large skillet for making the sauce - Measuring cups and spoons - Knife and cutting board for prep - Colander to drain orzo Start by preheating your oven to 400°F (200°C). While it heats, take your salmon fillets and season them well. Sprinkle salt and pepper on both sides. This step is key for great flavor. Place the fillets skin-side down on a baking sheet lined with parchment. Bake for 12-15 minutes. Your salmon will be done when it flakes easily with a fork. Next, grab a large pot and fill it with water. Add a pinch of salt to the water and bring it to a boil. Once boiling, add in 1 cup of orzo pasta. Cook it for about 8-10 minutes, until the orzo is al dente. Once ready, drain the orzo in a colander and set it aside. This pasta will soak up all those lovely flavors later. In a large skillet, heat 2 tablespoons of olive oil over medium heat. When the oil is hot, add 4 minced garlic cloves. Sauté the garlic for about 30 seconds. You want it fragrant, not browned. This step adds a nice garlic flavor to your sauce. Now, add in the lemon zest, juice, broth, and ½ cup of heavy cream. Stir this mixture and bring it to a gentle simmer for 3-4 minutes. Let it thicken a bit and stir occasionally. Reduce the heat to medium-low. Stir in ½ cup of grated Parmesan cheese. Mix until it melts and forms a creamy sauce. Next, fold in your cooked orzo. Make sure every piece gets coated with the sauce. Now, carefully flake the baked salmon into bite-sized pieces. Gently mix the salmon into the orzo. Taste your dish and adjust with more salt and pepper if you like. To serve, spoon the creamy lemon garlic orzo into bowls. For a burst of color, sprinkle fresh chopped parsley on top. Serve with lemon wedges on the side for extra zest. This dish looks beautiful and tastes amazing! Enjoy your meal! To make the sauce truly creamy, use fresh heavy cream. The cream adds richness and smoothness. When you add the cheese, mix it well. Stir until the cheese melts fully. This step makes the sauce thick and velvety. If you want more flavor, add extra lemon juice or zest. The brightness of lemon lifts the dish even more. After baking your salmon, let it cool for a minute. Use a fork to flake the salmon into bite-sized pieces. Be gentle to keep the fish intact. Remove any skin if you do not want it in the dish. Adding the salmon at the end keeps it moist and tender. This way, it blends perfectly with the creamy orzo. Cook the orzo pasta in boiling salted water. Follow the package instructions for timing, usually 8-10 minutes. Check the pasta a minute early. It should be firm but not hard. Al dente orzo holds its shape well and pairs nicely with the sauce. Once done, drain the pasta and do not rinse it. Rinsing can wash away the starch that helps the sauce stick. If you have leftovers, store them in an airtight container. Keep the orzo and salmon together for the best taste. It can stay in the fridge for up to 2 days. When reheating, add a splash of broth or cream. This helps restore the creaminess. Heat gently on low to avoid burning. Enjoy your meal again without losing flavor! {{image_4}} You can swap salmon for other proteins. Chicken breast works well. Simply season and bake it like the salmon. Shrimp is another great choice. Sauté shrimp in the skillet until they turn pink. Tofu is a good plant-based option. Use firm tofu, cut into cubes, and pan-fry it until golden. Adding vegetables boosts nutrition and flavor. Spinach is a great choice. Stir it into the sauce until it wilts. Broccoli florets add a nice crunch. Steam or sauté them briefly before mixing. You can also use peas for a sweet touch. Toss them in during the last few minutes of cooking for a pop of color. If you want a dairy-free dish, try coconut milk. It adds creaminess and a slight sweetness. Use the same amount as heavy cream in the recipe. Cashew cream is another option. Blend soaked cashews with water until smooth, then stir it in. This keeps your dish rich and creamy without dairy. To keep your creamy lemon garlic orzo with salmon fresh, let it cool first. Place it in an airtight container. Store it in the fridge for up to three days. Make sure to keep the salmon and orzo together to retain flavor. When you're ready to enjoy leftovers, reheating is simple. Use a skillet over medium heat. Add a splash of broth or water to prevent sticking. Stir gently until heated through. You can also use a microwave. Place the orzo in a bowl, cover it, and warm for 1-2 minutes. Stir halfway for even heating. Freezing this dish is possible, but keep in mind the texture changes. Allow it to cool completely before freezing. Use a freezer-safe container or bag. It can last up to two months in the freezer. To thaw, place it in the fridge overnight. Reheat as mentioned above after thawing. Yes, you can use other pastas. Penne, fusilli, or even spaghetti work well. Just keep an eye on the cooking time. Each type may cook differently. Ensure it becomes al dente for the best texture. Orzo's small size is great for this dish, but other shapes can add fun. If you want a lighter option, use half-and-half or milk mixed with cornstarch. Coconut milk is a tasty dairy-free choice. Cream cheese thinned with water is another option for thickness. These swaps will change the flavor slightly, but the dish will still be delicious. Cook the salmon until it flakes easily with a fork. This usually takes 12-15 minutes at 400°F. The inside should be opaque and not translucent. If you have a food thermometer, aim for 145°F for perfect doneness. Cooking times may vary with thickness, so check it closely. Yes, you can prepare parts ahead of time. Cook the orzo and sauce, then store them separately. Bake the salmon fresh for the best taste. If you mix everything, the orzo may become too soft. Store in airtight containers in the fridge for up to two days. Reheat gently to enjoy later. In this blog post, we explored ingredients for a delicious salmon dish. We covered preparation steps, cooking orzo, and making a creamy sauce. I shared tips for perfecting the sauce and flaking the salmon. We also discussed variations to enhance flavor and nutrition. Finally, I provided storage and reheating advice. Using these steps, you can create a tasty meal. Don't forget to try different proteins and veggies. Enjoy experimenting with this dish and make it your own!

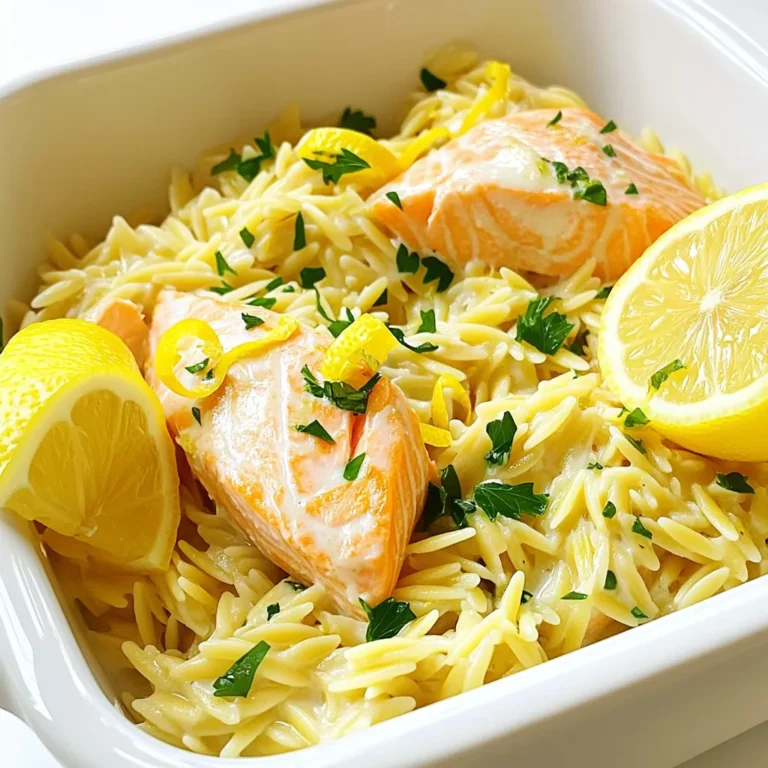
Creamy Lemon Garlic Orzo with Salmon Delightful Meal

- 1 large cucumber - 1 cup sushi rice - 1 1/4 cups water - 1 tablespoon rice vinegar - 1 tablespoon sugar - 1 teaspoon salt - 1/2 ripe avocado, sliced - 1 small carrot, cut into thin julienne strips - 1 red bell pepper, cut into thin julienne strips - Soy sauce - Wasabi - Pickled ginger Cucumber sushi rolls are fresh and fun to make. They are a great way to enjoy sushi without raw fish. You will love the crisp cucumber and creamy avocado together. First, you need a large cucumber. This will be your main wrap. It gives a unique texture and flavor. For the filling, you will use sushi rice. This rice is sticky and holds everything together. You will also need water to cook the rice properly. Next, you will season the rice to enhance its taste. Rice vinegar adds a tangy flavor. Sugar gives a hint of sweetness, while salt brings balance. Now, for the fillings, grab a ripe avocado. It adds creaminess and richness. A small carrot, cut into thin strips, adds crunch and color. Lastly, use a red bell pepper for sweetness and vibrancy. When serving your rolls, soy sauce is a must for dipping. Wasabi adds a kick, while pickled ginger cleanses your palate. These ingredients make your cucumber sushi rolls a delightful experience. - Rinsing the rice: Start by rinsing 1 cup of sushi rice under cold water. Keep rinsing until the water runs clear. This step removes extra starch and helps the rice cook better. - Cooking the rice: In a medium saucepan, add the rinsed rice and 1 1/4 cups of water. Bring this to a boil over medium heat. When it boils, lower the heat, cover the pot, and let it simmer for 20 minutes. This allows the rice to absorb all the water. After 20 minutes, take it off the heat and let it sit, covered, for 10 more minutes to steam. - Seasoning the cooked rice: In a small bowl, mix 1 tablespoon of rice vinegar, 1 tablespoon of sugar, and 1 teaspoon of salt. Stir until the sugar and salt dissolve. Once the rice is done, move it to a large bowl. Gently fold in the vinegar mixture using a spatula. Be careful not to mash the rice. Let it cool to room temperature. - Peeling the cucumber: Take 1 large cucumber and peel it with a vegetable peeler. Make long, thin strips. This helps create a nice look for the rolls. - Creating hollow casings: Cut the cucumber in half lengthwise. Use a spoon to scoop out the seeds from each half. This creates hollow casings to hold your sushi rolls. - Layering rice and fillings: Lay a sheet of nori, shiny side down, on a bamboo sushi mat. Wet your hands to prevent sticking. Spread an even layer of sushi rice on the nori, about 1/4 inch thick. Leave a 1-inch border at the top edge free of rice. In the center, place slices of avocado, julienned carrots, and julienned red bell pepper. - Rolling technique: Start rolling from the bottom edge of the mat. Gently but tightly fold the nori over the fillings. Use the mat to shape the roll into a cylinder. When you reach the top edge of the nori, dampen it with your fingers to help seal the roll. - Slicing technique: Use a sharp, wet knife to slice the sushi roll into bite-sized pieces. Make sure each piece is cut cleanly to keep the fillings intact. - Presentation tips: For an attractive display, cut the sushi rolls into smaller pieces. Arrange them neatly inside the hollow cucumber halves. This not only looks great but also makes serving easy. Place the rolls on a platter with small bowls of soy sauce, wasabi, and pickled ginger. For extra flair, sprinkle sesame seeds or chopped green onions on top. Enjoy your fresh and flavorful cucumber sushi rolls! Using a bamboo sushi mat makes rolling easy and fun. Lay a sheet of nori on the mat, shiny side down. Dampen your hands with water to avoid sticky rice. Spread sushi rice evenly on the nori, leaving a 1-inch edge at the top. Keep the rice layer about 1/4 inch thick. This helps the roll hold its shape. For tight rolls, start at the bottom. Gently lift the mat to roll the nori over the fillings. Use your fingers to tuck the filling in as you roll. When you reach the edge, wet it with a little water to seal the roll. Cooling sushi rice is key for great texture. After cooking, let the rice steam for 10 minutes. Then, transfer it to a large bowl. Gently fold in the vinegar mixture. Use a spatula for this. Avoid mashing the rice! Spread the rice out to cool off faster. Wait until it's at room temperature before using it for rolls. You can add optional ingredients for more flavor. Try adding sliced radish, cucumber strips, or even cream cheese. These ingredients give your rolls a unique twist. For dipping sauce, soy sauce is a classic choice. You can also serve wasabi and pickled ginger on the side. These pair well with cucumber sushi rolls and add an extra kick. Enjoy the fresh flavors! {{image_4}} You can swap some ingredients to make delicious vegetarian sushi rolls. Here are some ideas: - Substitutions: Use roasted bell peppers instead of fresh. Try marinated tofu for a different texture. - Flavor Combinations: Add fresh herbs like cilantro or basil for a burst of flavor. You can also include pickled vegetables for tang. Making vegan sushi rolls is easy! Focus on plant-based ingredients to keep it tasty: - Plant-based Ingredients: Use avocado, cucumber, and carrots as your main fillings. You can add hummus for creaminess. Get creative with your sushi rolls by trying new fillings: - Protein Suggestions: Add cooked shrimp or crab for a seafood twist. Grilled chicken or tofu also works well. - Other Vegetables: Try using sliced radishes or asparagus for a crunchy bite. You can even add cooked sweet potato for sweetness. To keep cucumber sushi rolls fresh, store them in the fridge. Use an airtight container to prevent drying out. If you have leftover sushi rolls, wrap each roll in plastic wrap. This helps maintain moisture and keeps them crisp. The shelf life of sushi rolls is about 24 hours in the fridge. Ingredients like cucumber and avocado can spoil quickly. So, it's best to enjoy your sushi soon after making it. If you notice any browning on the avocado, it’s time to toss that roll. Sushi rolls are best enjoyed cold. However, if you need to warm them up, use a microwave. Heat them for a few seconds. Be careful; too much heat can ruin the texture. To keep the sushi rolls tasty, avoid high heat. This helps maintain the fresh flavor and crispness. Always check for any changes in smell or texture before eating leftovers. If it doesn’t seem right, it’s safer to throw it away. You can use large cucumber slices as wraps instead of nori. First, peel the cucumber. Then, cut it into thin strips. Make sure the strips are wide enough to hold the fillings. You can also use rice paper or lettuce leaves as wraps. Both options keep the dish fresh and light. Yes, you can make cucumber sushi rolls ahead of time. Prepare the sushi rice and let it cool. Then, cut the cucumber and fill it with rice and veggies. Wrap each roll in plastic wrap to keep them fresh. Store them in the fridge until you are ready to serve. Cucumber adds crunch and hydration to sushi rolls. It is low in calories and high in water content. Cucumber also contains vitamins K and C. These vitamins support bone health and boost your immune system. Plus, cucumbers are great for digestion. You can find cucumber sushi rolls at many sushi restaurants. Look for places that offer fresh and healthy options. Some grocery stores have a sushi bar that sells ready-made rolls. Be sure to check the deli section for fresh cucumber sushi rolls. Cucumber sushi rolls are fun, fresh, and simple to make. We covered the main ingredients, like large cucumbers, sushi rice, and tasty fillings. You learned how to prepare sushi rice, assemble and cut your rolls, and store them correctly. Try different variations to suit your taste. Remember, mastering this dish means enjoying your creativity and flavors. Dive into this sushi experience and impress your friends with your skills!

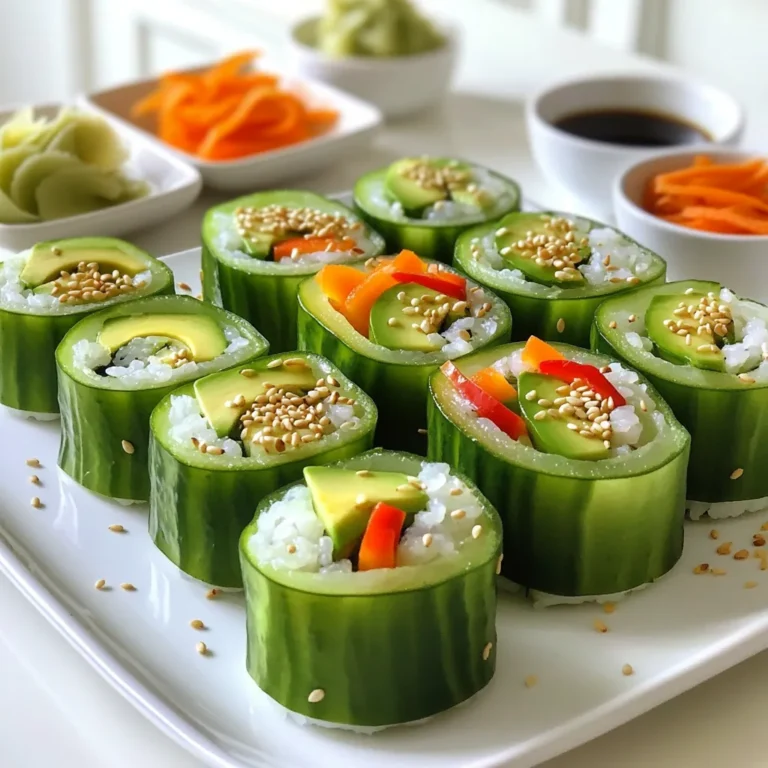
Cucumber Sushi Rolls Fresh and Flavorful Creation

- 20 Medjool dates, pitted - 5 oz goat cheese, softened to room temperature - 2 tablespoons honey (plus extra for drizzling) - 1/2 teaspoon vanilla extract - 1/4 teaspoon ground cinnamon - 1/4 teaspoon fine sea salt - 1/2 cup walnuts, finely chopped (or substitute with pecans) - Fresh rosemary or thyme leaves for garnish To get the best taste, use the right amount of each ingredient. The goat cheese needs to be soft. This helps it blend well with honey, vanilla, cinnamon, and salt. Mix these until smooth. The balance of flavors is key. I suggest using just enough honey to sweeten the cheese. Too much honey can make it overly sweet. The walnuts provide crunch. Make sure you chop them finely for even coating. Fresh herbs add a nice touch, so don’t skip them! If you can't find goat cheese, try cream cheese for a similar texture. It won’t have the same tang, but it works well. For those who prefer a nut-free option, skip the walnuts and use seeds like sunflower or pumpkin seeds. These give a different crunch. If you want to change the herbs, try mint or basil instead of rosemary or thyme. Each will give your dish a unique taste. Using maple syrup instead of honey can also add a fun twist. {{ingredient_image_2}} First, preheat your oven to 375°F (190°C). This step ensures that your dates bake evenly. Next, grab a medium bowl. Here, mix 5 ounces of softened goat cheese with 2 tablespoons of honey, 1/2 teaspoon of vanilla extract, 1/4 teaspoon of ground cinnamon, and 1/4 teaspoon of fine sea salt. Use a fork or a spatula to blend these ingredients until smooth. You want a creamy texture that’s easy to stuff into the dates. Now, take your 20 pitted Medjool dates. Use a small spoon or your fingers to fill each date with the goat cheese mixture. Make sure to fill them well but avoid letting the cheese overflow. Once all the dates are stuffed, roll each one in 1/2 cup of finely chopped walnuts. This adds not just flavor but also a nice crunch. Arrange the coated stuffed dates on a baking sheet lined with parchment paper. This prevents them from sticking, making cleanup easier. Place the baking sheet in the preheated oven. Bake for about 10 to 12 minutes. You want the walnuts to toast lightly, and the cheese should warm up without browning. After baking, remove the tray from the oven and let the dates cool for a few minutes. This cooling time helps the flavors settle. To add a special touch, drizzle a bit more honey over the warm dates. Finally, garnish with fresh rosemary or thyme leaves. This not only looks beautiful but also adds a fragrant aroma. For an elegant display, consider arranging the dates on a serving platter with sprigs of fresh herbs or next to a small bowl of honey for dipping. When making honey goat cheese stuffed dates, be cautious. Here are some common mistakes: - Using cold cheese: Cold goat cheese is hard to mix. Let it soften for a smooth blend. - Overstuffing dates: Fill each date generously, but don’t let the cheese overflow. - Skipping the toasting step: Toasting walnuts enhances their flavor. Don't skip this step. - Not preheating the oven: Always preheat your oven. This helps achieve the perfect bake. To make these dates even more delicious, try these tips: - Add herbs: Mix fresh herbs like thyme or rosemary into the cheese for extra flavor. - Use flavored honey: Infused honey, like lavender or chili, can add a unique twist. - Experiment with spices: A touch of cardamom or nutmeg can elevate the flavor. - Try different nuts: Pecans or almonds are great substitutes for walnuts. An attractive plate makes food more appealing. Here are some ideas: - Use a platter: Arrange stuffed dates on a large plate for a lovely display. - Garnish with herbs: Add fresh herbs like rosemary or thyme for color and aroma. - Drizzle honey: A light drizzle of honey on top adds shine and sweetness. - Serve with dipping options: Place a small bowl of honey next to the platter for dipping. Pro Tips Quality Cheese Matters: Use high-quality goat cheese for a creamier texture and richer flavor that pairs beautifully with the sweetness of the dates. Walnut Substitutions: If you prefer a different nut, pecans or almonds can work exceptionally well, providing their unique flavors while still complementing the dish. Herb Variations: Experiment with different herbs like mint or basil for a unique twist on the garnish, adding freshness to the sweet and savory profile. Make Ahead: Prepare the stuffed dates in advance and store them in the refrigerator. Bake them just before serving for a warm, delightful appetizer. {{image_4}} If you want to change things up, use different cheeses. Cream cheese adds a rich taste. It’s smooth and blends well with the honey. Ricotta offers a light, fluffy texture. Try feta for a salty kick. Each cheese brings its own flavor, making your stuffed dates unique. You can also add extra flavors to the cheese mix. A pinch of cayenne can add heat. Mix in herbs like thyme or rosemary for freshness. You might want to swap out the honey for maple syrup. This gives a sweet twist and pairs well with the cheese. Change your recipe with the seasons. In spring, add fresh lemon zest for brightness. Summer calls for a touch of basil to add a fresh taste. Fall is perfect for a hint of nutmeg or pumpkin spice. Winter can be brightened up with orange zest for a festive touch. Each season offers new ideas to keep your appetizer exciting! To store leftover Honey Goat Cheese Stuffed Dates, place them in an airtight container. Keep them in the fridge. They will stay fresh for up to four days. Make sure they are completely cool before sealing the container. This helps avoid moisture buildup. When you want to enjoy your stuffed dates again, preheat your oven to 350°F (175°C). Place the dates on a baking sheet. Heat them for about 5 to 10 minutes. This warms them up and keeps the cheese soft. You can also microwave them for about 15 to 20 seconds, but this may make them a bit soggy. If you want to freeze the stuffed dates, wrap each one in plastic wrap. Then, place them in a freezer-safe bag or container. They can last in the freezer for up to three months. When you are ready to eat them, thaw in the fridge overnight. Reheat as mentioned above. Enjoy the tasty flavors even after a long time! You can serve these stuffed dates with many tasty options. Try pairing them with a cheese board. Add some crackers, fresh fruit, and nuts for balance. A light salad with mixed greens works well too. You might also enjoy them with a honey drizzle or balsamic glaze. For drinks, serve with white wine or sparkling water. Yes, you can prepare these stuffed dates ahead of time. Stuff the dates and coat them with nuts. Store them in the fridge for up to a day. When you are ready, bake them just before serving. This keeps them fresh and warm. If you want, you can also drizzle honey right before serving for extra sweetness. Stuffed dates can be a healthy snack. Dates provide fiber and natural sugars for energy. Goat cheese adds protein and calcium. Walnuts or pecans give you healthy fats. Just watch how many you eat, as they can be high in calories. Enjoy them as part of a balanced diet for the best results. This article covers all you need to know about making Honey Goat Cheese Stuffed Dates. We discussed the best ingredients and how to choose the right flavors. You learned step-by-step instructions for preparation, baking, and presentation. I shared tips to avoid common mistakes and enhance each bite. You also saw variations to keep it fresh and exciting. Finally, we looked at storage and reheating for future enjoyment. Enjoy creating these tasty bites; they will impress your family and friends. Happy cooking!

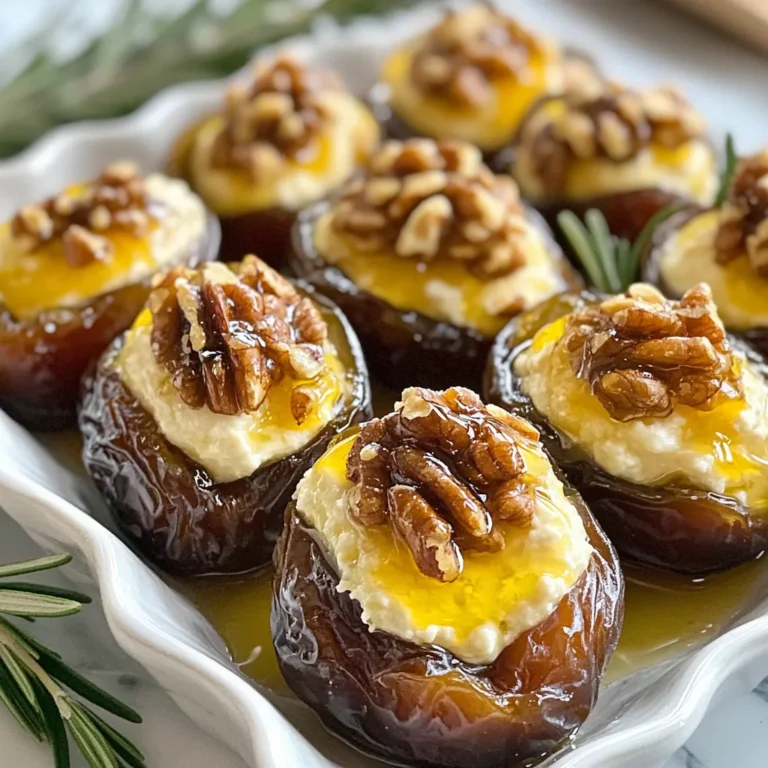
Honey Goat Cheese Stuffed Dates Irresistible Appetizer

- 1 pound ground beef (or a mixture of ground beef and turkey for a lighter option) - 1/2 cup breadcrumbs - 1/4 cup grated Parmesan cheese - 1/4 cup milk (whole or low-fat) - 1 large egg - 2 cloves garlic, minced - 1 small onion, finely chopped - 1 teaspoon Worcestershire sauce - 1 teaspoon dried thyme - 1 teaspoon dried oregano - Salt and freshly cracked black pepper to taste For the mini meatloaf, I start with ground beef. You can swap in turkey for a healthier dish. I add breadcrumbs and Parmesan cheese to give it a nice texture. Milk and a large egg bind everything together. Garlic and onion add flavor, while Worcestershire sauce gives it depth. Fresh herbs like thyme and oregano bring brightness, and a pinch of salt and pepper rounds it out. - 1 pound baby potatoes, halved - 2 tablespoons olive oil - Salt and pepper to taste - Additional herbs if desired For the potatoes, I use baby potatoes. They cook fast and get crispy. Tossing them in olive oil ensures they roast nicely. I sprinkle salt and pepper for flavor. You can also add herbs for an extra kick if you like. - Fresh parsley, chopped (for garnish) - Additional seasoning options To finish, I like to garnish with fresh parsley. It adds a pop of color and freshness. You can also try other seasonings to suit your taste. Simple touches make a big difference. {{ingredient_image_2}} First, preheat your oven to 400°F (200°C). This step helps cook the food evenly. Next, grab a large mixing bowl. In it, combine the ground beef, breadcrumbs, and grated Parmesan cheese. Add the milk, egg, minced garlic, and finely chopped onion. Then, pour in the Worcestershire sauce and sprinkle in the dried thyme and oregano. Don’t forget to add salt and freshly cracked black pepper. Mix gently until everything is just combined. Be careful not to overmix; this keeps the meatloaf tender. Now it’s time to shape the meat mixture. Form mini loaves, about 2 to 3 inches long. Make sure they are uniform for even cooking. Place them on a large, rimmed sheet pan. Leave some space between each loaf so the heat can circulate well. In a separate bowl, grab your baby potatoes. Halve them and add them to the bowl. Pour in the olive oil, then sprinkle with salt and freshly cracked black pepper. Add a dash of oregano for extra flavor. Toss the potatoes until they are well-coated. Now, arrange the potatoes around the mini meatloaves on the sheet pan. This will help them cook together and soak up the meatloaf's flavor. Put the sheet pan in the preheated oven. Bake for about 20 to 25 minutes. Check the meatloaves to make sure they reach an internal temperature of 160°F (70°C). The potatoes should be golden and tender. Halfway through baking, stir the potatoes gently. This helps them roast evenly and prevents burning. - Overmixing the meatloaf mixture: Mixing too much makes the meatloaf tough. Stir gently until the ingredients blend. This keeps it soft and yummy. - Undercooking the potatoes: Potatoes need to be fork-tender. Check them halfway through cooking. If they are still hard, give them more time in the oven. - Cooking temperature and duration: Bake at 400°F (200°C). Check after 20 minutes. The meatloaf should reach 160°F (70°C) for safety and taste. - Resting after baking: Let the meatloaf rest for a few minutes after baking. This allows juices to settle for extra flavor. - Rustic serving suggestions: Serve directly from the sheet pan. This gives a cozy, homey feel to your meal. - Plating options for individual servings: Plate the mini meatloaves with potatoes on each plate. Drizzle with olive oil and add parsley. This adds color and makes it look fancy. Pro Tips Use Lean Meat: For a healthier option, consider using ground turkey or a mix of ground turkey and beef. This will reduce the fat content while still providing great flavor. Don’t Overmix: When combining the meatloaf ingredients, mix gently to keep the texture tender. Overmixing can lead to a dense meatloaf. Add Veggies: For extra nutrition, consider adding finely chopped carrots or bell peppers into the meat mixture. They will add moisture and flavor. Rest Before Serving: Allow the meatloaf to rest for a few minutes after baking. This helps the juices redistribute, making each bite more flavorful and moist. {{image_4}} You can switch up the meat in your mini meatloaf. Ground turkey or chicken works great. They add a lighter taste and still pack flavor. Just replace the beef with the same amount of turkey or chicken. For a vegetarian option, use lentils or black beans. Mash them and mix with the same breadcrumbs and seasonings. You can add more veggies to boost nutrition. Try carrots, bell peppers, or spinach. Get creative with flavors in your meatloaf. Add chopped veggies like bell peppers or carrots to the mix. They add crunch and color. Spices can also change the game. Try smoked paprika for a smoky kick or chili powder for heat. For glazes, mix ketchup with brown sugar for sweetness. Or use barbecue sauce for tangy goodness. Potatoes are versatile. You can use red, yellow, or purple potatoes. Each type adds a unique taste and color to your dish. For a twist, add other root veggies like carrots or parsnips. Chop them into similar sizes as the potatoes. Toss them together with olive oil and seasonings for a colorful mix. To keep your sheet pan mini meatloaf and potatoes fresh, store leftovers in the fridge. Place them in an airtight container. This method helps keep moisture in and prevents odors from mixing. If you want to store them for longer, freeze the mini meatloaves and potatoes. Wrap each meatloaf in plastic wrap, then place them in a freezer-safe bag. Label the bag with the date for easy tracking. When it's time to enjoy your leftovers, the best way to reheat them is in the oven. Preheat to 350°F (175°C). Place the mini meatloaf and potatoes on a baking sheet. Cover with foil to keep them moist. Heat for about 15-20 minutes or until warmed through. You can also use a microwave, but the oven keeps the texture and flavor better. Microwave for about 1-2 minutes on high, checking for warmth. In the refrigerator, your mini meatloaf and potatoes last about 3-4 days. Always check for signs of spoilage. If you see any mold, or if the dish smells off, it’s best to discard it. When frozen, they can last up to 3 months. Just remember to thaw them in the fridge before reheating for the best results. Yes, you can make mini meatloaf ahead of time. This saves you time on busy nights. To do this, follow these steps: - Prepare the meat mixture as described in the recipe. - Shape the mini meatloaves and place them on the sheet pan. - Cover the pan with plastic wrap and store it in the fridge. You can also freeze them for later use. Just thaw them in the fridge overnight before baking. When you are ready to cook, bake them straight from the fridge or frozen, adding a few extra minutes to the cooking time. To check if your mini meatloaf is cooked, use a meat thermometer. Insert it into the center of a meatloaf. The internal temperature should reach 160°F (70°C). Here are other signs of doneness: - The meatloaf should feel firm but not hard. - The juices should run clear and not pink. - The edges will brown slightly. Let the meatloaf rest for a few minutes after baking. This allows the juices to settle. You can serve many tasty sides with mini meatloaf. Here are some suggestions: - Steamed broccoli or green beans add color and nutrients. - A fresh garden salad provides a nice crunch. - Creamy mashed potatoes or a simple baked potato for a classic touch. For a balanced meal, pair your mini meatloaf with these sides. This makes your dinner both satisfying and healthy. In this blog post, we explored how to make delicious sheet pan mini meatloaf with herb-roasted potatoes. You learned about the key ingredients and how to prepare both dishes step-by-step. We also shared tips to avoid common mistakes and ways to present your meal. Variations let you customize the flavors and ingredients to suit your taste. Proper storage and reheating tips ensure your leftovers stay fresh. Enjoy this easy recipe for a tasty family meal that is both fun and satisfying. Happy cooking!

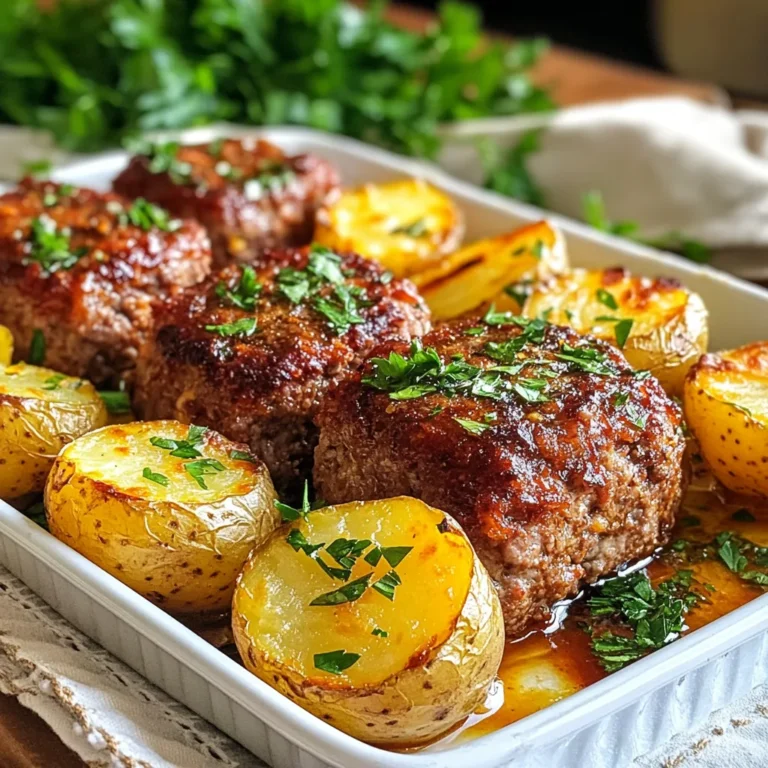
Sheet Pan Mini Meatloaf & Potatoes Easy Dinner Fix

- 12 lasagna noodles - 1 pound ground beef - 1 pound Italian sausage - 1 medium onion, finely chopped - 3 cloves garlic, minced - 2 cans crushed tomatoes - 2 tablespoons tomato paste - Herbs and spices: 1 teaspoon dried oregano, 1 teaspoon dried basil, salt, and pepper - 2 cups ricotta cheese - 1 large egg - 3 cups shredded mozzarella cheese - 1 cup grated Parmesan cheese - Fresh basil leaves for garnish When making classic lasagna, gather all the ingredients first. This helps you stay organized. You need both meat and veggie flavors. The ground beef and Italian sausage give a rich taste. The onion and garlic add sweetness and depth. For the sauce, crushed tomatoes and tomato paste create a thick base. Adding herbs like oregano and basil brings warmth. Don’t forget to season with salt and pepper; they enhance every bite. The cheese mixture is just as important. Ricotta cheese mixed with an egg makes it creamy. This mix gives a smooth texture between the layers. Lastly, mozzarella and Parmesan cheese top off the lasagna. They create a bubbly golden crust. Fresh basil leaves add a bright finish. Each ingredient plays a role in building flavor. Use fresh ingredients for the best taste. This classic dish is all about layering and balance. Enjoy the process, and remember, cooking is all about having fun! {{ingredient_image_2}} To begin, boil salted water in a large pot. Once it’s boiling, add the lasagna noodles. Cook them until they are al dente, as per the package instructions. This usually takes around 8-10 minutes. After cooking, drain the noodles and lay them flat on a clean kitchen towel. This helps prevent them from sticking together. In a large skillet, place one pound of ground beef and one pound of Italian sausage. Set the heat to medium. Cook the meat until it is well browned. Stir often and break any large chunks with a spoon. Once the meat is browned, drain any excess fat. Next, add one finely chopped onion and three minced garlic cloves. Sauté these for about 3-5 minutes until the onion is clear and smells good. Then, stir in two cans of crushed tomatoes and two tablespoons of tomato paste. Add one teaspoon of dried oregano, one teaspoon of dried basil, salt, and pepper to taste. Let this sauce simmer uncovered for about 20 minutes. Stir occasionally to mix the flavors. In a mixing bowl, combine two cups of ricotta cheese with one large egg. Add a pinch of salt and a dash of pepper. Mix this well until it’s smooth and creamy. This cheese mixture adds richness to the lasagna. Grab a 9x13 inch baking dish. Start by spreading a thin layer of the meat sauce on the bottom. Place four lasagna noodles on top of the sauce. Next, add half of the ricotta mixture and one-third of the meat sauce. Sprinkle some shredded mozzarella cheese on top. Repeat this layer one more time. Finish with another layer of noodles, the remaining meat sauce, and the rest of the mozzarella cheese. Top it off with a generous sprinkle of grated Parmesan cheese. Preheat your oven to 375°F (190°C). Cover the baking dish with aluminum foil. Make sure the foil does not touch the cheese to avoid sticking. You can spray the underside of the foil lightly with cooking spray. Bake the lasagna for 25 minutes covered. After that, remove the foil and bake for another 25 minutes. You want the cheese to be melted, bubbly, and golden on top. Once you've baked the lasagna, let it cool for about 10-15 minutes. This cooling time will help the layers stay together when you slice it. Just before serving, garnish with fresh basil leaves for a lovely touch. To make your meat sauce truly shine, start with fresh herbs. Fresh oregano and basil add a bright note. You can also mix in a splash of red wine to deepen the flavor. Let the sauce simmer longer for richer taste. Stir it often to prevent sticking. For perfect layers, use a spatula to spread sauce evenly. Place noodles flat to avoid gaps. Alternate between cheese and meat to balance flavors. Press down gently as you layer to create stability. This makes cutting and serving easier. If you want a twist, try different cheeses. Goat cheese gives a tangy flavor. Cream cheese adds creaminess. You can mix in some ricotta with spinach for extra nutrients. Just ensure your cheese melts well for that gooey texture we love. Pro Tips Tip Title: Use No-Boil Noodles: For an even quicker preparation, consider using no-boil lasagna noodles. They absorb moisture during baking and save you the hassle of pre-cooking. Tip Title: Layering Technique: Ensure that you spread the sauces evenly between the layers. This helps in achieving a well-balanced flavor in every bite. Tip Title: Let It Rest: Allow the lasagna to cool for 10-15 minutes after baking. This resting period helps the layers set, making it easier to slice and serve. Tip Title: Add Veggies: For a healthier twist, consider adding layers of sautéed vegetables like spinach, zucchini, or bell peppers between the noodles. {{image_4}} You can make a tasty vegetarian lasagna by swapping out the meat. Try using: - 1 pound of mushrooms, finely chopped - 1 pound of spinach, fresh or frozen - 1 zucchini, sliced thin - 1 bell pepper, chopped These veggies add flavor and texture. You can sauté them with the onions and garlic for extra taste. The crushed tomatoes will still be the base of your sauce, keeping it rich and hearty. Feel free to get creative with add-ins. Here are some great options: - 1 cup of diced eggplant - 1 cup of roasted red peppers - 1 cup of artichoke hearts, drained - 1 cup of cooked lentils for extra protein These ingredients boost flavor and nutrition. Mix and match to fit your tastes. Just make sure any add-ins are cooked and ready to layer! You can switch up the cheese for new flavors. Some tasty options include: - Goat cheese for a tangy twist - Fontina cheese for creaminess - Gruyère cheese for a nutty flavor Combining different cheeses can make your lasagna unique. Just keep the same amount of cheese to maintain the creamy texture. Enjoy experimenting with these options! After enjoying your classic lasagna, let it cool down. Once cool, cover it tightly with plastic wrap or foil. Store it in the fridge. It will stay fresh for 3 to 5 days. To keep the taste and texture, avoid leaving it out at room temperature for too long. If you want to save some for later, freezing is a great option. First, let the lasagna cool completely. Then, cut it into portions for easy meals. Wrap each piece tightly with plastic wrap. Place the wrapped pieces in a freezer-safe bag. This way, it can last for up to 3 months. Remember to label the bag with the date. To enjoy your lasagna again, preheat your oven to 350°F (175°C). Place the lasagna in an oven-safe dish. Cover it with foil to keep it moist. Heat for about 25 minutes or until hot. If you want a crispy top, remove the foil for the last 5 minutes. You can also use a microwave for quick warming. Just heat a single portion for 2 to 3 minutes. Enjoy your tasty meal! Yes, you can make classic lasagna ahead of time. You can prepare it a day in advance. Assemble the layers and cover the dish. Store it in the fridge. When you're ready to cook, just bake it. You may need to add a few extra minutes to the baking time. You can store cooked lasagna in the fridge for about 3 to 5 days. Make sure to cover it well. Use plastic wrap or aluminum foil to keep it fresh. If you want to enjoy it later, consider freezing it. Lasagna pairs well with many side dishes. Here are some tasty options: - Garlic bread - A simple green salad - Roasted vegetables - Steamed broccoli These dishes add flavor and balance to your meal. You can tell if your lasagna is done by looking for a few signs. The cheese should be melted and golden. The edges may bubble slightly. You can also check the center. Insert a knife; it should come out hot. Let it cool a bit before slicing. This helps the layers stay together. You’ve learned the key ingredients and steps to make delicious lasagna. From cooking the noodles to layering the rich flavors, each part matters for a tasty dish. You can even customize it to fit your taste with variations or cheese alternatives. Remember, cooling it properly enhances the flavor. With these tips, you can serve lasagna like a chef and impress your friends and family. Enjoy every bite of your homemade creation!

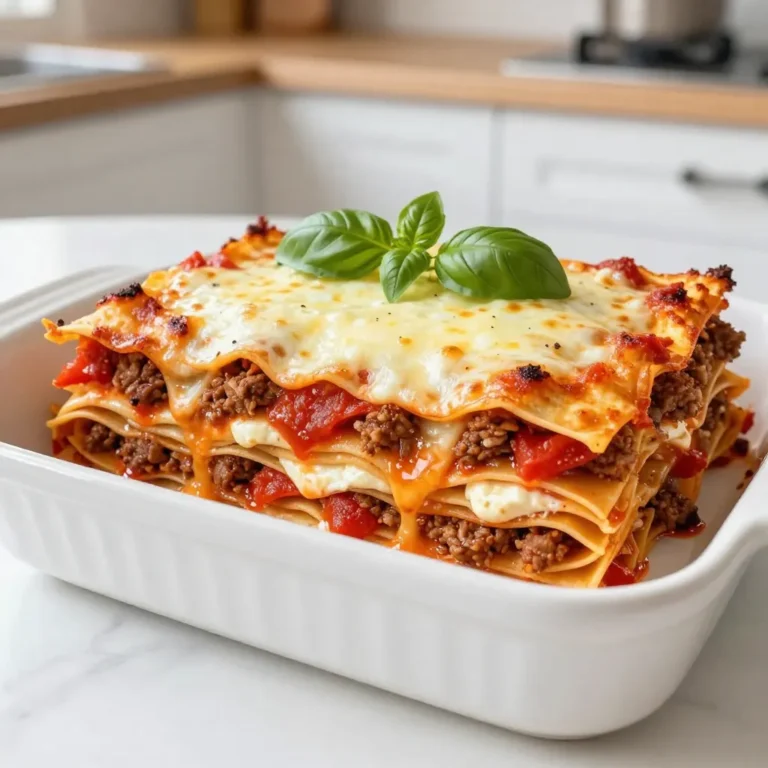
Classic Lasagna with Meat Sauce Flavorful Comfort Food

To make caramel apple hand pies, you will need: - 2 cups all-purpose flour - 1/2 teaspoon salt - 1 tablespoon sugar - 1/2 cup unsalted butter, cold and cubed - 5-6 tablespoons ice water - 3 medium apples (preferably Granny Smith or Honeycrisp), peeled, cored, and diced - 1/4 cup brown sugar - 1 teaspoon ground cinnamon - 1 tablespoon fresh lemon juice - 1/4 cup caramel sauce (plus extra for drizzling) - 1 egg (for egg wash) - Granulated sugar for sprinkling For the best results, I recommend using Granny Smith or Honeycrisp apples. They give a nice balance of sweet and tart flavors. You can also mix in some sweeter apples like Fuji for extra flavor. You can customize your hand pies with: - Chopped nuts like walnuts or pecans for crunch - A pinch of nutmeg for extra spice - Different fruit fillings such as pears or berries if you want to mix it up These optional ingredients can add a fun twist to your hand pies. 1. In a large bowl, mix together the flour, salt, and sugar. 2. Add the cold, cubed butter. Use a pastry cutter or your fingers to blend until you see crumbs. 3. Gradually add ice water, one tablespoon at a time. Stir until the dough forms a ball. 4. Shape the dough into a flat disk, wrap it in plastic, and chill for at least 30 minutes. 1. In a medium bowl, combine the diced apples, brown sugar, cinnamon, and lemon juice. 2. Stir until the apples are coated evenly with the sugar and spices. 3. Drizzle the caramel sauce over the apple mixture and gently mix to combine. 1. Preheat your oven to 400°F (200°C). 2. On a floured surface, roll out the chilled dough to about 1/8 inch thick. 3. Use a round cutter or glass to cut out circles, around 4-5 inches in diameter. 4. Place a tablespoon of the apple filling on one half of each dough circle. 5. Fold the dough over to form a half-moon shape. Press the edges with a fork to seal. 6. Cut small slits on top of each pie to let steam escape. 1. Place the hand pies on a parchment-lined baking sheet. 2. In a small bowl, beat the egg and brush it over the tops of the pies. 3. Sprinkle some granulated sugar on top for added sweetness. 4. Bake for 20-25 minutes, or until the tops turn a lovely golden brown. 5. Let them cool slightly before serving. Drizzle with extra caramel sauce if you like. To make your crust flaky, keep your butter cold. Cut it into small cubes. When mixing, use your fingers or a pastry cutter to break it into the flour. Aim for pea-sized bits. This helps create layers. Chill your dough. After mixing, wrap it in plastic. Put it in the fridge for at least 30 minutes. This cools the dough and makes it easier to roll. Resting time is key. Letting the dough sit after chilling allows the gluten to relax. This helps in rolling out the dough without tearing. Add spices for a flavor boost. Consider nutmeg or allspice. A hint of ginger can also work wonders. Mix these spices with the apples for a warm taste. Choose your caramel sauce wisely. A thick, rich sauce works best. It adds sweetness and a nice texture to the filling. Adjust sweetness based on your apples. Granny Smith apples are tart. If you use them, you may want more sugar. For sweeter apples like Honeycrisp, less sugar is better. Serve the hand pies warm. Drizzle caramel sauce on top for a beautiful look. It adds an extra touch of sweetness. Dust with powdered sugar before serving. This makes the pies look fancy. It also adds a touch of sweetness on top. Pair your hand pies with drinks like cider or tea. They complement the flavors well. A warm drink makes your treat even better. {{image_4}} You can change the flavor of your hand pies easily. Adding nuts gives a nice crunch. Chopped pecans or walnuts work well. You can also mix different fruits with the apples. Try pears or berries for a fun twist. Using flavored pie crusts like cinnamon or nutmeg adds great taste too. You can make your hand pies unique this way! If you need gluten-free options, use almond flour instead of regular flour. This keeps the crust delicious. For a vegan filling, swap butter with coconut oil. You can use maple syrup instead of brown sugar. If you want less sugar, use less caramel sauce. These small changes help everyone enjoy hand pies. Making mini hand pies is fun! Roll the dough thinner and cut smaller circles. Each should be about 3-4 inches wide. Bake these little pies for 15-20 minutes. Keep an eye on them. Serve them on a platter with a dip of caramel sauce. These bite-sized treats are perfect for parties! To keep your caramel apple hand pies fresh, store them in an airtight container. Place parchment paper between layers to avoid sticking. The pies will last about 3 to 4 days in the fridge. Make sure they cool completely before putting them away. This helps keep the crust from getting soggy. You can freeze both unbaked and baked hand pies. For unbaked pies, place them on a baking sheet and freeze until solid. Then, transfer them to a freezer bag. They can stay frozen for up to 3 months. For baked hand pies, let them cool completely first. Wrap each pie in plastic wrap, then place them in a freezer bag. To thaw, move the pies to the fridge overnight. For unbaked pies, you can bake them straight from the freezer. Just add a few extra minutes to the baking time. To reheat baked hand pies, the oven is your best friend. Set it to 350°F (175°C) and place the pies on a baking sheet. Heat for about 10 to 15 minutes, until they are warm and crispy. You can also use an air fryer for about 5 to 7 minutes at the same temperature. This keeps the crust nice and flaky. Avoid microwaving, as it can make the crust soggy. To keep your hand pies crispy, follow these tips: - Use cold butter in your dough. This helps create layers. - Chill the dough before rolling it out. It helps with flakiness. - Avoid overfilling the pies. Too much filling makes them soggy. - Bake at a high temperature. This gives a nice golden brown color. - Let them cool on a wire rack after baking. This prevents steam build-up. Yes, you can use store-bought pie crust. Here are some pros and cons: Pros: - Saves time and effort. - No need to worry about dough texture. - Often comes ready to roll or fit into pans. Cons: - May not taste as fresh as homemade. - Texture might be less flaky. - Limited control over ingredients. Pairing enhances the eating experience. Try these suggestions: - Serve with vanilla ice cream for a creamy contrast. - Drizzle extra caramel sauce on top for added sweetness. - A scoop of whipped cream can add a light touch. - Pair with a hot cup of cider or coffee for warmth. - Serve with a side of fresh apple slices for crunch. In this blog post, we covered how to make tasty Caramel Apple Hand Pies. You learned about the required ingredients, step-by-step instructions, and helpful tips to perfect your pies. We also explored variations, storage methods, and answers to common questions. These hand pies can delight anyone who tries them. Enjoy customizing and sharing them with friends and family! By following this guide, you’ll bake delicious treats everyone will love.

Caramel Apple Hand Pies Irresistible Sweet Treat

PREV 1 … 3 4 5 … 44 NEXT
yummybiterecipes

explore

DessertsDinnerAppetizersDrinks

Our Policies

  • Cookie Policy
  • Copyright Policy
  • Disclaimer
  • GDPR Policy
  • Terms Of Use
Back to Top
  • About
  • Contact Us
  • Privacy Policy
© 2025 yummybiterecipes