FREE DINNER EBOOK! Get your copy!
  • Cookie Policy
  • GDPR Policy
  • Disclaimer
  • Terms Of Use
  • Visit my other site: Fun Cookie Recipes
yummybiterecipes
  • Home
  • Dinner
  • Desserts
  • Drinks
  • Appetizers
  • Contact
  • About
  • Privacy Policy
  • Home
  • Dinner
  • Desserts
  • Drinks
  • Appetizers
  • Contact
  • About
  • Privacy Policy
  • Cookie Policy
  • GDPR Policy
  • Disclaimer
  • Terms Of Use
Visit my other site: Fun Cookie Recipes

HOME / CATEGORIES /

Latest

- 1 lb (450g) boneless, skinless chicken breasts, cut into bite-sized pieces - 4 tablespoons unsalted butter - 5 cloves garlic, finely minced - 1 teaspoon smoked paprika - ½ teaspoon dried oregano - ½ teaspoon freshly ground black pepper - ½ teaspoon salt - 2 tablespoons fresh parsley, finely chopped (for garnish) - Zest of 1 medium lemon - Juice of 1 medium lemon To start, gather all your ingredients. Measure each one carefully. Cutting the chicken into small pieces helps them cook faster. Make sure the garlic is minced well. This way, it infuses flavor better. The lemon zest adds a fresh touch. Use a microplane or fine grater for zesting. Juice the lemon right before using it to keep it fresh. When choosing chicken breasts, look for ones that are pink and plump. Avoid any with spots or a grayish hue. Fresh chicken should have no smell. If possible, buy organic or free-range chicken. This type often has better flavor. Always check the sell-by date to ensure freshness. {{ingredient_image_2}} Start with one pound of boneless, skinless chicken breasts. Cut them into bite-sized pieces. In a large mixing bowl, add the chicken pieces. Sprinkle in one teaspoon of smoked paprika, half a teaspoon of dried oregano, half a teaspoon of black pepper, and half a teaspoon of salt. Toss everything well to coat the chicken evenly. This step adds flavor to every bite. Next, take four tablespoons of unsalted butter and place it in a large skillet. Heat the skillet over medium heat. Let the butter melt completely. Once melted, add five cloves of finely minced garlic. Sauté the garlic gently for one to two minutes. Stir it often to prevent burning. You want it fragrant, not browned. This will keep the garlic sweet. Now, introduce the seasoned chicken bites into the skillet. Arrange them in a single layer. Cook the chicken for about five to seven minutes. Turn the pieces occasionally with tongs. You want them golden brown and cooked through. Make sure they reach an internal temperature of 165°F (75°C). This ensures they are safe to eat. Once the chicken is fully cooked, it’s time to add brightness. Sprinkle the zest of one medium lemon over the chicken. Then, drizzle the juice of that lemon on top. Stir everything together well. Let it simmer for an additional minute. This will meld all the flavors beautifully. Remove the skillet from heat. Before serving, sprinkle chopped fresh parsley on top for color. For a nice presentation, use a rustic wooden bowl or a sleek white platter. Consider adding toothpicks for easy eating. You can also serve extra lemon wedges for those who want more zing. Enjoy your garlic butter chicken bites! To make the best garlic butter chicken bites, focus on the cooking method. Start with high-quality chicken. Cut it into even pieces to ensure even cooking. Season well before cooking, so the flavor sinks in. Use medium heat when melting the butter. This prevents burning the garlic. Sauté the garlic until fragrant, not brown. This keeps the dish sweet and tasty. Cook the chicken in a single layer, allowing it to brown nicely. Flip the pieces gently for even cooking. Always check the chicken's internal temperature. It should reach 165°F (75°C) for safety. You can easily boost the flavor of your chicken bites. Try adding a pinch of red pepper flakes for heat. If you like herbs, fresh thyme or rosemary can add depth. Instead of lemon, use lime for a different twist. You can also swap out the chicken for shrimp or tofu. Both options work well with this garlic butter sauce. If you want a creamier taste, add a splash of heavy cream at the end. For serving, these chicken bites shine with fresh garnishes. Consider a sprinkle of parsley for color. Pair them with a light salad for a balanced meal. Garlic butter chicken bites also taste great with rice or crusty bread. For drinks, a chilled white wine or lemonade complements the dish wonderfully. Don't forget to offer lemon wedges on the side for extra zest! Pro Tips Marinate for Extra Flavor: Consider marinating the chicken in the seasoning mix for at least 30 minutes or up to overnight. This will enhance the flavors and tenderness of the chicken. Use Fresh Garlic: Always opt for fresh garlic over pre-minced garlic for a more potent and aromatic flavor. Fresh garlic will elevate the taste of your dish significantly. Adjust the Heat: If you prefer a bit of heat, add a pinch of red pepper flakes to the chicken seasoning. This will add a nice kick without overwhelming the garlic and lemon flavors. Serve with Sides: Pair these garlic butter chicken bites with a side of steamed vegetables or a fresh salad to create a well-rounded meal that balances flavors and textures. {{image_4}} For those who love a kick, spicy garlic butter chicken bites are perfect. Start by adding 1 teaspoon of cayenne pepper to the chicken mix. You can also use hot sauce in the butter. This gives the dish a nice heat that balances well with the garlic and lemon. If you enjoy fresh herbs, try herb-infused garlic butter chicken bites. Mix in 1 tablespoon of fresh thyme or rosemary along with the garlic. These herbs add a fragrant touch that enhances the dish's flavor. You could even use a mix of dried herbs like Italian seasoning for a quick swap. For a taste of the Mediterranean, use Greek spices. Add 1 teaspoon of dried oregano and substitute lemon juice with a splash of balsamic vinegar. You can also toss in some sun-dried tomatoes and olives at the end. This variation gives a rich and savory twist that will impress your guests. To store your leftover garlic butter chicken bites, let them cool first. Place them in an airtight container. You can keep them in the fridge for up to three days. Make sure the lid is tight to keep them fresh. When you're ready to eat the leftovers, pull them from the fridge. You can reheat them in a skillet over medium heat. Add a little butter to keep them moist. Cook for about 5 minutes, stirring often until hot. You can also use a microwave. Just place them in a microwave-safe dish and heat for about 1-2 minutes. If you want to freeze the chicken bites, use a freezer-safe container. They can last up to three months in the freezer. To thaw, move them to the fridge for a few hours before reheating. This way, they stay tasty and safe to eat. You can serve garlic butter chicken bites with many sides. Try creamy mashed potatoes or fluffy rice. They pair well with roasted veggies too. A fresh salad adds a nice crunch. For a fun twist, serve them in a wrap with your favorite sauce. You can even offer toothpicks for easy snacking at parties. Yes, you can use chicken thighs! Thighs are juicier and have more flavor. Just cut them into bite-sized pieces like the breasts. Cook them the same way, but check for doneness. They should reach an internal temperature of 165°F (75°C) as well. To make garlic butter chicken bites low-carb, skip the rice or potatoes. Instead, serve them with steamed broccoli or cauliflower rice. You can also add more leafy greens to your salad. Use more garlic and herbs to boost flavor without adding carbs. To keep your chicken juicy, avoid overcooking. Cook until they're golden brown and reach 165°F (75°C). Marinating the chicken before cooking can also help. Use olive oil, lemon juice, or yogurt in your marinade for extra moisture. In this post, we covered how to make delicious garlic butter chicken bites. You learned about the right ingredients, preparation steps, and helpful tips. I shared flavor variations to keep meals exciting and easy storage tips to save leftovers. My final thought is that making these chicken bites can bring joy to your table. Enjoy the cooking process and get creative with flavors. These bites are sure to please everyone!

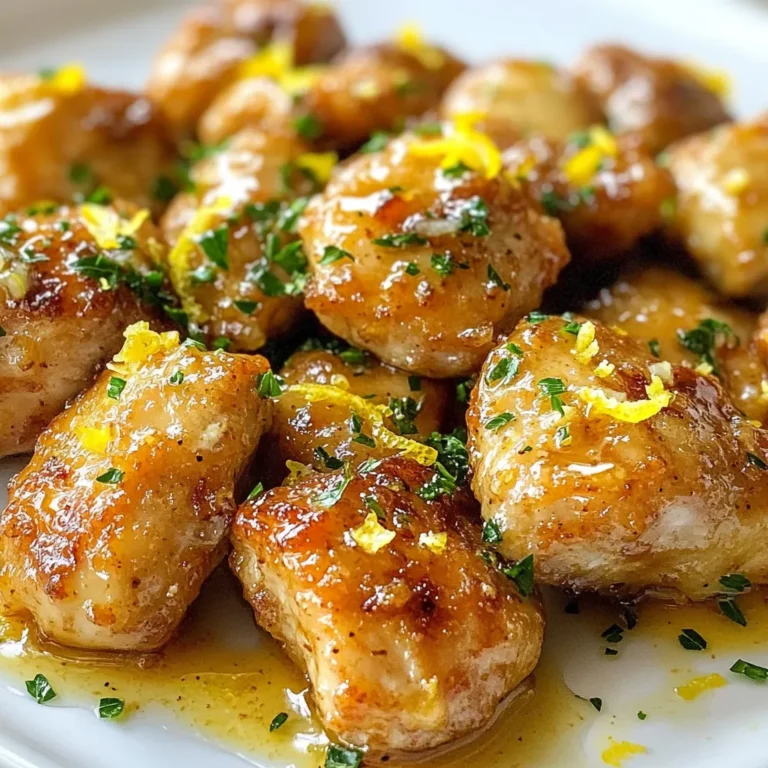
Garlic Butter Chicken Bites Savory and Simple Delight

To make a great Bolognese sauce, you need these key items: - 1 tablespoon extra virgin olive oil - 1 medium onion, finely chopped - 2 cloves garlic, minced - 1 medium carrot, finely diced - 1 celery stalk, finely diced - 500g ground beef - 250g ground pork - 1 can (400g) crushed tomatoes - 2 tablespoons concentrated tomato paste - 1 cup rich beef broth - 1 teaspoon dried oregano - 1 teaspoon dried basil - 1 bay leaf - Salt and freshly cracked pepper to taste - Fresh parsley, finely chopped (for garnishing) - Freshly grated Parmesan cheese (for serving) Each of these ingredients plays a vital role in building flavor. The meats give richness. The vegetables add sweetness and depth. Tomatoes provide acidity and body. While the essential ingredients create a solid base, you can enhance the sauce with these extras: - A splash of red wine for depth - A pinch of nutmeg for warmth - Bacon or pancetta for smokiness These optional ingredients can elevate your sauce. Adding wine can deepen the flavor, while nutmeg adds a hint of warmth. If you like a smoky touch, bacon is perfect. You can easily adjust this recipe for various diets. Here are some swaps: - Use ground turkey or chicken for a leaner option. - Replace beef broth with vegetable broth for a vegetarian sauce. - Use lentils or mushrooms instead of meat for a plant-based option. These substitutions keep the spirit of Bolognese alive while meeting your needs. Feel free to experiment. Cooking is about making it your own! {{ingredient_image_2}} Start by gathering your vegetables. You need one medium onion, two cloves of garlic, one medium carrot, and one celery stalk. Chop the onion finely. Mince the garlic. Dice the carrot and celery into small pieces. Heat one tablespoon of extra virgin olive oil in a large saucepan over medium heat. Add the chopped onion and sauté for about five minutes. Wait until the onion turns soft and clear. Then, toss in the minced garlic, diced carrot, and celery. Cook these for another five minutes. Stir them often until they become tender and fragrant. Now it’s time for the meat. Add 500 grams of ground beef and 250 grams of ground pork to the pan. Increase the heat to medium-high. Break the meat apart with a spatula. Cook it for about seven to ten minutes. You want it to turn a nice brown color and be fully cooked. After the meat is browned, drain any extra fat. This keeps your sauce rich but not greasy. Next, stir in one can of crushed tomatoes, two tablespoons of tomato paste, and one cup of rich beef broth. Mix these well so all the ingredients come together. Now, season your mixture. Add one teaspoon of dried oregano, one teaspoon of dried basil, salt, and fresh cracked pepper. Toss in one bay leaf for added flavor. Lower the heat to a gentle simmer. Cover the saucepan with a lid. Let the sauce simmer for at least 30 minutes. For even more flavor, simmer it for up to two hours. Stir occasionally and add a splash of water if the sauce gets too thick. Before serving, taste the sauce and adjust the seasoning. Don’t forget to remove the bay leaf! To make Bolognese sauce burst with flavor, use a few key techniques. First, always start with a good base. Heat extra virgin olive oil in your pan. Add finely chopped onion and sauté it. This step releases sweet notes. Next, add minced garlic, diced carrot, and celery. Sauté until they become soft and fragrant. This mix is called a soffritto, and it gives depth. When browning the meat, use medium-high heat. This helps develop a nice color and robust flavor. Make sure to break apart the ground beef and pork as they cook. Drain excess fat after browning. This keeps the sauce rich but not greasy. Cooking Bolognese sauce can take time, but there are ways to save it. Chop your vegetables in advance. You can even use a food processor for a quick prep. If you are short on time, consider using store-bought mirepoix. This mix of onion, carrot, and celery is ready to go. Another time-saver is to make a larger batch. You can freeze the extra sauce for later meals. Just store it in airtight containers. This way, you can enjoy homemade Bolognese anytime! For the best texture, simmer your sauce gently. A longer simmer allows flavors to meld. I suggest at least 30 minutes, but 2 hours is even better. Stir occasionally to prevent sticking. If it becomes too thick, add a splash of water or broth. Before serving, taste the sauce. Adjust the seasoning to your liking. Remove the bay leaf for a smooth finish. For serving, pair it with your favorite pasta. A sprinkle of parsley and grated Parmesan cheese adds a nice touch. Enjoy your delicious Bolognese! Pro Tips Quality Meat Matters: Using a mix of ground beef and pork enhances the flavor and texture of your Bolognese sauce, making it rich and satisfying. Longer Simmer, Better Flavor: Allowing the sauce to simmer for at least 30 minutes, or up to 2 hours, will deepen the flavors and create a more robust sauce. Fresh Herbs Make a Difference: If possible, use fresh herbs instead of dried for a brighter, more vibrant flavor profile in your sauce. Don't Skip the Parmesan: Serving your Bolognese with freshly grated Parmesan cheese not only adds a creamy texture but also enhances the overall taste of the dish. {{image_4}} If you want a meat-free option, try lentils or mushrooms. Both give a rich texture. Use about 1 cup of cooked lentils or 2 cups of finely chopped mushrooms. Saute them with the onions and garlic. You can also add diced zucchini or bell peppers for extra flavor and color. Bolognese sauce is not just about beef and pork. You can mix it up! Ground turkey or chicken works well too. They add a lighter taste. You can also try using venison or lamb for a different spin. Just make sure to adjust cooking times based on the meat used to keep it juicy. Different regions in Italy offer unique takes on Bolognese. In Bologna, they often add milk or cream for a creamy finish. In other areas, they might use more wine for depth. You could even find Bolognese with pancetta or bacon for a smoky flavor. Each twist brings its own charm to this classic dish. To keep your leftover Bolognese sauce fresh, let it cool first. Once cool, pour it into a clean container. Use a glass or plastic container with a tight lid. Label it with the date. Store the sauce in the fridge for up to 3 days. If you want to keep it longer, freezing is a great option. Freezing Bolognese sauce is easy. After cooling, divide the sauce into smaller portions. Use freezer-safe bags or containers. Press out as much air as possible before sealing. You can store it in the freezer for up to 3 months. When you are ready to use it, simply thaw it in the fridge overnight. To reheat your Bolognese sauce, pour it into a saucepan. Heat it over low to medium heat. Stir often to prevent sticking. If the sauce seems thick, add a splash of beef broth or water. This will help restore its rich flavor. For best results, serve it hot over pasta or bread. Enjoy every bite! The secret lies in the balance of flavors and cooking time. Use quality ingredients like fresh herbs and good meat. Cook the sauce low and slow. This allows the flavors to meld together. Aim for a rich, hearty texture. Don't rush the simmering; let it develop for at least 30 minutes. For best results, a longer simmering time of up to 2 hours is ideal. Bolognese is a meat-based sauce, while marinara is tomato-based. Bolognese uses ground beef and pork, giving it a rich flavor. Marinara is lighter and often vegan, made mainly with tomatoes and garlic. Bolognese also includes vegetables like carrots and celery, which add depth. Marinara is quicker to make, while Bolognese needs time for flavors to deepen. Yes, you can make Bolognese sauce ahead of time. In fact, it often tastes better the next day. Allow it to cool, then store it in the fridge for up to three days. You can also freeze it for up to three months. Just make sure to let it thaw in the fridge before reheating. When reheating, do so gently to keep the flavors intact. In this blog post, we explored how to make Bolognese sauce. We covered essential and optional ingredients, plus substitutions. I shared step-by-step instructions for prepping, browning, and simmering. Tips on cooking techniques and time-saving ideas were also included. You learned about different variations and the best storage methods. Remember, a great Bolognese relies on patience and the right ingredients. Enjoy making this classic dish your own!

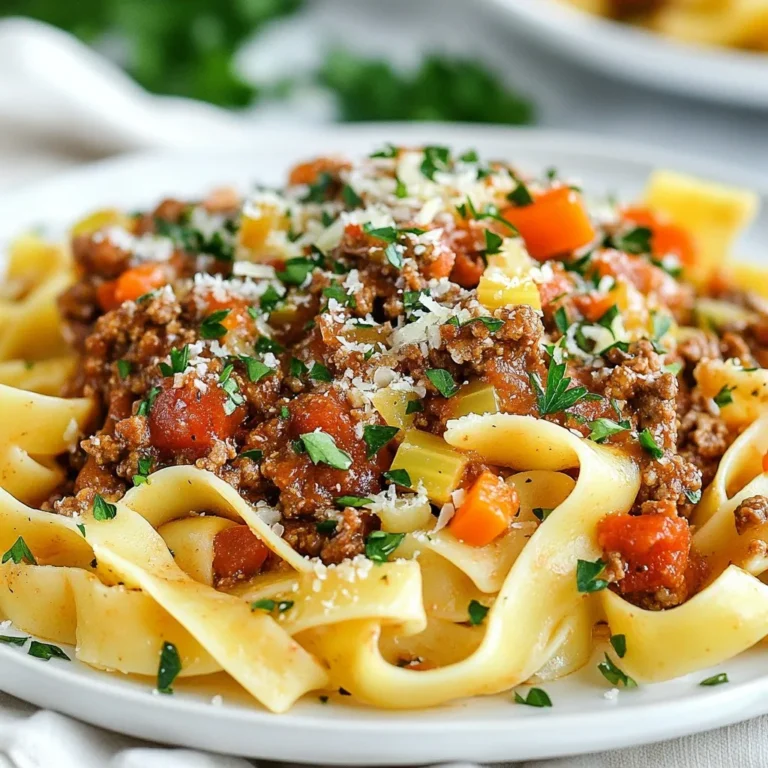
The Best Bolognese Sauce Simple and Flavorful Recipe

- 4 medium sweet potatoes - 1 lb ground turkey or chicken - 1 can black beans, drained and rinsed - 1 cup corn kernels (fresh or frozen) - 1 packet taco seasoning (about 2 tablespoons) - 1 cup diced tomatoes (canned or fresh) - 1 cup shredded cheese (cheddar or Mexican blend) - 1 ripe avocado, diced - ½ cup sour cream or Greek yogurt - Fresh cilantro, chopped (for garnish) - Salt and pepper to taste - Olive oil If you want to switch things up, here are some ideas: - Use ground beef or pork instead of turkey or chicken. - Swap black beans for pinto beans or kidney beans. - Try quinoa for a grain option instead of beans. - Use spicy cheese or add jalapeños for heat. - Greek yogurt can replace sour cream for a healthier twist. - If you want to skip dairy, use vegan cheese or avocado crema. These taco stuffed sweet potatoes are not just tasty; they are also packed with nutrition: - Calories: About 400 per serving - Protein: Approximately 30 grams - Carbohydrates: Roughly 45 grams - Fiber: Around 10 grams - Fat: About 15 grams Sweet potatoes give you vitamins A and C, while beans add protein and fiber. This meal is filling and balanced, perfect for a hearty lunch or dinner. {{ingredient_image_2}} Start by preheating your oven to 400°F (200°C). Rinse the sweet potatoes well under cold water, scrubbing off any dirt. Pat them dry with a paper towel. Use a fork to poke several holes in each sweet potato. This lets steam escape while they bake. Rub the skins with olive oil and sprinkle some salt on top. Place the sweet potatoes on a baking sheet lined with parchment paper. Bake for 45 to 60 minutes, or until they are soft and easy to pierce with a fork. While the sweet potatoes are baking, heat a large skillet over medium heat. Add 1 pound of ground turkey or chicken. Cook it for about 5 to 7 minutes, breaking it apart as it cooks. Once the meat is fully cooked, stir in 1 can of black beans, drained and rinsed, along with 1 cup of corn kernels and 1 cup of diced tomatoes. Sprinkle in 1 packet of taco seasoning. Mix everything well. Let it simmer for 5 to 10 minutes, stirring often, until heated through. Don’t forget to add salt and pepper to taste! After the sweet potatoes finish baking, take them out and let them cool for a few minutes. Carefully slice each sweet potato lengthwise to create a pocket. Use a fork to fluff the flesh inside each sweet potato, seasoning it lightly with salt. Now, fill each pocket with the taco mixture, making sure to distribute it evenly. Top each stuffed sweet potato with shredded cheese. Return them to the oven for another 5 to 10 minutes. This will melt the cheese and make it bubbly. Finally, add diced avocado, a dollop of sour cream or Greek yogurt, and a sprinkle of fresh cilantro on top. Enjoy your flavorful taco stuffed sweet potatoes! To get the best sweet potatoes, start by preheating your oven to 400°F (200°C). Rinse and scrub your sweet potatoes well. Make sure to poke holes in them with a fork. This helps steam escape while they roast. Rub olive oil on the skins and sprinkle a little salt. Place them on a baking sheet lined with parchment paper. Roast for 45 to 60 minutes. You want them soft enough that a fork goes in easily. This step ensures they’re perfectly tender inside. Toppings can take your taco stuffed sweet potatoes to the next level. After filling each potato, sprinkle on some shredded cheese. It melts beautifully, adding rich flavor. Fresh avocado adds creaminess and a nice texture. A dollop of sour cream or Greek yogurt brings a tangy contrast. Don’t forget the chopped cilantro for a burst of freshness. You can also add sliced jalapeños for heat or diced onions for crunch. Mix and match toppings to fit your taste! You can make taco stuffed sweet potatoes vegetarian too! Swap ground turkey or chicken for lentils or quinoa. Both options provide protein and fiber. Use black beans and corn to keep that hearty feel. You can also add extra veggies like bell peppers or zucchini to the mix. They add color and nutrients. With these variations, everyone can enjoy a delicious meal, no matter their dietary needs. Pro Tips Choosing Sweet Potatoes: Opt for sweet potatoes that are firm and free of blemishes or soft spots to ensure the best flavor and texture. Cooking Ground Meat: For a more flavorful filling, consider adding minced garlic and onion to the skillet when cooking the ground turkey or chicken. Cheese Options: Experiment with different types of cheese like Monterey Jack or queso fresco for a unique twist on the classic taco flavor. Make It Ahead: Prepare the taco mixture in advance and store it in the refrigerator. Simply reheat it when you're ready to serve it with the sweet potatoes! {{image_4}} You can switch up the protein in this dish. Ground turkey or chicken works great, but you can use beef or even pork. If you want a plant-based option, try lentils or tempeh. These choices give you variety and flavor. Each protein adds its own twist to the taco stuffed sweet potatoes. You control the spice level! If you like it hot, add some diced jalapeños or a dash of hot sauce. For a milder taste, skip the spicy ingredients. You can also use a mild taco seasoning for less heat. Adjusting the spice makes this meal perfect for everyone, no matter their taste. Don’t be shy about adding more veggies! Chopped bell peppers, zucchini, or spinach all work well. You can mix them into the taco filling for added nutrition. This not only boosts the flavor but also makes the meal more colorful and fun. Each bite will be a tasty surprise! After you enjoy your taco stuffed sweet potatoes, store any leftovers in an airtight container. Keep them in the fridge for up to four days. Make sure to let them cool down before sealing them up. If you want to keep them longer, consider freezing them. They will last for about three months in the freezer. Just remember to label the container with the date. To reheat your taco stuffed sweet potatoes, you can use the oven or microwave. For the oven, preheat it to 350°F (175°C). Place the stuffed sweet potatoes on a baking sheet and heat for about 15-20 minutes. If you’re in a hurry, the microwave works too! Heat each sweet potato for about 2-3 minutes. Just be sure to check if they are warm all the way through. Meal prep can make your week easier! You can prepare the taco filling ahead of time. Just cook the meat, beans, corn, and spices together. Store the filling in the fridge for up to three days. When you are ready to eat, roast the sweet potatoes fresh. This keeps them fluffy and tasty. You can also pre-bake the sweet potatoes and stuff them when you need them. Yes, you can make taco stuffed sweet potatoes ahead. You can cook the sweet potatoes and the taco filling separately. Store each in the fridge for up to three days. When you are ready to eat, just reheat them in the oven or microwave. This makes it easy for busy days! Taco stuffed sweet potatoes are great on their own, but you can add sides. Here are some good options: - A fresh green salad with lime dressing - Simple guacamole or salsa - Corn chips for crunch - A side of cilantro rice These sides can balance the meal and add more flavor! To make taco stuffed sweet potatoes healthier, try these tips: - Use lean ground turkey or chicken. - Swap sour cream for Greek yogurt. - Add more vegetables like bell peppers or zucchini to the filling. - Choose low-fat cheese or skip it entirely. These changes can lower calories while keeping the taste delicious! In this blog post, I shared how to make taco stuffed sweet potatoes. We covered key ingredients, step-by-step instructions, and helpful tips. I also suggested variations and how to store leftovers. Taco stuffed sweet potatoes are fun to make and tasty to eat. With different proteins and toppings, you can create your perfect dish. I hope these ideas inspire your cooking and bring joy to your meals. Enjoy your tasty creations!

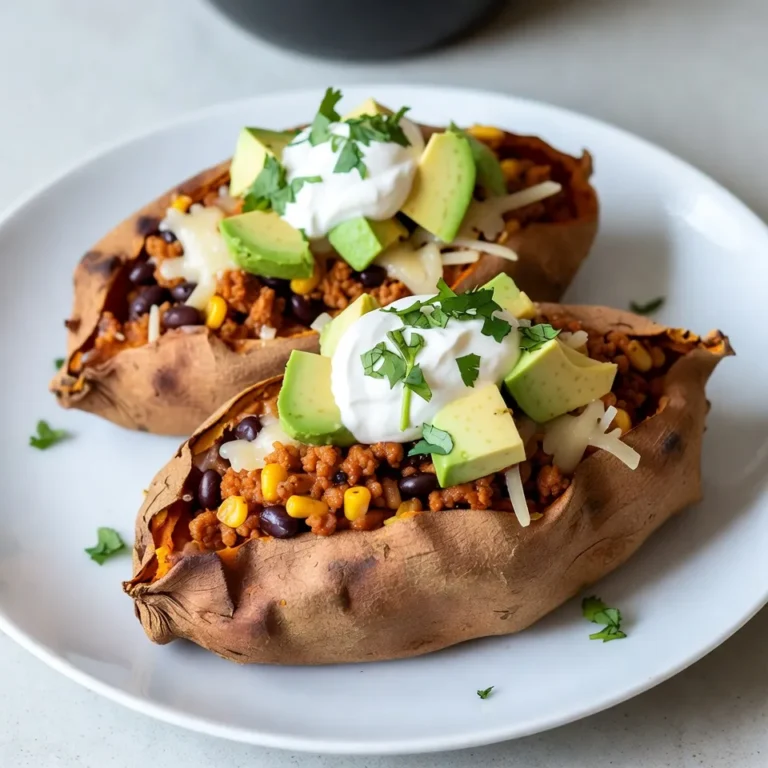
Taco Stuffed Sweet Potatoes Flavorful and Filling Meal

- 2 cups all-purpose flour - 1/4 cup brown sugar, tightly packed - 1 tablespoon baking powder - 1 teaspoon ground ginger - 1 teaspoon ground cinnamon - 1/2 teaspoon ground nutmeg - 1/4 teaspoon ground cloves - 1/2 teaspoon salt - 1/2 cup unsalted butter, cold and cut into small cubes - 1/2 cup molasses - 1/4 cup milk - 1 large egg - 1 teaspoon vanilla extract - Optional: 1/2 cup chopped crystallized ginger or chocolate chips for added sweetness I love using fresh ingredients in my baking. Each one plays a key role in flavor. The all-purpose flour gives the scones their structure. Brown sugar adds a nice sweetness and deep flavor. The baking powder helps the scones rise and become fluffy. Spices are a must for gingerbread scones. Ground ginger, cinnamon, nutmeg, and cloves create that warm, cozy taste we all love. Salt balances the sweetness and enhances the spices. Cold unsalted butter is vital. It keeps the scones tender and flaky. I cut it into small cubes to mix into the flour. Molasses adds a rich, dark sweetness. It also gives a lovely color to the scones. Milk, an egg, and vanilla extract bring everything together. The egg helps bind the ingredients, while vanilla adds a nice aroma. For a fun twist, I love adding optional ingredients like crystallized ginger or chocolate chips. They add extra sweetness and flavor. These ingredients work together to create the perfect festive treat. Each bite offers a delightful mix of spice and sweetness, just right for the holiday season. {{ingredient_image_2}} 1. Preheat your oven to 400°F (200°C). This heat will give your scones a nice golden color. 2. Line a baking sheet with parchment paper. This helps prevent the scones from sticking. 3. In a large bowl, mix together the dry ingredients: - 2 cups all-purpose flour - 1/4 cup brown sugar - 1 tablespoon baking powder - 1 teaspoon ground ginger - 1 teaspoon ground cinnamon - 1/2 teaspoon ground nutmeg - 1/4 teaspoon ground cloves - 1/2 teaspoon salt 4. Whisk the dry ingredients until well blended. This step ensures you get a nice, even flavor. 5. Add the cold, cubed butter (1/2 cup) into the flour mix. 6. Use your fingertips or a pastry cutter to mix the butter until it looks like coarse crumbs. Avoid large butter pieces. 1. In a separate bowl, whisk together the wet ingredients: - 1/2 cup molasses - 1/4 cup milk - 1 large egg - 1 teaspoon vanilla extract 2. Make sure the mixture is smooth and well combined. This will add moisture and flavor to your scones. 1. Pour the wet mixture into the dry ingredients. Stir gently until just combined. 2. If you want extra flavor, fold in 1/2 cup of chopped crystallized ginger or chocolate chips. 3. Lightly flour your work surface. Turn the dough out onto it. 4. Knead the dough gently for about 5-6 times. You want it to come together without overworking it. 5. Shape the dough into a circle about 1-inch thick. 6. Cut the circle into 8 equal wedges, like a pizza. 7. Carefully transfer the wedges to your prepared baking sheet. 8. Bake in the oven for 15-18 minutes. Look for a golden brown color on top. 9. While cooling, prepare the glaze by whisking together: - 1 cup powdered sugar - 2-3 tablespoons milk - A pinch of ground ginger 10. If the glaze is too thick, add more milk until it reaches your desired consistency. 11. Drizzle the glaze over the warm scones and let it set before serving. To make the best gingerbread scones, the texture matters a lot. Start by mixing the dry ingredients well to avoid clumps. When you add the butter, don't overmix. Use your fingers or a pastry cutter to combine until it looks like coarse crumbs. This helps keep your scones light and fluffy. Next, watch your oven temperature. Preheat it to 400°F (200°C). An even temperature helps the scones rise perfectly. If your oven runs hot, check them a minute or two early. Look for a golden brown color on top to know they are done. Making the glaze is easy and fun. Mix powdered sugar, milk, and a pinch of ground ginger in a bowl. Stir until smooth. If it seems too thick, add a bit more milk. You want it to drizzle easily over the scones. When it comes to decorating, be creative! Drizzle the glaze over the top in zigzag patterns. For an extra touch, sprinkle some powdered sugar on top. You can also add fresh rosemary or cranberries for color. This makes your scones look festive and inviting. Pro Tips Chill Your Ingredients: For flakier scones, ensure your butter and milk are cold. This helps create a light, tender texture that’s perfect for scones. Don’t Overmix the Dough: Mixing just until combined helps keep the scones from becoming tough. Gentle handling is key to a soft bite. Use a Pizza Cutter: For clean cuts, especially when slicing the dough into wedges, a pizza cutter works wonders and reduces tearing. Experiment with Spices: Feel free to add more spices or adjust their amounts according to your taste. A little cardamom or allspice can enhance the flavor profile beautifully. {{image_4}} You can boost the flavor of your gingerbread scones in many ways. Adding different spices makes them unique. Try a pinch of cardamom or some allspice for a new twist. You can also mix in some chopped nuts or dried fruits. Walnuts or cranberries add great texture and taste. For a sweeter touch, consider adding chocolate chips. They melt and mix nicely with the warm scones. If you need gluten-free options, use gluten-free flour blends. These work well in this recipe, keeping the scones light and fluffy. For those following a vegan diet, swap the egg for a flax egg. Just mix one tablespoon of ground flaxseed with three tablespoons of water and let it sit for a few minutes. You can also use plant-based milk instead of regular milk. Want a healthier treat? Reduce the brown sugar by half or use a sugar substitute. This way, you can enjoy the scones without too much sugar. The flavors will still shine through, making them a delightful snack for everyone. To keep your gingerbread scones fresh, store them in an airtight container. This helps maintain their soft texture. If you have a few left after Christmas, don’t worry! They can last up to two days at room temperature. Just make sure to place them in a cool, dry spot. For long-term storage, freezing is a great option. Wrap each scone tightly in plastic wrap. Then, place them in a freezer-safe bag. You can freeze them for up to three months. When you're ready to enjoy them, just thaw at room temperature or heat them in the oven. Reheating scones is easy and will bring back their fresh taste. Preheat your oven to 350°F (175°C). Place the scones on a baking sheet. Heat for about 5 to 10 minutes. This method keeps them warm and soft. If you prefer a microwave, use it on low power. Heat each scone for about 15 to 20 seconds. Be careful not to overheat, as this can make them tough. Enjoy your festive treat as if they were just baked! How do I know when the scones are done baking? You’ll know the scones are done when they turn golden brown on top. They should feel firm to the touch. A toothpick inserted in the center should come out clean. This means they are baked through. Can I make the dough in advance? Yes, you can make the dough ahead of time. Wrap it tightly in plastic wrap. Store it in the fridge for up to 24 hours. This makes it easy to bake fresh scones later. How long do the scones last? Freshly baked scones last about 2-3 days at room temperature. Store them in an airtight container. If you want them longer, freeze them. They can last up to 3 months in the freezer. What can I substitute for molasses? If you don’t have molasses, you can use honey or maple syrup. They will change the flavor slightly but still add sweetness. Brown sugar mixed with water can also work in a pinch. Can I use any other type of flour? Yes, you can use whole wheat flour for a nuttier taste. Almond flour is another option, but it may change the texture. Just keep in mind that you might need to adjust the liquid in the recipe. This blog post covered the essential ingredients and steps for making delicious scones. You learned how to mix and bake the dough and even enhance flavors. I shared tips for perfecting your scones and offered variations for different diets. Storing and reheating methods ensure your scones stay fresh. Remember, scones are versatile. Feel free to experiment with flavors and ingredients. Enjoy your baking journey, and share your tasty creations!

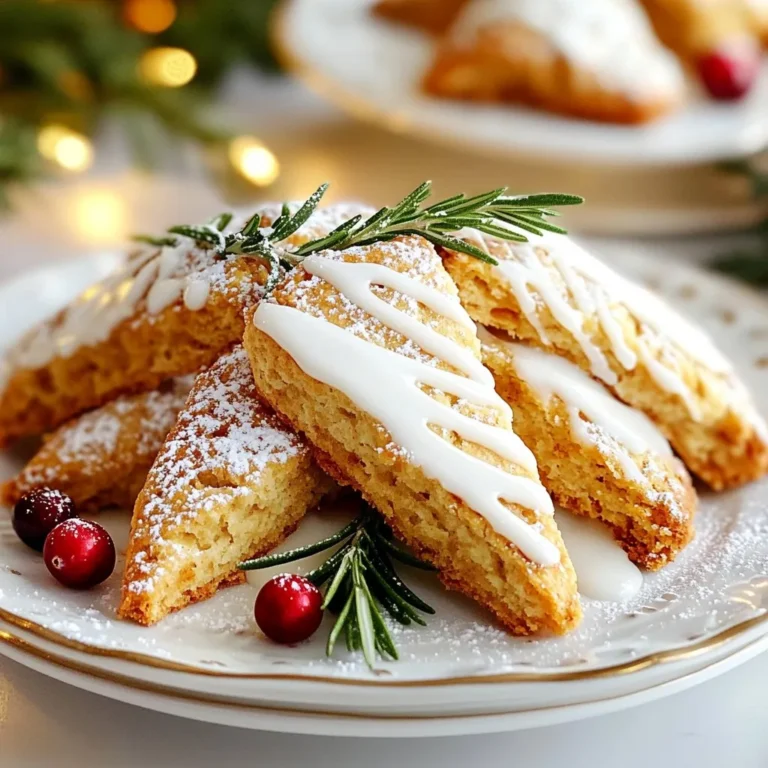
Christmas Bakery Gingerbread Scones Festive Delight

- 1 lb boneless, skinless chicken thighs - 2 tablespoons cornstarch - 2 tablespoons vegetable oil, divided - 1 medium onion, sliced into thin rings - 2 cloves garlic, finely minced - 1-inch piece of ginger, freshly grated - 1 bell pepper, sliced thinly - 1 cup snow peas, trimmed - 3 green onions, chopped For this dish, I prefer using boneless, skinless chicken thighs. They stay juicy and flavorful. The cornstarch gives the chicken a crispy coating that you’ll love. I also recommend using a mix of colorful vegetables like bell peppers and snow peas. They add crunch and color to the meal. - 3 tablespoons soy sauce - 2 tablespoons hoisin sauce - 1 tablespoon sesame oil - 1 teaspoon red chili flakes (optional) - Salt and pepper to taste Soy sauce and hoisin sauce create a rich, sweet, and salty flavor. Sesame oil adds a nutty taste that makes this dish pop. If you like heat, add red chili flakes. Don’t forget salt and pepper to enhance all the flavors. Mongolian Chicken Stir-Fry pairs well with rice or noodles. I enjoy serving it over fluffy white rice for a classic touch. You can also use lo mein noodles for a fun twist. For sides, steamed broccoli or a fresh salad work beautifully. Feel free to garnish with extra green onions for a fresh finish. {{ingredient_image_2}} 1. Start by slicing 1 pound of boneless, skinless chicken thighs into thin strips. 2. In a medium bowl, toss these chicken strips with 2 tablespoons of cornstarch. 3. This coating helps the chicken become crispy when cooked. 1. Heat 1 tablespoon of vegetable oil in a large skillet over medium-high heat. 2. Once the oil shimmers, add the coated chicken in a single layer. 3. Cook for about 4-5 minutes, flipping occasionally, until the chicken turns golden brown. 4. Remove the chicken and set it aside on a plate. 5. In the same skillet, add another tablespoon of vegetable oil. 6. Sauté 1 sliced onion, 2 minced garlic cloves, and 1-inch grated ginger for 1-2 minutes. 7. When the onion is translucent, add a sliced bell pepper and 1 cup of trimmed snow peas. 8. Stir-fry these for 2-3 minutes until they are vibrant and slightly tender. 9. Return the cooked chicken to the skillet. 10. Pour in 3 tablespoons of soy sauce, 2 tablespoons of hoisin sauce, and 1 tablespoon of sesame oil. 11. If you like heat, add 1 teaspoon of red chili flakes. 12. Stir everything well and let it cook for another minute to blend the flavors. 1. Add 3 chopped green onions and toss the stir-fry again. 2. Season with salt and pepper to taste. 3. Serve your Mongolian Chicken Stir-Fry over warm cooked rice or noodles. 4. For a pop of color, garnish with extra chopped green onions. To achieve crispy chicken, first coat it with cornstarch. This layer helps the chicken brown nicely. When you cook the chicken, keep it in a single layer. This way, it gets crispy all over. Cook on medium-high heat and don’t rush. If you crowd the pan, the chicken will steam instead of fry. To avoid overcooked vegetables, stir-fry them quickly. Use high heat and keep them moving. Cook them just until they are bright and tender. This method keeps their crunch and color. For extra flavor, consider adding spices like ginger or garlic. You can also try a splash of rice vinegar for tang. If you like it spicy, add more red chili flakes. Adjust the heat level to fit your taste. Just remember, you can always add more, but it’s hard to take away! For stir-frying, a large skillet or wok works best. A non-stick pan can also help prevent sticking. Make sure your pan gets hot before adding oil. For prep, use a sharp knife for cutting chicken and veggies. A cutting board is key for safety. When serving, a large plate lets you show off your dish. Pro Tips Coat for Crispiness: Ensure to fully coat the chicken strips with cornstarch before cooking. This will help achieve that delicious crispy texture that makes stir-fries irresistible. High Heat is Key: Always cook your stir-fry on high heat. This helps to quickly sear the chicken and vegetables, locking in flavors and keeping them vibrant and crunchy. Prep Your Ingredients: Have all your ingredients prepped and ready to go before you start cooking. Stir-frying happens quickly, and having everything on hand will ensure a smooth cooking process. Customize Your Veggies: Feel free to swap in any of your favorite vegetables! Broccoli, carrots, or even mushrooms can add great flavor and nutrition to your Mongolian Chicken Stir-Fry. {{image_4}} You can switch the chicken for other proteins. Beef, shrimp, or tofu all work well. If you use beef, cut it thinly like the chicken. Shrimp cooks fast, so add it last. For tofu, use firm tofu and press it to remove extra water. Adjust cooking times based on what you use: - Beef: Cook for 3-4 minutes until browned. - Shrimp: Cook for about 2-3 minutes until pink. - Tofu: Cook for 4-5 minutes until golden on all sides. Want a plant-based meal? Substitute chicken with tofu or tempeh. For a vegan option, also check the sauces. Many hoisin sauces have animal products. Look for a vegan brand or make your own. Use these swaps: - Tofu or Tempeh: Use the same amount as chicken. - Sauce: Ensure your soy sauce and hoisin sauce are vegan-friendly. You can change the taste of your stir-fry easily! Add different veggies or spices to mix it up. Try these ideas: - Vegetables: Broccoli, carrots, or zucchini add color and crunch. - Spices: Experiment with garlic powder or chili powder for a kick. - Sweet vs. Savory: Add a bit of brown sugar for sweetness or more soy sauce for saltiness. Feel free to play with flavors to find your favorite version! To store leftover Mongolian Chicken Stir-Fry, place it in an airtight container. This keeps the dish fresh. The stir-fry lasts in the fridge for about three to four days. Make sure to cool it down before sealing the container. This helps avoid extra moisture that can make your food soggy. You can freeze Mongolian Chicken Stir-Fry for longer storage. First, let it cool completely. Then, transfer it to a freezer-safe container or bag. Remove as much air as possible to prevent freezer burn. It can last in the freezer for up to three months. When you want to eat it, thaw it overnight in the fridge. To reheat, you can use a skillet or microwave. Make sure to stir it well to keep the flavors strong. The best way to reheat stir-fry is in a skillet over medium heat. This helps retain its crispy texture. If using a microwave, cover it with a damp paper towel. This helps keep moisture in. Avoid overheating, as this can make the chicken tough or the vegetables soggy. Stir occasionally to heat evenly. What is Mongolian Chicken Stir-Fry? Mongolian Chicken Stir-Fry is a quick and tasty dish. It features tender chicken in a sweet and savory sauce. You mix it with vibrant veggies like bell peppers and snow peas. This dish is colorful, healthy, and perfect for any meal. Can I make it ahead of time? Yes, you can make Mongolian Chicken Stir-Fry ahead of time. Cook it as directed, then cool it down. Store it in an airtight container. It will stay fresh in the fridge for up to three days. To reheat, warm it in a skillet or microwave until hot. How should I cut the chicken for the best results? Cut the chicken thighs into thin strips. Aim for pieces about half an inch wide. This helps them cook evenly and stay juicy. Thin strips also soak up the sauce better, adding more flavor. What's the best way to serve Mongolian Chicken Stir-Fry? Serve Mongolian Chicken Stir-Fry over warm rice or noodles. You can also top it with extra green onions for a pop of color. This dish looks great on the plate and tastes even better. Can I substitute ingredients if I’m allergic? Yes, you can make substitutions based on allergies. If you're allergic to chicken, try beef, shrimp, or tofu. You can also use different vegetables if needed. Just keep the main flavors in mind. What are some gluten-free options for this recipe? For gluten-free options, use tamari instead of soy sauce. Check the hoisin sauce for gluten-free labels. You can also use rice noodles or vegetable rice as a base. These options keep the dish tasty and safe for gluten-free diets. Mongolian Chicken Stir-Fry is easy and tasty. We covered the main ingredients, cooking steps, and helpful tips. You learned how to choose protein and vegetables, and how to store leftovers. Experiment with flavors and find what you like best. Cooking can be fun and creative. With this guide, you can impress family and friends. Enjoy your stir-fry journey, and don’t be afraid to change it up!

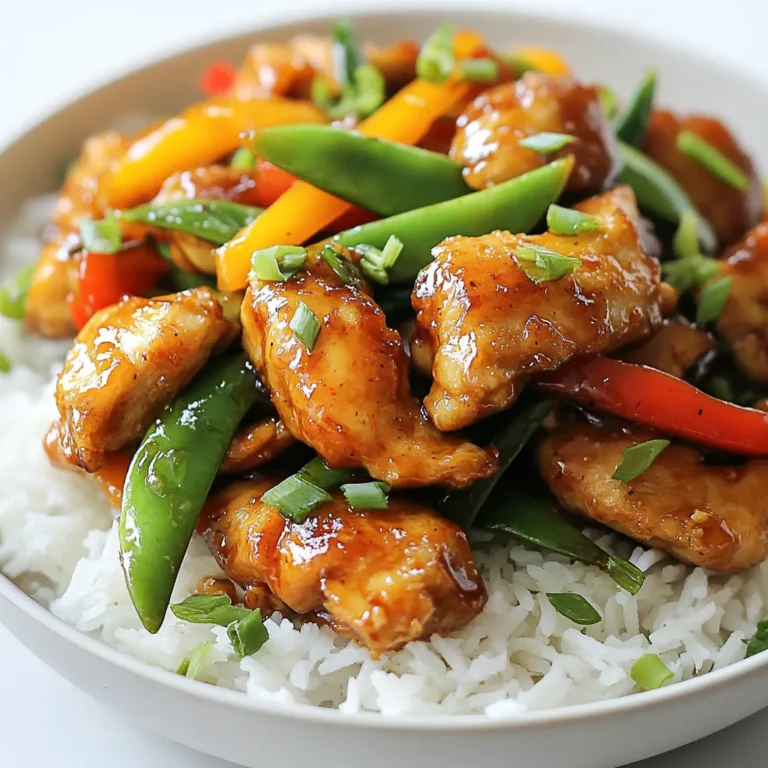
Mongolian Chicken Stir-Fry Quick and Tasty Recipe

- 2 cups heavy cream - 1 cup whole milk - 1 cup granulated sugar - 4 large egg yolks - 1 cup semi-sweet chocolate chips - 1 teaspoon pure vanilla extract - 1/2 teaspoon sea salt - Optional: Chocolate shavings or cacao nibs for garnish - Heavy cream: This adds richness and creaminess. It helps create a smooth texture in the ice cream. - Whole milk: It balances the cream and keeps the ice cream from being too heavy. - Granulated sugar: This sweetens the custard and adds to its creamy texture. - Egg yolks: They create a rich custard base. They help the ice cream stay smooth and creamy. - Semi-sweet chocolate chips: They provide that deep chocolate flavor we all love. - Pure vanilla extract: This adds warmth and enhances the chocolate flavor. - Sea salt: Just a pinch can boost the sweetness and overall flavor. - Chocolate shavings or cacao nibs (optional): These are great for garnish. They add texture and visual appeal. - Use fresh heavy cream and milk for the best flavor. Check the expiration date. - Granulated sugar should be fine and free of lumps. This ensures even sweetness. - Choose high-quality chocolate chips. Look for brands with cocoa content above 50%. - Use farm-fresh eggs for a richer taste. Freshness matters in custard recipes. - Always opt for pure vanilla extract instead of imitation. The flavor is much better. - If you use optional garnishes, choose those that you enjoy. They make the dish special. {{ingredient_image_2}} 1. Start by heating the heavy cream, whole milk, and 1/2 cup sugar in a medium saucepan. Stir until the sugar dissolves. Keep the heat medium and do not boil. 2. In a bowl, whisk the egg yolks and the remaining 1/2 cup sugar. Whisk until creamy and lighter. 3. Slowly add a bit of the warm cream mix to the egg yolks while whisking. This helps avoid scrambled eggs. 4. Pour the egg yolk mix back into the saucepan with the cream. Cook over medium-low heat. Stir with a wooden spoon until it thickens, about 8-10 minutes. 5. Remove from heat and stir in the chocolate chips. Keep stirring until they melt fully into the custard. 6. Add the vanilla extract and sea salt. Let the custard cool for 30 minutes. Then chill in the fridge for at least 2 hours, or overnight for best results. 7. Pour the chilled custard into an ice cream maker. Churn according to the maker's instructions for about 20-25 minutes. 8. Move the ice cream to an airtight container and freeze for at least 4 hours until firm. 9. Before serving, let the ice cream sit at room temperature for 5-10 minutes. This makes scooping easier. - For step 1, watch the mixture closely. If it starts to boil, lower the heat. - In step 2, whisk firmly to get air into the yolks. This creates a lighter custard. - In step 3, add the warm cream slowly. This keeps the eggs from cooking too fast. - During step 4, stir constantly. This helps the custard cook evenly. - In step 5, make sure the chocolate melts completely. This gives a smooth texture. - For step 6, chilling overnight allows better flavor development. - In step 7, do not over-churn. Stop when it reaches soft-serve consistency. - For step 9, this step helps the ice cream become scoopable without breaking. - Do not let the cream mixture boil. Boiling can change the texture. - Avoid whisking the egg yolks too slowly. This can lead to a heavy custard. - Don't skip the tempering step. This is key to a smooth custard. - Be careful not to overheat the custard in step 4. It can curdle if too hot. - Ensure the chocolate is fully melted in step 5. A lumpy texture is unappealing. - Remember to chill the custard long enough. Rushing this step affects the final taste. - Do not freeze the ice cream too quickly. Let it firm up slowly for the best texture. - Finally, avoid scooping the ice cream straight from the freezer. Let it soften first. To get the best custard texture, keep these tips in mind: - Heat Slowly: Always heat the cream and milk slowly. This helps melt the sugar without boiling. - Whisk Well: Whisk the egg yolks until they look lighter. This adds air for creaminess. - Temper Carefully: When mixing the warm cream with the eggs, do it slowly. This helps prevent the eggs from cooking too fast. - Stir Constantly: While cooking, stir the custard non-stop. It thickens nicely this way. - Check the Coating: The custard is ready when it coats the back of a spoon. This shows it has thickened correctly. Storing your chocolate custard ice cream correctly keeps it fresh: - Freeze Firmly: After churning, freeze the ice cream for at least 4 hours. This makes it easy to scoop. - Room Temperature: Before serving, let the ice cream sit out for 5-10 minutes. This softens it for easier scooping. - Use Airtight Containers: Store ice cream in airtight containers to prevent ice crystals from forming. - Garnish for Style: Top with chocolate shavings or cacao nibs for a fancy touch. This adds texture and looks great on the table. Using the right tools makes ice cream making easier: - Medium Saucepan: For heating the cream and milk. - Mixing Bowls: Use these for whisking egg yolks and mixing. - Wooden Spoon: This is perfect for stirring the custard. - Ice Cream Maker: Essential to churn the custard into ice cream. - Airtight Container: Helps store your ice cream safely in the freezer. With these tips and tools, you can create a smooth and creamy chocolate custard ice cream that everyone will love! Pro Tips Use Quality Chocolate: The flavor of your ice cream largely depends on the chocolate used. Opt for high-quality semi-sweet chocolate chips for the best taste and texture. Chill Thoroughly: Allowing the custard to cool completely in the refrigerator before churning ensures a creamier texture. It's best to leave it overnight if possible. Don’t Rush the Churning: Follow the manufacturer’s instructions carefully when churning the ice cream. Over-churning can lead to a grainy texture. Let It Sit: Before serving, let the ice cream sit at room temperature for about 5-10 minutes. This makes it easier to scoop and enhances the overall eating experience. {{image_4}} You can change the flavor of your chocolate custard ice cream easily. Try using dark chocolate chips for a richer taste. For a twist, add white chocolate chips for a sweet contrast. You can also mix in flavored chocolate, like mint or orange. This change will give your ice cream a fun and unique taste. If you want a dairy-free option, use coconut cream instead of heavy cream. Almond milk works well too. Just make sure to pick a dairy-free chocolate. This way, you can enjoy the same creamy texture without the dairy. You can also try using egg substitutes to make the recipe vegan-friendly. Toppings can bring your chocolate custard ice cream to a new level. Chocolate shavings are a classic choice and add a nice look. Cacao nibs give a crunchy texture and a deeper chocolate flavor. You can also use fresh fruits like raspberries or strawberries for a fruity touch. A drizzle of caramel or chocolate sauce can make it even more delicious. To keep your chocolate custard ice cream fresh, store it in an airtight container. This helps prevent ice crystals from forming. Place a piece of plastic wrap directly on the surface of the ice cream before sealing the container. This extra layer keeps air out. Always freeze the ice cream at 0°F (-18°C) or lower. Avoid opening the freezer too often, as this can raise the temperature. When stored properly, chocolate custard ice cream lasts about 2-3 weeks in the freezer. After this time, it may lose its rich taste and texture. Signs of spoilage include ice crystals on the surface or a grainy texture. If the ice cream smells off or has an unusual color, it's best to throw it away. Always trust your senses. If it doesn't seem right, don't eat it. If your ice cream becomes too hard, you can revive it by re-churning. Let it sit at room temperature for about 10-15 minutes to soften. Then, transfer it back to your ice cream maker and churn again until creamy. This process helps restore the smooth texture. If you don't have an ice cream maker, you can stir it by hand every 30 minutes as it freezes. This method breaks up ice crystals and keeps your ice cream creamy. Custard has egg yolks, while regular ice cream does not. The egg yolks give custard a rich and creamy texture. This makes custard ice cream smoother and denser. Regular ice cream often feels lighter. Both are delicious, but custard offers a unique taste and feel. Yes, you can make it without an ice cream maker. After chilling the custard, pour it into a shallow dish. Place it in the freezer. Stir it every 30 minutes for about 2-3 hours. This process breaks up ice crystals and keeps the texture smooth. It takes a bit more time but works well! To make your ice cream creamier, use more heavy cream and less milk. The fat in cream adds richness. You can also add a bit of corn syrup; it helps with texture. Churning the ice cream well while it freezes incorporates air, making it fluffier. Lastly, ensure you chill the custard fully before churning. In this post, we explored key ingredients for ice cream, how to prepare them, and tips for success. I shared ways to get the perfect custard texture and creative variations to try. Remember to store your ice cream right and check for spoilage signs. Making ice cream at home can be fun and rewarding. Use these tips to create a tasty treat that everyone will love. Enjoy your homemade ice cream journey!

Chocolate Custard Ice Cream Rich and Creamy Delight

- 4 boneless, skinless chicken breasts - 1 cup fresh mozzarella cheese, diced - 1 cup fresh spinach, finely chopped - 1/2 cup sun-dried tomatoes, roughly chopped - 2 cloves garlic, minced - 1 teaspoon Italian seasoning - 1/2 teaspoon red pepper flakes (optional for added heat) - Salt and freshly ground black pepper, to taste - 1 tablespoon extra virgin olive oil - 1/4 cup fresh basil leaves, chopped (for garnish) For a tasty dish, you need simple yet fresh ingredients. Start with chicken breasts. Choose boneless and skinless ones for ease. For the filling, fresh mozzarella and spinach add great flavor. Sun-dried tomatoes give a sweet tang. Garlic and Italian seasoning round out the taste. To spice it up, add red pepper flakes if you like heat. Use salt and black pepper to season the chicken well. The olive oil helps crisp the chicken while cooking. Lastly, fresh basil makes a lovely garnish. This simple mix creates a rich, tasty meal you can enjoy. {{ingredient_image_2}} - Begin by preheating your oven to 375°F (190°C). - In a bowl, combine diced mozzarella, spinach, sun-dried tomatoes, minced garlic, Italian seasoning, and optional red pepper flakes. Mix well. - Take each chicken breast and create pockets with a sharp knife. Cut horizontally but do not slice all the way through. - Season the inside and outside with salt and pepper. - Stuff the chicken with the cheese and spinach mixture. Use toothpicks or kitchen twine to secure the openings. - Heat olive oil in a large skillet over medium heat. - Sear the stuffed chicken seam-side down for 4-5 minutes until golden brown. - Transfer the chicken to a baking dish. - Bake for 20-25 minutes until cooked through, reaching an internal temperature of 165°F (74°C). To make the best stuffed mozzarella chicken, focus on your stuffing technique. First, ensure you distribute the filling evenly. This gives every bite the same great flavor. Avoid overstuffing the chicken. If you pack it too tight, the filling may spill out while cooking. Use a meat thermometer to check the chicken’s doneness. The safe internal temperature should reach 165°F (74°C). This step prevents undercooking or overcooking. After baking, let the chicken rest for a few minutes. This helps the juices settle, keeping the meat juicy and tender. For a stunning presentation, serve the stuffed chicken on a bed of sautéed spinach. You could also use colorful roasted vegetables around the chicken. To elevate both flavor and look, drizzle with balsamic reduction. Finally, sprinkle fresh basil on top for a pop of color and a fresh taste. Pro Tips Resting is Key: Allow the stuffed chicken to rest for a few minutes after baking to let the juices redistribute, ensuring a moist and flavorful bite. Customize the Filling: Feel free to add other ingredients to the stuffing, such as chopped artichokes, olives, or different herbs for a unique flavor profile. Check Doneness: Use a meat thermometer to ensure the chicken reaches an internal temperature of 165°F (74°C) for food safety and perfect doneness. Presentation Matters: Serve with a side of roasted vegetables or a fresh salad to enhance the dish's visual appeal and balance the meal. {{image_4}} You can change the cheese to fit your taste. Provolone adds a nice kick. Feta gives a tangy taste. Both can replace mozzarella if you want something different. You can also swap basil for fresh parsley or oregano. These herbs bring their own unique flavors. To spice things up, add garlic powder, onion powder, or smoked paprika. These spices add depth. You can also include more veggies in the mix. Think bell peppers or mushrooms for added texture. If you want protein, consider adding cooked sausage or bacon to the stuffing. These options make the dish heartier. For a gluten-free meal, ensure your ingredients are labeled as gluten-free. This dish is naturally low-carb, thanks to the chicken and cheese. If you prefer a vegetarian option, use eggplant or zucchini instead of chicken. Slice the veggies and stuff them for a tasty alternative. These ideas let you enjoy this dish no matter your dietary needs. To keep your stuffed mozzarella chicken fresh, choose the right storage method. You can refrigerate or freeze the leftovers. For refrigeration, place the chicken in an airtight container. It will stay good for about 3 to 4 days. If you want to keep it longer, freeze the chicken. In the freezer, it can last up to 3 months. Just make sure to wrap it well to prevent freezer burn. When it is time to eat your leftovers, you want them to taste great. The best way to reheat stuffed chicken is in the oven. Set your oven to 350°F (175°C). Place the chicken in a baking dish and cover it with foil. Heat for about 15 to 20 minutes. If you use a microwave, heat it for about 2 to 3 minutes, but the oven is better for keeping the texture. Preparing stuffed mozzarella chicken in advance can save you time. You can make a batch on Sunday and enjoy it all week. To do this, follow the recipe and store the cooked chicken in the fridge. Pair it with easy sides like rice, mixed veggies, or salad for quick dinners. This makes meal time simple and tasty! Yes, you can use frozen chicken. However, you will need to thaw it first. Place the frozen chicken in the fridge overnight. If you are short on time, you can also use the microwave. Be sure to cook the chicken right after thawing. Adjust the cooking time to ensure the chicken cooks evenly. Stuffed Mozzarella Chicken pairs well with many sides. Here are some tasty options: - Garlic mashed potatoes - Steamed broccoli - Roasted vegetables - A fresh garden salad - Pasta with marinara sauce These side dishes add flavor and color to your meal. You can mix and match based on your taste. To check if the chicken is done, use a meat thermometer. The internal temperature should be 165°F (74°C). If you don’t have a thermometer, look for these signs: - The juices should run clear, not pink. - The chicken should feel firm to the touch. - The surface should be golden brown. These checks will help ensure your chicken is cooked through and safe to eat. This blog post covered everything you need to know about making stuffed mozzarella chicken. We explored the key ingredients, step-by-step instructions, and tips for perfecting your dish. You also learned about variations, storage tips, and common questions. In conclusion, this dish is both simple and tasty. It’s perfect for any occasion. With a bit of practice, you’ll impress family and friends. Enjoy the cooking process and savor the delicious results. Happy cooking!

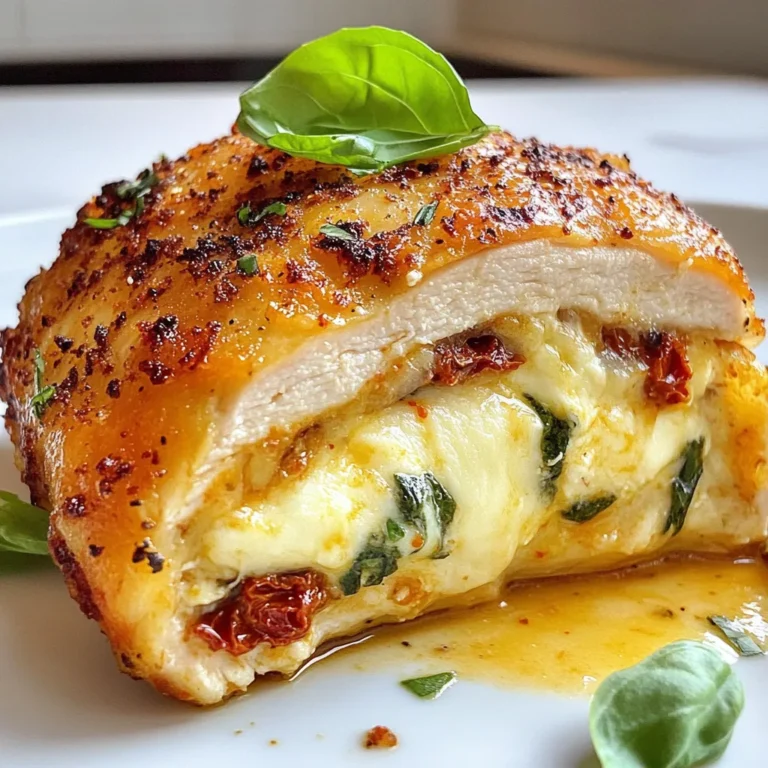
Stuffed Mozzarella Chicken Flavorful and Easy Recipe

- 4 salmon fillets (approximately 6 oz each) - 1/4 cup honey - 1/4 cup soy sauce (or tamari for a gluten-free option) - 3 cloves garlic, minced finely - 1 tablespoon fresh ginger, grated - 2 cups broccoli florets - 1 medium red bell pepper, sliced into thin strips - 1 cup snap peas, trimmed - 2 tablespoons extra virgin olive oil - Salt and freshly cracked black pepper to taste - Fresh cilantro or parsley, finely chopped, for garnish (optional) When making this dish, I love to focus on fresh ingredients. The salmon fillets should be bright and firm. Honey adds sweetness that balances the saltiness of the soy sauce. Minced garlic and ginger give the dish a nice kick. For the veggies, I choose broccoli, red bell pepper, and snap peas. They not only taste great but also add color to the meal. Olive oil helps to coat the veggies, making them crisp and tasty. I recommend using fresh herbs, like cilantro or parsley, for garnish. They bring freshness and look beautiful on the plate. This combination of ingredients makes for a quick and healthy dinner that everyone will enjoy. {{ingredient_image_2}} 1. Preheat your oven to 400°F (200°C). Line a large sheet pan with parchment paper. This helps with clean-up and keeps food from sticking. 2. In a small bowl, mix together 1/4 cup honey, 1/4 cup soy sauce, 3 minced garlic cloves, and 1 tablespoon grated ginger. Whisk until the mixture is smooth. This is your honey garlic marinade. 3. Place 4 salmon fillets on one side of the sheet pan. Use a brush or spoon to coat the tops with half of the marinade. Save the rest for later. 1. In a big bowl, combine 2 cups of broccoli florets, 1 sliced red bell pepper, and 1 cup of snap peas. Drizzle with 2 tablespoons of olive oil. Sprinkle with salt and pepper. 2. Toss the vegetables until they are all coated in oil and seasoning. Spread them on the other side of the sheet pan around the salmon. Make sure they have space to roast well. 1. Bake the sheet pan in the oven for about 15-20 minutes. The salmon is done when it flakes easily with a fork. The veggies should be tender but still crisp. 2. Carefully take the sheet pan out of the oven. Drizzle the reserved marinade over both the salmon and vegetables. If you want a caramelized look, put the pan back in the oven for another 2-3 minutes. 3. Let the dish sit for a few minutes. This helps the flavors mix together. Just before serving, you can add freshly chopped cilantro or parsley for extra color and taste. Enjoy your meal! To ensure even cooking, space the salmon and veggies well. This allows hot air to flow freely. If the salmon fillets are thick, check them at 15 minutes. Thinner fillets may need only 12 minutes. A fork should easily flake the salmon when it’s done. For the veggies, they should be tender but still bright. To add some heat, consider chili flakes. They give a nice kick to the dish. You can also try different sauces. A teriyaki sauce can change the flavor profile. For a citrus twist, add lemon juice to your marinade. Mix and match to find your favorite flavor! Pro Tips Marinate Longer for More Flavor: If you have time, marinate the salmon for at least 30 minutes to enhance the flavor. The honey and garlic will penetrate the fish, making each bite deliciously sweet and savory. Use Fresh Ingredients: Fresh garlic and ginger will give the best flavor. Dried versions can be used in a pinch, but fresh will elevate the dish significantly. Cut Vegetables Uniformly: Ensure that your vegetables are cut into similar sizes for even cooking. This helps them cook at the same rate, resulting in perfectly tender yet crisp veggies. Experiment with Other Veggies: Don’t hesitate to swap in your favorite vegetables! Asparagus, zucchini, or carrots can be great additions and provide a variety of textures and flavors. {{image_4}} You can switch up the protein in this recipe. If you want something different, try trout or tilapia. Both fish have a mild taste that pairs well with the honey garlic sauce. They also cook quickly, just like salmon. If you prefer chicken, use boneless, skinless chicken breasts. Cut them into smaller pieces for even cooking. You can follow the same marinating steps. For a plant-based option, tofu works great. Use firm tofu, press it to remove excess water, and cut it into cubes. Marinade it just like the salmon for maximum flavor. Feel free to swap out the veggies for your favorites. Seasonal vegetables work well and add variety. Try asparagus, zucchini, or carrots. Just remember to cut them into similar sizes for even cooking. For quick-cooking tips, add faster-cooking veggies like spinach or mushrooms later. This way, they won’t overcook. You can toss them in during the last 5 minutes of baking. This keeps them tender and bright. Enjoy experimenting with different flavors and colors! To keep your Honey Garlic Salmon fresh, store it properly. Place leftover salmon and veggies in an airtight container. This helps prevent drying and keeps flavors intact. - Refrigeration: Store in the fridge for up to 3 days. - Freezing: For longer storage, you can freeze it for up to 3 months. Just make sure to wrap the salmon tightly. Reheating can be tricky. You want your salmon warm without losing moisture. Here are some great methods: - Oven: Preheat your oven to 300°F (150°C). Place the salmon on a baking sheet. Cover it with foil to keep it moist. Heat for about 10-15 minutes. - Microwave: Use a microwave-safe dish. Add a splash of water and cover. Heat in short bursts of 30 seconds until warm. This helps to keep the fish from drying out. These methods will keep your dish tasty and enjoyable even on day two! How can I make this recipe gluten-free? You can easily make this dish gluten-free by using tamari instead of soy sauce. Tamari is a gluten-free soy sauce alternative. Check the label to ensure that it is certified gluten-free. Can I prepare the marinade in advance? Yes, you can prepare the honey garlic marinade ahead of time. Mix the honey, soy sauce, garlic, and ginger in a bowl. Store it in the fridge for up to three days. This saves time on busy nights. What should I serve with honey garlic salmon? Honey garlic salmon pairs well with rice or quinoa. You can also serve it with a fresh salad or some crusty bread. The meal can be balanced and filling with these sides. Can I use frozen salmon fillets? Yes, you can use frozen salmon fillets. Just make sure to thaw them first. You can place them in the fridge overnight or use the microwave. The cooking time may need slight adjustments based on thickness. This blog post covered a simple and delicious honey garlic salmon recipe. We explored the key ingredients, from fresh salmon and vibrant vegetables to a flavorful marinade. I shared clear, step-by-step instructions for preparation and baking. Cooking tips and variations offer options for everyone, whether you prefer different proteins or veggies. In conclusion, cooking can be fun and rewarding. This dish is not only tasty but also flexible. Enjoy it your way and share it with loved ones. Happy cooking!

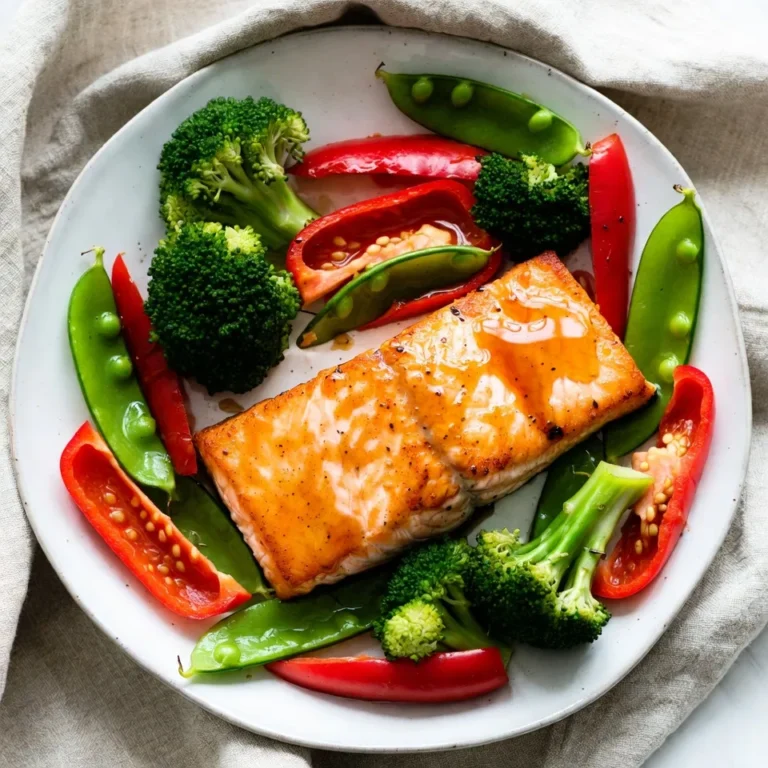
Honey Garlic Salmon Sheet Pan Easy Dinner Delight

- 2 large sweet potatoes, sliced into thin rounds - 1 cup black beans, drained and rinsed - 1 cup corn kernels (fresh, frozen, or canned) Sweet potatoes form the base for these nachos. They have a sweet flavor and a soft texture. Black beans add protein and fiber. Corn gives a nice crunch and sweetness to the dish. - 1 avocado, diced - 1 jalapeño, sliced (optional for heat) - Fresh cilantro leaves, for garnish Adding toppings makes your nachos even better. Avocado gives creaminess. Jalapeño adds heat, but you can skip it if you prefer mild. Fresh cilantro brings a burst of flavor and freshness. - 1 tablespoon olive oil - 1 teaspoon smoked paprika - 1 teaspoon garlic powder - Salt and freshly ground black pepper, to taste The right seasonings can change everything. Olive oil helps the sweet potatoes crisp up. Smoked paprika gives a deep, smoky flavor. Garlic powder is a must for taste. Don't forget salt and pepper for balance. {{ingredient_image_2}} First, you need to get your oven ready. Preheat it to 400°F (200°C). This makes sure your nachos cook well. In a large bowl, mix two large sweet potatoes, sliced into thin rounds, with one tablespoon of olive oil. Add one teaspoon of smoked paprika and one teaspoon of garlic powder. Sprinkle in some salt and black pepper to taste. Toss everything until the sweet potatoes are fully coated. Next, arrange the seasoned sweet potato rounds on a baking sheet. Line the sheet with parchment paper to prevent sticking. Spread the rounds in a single layer. Bake them in the preheated oven for 20-25 minutes. Flip the rounds halfway through cooking. This helps them get crispy and golden-brown. While the sweet potatoes bake, prepare your toppings. In another bowl, combine one cup of black beans, one cup of corn, and one cup of halved cherry tomatoes. Lightly season this mix with salt and pepper. After baking, transfer the sweet potatoes to a large platter. Layer them nicely. Spread the black bean and corn mixture evenly over the warm sweet potato rounds. Then, add diced avocado on top. Next, sprinkle one cup of shredded cheddar cheese over everything. If you like heat, add sliced jalapeño on top of the cheese. Return the nachos to the oven and bake for another 5-7 minutes. This time, you want the cheese to melt and bubble. Once done, take them out of the oven, garnish with fresh cilantro leaves, and serve with lime wedges for a zesty finish. To make sweet potato nachos crispy, start by cutting the sweet potatoes thin. Aim for even slices, about 1/4 inch thick. This helps them cook nicely. Next, coat them well in olive oil and seasonings. This adds flavor and helps with crisping. Spread the rounds in a single layer on the baking sheet. If they overlap, they won't crisp well. Bake them at 400°F for 20-25 minutes. Flip them halfway through for even cooking. You'll know they are perfect when they are golden and crunchy. Fresh herbs and spices can boost your nachos' taste. I love using smoked paprika and garlic powder. They add a warm, savory note. You can also try fresh cilantro for a bright flavor. Squeeze fresh lime juice on top before serving. This adds a tang that contrasts well with the sweetness of the potatoes. Don’t be shy; mix in your favorite spices too! When serving loaded sweet potato nachos, dips and drinks can elevate the meal. Try pairing them with creamy guacamole or zesty salsa. A cool dip balances the warm nachos. For drinks, I recommend a light beer or sparkling water with lime. This refreshment works well with the flavors. Feel free to get creative here; your guests will love it! Pro Tips Cut Evenly: Ensure your sweet potato rounds are sliced uniformly to guarantee even cooking and crispiness. Season Generously: Don't shy away from seasoning! Adjust the salt and spices to your preference for maximum flavor. Layering is Key: When assembling your nachos, layer the toppings evenly for balanced bites of flavor in every serving. Serve Fresh: For the best taste, serve the nachos immediately after baking to maintain the crispiness of the sweet potatoes. {{image_4}} You can make this dish lighter by using dairy-free cheese. Many brands offer tasty options that melt well. You can also swap the cheddar for nutritional yeast. It adds a cheesy flavor without the dairy. Additionally, consider using less oil or a light spray for cooking the sweet potatoes. Mix up the toppings to suit your taste. Try using pinto beans or chickpeas instead of black beans. You can add roasted bell peppers or sautéed mushrooms for extra flavor. For a fresh twist, top with diced red onion or a sprinkle of fresh corn salsa. This helps create a colorful, tasty dish. Adjusting the spice level is easy. If you want more heat, add more jalapeños or use a spicy salsa. For less heat, skip the jalapeños altogether. You can also use mild chili powder or sweet paprika instead of smoked paprika. This way, you can customize the heat to your liking. To keep your loaded sweet potato nachos fresh, store them in the fridge. Use an airtight container. This prevents moisture loss and keeps flavors intact. Make sure they cool down before sealing. They last about 3 to 5 days in the fridge. When ready to eat, you can enjoy them cold or reheat them. If you want to save nachos for later, freezing is a great option. However, it's best to freeze the sweet potatoes and toppings separately. This way, the texture stays nice. Spread the sweet potatoes in a single layer on a baking sheet. Freeze until solid, then transfer to a freezer bag. For toppings, use a separate bag. They can last up to 3 months in the freezer. When you are ready to enjoy your nachos again, reheating is key. The oven is the best method. Preheat your oven to 350°F (175°C). Spread the nachos on a baking sheet. Heat for about 10 to 15 minutes until warm and crispy. If they seem dry, add a splash of water to keep them moist. Avoid the microwave if you want to keep that crispy texture. Enjoy your loaded sweet potato nachos as if they were freshly made! Yes, you can prepare some parts ahead. Start by slicing the sweet potatoes. Store them in water to keep them fresh. You can also mix the black beans, corn, and tomatoes in advance. Keep that mixture in the fridge. When you are ready, bake the sweet potatoes and add toppings. This method saves time and keeps things simple. If you want an alternative, try regular potatoes or zucchini. You can also use tortilla chips for a different twist. Each option offers a unique taste and texture. Just make sure to adjust cooking times as needed. Regular potatoes may take longer to cook, while zucchini cooks faster. For more heat, add sliced jalapeños or crushed red pepper flakes. You can also mix in hot sauce with the black bean blend. If you want a smoky flavor, add smoked paprika. Start with a little and taste as you go. This way, you can find the perfect spice level for your nachos. In this post, we explored how to make loaded sweet potato nachos. We covered main ingredients like sweet potatoes and black beans, along with tasty toppings and seasonings. I shared step-by-step instructions to achieve the perfect bake and crisp. Remember, adjusting toppings and spice levels adds variety to your dish. You can also store leftovers for later enjoyment. Embrace these ideas to create your own delicious spin on this fun meal. Enjoy your cooking adventure!

Loaded Sweet Potato Nachos Flavorful and Simple Recipe

To make the Pomegranate Power Smoothie, gather these ingredients: - 1 cup pomegranate juice (freshly squeezed or store-bought) - 1 cup Greek yogurt (plain or vanilla) - 1 ripe banana - 1/2 cup fresh spinach - 1 tablespoon chia seeds - 1 tablespoon honey - 1/2 cup ice cubes - A handful of pomegranate seeds (for garnish) Fresh pomegranate juice gives the best flavor. It has bright notes and a vibrant taste. You can make it by squeezing ripe pomegranates. If you can't find fresh juice, store-bought is a good option. Just check the label for added sugars. Less sugar means a healthier smoothie! Want to spice up your smoothie? Here are a few fun add-ins: - A dash of cinnamon for warmth - A scoop of nut butter for creaminess - A tablespoon of flaxseeds for extra nutrients - A splash of coconut water for a tropical twist These additions can change the taste and add more health benefits. Try mixing different flavors to find your perfect blend! {{ingredient_image_2}} First, gather all your ingredients. You will need: - 1 cup pomegranate juice - 1 cup Greek yogurt - 1 ripe banana - 1/2 cup fresh spinach - 1 tablespoon chia seeds - 1 tablespoon honey - 1/2 cup ice cubes - A handful of pomegranate seeds Make sure your counter is clean. This helps keep your kitchen neat. In your blender, combine the pomegranate juice, Greek yogurt, banana, and spinach. This mix makes a tasty base. Next, add chia seeds and honey to the blender. Chia seeds give your smoothie a healthy boost. Honey adds sweetness. Then, toss in the ice cubes. They chill the drink nicely. Blend everything on high speed. Keep blending until the mix is smooth and creamy. Check for lumps; you want a silky texture. After blending, taste your smoothie. If you want it sweeter, add more honey. Pour the smoothie into glasses. For a pretty touch, sprinkle pomegranate seeds on top. This gives a lovely crunch and bright color. Enjoy your Pomegranate Power Smoothie chilled for the best taste! When picking pomegranates, look for shiny, smooth skin. Choose ones that feel heavy for their size. This means they are juicy and ripe. A ripe pomegranate has a deep red color. Avoid any with cracks or soft spots. These signs mean the fruit may be overripe or spoiled. Fresh pomegranates give the best juice for your smoothie. To make your smoothie creamy, use ripe bananas. They add natural sweetness and smooth texture. Greek yogurt also helps with creaminess. Choose plain yogurt for a tangy taste or vanilla for sweetness. If you want it even creamier, blend in a bit more yogurt. Blend all ingredients well until smooth. This ensures you get that dreamy, velvety finish. Sweetness can vary based on your taste. Start with one tablespoon of honey. Blend it in, then taste your smoothie. If you want it sweeter, add more honey a little at a time. You can also use maple syrup or agave for a twist. Remember, the ripe banana adds some sweetness too, so adjust based on what you prefer! Pro Tips Use Fresh Ingredients: For the best flavor and nutrition, opt for fresh pomegranate juice and ripe bananas. Fresh ingredients elevate the overall taste of your smoothie. Customize Sweetness: Adjust the amount of honey based on your preference. If you enjoy a sweeter smoothie, feel free to add more honey gradually until it reaches your desired sweetness. Boost Nutrition: Add additional superfoods like flax seeds or protein powder for an extra nutritional boost. This can make your smoothie even more filling and beneficial. Chill Before Serving: For the best experience, chill your smoothie in the fridge for a few minutes before serving or use frozen fruits instead of ice cubes to enhance creaminess. {{image_4}} Pomegranates are small but mighty. One cup of pomegranate juice packs a punch. It contains vitamin C, potassium, and fiber. These nutrients help your body stay healthy and strong. Greek yogurt adds protein and calcium. Spinach brings iron and vitamins A and K. Together, they make this smoothie a powerhouse of nutrition. Pomegranates shine with their antioxidant strength. Antioxidants fight off free radicals that can harm your cells. They support heart health and may lower blood pressure. Studies show that pomegranate juice may even improve memory. Drinking this smoothie can help protect your body from illness. You get protection and deliciousness in one sip! Spinach is a leafy green with many perks. It adds a fresh taste and vibrant color. It’s low in calories but high in nutrients. Chia seeds are tiny but full of goodness. They provide omega-3 fatty acids and fiber. These seeds help you feel full longer. Together, spinach and chia seeds boost your smoothie’s health. They make every sip nutrient-rich and satisfying. You can add other fruits to your Pomegranate Power Smoothie for extra flavor. Berries like strawberries or blueberries work great. They add sweetness and color. Mango or pineapple also make the smoothie tropical. Just swap out some banana or spinach to keep the balance right. Try mixing one fruit at a time to find your favorite combo! If you want a vegan version, you can easily switch a few ingredients. Use almond or coconut yogurt instead of Greek yogurt. This keeps the creaminess while making it dairy-free. For sweetness, swap honey with maple syrup or agave nectar. Both options work well and add their own unique flavor! To make your smoothie even more filling, add protein. You can mix in a scoop of your favorite protein powder. Plant-based powders like pea or hemp work best in a vegan smoothie. You can also add nut butter, like almond or peanut, for a rich taste. Just a tablespoon gives you great flavor and protein! If you have extra smoothie, store it quickly. Pour it into an airtight container. Keep it in the fridge. Consume it within 24 hours for the best taste. Smoothies may separate over time. Just shake or stir before drinking. To keep your smoothie fresh, add a little lemon juice. This helps prevent browning. Always use fresh ingredients. If you make a big batch, blend only what you need. The rest can wait in the fridge. For easy mornings, prep your ingredients ahead. Measure out pomegranate juice, yogurt, and spinach. Place them in freezer bags. You can freeze bananas too. Just peel and slice them first. This makes blending quick and easy when you're ready. Yes, you can use frozen fruit! Frozen fruits work well in smoothies. They create a thick, creamy texture. They also chill the drink without needing extra ice. Just blend them the same way as fresh ones. If you use frozen bananas, let them thaw a bit for easier blending. You can store your smoothie in the fridge for up to 24 hours. Use an airtight container to keep it fresh. If you want to store it longer, freeze it. Just remember to leave space for the smoothie to expand when it freezes. Thaw it overnight in the fridge before drinking. Yes, pomegranate seeds are safe to eat! They are tasty and full of nutrients. They provide fiber, vitamins, and antioxidants. You can enjoy them as a snack or add them to dishes. Just be mindful of their tartness if you're new to them. This blog post shared how to make a tasty pomegranate smoothie. I covered ingredients, fresh versus store-bought juice, and optional add-ins. You learned step-by-step instructions for prep and serving, plus tips for fresh pomegranates and creaminess. I also highlighted health benefits of pomegranates, spinach, and chia seeds. You discovered various ways to customize flavors and store your smoothies. Remember, you have the power to create delicious and healthy smoothies that fit your taste!

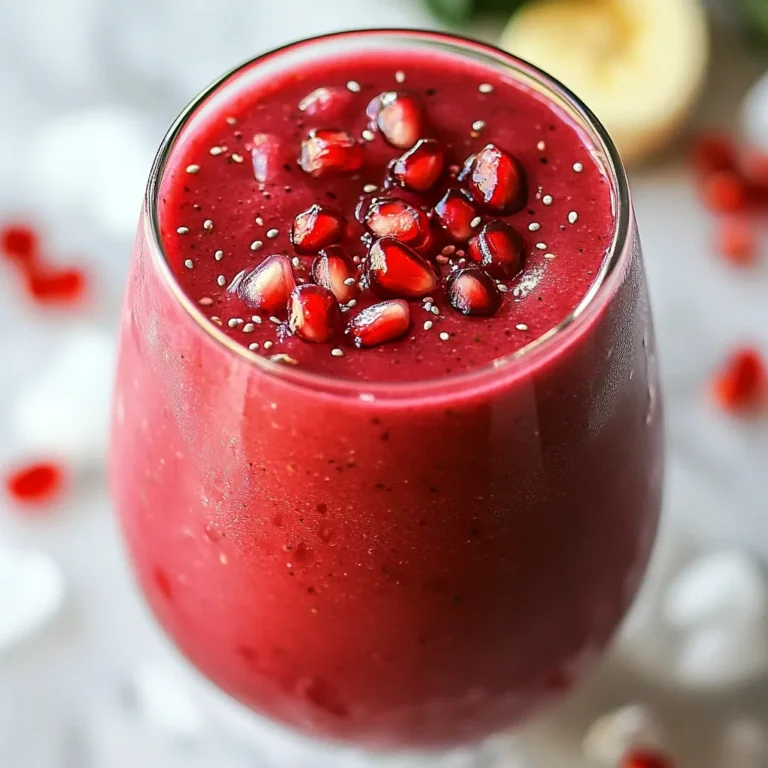
Pomegranate Power Smoothie Energizing Health Boost

PREV 1 … 38 39 40 … 44 NEXT
yummybiterecipes

explore

DessertsDinnerAppetizersDrinks

Our Policies

  • Cookie Policy
  • Copyright Policy
  • Disclaimer
  • GDPR Policy
  • Terms Of Use
Back to Top
  • About
  • Contact Us
  • Privacy Policy
© 2025 yummybiterecipes