FREE DINNER EBOOK! Get your copy!
  • Cookie Policy
  • GDPR Policy
  • Disclaimer
  • Terms Of Use
  • Visit my other site: Fun Cookie Recipes
yummybiterecipes
  • Home
  • Dinner
  • Desserts
  • Drinks
  • Appetizers
  • Contact
  • About
  • Privacy Policy
  • Home
  • Dinner
  • Desserts
  • Drinks
  • Appetizers
  • Contact
  • About
  • Privacy Policy
  • Cookie Policy
  • GDPR Policy
  • Disclaimer
  • Terms Of Use
Visit my other site: Fun Cookie Recipes

HOME / CATEGORIES /

Latest

- 4 boneless, skinless chicken breasts - 1 cup sour cream - 1 cup shredded cheddar cheese - 1 cup cream of mushroom soup - 1 tablespoon garlic powder - 1 tablespoon onion powder - 1 teaspoon paprika - Salt and black pepper, to taste - 1 cup breadcrumbs (optional) - 2 tablespoons fresh parsley, chopped Alternatives for sour cream You can use Greek yogurt instead of sour cream. It adds a nice tang and is thick. Options for cream of mushroom soup If you want a healthier choice, use homemade soup or a can of cream of chicken soup. Both work well in this recipe. Cheese alternatives You can swap cheddar cheese for mozzarella or pepper jack. Each cheese brings a different taste. {{ingredient_image_2}} - Preheat your oven to 375°F (190°C). This makes sure your dish cooks well. - Grease a 9x13 inch baking dish with cooking spray or olive oil. This helps the chicken not stick. - In a medium bowl, mix together 1 cup of sour cream, 1 cup of cream of mushroom soup, 1 tablespoon of garlic powder, 1 tablespoon of onion powder, and 1 teaspoon of paprika. - Add a pinch of salt and black pepper. Stir until everything is smooth and well combined. - Arrange 4 boneless, skinless chicken breasts in the greased dish. Season both sides with salt and pepper. - Spread the sour cream mixture over each chicken breast. Make sure each piece is fully coated. - Sprinkle 1 cup of shredded cheddar cheese on top. If you like a crunchy texture, add 1 cup of breadcrumbs. - Cover the dish with aluminum foil to keep the chicken moist. - Place the dish in the oven and bake for 30 minutes. After that, remove the foil and bake for another 10-15 minutes. - Check that the chicken is fully cooked when it reaches an internal temperature of 165°F (75°C). The cheese should be bubbly and golden. - Best practices for seasoning chicken: Start with fresh chicken breasts. Use salt and black pepper generously on both sides. Mix garlic powder, onion powder, and paprika into the sour cream mixture for more flavor. This helps the seasoning stick well. - Ensuring chicken stays moist: Cover the baking dish with aluminum foil while baking. This traps steam and keeps the chicken juicy. You can remove the foil later to let the cheese brown, but do not skip the foil at first. - Garnishing with parsley: After baking, sprinkle fresh parsley on top. This adds color and freshness to your dish. It makes the meal look festive and appetizing. - Pairing with sides like vegetables and salads: Serve with steamed broccoli, green beans, or a crisp salad. These sides balance the rich flavors of the dish. Choose bright colors for a more appealing plate. - Best methods for reheating leftovers: Use the oven for best results. Preheat it to 350°F (175°C). Place the chicken in an oven-safe dish and cover it with foil. Heat for about 20 minutes or until warm. - Maintaining texture and flavor: Avoid using the microwave if possible. The oven keeps the chicken moist and the cheese bubbly. If using a microwave, cover the chicken with a damp paper towel to prevent it from drying out. Pro Tips Marinate for More Flavor: For an extra depth of flavor, marinate the chicken in the sour cream mixture for a few hours or overnight in the refrigerator before baking. Use Fresh Herbs: Enhance the freshness of the dish by adding chopped fresh herbs like thyme or rosemary to the sour cream mixture for an aromatic twist. Experiment with Cheeses: While cheddar is delicious, try mixing in other cheeses like mozzarella or pepper jack for a different flavor profile. Check for Doneness: Always use a meat thermometer to ensure the chicken reaches an internal temperature of 165°F (75°C) for safe consumption and optimal texture. {{image_4}} You can make this dish low-carb by using cauliflower instead of breadcrumbs. Simply chop the cauliflower into small bits and mix it into the sour cream layer. This keeps the texture nice while reducing carbs. For a different flavor, try using herbs like thyme or rosemary instead of the usual seasonings. These fresh flavors make your dish stand out. To kick up the taste, add spices like cayenne for heat or Italian seasoning for herb flavor. You can also incorporate sautéed vegetables like bell peppers or zucchini. This adds color and nutrients to your meal. The vegetables also blend nicely with the creamy sauce, giving each bite more depth. If you need a gluten-free option, use gluten-free breadcrumbs. They work just as well in this dish. For dairy-free needs, you can swap the sour cream and cheese for vegan alternatives. There are many tasty plant-based options that mimic the creaminess of the original ingredients. This way, everyone can enjoy the Cheesy Sour Cream Chicken Bake. To keep your Cheesy Sour Cream Chicken Bake fresh, store leftovers in the fridge. Place them in an airtight container to prevent drying out. Make sure to cool the dish before sealing it. This dish lasts about 3 to 4 days in the fridge. If you want to enjoy it later, freezing is a great option. To freeze your Cheesy Sour Cream Chicken Bake, follow these steps: - Allow the dish to cool completely. - Cut it into portions for easy thawing later. - Wrap each piece tightly in plastic wrap. - Place the wrapped pieces in a heavy-duty freezer bag. - Label the bag with the date. When you're ready to eat, thaw the chicken bake in the fridge overnight. To reheat, place it in the oven at 350°F (175°C) until warmed through. This way, you’ll enjoy the same cheesy, creamy goodness! You can serve many tasty sides with this dish. Here are some great options: - Steamed broccoli or green beans - A fresh garden salad with vinaigrette - Garlic bread for extra flavor - Mashed potatoes for a cozy touch These sides balance the rich and creamy chicken bake. Yes, you can prep this dish in advance. Here’s how: - Assemble the chicken bake as directed. - Cover it tightly and store it in the fridge. - Bake it when you are ready to eat. You can keep it in the fridge for up to two days before baking. The chicken is done when it reaches an internal temperature of 165°F (75°C). Here are some signs to look for: - The juices run clear, not pink. - The chicken feels firm to the touch. - The cheese is bubbly and golden. These cues help ensure a safe and delicious meal. Yes, you can use frozen chicken breasts. Follow this guidance: - Thaw the chicken in the fridge overnight. - If you are short on time, you can use the microwave. - Make sure to check the internal temp to 165°F (75°C) while cooking. Using frozen chicken is a great way to save time. This article covered a tasty Cheesy Sour Cream Chicken Bake. I shared the key ingredients, steps, and some helpful tips. With options for substitutions and variations, you can easily adapt the recipe. Remember to store leftovers properly for the best flavor. I hope this dish brings joy to your table. Try it out and impress your family with your cooking skills!

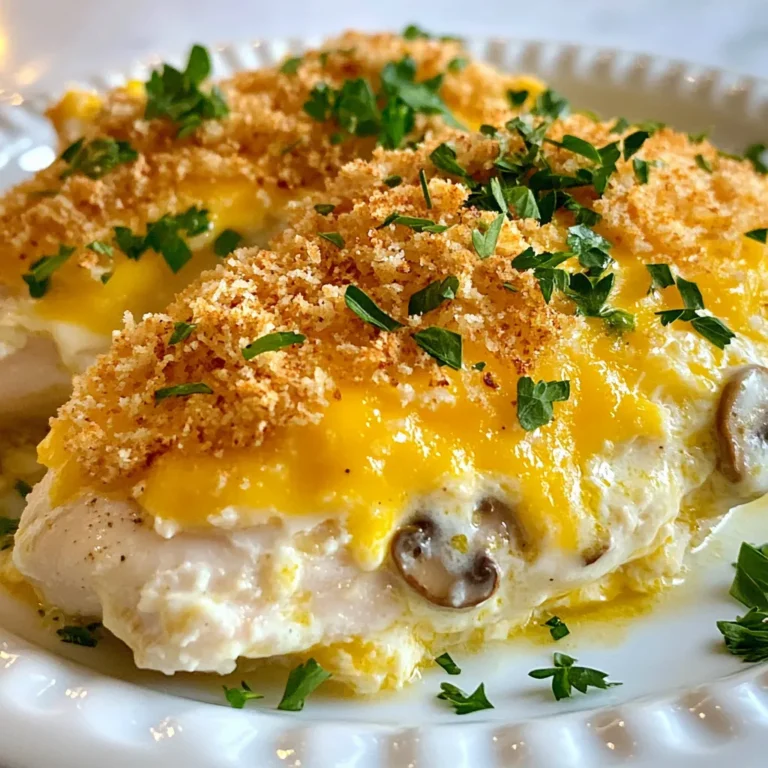
Cheesy Sour Cream Chicken Bake Simple and Tasty Dish

- 1 lb boneless, skinless chicken breasts - 1 cup long-grain white rice - 2 cups chicken broth - 1 cup Greek yogurt - 1 medium cucumber, diced - 2 tablespoons fresh dill, finely chopped - 2 tablespoons fresh lemon juice (about 1 medium lemon) - 1 clove garlic, minced - 1 cup cherry tomatoes, halved - 1 tablespoon extra virgin olive oil - Salt and freshly ground pepper to taste To make Dump-and-Bake Chicken Tzatziki Rice, gather these fresh ingredients. The chicken breasts are the main protein. I love using boneless and skinless chicken breasts for ease and quick cooking. They stay juicy while baking and soak up flavors well. Next, the long-grain white rice acts as the perfect base. It cooks beautifully in the chicken broth, absorbing all the savory goodness. The broth adds depth to the dish, making it rich and flavorful. For the tzatziki sauce, Greek yogurt gives it a creamy texture. I add diced cucumber for crunch and fresh dill for that herbal kick. The tzatziki sauce adds a refreshing balance to the warm chicken and rice. Finally, lemon juice, minced garlic, cherry tomatoes, olive oil, salt, and pepper round out the ingredients. The lemon juice brightens the sauce, while garlic brings a warm depth. Cherry tomatoes add a pop of color and flavor. The olive oil helps bind everything together, making the dish shine. Using these ingredients creates a simple yet satisfying meal. It’s easy to prepare and perfect for busy days! {{ingredient_image_2}} Preheating the oven to 400°F (200°C) is vital. A hot oven helps cook the chicken and rice evenly. This step ensures your meal comes out perfectly. If you skip this, your dish may not cook well. In a large casserole dish, combine 1 cup of long-grain white rice and 2 cups of chicken broth. Stir well with a spoon. Make sure the rice is spread out evenly. Next, lay 1 pound of boneless, skinless chicken breasts on top. Season the chicken with salt and freshly ground pepper. This adds flavor and makes your dish tasty. Seal the dish tightly with aluminum foil. This keeps the steam inside, helping the rice and chicken cook. Bake in the preheated oven for 25 minutes. After 25 minutes, take the dish out. Remove the foil and sprinkle 1 cup of halved cherry tomatoes over the chicken. Return the dish to the oven without foil. Bake for another 10-15 minutes until the chicken is cooked through. The internal temperature should reach 165°F (75°C). Let it rest for 5 minutes before serving. Fluff the rice with a fork and drizzle tzatziki sauce over the chicken. Enjoy your meal! To ensure the chicken is tender and juicy, I recommend using chicken breasts that are uniform in size. This helps them cook evenly. Season them well with salt and pepper before baking. A meat thermometer is your best friend here. It helps you check the internal temperature. The chicken should reach 165°F (75°C) to be safe to eat. This ensures you avoid dry chicken while keeping it juicy and flavorful. After baking, fluff the rice with a fork. This adds air and keeps it light. To avoid mushy rice, make sure to use long-grain white rice and the right amount of chicken broth. Too much liquid makes the rice soggy. Stick to the recipe for the best results. Remember, the rice cooks in the steam created by the covered dish. You can adjust the garlic and dill levels in the tzatziki to fit your taste. If you love garlic, add more! For a milder taste, use less. If you want a substitute for Greek yogurt, try using sour cream or a plant-based yogurt. This can change the flavor and texture slightly, but it still tastes great. Pro Tips Marinate for Extra Flavor: For a more flavorful chicken, consider marinating the chicken breasts in lemon juice, garlic, and dill for at least 30 minutes before baking. Use Jasmine or Basmati Rice: For an aromatic touch, try using jasmine or basmati rice instead of regular long-grain rice. They will infuse a lovely fragrance into the dish. Check for Doneness: Always use a meat thermometer to ensure your chicken has reached an internal temperature of 165°F (75°C) for safe consumption. Add Veggies for Color: Feel free to add other vegetables such as bell peppers or spinach to the rice mixture before baking for added nutrition and vibrant color. {{image_4}} You can switch out the chicken for other proteins. Turkey works well and stays juicy. Tofu is a great choice for a meatless option. It absorbs flavors nicely, making it tasty. Instead of long-grain white rice, try using quinoa. Quinoa adds a nice crunch and is packed with protein. Brown rice is another healthy swap, though it may need extra cooking time. Spices can elevate this dish. Adding cumin gives a warm, earthy taste. Paprika can add a smoky flavor that’s delightful. You can also toss in vegetables for more color and nutrition. Bell peppers add a sweet crunch, while zucchini brings a light, fresh taste. Feel free to mix and match your favorites. For a beautiful presentation, serve in individual bowls. Garnish each bowl with fresh dill and a lemon wedge for brightness. You can also serve this dish as a cold meal. It makes for a refreshing lunch option on hot days. Meal prep is easy with this recipe, so consider making it ahead for busy weeks. To keep leftovers fresh, place them in airtight containers. This helps to avoid drying out. You can store the chicken tzatziki rice in the fridge for up to four days. Make sure it cools down first before sealing. This keeps the flavors intact and safe to eat later. To reheat, use the microwave or oven. If using a microwave, heat in short bursts. Stir in between to warm it evenly. For the oven, cover with foil and heat at 350°F (175°C). This keeps the chicken moist and tender. Always check the chicken's internal temperature; it should be 165°F (75°C) to ensure safety. You can freeze this dish for up to three months. To freeze, let it cool completely first. Then, store it in freezer-safe containers. When ready to eat, thaw it in the fridge overnight. Reheat as mentioned above to enjoy a tasty meal later! Yes, you can use brown rice. However, you must adjust the cooking time. Brown rice takes longer to cook. You may need to add extra water, too. I suggest cooking the brown rice for about 45 minutes. This helps it get tender and fluffy. Keep in mind, the texture will differ a bit from white rice. To check if the chicken is done, use a meat thermometer. The chicken should reach 165°F (75°C). Insert the thermometer into the thickest part of the chicken. If you don’t have a thermometer, cut into the chicken. The meat should be opaque and the juices clear. Any pink means it needs more time. You can pair this dish with a fresh salad. A Greek salad works great with its flavors. Add some warm pita bread on the side. Roasted vegetables also make a nice addition. You can even serve a light yogurt dip for more tzatziki flavor. Yes, you can prepare it ahead. Just follow the recipe up to the baking step. Cover the dish and keep it in the fridge. When you are ready, bake it as directed. This helps the flavors blend well. It also saves you time on busy days. Absolutely! You can use chickpeas or tofu instead of chicken. Both options add protein and texture. Make sure to adjust the cooking time. Cook the rice and broth as usual. Add the chickpeas or tofu when you would add the chicken. It will be just as tasty and filling! Dump-and-Bake Chicken Tzatziki Rice is a simple dish to make. We covered ingredients like chicken breasts, rice, and tzatziki sauce. I shared easy steps for preparing, baking, and customizing the dish. You learned tips for great chicken and rice texture. Remember, feel free to swap proteins or grains to fit your taste. This dish is perfect for busy days or meal prep. Enjoy healthy and flavorful meals with little effort. Your kitchen can be a fun place to explore new flavors!

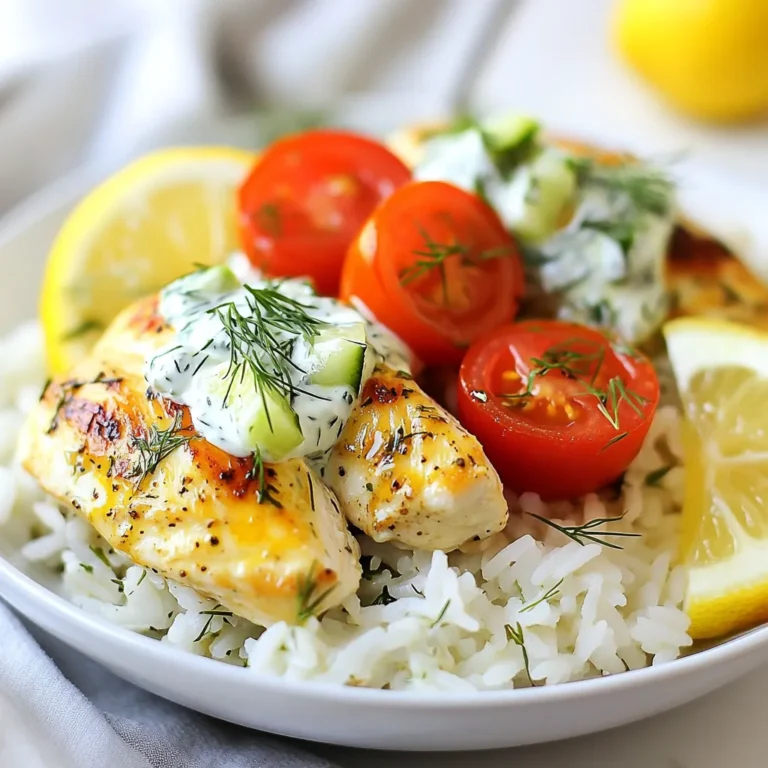
Dump-and-Bake Chicken Tzatziki Rice Simple Meal Recipe

- 1.5 lbs boneless, skinless chicken breasts - 1 can (15 oz) white beans, drained and rinsed - 1 can (4 oz) diced green chilies - 1 medium onion, finely chopped - 2 cloves garlic, minced - 1 cup corn (fresh or frozen) - 2 cups chicken broth When I make this chili, I love using boneless, skinless chicken breasts. They cook well and shred easily. White beans add a creamy texture that blends perfectly with the other ingredients. Diced green chilies bring a mild heat and great flavor. Chopping onion and garlic adds depth. I often use corn for a sweet touch, and chicken broth binds all the flavors. - 1 teaspoon ground cumin - 1 teaspoon chili powder - 1 teaspoon dried oregano - Salt and pepper to taste The seasonings truly make this dish stand out. Ground cumin gives a warm, earthy flavor. Chili powder adds a bit of kick without being too spicy. Dried oregano enhances the taste. I always sprinkle salt and freshly cracked pepper to finish, adjusting to my preference. - 1 cup sour cream - 1 cup shredded Monterey Jack cheese - Fresh cilantro, chopped, for garnish In my opinion, the creamy additions are what elevate this chili. Sour cream makes it rich and smooth. Shredded Monterey Jack cheese melts beautifully, creating a comforting texture. I love topping it with fresh cilantro. It adds a burst of color and flavor that brightens up the dish. {{ingredient_image_2}} To start, layer the chicken breasts at the bottom of your crockpot. Use 1.5 pounds of boneless, skinless chicken. This makes a tasty base. Next, add a 15-ounce can of drained and rinsed white beans. Then, pour in a 4-ounce can of diced green chilies. It gives a nice kick! Now, chop one medium onion finely and add it in. Don't forget two cloves of minced garlic. They add great flavor! Finally, toss in one cup of corn, fresh or frozen. Once that’s done, it’s time to add the broth and spices. Pour in two cups of chicken broth. This keeps everything moist and flavorful. Sprinkle one teaspoon of ground cumin, one teaspoon of chili powder, and one teaspoon of dried oregano on top. Add salt and pepper to taste. Use a large spoon to mix everything gently. Make sure not to disturb the chicken too much. You want it to stay whole while cooking. Cover the crockpot with its lid. You can choose to cook on low for 6 to 7 hours or high for 4 to 5 hours. Cooking on low helps the flavors blend better. To ensure even cooking, make sure the lid fits well. This keeps the heat in. Stir the chili halfway through cooking if you can. This helps it cook evenly. When the cooking time is up, carefully take the chicken out using tongs. Place it on a cutting board. Shred the chicken using two forks. It should fall apart easily. Return the shredded chicken back into the crockpot. Now, it’s time for the creamy finish! Stir in one cup of sour cream and one cup of shredded Monterey Jack cheese. Mix until the cheese melts and the chili is creamy. Taste the chili and adjust the seasonings if needed. Add more salt or spices if you like. Serve your creamy white chicken chili hot. Top it with fresh chopped cilantro for a pop of color and taste! Enjoy it with crusty bread or tortilla chips for a fun meal. To shred chicken easily, pull it apart while warm. Use two forks to tear it into small pieces. This way, the chicken mixes well with the chili. If you need a creamier chili, add more sour cream or cheese. Stir gently to blend it without losing the texture. To boost flavor, try adding more spices. A pinch of paprika or cayenne pepper can add heat. You can also add fresh herbs like cilantro or parsley. These herbs enhance the taste and make the dish look fresh. Add them just before serving for the best flavor. For best results, cook on low for 6-7 hours or high for 4-5 hours. If you are unsure if it's done, check the chicken. It should shred easily with a fork. The chili is ready when it’s thick and creamy, with all flavors well combined. Pro Tips Use Frozen Ingredients: If you're short on time, using frozen corn and pre-cooked chicken can save you prep time without sacrificing flavor. Adjust the Spice Level: For a spicier chili, add more diced green chilies or a pinch of cayenne pepper to the mix. Serve with Toppings: Enhance your chili by serving it with toppings like avocado, jalapeños, or additional cheese for extra flavor and texture. Make it Ahead: This chili can be made a day in advance. The flavors deepen overnight, making it even tastier when reheated! {{image_4}} You can change a few ingredients in this chili to suit your taste. First, try different beans. Instead of white beans, use black beans or pinto beans. They bring their own flavor and texture. You can also use turkey or beef instead of chicken. Ground turkey or shredded beef works great. Just adjust the cooking time based on the meat you choose. Want a meatless version? You can make this chili vegetarian easily. Start by leaving out the chicken. Use more beans and add some chopped bell peppers for texture. For the broth, use vegetable broth instead of chicken broth. This keeps the flavor rich and savory. If you love heat, spice up your chili! Add jalapeños or other hot peppers to the mix. You can chop them finely and mix them in with the other veggies. If you want extra heat, stir in some hot sauce at the end. This gives your chili a nice kick that spice lovers will enjoy. To keep your chili fresh, use airtight containers. Glass or plastic containers work well. Let the chili cool first. This prevents condensation inside the container. Store it in the fridge if you plan to eat it soon. For longer storage, freeze it. Make sure to label the containers with dates. This helps you keep track of freshness. When it’s time to eat your chili again, you have a few good options. You can use the microwave, stovetop, or crockpot. For the microwave, heat it in short bursts. Stir it every minute to keep it even. On the stovetop, warm it in a pot over low heat. Add a splash of chicken broth if it seems too thick. If you use the crockpot, set it to low. This method keeps the creaminess of the sour cream and cheese. Stir often to avoid sticking. In the fridge, this chili lasts about 3-4 days. Make sure to eat it within this time. If you freeze it, it can last for up to 3 months. Signs of spoilage include changes in smell or color. If it looks or smells off, throw it away. Always trust your senses when it comes to food safety. Yes, you can make this chili ahead of time. Meal prepping saves you time later. You can prepare the chili in your crockpot and let it cook. Once cooked, let it cool. Store it in an airtight container in the fridge for up to three days. When ready to eat, just reheat it on the stove or in the microwave. This method keeps the flavors fresh and tasty. Absolutely! Freezing chili is a great way to save leftovers. To freeze, let the chili cool completely. Transfer it to a freezer-safe container or bag. Make sure to leave some space at the top for expansion. Seal it tightly and label it. When you want to eat it, thaw it in the fridge overnight. Then heat it on the stove or in the microwave until hot. Yes, you can use cooked chicken. Just make sure it is shredded or diced. Using cooked chicken cuts down on the cooking time. Add the cooked chicken to the crockpot with the other ingredients. Cook for about 2 hours on high or 4 hours on low. This way, the flavors blend nicely without overcooking the chicken. In this post, we explored how to make Crockpot White Chicken Chili. We discussed key ingredients like chicken, beans, and spices. I shared step-by-step cooking instructions and tips for perfect texture. You learned about variations, from vegetarian options to spicy twists. Lastly, we covered storage tips to keep your chili fresh. This recipe is easy and flexible. You can adjust flavors and ingredients to match your taste. Enjoy your chili adventures and make it your own!

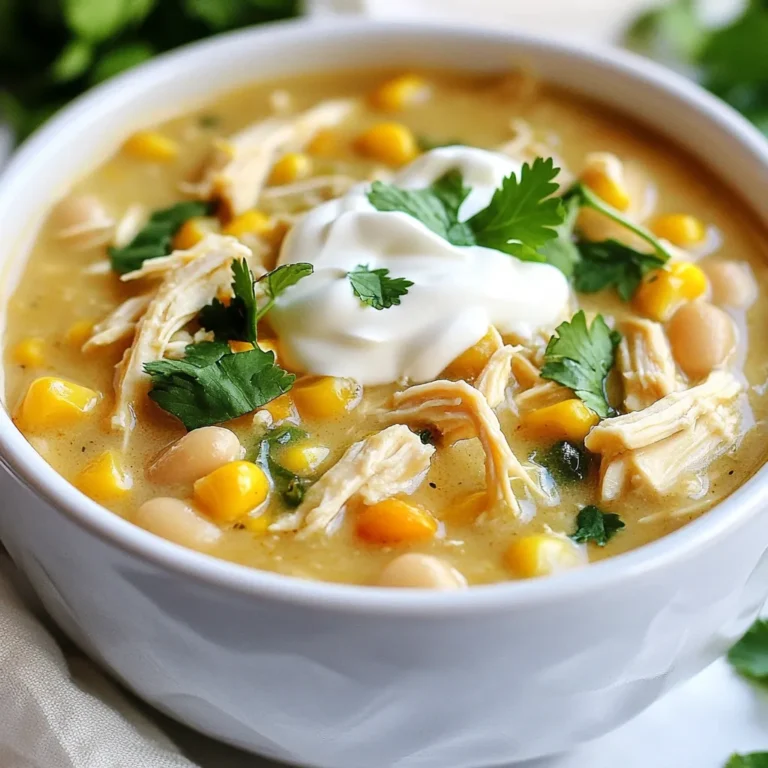
Crockpot White Chicken Chili Flavorful and Easy Recipe

- 1 pound ground beef (85% lean) - 1 tablespoon sesame oil - 4 cloves garlic, finely minced - 1-inch piece of fresh ginger, finely grated - 3 tablespoons low-sodium soy sauce - 2 tablespoons brown sugar - 1 tablespoon rice vinegar - 1 tablespoon gochujang (Korean chili paste) - 1 cup green onions, chopped (keeping the white and green parts separate) - 2 cups cooked jasmine rice - 1 cup shredded carrots - 1 cup cucumber, thinly sliced - 1 tablespoon sesame seeds (for garnish) - Optional: Kimchi, for serving When making Korean Ground Beef Bowls, the right ingredients matter. Start with ground beef that is 85% lean. This keeps the dish juicy. I like to use sesame oil for cooking. It adds a nutty flavor. Fresh garlic and ginger give a nice aroma and depth. For the sauce, low-sodium soy sauce helps control saltiness. Brown sugar adds sweetness. Rice vinegar gives a tangy kick, while gochujang brings heat. Adjust the gochujang to your spice level. When serving, I chop green onions, keeping the white and green parts separate. Cooked jasmine rice makes a great base. Shredded carrots add color and crunch. Thinly sliced cucumbers cool down the dish. Finally, sprinkle sesame seeds for texture. If you want, add kimchi for an extra burst of flavor. These ingredients work together to create a satisfying meal you will love. {{ingredient_image_2}} - Heat sesame oil in a skillet over medium-high heat. - Sauté minced garlic and grated ginger for 1 minute. Start by warming the sesame oil in your skillet. The oil adds a rich flavor to the dish. After the oil gets hot, toss in the minced garlic and grated ginger. Keep an eye on it! You want them to turn fragrant, not burnt. - Add ground beef and brown for 5-7 minutes until fully cooked. - Prepare sauce: whisk soy sauce, brown sugar, rice vinegar, and gochujang. Next, add the ground beef to the skillet. Use a spatula to break the meat apart. Cook it for about 5 to 7 minutes. You want it nicely browned and fully cooked. While the beef cooks, grab another bowl. In this bowl, whisk together soy sauce, brown sugar, rice vinegar, and gochujang. It should turn into a smooth mixture. - Pour sauce over cooked beef, simmer for 2-3 minutes. - Add white parts of green onions and shredded carrots, cook for 2 minutes. Once the beef is ready, pour the sauce over it. Stir well to coat the meat. Let it simmer for 2 to 3 minutes. This helps the flavors mix together. Now, add the white parts of the green onions and the shredded carrots. Cook everything together for 2 more minutes. The carrots should soften just a bit. - Place jasmine rice as the base in each bowl. - Top with Korean ground beef, cucumbers, and remaining green onions. - Garnish with sesame seeds and optional kimchi. Now, it's time to build your bowls! Start with a scoop of jasmine rice at the bottom. This serves as the base. Next, spoon the Korean ground beef mixture on top of the rice. Add some thinly sliced cucumbers for crunch. Finally, sprinkle the green parts of the green onions on top. For a finishing touch, add sesame seeds. If you like, serve with kimchi on the side for extra flavor. Enjoy your delicious Korean Ground Beef Bowls! - Use an 85% lean beef for best flavor and texture. This ratio keeps the meat juicy. - Adjust gochujang to suit your spice preference. Start with a small amount if unsure. - Serve with a side of kimchi for color and flavor contrast. It adds zest to your dish. - Sprinkle additional sesame seeds on top for extra crunch. They also make the dish look nice. - Add sesame oil to the serving bowl for extra richness. It deepens the flavor of the meal. - Experiment with pickled vegetables for added depth. They provide a nice tang and crunch. Pro Tips Adjust Spice Level: Depending on your spice tolerance, you can increase or decrease the amount of gochujang used in the recipe. Start with a smaller amount and taste as you go to find your perfect balance. Use Fresh Ingredients: For the best flavor, opt for fresh garlic and ginger. This will enhance the overall taste of your Korean ground beef bowls, making them more aromatic and delicious. Customize Your Toppings: Feel free to add other toppings such as avocado, radishes, or pickled vegetables to your bowls for a personalized touch and extra texture. Meal Prep Friendly: This dish is great for meal prep! Cook a larger batch of the ground beef mixture and store it in the fridge for up to 3 days, making it easy to assemble quick meals during the week. {{image_4}} You can easily change this dish to fit your needs. For a leaner option, use ground turkey or chicken instead of beef. This will give you less fat while keeping the flavor. If you want a low-carb meal, try cauliflower rice instead of jasmine rice. It has a nice texture and soaks up the sauce well. Feel free to get creative with your ingredients! Adding extra veggies can make your bowl even better. You can mix in bell peppers or snap peas for extra crunch and color. If you want to switch up the flavors, try using different sauces like teriyaki or sweet chili. Each sauce will give your dish a unique twist. For a more authentic taste, consider using marinated beef bulgogi instead of ground beef. This will give your meal a richer flavor that is hard to beat. You can also serve your bowls with traditional Korean side dishes. A cucumber salad pairs well and adds a refreshing crunch. - Store cooked Korean ground beef in an airtight container. - Keep jasmine rice stored separately to prevent sogginess. This helps keep your rice fluffy and fresh. - Leftovers can last in the refrigerator for up to 3-4 days. - Make sure to reheat thoroughly before serving. This ensures you enjoy the full flavor and safety. - Freeze portions in airtight containers for up to 3 months. This is great for meal prep. - Thaw in the refrigerator before reheating. This method keeps the meat juicy and tasty. You can use sriracha or chili garlic sauce as alternatives. Both have a nice kick. If you like it less spicy, go easy on the amount. Yes, you can! Cook the beef and rice separately. Just mix them together right before serving. This keeps everything fresh and tasty. The spiciness depends on how much gochujang you use. Start with a little, then taste it. You can add more if you want more heat. You can swap ground beef with sautéed mushrooms or tofu. Both options work well and keep the dish filling. Enjoy the flavors without the meat! This recipe for Korean ground beef offers delicious flavors and easy steps. You start with cooking the beef and preparing a tasty sauce. Then, you assemble your bowl with rice and fresh toppings. Remember, you can adjust spice levels and try different proteins or veggies. In the end, this dish is adaptable and perfect for any meal. Enjoy making it your own while savoring every bite!

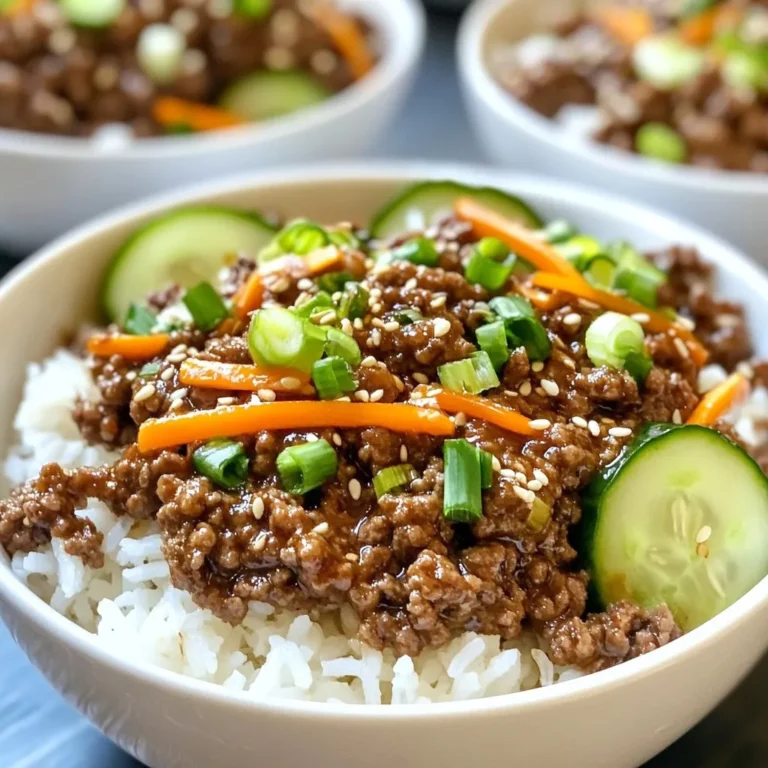
Korean Ground Beef Bowls Flavorful and Easy Recipe

- 1 lb Italian chicken sausage (or turkey sausage), casings removed - 1 medium onion, finely chopped - 3 cloves garlic, minced - 2 medium carrots, diced into small pieces - 2 celery stalks, diced - 4 cups low-sodium chicken broth - 2 cups kale, chopped (stems removed and discarded) - 1 can (15 oz) diced tomatoes, drained - 1 teaspoon dried oregano - 1 teaspoon smoked paprika - Salt and freshly cracked black pepper to taste - 2 tablespoons extra virgin olive oil - Fresh parsley, chopped, for a vibrant garnish You can add your favorite veggies to mix things up. Try bell peppers, potatoes, or corn. If you want heat, add red pepper flakes. You can also swap the sausage for a plant-based option if needed. This lets you make the soup fit your style and taste. Each serving has about 320 calories. It includes 20 grams of protein, 15 grams of fat, and 30 grams of carbs. This soup gives you fiber from the kale and carrots. It also packs a good dose of vitamins A and C. This makes it not only tasty but also healthy! {{ingredient_image_2}} First, heat 2 tablespoons of extra virgin olive oil in a large pot. Use medium heat. Once hot, add 1 medium onion, finely chopped. Cook for about 5 minutes until the onion is soft and slightly golden. Next, add 3 cloves of minced garlic, 2 medium diced carrots, and 2 diced celery stalks. Stir and cook for another 5 to 7 minutes. The veggies should smell great and become tender. Now, take 1 pound of Italian chicken sausage and remove the casings. Crumble the sausage into the pot. Use a wooden spoon to break it up. Cook for 8 to 10 minutes until the sausage is browned. Stir often to cook evenly. Once browned, sprinkle in 1 teaspoon of dried oregano and 1 teaspoon of smoked paprika. Add salt and pepper to taste. Stir well and let it cook for another minute to release the spices' flavors. Pour in 4 cups of low-sodium chicken broth. Increase the heat to bring the soup to a gentle simmer. Once it bubbles, add 1 can of drained diced tomatoes and 2 cups of chopped kale. Stir everything together. Let the soup simmer uncovered for 15 to 20 minutes. The kale should wilt and soften. Taste the soup and adjust the seasoning if needed. Serve hot, garnished with fresh chopped parsley for a touch of color. To boost the taste of your sausage soup, try these tips: - Use fresh herbs. Add thyme or bay leaves for a richer flavor. - Choose quality sausage. Good sausage makes a big difference in taste. - Add a splash of vinegar. A bit of balsamic or red wine vinegar brightens the dish. - Finish with olive oil. Drizzle a little extra virgin olive oil before serving for richness. Here are some mistakes to steer clear of: - Not browning the sausage. This step adds depth to the soup. - Skipping the sauté. Don’t rush cooking the vegetables; it builds flavor. - Overcooking the kale. Add it near the end to keep its vibrant color and crunch. - Ignoring seasoning. Taste as you go and adjust the salt and pepper. Cooking times can vary, so keep these in mind: - For faster prep. Use pre-chopped vegetables or frozen kale. - If using regular sausage. Cook it a few minutes longer until it’s browned. - For a thicker soup. Simmer it uncovered for a longer time to reduce liquid. - If you're in a hurry. Use a pressure cooker for quick results, but adjust broth amounts. Pro Tips Use Fresh Ingredients: For the best flavor, use fresh kale and high-quality sausages. Fresh ingredients enhance the overall taste and nutritional value of your soup. Customize Your Greens: While kale is a great choice, feel free to substitute with Swiss chard or spinach if you prefer. Each green brings a unique flavor and texture. Adjust the Spice Level: If you like a bit of heat, consider adding red pepper flakes or a dash of hot sauce to the soup. Adjust according to your preference. Make it Ahead: This soup tastes even better the next day! Make a big batch and store leftovers in the fridge for an easy meal throughout the week. {{image_4}} You can switch the sausage type for different flavors. Try using Italian chicken or turkey sausage. Both options are lean and tasty. If you want more heat, go for spicy sausage. For a milder taste, sweet Italian sausage works well. You can even use plant-based sausage for a vegetarian version. This change keeps the soup hearty and satisfying. Feel free to mix in your favorite veggies. Zucchini, bell peppers, or potatoes can add depth. Use green beans or spinach for a fresh twist. Each vegetable brings unique flavors and textures. Just remember to chop them small for even cooking. You can also toss in some frozen peas for quick prep. This flexibility makes the soup fun and personal. Adjust the heat to match your taste. Add crushed red pepper flakes for a spicy kick. You can also include jalapeños or hot sauce if you like it fiery. For a milder soup, skip spicy ingredients or add more broth. Taste as you go to balance the flavors. Finding your ideal spice level is all part of the fun! After you enjoy your sausage soup, let it cool first. This keeps it tasty. Transfer the soup into an airtight container. Make sure to leave some space at the top. This helps the soup expand if it freezes. Label the container with the date. Store it in the fridge for up to three days. If you want to keep it longer, use the freezer. Sausage soup freezes well. Pour the cooled soup into freezer-safe bags or containers. Remove as much air as you can. This helps prevent freezer burn. You can freeze the soup for up to three months. When you are ready to eat, take it out and thaw it in the fridge overnight. To reheat the soup, pour it into a pot over medium heat. Stir it often to heat evenly. If the soup is thick, add a little broth or water. This will help bring back the right texture. You can also use a microwave. Put the soup in a microwave-safe bowl. Heat it in short bursts. Stir after each burst until it is hot. Enjoy your soup just like fresh! Yes, you can make Sausage Soup in a slow cooker. First, cook the sausage in a pan. After it is browned, add it to the slow cooker. Then, toss in the onion, garlic, carrots, and celery. Pour in the chicken broth, tomatoes, and spices. Set the slow cooker on low for 6-8 hours or high for 3-4 hours. Add the kale in the last 30 minutes. This method makes the soup very easy. You can serve Sausage Soup with many sides. A crusty bread works well for dipping. A fresh salad adds crunch and color. You might also enjoy it with a light pasta. If you want something heartier, serve it with rice or quinoa. These options will make your meal more filling. To thicken Sausage Soup, you have a few options. You can add a cornstarch slurry. Mix 1 tablespoon of cornstarch with 2 tablespoons of water. Stir this into the soup and let it simmer. Another way is to blend some of the soup in a blender. This gives it a thicker texture. You can also add more vegetables, like potatoes, to naturally thicken the soup. Sausage soup is simple and tasty. Key ingredients make a rich flavor. You can customize with optional ingredients. I shared steps to cook and enhance your soup. Avoid common mistakes for the best results. Feel free to try variations for new tastes. Store or freeze leftovers easily and enjoy them later. Follow the tips to make this dish perfect every time. Now you have the tools to impress with your sausage soup. Embrace the joy of cooking!

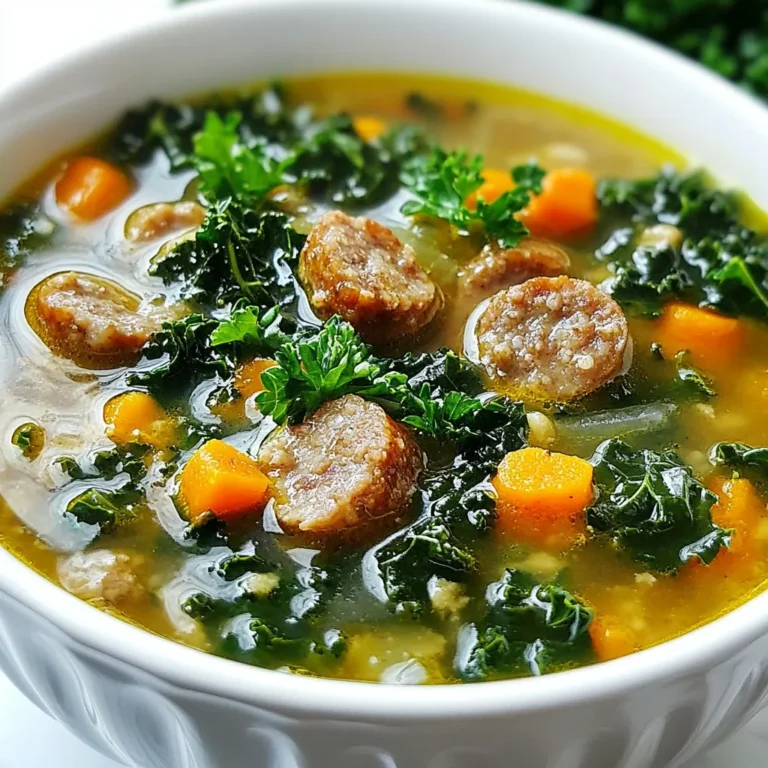
Sausage Soup Hearty and Flavorful Comfort Dish

To make Coconut Lime Chicken Skewers, you need a few key items. The main star is chicken thighs. I like using boneless, skinless chicken thighs. They stay juicy and tender when grilled. You will also need: - 1 pound boneless, skinless chicken thighs, cut into 1-inch cubes - 1 cup creamy coconut milk - Zest of 2 vibrant limes - 2 tablespoons freshly squeezed lime juice - 2 tablespoons honey - 1 tablespoon fish sauce (optional) - 2 cloves garlic, finely minced - 1 teaspoon ground ginger - Salt and pepper, to taste - Wooden skewers, soaked in water for at least 30 minutes The coconut milk gives a rich flavor that pairs well with lime. The zest adds a fresh note, and the honey balances the tartness. To boost the taste, consider adding a few optional ingredients. Fish sauce adds depth. You might also try extra spices like chili flakes for heat. Here are some ideas: - Fresh herbs like cilantro or basil - A splash of soy sauce for umami - A dash of red pepper flakes for spice These additions can take your skewers to the next level. When choosing chicken for skewers, I recommend thighs over breasts. Thighs stay moist and tender during cooking. They also absorb the marinade better. However, if you prefer chicken breasts, you can use them. Just be mindful to not overcook them. Aim for an internal temperature of 165°F (75°C) to keep them juicy. {{ingredient_image_2}} Start by grabbing a mixing bowl. Whisk together the creamy coconut milk, lime zest, lime juice, honey, and fish sauce if you like that depth of flavor. Next, add the minced garlic and ground ginger. Stir well until everything blends nicely. This marinade will give your chicken a bright and tasty kick. Now, take your chicken thighs and cut them into 1-inch cubes. Add these cubes to the marinade, making sure each piece is well coated. Cover the bowl with plastic wrap. Place it in the fridge for at least 1 hour. For even better flavor, let it marinate for up to 4 hours. This step is key for tender and flavorful chicken. Before grilling, preheat your grill to medium-high heat. While it heats up, soak your wooden skewers in water for at least 30 minutes. This helps prevent burning. Carefully thread the marinated chicken onto the skewers. Leave a small gap between pieces for even cooking. Season the skewers lightly with salt and pepper on all sides. Place the skewers on the grill and cook for 10 to 15 minutes. Turn them occasionally to get nice grill marks. Use a meat thermometer to check that the chicken reaches 165°F (75°C). This ensures it’s safe to eat. Once cooked, take the skewers off the grill. Let them rest for about 5 minutes to keep the juices inside. Serve your Coconut Lime Chicken Skewers with fresh lime wedges and chopped cilantro for a pop of color. For a full meal, pair it with fluffy coconut rice or a cool cucumber salad. Enjoy each flavorful bite! Start with the coconut milk as your base. It adds rich creaminess. The lime zest brightens the flavor. Use fresh limes for the best taste. Honey adds a nice sweetness. If you want depth, add fish sauce. Mix all these in a bowl. Make sure to whisk until smooth. Add minced garlic and ginger, and stir well. This blend will soak into the chicken, making it juicy and flavorful. Marinate the chicken for at least an hour. For even better results, let it sit for four hours. Preheat your grill to medium-high heat. This step is crucial for nice grill marks. Thread the marinated chicken onto soaked skewers. Leave small gaps between each piece. This ensures even cooking and allows heat to circulate. Season the skewers lightly with salt and pepper. Grill the skewers for 10 to 15 minutes. Turn them often for even cooking. Use a meat thermometer to check the temperature. It should reach 165°F (75°C) for safe eating. Once the skewers are done cooking, take them off the grill. Let them rest for five minutes. This step helps the juices stay inside the chicken. Serve the skewers with fresh lime wedges. A sprinkle of cilantro adds a nice touch. For a complete meal, pair with coconut rice or cucumber salad. This will enhance the tropical flavor. Enjoy your delicious coconut lime chicken skewers! Pro Tips Marination Time: For the best flavor, marinate the chicken for at least 2-4 hours. This allows the flavors to deeply penetrate the meat, making it more delicious and tender. Grilling Temperature: Preheat the grill to medium-high heat before cooking. This ensures a proper sear on the chicken, locking in moisture and enhancing the overall taste. Resting Period: Allow the skewers to rest for about 5 minutes after grilling. This helps the juices redistribute throughout the chicken, keeping it juicy and flavorful. Skewer Soaking: Make sure to soak the wooden skewers in water for at least 30 minutes. This prevents them from burning on the grill and helps them hold the chicken without breaking. {{image_4}} You can change the marinade to fit your taste. Try adding a bit of soy sauce for a salty kick. You can also use pineapple juice for a sweeter flavor. A dash of chili flakes can give it a spicy twist. Experiment with herbs like cilantro or basil for a fresh touch. Chicken is great, but other proteins work well, too. Try shrimp for a seafood twist. Cubes of pork or beef can also soak up the flavors nicely. If you want something leaner, turkey breast is a tasty choice. Just remember to adjust the cooking time based on what you use. If you prefer not to use meat, tofu is a fantastic option. Use firm tofu and press it to remove excess moisture. Marinate it just like the chicken for great flavor. You can also thread colorful veggies like bell peppers, zucchini, and mushrooms onto skewers. These add crunch and bright colors to your dish. To keep leftover Coconut Lime Chicken Skewers fresh, place them in an airtight container. Make sure they cool down first. Store them in the fridge for up to three days. If you want to save them longer, freezing is a great option. To freeze the skewers, wrap them tightly in plastic wrap. Place them inside a freezer-safe bag. Remove as much air as possible to prevent freezer burn. You can freeze them for up to three months. When you're ready to eat, thaw them in the fridge overnight. To reheat, place the skewers in a preheated oven at 350°F (175°C). Heat for about 10-15 minutes or until warmed through. You can also reheat them on the grill for a few minutes. This method keeps the flavors intact and adds a nice char. Enjoy your tasty leftovers! You can tell the chicken is done when it reaches 165°F (75°C) inside. Use a meat thermometer for accuracy. The chicken should look golden brown and firm to the touch. If you cut into it, the juices should run clear, not pink. Yes, you can make these skewers in the oven or on a stovetop pan. If using an oven, preheat to 400°F (200°C). Place the skewers on a baking sheet lined with foil. Bake for about 15-20 minutes, turning halfway through. On a stovetop, use a grill pan over medium heat. Cook for 10-15 minutes, turning often. These skewers pair well with many sides. Try serving them with fluffy coconut rice. A fresh cucumber salad also adds a nice crunch. You can even add grilled veggies or a tangy dipping sauce for extra flavor. A sprinkle of chopped cilantro and lime wedges brightens the dish. In this post, I covered the essentials for making delicious chicken skewers. You learned about key ingredients, step-by-step grilling instructions, and tips for the best flavor. I also shared ways to add variety and how to store extras. Chicken skewers can be simple yet tasty. With a bit of care, you’ll impress your friends and family. Enjoy your cooking journey and keep experimenting to find your favorite flavors!

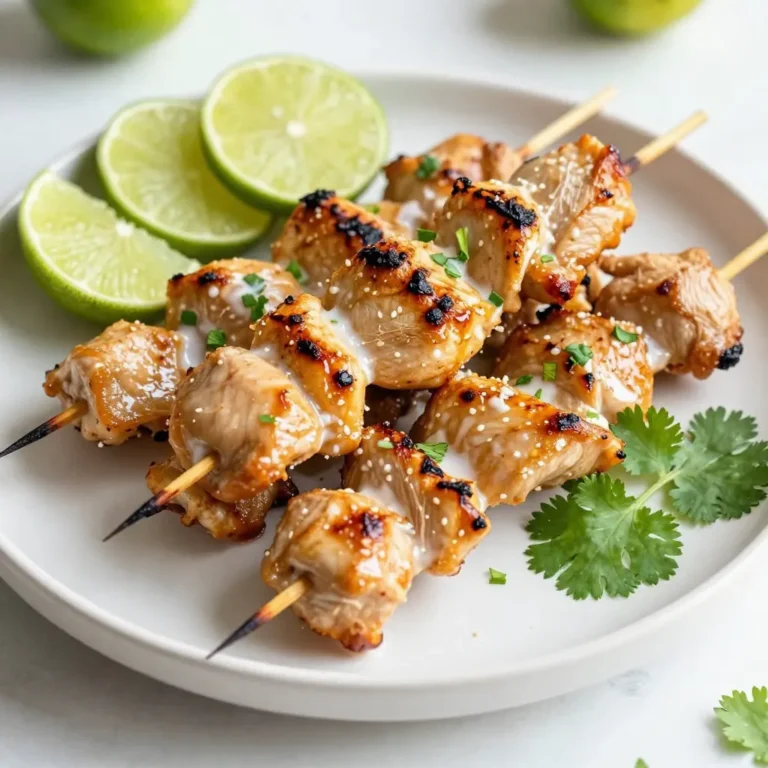
Coconut Lime Chicken Skewers Tasty and Simple Dish

- Chicken and Sweet Potato Components - 1 pound boneless chicken thighs, cut into bite-sized pieces - 1 large sweet potato, peeled and cut into 1-inch cubes - 1 medium onion, finely chopped - 3 cloves garlic, minced - 1 tablespoon fresh ginger, grated - Spices and Flavorings - 1 can (14 oz) coconut milk - 2 tablespoons curry powder - 1 teaspoon turmeric powder - 1 teaspoon ground cumin - 1 teaspoon ground coriander - 1/2 teaspoon red chili flakes (adjust according to heat preference) - 2 tablespoons vegetable oil - Salt to taste - Garnishes and Serving Suggestions - Fresh cilantro leaves, for garnish - Lime wedges, for serving This dish brings together simple yet vibrant flavors. The chicken and sweet potato create a hearty base, while the spices add warmth. Coconut milk gives it a creamy richness that makes every bite special. You can adjust the chili flakes for your heat level. Fresh cilantro and lime add brightness and freshness at the end. Pair this curry with fluffy rice or warm naan to soak up all that delicious sauce. Enjoy your cooking adventure! {{ingredient_image_2}} Heating the Oil and Sautéing Aromatics First, grab a large pot. Pour in 2 tablespoons of vegetable oil and heat it over medium heat. Wait until the oil shimmers. Then, add 1 medium onion, finely chopped. Sauté the onion for about 5 minutes. You want it soft and clear. Next, stir in 3 cloves of minced garlic and 1 tablespoon of grated ginger. Cook these for 1-2 minutes until they smell great. Cooking the Chicken Now it’s time for the chicken! Add 1 pound of bite-sized chicken thighs to your pot. Turn up the heat slightly. Stir the chicken often so it browns on all sides. This should take around 5-7 minutes. Adding Spices and Sweet Potatoes Once the chicken is browned, sprinkle in 2 tablespoons of curry powder, 1 teaspoon of turmeric, 1 teaspoon of cumin, 1 teaspoon of coriander, and 1/2 teaspoon of red chili flakes. Mix well until the chicken is coated in spices. Then, add 1 large sweet potato, cut into 1-inch cubes. Stir everything together so the sweet potato gets the spice love too. Incorporating Coconut Milk and Simmering Next, pour in 1 can of coconut milk. Stir it all to combine. Bring the mixture to a gentle simmer. Lower the heat and cover the pot. Let it cook for 20-25 minutes. Check if the sweet potatoes are soft and the chicken is cooked through. Taste and add salt as needed. If you want a thicker curry, simmer it uncovered for another 5-10 minutes. When it’s ready, serve hot, garnished with fresh cilantro and lime wedges. Enjoy! Adjusting Spice Levels You can change how spicy your curry is. If you like it mild, use less red chili flakes. For more heat, add more chili flakes or even fresh chili. Taste as you go. This way, you can get it just right for your family. Options for Creaminess Coconut milk gives this curry a rich creaminess. If you want it creamier, try adding more coconut milk. You can also use Greek yogurt or cashew cream to add a different texture. Both options will keep the dish rich and tasty. Best Practices for Sautéing Sautéing the onion, garlic, and ginger right is key to great flavor. Heat the oil until it shimmers before adding your onion. Cook the onion until soft. Then, add garlic and ginger. This helps release their full flavor. Stir often to prevent burning. Pro Tips Fresh Herbs Matter: Always use fresh cilantro for garnish right before serving to enhance flavor and presentation. Customize the Heat: Adjust the amount of red chili flakes based on your heat preference; start with less and add more if desired. Perfect Sweet Potatoes: Cut sweet potatoes into uniform pieces to ensure they cook evenly and become tender at the same time. Thicker Sauce Tip: For a creamier curry, let it simmer uncovered for a few extra minutes to allow the sauce to thicken up nicely. {{image_4}} Chicken Alternatives You can swap chicken thighs for chicken breasts if you want lean meat. If you prefer a plant-based option, use chickpeas or lentils. Both options work well in this dish. Veggie Additions Want to add more veggies? Try carrots, bell peppers, or spinach. These will add color and flavor. They also boost nutrition, making your meal even better! Different Curry Styles You can change the flavor by using different curry pastes. For a Thai twist, use red or green curry paste. If you want a milder taste, go for a korma paste. Each option brings a new vibe to your curry. Feel free to mix and match these ideas to make the dish your own! To keep your chicken sweet potato curry fresh, store it in an airtight container. This helps keep moisture in and bacteria out. Let the curry cool down before sealing it. You can keep it in the fridge for up to three days. When you are ready to eat, reheat the curry on the stove. Place it in a pot and heat it over medium heat. Stir often to avoid burning. You can also microwave individual servings. Add a splash of water if it looks too thick. If you want to save some curry for later, freezing is a great choice. Use a freezer-safe container or heavy-duty freezer bags. Make sure to leave a little space at the top, as the curry will expand when frozen. You can store it for up to three months. To thaw your curry, take it out of the freezer and place it in the fridge overnight. If you need it fast, you can use the microwave. Just be sure to heat it slowly, stirring often for even warming. Enjoy your curry later with the same great taste! Can I use other types of potatoes? Yes, you can use other potatoes. Regular potatoes work well. Yukon gold or red potatoes add nice flavor. Just remember to cut them into similar sizes. This helps them cook evenly and stay tender. How can I make this curry vegetarian? To make this curry vegetarian, swap the chicken for chickpeas or tofu. You can also add more vegetables like bell peppers or carrots. Use vegetable broth instead of chicken broth for more flavor. This way, you keep all the creamy goodness and spices. What to serve with Chicken Sweet Potato Curry? Serve this curry with fluffy rice or warm naan bread. Rice soaks up the sauce nicely. Naan adds a fun twist and is perfect for dipping. You can also add a side salad for a fresh touch. This blog post covered the key ingredients for Chicken Sweet Potato Curry. You learned about cooking steps, flavor tips, and how to store leftovers. I shared variations to keep meals exciting. Finally, experimenting with this recipe will enhance your cooking skills. Try different spices and ingredients to make it your own. Enjoy every bite of this comforting dish!

Flavorful Chicken Sweet Potato Curry Easy and Quick Meal

- 1 cup rolled oats - 1/2 cup creamy almond butter - 1/4 cup honey or maple syrup - 1/2 cup dried cranberries, finely chopped - 1/4 cup almond slices - 1/2 teaspoon vanilla extract - 1/4 teaspoon ground cinnamon - Pinch of sea salt The ingredients in these cranberry almond energy balls are simple and wholesome. Each one plays a role in creating a tasty and healthy snack. - Rolled oats provide fiber and help keep you full. - Creamy almond butter adds healthy fats and a rich flavor. - Honey or maple syrup gives natural sweetness. You can choose based on your taste. - Dried cranberries give a burst of tartness and sweetness. - Almond slices add crunch and extra nutrients. - Vanilla extract enhances the flavor. - Ground cinnamon brings warmth and depth. - A pinch of sea salt balances the sweetness. These energy balls are packed with nutrition. They are: - High in fiber: This helps digestion and keeps you feeling satisfied. - Rich in healthy fats: Almond butter and almond slices provide good fats for energy. - Natural sweeteners: Honey or maple syrup gives a sweet taste without refined sugars. Making these energy balls is not just fun; it's smart. You get a snack that is tasty and good for you! {{ingredient_image_2}} - Mixing the base ingredients In a large mixing bowl, combine 1 cup of rolled oats, 1/2 cup of creamy almond butter, and 1/4 cup of honey or maple syrup. Use a spatula or wooden spoon to mix well. You want a thick and sticky blend. - Incorporating additional ingredients Now, add 1/2 cup of finely chopped dried cranberries, 1/4 cup of almond slices, 1/2 teaspoon of vanilla extract, 1/4 teaspoon of ground cinnamon, and a pinch of sea salt. Mix again until everything is evenly combined. - Rolling technique tips With clean hands, grab about a tablespoon of the mixture. Roll it between your palms to create a ball. Keep the balls about the size of a golf ball. Make sure they are smooth and round. - Spacing on the tray Place the balls on a parchment-lined baking sheet. Leave some space between each ball. This helps when you handle them later. - Importance of chilling Put the baking sheet in the fridge and chill for at least 30 minutes. Chilling helps the energy balls firm up. This makes them easier to eat and keeps their shape. - Storing in an airtight container Once firm, transfer the energy balls to an airtight container. They can last in the fridge for up to one week. You can also freeze them for longer storage. Enjoy! To get the best texture for your energy balls, mix your ingredients well. I like to use a spatula to blend the oats and almond butter first. This helps create a sticky base. Next, add the cranberries and almonds, mixing until every piece is coated. If your mixture feels too dry, add a bit more almond butter or honey. Customization is key to making these energy balls your own. You can swap dried cranberries for other dried fruits like apricots or raisins. You can also change almond slices to walnuts or pecans. Adding a scoop of protein powder can give them an extra boost. When serving your energy balls, think about how to make them look great. I like to arrange them in a small bowl. You can sprinkle extra almond slices around for a nice touch. This makes them look inviting and fun to eat. Pair these bites with a cold glass of almond milk or a warm cup of tea. They make a perfect snack for any time of the day. You can even pack them for a picnic or road trip. They are easy to grab and tasty on the go! Pro Tips Use Fresh Ingredients: Always opt for fresh, high-quality dried cranberries and almonds to enhance the flavor and nutritional value of your energy bites. Customize Sweetness: Adjust the sweetness according to your preference by varying the amount of honey or maple syrup. You can also experiment with different sweeteners like agave or coconut nectar. Chill for Firmness: Don’t skip the chilling step! Allowing the energy bites to firm up in the refrigerator helps them hold their shape better, making them easier to handle. Experiment with Add-ins: Feel free to get creative by adding other mix-ins like chia seeds, flaxseeds, or even chocolate chips for a different flavor profile. {{image_4}} You can make your energy balls even more fun! Adding chocolate chips gives a sweet touch. Choose dark chocolate for a richer flavor. You can also add seeds like chia or flax. These seeds boost nutrition and add crunch. If you want a change in sweetness, try agave nectar. It has a mild flavor and is easy to mix in. Date paste is another great option. It adds a rich taste and natural sweetness. Want to make these energy balls gluten-free? Just use gluten-free oats. This keeps the same great taste without gluten. For a vegan version, swap honey for maple syrup or agave. This way, everyone can enjoy these tasty bites! You can keep your cranberry almond energy balls in the fridge for up to one week. Store them in an airtight container to keep them fresh. If you notice any unusual smell or mold, it's time to toss them out. Always check for a change in texture. If they feel too dry or hard, they may not be good to eat. To freeze your energy balls, first, arrange them on a baking sheet in a single layer. Place the sheet in the freezer for about two hours until they are firm. Then, transfer the frozen energy balls to a freezer-safe bag or container. This helps prevent them from sticking together. For thawing, simply take out a few balls and let them sit at room temperature for about 10-15 minutes. Enjoy them fresh and tasty! Cranberry almond energy balls last up to one week in the fridge. Store them in an airtight container. They can also freeze for longer storage. When frozen, they keep well for about three months. Yes, you can use different nuts or seeds! Almonds are great, but walnuts, pecans, or sunflower seeds work well too. Just chop them finely. This lets you customize flavors and textures to your liking. Absolutely! These energy balls are perfect for kids. They are fun to eat and packed with energy. The sweetness from honey or maple syrup makes them a tasty treat that kids love. Yes, making these in bulk is easy! You can double or triple the recipe. Just store extras in the fridge or freezer. This way, you always have a healthy snack ready to go. You now have a clear guide to making tasty cranberry almond energy balls. We explored the key ingredients and their health benefits, plus step-by-step instructions to make the process easy. I shared helpful tips to perfect your energy balls, variations to try, and storage advice to keep them fresh. These energy balls are nutritious and fun. Enjoy creating and sharing them with friends and family. You’ll have a healthy snack ready anytime!

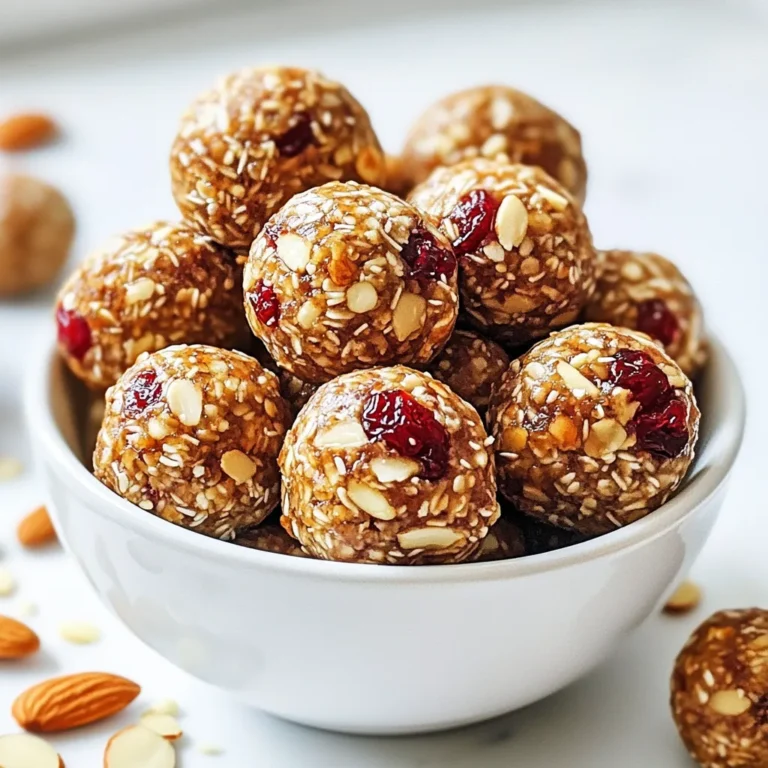
Cranberry Almond Energy Balls Healthy Snack Option

To make this hearty Italian sausage gnocchi soup, you will need: - 1 tablespoon extra virgin olive oil - 1 pound Italian sausage (choose from mild or spicy, crumbled) - 1 medium onion, finely diced - 2 cloves garlic, minced (or crushed) - 3 medium carrots, sliced into thin rounds - 3 celery stalks, diced into small pieces - 4 cups rich chicken broth - 1 can (14 oz) diced tomatoes, undrained - 1 teaspoon dried Italian herbs (a mix of oregano, basil, and thyme) - 1/2 teaspoon red pepper flakes (optional, for heat) - 1 package (16 oz) gnocchi (either store-bought or homemade) - 2 cups fresh baby spinach - Salt and freshly ground black pepper, to taste - Grated Parmesan cheese, for serving - Fresh basil leaves, for garnish You can swap some ingredients to fit your taste or pantry. Here are some ideas: - Use turkey or chicken sausage instead of Italian sausage for a lighter option. - If you don’t have fresh spinach, kale works well too. - You can replace chicken broth with vegetable broth for a vegetarian soup. - If you need a different pasta, any small pasta shape can fit in place of gnocchi. Using fresh ingredients often gives the best taste and texture. Fresh vegetables add crunch and flavor. However, canned ingredients can save time without losing too much quality. - Fresh Tomatoes: If using fresh tomatoes, use about 4 cups, diced. - Canned Tomatoes: These bring a rich flavor and are ready to use. - Broth: Homemade broth is best, but store-bought is fine. Using a mix of both fresh and canned can balance flavor and convenience. This way, you can enjoy a tasty and quick meal. {{ingredient_image_2}} First, take a large pot and heat 1 tablespoon of olive oil over medium heat. When the oil shimmers, add 1 pound of crumbled Italian sausage. I like to use mild or spicy sausage for different flavors. Cook the sausage for about 5 to 7 minutes, stirring often. The sausage should turn brown. Use a wooden spoon to break the sausage into small pieces as it cooks. Next, add 1 medium onion, finely diced, 3 medium carrots sliced into thin rounds, and 3 celery stalks diced into small pieces. Sauté this mix for 3 to 4 minutes. You want the veggies to soften and the onion to look clear. This step builds the flavor for your soup. Then, stir in 2 cloves of minced garlic. Cook for another minute. You will smell the nice aroma of garlic, which makes the soup even better. After that, pour in 4 cups of rich chicken broth and 1 can of diced tomatoes with their juices. This adds depth to the soup. Sprinkle in 1 teaspoon of dried Italian herbs, which is a mix of oregano, basil, and thyme. If you like heat, add 1/2 teaspoon of red pepper flakes. Now, turn up the heat to bring it all to a rolling boil. Once it boils, lower the heat to a gentle simmer. This helps the flavors blend nicely. Now it’s time to add the star of the dish: the gnocchi. Use 1 package (16 oz) of gnocchi, either store-bought or homemade. Cook according to package instructions, usually 2 to 3 minutes. The gnocchi will float when they are done. Next, gently stir in 2 cups of fresh baby spinach. Let it cook for 1 to 2 minutes until it wilts. Finally, taste your soup and adjust the seasoning with salt and freshly ground black pepper. Using a ladle, serve the soup into bowls. Top each bowl with grated Parmesan cheese and a few fresh basil leaves. This adds a nice finish to your dish. Enjoy your warm and hearty Italian sausage gnocchi soup! To make this soup truly shine, focus on the quality of your ingredients. Use fresh vegetables whenever you can. Fresh garlic adds a strong aroma. Fresh basil gives a bright flavor. - Italian Sausage: Choose between mild or spicy based on your taste. - Broth: Use rich chicken broth for depth. Homemade broth is even better. - Herbs: Dried Italian herbs blend well. They add warm flavors. Let the soup simmer for a while. This helps the flavors mix and deepen. Taste as you go. Adjust salt and pepper to your liking. A little red pepper can add a nice kick if you want some heat. Gnocchi needs careful cooking. Follow these tips for the best result: - Fresh or Store-bought: Both types can work well. If you make your own, enjoy the process! - Cooking Time: Watch the gnocchi closely. They are done when they float. - Don’t Overcook: Overcooked gnocchi can become mushy. Add gnocchi right before serving. This keeps them firm and delightful. How you serve this soup can elevate the meal. Here are some ideas: - Bowl: Use a deep bowl for a cozy feel. - Toppings: Add grated Parmesan cheese generously. Fresh basil leaves look beautiful and add flavor. - Accompaniments: Serve with crusty bread for dipping. For a fancy touch, drizzle high-quality olive oil over the soup. This adds richness and flavor. Enjoy every bite of your comforting creation! Pro Tips Choose Your Sausage Wisely: Opt for high-quality Italian sausage for the best flavor. Experiment with different spice levels to suit your taste preferences, whether you prefer mild or spicy. Don’t Overcook the Gnocchi: Gnocchi is done when it floats to the surface. Overcooking can lead to a mushy texture, so keep a close eye on it! Add Freshness with Spinach: Fresh baby spinach wilts quickly, so add it at the end of cooking to preserve its vibrant color and nutrients, enhancing both flavor and appearance. Perfect Presentation: Serve the soup hot with a sprinkle of grated Parmesan and fresh basil for a touch of elegance. A drizzle of high-quality olive oil can elevate the dish even further. {{image_4}} You can make a tasty vegetarian version of Italian sausage gnocchi soup. Start by omitting the sausage. Instead, use plant-based sausage or mushrooms for a meaty texture. Add more beans or lentils for protein. You can also boost flavor with extra herbs and spices. This version is still hearty and comforting. The choice between spicy and mild sausage changes the soup's heat. If you like heat, use spicy Italian sausage. You can also add red pepper flakes for more spice. For a milder soup, stick with the mild sausage. This lets the other flavors shine without overpowering heat. Adjust the heat to fit your taste. Adding extra vegetables makes the soup more colorful and nutritious. You can toss in zucchini, bell peppers, or even kale. Just chop them small and add them with the other veggies. This not only boosts flavor but also adds texture to the soup. Feel free to get creative with your veggie choices! To keep your gnocchi soup fresh, let it cool down first. Transfer it to an airtight container. You can then store it in the fridge for up to three days. If you want to keep it longer, freezing is a great option. When it's time to eat your leftovers, pour the soup into a pot. Heat it over medium heat. Stir often to warm it evenly. If the soup thickens too much, add a splash of broth or water to get your desired texture. If you want to freeze the soup, do it right after it cools. Use a freezer-safe container, leaving some space at the top. This helps the soup expand as it freezes. It’s best to eat frozen soup within three months for the best flavor. To reheat, simply thaw it overnight in the fridge and follow the reheating instructions above. Yes, you can use frozen gnocchi in this soup. Just add them straight into the pot. You do not need to thaw them first. Cook them for about 2-3 minutes, just like you would fresh gnocchi. They will float when they are ready. If you want a different flavor, try ground turkey or chicken. You can also use plant-based sausage for a vegetarian option. Just make sure to add some herbs and spices to keep the flavor strong. This soup can be gluten-free if you choose the right gnocchi. Look for gluten-free brands in stores. Also, check the chicken broth for gluten. Most broths are safe, but it's good to read the label. This blog post covered everything you need to make a tasty soup. We explored the ingredients, including fresh and canned options, and shared substitutes. I provided step-by-step instructions for cooking and some tips for great flavor. We also discussed variations, storage, and answered common questions. These details will help you create a delicious dish that suits your taste. Enjoy your cooking adventure!

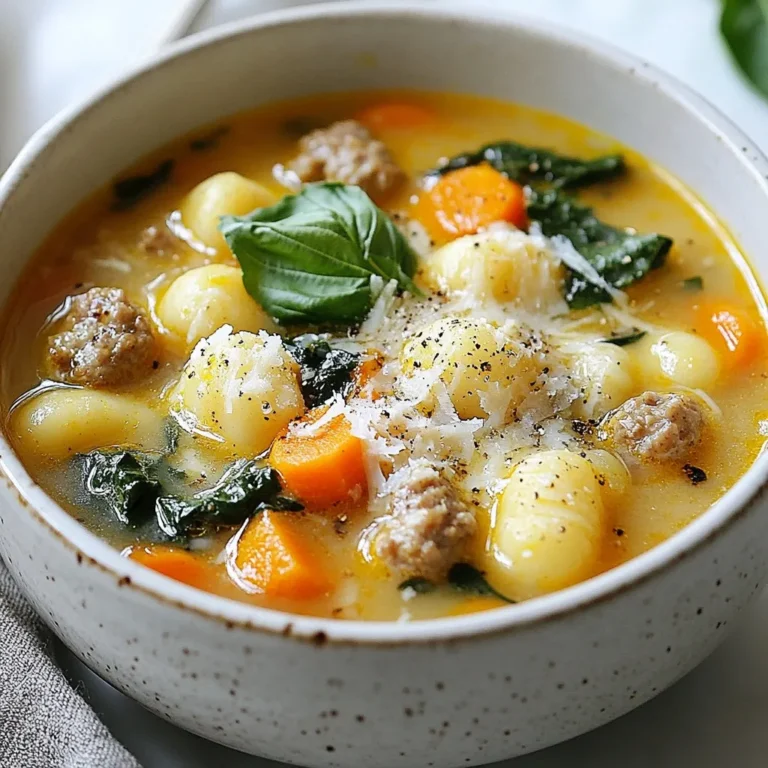
Italian Sausage Gnocchi Soup Flavorful Comfort Dish

For these rich chocolate mousse brownies, gather the following: - 1 cup unsalted butter - 8 oz dark chocolate (60-70% cocoa), chopped - 1 cup granulated sugar - 1 cup brown sugar, packed - 4 large eggs - 1 teaspoon pure vanilla extract - 1 cup all-purpose flour - 1/2 cup unsweetened cocoa powder - 1/2 teaspoon salt - 1 cup heavy cream - 2 tablespoons powdered sugar - 1 teaspoon espresso powder (optional) - Chocolate shavings or cacao nibs for garnish If you can't find certain ingredients, here are some swaps: - Use coconut oil instead of butter for a dairy-free option. - Swap dark chocolate for semi-sweet chocolate if you prefer a sweeter taste. - You can replace granulated sugar with coconut sugar for a healthier choice. - Use egg substitutes like flaxseed meal or applesauce if you want a vegan version. Quality matters when making these brownies. Here are some tips: - Chocolate: Select high-quality dark chocolate. Look for brands with minimal ingredients. - Butter: Use unsalted butter for better control over salt levels. - Eggs: Fresh, organic eggs will enhance the flavor and texture. - Vanilla: Pure vanilla extract offers a richer taste than imitation. - Cocoa Powder: Choose unsweetened cocoa powder with a deep color for bold flavor. Choosing the right ingredients will elevate your chocolate mousse brownies. Enjoy the process! {{ingredient_image_2}} Start by preheating your oven to 350°F (175°C). This ensures even baking. Next, grab a 9x13 inch baking pan. Lightly grease it and line the bottom and sides with parchment paper. Leave some paper hanging over the edges. This will help you lift the brownies out later. In a medium saucepan, combine 1 cup of unsalted butter and 8 ounces of chopped dark chocolate. Melt them over low heat. Stir continuously until the mix is smooth. Once melted, remove it from the heat and let it cool slightly before using it. In a large bowl, mix 1 cup of granulated sugar and 1 cup of brown sugar. Pour in the slightly cooled chocolate mix. Stir well to blend the sugars fully. Then, add 4 large eggs one at a time. Mix after each addition. Finally, stir in 1 teaspoon of pure vanilla extract. In a separate bowl, sift together 1 cup of all-purpose flour, 1/2 cup of unsweetened cocoa powder, and 1/2 teaspoon of salt. Slowly fold the dry ingredients into the wet mix. Be gentle; we don’t want to overmix. Now, pour the batter into your prepared pan. Spread it evenly. Bake for 25-30 minutes. Check with a toothpick. It should come out with a few moist crumbs. While the brownies bake, whip up the chocolate mousse. In a mixing bowl, beat 1 cup of heavy cream, 2 tablespoons of powdered sugar, and 1 teaspoon of espresso powder (if using). Whip until soft peaks form. Be careful not to overwhip; the mousse should be fluffy and smooth. Once the brownies cool completely, lift them out using the parchment overhang. Spread the whipped mousse evenly on top of the brownies. Chill in the fridge for at least 1 hour. This helps the mousse set. Just before serving, sprinkle with chocolate shavings or cacao nibs for a fancy touch. Cut into squares, serve, and enjoy! For the best brownie texture, start with quality chocolate. I use dark chocolate with 60-70% cocoa for rich flavor. Melt the chocolate and butter slowly. Stir often to keep it smooth. Mix the sugar and chocolate well before adding eggs. This step helps create a shiny crust. When you mix in the flour, do it gently. Overmixing can lead to dry brownies. Bake them until a toothpick shows moist crumbs. This means they are perfectly fudgy. To make light and fluffy mousse, use heavy cream. It whips up better than lighter creams. Add powdered sugar for sweetness and espresso powder for depth. Whip the cream until soft peaks form. Stop mixing once it becomes fluffy. Overwhipping can lead to grainy mousse. Spread it evenly on cooled brownies. Chilling helps the mousse set and gives it a nice texture. Many people overbake brownies, making them dry. Always check with a toothpick. If it comes out with a few moist crumbs, they are done. Another mistake is not letting brownies cool. They need to cool completely before adding mousse. This prevents melting and helps keep layers distinct. Finally, don’t rush the chilling step. Letting the mousse set is key to a great dessert. Pro Tips Use Quality Chocolate: The flavor of your brownies will largely depend on the quality of the chocolate you use. Opt for a high-quality dark chocolate with at least 60% cocoa for a rich and decadent taste. Don’t Overmix: When combining the dry ingredients with the wet ingredients, mix just until combined. Overmixing can lead to tough brownies instead of the desired fudgy texture. Let Them Cool: It's crucial to let the brownies cool completely before adding the mousse. This prevents the mousse from melting and ensures a clean, beautiful layer on top. Chill Before Serving: Allow the assembled brownies to chill in the fridge for at least an hour. This helps the mousse set properly, making for easier slicing and a more enjoyable texture. {{image_4}} You can jazz up your chocolate mousse brownies with extra flavors. One easy way is to add mint. Use mint extract in the mousse for a refreshing twist. A little goes a long way, so start with just a half teaspoon. Another fun option is orange. Add orange zest to the brownie mix for a bright flavor. You can also use orange extract in the mousse. This adds a citrus kick that pairs well with chocolate. You can easily make these brownies gluten-free. Swap the all-purpose flour for a gluten-free blend. Look for a blend that has xanthan gum to help with texture. This keeps your brownies moist and chewy. Make sure your chocolate is also gluten-free. Most dark chocolates are safe, but check the label. You want to avoid any hidden gluten. Serve these brownies with some fresh berries. Raspberries or strawberries add a nice tartness. A scoop of vanilla ice cream goes great with the rich chocolate too. For a fun twist, pair the brownies with a strong coffee. The coffee brings out the chocolate flavor. You can even sprinkle some sea salt on top for a salty-sweet treat. To keep your chocolate mousse brownies fresh, store them in an airtight container. This method prevents air from drying them out. Always let the brownies cool completely before storing. If they are warm, they can create steam, which makes them soggy. You can keep them at room temperature for up to three days. If you want them to last longer, refrigerate them for up to a week. Mousse can lose its lightness if not stored right. To preserve that fluffy texture, cover the mousse brownies with plastic wrap. Ensure the wrap doesn’t touch the mousse. This keeps moisture out and helps maintain its creaminess. When ready to serve, simply remove the wrap and cut the brownies. The mousse will still be smooth and delicious. Freezing is a great way to save extras. First, cut the brownies into squares. This makes it easier to thaw only what you need. Wrap each square in plastic wrap, then place them in a freezer-safe bag. They can stay frozen for up to three months. When you’re ready to enjoy them, let them thaw in the fridge overnight. This keeps the mousse from melting too fast. Enjoy the rich taste of these brownies anytime! To cut brownies cleanly, use a sharp knife. First, let the brownies cool fully. Run the knife under hot water, then dry it. Make your cuts in straight, even strokes. Wipe the knife between cuts to keep it clean. This keeps the edges neat and reduces crumbling. Yes, you can make the mousse ahead of time. Prepare it one day before you plan to serve the brownies. Store it in the fridge in an airtight container. Just remember to spread it on the brownies right before serving. To prevent sticking, grease your pan well. Use unsalted butter or cooking spray. Line the bottom and sides with parchment paper, leaving overhang. This helps you lift the brownies out easily after baking. For this recipe, use dark chocolate with 60-70% cocoa. This gives a rich flavor. You can also use semi-sweet chocolate if you prefer a sweeter taste. Avoid using milk chocolate, as it may make the brownies too sweet. Chocolate mousse brownies last about 3-4 days in the fridge. Store them in an airtight container to keep them fresh. If you want to keep them longer, you can freeze them for up to 2 months. Just wrap them well in plastic wrap. You learned how to make chocolate mousse brownies, from ingredients to storage. Quality ingredients lead to great desserts. Follow the steps for perfect brownies and fluffy mousse. Don't skip the tips to avoid common mistakes. You can try different flavors and even make a gluten-free version. Store wisely to keep your treats fresh longer. Enjoy the process, and impress your friends with this delicious dessert!

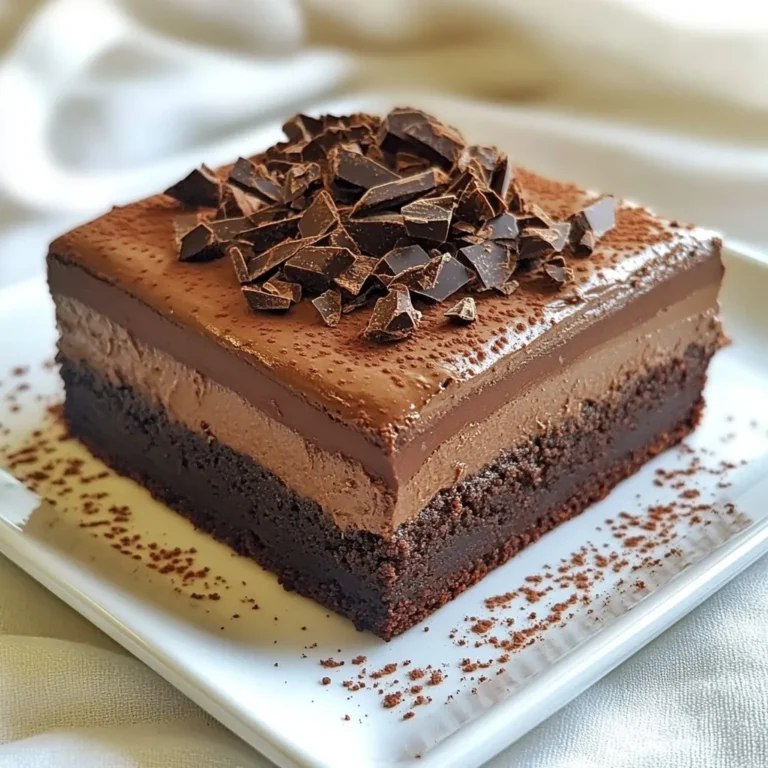
Chocolate Mousse Brownies Indulgent and Rich Dessert

PREV 1 … 37 38 39 … 44 NEXT
yummybiterecipes

explore

DessertsDinnerAppetizersDrinks

Our Policies

  • Cookie Policy
  • Copyright Policy
  • Disclaimer
  • GDPR Policy
  • Terms Of Use
Back to Top
  • About
  • Contact Us
  • Privacy Policy
© 2025 yummybiterecipes