FREE DINNER EBOOK! Get your copy!
  • Cookie Policy
  • GDPR Policy
  • Disclaimer
  • Terms Of Use
  • Visit my other site: Fun Cookie Recipes
yummybiterecipes
  • Home
  • Dinner
  • Desserts
  • Drinks
  • Appetizers
  • Contact
  • About
  • Privacy Policy
  • Home
  • Dinner
  • Desserts
  • Drinks
  • Appetizers
  • Contact
  • About
  • Privacy Policy
  • Cookie Policy
  • GDPR Policy
  • Disclaimer
  • Terms Of Use
Visit my other site: Fun Cookie Recipes

HOME / CATEGORIES /

Latest

- 1 cup unsalted butter, softened to room temperature - 1 cup granulated sugar - 1 large egg - 2 tablespoons freshly grated lemon zest - 2 tablespoons fresh lemon juice - 2 cups all-purpose flour, sifted - 1 teaspoon baking powder - 1/2 teaspoon fine sea salt - 1 cup fresh raspberries (or frozen raspberries, thawed and well-drained) - 1/2 teaspoon pure vanilla extract - Powdered sugar for dusting (optional) If you run out of an ingredient, you can swap it. Use margarine instead of butter. If you want a lower sugar option, try using coconut sugar. For a vegan twist, replace the egg with a flaxseed meal or unsweetened applesauce. You can also use lemon extract if you don’t have fresh lemons. To get the best results, measure your ingredients carefully. For flour, spoon it into your measuring cup and level it off with a knife. Avoid packing it down. When measuring butter, cut it into sticks for easy measurement. Use a kitchen scale if you have one; it ensures accuracy and helps your cookies turn out just right. {{ingredient_image_2}} Start by preheating your oven to 350°F (175°C). Next, line a baking sheet with parchment paper. This stops the cookies from sticking. Gather all your ingredients on the counter for easy access. Having everything ready makes the process smooth. In a large mixing bowl, add 1 cup of softened unsalted butter and 1 cup of granulated sugar. Use an electric mixer on medium speed to mix them together. Cream these for about 3-4 minutes. You want the mixture to be light and fluffy. This step adds air, making your cookies soft and tender. In a separate bowl, whisk together 2 cups of sifted all-purpose flour, 1 teaspoon of baking powder, and 1/2 teaspoon of fine sea salt. Slowly add the dry mix to the creamy butter and sugar. Mix just until combined. Overmixing can lead to tough cookies. Then, gently fold in 1 cup of fresh raspberries and 1/2 teaspoon of pure vanilla extract. Be careful to keep the raspberries intact for juicy bursts in every bite. When baking lemon raspberry cookies, avoid overmixing your dough. Mixing too much can make the cookies tough. Focus on combining the ingredients until just mixed. Also, be careful with the raspberries. If you mash them too much, they can turn your dough pink and lose their shape. Use fresh or well-drained frozen raspberries for the best results. For soft and chewy cookies, make sure to cream your butter and sugar well. This creates air in the dough. Also, measure your flour correctly. Too much flour can lead to dry cookies. Use the spoon and level method: spoon flour into your measuring cup and level it off with a knife. Lastly, don’t skip the cooling time. Letting the cookies sit on the baking sheet helps them firm up without becoming hard. You can enhance the lemon raspberry flavor by adding a bit of zest to the dough. A teaspoon of lemon zest boosts the brightness. Try mixing in white chocolate chips for sweetness. They pair well with the tart raspberries. Another option is to sprinkle a hint of sea salt on top after baking. This makes the flavor pop even more. Pro Tips Use Fresh Ingredients: Always opt for fresh raspberries and real lemon juice for the best flavor. Fresh ingredients enhance the taste and overall quality of your cookies. Don’t Overmix: After adding the flour mixture, mix just until incorporated. Overmixing can lead to tough cookies instead of light and fluffy ones. Proper Cooling: Allow the cookies to cool on the baking sheet for a few minutes before transferring to a wire rack. This helps them set properly and prevents them from breaking. Perfect Storage: Store cookies in an airtight container at room temperature for up to a week. For longer freshness, consider freezing them in a single layer and then transferring to a freezer bag. {{image_4}} You can make gluten-free lemon raspberry cookies! Use gluten-free flour instead of all-purpose flour. Look for a blend that works well for baking. This swap keeps the cookies light and tasty. Follow the same steps in the recipe, and enjoy your gluten-free treat. For a fun twist, try making lemon raspberry cookie sandwiches. Bake the cookies as usual and let them cool. Then, spread a layer of lemon frosting or vanilla cream between two cookies. This adds a delightful creaminess to each bite. You can even add fresh raspberries inside for extra flavor. You can enhance your cookies by adding white chocolate chips or nuts. Mix in half a cup of white chocolate chips for a sweet touch. If you prefer nuts, try chopped walnuts or pecans. Just fold them into the dough before baking. This twist adds texture and flavor to your cookies. To keep your lemon raspberry cookies fresh and tasty, store them in an airtight container. This helps maintain their softness and flavor. You can place parchment paper between layers of cookies to prevent sticking. Keep the container at room temperature for the best results. Avoid storing them in the fridge, as it can dry them out. Freezing is a great way to save cookies for later. First, let the cookies cool completely. Then, place them on a baking sheet lined with parchment paper. Freeze them for about 1-2 hours until solid. Once frozen, transfer the cookies to a freezer-safe bag or container. Make sure to remove as much air as possible to prevent freezer burn. You can freeze them for up to three months. Fresh lemon raspberry cookies last about 5-7 days at room temperature if stored properly. If you freeze them, expect the quality to remain good for about three months. Once you thaw the cookies, eat them within 3 days for the best taste and texture. Always check for any signs of spoilage before enjoying your treat! Yes, you can use frozen raspberries. Make sure to thaw them first. Drain any extra juice so the dough stays firm. This helps keep the cookies from getting too soggy. The flavor will still shine through, giving your cookies that fresh taste. You can tell the cookies are done when the edges turn light golden. The centers should still feel soft but not doughy. If you gently press the top, it should spring back. This means they are ready to come out. Absolutely! You can make the dough and chill it in the fridge. Wrap it in plastic wrap for best results. You can store it for up to 2 days. When you are ready to bake, scoop and place it on the baking sheet. This way, you can enjoy fresh cookies anytime. This blog post covered all you need for great lemon raspberry cookies. You learned about key ingredients, substitutions, and measuring tips. We walked through easy step-by-step instructions for baking. I shared tips to avoid common mistakes and achieve the best texture. You also discovered tasty variations, storage tips, and answers to common questions. Now, you can confidently bake these cookies and impress everyone. Enjoy the process, and remember, practice makes perfect!

Lemon Raspberry Cookies Fresh and Tasty Treat

- 3 to 4 pounds beef chuck roast - 4 large yellow onions, thinly sliced - 4 cloves garlic, minced - 2 tablespoons olive oil - 4 cups beef broth - 2 tablespoons balsamic vinegar - 2 teaspoons dried thyme - 2 bay leaves - 1 cup shredded Gruyère cheese - Fresh parsley for garnish - Salt and pepper to taste The main ingredients are key to making this dish rich and full of flavor. The beef chuck roast is the star, giving you a tender and juicy bite. Yellow onions add sweetness and depth. Minced garlic brings in a nice aromatic kick. Olive oil helps with searing and adds richness. For the additional flavors, beef broth forms a savory base. Balsamic vinegar gives a hint of tanginess. Dried thyme and bay leaves infuse the roast with herbaceous notes. These ingredients work together to create a comforting and savory broth. Finally, topping the finished roast with shredded Gruyère cheese adds creamy richness. Fresh parsley adds a pop of color and freshness. A sprinkle of salt and pepper enhances all the delicious flavors. Keep these ingredients handy, and you’ll create a dish that feels like a warm hug on a cold day. {{ingredient_image_2}} First, preheat your oven to 325°F (163°C). This heat is best for slow-cooking the roast. While the oven warms, season the beef chuck roast with salt and pepper. Make sure to cover all sides well. This adds great flavor to the meat. Next, we will sear the roast. Heat 2 tablespoons of olive oil in a large Dutch oven over medium-high heat. Once the oil shimmers, carefully place the roast in the pot. Sear it for about 4-5 minutes on each side. You want a nice brown crust to form. This step seals in the juices and adds flavor. Now, let’s focus on the onions. Add 4 large, thinly sliced yellow onions to the pot. Sprinkle a pinch of salt over them. Stir often to help them cook evenly. It takes about 15-20 minutes for the onions to turn golden brown and sweet. When they are ready, add 4 cloves of minced garlic. Sauté the garlic for 1-2 minutes until it smells great. Next, pour in 4 cups of beef broth and 2 tablespoons of balsamic vinegar. Don’t forget to scrape the bottom of the pot with a wooden spoon. This lets all those tasty bits mix in. Add 2 teaspoons of dried thyme and 2 bay leaves for extra flavor. Carefully return the seared roast to the pot. Make sure it is mostly covered by the onion broth. Cover the pot tightly with a lid and place it in the preheated oven. Roast for 3 to 4 hours. Check the pot every hour to make sure there is enough liquid. If it looks dry, add more beef broth. The roast is done when it falls apart easily with a fork. After roasting, take the pot out of the oven. Let the roast rest for 10-15 minutes on a cutting board. This helps the juices move back into the meat. While it rests, bring the onion broth to a gentle simmer on the stove. This will boost the flavors even more. Slice the roast into portions and place them on a serving platter. Ladle the rich onion broth over the meat, then sprinkle 1 cup of shredded Gruyère cheese on top. For a final touch, broil it for a few minutes until the cheese melts and bubbles. Just before serving, add some fresh parsley on top for color and freshness. Searing your roast is key for deep flavor. Use a heavy pot, like a Dutch oven. Heat olive oil until it shimmers. Season the roast with salt and pepper. Sear each side for 4-5 minutes. This browning adds great taste. After searing, caramelize the onions in the same pot. Stir often until they turn golden brown. This step takes about 15-20 minutes. Adding garlic at the end boosts the flavor even more. To check doneness, use a fork. When the meat pulls apart easily, it’s ready. Aim for a roast that cooks for 3 to 4 hours. Keep an eye on the liquid. If it looks low, add more beef broth. This keeps the roast moist. Letting it rest after cooking is also important. Resting for 10-15 minutes lets the juices settle. This ensures each slice is juicy and tender. To elevate the taste, consider a splash of balsamic vinegar. It adds a nice tang. Fresh herbs like thyme can boost flavor too. Don't forget the Gruyère cheese. It melts beautifully on top and adds richness. Finally, garnish with fresh parsley for color and brightness. These simple tweaks make your pot roast stand out! Pro Tips Resting the Roast: Allow the pot roast to rest for at least 10-15 minutes before slicing. This helps the juices redistribute, ensuring a moist and flavorful meat. Enhancing Flavor: For an extra depth of flavor, consider adding a splash of red wine to the broth before roasting. It complements the richness of the beef beautifully. Onion Variations: Experiment with different onion varieties such as sweet onions or shallots for a unique twist on the classic caramelized onion flavor. Serve with Sides: Pair the pot roast with creamy mashed potatoes or crusty bread to soak up the delicious onion broth for a hearty meal. {{image_4}} You can use other cuts of meat for your French onion pot roast. Some good options include: - Brisket - Round roast - Pork shoulder - Lamb shanks Each cut brings a unique flavor and texture. Brisket is juicy and rich, while round roast is lean and flavorful. Pork shoulder adds a sweet taste, and lamb shanks offer a tender bite. Choose what you like best! Want a meatless option? You can still enjoy the flavors of French onion pot roast. Here are some ideas: - Use a large portobello mushroom as the main item. - Replace meat with hearty vegetables like carrots and potatoes. - Use vegetable broth instead of beef broth. - Add lentils or chickpeas for protein and texture. These options keep the dish hearty and satisfying without meat. Try different herbs and spices to change the taste of your pot roast. Some great additions include: - Rosemary for a fresh, earthy flavor. - Oregano for a hint of sweetness. - Smoked paprika for a touch of warmth. - Bay leaves for depth and aroma. Experiment with these flavors to find your favorite mix! To keep your French onion pot roast fresh, store it in the fridge. Use an airtight container to prevent drying out. If you want to save it longer, freeze it. Cut the roast into portions for easy reheating later. Wrap each piece well in plastic wrap or foil before placing it in a freezer bag. This way, you avoid freezer burn. When it's time to eat the leftovers, you want to keep the flavor. The best way is to reheat in the oven. Preheat your oven to 325°F (163°C). Place the roast in a baking dish with a little broth or water. Cover it with foil to trap moisture. Heat for about 20-30 minutes. You can also use a microwave, but be careful. Heat in short bursts, checking often to avoid overcooking. In the fridge, your pot roast will last about 3-4 days. If you freeze it, it can last up to 3 months. Just remember to label your containers with the date. This helps you keep track of freshness. Always check for any signs of spoilage before eating. Yes, you can use a slow cooker for this dish. First, sear the roast in a pan. This step adds flavor. After searing, place the roast in the slow cooker. Add the caramelized onions, garlic, broth, and seasonings. Cook on low for 6 to 8 hours. Your pot roast will still be tender and tasty. I love pairing this pot roast with creamy mashed potatoes. The potatoes soak up the rich broth. You can also serve it with roasted vegetables for a healthy touch. A fresh green salad adds a nice crunch. Don’t forget some crusty bread for dipping! To make this dish gluten-free, just use gluten-free beef broth. Check the label to ensure it’s safe. Balsamic vinegar is usually gluten-free, but verify it too. The rest of the ingredients in this recipe are naturally gluten-free. Absolutely! While Gruyère cheese is classic, you can try other cheeses. Swiss cheese offers a milder flavor. Cheddar brings a sharp taste. Mozzarella melts well and adds a gooey texture. Mix and match to find your favorite. Searing the meat is not strictly necessary, but I highly recommend it. Searing creates a nice brown crust on the roast. This crust adds flavor and depth to the dish. It also helps lock in juices, making the meat more tender. Don’t skip this step for the best results! This blog post covered how to make a delicious French Onion Pot Roast. I shared key ingredients, like beef chuck roast and yellow onions. You learned important steps, such as searing the meat and caramelizing the onions for maximum flavor. Remember to rest the roast before serving for the best texture. Try the tips for different cuts or a vegetarian option to suit your taste. With the right techniques and flavors, you can enjoy a truly satisfying meal. Happy cooking!

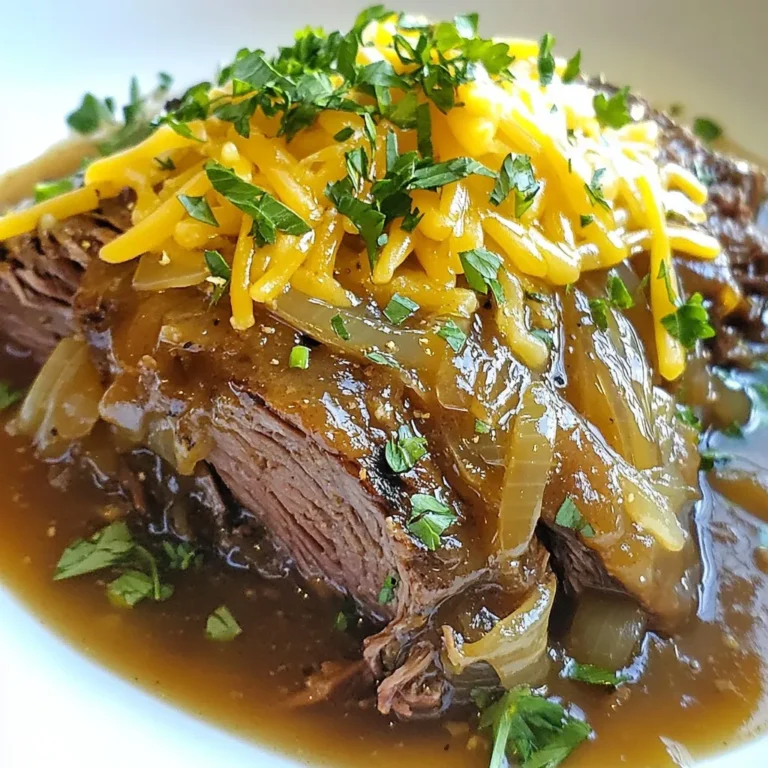
French Onion Pot Roast Savory and Comforting Dish

To make this tasty casserole, you need these main ingredients: - 6 large croissants, torn into bite-sized pieces - 6 large eggs - 2 cups whole milk - 1 cup shredded Gruyère cheese, divided - 1 cup diced cooked ham or turkey - 1 bell pepper, diced - 1 cup fresh spinach, chopped - 1 teaspoon garlic powder - ½ teaspoon salt - ½ teaspoon black pepper - 1 tablespoon Dijon mustard These simple ingredients come together to create a rich, flavorful dish. The croissants offer a buttery base, while the eggs and cheese provide creaminess. The ham or turkey adds protein, and the veggies bring freshness. You can customize the casserole to fit your taste. Here are some great options: - Swap the ham for cooked sausage or bacon for extra flavor. - Use different cheeses like cheddar or feta for a unique twist. - Add diced tomatoes or mushrooms for more veggies. - If you want a vegetarian option, leave out the meat entirely. These changes can make the dish your own and suit your family's preferences. Herbs can enhance the flavor and look of your casserole. Here are some tasty options: - Fresh parsley - Chives - Thyme - Basil Sprinkle these herbs on top before serving. They add color and a burst of fresh flavor. You can also serve the casserole with a light salad or fresh fruit for a balanced breakfast. {{ingredient_image_2}} Generously grease a 9x13 inch baking dish. You can use cooking spray or softened butter. This step helps the casserole come out easily after baking. Tear 6 large croissants into bite-sized pieces. Spread them evenly across the bottom of your baking dish. This layer is the base of your casserole. Next, sprinkle a cup of diced cooked ham or turkey on top. Add one diced bell pepper and a cup of chopped spinach for color and flavor. Finally, sprinkle ¾ cup of shredded Gruyère cheese over the top. This mix adds richness and texture. In a large bowl, whisk together 6 large eggs and 2 cups of whole milk. Add 1 teaspoon of garlic powder, ½ teaspoon of salt, and ½ teaspoon of black pepper. Don’t forget the 1 tablespoon of Dijon mustard for a little kick. Whisk until creamy and smooth. Pour this egg mixture over the layered croissants and fillings. Gently press down to make sure the croissant pieces soak up the mixture. Lastly, sprinkle the remaining ¼ cup of Gruyère cheese on top for a cheesy finish. To get the best flavor, soak your croissants well. Use a mix of eggs and milk. Whisk the eggs and milk together until smooth. Pour it over the croissants. Press them down gently to soak every piece. This helps the croissants soak up the mix. Let them sit in the fridge overnight. This makes them soft and tasty. For added flavor, try adding spices, like garlic powder or herbs. For a great cheese crust, use Gruyère cheese. It melts nicely and browns well. Sprinkle it on top before baking. This will create a golden and crispy layer. Don’t skip this step; it adds a lot of flavor. You can also mix in some Parmesan for extra taste. If you want a richer flavor, use aged cheese. To reheat leftovers, use an oven for the best results. Preheat your oven to 350°F (175°C). Place individual servings in an oven-safe dish. Cover with foil to keep them moist. Heat for about 15-20 minutes. If you want a crispy top, remove the foil for the last few minutes. You can also use a microwave, but the texture won’t be as good. Pro Tips Use Day-Old Croissants: For the best texture, use croissants that are a day or two old. They will absorb the egg mixture better without becoming too soggy. Customize Your Fillings: Feel free to mix and match your fillings! Try adding sautéed mushrooms, zucchini, or different types of cheese for a unique twist. Let It Rest: Allowing the casserole to rest in the refrigerator overnight is key. This gives the croissants time to soak up the custard, resulting in a fluffy texture. Garnish for Freshness: Adding fresh herbs before serving not only enhances the presentation but also brightens the flavors of the casserole. {{image_4}} You can make this dish vegetarian by skipping the meat. Use extra veggies instead. Try adding mushrooms or zucchini for more texture. You can also include diced tomatoes for a fresh burst of flavor. Spinach and bell peppers already add color and nutrients. This makes the dish hearty and filling without any meat. While Gruyère is rich and creamy, you can switch it up. Try mozzarella for a milder taste. Cheddar gives a sharp kick, which some may enjoy. Goat cheese adds a tangy twist that pairs well with the egg. Mix and match to find your favorite cheese blend. Each option changes the flavor in a fun way. You can adjust this casserole for different seasons. In fall, add pumpkin puree and spices like nutmeg or cinnamon. For winter, consider using sage or rosemary for a cozy flavor. In spring, fresh herbs like dill or basil can brighten the dish. Summer is great for fresh tomatoes and corn. Each season brings new tastes to enjoy. To keep your leftover casserole fresh, place it in an airtight container. Make sure to cover it tightly. Store it in the fridge for up to three days. This helps retain the flavors and texture of the dish. If you want to save some for later, freezing works well. Cut the casserole into portions. Place each piece in freezer-safe bags or containers. Label them with the date. You can freeze it for up to three months. To reheat, take the casserole out of the fridge or freezer. If frozen, let it thaw overnight in the fridge. Preheat your oven to 350°F (175°C). Place the casserole in a baking dish, cover with foil, and warm it for about 20-30 minutes. Check that it’s heated all the way through before serving. Enjoy your tasty breakfast! Yes, day-old croissants work great. They soak up the egg mixture better. Fresh croissants can be too soft and mushy. Day-old croissants hold their shape well and add a nice texture to the casserole. Just tear them into bite-sized pieces and layer them in your baking dish. You can store the casserole in the fridge for up to three days. Make sure to cover it well with plastic wrap. This keeps it fresh and prevents any odors from other foods in the fridge. Just reheat it before serving for a quick breakfast. Yes, you can make this dish gluten-free. Use gluten-free croissants instead of regular ones. Many stores sell these now, or you can make your own. Just ensure all other ingredients, like cheese and ham, are also gluten-free. This way, everyone can enjoy the casserole! Overnight croissant breakfast casserole is a tasty and easy dish to make. We covered key ingredients, from croissants to herbs. I shared step-by-step instructions to help you create it perfectly. Tips for soaking croissants and reheating leftovers ensure good results. You can also try variations like vegetarian options and seasonal flavors. This casserole is flexible and can fit any taste. Enjoy your cooking!

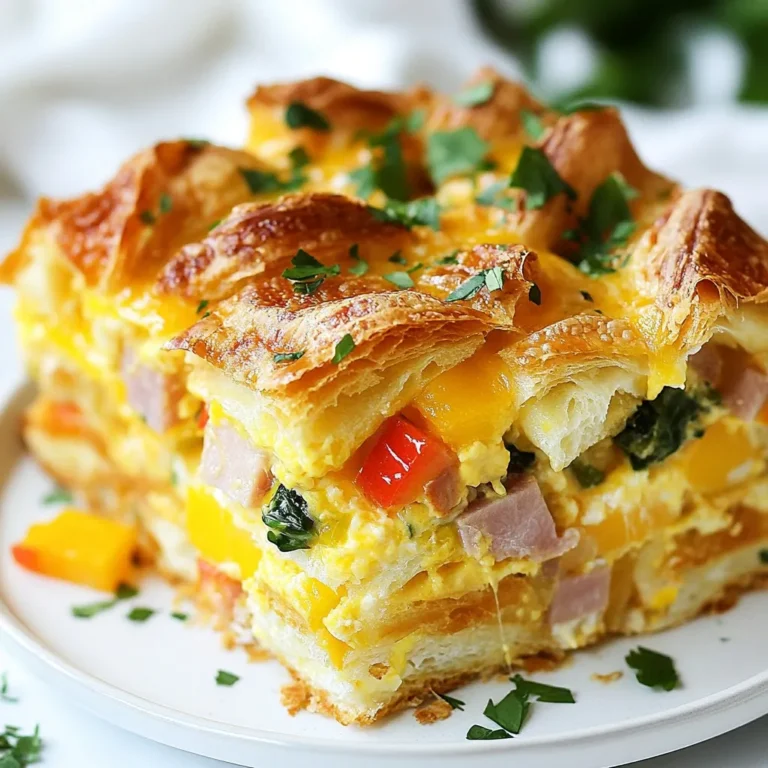
Overnight Croissant Breakfast Casserole Delight

- 2 salmon fillets - 1 cup cooked jasmine rice - 1 cup broccoli florets - 1 medium carrot, julienned - 1 red bell pepper, sliced - 2 tablespoons soy sauce - 2 tablespoons honey - 1 tablespoon rice vinegar - 1 teaspoon freshly grated ginger - 1 garlic clove, finely minced - 1 teaspoon sesame oil (plus extra for cooking) - Sesame seeds, for garnish - Chopped green onions, for garnish When I make teriyaki salmon bowls, I love to use fresh, quality ingredients. You need two salmon fillets, which bring rich flavor and healthy fats. Jasmine rice serves as a soft base that absorbs the sauce well. Broccoli florets add a nice crunch and bright color. The julienned carrot and sliced red bell pepper give a sweet taste and a pop of color. For the teriyaki sauce, you will need soy sauce, honey, rice vinegar, grated ginger, minced garlic, and sesame oil. These ingredients blend together to create a sweet and savory sauce. Finally, sesame seeds and chopped green onions are great garnishes that add texture and flavor to your dish. Using these ingredients, you can create a fresh and colorful meal that is both tasty and healthy. {{ingredient_image_2}} To make the teriyaki sauce, grab a small bowl. In it, mix together: - 2 tablespoons soy sauce - 2 tablespoons honey - 1 tablespoon rice vinegar - 1 teaspoon freshly grated ginger - 1 garlic clove, finely minced - 1 teaspoon sesame oil Whisk until smooth. Set this aside. You will use it later to glaze the salmon. Heat a splash of sesame oil in a non-stick skillet over medium heat. Place the salmon fillets in the skillet, skin side down. Cook for 4-5 minutes. Don’t move the fillets. This lets the skin get crispy. After that, gently flip the salmon. Cook for another 3-4 minutes. The salmon should flake easily with a fork when done. Once cooked, pour half of the teriyaki sauce over the salmon. Let it cook for 1-2 minutes. This helps the sauce caramelize and adds flavor. Bring a pot of water to a boil. Add the broccoli florets and julienned carrots. Blanch them for about 2 minutes. They should turn bright and tender-crisp. Quickly transfer them to an ice water bath. This stops the cooking and keeps their color. Start with a base of cooked jasmine rice in each bowl. Place the glazed salmon fillet on top. Arrange the blanched broccoli, carrot, and sliced red bell pepper around the salmon. This creates a colorful and appealing dish. Drizzle the remaining teriyaki sauce over each bowl. This boosts the flavor. Finally, sprinkle sesame seeds and chopped green onions on top. This adds a nice crunch and color. Serve your teriyaki salmon bowls right away and enjoy! To cook salmon perfectly, heat sesame oil in a non-stick skillet. Place the salmon skin side down and cook for 4-5 minutes. Don't move the fillets; let the skin get crispy. Flip the salmon and cook for another 3-4 minutes. It should flake easily with a fork when done. To boost the teriyaki flavor, use fresh ingredients. Fresh ginger and garlic make a big difference. Mixing soy sauce with honey gives a nice sweetness. Let the teriyaki sauce reduce on the salmon for 1-2 minutes. This helps the flavors blend and caramelize nicely. You can swap some ingredients for healthier choices. Use brown rice instead of jasmine rice for more fiber. Try adding more veggies, like spinach or snap peas. If you want less sugar, cut back on honey or use a sugar substitute. These changes can make your teriyaki salmon bowls even better! Pro Tips Fresh Ingredients: Always use fresh salmon and vegetables for the best flavor and texture in your bowls. Master the Teriyaki Sauce: Adjust the sweetness and saltiness of the teriyaki sauce to your taste by varying the honey and soy sauce amounts. Perfectly Cooked Salmon: Use a meat thermometer to ensure the salmon reaches an internal temperature of 145°F for optimal doneness. Vibrant Presentation: Arrange your vegetables in a colorful way to make the dish visually appealing and appetizing. {{image_4}} You can switch out the salmon for many proteins. Chicken works well with teriyaki sauce. Simply grill or pan-sear chicken breast until it's cooked through. It will soak up the sauce's flavor nicely. Tofu is a great plant-based option. Press it to remove excess water, then cube and sauté it until golden. Both choices taste amazing in these bowls. For a vegan version, use marinated tempeh or seitan. These options provide protein and texture. Marinate them in the teriyaki sauce for extra flavor. You could also try chickpeas or lentils. They add protein and pair well with the other ingredients. Just cook them until warm, and they will fit right in. Feel free to mix up the veggies in your bowls. Snap peas or green beans add crunch. You can also add mushrooms for a savory touch. Spinach or kale can bring extra nutrients. Just sauté or blanch them like the broccoli and carrots. This way, your bowl stays colorful and tasty. Choose what you love for a personal twist. After enjoying your teriyaki salmon bowls, store any leftovers in an airtight container. Keep them in the fridge and eat them within three days for the best taste. Make sure to separate the salmon from the rice and veggies to keep everything fresh. To reheat, use a microwave for quick warming. Place your salmon and veggies on a plate, cover with a damp paper towel, and heat for 1-2 minutes. If you prefer the stove, warm them in a pan over low heat. This keeps the salmon juicy and the veggies crisp. You can freeze your teriyaki salmon bowls for later. Wrap each portion tightly in plastic wrap and then place it in a freezer bag. They can last for up to three months. Thaw in the fridge overnight before reheating. This way, you can enjoy your tasty meal anytime! To make teriyaki sauce, mix a few simple ingredients. You need soy sauce, honey, rice vinegar, grated ginger, minced garlic, and sesame oil. Just whisk these together until they blend smoothly. This sauce adds rich flavor to your salmon and veggies. For the best salmon, use a non-stick skillet. First, heat sesame oil over medium heat. Place the salmon fillets skin side down. Cook for 4-5 minutes without moving them. This helps the skin get crispy. Then, flip the fillets and cook for another 3-4 minutes. It's ready when it flakes easily with a fork. Yes, you can! While jasmine rice is great, you can also try brown rice or sushi rice. Each type will give a different taste and texture, so feel free to choose what you like best. You can store these bowls in the fridge for up to three days. Just keep them in an airtight container. When you’re ready to eat, reheat them in the microwave or on the stove for a quick meal. In this post, I covered how to make delicious teriyaki salmon bowls. We explored essential ingredients, step-by-step cooking instructions, and helpful tips. You learned about variations, storage options, and answers to common questions. This dish is flexible and easy to customize, making it great for any meal. Enjoy the process and keep experimenting to find your favorite flavors. Cooking can be fun and rewarding!

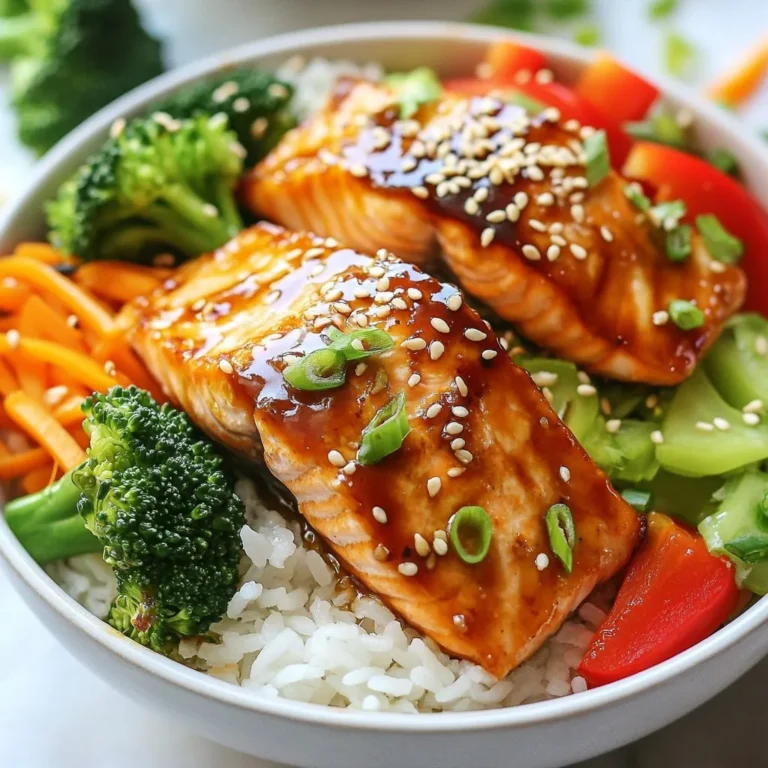
Teriyaki Salmon Bowls Fresh and Flavorful Meal

- 2 ½ cups all-purpose flour - 1 cup unsalted butter, softened to room temperature - 1 cup granulated sugar - 1 large egg - 2 teaspoons pure vanilla extract - 1 teaspoon almond extract - ½ teaspoon baking powder - ½ teaspoon fine salt - Food coloring (red, green, and any other festive color of your choice) - Sprinkles or colored sugar for decoration - Chopped nuts like walnuts or pecans for crunch - Mini chocolate chips for a sweet twist - Dried fruit bits like cranberries or cherries for chewiness - Citrus zest for a fresh, bright flavor - For all-purpose flour, I like King Arthur Flour for its quality. - Land O'Lakes is my go-to for unsalted butter; it blends well. - Domino granulated sugar is my favorite for sweetness and texture. - For extracts, I use Nielsen-Massey for a rich vanilla taste. - I often choose Wilton food coloring for vibrant hues. - For sprinkles, I trust Betty Crocker for colorful options that pop. {{ingredient_image_2}} 1. Start by creaming together the softened butter and sugar in a large bowl. Use an electric mixer. Mix for about 3-5 minutes until fluffy and light. 2. Next, add one large egg, vanilla extract, and almond extract. Mix well until everything is smooth. 3. In a separate bowl, mix the flour, baking powder, and salt. Gradually add this dry mix to the wet mix. Stir gently to form a smooth dough. 4. Divide the dough into three equal parts. Keep one part plain. For the other two, add food coloring and knead until the color is bright and even. 5. Shape each colored portion into cylindrical logs, about 2 inches wide. Wrap each log in plastic wrap and chill in the fridge for at least 2 hours. 6. Preheat your oven to 350°F (175°C) while the dough chills. 7. After chilling, remove the logs. Slice each log into rounds, about ¼ inch thick. Place the slices on a baking sheet lined with parchment paper, leaving space between them. 8. To make them festive, sprinkle colorful sugar or sprinkles on top of each cookie. 9. Bake for 10-12 minutes until the edges turn light golden. 10. Let the cookies cool on the baking sheet for 5 minutes, then transfer them to a wire rack to cool completely. - Always start with softened butter for easy mixing. - When adding food coloring, knead until the color is evenly spread. - Use clean hands when shaping and slicing the dough to avoid mess. - Refrigerate the dough long enough for it to firm up. This helps with slicing. - Set your oven to 350°F (175°C) before placing the cookies inside. - Always line your baking sheet with parchment paper. This prevents sticking and makes cleanup easy. - Keep an eye on the cookies as they bake. Ovens can vary, so check for light golden edges. To make perfect slice and bake cookies, start with soft butter. This helps blend the butter and sugar well. Mix them until light and fluffy, about 3-5 minutes. Next, add your egg and extracts. This adds flavor and richness to your cookies. When mixing dry ingredients, whisk the flour, baking powder, and salt together. This helps even distribution. When you form the dough, divide it into three portions. Leave one plain and color the others. Use food coloring and knead it in until the colors shine bright. Shape each dough into logs, about 2 inches wide. Wrap them tightly in plastic wrap and chill for at least 2 hours. Chilling firms the dough, making it easier to slice. One common mistake is not chilling the dough. Skipping this step leads to cookies that spread too much. Another mistake is slicing the logs too thick. Aim for ¼ inch thick slices to ensure even baking. Be careful not to overcrowd the baking sheet. Leave at least 1 inch between each cookie. This helps them bake evenly and prevents sticking. Lastly, don’t forget to check your oven temperature. An oven that’s too hot can burn the edges of your cookies. To enhance flavor, try adding zest. Lemon or orange zest adds a fresh, bright note. For texture, consider mixing in chopped nuts or chocolate chips. This adds crunch and rich flavor. You can also swap out the almond extract for other flavors like coconut or peppermint. This can create a fun twist on the classic cookie. Finally, sprinkle sea salt on top before baking for a sweet and salty balance. This simple step can elevate your cookie experience. Pro Tips Chill for Optimal Texture: Make sure to refrigerate the dough for at least 2 hours. This helps solidify the butter, leading to a better texture and preventing the cookies from spreading too much while baking. Color Mixing Tips: When adding food coloring, start with a small amount and gradually add more until you achieve your desired shade. Knead the dough thoroughly to ensure the color is evenly distributed. Perfect Baking Time: Keep an eye on the cookies while they bake. Oven temperatures can vary, so check for the edges to turn lightly golden before removing them from the oven to avoid over-baking. Decorative Touch: For an extra festive look, consider using themed sprinkles or edible glitter. Apply them right after slicing the cookies so they stick better before baking. {{image_4}} You can play with flavors to make these cookies special. Here are a few ideas: - Chocolate Chip: Add 1 cup of chocolate chips to the dough. - Lemon: Use lemon extract instead of almond for a fresh taste. - Mint: Add a few drops of peppermint extract for a cool twist. - Nutty: Mix in chopped nuts like walnuts or pecans for a crunchy bite. These simple changes can give your cookies new life. Each flavor brings joy and surprise. Decorating these cookies can be so much fun! Here are some ideas: - Sprinkles: Use colorful sprinkles to add a festive touch. - Icing: Make a simple icing with powdered sugar and water. - Glitter: Edible glitter can make your cookies shine. - Fruity: Add dried fruit pieces on top before baking. These decorations make your cookies look pretty and taste great, too! If you need to adjust these cookies for different diets, here are some options: - Gluten-Free: Use a gluten-free flour blend in place of all-purpose flour. - Vegan: Replace the egg with a flax egg (1 tablespoon ground flaxseed + 2.5 tablespoons water). These swaps help everyone enjoy the cookies. You can still have fun with flavors and decorations! To keep your cookies fresh, store them in an airtight container. Line the container with parchment paper to absorb moisture. Keep the container in a cool, dry place. If you stack cookies, place layers of parchment paper between them. This prevents sticking and helps maintain their shape. Freezing unbaked dough is a great way to save time. After shaping the dough into logs, wrap each log tightly in plastic wrap. Place the wrapped logs in a freezer-safe bag. Make sure to label the bag with the date. You can freeze the dough for up to three months. When you’re ready to bake, just slice the frozen logs and bake as usual, adding a minute or two to the baking time. Baked cookies can last for about one week at room temperature. If you want them to last longer, store them in the fridge. Baked cookies can stay fresh for up to two weeks in the fridge. For best flavor, consume them within the first few days. If you notice any changes in texture or smell, it's best to toss them. Enjoy your cookies while they are at their best! Yes, you can use other flours. For a gluten-free option, try almond flour or a gluten-free blend. If you use whole wheat flour, the cookies may taste nuttier and have a denser texture. You might need to adjust the liquid in the recipe. Start with less liquid and add more as needed. Always check the dough texture to ensure it feels right. The cookies are done when the edges turn lightly golden. Look for a slight firmness on the edges. If the centers look a bit soft, that's okay; they will firm up as they cool. Use a timer to avoid overbaking. Check them at the 10-minute mark. If they need more time, add only 1-2 more minutes. To transport homemade cookies safely, start with a sturdy container. Use a tin or a plastic container with a lid. Line the bottom with parchment paper to prevent sticking. Place a layer of cookies, then add parchment between layers. This keeps them fresh and prevents them from breaking. Avoid stacking them too high. For extra decoration, add a holiday ribbon around the container. In this post, we explored the key ingredients for delicious cookies and how to use them. I shared step-by-step instructions and tips for making perfect dough. You learned about variations and how to store your treats well. Remember, experimenting with flavors and decorations can lead to tasty surprises. Follow these tips and enjoy your baking adventure. Your cookies can be a hit every time!

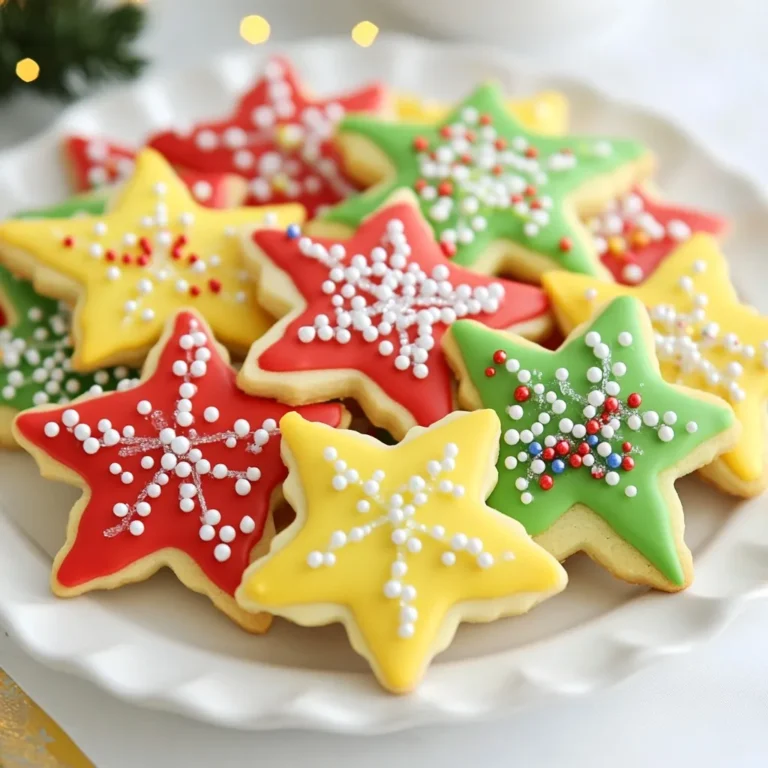
Flavor Slice & Bake Holiday Cookies Simple Treat

To make these delicious Chocolate Peanut Butter Energy Bites, you will need the following ingredients: - 1 cup rolled oats - 1/2 cup natural peanut butter - 1/3 cup honey or maple syrup - 1/4 cup unsweetened cocoa powder - 1/4 cup mini chocolate chips - 1/4 cup ground flaxseed (optional) - 1/2 teaspoon vanilla extract - A pinch of sea salt Each ingredient plays a key role in flavor and texture. Rolled oats provide a chewy base. Peanut butter adds creaminess and protein. Honey or maple syrup brings sweetness and binds everything together. Unsweetened cocoa powder gives a rich chocolate taste. Mini chocolate chips offer little bursts of chocolate joy. Ground flaxseed is optional but adds healthy fats and fiber. Vanilla extract enhances the flavors, while sea salt balances the sweetness. Gather your ingredients before starting. It makes the process smooth and fun! Enjoy the simple pleasure of mixing these ingredients to create a snack that is both tasty and nutritious. {{ingredient_image_2}} Start by taking a large bowl. Combine 1 cup of rolled oats, 1/4 cup of unsweetened cocoa powder, and 1/4 cup of ground flaxseed if you want added nutrition. Stir well until everything is mixed evenly. This blend gives your energy bites a nice base and texture. In a different bowl, whisk together 1/2 cup of natural peanut butter, 1/3 cup of honey or maple syrup, 1/2 teaspoon of vanilla extract, and a pinch of sea salt. Keep whisking until the mixture is smooth and creamy. This step is key for a rich flavor. Now, pour the wet mixture into the bowl with the dry ingredients. Use a spatula or a wooden spoon to mix them together. Stir until the mixture is sticky and holds its shape. This means your bites will form nicely later. Next, gently fold in 1/4 cup of mini chocolate chips. Make sure they spread evenly throughout the mix. This adds little bursts of chocolate in every bite, making them even more delicious. To make it easier to handle, place the bowl in the refrigerator. Chill the mixture for about 30 minutes. This step firms it up, so rolling the bites will be simpler. After chilling, remove the mixture from the fridge. Take small portions of the mix and roll them into 1-inch balls. Place these on a parchment-lined baking sheet. Keep them evenly spaced out for easy handling. Once all the bites are shaped, put them back in the refrigerator. Chill them again for 10 to 15 minutes. This will help them firm up nicely and make them easier to eat. Finally, transfer the energy bites to an airtight container. Store them in the fridge, where they will stay fresh for up to a week. Keep them handy for a quick snack or breakfast on the go! To create the best energy bites, you must mix well. This ensures all ingredients blend perfectly. Start by mixing the dry ingredients first. In a large bowl, combine rolled oats, cocoa powder, and flaxseed. Stir until these dry items are evenly mixed. In another bowl, whisk your wet ingredients until smooth. This step is key for a good texture. Get creative with your energy bites! You can add nuts like almonds or walnuts for crunch. Dried fruits like raisins or cranberries work well too. These additions give great flavors and textures. Try swapping out ingredients based on what you enjoy. The options are endless! Pair these bites with drinks for a tasty snack. A cup of herbal tea or a glass of almond milk complements them nicely. They also make a great quick breakfast option. Enjoy them anytime you need a boost! Pro Tips Use Fresh Ingredients: Ensure that your peanut butter is fresh and natural for the best flavor and texture in your energy bites. Adjust Sweetness: Feel free to adjust the amount of honey or maple syrup to your liking, depending on how sweet you want your energy bites to be. Experiment with Add-ins: Try adding different ingredients like dried fruits, nuts, or seeds to customize your energy bites further! Perfect Storage: Keep your energy bites in an airtight container in the fridge to maintain their freshness and texture throughout the week. {{image_4}} Each serving of these energy bites packs a nutritious punch. Here’s what you can expect: - Calories: About 120 - Protein: 4 grams - Total Fat: 6 grams - Carbohydrates: 14 grams - Fiber: 2 grams - Sugar: 5 grams These bites are rich in energy, making them perfect for a snack or quick breakfast. The ingredients in these energy bites offer many health benefits: - Oats: They are a great source of fiber. This fiber helps with digestion and keeps you full longer. - Peanut Butter: Packed with protein and healthy fats, peanut butter supports muscle repair and energy. - Flaxseed: This optional ingredient adds omega-3 fatty acids. Omega-3s are good for heart health and reduce inflammation. These ingredients work well together, offering a balanced snack. Each energy bite is about 120 calories. Here's how it breaks down: - Protein: 4 grams help with muscle growth. - Fats: 6 grams are mainly healthy fats from peanut butter and flaxseed. - Carbohydrates: 14 grams provide energy, with 2 grams coming from fiber. This mix of nutrients fuels your day, making these bites a smart choice. You can swap honey for agave or maple syrup. Each sweetener adds a unique flavor. Agave has a milder taste. Maple syrup brings a cozy, warm note. Try each to find your favorite! If you want to mix it up, use almond or cashew butter. Almond butter gives a nutty taste. Cashew butter is creamier and milder. Both options make great substitutes for peanut butter. You'll still enjoy that rich texture. Want to add a twist? Sprinkle in spices like cinnamon or nutmeg. These spices can elevate your bites. Cinnamon brings warmth, while nutmeg adds depth. Just a pinch can make a big difference! These energy bites last about one week in the fridge. Store them in an airtight container. Keeping moisture out helps them stay fresh longer. If you notice any changes in smell or texture, it’s best to toss them. Yes, you can freeze these bites! To freeze, place them in a single layer on a baking sheet. Once frozen, transfer them to a freezer bag. This way, you can grab one whenever you need a quick snack. They can last up to three months in the freezer. If you're allergic to peanuts, try almond butter or sunflower seed butter. Both options work well and still taste great. You can also use soy nut butter if you want a nut-free choice. Yes, these energy bites are quite healthy! They offer a good mix of protein, fiber, and healthy fats. Oats provide long-lasting energy, while peanut butter adds protein. The cocoa powder has antioxidants, making them a smart snack choice. I recommend starting with two energy bites per serving. They are filling and have a good balance of nutrients. Adjust based on your hunger and daily needs. Enjoy them as a snack or a quick breakfast! These chocolate peanut butter energy bites are easy and fun to make. You mix oats, cocoa, and peanut butter to create a tasty snack. Remember to chill the mixture for easier shaping. Store them in a container to enjoy later. In the end, these bites offer a quick energy boost and many health benefits. Feel free to tweak the recipe with your favorite ingredients. Enjoy making your snacks and feeling good about what you eat.

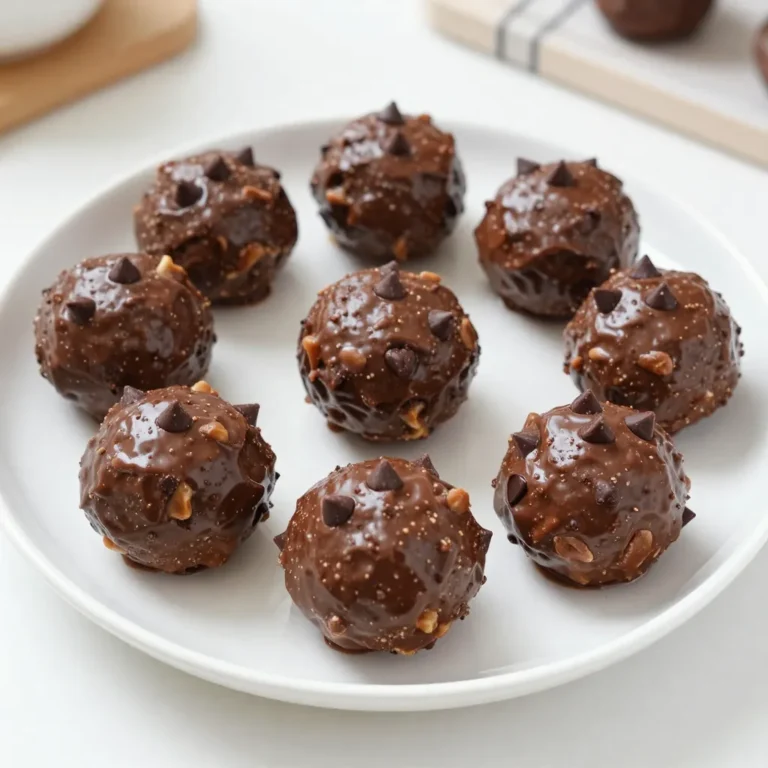
Chocolate Peanut Butter Energy Bites Simple Snack Treat

To make Gingerbread Cookie Bars, you need: - 2 ½ cups all-purpose flour - 2 teaspoons ground ginger - 1 teaspoon ground cinnamon - ½ teaspoon ground nutmeg - ½ teaspoon baking soda - ½ teaspoon salt - ¾ cup unsalted butter, softened - 1 cup brown sugar, firmly packed - ½ cup unsulfured molasses - 1 large egg - 1 teaspoon pure vanilla extract - 1 cup powdered sugar (for frosting) - 2-3 tablespoons milk (for frosting) You can add some fun toppings to your gingerbread bars: - Colorful sprinkles - Crushed candies These toppings give the bars a festive look and add extra sweetness. If you need to swap some items, here are good options: - Use whole wheat flour instead of all-purpose flour for a heartier taste. - Maple syrup can replace unsulfured molasses, but it will change the flavor. - Coconut oil works well in place of butter for a dairy-free option. - You can use almond milk or oat milk instead of regular milk for frosting. These swaps can help you make the bars fit your diet or taste preferences. {{ingredient_image_2}} First, set your oven to 350°F (175°C). This warm temperature helps the bars rise nicely. Next, grab a 9x13-inch baking pan. Lightly grease it or line it with parchment paper. This makes it easy to take the bars out later. In a medium bowl, whisk together 2 ½ cups of all-purpose flour, 2 teaspoons of ground ginger, 1 teaspoon of ground cinnamon, ½ teaspoon of ground nutmeg, ½ teaspoon of baking soda, and ½ teaspoon of salt. Mixing these dry ingredients well helps the flavors blend. In a large mixing bowl, add ¾ cup of unsalted butter and 1 cup of packed brown sugar. Use an electric mixer to beat them together. Mix for about 2-3 minutes until it looks light and fluffy. This step adds air to your mixture, which helps the bars rise. Now, add ½ cup of unsulfured molasses, 1 large egg, and 1 teaspoon of pure vanilla extract to the butter-sugar mix. Mix on medium speed until everything is smooth and well combined. This adds moisture and flavor to your bars. Take your dry mix and gradually add it to the wet mixture. Stir gently until just combined. Be careful not to overmix. This keeps your bars soft and tender, which is what we want. Spread the gingerbread batter evenly in the prepared baking pan. Use a spatula to smooth the top for even baking. Place the pan in the oven and bake for 20-25 minutes. Check for doneness by inserting a toothpick in the center. It should come out clean or have a few moist crumbs. After baking, let the bars cool in the pan for 10 minutes. Then, carefully move them to a wire rack to cool completely. To make the frosting, combine 1 cup of powdered sugar with 2 tablespoons of milk in a mixing bowl. Stir until smooth. If it’s too thick, add more milk, one teaspoon at a time. Once the bars are cool, spread the frosting evenly over the top. For a festive touch, add sprinkles or crushed candies before the frosting sets. Enjoy your delicious gingerbread cookie bars! For soft and chewy gingerbread cookie bars, follow these tips: - Use Room Temperature Ingredients: Make sure your butter and egg are at room temperature. This helps to create a smooth batter. - Avoid Overmixing: Mix the wet and dry ingredients just until they combine. Overmixing can lead to tough bars. - Use Fresh Spices: Fresh spices enhance flavor and aroma. Check your spices for freshness before use. To boost the flavor of your gingerbread cookie bars, try these tips: - Add a Pinch of Salt: A little salt brings out the sweetness. It balances the flavors well. - Use High-Quality Vanilla: Pure vanilla extract adds depth. It makes a big difference in taste. - Experiment with Spices: Consider adding a dash of allspice or cloves for a unique twist. Avoid these mistakes for the best gingerbread bars: - Not Preheating the Oven: Always preheat your oven. This ensures even baking throughout. - Using Cold Ingredients: Cold butter can lead to uneven mixing. Always use room temperature ingredients. - Skipping the Cooling Step: Let your bars cool properly before frosting. This helps the frosting set better. Pro Tips Use Fresh Spices: Fresh ground spices will enhance the flavor of your gingerbread bars significantly. If possible, grind your spices just before using them for the best taste. Don’t Overmix: When combining the wet and dry ingredients, mix just until combined. Overmixing can lead to tough bars instead of the tender texture you want. Check for Doneness: Since ovens can vary, start checking your bars at the 20-minute mark. They are done when a toothpick comes out clean or with a few moist crumbs. Customize the Frosting: Feel free to add spices or citrus zest to the frosting for a unique twist. This can elevate the flavors and make your bars stand out. {{image_4}} You can make these gingerbread bars gluten-free. Use gluten-free flour instead of all-purpose flour. Look for a blend that works well for baking. This swap keeps the texture light and tasty. You may need to adjust the amount of flour slightly. Start with the same amount and add more if the batter feels too wet. To make vegan gingerbread cookie bars, swap out the egg with a flax egg. Mix one tablespoon of flaxseed meal with three tablespoons of water. Let it sit for five minutes until it thickens. For the butter, use vegan butter or coconut oil. These changes keep the bars soft and flavorful without animal products. You can easily switch up the flavor of your gingerbread cookie bars. Here are some fun ideas: - Nuts: Add chopped walnuts or pecans for a crunchy twist. They pair well with the spices. - Chocolate Chips: Stir in semi-sweet or dark chocolate chips. They add richness and sweetness. - Dried Fruits: Consider raisins or cranberries for extra chewiness and taste. They give a nice contrast to the spices. - Citrus Zest: Grate some orange or lemon zest into the batter. This brightens the flavor and adds a nice aroma. Feel free to mix and match these options. Each variation brings its own special touch to this delightful treat! To keep your gingerbread cookie bars fresh, store them in an airtight container. You can place parchment paper between the bars to prevent sticking. If you want to keep them even longer, wrap the container in plastic wrap. This will help keep moisture out and flavors in. When stored properly, gingerbread cookie bars can last up to one week at room temperature. If you place them in the fridge, they may stay good for about two weeks. Just remember, the longer they sit, the less fresh they will taste. You can freeze gingerbread cookie bars for up to three months. To do this, cut the bars and wrap them tightly in plastic wrap, then place them in a freezer-safe bag. When you're ready to enjoy them, take them out and let them thaw at room temperature for a few hours. You can also warm them in the oven for a few minutes if you want a fresh-baked taste. Yes, you can use different flours. Whole wheat flour gives a nutty taste. Almond flour makes it gluten-free. Just remember, the texture may change. You might need to adjust the amount of liquid in your recipe. You can use coconut oil or vegetable shortening. Both give a nice texture. If you want dairy-free, use a plant-based butter. The flavor may change slightly, but it will still taste great. Check for a clean toothpick. Insert it into the center of the bars. If it comes out clean or with a few crumbs, they are done. The edges should look firm and slightly golden. Yes, you can make them a day in advance. Store the bars in an airtight container. This keeps them fresh and soft. Just frost them right before serving for the best look. You can use honey or maple syrup instead. These will change the taste slightly, but they work well. Use the same amount as molasses. For a deeper flavor, add a bit of brown sugar. In this post, we covered how to make delicious gingerbread cookie bars. We listed the needed ingredients and offered ideas for optional toppings. The step-by-step instructions made baking easy. I shared tips for great texture and flavor, plus common mistakes to avoid. You can switch ingredients to suit your needs, too. Store them properly to enjoy for days. With the right methods, you can make these bars a family favorite. Now, go ahead and bake your gingerbread cookie bars! They will surely delight everyone.

Gingerbread Cookie Bars Soft and Flavorful Treat

- 2 ¾ cups all-purpose flour - 1 teaspoon baking powder - ½ teaspoon baking soda - ½ teaspoon salt - ½ cup unsalted butter, softened - 1 cup granulated sugar - 1 large egg - 1 teaspoon vanilla extract - ½ teaspoon almond extract - 1 cup powdered sugar (for frosting) - 2 tablespoons milk (for frosting) - Food coloring (optional, for frosting) - Sprinkles (for garnish) For common allergens, here are some easy swaps: - Butter: Use coconut oil or margarine for a dairy-free option. - Egg: Replace with a flax egg (1 tablespoon flaxseed meal + 2.5 tablespoons water). - Milk: Use almond milk or soy milk for a dairy-free choice. - Flour: Use a gluten-free all-purpose flour blend. You will need specific tools to make these cookie bars: - Baking Dish: A 9x13-inch baking dish lined with parchment paper. - Mixing Bowls: A large bowl for mixing wet ingredients and a medium bowl for dry ingredients. - Electric Mixer: This helps cream the butter and sugar together easily. - Spatula: For spreading the dough and frosting evenly. - Wire Rack: To cool the cookie bars after baking. With these ingredients and tools, you are ready to create a sweet treat that everyone will love! {{ingredient_image_2}} 1. Preheat your oven to 350°F (175°C). 2. Prepare a 9x13-inch baking dish by lining it with parchment paper. Leave some paper hanging over the edges for easy removal later. 3. Mix dry ingredients: In a medium bowl, whisk together 2 ¾ cups of all-purpose flour, 1 teaspoon of baking powder, ½ teaspoon of baking soda, and ½ teaspoon of salt. Set aside. 4. Cream butter and sugar: In a large bowl, beat ½ cup of softened unsalted butter with 1 cup of granulated sugar. Use an electric mixer on medium speed for 3-4 minutes. You want it light and fluffy. 5. Incorporate wet ingredients: Add 1 large egg, 1 teaspoon of vanilla extract, and ½ teaspoon of almond extract to the butter mixture. Mix on low speed until well combined. 6. Combine mixtures: Gradually add the dry mixture to the wet mixture. Stir gently until just combined. Do not overmix; this keeps the bars soft and light. 7. Spread in pan: Spoon the dough into your prepared baking dish. Use a spatula to spread it evenly. 8. Bake: Place in the preheated oven for 20-25 minutes. The edges should be lightly golden. Check with a toothpick; it should come out clean. 9. Cool the bars: Allow the cookie bars to cool in the pan for 10 minutes. Then, lift them out using the parchment paper. Transfer to a wire rack to cool completely. 10. Prepare frosting: While cooling, whisk 1 cup of powdered sugar with 2 tablespoons of milk in a bowl until smooth. If you want color, add a few drops of food coloring. 11. Frost the cookies: Once cooled, spread the frosting generously over the bars. Use a spatula or knife for even coverage. 12. Add sprinkles: Finish by sprinkling colorful toppings over the frosting for a fun touch. 13. Slice and serve: Use a sharp knife to cut into squares or rectangles. Enjoy these sweet delights! To avoid common baking mistakes, measure your flour carefully. Use a spoon to fluff the flour and scoop it into your measuring cup. Don't pack it down. Overpacking can lead to dry cookie bars. Mix your dry ingredients well to ensure even baking. When combining wet and dry, mix just until blended. Overmixing makes the bars tough, not soft. To ensure the perfect texture, cream the butter and sugar until light and fluffy. This step helps create air in the dough. Also, cool the bars completely before frosting. Warm bars may melt the frosting, making it runny. For the best frosting consistency, start with room-temperature butter. Mix the powdered sugar and milk until smooth. If it’s too thick, add more milk slowly. If it’s too thin, add more powdered sugar. For mixing in food coloring effectively, use gel colors for vibrant shades. Add a little at a time and mix well. This helps you control the color and avoid a watery frosting. For serving and garnishing ideas, use a decorative platter or cake stand. This makes your cookie bars look extra special. Add colorful sprinkles on top for a festive touch. You can also use edible glitter for fun. To store leftovers attractively, place them in an airtight container. You can layer parchment paper between the bars to keep them from sticking together. This keeps them fresh and easy to grab later. Pro Tips Chill the Dough: For thicker cookie bars, chill the dough for 30 minutes before spreading it in the pan. This helps the bars maintain their shape while baking. Frosting Consistency: If your frosting is too thick, add a little more milk, a teaspoon at a time, until you reach the desired spreadable consistency. Make Ahead: These cookie bars can be made a day in advance. Just store them in an airtight container to maintain freshness. Customizable Toppings: Get creative with toppings! You can use crushed candies, nuts, or even drizzle melted chocolate over the frosting for added flavor and texture. {{image_4}} You can change the taste of your sugar cookie bars easily. Try adding different extracts, like lemon or orange. These will give your bars a fresh twist. You can also mix in spices like cinnamon or nutmeg for a warm flavor. If you love chocolate, fold in some chocolate chips. They add a sweet and rich taste. You can even use white chocolate or butterscotch chips. The options are endless, and you can make these bars your own! Frosting is where you can get creative. The basic frosting recipe is great. But you can try other flavors too! Adding cocoa powder gives you chocolate frosting. Or try cream cheese for a tangy twist. If you want a vegan option, use coconut cream instead of milk. You can also make a simple frosting with powdered sugar and nut milk. This way, everyone can enjoy these delicious bars. Pair your frosted sugar cookie bars with fun drinks. A glass of cold milk is a classic choice. But you could also serve them with hot cocoa or tea. These bars are perfect for parties! Use them for birthdays, holidays, or any celebration. You can even decorate them with themed sprinkles to match your event. Everyone will love these sweet treats! To store your cookie bars at room temperature, let them cool completely. Then, cut them into squares. Place the squares in an airtight container. This helps keep them fresh. Use parchment paper between layers to avoid sticking. You can enjoy them for up to a week this way. The best containers for maintaining freshness are glass or plastic containers with tight lids. If you have a cake dome, that works great too. Just make sure the bars are fully cooled before sealing them. For long-term storage, you can freeze the cookie bars. First, cut them into squares. Wrap each square in plastic wrap tightly. This protects against freezer burn. Then, place them in a freezer-safe bag or container. They can last up to three months in the freezer. When you want to enjoy them again, thaw the bars in the fridge overnight. If you need to reheat them, pop them in the microwave for about 10 to 15 seconds. This warms them up without drying them out. Enjoy your sweet treat! What is the best way to cut cookie bars? To cut cookie bars, first cool them completely. Use a sharp knife for clean cuts. For neat edges, wipe the knife with a damp cloth between cuts. You can also line the baking dish with parchment paper to help lift the bars out easily. How long do frosted sugar cookie bars last? Stored in an airtight container, these bars last for about five days. If you keep them in a cool place, they stay fresh longer. For best results, enjoy them within three days for peak flavor. Can I substitute ingredients in the recipe? Yes, you can swap some ingredients. If you need a dairy-free option, use vegan butter. Coconut flour can replace all-purpose flour, but you will need to adjust the amount. For a lower-sugar option, try using less granulated sugar or a sugar substitute. How to make these gluten-free? To make these bars gluten-free, use a gluten-free all-purpose flour blend. Make sure the blend includes a binding agent, like xanthan gum. Follow the recipe as written for the other ingredients. What to do if the bars come out too dry? If your bars are dry, you may have overbaked them. Check your oven temperature with an oven thermometer to ensure it's accurate. Next time, bake for a shorter time and watch for a lightly golden edge. How to fix over-chilled frosting? If your frosting gets too cold, let it sit at room temperature for a few minutes. Then, mix it again until smooth. If it’s still too thick, add a splash of milk to loosen it up. This blog post covered all you need to make perfect cookie bars. We went over key ingredients and helpful substitutions for allergies. I provided a thorough baking guide, from preparation to cooling and frosting. You now have tips and tricks to avoid common mistakes. I also shared variations for flavors and frostings to keep it fun. With proper storage tips, your cookie bars will stay fresh longer. Enjoy your baking journey! It's time to create something tasty.

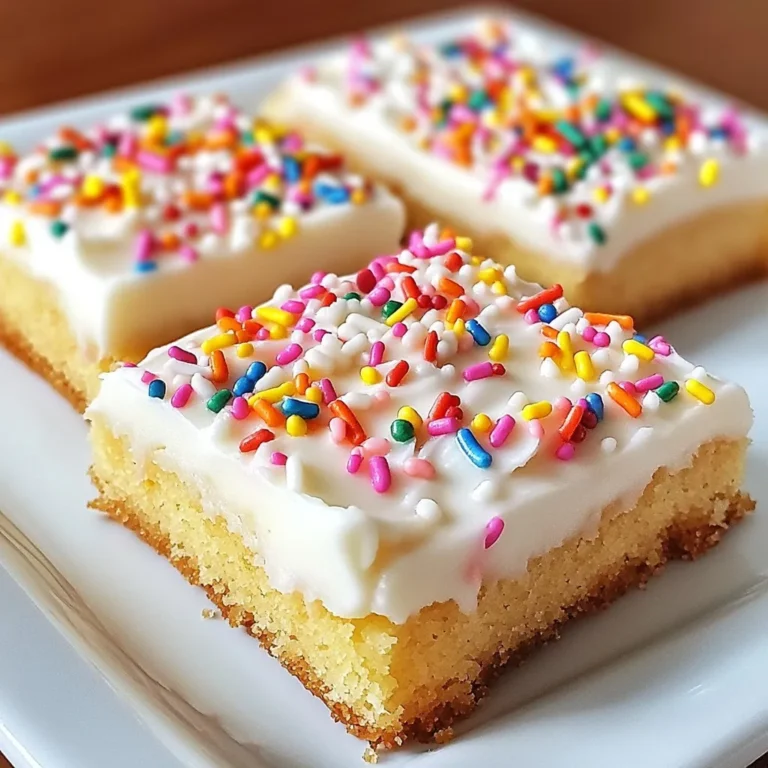
Frosted Sugar Cookie Bars Simple Sweet Delight

To make Greek Chicken Gyro Wraps, you need fresh and tasty ingredients. Here’s what you will need: - 1 lb boneless, skinless chicken thighs - 3 tablespoons extra-virgin olive oil - 3 cloves garlic, finely minced - 2 teaspoons dried oregano - 1 teaspoon ground cumin - 1 teaspoon smoked paprika - Sea salt and freshly ground black pepper to taste - 4 large whole wheat pita breads - 1 cup cucumber, diced into small cubes - 1 cup ripe tomatoes, diced - 1/2 medium red onion, thinly sliced - 1 cup romaine lettuce, finely shredded - 1/2 cup tzatziki sauce These ingredients create a tasty and balanced dish. The chicken thighs stay juicy and full of flavor, while the veggies add crunch and freshness. You can add extra garnishes to make your gyro wraps even better. Here are some fun options: - Fresh dill sprigs - Crumbled feta cheese - Sliced olives - Extra tzatziki sauce These toppings can boost the flavor and look of your wraps. Feel free to mix and match! Each serving of Greek Chicken Gyro Wraps provides a nutritious meal. Here’s a rough breakdown: - Calories: 400 - Protein: 28g - Carbs: 40g - Fat: 15g - Fiber: 5g These wraps offer a good mix of protein, carbs, and healthy fats. Enjoy them as a filling lunch or dinner! {{ingredient_image_2}} To marinate the chicken, start with a bowl. Add 3 tablespoons of olive oil, 3 minced garlic cloves, 2 teaspoons of dried oregano, 1 teaspoon of ground cumin, and 1 teaspoon of smoked paprika. Season with sea salt and black pepper. Mix it well to create a fragrant marinade. Next, add 1 pound of boneless chicken thighs to the bowl. Make sure each piece is coated well. Cover the bowl with plastic wrap and refrigerate. Let it sit for at least 30 minutes, or up to 2 hours. This step gives the chicken great flavor. Now, it’s time to grill! Preheat your grill or grill pan to medium-high heat. Take the marinated chicken out of the fridge. Let any excess marinade drip off before placing it on the grill. Grill the chicken for about 5 to 7 minutes on each side. You want it to reach 165°F inside. This ensures it is cooked through. Once done, move the chicken to a cutting board and let it rest for 5 minutes. After resting, slice the chicken into thin strips. Warm your pita breads on the grill for about 1 minute on each side. This makes them soft and easy to wrap. Start with a handful of shredded romaine lettuce in the center of each warm pita. Next, layer on the sliced grilled chicken, diced cucumbers, juicy tomatoes, and thin slices of red onion. This adds color and crunch. Drizzle tzatziki sauce over the top. If you like, add fresh dill for extra flavor. Now, carefully fold in the sides of the pita. Roll it tightly from the bottom to keep all the fillings inside. Serve your Greek Chicken Gyro Wraps right away. Enjoy with extra tzatziki sauce on the side! To get the best grilled chicken, use boneless, skinless thighs. They stay juicy and tender. Marinate them for at least 30 minutes to soak in flavors. If you can, let them marinate for up to 2 hours. This gives the chicken a deeper taste. When grilling, make sure your grill is hot. Cook each side for 5-7 minutes. Aim for an internal temperature of 165°F (75°C). This ensures the chicken is safe to eat. Warming pita breads is simple and quick. Place them on the grill for about 1 minute on each side. This makes them soft and easy to wrap. You can also warm them in a skillet on the stove. Just heat the skillet over medium heat, then add the pita. Flip them after 30 seconds. This way, they get nice and warm without burning. Serve your Greek Chicken Gyro Wraps right after making them. Place a few wraps on a platter for sharing. Add extra tzatziki sauce on the side for dipping. Fresh dill sprigs can add a nice touch. For a complete meal, pair the wraps with a simple Greek salad. Chopped cucumbers, tomatoes, and olives make a great side. This adds freshness and balance to your meal. Pro Tips Marinate Longer for More Flavor: Allowing the chicken to marinate for a longer period, up to 2 hours, enhances the infusion of spices and results in a more flavorful dish. Rest the Chicken: Letting the grilled chicken rest for a few minutes before slicing helps retain its juices, ensuring every bite is tender and succulent. Warm Pita for Better Wrapping: Warming the pita breads on the grill not only makes them pliable but also adds a delightful smoky flavor to your wrap. Add Extra Crunch: For an added texture, consider including some sliced bell peppers or radishes along with the veggies in your wrap. {{image_4}} You can swap chicken for other proteins. Try lamb, beef, or pork. For a lighter option, use shrimp or fish. For plant-based eaters, marinated tofu or tempeh works well. Each protein brings its own flavor, making the gyro wrap unique. Tzatziki is classic, but you can try other sauces. A spicy harissa or a garlic aioli adds a kick. A creamy tahini sauce gives a nutty taste. For a fresh twist, use chimichurri or a yogurt-based ranch. Each sauce changes the wrap’s flavor profile. While whole wheat pita is great, experiment with other breads. Try traditional pita, naan, or lavash for a change. Corn tortillas can make a fun twist, too. Each type of bread adds a new texture and taste to your gyro wrap. To store leftover gyro wraps, wrap them tightly in plastic wrap. This helps keep the flavors fresh. Place the wrapped wraps in an airtight container. Store them in the fridge. They will stay good for up to three days. To reheat gyro wraps, unwrap them from the plastic. Place the wraps on a microwave-safe plate. Heat them in the microwave for about 30 seconds. Check if they are warm enough. If not, heat for an extra 15 seconds. You can also reheat them in a skillet. Heat the skillet on medium heat, then warm each side for about two minutes. You can freeze gyro wraps to save them for later. Wrap each gyro tightly in plastic wrap. Then place them in a freezer bag. They can last up to three months in the freezer. To thaw, take them out and place them in the fridge overnight. Once thawed, reheat as mentioned above. This way, you can enjoy your delicious wraps anytime! You can use chicken breasts or pork for this recipe. Both options work well in flavor. If you prefer beef or lamb, those can be tasty too. Just keep in mind that cooking times may change. Chicken breasts cook faster, while pork may need a bit more time. To make this recipe gluten-free, choose gluten-free pita bread. Many brands offer great options. You can also use lettuce wraps. This keeps the taste while making it safe for those with gluten sensitivities. Yes, you can prepare the marinade a day ahead. Just mix the olive oil, garlic, and spices in a bowl. Store it in the fridge. This helps the flavors develop more. When you are ready, add the chicken and marinate. Tzatziki sauce is made of yogurt, cucumber, garlic, and herbs. It often includes dill and lemon juice too. This sauce adds a refreshing taste to your gyro. It balances the spices and makes each bite amazing. Greek chicken gyro wraps are delicious and easy to make. You learned about key ingredients and how to grill chicken just right. I shared tips to warm pita bread and suggested great serving ideas. I also explored fresh variations and how to store leftovers properly. Remember, making these wraps can be fun and rewarding. Enjoy your cooking and mix things up to fit your taste! These wraps can be a hit for any meal.

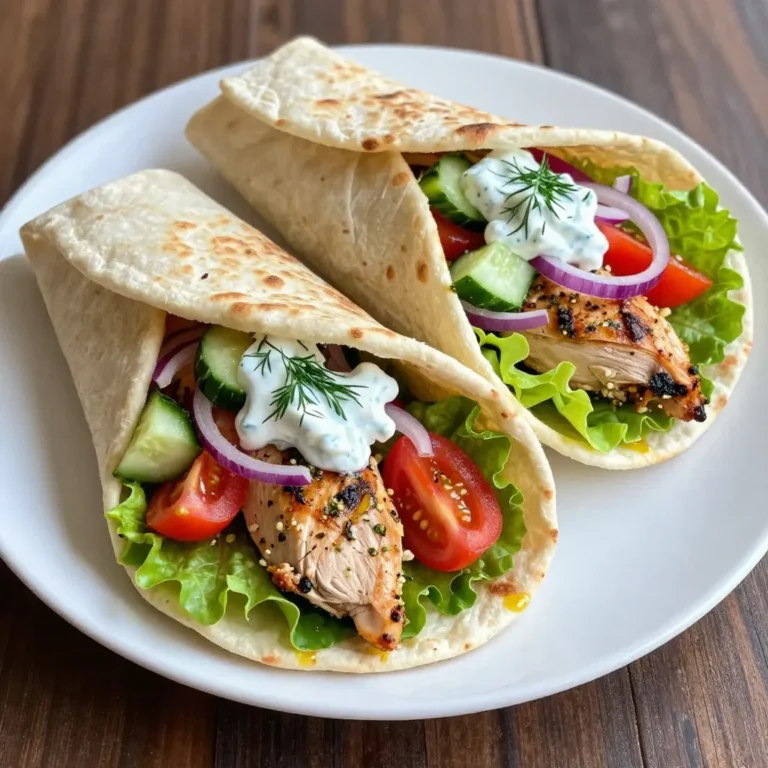
Greek Chicken Gyro Wraps Flavorful and Easy Recipe

- 2 cups cooked jasmine rice - 1 pound chicken breast, diced into bite-sized pieces - 1/2 cup cornstarch - 1/2 cup all-purpose flour - 1 tablespoon garlic powder - 1 tablespoon onion powder - 1 teaspoon cayenne pepper (adjust to your desired spice level) - Salt and pepper, to taste - 1/4 cup vegetable oil (for frying) - 1/2 cup mayonnaise - 1/4 cup sweet chili sauce - 1 tablespoon sriracha (adjust based on heat preference) - 1 cup green onions, finely chopped - 1 cup shredded carrots - 1 avocado, sliced - Sesame seeds, to garnish You can swap jasmine rice for brown rice or quinoa. These options add more fiber. For the chicken, try tofu for a vegetarian twist. Cornstarch can be replaced with potato starch if needed. Use gluten-free flour for a gluten-free option. If you dislike mayonnaise, Greek yogurt works well in the sauce. You can also adjust spice levels by using milder sauces or skipping the cayenne. Each serving of the Bang Bang Chicken Bowl contains about: - Calories: 600 - Protein: 30g - Carbohydrates: 70g - Fat: 25g - Fiber: 5g This bowl packs a punch of flavor and nutrition. The crispy chicken and fresh veggies give you a tasty meal. Enjoy the crunch from the sesame seeds and the creaminess of avocado. This dish is fun to make and eat! {{ingredient_image_2}} Start with a medium bowl. Add 1/2 cup mayonnaise. Pour in 1/4 cup sweet chili sauce. Then, add 1 tablespoon sriracha. Whisk together until smooth. Set it aside for now. This sauce gives the bowl its rich flavor. In another bowl, mix 1/2 cup cornstarch, 1/2 cup flour, 1 tablespoon garlic powder, and 1 tablespoon onion powder. Add 1 teaspoon cayenne pepper and a pinch of salt and pepper. Stir well to combine. This mix coats the chicken and makes it crispy. Heat 1/4 cup vegetable oil in a large skillet over medium-high heat. When the oil shimmers, it's ready. Take the diced chicken and dredge it in the flour mix. Make sure each piece is well coated. Carefully place the chicken in the hot oil. Fry for 5-7 minutes, until golden brown. Use a slotted spoon to take the chicken out. Let it drain on paper towels. Grab your bowls and start with 2 cups of cooked jasmine rice. Place a scoop of rice in each bowl. Next, add the crispy fried chicken on top. Drizzle the prepared Bang Bang sauce over the chicken. This adds creamy and spicy goodness. Now, add 1 cup of shredded carrots and 1 cup of chopped green onions for color and crunch. Finally, slice an avocado and place it on top. Sprinkle sesame seeds over everything. This adds a nice crunch and makes it look pretty. Enjoy your flavorful Bang Bang Chicken Bowl! To get that perfect crunch, use a good coating. I mix cornstarch with flour. This blend gives the chicken a light, crispy crust. Make sure to coat each piece well. Shake off the extra flour to avoid clumping. Heat the oil until it shimmers before frying. This helps the chicken cook fast and stays crispy. Fry in small batches. This keeps the oil hot and avoids soggy chicken. Want more heat? Add more cayenne pepper or sriracha. Start with a little, and taste as you go. If you want less spice, cut back on these ingredients. The sweet chili sauce adds sweetness, balancing the heat. You can also use a milder sauce if you prefer. Always adjust based on your taste buds. Serve your Bang Bang Chicken Bowl with fresh toppings. I love adding shredded carrots and chopped green onions. They add color and crunch. Slices of avocado give a creamy texture that pairs well. Don’t forget the sesame seeds! They add a nice finish. Enjoy with a side of extra Bang Bang sauce for dipping. Pro Tips Choose the Right Oil: Use oil with a high smoke point like vegetable or peanut oil for frying to achieve a perfect crispy texture. Double-Dip for Extra Crunch: For an even crunchier chicken, dip the coated pieces back into the seasoned flour mixture a second time before frying. Customize Your Heat Level: Adjust the amount of cayenne pepper and sriracha in the Bang Bang sauce to suit your personal spice preference. Let the Chicken Rest: Allow the fried chicken to rest on paper towels for a few minutes after frying to ensure it stays crispy and drains excess oil. {{image_4}} You can enjoy a Bang Bang Chicken Bowl without meat. Swap chicken for crispy tofu or tempeh. Both options soak up flavor well. Use the same seasoning mix for a tasty crunch. For the sauce, keep the mayonnaise or try a vegan mayo. This way, you keep the creamy texture and flavor. You can also add more veggies like bell peppers or zucchini for extra taste. While jasmine rice is classic, you can choose other grains. Quinoa adds a nutty flavor and boosts protein. Brown rice offers more fiber, making it heartier. For a low-carb option, try cauliflower rice. Each grain base brings its own unique flavor and texture. You can even mix grains for added variety! You can play with flavors to suit your taste. For a spicy kick, add more sriracha or chili oil. You can even mix in some diced jalapeños. If you prefer sweet, increase the sweet chili sauce. Adding pineapple chunks can also bring a fresh sweetness. Each twist allows you to explore and enjoy new taste sensations! To keep your Bang Bang Chicken Bowl fresh, store leftovers in an airtight container. Make sure to let the bowl cool down before sealing it. This helps keep the rice fluffy and the chicken crispy. You can store it in the fridge for up to three days. If you have any extra sauce, store it separately to maintain its flavor. When you’re ready to enjoy your leftovers, reheat the rice and chicken in a microwave-safe dish. Cover it with a damp paper towel to keep moisture in. Heat in short bursts of one minute, stirring in between. This keeps the chicken juicy and prevents it from drying out. If you want that crispy texture back, consider using an oven. Preheat it to 350°F (175°C) and place the chicken on a baking sheet for about 10 minutes. If you want to store your Bang Bang Chicken Bowl for longer, freezing is a great option. Place the chicken and rice in separate freezer-safe bags or containers. Make sure to remove as much air as possible. Your meal can last in the freezer for up to three months. When you are ready to eat, thaw in the fridge overnight. Then, reheat as mentioned above. This keeps all the flavors intact. The Bang Bang Chicken Bowl is a tasty dish full of flavors. It has fried chicken pieces, jasmine rice, and a special sauce. The chicken gets crispy from being coated in flour and cornstarch. The sauce is creamy and sweet with a spicy kick from sriracha. You’ll love the crunch of fresh carrots and green onions, plus creamy avocado slices. This bowl is a feast for your eyes and taste buds. Yes, you can easily make this recipe gluten-free. Swap the all-purpose flour for gluten-free flour. You can also use gluten-free cornstarch, which is already a gluten-free option. Make sure the sweet chili sauce and mayonnaise are also gluten-free. This way, you can enjoy a delicious Bang Bang Chicken Bowl without gluten. Many Asian restaurants and trendy eateries serve Bang Bang Chicken Bowls. Look for places that offer Asian fusion dishes. You may find it on the menu under bowls or rice dishes. Some places might even have their own unique twist on this classic bowl. A quick search online can help you find local spots that serve it. You’ve learned about making the Bang Bang Chicken Bowl from start to finish. We covered ingredients, cooking steps, and tips to nail that perfect crunch. I shared various options, catering to different diets, and how to store leftovers. This dish is fun, tasty, and easy to adapt. Whether you want it spicy or sweet, you can make it your own. Now, it’s time to enjoy your delicious creation with friends and family!

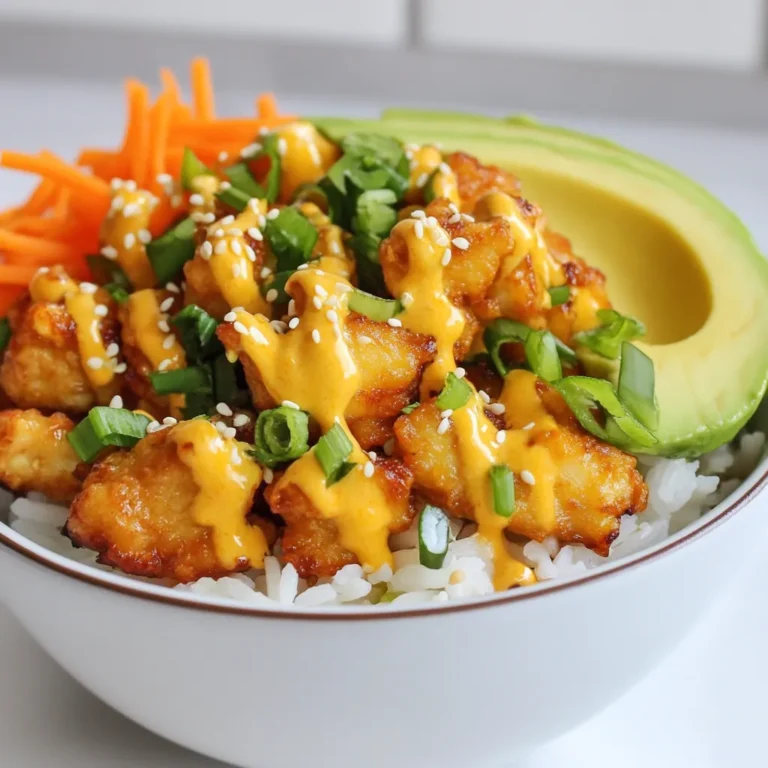
Bang Bang Chicken Bowl Irresistible Flavor Explosion

PREV 1 … 36 37 38 … 44 NEXT
yummybiterecipes

explore

DessertsDinnerAppetizersDrinks

Our Policies

  • Cookie Policy
  • Copyright Policy
  • Disclaimer
  • GDPR Policy
  • Terms Of Use
Back to Top
  • About
  • Contact Us
  • Privacy Policy
© 2025 yummybiterecipes