FREE DINNER EBOOK! Get your copy!
  • Cookie Policy
  • GDPR Policy
  • Disclaimer
  • Terms Of Use
  • Visit my other site: Fun Cookie Recipes
yummybiterecipes
  • Home
  • Dinner
  • Desserts
  • Drinks
  • Appetizers
  • Contact
  • About
  • Privacy Policy
  • Home
  • Dinner
  • Desserts
  • Drinks
  • Appetizers
  • Contact
  • About
  • Privacy Policy
  • Cookie Policy
  • GDPR Policy
  • Disclaimer
  • Terms Of Use
Visit my other site: Fun Cookie Recipes

HOME / CATEGORIES /

Latest

- 1 can (15 oz) cannellini beans - 1 medium onion, finely diced - 2 cloves garlic, minced - 1 medium carrot, peeled and diced - 1 stalk celery, diced - 5 cups vegetable broth - 1 can (14 oz) diced tomatoes - 1 teaspoon dried sage - 1 teaspoon dried thyme - 1 teaspoon red pepper flakes - 2 cups kale, chopped - 2 tablespoons extra virgin olive oil - Salt and freshly cracked black pepper - Fresh parsley, chopped for garnish I love the blend of flavors in Tuscan white bean soup. The key ingredient is the cannellini beans. They add a creamy texture and a nice protein boost. The vegetables bring color and nutrients. I always use a mix of onion, garlic, carrot, and celery. They create a strong base for the soup. Next, I add kale for its vibrant green color and health benefits. It wilts beautifully and adds a nice bite. The herbs, sage and thyme, offer warmth and depth. Red pepper flakes give a hint of heat. Adjust the spice to match your taste. Using a good vegetable broth is crucial. It makes the soup rich and full of flavor. The diced tomatoes add sweetness and acidity. They brighten the dish and enhance the overall taste. Finally, don’t skip the olive oil. It adds richness and helps blend all the flavors. A sprinkle of fresh parsley on top gives a nice finish. All these ingredients come together to create a nourishing bowl of comfort. {{ingredient_image_2}} 1. Heating oil and sautéing vegetables To start, grab a large pot and heat 2 tablespoons of extra virgin olive oil over medium heat. Once the oil is hot, add 1 finely diced onion, 1 peeled and diced carrot, and 1 diced stalk of celery. Sauté these veggies for about 5 to 7 minutes. Stir them often. You want them soft and the onion to turn translucent. 2. Adding garlic and beans Next, add 2 minced cloves of garlic to the pot. Cook for 1 more minute. This will fill the air with a lovely aroma. Then, pour in 1 drained can of cannellini beans and 1 can of diced tomatoes, juice and all. Give it a good stir. 3. Incorporating broth and seasonings Now, pour in 5 cups of vegetable broth. Sprinkle in 1 teaspoon of dried sage, 1 teaspoon of dried thyme, and 1 teaspoon of red pepper flakes. Mix everything well so that the flavors can blend. 1. Bringing to a boil and simmering Increase the heat and bring your soup to a gentle boil. Once it starts bubbling, turn the heat down low. Let the soup simmer uncovered for about 20 minutes. This lets all the flavors work together. 2. Adding kale and finishing the soup After 20 minutes, toss in 2 cups of chopped kale. Stir it in gently. Cook for another 5 minutes. The kale should be tender and bright green when done. 1. How to garnish and serve Serve the soup hot in bowls. For a nice touch, sprinkle some chopped fresh parsley on top. It adds color and flavor. 2. Best accompaniments for the soup Pair this soup with crusty bread for a delightful meal. You can also drizzle a bit of olive oil on top before serving for that extra flavor. To ensure flavor depth in your Tuscan White Bean Soup, start by sautéing the onion, carrot, and celery. This mix, known as mirepoix, adds a solid base of flavor. Cook these for about 5-7 minutes until they are soft. Next, add the garlic for a minute. This boosts the aroma and taste. For perfect vegetable tenderness, add kale last. It only needs a few minutes to cook. This helps the greens stay bright and vibrant. If you overcook them, they may lose their color and crunch. Choosing the best canned beans is key. I recommend cannellini beans for their creamy texture. Always check for low-sodium options. Rinse them well to remove excess salt. If you don’t have fresh herbs, dried ones work fine. Use about one-third of the amount. For example, if a recipe calls for one tablespoon of fresh sage, use one teaspoon dried. This keeps your soup flavorful without a trip to the store. Pro Tips Enhance Flavor: Add a splash of balsamic vinegar just before serving to elevate the soup's flavor profile. Bean Variations: Feel free to substitute cannellini beans with other beans like great northern or navy beans for a different texture. Vegetable Add-ins: Consider adding other vegetables such as zucchini or bell peppers for added nutrition and flavor. Storage Tips: This soup can be stored in the refrigerator for up to 4 days, and it freezes well for up to 3 months. {{image_4}} You can make Tuscan white bean soup even healthier. Here are two easy ideas: - Adding more vegetables: Toss in extra veggies like spinach, zucchini, or bell peppers. They add great taste and nutrients. You can mix and match according to what you have. Just chop them up and add them when you sauté the onions and carrots. - Utilizing low-sodium broth: Use low-sodium vegetable broth instead of regular broth. This cuts down on salt. You’ll still get all the rich flavors without too much sodium. Always taste your soup and adjust the seasoning as needed. You can also enhance the flavor of your soup. Here are some tips to try: - Incorporating different spices: Experiment with spices like cumin, paprika, or oregano. Each spice brings its unique twist. Start with a small amount and taste as you go. Adjust to find your favorite mix. - Adding protein options: If you want more protein, consider adding diced chicken or turkey. You can also stir in cooked sausage or bacon for a heartier meal. Just make sure to cook the meat first before adding it to the soup. This will ensure it’s safe to eat and packed with flavor. To store leftover soup, let it cool first. Transfer the soup to airtight containers. It will stay fresh in the fridge for up to five days. For longer storage, freeze the soup. Make sure to leave some space in the container. This allows the soup to expand as it freezes. The best containers for freezing are freezer-safe glass jars or plastic containers. Use bags designed for freezing, too. They save space and make thawing easy. To reheat, first, thaw the soup in the fridge overnight if frozen. For best flavor and texture, heat it on the stovetop. Pour the soup into a pot and warm it over low heat. Stir it often to heat evenly. If you need a quick option, you can use the microwave. Place the soup in a microwave-safe bowl. Cover it loosely and heat in short bursts, stirring between. This helps keep the soup from getting too hot in spots. Enjoy your tasty bowl of Tuscan White Bean Soup! Yes, you can make Tuscan White Bean Soup in a slow cooker. Start by sautéing the onion, carrot, celery, and garlic in a pan. Then, add everything to the slow cooker. Include the cannellini beans, diced tomatoes, vegetable broth, and seasonings. Cook on low for 6-8 hours. This method brings out deep flavors and makes the soup even more comforting. I love pairing this soup with crusty bread for dipping. A fresh green salad also works well. If you want a heartier meal, try a simple pasta dish on the side. It balances the soup’s lightness. You can also add a sprinkle of grated cheese on top for extra flavor. Tuscan White Bean Soup lasts about 4 to 5 days in the fridge. Make sure to store it in an airtight container. If you want to freeze it, it can last up to 3 months. Just let it cool completely before freezing. To reheat, thaw it in the fridge overnight and warm it on the stove or in the microwave. This blog post covered the key ingredients and steps to make delicious Tuscan White Bean Soup. You learned about the best beans, veggies, and seasonings to create flavor. We also shared tips for cooking, storing, and enhancing your soup. In closing, enjoy experimenting with different flavors and ingredients. This soup is simple to make and can be tailored to your taste. Plus, it packs nutrients and warmth in every bowl. Happy cooking!

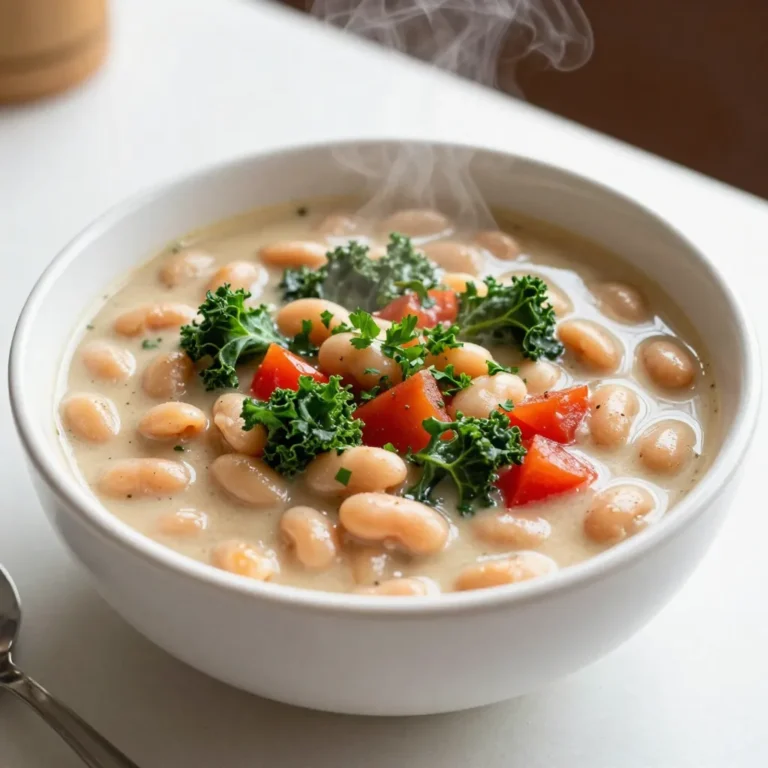
Tuscan White Bean Soup Flavorful and Nourishing Bowl

- 12 oz cheese tortellini (fresh or frozen) - 1 cup heavy cream - 1/2 cup basil pesto - 1 cup cherry tomatoes, halved - 1 cup baby spinach - 1/2 cup grated Parmesan cheese - 2 tablespoons olive oil - 2 cloves garlic, minced - Salt and pepper to taste These ingredients work together to create a rich and tasty dish. The cheese tortellini serves as the base, while heavy cream adds creaminess. Basil pesto brings in fresh flavor, and cherry tomatoes add a burst of sweetness. Baby spinach not only adds color but also boosts nutrition. Garlic, salt, and pepper enhance the overall taste. - Sun-dried tomatoes for a tangy twist - Grilled chicken for added protein - Zucchini noodles for a low-carb option - Almond milk instead of heavy cream for a lighter sauce Feel free to mix and match. If you want more flavor, try sun-dried tomatoes. If you need protein, grilled chicken is a great choice. Want a lighter dish? Use almond milk instead of heavy cream. These options let you tailor the recipe to your taste and needs. - Fresh basil leaves - Extra grated Parmesan cheese - A drizzle of olive oil Garnishes make your meal look appealing. Fresh basil adds a pop of color and flavor. Extra Parmesan cheese gives a salty kick. A drizzle of olive oil enhances the dish's richness. These simple touches can elevate your creamy pesto tortellini skillet to a new level. {{ingredient_image_2}} Start by placing a large skillet on medium heat. Once warm, add 2 tablespoons of olive oil. Swirl the oil to coat the pan well. Next, add 2 cloves of minced garlic. Sauté the garlic for about 30 seconds. Keep watch to prevent browning. You want it to smell great and become aromatic. Now, it’s time to add 1 cup of halved cherry tomatoes to the skillet. Cook these for 3-4 minutes, stirring often. You want them to soften and release their juices. This step adds a burst of flavor to the oil. While the tomatoes cook, bring a pot of water to a boil. Add 12 oz of cheese tortellini. Cook according to the package instructions, usually about 3-5 minutes. Once cooked, drain the tortellini and set it aside. This will be ready to mix with the creamy sauce later. To cook tortellini just right, start with a big pot of salted water. Bring it to a boil. Add the tortellini and stir gently. This keeps them from sticking. Fresh tortellini will cook fast, usually in 3-5 minutes. Frozen may take a little longer. Check the package for exact times. When they float to the top, they are ready! Drain them well, but save a bit of the pasta water. This starchy water can help the sauce stick later. If you want a creamier sauce, add more heavy cream. Start with a full cup for a rich taste. If it’s too thick, add a splash of pasta water to loosen it up. For a lighter sauce, reduce the cream and add a little vegetable broth instead. This keeps the flavor while making it less heavy. Taste often and adjust until it’s just how you like it! You can boost the flavor of your creamy pesto tortellini easily. Add sautéed mushrooms or bell peppers for extra texture. For a kick, try red pepper flakes or a squeeze of lemon juice. Fresh herbs like parsley or chives make great additions too. They add bright flavors and color. If you want protein, grilled chicken or shrimp mix in well. The key is to play around and find what you love! Pro Tips Use Fresh Ingredients: For the best flavor, opt for fresh basil pesto and ripe cherry tomatoes. Fresh ingredients will elevate the dish and make it taste more vibrant. Customize Your Greens: Feel free to substitute or add other greens like kale or arugula instead of baby spinach. This can change the flavor profile while adding extra nutrients. Perfectly Cooked Tortellini: Be careful not to overcook the tortellini. They should be al dente, which means they should have a slight bite to them to enhance the overall texture of the dish. Enhance the Flavor: A sprinkle of red pepper flakes or a squeeze of lemon juice can add a delightful kick and brightness to the creamy pesto sauce. Adjust according to your taste preference. {{image_4}} You can boost the nutrition of your creamy pesto tortellini with great veggie add-ins. Try adding: - Zucchini: Dice and sauté it with the garlic. - Bell Peppers: Slice and toss them in for color and crunch. - Mushrooms: Sauté until soft for an earthy flavor. - Broccoli: Steam and add it toward the end for bright color and fiber. These veggies add taste and texture. They make the dish more colorful and lively. Plus, they help you meet your daily vegetable goals. If you want extra protein, chicken or shrimp are perfect choices. For chicken: - Grilled Chicken: Dice grilled chicken breast and mix it in. - Rotisserie Chicken: Use store-bought for ease. Just shred it and add to the skillet. For shrimp: - Shrimp: Sauté shrimp in olive oil until pink before adding them to the creamy sauce. These protein options help make the meal more filling and satisfying. You can still enjoy creamy pesto tortellini if you're gluten-free. Look for gluten-free tortellini made from: - Rice: Delicate and soft, it mimics traditional pasta well. - Corn: Offers a mild flavor and good texture. - Chickpeas: High in protein and fiber, these add a unique twist. These alternatives let everyone enjoy this creamy dish without worry. To keep your creamy pesto tortellini fresh, store leftovers in an airtight container. Make sure to let the dish cool down before sealing it. This helps prevent moisture buildup, which can make the pasta soggy. You can store it in the fridge for up to three days. If you notice any excess liquid, simply drain it before serving. When it's time to enjoy your leftovers, you can reheat them in a skillet or microwave. For the skillet, add a splash of cream or water to help revive the sauce. Heat on medium until warmed through. In the microwave, place the tortellini in a bowl, cover it with a lid or plastic wrap, and heat in short intervals. Stir between intervals to ensure even heating. Freezing is a great option if you want to save your creamy pesto tortellini for later. Portion the dish into freezer-safe containers or bags. Squeeze out any excess air before sealing. You can freeze it for up to three months. When you're ready to eat, thaw it overnight in the fridge. Then reheat as described above. Yes, you can use store-bought pesto. It saves time and adds great flavor. Look for a brand that uses fresh ingredients. This keeps the taste bright and vibrant. You still get a rich, creamy sauce with less effort. If you have homemade pesto, that works even better! To make a lighter version, swap heavy cream for half-and-half or cashew milk. This cut the fat but keeps the creaminess. You can also use less pesto. Try adding more spinach or other veggies. This boosts nutrition without adding calories. You can serve this dish with garlic bread or a simple green salad. A side of roasted veggies also works well. The fresh flavors balance the creamy pasta. For a fun twist, add grilled chicken or shrimp for extra protein. In this blog post, we explored how to make creamy pesto tortellini. We discussed key ingredients and steps, including cooking tips. You can customize the dish with protein or vegetarian options. Proper storage keeps leftovers fresh, making this meal enjoyable later. Remember, cooking is about experimenting and having fun. Use this recipe as your base. Enjoy your culinary journey!

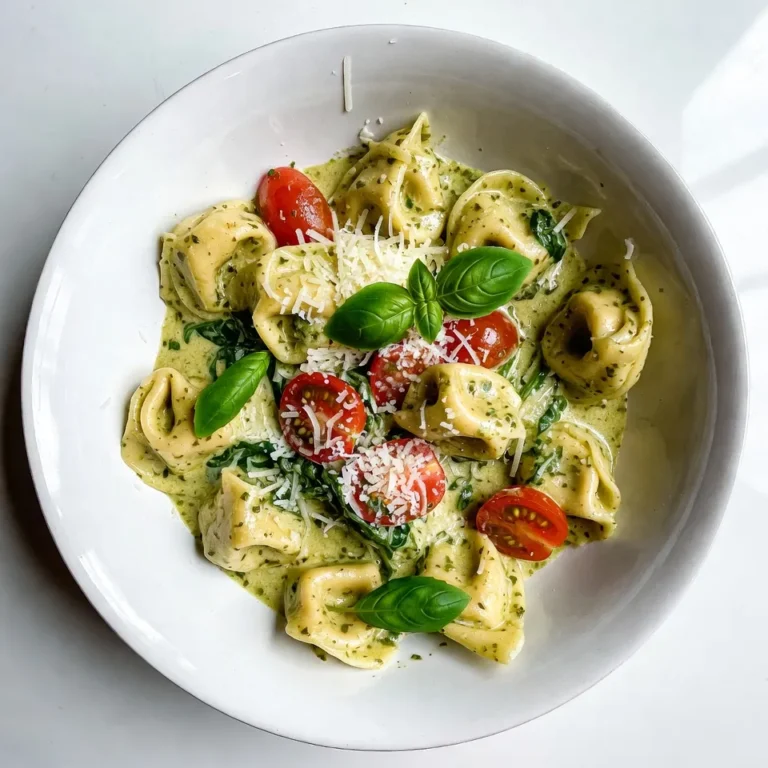
Creamy Pesto Tortellini Skillet Easy Weeknight Meal

- 2 tablespoons unsalted butter - 1 small onion, finely diced - 2 cloves garlic, minced - 4 cups broccoli florets (fresh or frozen) - 4 cups vegetable broth - 1 cup carrots, sliced - 1 cup heavy cream - 2 cups sharp cheddar cheese, grated - 1 teaspoon Dijon mustard - Salt and freshly ground black pepper, to taste For my Broccoli Cheddar Soup, I find these ingredients essential. The unsalted butter starts the dish with a rich flavor. A small onion and two cloves of garlic add depth. Fresh or frozen broccoli makes it vibrant and healthy. I prefer using four cups of broccoli florets for a great texture. Next, we add four cups of vegetable broth. This gives the soup a warm base. I like to add one cup of sliced carrots for sweetness and color. To make it creamy, I stir in one cup of heavy cream. The star of the show is two cups of sharp cheddar cheese. This cheese melts beautifully and adds a rich taste. A teaspoon of Dijon mustard gives a subtle kick. Finally, I season with salt and freshly ground black pepper to balance the flavors. These ingredients come together to create a creamy and flavorful soup that warms the soul. {{ingredient_image_2}} Start by melting the butter in a large pot over medium heat. Once it melts, add the diced onion. Sauté the onion for about five minutes, stirring often. You want it to be soft and clear. Next, add the minced garlic to the pot. Sauté for one more minute. Be careful not to let it burn; we want a nice flavor. Now, it's time to add the broccoli florets and sliced carrots. Mix them well with the onion and garlic. They should be coated in that tasty butter. Pour in the vegetable broth and crank up the heat. Bring the mixture to a boil. Once it boils, lower the heat to let it simmer. Cook for about ten to fifteen minutes. You want the broccoli and carrots to be tender enough to poke with a fork. After the veggies are soft, grab your immersion blender. Blend the soup until it reaches the texture you like. If you want it creamy, blend it smooth. For a chunkier soup, blend just half of it. With the soup blended, stir in the heavy cream, Dijon mustard, and grated cheddar cheese. Mix it all together until the cheese melts. This makes the soup rich and creamy. Next, taste the soup. Now is the time to add salt and black pepper. Adjust the seasoning to match your taste. Serve the soup hot. Ladle it into bowls and add croutons on top for a nice crunch. Enjoy your delicious creation! To get the right texture in your soup, you can choose to blend it smooth or chunky. For a creamy finish, blend the soup completely until it feels velvety. If you like some texture, blend only half of it. This way, you keep some broccoli bits for a nice bite. Timing is key for tender veggies. Cook your broccoli and carrots for about 10 to 15 minutes. They should be fork-tender but not mushy. You want them to hold their shape and add a lovely mouthfeel. Adding the right seasonings can elevate your soup. Try a pinch of garlic powder or a sprinkle of paprika for warmth. Fresh herbs like thyme or parsley add a bright note. For toppings, croutons bring a great crunch. You can also add a sprinkle of extra cheese or a swirl of cream. These small touches make a big difference in flavor and presentation. Use a large pot for cooking the soup; it helps everything blend well. A pot of at least 4 quarts is great for this recipe. An immersion blender works wonders for blending your soup right in the pot. It's easy and saves time on cleanup. If you don’t have one, a regular blender will work too—just be careful with the hot soup! Pro Tips Use Fresh Broccoli: Fresh broccoli will give your soup a brighter flavor and better texture compared to frozen. Look for firm, vibrant green florets. Adjust Creaminess: For a lighter version, substitute half of the heavy cream with low-fat milk. This will still keep your soup creamy but reduce the calories. Enhance Flavor: Add a squeeze of fresh lemon juice just before serving to brighten the flavors and balance the richness of the cheese. Cheese Choice: Experiment with different types of cheese, such as Gruyere or a blend of cheeses, for a unique flavor profile in your creamy soup. {{image_4}} If you want a lighter soup, try dairy-free options. Coconut milk gives a nice creaminess without dairy. Nutritional yeast adds a cheesy flavor without the fat. You can also add more veggies. Spinach, kale, or cauliflower boost nutrition. These veggies blend well and add color to your soup. Want to spice things up? Add a pinch of cayenne for heat. Nutmeg gives a warm, cozy taste. You can also add protein to make your soup heartier. Cooked chicken or beans work well. They add texture and make the soup more filling. Cheddar soup can be more than one flavor. Try using smoked cheddar for a rich, smoky taste. Gouda brings a creamy, nutty flavor. Mixing different cheeses can make your soup unique. Each cheese adds its own twist, making every bowl special. After enjoying your soup, store leftovers in a container. I suggest using airtight glass containers. These keep the soup fresh and help avoid any strange smells. In the fridge, your soup stays tasty for about 3 to 4 days. Just make sure it cools to room temperature before sealing it up tight. Want to save your soup for later? You can freeze it! First, let the soup cool down. Then, pour it into freezer-safe bags or containers. Leave some space at the top for expansion. It can stay frozen for about 3 months. When you're ready to eat, thaw the soup in the fridge overnight. Heat it gently on the stove. Stir well to mix everything, as some ingredients may separate. Leftover soup can do more than just sit in the fridge. You can use it as a sauce over pasta. Just heat it up and mix it in! You can also pour some over baked potatoes for a tasty twist. If you want, add it to casseroles for extra flavor. Get creative and enjoy your soup in new ways! You can use several substitutes for heavy cream. Half-and-half gives a similar taste with less fat. Coconut milk adds a unique flavor, perfect for a dairy-free option. Silken tofu blended with a bit of water also works well. Each choice changes the taste slightly, so pick what you like best. Yes, you can! To make it in a slow cooker, start by sautéing the onion and garlic in a pan. Then, add all ingredients to the slow cooker. Set it on low for 6-8 hours or high for 3-4 hours. Blend it when it's done, and stir in the cheese and cream. You can thicken your soup in a few ways. Adding more cheese helps create a rich texture. You can also mix in a cornstarch slurry. Just mix cornstarch and water, then stir it in while the soup simmers. Finally, blending more of the soup creates a thicker base. Yes, Broccoli Cheddar Soup can be gluten-free. Just ensure your vegetable broth does not contain gluten. Most brands offer gluten-free options. The rest of the ingredients, like cheese and vegetables, are naturally gluten-free. Many sides complement Broccoli Cheddar Soup. A fresh garden salad adds crispness. Grilled cheese sandwiches are a classic choice. You could also serve it with crusty bread for dipping. Try adding some roasted veggies for a colorful plate. Broccoli cheddar soup is a warm and comforting dish you can easily make. We covered essential ingredients, from butter and cheese to fresh broccoli. I shared step-by-step instructions for preparing, cooking, and blending. You learned tips for achieving the perfect texture and flavor enhancements. With simple variations and storage tips, you can enjoy this soup in many ways. Try new ingredients or make it your own. Enjoy your cooking and savor every spoonful!

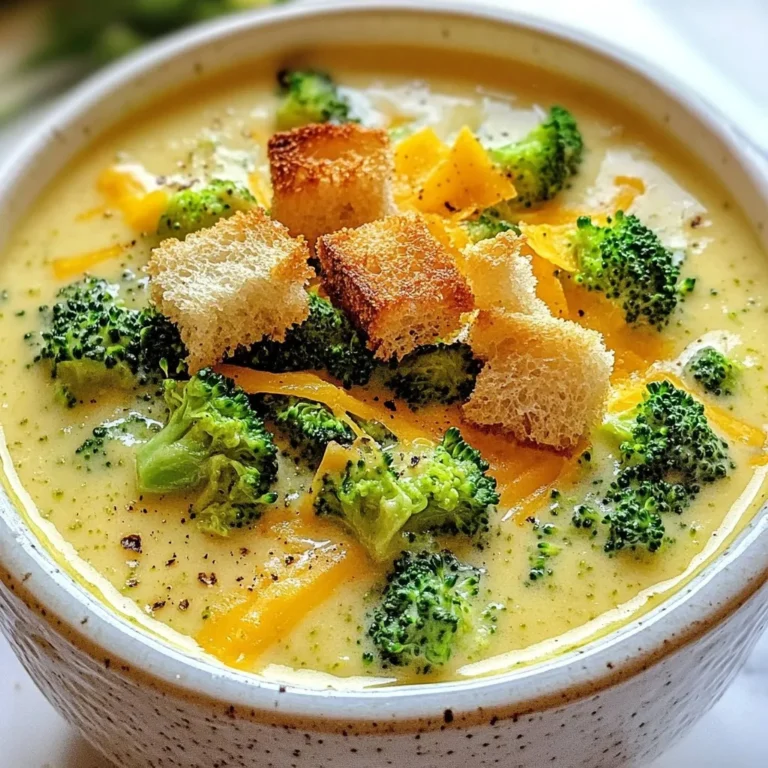
Broccoli Cheddar Soup Creamy and Flavorful Delight

- 2 packs of instant ramen noodles (discard seasoning packets) - 4 tablespoons unsalted butter - 6 cloves garlic, minced - 1 teaspoon red pepper flakes - 2 cups vegetable broth - 1 cup water - 2 tablespoons soy sauce - 1 tablespoon sesame oil - 2 green onions, sliced - 1 cup baby bok choy, roughly chopped - 2 eggs (optional) - Salt and pepper to taste The heart of Spicy Garlic Butter Ramen lies in its simple yet bold ingredients. You start with instant ramen noodles, which make cooking quick and easy. Use unsalted butter for a rich flavor that blends well with the garlic. The minced garlic is key to a robust taste, while red pepper flakes add just the right amount of heat. For the broth, vegetable broth and water create a light base. Adding soy sauce enhances the umami flavor, while sesame oil brings a nutty aroma. When it comes to garnishes, fresh green onions add a bright crunch. Baby bok choy gives a pop of color and freshness. If you want extra creaminess, consider adding soft-boiled eggs. Don't forget to season your dish with salt and pepper for that perfect finishing touch! {{ingredient_image_2}} First, fill a large pot with water and bring it to a boil. Once the water is bubbling, add the instant ramen noodles. Cook them for about 3 to 4 minutes. You want them to be tender but not mushy. After cooking, drain the noodles and set them aside. Let them rest while you prepare the next steps. In the same pot, lower the heat to medium. Add the unsalted butter and let it melt. Once the butter is melted, toss in the minced garlic and red pepper flakes. Sauté the garlic for 1 to 2 minutes. Keep stirring to avoid burning it. You should smell a rich, savory aroma filling your kitchen. Pour in both the vegetable broth and water. Add the soy sauce and sesame oil. Stir well to mix all the flavors. Next, add the chopped baby bok choy. Cook this for about 2 minutes until the greens are bright and wilted. Then, return the drained ramen noodles to the pot. Toss everything together, making sure the noodles are well coated in the garlic butter sauce. Let it cook for an extra 1 to 2 minutes to blend the flavors. Taste your ramen and season it with salt and pepper as needed. If you want, you can prepare the eggs now. Boil or poach them until they're just right. Soft-boiled eggs add a lovely creaminess. Serve your ramen in colorful bowls, topped with sliced green onions and the eggs if you used them. Enjoy your delicious meal! To get your spicy garlic butter ramen just right, adjust the spice levels to fit your taste. Start with one teaspoon of red pepper flakes. If you like it hotter, add more! You can also mix in some chili oil for extra heat. When sautéing garlic, keep a close eye on it. Garlic cooks fast and can burn easily. Use medium heat and stir constantly. Once it turns golden and fragrant, it’s ready. If you want your ramen creamier, try adding more butter or a splash of heavy cream. You can also whisk in a little miso paste for depth. Using different types of broth can also make a big difference. Chicken broth adds richness. If you want a lighter taste, go for vegetable broth. Garnish your ramen with sliced green onions and a sprinkle of sesame seeds. This adds color and a nice crunch. Choose vibrant bowls that catch the eye. Serving with chopsticks makes it feel special. If you have large spoons, they work well too for slurping! Pro Tips Use High-Quality Noodles: For an even better texture and flavor, consider using fresh ramen noodles instead of instant ones. They can elevate the dish significantly. Adjust Spice Level: If you love heat, try adding sriracha or chili oil to the dish right before serving for an extra kick! Add Protein: For a more filling meal, you can add tofu, chicken, or shrimp to the dish. Cook the protein separately and mix it in before serving. Experiment with Vegetables: Feel free to mix in other vegetables like bell peppers, carrots, or snap peas for added color and nutrition. {{image_4}} You can change the protein in your ramen for more flavor. Chicken is a great choice. Use cooked, shredded chicken for a warm touch. Tofu is perfect for a vegetarian meal. Just cube it and sauté until golden. Shrimp also works well; just cook them until pink. If you want a vegetarian meal, skip meat and add extra veggies. Switch up the greens to brighten your dish. You can use spinach, kale, or even snap peas. Seasonal vegetables like asparagus or zucchini add a fresh twist. Carrots or bell peppers can give your ramen a crunch. Don’t be shy; add your favorites to make it yours! The broth sets the tone for your ramen. Chicken broth gives a rich flavor, while beef broth adds depth. If you want a lighter taste, stick to vegetable broth. You can also use flavored broth cubes or concentrates for quick options. They can save time and still pack a punch! To store leftover ramen, let it cool completely. Place it in an airtight container. Keep it in the fridge for up to three days. This keeps the noodles fresh and safe to eat later. For reheating, add a splash of water to the ramen. This helps to revive the noodles. Heat it in a pot or microwave. Stir it often to warm it evenly. You can freeze the ramen, but it's best to freeze the noodles and broth separately. This way, the texture stays better. Use freezer-safe bags or containers. When you want to enjoy it again, thaw the broth in the fridge overnight. Reheat it in a pot. Add the noodles once the broth is hot. This keeps your meal tasty and fresh. To make ramen noodles from scratch, you need flour, water, and salt. Mix 2 cups of flour with a pinch of salt. Slowly add 1/2 cup of water while mixing. Knead the dough for 10 minutes until smooth. Wrap it and let it rest for 30 minutes. Roll it out thin and cut it into strips. Cook these noodles in boiling water for 2-3 minutes. Fresh noodles will give you a great texture. Yes, you can easily make spicy garlic butter ramen vegetarian. Use vegetable broth instead of chicken broth. You can also add tofu or mushrooms for protein. Make sure to use soy sauce that is labeled vegetarian. This way, you keep all the flavors while making it suitable for vegetarians. If you need a substitute for garlic, try using shallots or garlic powder. Shallots have a milder taste and can add a nice flavor. If you use garlic powder, start with 1/4 teaspoon and adjust to your taste. You can also use chives for a fresh flavor. To make your ramen spicier, add more red pepper flakes. You can also use chili oil or hot sauce for extra heat. Sriracha is a great choice! Start with a little and taste as you go to find the right spice level for you. Ramen pairs well with many side dishes. You can serve it with edamame, gyoza, or a fresh salad. Pickled vegetables also make a nice side. They add a crunchy texture and balance the meal nicely. Enjoy your ramen with any of these tasty sides! In this post, we explored how to make delicious garlic butter ramen. First, we covered the key ingredients, from instant noodles to flavorful broth. Next, I shared step-by-step instructions for cooking and combining everything. We also discussed tips for perfecting flavor and enhancing presentation. Finally, I highlighted variations and storage tips. Enjoy making this easy recipe. You can customize it to your taste and liking. Get creative with your toppings and ingredients! Happy cooking!

Spicy Garlic Butter Ramen Flavorful Comfort Meal

- 4 boneless, skinless chicken breasts - 1 cup low-sodium chicken broth - 1 cup cherry tomatoes, halved - 1 packet ranch seasoning mix - ½ cup cream cheese, softened You can swap chicken breasts for thighs if you want more flavor. Thighs stay moist and tender. For the broth, vegetable broth works too. It keeps the dish light and fresh. If you need a cream cheese substitute, try Greek yogurt or sour cream. Both add creaminess with a slight tang. Fresh cherry tomatoes are key. They add sweetness and brightness to the dish. Look for tomatoes that are firm and brightly colored. For the ranch seasoning, choose a quality brand. The flavor boosts the chicken and makes it taste amazing. Always check the label for no added sugars or fillers. Quality ingredients make a big difference in taste. {{ingredient_image_2}} Start by placing the chicken breasts in the bottom of the crockpot. Lay them flat and in a single layer. This helps them cook evenly. Next, pour the chicken broth over the chicken. This keeps the meat moist as it cooks. Now, sprinkle the ranch seasoning mix on top of the chicken. Make sure to cover it all for full flavor. Then, add the halved cherry tomatoes. Spread them evenly over the chicken. Their sweetness adds a nice contrast. Finally, cut the cream cheese into small cubes. Scatter these over the tomatoes for creamy goodness. You can cook the chicken on low heat for 6 to 7 hours. This gives a very tender result. If you’re in a hurry, high heat works too, cooking for 3 to 4 hours. About 30 minutes before it finishes, shred the chicken with two forks. Mix it well with the tomatoes and sauce. For the last half hour, leave the lid off. This helps the dish thicken and gets richer in flavor. To avoid dry chicken, always ensure the chicken breasts stay submerged in broth. This keeps the meat juicy. You can also check the crockpot halfway through cooking. If it looks too dry, add a splash more broth. For even cooking, layer the chicken breasts flat at the bottom. This helps them cook uniformly. Make sure not to stack them. If you have a larger batch, cook in two layers but keep them separate. Adding herbs and spices can amp up the flavor of this dish. Try adding fresh basil or oregano for a pop of taste. You can sprinkle these herbs in during the last hour of cooking for the best result. Pair this chicken with sides like rice or pasta. These absorb the sauce and enhance the meal. You can also serve it with a side salad for a fresh touch. For plating, serve the chicken over fluffy rice or al dente pasta. This creates a pleasing look on the plate. Finish with a sprinkle of fresh parsley for a burst of color. Best sides to complement this dish include steamed broccoli or a vibrant garden salad. These add texture and freshness to your meal. You can also serve with crusty bread to soak up the delicious sauce. Pro Tips Use Fresh Ingredients: Fresh cherry tomatoes will enhance the flavor and brightness of the dish. Look for plump, vibrant tomatoes for the best results. Customize the Seasoning: Feel free to experiment with different seasoning mixes, such as Italian or garlic herb, to give the dish your unique twist. Perfect Shredding Technique: Shred the chicken while it's still hot for easier handling and to ensure it mixes well with the sauce. Thickening Tips: If you prefer a thicker sauce, you can add a cornstarch slurry (1 tablespoon cornstarch mixed with 2 tablespoons water) during the last 30 minutes of cooking. {{image_4}} You can easily change the taste of your dish. Adding vegetables like bell peppers adds color and crunch. Just chop them up and toss them in the crockpot with the other ingredients. You can also try different seasonings. Instead of ranch, use taco seasoning or Italian herbs. This simple change makes your chicken unique each time. If you need gluten-free options, check the ranch seasoning. Many brands offer gluten-free choices. You can also replace the cream cheese with a dairy-free cream. For low-carb diets, skip the cream cheese. Use avocado instead for creaminess without the carbs. These swaps help fit your health needs while keeping the dish tasty. This crockpot chicken works great in many meals. You can serve it in tacos with fresh toppings like lettuce and salsa. It also makes a hearty filling for salads. Just shred the chicken and mix it with greens and veggies. For sandwiches, spread the chicken on crusty bread. Each option adds variety to your dining experience. Store any leftovers in an airtight container. This keeps the chicken fresh. Use glass or BPA-free plastic for best results. Make sure to let the chicken cool before sealing it. You can freeze portions of this dish for later. Divide the chicken into single servings. Place each portion in a freezer-safe bag. Remove as much air as possible before sealing. To thaw, place the bag in the fridge overnight. Reheat in the microwave or the stovetop until hot. In the fridge, the dish lasts up to three days. If you freeze it, it can last up to three months. Look for signs of spoilage, like a bad smell or discoloration. If you notice these, it’s best to throw it away. Can I use frozen chicken? Yes, you can use frozen chicken. Just increase cooking time. Frozen chicken takes longer to cook. Make sure it reaches 165°F for safety. What can I serve with Five-Ingredient Crockpot Chicken? This dish pairs well with rice or pasta. You can also serve it with a side salad. Fresh bread is great for soaking up the sauce too. How do I know when the chicken is fully cooked? Use a meat thermometer to check. The chicken should reach 165°F. It should also be tender and easy to shred with a fork. Can I adjust the cooking time? Yes, you can adjust the time. If you're in a hurry, use high heat. Cook for 3 to 4 hours instead of 6 to 7. How to make it spicier? Add cayenne pepper or red pepper flakes. You can also use spicy ranch seasoning. Just sprinkle it on before cooking. Can I use homemade ranch seasoning? Yes, homemade ranch seasoning works well. Just use the same amount as the packet. This gives a nice personal touch. What if I don’t have cream cheese? You can use Greek yogurt or sour cream instead. Both options keep the dish creamy. Just add them near the end of cooking. This blog post covered an easy five-ingredient crockpot chicken recipe. We explored the best ingredients, cooking tips, and variations to enhance flavors. Remember to choose quality ingredients for the best results. You can adapt the recipe to fit different diets and cooking styles. Store leftovers well and enjoy them later. With these tips, you will create a tasty meal every time. Enjoy making this simple dish that fits any occasion.

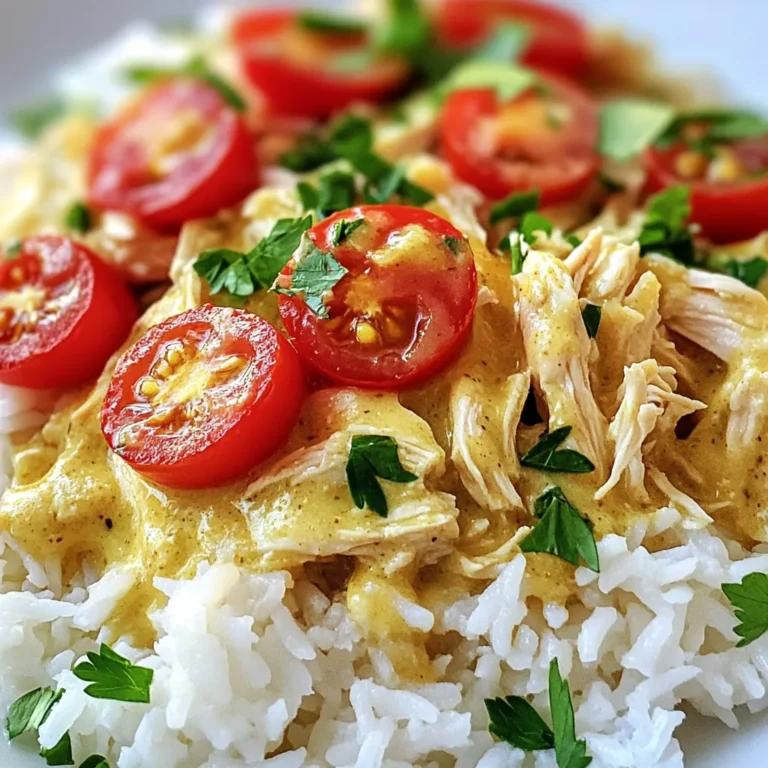
Savory Five-Ingredient Crockpot Chicken Delight

To make Christmas Peppermint Fluff Dip, gather these key items: - 1 cup cream cheese, softened to room temperature - 1 cup powdered sugar - 1 teaspoon vanilla extract - 1 cup whipped topping (like Cool Whip) - 1/2 cup crushed peppermint candies, plus extra for garnish - 1/4 teaspoon peppermint extract - 1/2 cup mini marshmallows These ingredients work together to create a sweet and creamy dip that tastes like the holidays. You can adjust the dip to suit your taste. Consider these options: - Add crushed cookies for a crunchy texture. - Use flavored whipped topping for a twist. - Mix in chocolate chips for extra sweetness. These additions let you create a dip that reflects your unique flavor preferences. When picking ingredients, focus on quality. Here are some tips: - Choose full-fat cream cheese for a rich flavor. - Look for fresh peppermint candies for the best taste. - Use pure vanilla and peppermint extracts for a stronger aroma. High-quality ingredients make a big difference in how your dip turns out. Trust me, your taste buds will thank you! {{ingredient_image_2}} To start, gather your ingredients. You will need cream cheese, powdered sugar, vanilla extract, whipped topping, crushed peppermint candies, peppermint extract, and mini marshmallows. 1. Cream the Cheese: Place the softened cream cheese in a mixing bowl. Beat it on medium speed with an electric mixer until smooth. This helps to avoid lumps. 2. Add Sugar: Gradually sift in the powdered sugar. Mix it on low speed until everything blends well and looks fluffy. 3. Flavor it Up: Next, add the vanilla and peppermint extracts. Blend these in to spread the festive flavor evenly. 4. Fold in Whipped Topping: Carefully fold in the whipped topping using a spatula. Be gentle so you keep the light texture. 5. Add Peppermint and Marshmallows: Finally, stir in the crushed peppermint candies and mini marshmallows. Mix gently to keep the dip fluffy. For a great fluffy texture, use softened cream cheese. If it is too cold, it will be hard to mix. An electric mixer works best to get the cream cheese smooth. When adding powdered sugar, do it slowly. This helps prevent clumps. Mixing on low speed at first keeps everything from flying out of the bowl. When folding in whipped topping, use a spatula. This way, you protect the air bubbles. Keep stirring until just combined. Once your dip is ready, move it to a decorative serving bowl. Cover it tightly with plastic wrap. Chilling it in the fridge for at least 30 minutes is key. This allows the flavors to come together. If you have time, chill it longer for even better taste. Just before you serve, sprinkle more crushed peppermint on top for a festive touch. To serve your Christmas Peppermint Fluff Dip, make it look festive. Use a bright bowl. Add some crushed peppermint on top for color. Arrange dippers like graham crackers, apple slices, or vanilla wafers around the bowl. This makes the dish look inviting and fun. You can also add some small holiday decorations near the dip. This adds to the cheer. If you have leftovers, store them in an airtight container. This keeps the dip fresh. Place it in the fridge. It can last up to three days. Before serving again, you might want to mix it gently. This helps restore its creamy texture. If it seems thick, you can fold in a bit of whipped topping. One common mistake is over-mixing the whipped topping. This can make your dip less fluffy. Be gentle when folding it in. Also, be careful not to skip chilling the dip. Chilling enhances the flavor and texture. Finally, don’t forget the extra crushed peppermint on top before serving. It gives that final festive touch! Pro Tips Chill for Maximum Flavor: Allow the dip to chill for at least 30 minutes before serving; this helps the flavors meld and enhances the overall taste. Use Room Temperature Ingredients: Ensure your cream cheese is softened to room temperature for easier mixing and a creamier texture. Customize Your Dippers: Experiment with various dippers like pretzels, cookies, or fresh fruit to add different flavors and textures to your presentation. Garnish Generously: Don’t skimp on the crushed peppermint for garnish; it adds a festive touch and extra crunch to the dip. {{image_4}} You can change the flavor of the Christmas Peppermint Fluff Dip easily. Try adding other extracts like almond or orange for a unique twist. If you want a chocolate flavor, mix in cocoa powder or mini chocolate chips. This will give your dip a rich taste that pairs well with peppermint. Switching ingredients can make this dip even more fun. For instance, use crushed gingerbread cookies instead of peppermint candies for a cozy holiday theme. You can also try using eggnog-flavored whipped topping to add warmth to the dip. These swaps will keep your dip fresh and exciting every time you serve it. Presentation is key for any dish. Serve the dip in a festive bowl surrounded by colorful dippers. You can use graham crackers, apple slices, or even pretzels. For a more whimsical touch, shape the dip into a holiday tree or snowman. This will impress your guests and make your spread more festive. To enjoy the Christmas Peppermint Fluff Dip, you need tasty dippers. Some of my favorites are: - Graham crackers - Apple slices - Vanilla wafers - Pretzel sticks - Mini cookies These dippers add crunch and flavor. Each bite is a sweet delight. You can mix and match for fun! Make your dip look festive! Use a pretty bowl and add some flair. Here are a few ideas: - Use a large platter and surround the dip with dippers. - Add fresh mint leaves for color and aroma. - Place small candy canes next to the dip for a holiday touch. This will catch your guests' eyes and make them excited to dig in. Turn your dip into a dessert platter! Here’s how: - Add fresh fruit like berries and banana slices. - Include mini cupcakes or brownies for variety. - Use chocolate-covered pretzels for more sweetness. This platter will be the star of your holiday spread. It’s fun, colorful, and full of flavors everyone loves! You can store Christmas Peppermint Fluff Dip in the fridge for up to five days. Make sure to keep it in an airtight container. This helps keep the dip fresh and tasty for your holiday gatherings. If you notice any separation, just stir it gently before serving. Yes, you can make this dip a day ahead of time. Preparing it in advance allows flavors to blend well. Just remember to chill it for at least 30 minutes before serving. This makes it easier for you to enjoy the party without stress. You can use Greek yogurt or vegan cream cheese as substitutes for cream cheese. Both options work well and taste great. Just make sure the substitute is smooth to keep the dip creamy. This way, you can enjoy the dip while meeting dietary needs. If you don’t have crushed peppermint candies, try using chocolate chips or toffee bits. You can also use crushed candy canes for a similar flavor. Each option adds a unique twist to the dip while keeping the festive spirit alive. In this post, we explored the key ingredients and steps to make a delicious dip. I shared tips for selecting quality items, mixing for a fluffy texture, and chilling for great taste. We covered ways to present your dip and how to store leftovers. I also shared some fun variations and serving ideas. The right ingredients and creativity can enhance your dip. Enjoy trying different flavors and impress your friends!

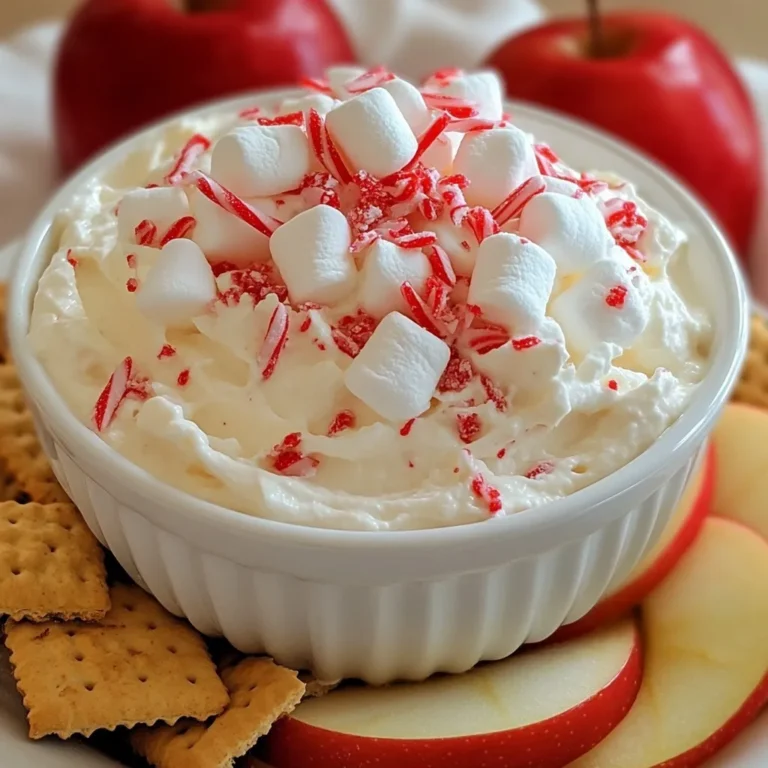
Christmas Peppermint Fluff Dip Festive and Tasty Treat

- 8 oz. linguine or penne pasta - 1 lb. large shrimp, peeled and deveined - 4 tablespoons unsalted butter - 4 cloves garlic, minced - 1 teaspoon red pepper flakes - Zest and juice of 1 lemon - 1 cup heavy cream - 1 cup shredded mozzarella cheese - ½ cup grated Parmesan cheese - 1 cup cherry tomatoes, halved - 2 tablespoons fresh parsley, chopped - Salt and pepper to taste - Baking dish (9x13 inch) - Large pot for boiling pasta - Skillet for cooking shrimp - Mixing bowl - Additional spices (e.g., Italian seasoning) - Fresh herbs (e.g., basil or thyme) When making Shrimp Scampi Pasta Bake, you’ll need key ingredients that pack flavor and comfort. Start with 8 oz. of pasta. You can use linguine or penne, based on your taste. I prefer linguine for its ability to hold the sauce well. Next, the star of the dish: 1 lb. of large shrimp. Ensure these are peeled and deveined for ease of eating. The shrimp will soak up the buttery, garlicky flavors, making each bite a delight. For the base, you’ll need 4 tablespoons of unsalted butter. This gives richness to the dish. The butter melts and mixes with 4 cloves of minced garlic. Garlic adds depth and aroma. A kick of heat comes from 1 teaspoon of red pepper flakes. Adjust to your taste. If you like it spicy, add more! To brighten the dish, use the zest and juice of 1 lemon. This adds a nice zing. For creaminess, have 1 cup of heavy cream ready. It makes the dish rich and satisfying. You’ll also need 1 cup of shredded mozzarella cheese and ½ cup of grated Parmesan cheese. These cheeses create a gooey topping that everyone loves. Add 1 cup of halved cherry tomatoes for a burst of freshness and color. Finally, sprinkle in 2 tablespoons of chopped fresh parsley. This adds a pop of green and freshness. Don’t forget to season with salt and pepper to taste. Gather your recommended equipment: a 9x13 inch baking dish for baking, a large pot for boiling the pasta, a skillet for cooking the shrimp, and a mixing bowl for combining everything. You can also enhance flavors with optional ingredients. Consider adding Italian seasoning or fresh herbs like basil or thyme. These can elevate your dish even more! {{ingredient_image_2}} - Preheat the oven to 375°F (190°C). - Boil salted water and cook pasta until al dente. To start, you need a hot oven. This step ensures your pasta bake cooks evenly. While the oven heats, grab a large pot. Fill it with water, add salt, and bring it to a boil. Once boiling, add your pasta. Cook the linguine or penne until it's al dente. This means it should be firm to the bite. After cooking, drain the pasta and let it cool a bit. - Melt butter and sauté garlic and red pepper flakes. - Add shrimp and cook until pink and opaque, seasoning as needed. Next, you’ll cook the shrimp. In a large skillet, melt the butter over medium heat. Once melted, add minced garlic and red pepper flakes. Sauté these for about 1-2 minutes. You want the garlic to smell great, not burn. Now, add the shrimp to the skillet. Cook them for 3-4 minutes, stirring often. The shrimp should turn pink and opaque. Don’t forget to season with salt and pepper for flavor. - Stir in lemon juice, zest, and heavy cream. - Combine cooked pasta, shrimp mixture, tomatoes, and cheeses; transfer to baking dish. - Bake until cheese is melted and golden brown. Now comes the fun part! Stir in the fresh lemon juice, zest, and heavy cream with the shrimp. Mix it well and let it simmer for 2-3 minutes. This helps all the flavors blend. In a large bowl, combine your cooked pasta, the shrimp mixture, halved cherry tomatoes, and half of both cheeses. Gently toss everything together. Grease a 9x13 inch baking dish. Transfer the pasta mixture to it and spread it out evenly. Sprinkle the top with the remaining mozzarella and Parmesan cheese. Now, pop the dish in your preheated oven. Bake for 25-30 minutes. You want the cheese to melt and turn golden brown. Enjoy the wonderful aroma while it bakes! To make sure your shrimp scampi pasta bake cooks evenly, follow these tips: - Ensure even cooking and browning: Spread the pasta mixture evenly in the baking dish. This allows for uniform heat distribution. Watch the edges; they tend to brown faster. You can rotate the dish halfway through baking to help. - Letting the dish rest before serving: After baking, let the dish sit for about 5 minutes. This helps the layers set and makes serving easier. It also allows flavors to meld. Flavor is key in this dish. Here’s how to make it pop: - Balancing creamy and zesty elements: The heavy cream provides richness, while lemon juice gives a bright bite. Adjust these to find your perfect balance. Add more lemon or cream as needed. - Using high-quality ingredients: Fresh shrimp and good cheese can elevate your bake. The better your ingredients, the better the dish. Seek out fresh shrimp and real Parmesan for the best taste. What to serve with your shrimp scampi pasta bake? Here are some ideas: - Recommended side dishes or salads: A simple green salad with lemon vinaigrette pairs well. Garlic bread also complements this dish nicely. - Wine pairings for shrimp scampi pasta bake: A crisp white wine like Sauvignon Blanc is a great match. It enhances the flavors without overpowering them. Pro Tips Perfect Pasta: Be sure to cook the pasta al dente, as it will continue to cook while baking in the oven. Garlic Magic: Watch the garlic closely while sautéing; it should be fragrant but not browned, as burnt garlic can become bitter. Cheesy Goodness: For an extra cheesy topping, mix in some cream cheese or ricotta with your mozzarella before baking. Flavor Boost: Customize the seasoning by adding fresh herbs like basil or thyme for a unique twist on the classic flavor. {{image_4}} You can change the pasta type for fun. Try bowtie or spaghetti instead of linguine or penne. Each shape holds sauce differently, giving you new tastes. For seafood swaps, use scallops or crab if you want. These options add different flavors and textures. You could even mix shrimp with these seafood items for a medley. If you need gluten-free options, look for gluten-free pasta. Many brands make great substitutes that work well in this dish. Just cook them according to the package. For dairy-free options, replace the heavy cream with coconut cream or a nut milk. Use dairy-free cheese to keep the cheesy goodness while avoiding dairy. Seasonal vegetables can brighten your dish. In summer, add zucchini or bell peppers for freshness. In winter, consider using butternut squash or spinach for warmth. You can also adjust flavors based on the season. In summer, use fresh herbs like basil for a bright taste. In winter, add sage or thyme to deepen the dish's warmth. To keep your shrimp scampi pasta bake fresh, store leftovers right away. Place it in an airtight container. This helps keep flavors in and bacteria out. Refrigerate the dish within two hours of baking. Leftovers last about 3 to 4 days in the fridge. To reheat, use the oven or microwave. The oven is best for keeping the texture. Preheat it to 350°F (175°C). Place the pasta bake in a baking dish, cover with foil, and heat for about 20 minutes. For the microwave, heat in short bursts. Stir every minute to help it heat evenly. To refresh flavors, squeeze a bit of lemon juice on top before serving. You can freeze this dish before or after baking. If freezing before baking, wrap the dish tightly with plastic wrap and then foil. This prevents freezer burn. It can stay frozen for up to three months. To freeze after baking, let it cool completely. Store it in an airtight container. When you're ready to eat, thaw it in the fridge overnight. Reheat it as described above. This ensures you enjoy your pasta bake just as much as the first time! You can tell shrimp is cooked when it turns pink and opaque. It should curl slightly. If it looks gray or transparent, it needs more time. Cooking shrimp takes about 3-4 minutes. Keep a close eye to avoid overcooking. Yes, you can prepare the dish in advance. Cook the pasta and shrimp mixture, then mix them together. Place everything in a baking dish, but don’t bake it. Cover and store it in the fridge for up to 24 hours. When ready, just bake it as directed. This dish pairs well with many sides. Consider a fresh green salad for a light touch. Garlic bread also complements it nicely. For a heartier option, serve roasted vegetables or a creamy coleslaw. The spice level can be adjusted to your taste. The red pepper flakes add mild heat. You can use less or more to suit your preference. If you want no heat, skip the flakes altogether. Enjoy the creamy, lemony flavors without spice! This blog post covered the delicious shrimp scampi pasta bake, from ingredients to storage tips. We discussed key ingredients like shrimp, pasta, and creamy sauces, along with ways to enhance flavor. Properly cooking shrimp and pairing side dishes boost your meal. Remember, you can customize this dish for dietary needs or seasonal flavors. Follow the steps to create a tasty meal everyone will enjoy. Enjoy your cooking journey and share this recipe with others!

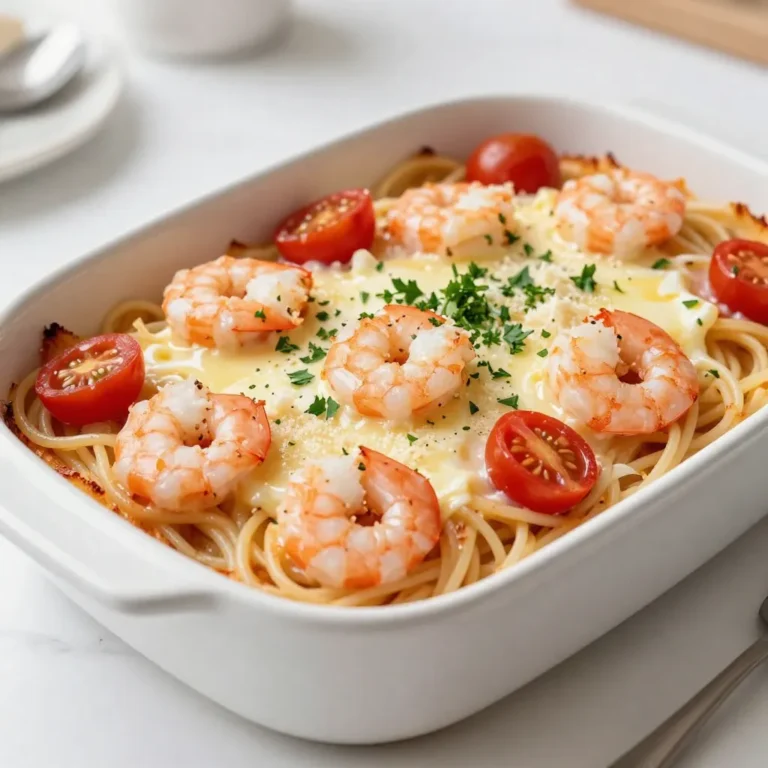
Savory Shrimp Scampi Pasta Bake Simple and Satisfying

- 1 cup vegetable broth - 1 cup water - 1 medium carrot, diced - 1 stalk celery, diced - 1 small onion, finely chopped - 2 garlic cloves, minced - 1 medium potato, diced into small cubes - 1 cup frozen mixed vegetables (such as peas, corn, and green beans) - 1 teaspoon dried thyme - 1 tablespoon extra virgin olive oil - Salt and pepper to taste - Fresh parsley, chopped, for garnish For this quick soup, you need simple, fresh ingredients. Start with vegetable broth and water. The broth gives the soup flavor while the water helps it cook well. Add a medium carrot, a stalk of celery, a small onion, and two garlic cloves for a tasty base. Next, dice a medium potato into small cubes. This potato adds heartiness to the soup. Don't forget the frozen mixed vegetables. They save time and add color. Choose a mix with peas, corn, and green beans for variety. For seasoning, grab dried thyme, salt, and pepper. They enhance flavors and make the soup delicious. Finally, fresh parsley adds a bright touch when you serve the soup. With these ingredients, you can make a wonderful Soupe de Dernière Minute in just 30 minutes. Enjoy your cooking! {{ingredient_image_2}} Sautéing the Aromatics Start by heating 1 tablespoon of extra virgin olive oil in a large pot over medium heat. Add 1 small chopped onion and 2 minced garlic cloves. Sauté these for about 2 minutes until fragrant. Next, add 1 medium diced carrot and 1 stalk of diced celery. Stir these together for about 5 minutes. The goal is to make the vegetables soft and aromatic. Adding Vegetables and Broth After sautéing, add 1 medium diced potato into the pot. Stir for another 3 minutes, allowing it to soften. Then, pour in 1 cup of vegetable broth and 1 cup of water. Stir everything well, and turn up the heat until it boils. Once boiling, lower the heat to medium-low. Add 1 cup of frozen mixed vegetables and 1 teaspoon of dried thyme. Stir again to combine. Simmering the Soup Cover the pot and let the soup simmer for about 10 to 15 minutes. This helps the potatoes cook through. You know it's ready when you can easily pierce the potatoes with a fork. Blending Techniques Once the soup has simmered, remove the pot from heat. Let it cool for a few minutes. You can use an immersion blender to blend the soup until smooth. If you like some texture, use a standard blender. Just blend a portion of the soup. Adjusting Seasoning and Reheating Return the blended soup to the pot. If it needs reheating, do it gently over low heat. Taste the soup, and add salt and pepper as needed. This last step ensures your soup is just right. - Pre-chopping vegetables: Spend a few minutes cutting your vegetables ahead of time. This saves time when you cook. You can store them in the fridge for later use. - Using frozen ingredients: Frozen vegetables are quick and easy. They add nutrition and flavor without extra work. Just toss them in as you cook. - Alternative flavors and spices: You can change the soup's taste by adding different spices. Try cumin for warmth or paprika for a smoky touch. Herbs like basil or rosemary can also add a fresh kick. If you want a spicy kick, add some red pepper flakes. You can mix and match to create your unique flavor. Pro Tips Enhance Flavor: Add a splash of lemon juice or a dash of vinegar at the end of cooking to brighten the flavors of your soup. Experiment with Herbs: Feel free to swap out dried thyme for other herbs like rosemary or oregano to create different flavor profiles. Make it Creamy: For a creamier texture, stir in a splash of cream or a dollop of yogurt just before serving. Batch Cooking: This soup freezes well, so consider making a double batch and storing portions for quick meals later! {{image_4}} You can change the soup's taste by using different vegetables. I love to use seasonal vegetables. In spring, try adding fresh asparagus or peas. In fall, consider using squash or pumpkin. Each season offers a new flavor profile. You can also add protein to make the soup more filling. Beans are a great choice. They add texture and fiber. Tofu is another good option. It soaks up the soup's flavor well. Just chop the tofu into small cubes and add it to the pot. If you need a gluten-free version, this soup is perfect. All the ingredients are naturally gluten-free. Just double-check your vegetable broth to ensure it's gluten-free too. You can also make it vegan. The recipe is already vegan-friendly! Just ensure you're using plant-based ingredients and broth. This soup is not only quick but also meets many dietary needs. To keep your soup fresh, store it right. Use a clean, airtight container. This helps avoid spills and keeps the soup from drying out. Place the container in the fridge. It’s best to eat the soup within three days. If you want to save it longer, freezing is a great option. Let the soup cool down first. Then, pour it into freezer-safe bags or containers. Leave some space at the top for expansion. Label the bags with the date. You can freeze it for up to three months. Reheating your soup needs care to keep the flavor. The best way is on the stove. Pour the soup into a pot. Heat it over low to medium heat. Stir it often to avoid sticking. If you want to use a microwave, transfer the soup to a microwave-safe bowl. Cover it loosely with a lid or a paper towel. Heat in short bursts, stirring in between. This helps heat evenly and keeps the taste strong. Enjoy your warm, tasty soup! You can keep leftover soup in the fridge for 3 to 4 days. Make sure to store it in an airtight container. If you want to save it longer, freeze it. The soup lasts up to 3 months in the freezer. To thaw, just move it to the fridge overnight or use the microwave. Yes, you can use many types of broth. You can choose vegetable, chicken, or beef broth. Store-bought broth is quick and easy. If you want homemade, just simmer bones or veggies in water. This adds flavor and nutrition to your soup. Soupe de Dernière Minute goes well with crusty bread or warm rolls. You can also serve it with a simple salad. Some cheese or crackers add a nice touch too. These sides make your meal hearty and filling. This blog post guided you through making a delicious soup. We covered essential ingredients like vegetables, broth, and seasonings. I shared step-by-step instructions to ensure your soup turns out great every time. We also explored tips to save time and suggested ways to personalize your dish. Don’t forget about storage! Proper methods keep your soup fresh for later. Use these tips to create your own unique version. Enjoy this easy and tasty meal with friends or family. Keep experimenting and have fun in the kitchen!

Soupe de Dernière Minute Quick and Flavorful Recipe

- 2 cups chocolate cookie crumbs - ½ cup unsalted butter, melted - 3 packages (8 oz each) cream cheese, softened to room temperature - 1 cup granulated sugar - 1 teaspoon vanilla extract - 3 large eggs, room temperature - ½ cup sour cream, at room temperature - ½ cup brewed espresso or strong coffee, cooled - 1 cup crushed peppermint candies (plus extra for garnish) - 1 teaspoon peppermint extract - 1 cup semi-sweet chocolate chips - Whipped cream, for topping These ingredients create a rich and festive cheesecake. I love using chocolate cookie crumbs for the crust. They give a nice chocolatey flavor. The unsalted butter helps bind everything together. Cream cheese is the star of this dessert. It makes the cheesecake creamy and smooth. Granulated sugar adds sweetness. Vanilla extract brings warmth and depth. The eggs help set the cheesecake and give it structure. Sour cream adds a slight tanginess, which balances the sweetness well. Brewed espresso or strong coffee gives that mocha taste. Crushed peppermint candies add a fun crunch and minty flavor. Peppermint extract enhances the mint experience. The semi-sweet chocolate chips make every bite extra special. Finally, whipped cream on top adds a lovely finish to this dessert. - Extra crushed peppermint candies - Chocolate shavings - Fresh mint leaves These garnishes are not just pretty; they add flavor too. Extra crushed peppermint candies make it festive. Chocolate shavings give a touch of elegance. Fresh mint leaves add a pop of color and freshness. You can mix and match these garnishes as you like. {{ingredient_image_2}} - Preheat the oven to 325°F (160°C). - To prepare the crust, mix 2 cups of chocolate cookie crumbs with ½ cup of melted unsalted butter. Press this mix into the bottom of a 9-inch springform pan. Make sure it is compact and even. Bake the crust for 10 minutes. Let it cool completely. - In a large bowl, beat 3 packages of softened cream cheese with 1 cup of granulated sugar. Mix until smooth and creamy. This takes about 2-3 minutes. - Add 1 teaspoon of vanilla extract. Then, incorporate 3 large eggs one at a time. Mix well after each one. - Next, stir in ½ cup of sour cream, ½ cup of cooled espresso, and 1 teaspoon of peppermint extract. Make sure everything is well blended. - Fold in 1 cup of semi-sweet chocolate chips and 1 cup of crushed peppermint candies. Be gentle to avoid overmixing. - Pour the filling over the cooled crust. Smooth the top with a spatula. Place it in the oven and bake for 55-60 minutes. The edges should set, but the center can still jiggle a bit. - After baking, turn off the oven and crack the door. Let the cheesecake cool inside for 1 hour to prevent cracks. Then take it out and cool completely at room temperature. - Once cool, cover the cheesecake with plastic wrap. Refrigerate it for at least 4 hours, or overnight if you can. - Before serving, top the cheesecake with whipped cream. Sprinkle extra crushed peppermint candies on top for a festive look. Enjoy! To keep your cheesecake smooth, use a simple cooling technique. After baking, turn off the oven and slightly open the door. Let the cheesecake cool inside for about one hour. This gentle cooling helps prevent cracks. Make sure you bake at the right temperature. Set your oven to 325°F (160°C). Bake for 55-60 minutes. The edges should be set, but the center can jiggle slightly when done. Using room temperature ingredients is key. Take out the cream cheese, eggs, and sour cream before you start. When they are warm, they mix better and become smooth. Mixing techniques also matter. Use an electric mixer to beat the cream cheese until it is creamy. Gradually add sugar, then blend in the eggs one at a time. This method helps create a light and fluffy filling. Pair this cheesecake with a warm drink. A cup of coffee or hot chocolate works well. The flavors of peppermint and mocha blend perfectly. For presentation, add dollops of whipped cream on top. Sprinkle extra crushed peppermint candies for a festive look. You can also add chocolate shavings for extra charm. Pro Tips Use Room Temperature Ingredients: Ensure all your ingredients, especially cream cheese and eggs, are at room temperature before mixing. This helps create a smoother batter and prevents lumps. Don't Overmix: When incorporating the chocolate chips and peppermint candies, fold gently to avoid deflating the batter and to keep the cheesecake light and fluffy. Prevent Cracking: Allow the cheesecake to cool gradually in the oven with the door ajar. This slow cooling process helps to prevent the surface from cracking. Chill Overnight: For the best flavor and texture, let the cheesecake chill in the refrigerator overnight. This enhances the taste and allows it to firm up perfectly. {{image_4}} You can make a no-bake version of this cheesecake. First, skip baking the crust. Mix chocolate cookie crumbs with melted butter. Then, press it into a pan and chill it in the fridge. For the filling, use cream cheese, sugar, and whipped topping. Add espresso, peppermint extract, and crushed candies. Chill until firm, usually about 4 hours. Alternative crust options include using graham cracker crumbs or even crushed nuts. Both give a nice flavor and texture. To make a vegan version, swap cream cheese for dairy-free cream cheese. Use almond or coconut milk instead of sour cream. You can also replace eggs with flax eggs. Just mix 1 tablespoon of ground flaxseed with 2.5 tablespoons of water. Let it sit for a few minutes to thicken. Adjusting the recipe for vegan diets is simple. Keep the espresso and crushed peppermint candies. This way, you still get that delicious peppermint mocha flavor. You can easily change the flavors in this cheesecake. Adding different extracts can make a big impact. Try almond or orange extract for a twist. Adjusting the chocolate and peppermint ratios is another fun way to customize. If you love chocolate, add more chocolate chips. If you prefer peppermint, increase the crushed candies. This way, you can create your perfect holiday treat! To keep your peppermint mocha cheesecake fresh, use airtight containers. This locks in moisture and flavor. Make sure the cheesecake is completely cool before storing. Wrap it in plastic wrap or foil for added protection. Place it in the fridge. To keep it for longer, separate slices with parchment paper. This prevents sticking. You can freeze this cheesecake for up to three months. First, let it cool completely. Then wrap it tightly in plastic wrap and foil. This keeps out air and moisture. To enjoy later, move it to the fridge overnight to thaw. Avoid using the microwave, as it can change the texture. In the fridge, the cheesecake lasts about five to seven days. Always check for signs of spoilage. Look for a change in color or texture. If it smells off, throw it away. Keeping it sealed helps maintain its quality longer. Enjoy your cheesecake while it’s fresh for the best taste! Yes, you can. If you want a lighter option, use Greek yogurt. Ricotta cheese is another great choice. Both will change the taste a bit but still create a creamy texture. Check for set edges and a jiggly center. The center should not be liquid. If it wobbles slightly, it's perfect. The cheesecake will firm up as it cools. You can use vanilla extract for a different flavor. Almond extract is another option but be careful; it has a strong taste. You can also crush more peppermint candies for a minty kick. Yes, you can double the recipe. Just use two springform pans or bake it in a larger pan. Adjust baking time as needed. Check for doneness as you bake. This blog post covered how to make a delicious Peppermint Mocha Cheesecake. We explored the right ingredients, like chocolate cookie crumbs and cream cheese, and walked through each step, from prepping to serving. I shared tips for avoiding cracks and achieving that creamy texture. You can also try variations like no-bake or vegan options. Remember to follow storage tips to keep your cheesecake fresh. Enjoy making this treat! You’ll impress anyone who takes a bite.

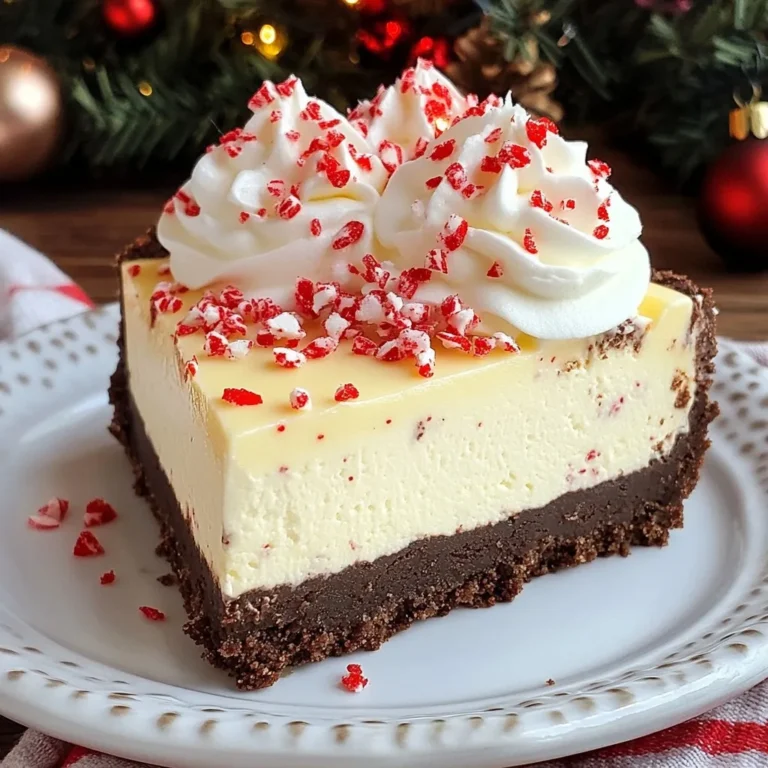
Peppermint Mocha Cheesecake Decadent Holiday Treat

- 4 medium potatoes, peeled and diced into 1-inch cubes - 3 medium carrots, sliced into rounds - 2 parsnips, peeled and sliced into rounds - 1 large onion, finely chopped - 2 cloves garlic, minced - 1 cup fresh green beans, trimmed and cut into 1-inch pieces - 1 cup vegetable broth (preferably low-sodium) - 1 cup water - 1 tablespoon extra virgin olive oil - 1 teaspoon dried thyme - 1 teaspoon dried rosemary - Salt and freshly ground black pepper to taste - Fresh parsley, finely chopped (for garnish) Gathering fresh ingredients is key for great flavor. Potatoes, carrots, and parsnips form the hearty base. They bring a nice texture and comfort. Onion and garlic add depth and warmth to the stew. Fresh green beans contribute a lovely crunch and color. Herbs like thyme and rosemary enhance the taste. They lend an earthy note that complements the vegetables. Using low-sodium broth helps keep the stew tasty without being too salty. You can always add more seasoning later. Don't forget the salt and pepper! They bring all the flavors together. Lastly, have fresh parsley ready for garnish. It gives a bright touch to your warm bowl of stew. Enjoy the process of preparing these ingredients. The smell of cooking will fill your kitchen with comfort. {{ingredient_image_2}} Heating the Olive Oil Start by taking a large pot. Heat 1 tablespoon of extra virgin olive oil over medium heat. Wait for the oil to shimmer, which means it's ready. Sautéing Onion and Garlic Next, add 1 large, finely chopped onion and 2 cloves of minced garlic. Stir them often for about 3-4 minutes. You want the onion to be soft and clear. This step adds a strong flavor base to your stew. Adding Root Vegetables Now, toss in 4 medium potatoes, diced into cubes, 3 medium carrots sliced into rounds, and 2 parsnips sliced into rounds. Mix all the veggies well and cook for 5 minutes, stirring every so often to avoid burning. This helps the vegetables soften and release their flavors. Incorporating Broth and Green Beans Pour in 1 cup of vegetable broth and 1 cup of water. Stir everything together. Turn the heat up to bring it to a gentle boil. Keep an eye on it as it heats. Seasoning the Stew Once boiling, add 1 cup of fresh green beans, cut into 1-inch pieces. Sprinkle in 1 teaspoon of dried thyme and 1 teaspoon of dried rosemary. Taste your stew and season with salt and black pepper to your liking. These herbs will give the stew a warm, comforting flavor. Simmering for Flavor Lower the heat to a simmer and cover the pot. Let it cook for about 30-35 minutes. Stir occasionally and taste it, adjusting the seasoning if needed. The stew is done when all the veggies are tender and soaked in flavor. Resting the Stew After cooking, take the pot off the heat. Let the stew sit for about 5 minutes. This helps the flavors settle together. Serving Suggestions Ladle the stew into warm, rustic bowls. For a pop of color, garnish with finely chopped fresh parsley. Pair it with crusty bread for dipping. Enjoy your hearty Irish Vegetable Stew! - Importance of Fresh Ingredients Fresh ingredients make this stew shine. Use firm potatoes and bright carrots. Fresh herbs like thyme and rosemary also bring a burst of flavor. Quality veggies will taste better and add more nutrients to your dish. - Optimal Cooking Time for Tender Vegetables Cook each vegetable just right. Start with onions and garlic to build flavor. Add potatoes, carrots, and parsnips next, allowing them to soften. Simmer the stew for 30 to 35 minutes to ensure all veggies become tender. Stir occasionally to help flavors blend. - Serving in Rustic Bowls Serve the stew in warm, rustic bowls. This makes the meal feel cozy and inviting. The bowls can enhance the colors of the stew, making it more appealing. - Garnishing with Parsley Add a sprinkle of fresh parsley on top. This not only looks great but also adds a fresh taste. The green color brightens the dish and makes it more inviting. - Low-Sodium Alternatives Use low-sodium vegetable broth to keep the stew healthy. This helps control salt levels while still delivering rich flavor. You can also add more herbs for taste without sodium. - Vegan Adaptations This stew is already vegan-friendly. You can keep it plant-based by using vegetable broth. It’s a great option for everyone, whether you’re vegan or not. Enjoy a hearty meal without any animal products. Pro Tips Use Seasonal Vegetables: Opt for seasonal and fresh vegetables for optimal flavor and nutrition. They not only enhance the taste of your stew but also make it more colorful and appealing. Layer Your Flavors: Sautéing the onions and garlic at the beginning builds a strong flavor base for your stew. Don’t skip this step, as it adds depth to the overall dish. Adjust the Consistency: If you prefer a thicker stew, mash a few of the potatoes against the side of the pot to release their starch. This will naturally thicken the broth without needing a thickener. Garnish for Freshness: Fresh parsley not only adds a pop of color but also a burst of freshness. Add it just before serving to maintain its vibrant flavor and appearance. {{image_4}} Adding seasonal vegetables can make your Irish vegetable stew even better. Consider bell peppers, zucchini, or turnips. They bring unique flavors and textures. You can also use veggies you have on hand. If you have allergies, swap potatoes with sweet potatoes or use squash instead. These changes keep the stew fresh and exciting. To boost flavor, add beans or lentils. They provide protein and make the stew hearty. You can use canned beans for ease or cook dried beans in advance. Fresh herbs can also lift the dish. Try basil, oregano, or even a hint of dill for a new twist. Experimenting with these can lead to your perfect bowl of stew. Leftovers can be a delightful surprise. Turn your stew into shepherd's pie by layering it with mashed potatoes. Bake it until golden for a comforting meal. You can also use the stew as a soup base. Just add more broth and your favorite greens for a quick soup. These ideas help you enjoy every last bite. To cool the stew safely, let it sit at room temperature for no more than two hours. This keeps it from getting too warm, which can cause bacteria to grow. After cooling, transfer the stew to containers. I recommend using airtight containers for the best storage. Glass or BPA-free plastic containers work great. When reheating, use a pot on the stove or a microwave. If using the stove, heat on low, stirring often. This helps heat the stew evenly. If you use a microwave, heat in short bursts, stirring in between. This keeps the vegetables from becoming mushy. Always check the temperature, aiming for at least 165°F (74°C) before serving. To freeze the stew, let it cool completely first. Then, pour it into freezer-safe bags or containers. I like using bags because they save space. Remove as much air as possible before sealing. For thawing, place the frozen stew in the fridge overnight. Reheat it on the stove or in the microwave, ensuring it’s hot throughout. Irish Vegetable Stew is made with simple, fresh ingredients. The main veggies are potatoes, carrots, and parsnips. You also need onions and garlic for flavor. Green beans add bright color and texture. The dish uses vegetable broth and water for a rich base. Season with dried thyme and rosemary for an earthy taste. Salt and pepper bring out all the flavors. Fresh parsley on top adds a nice touch. To thicken your stew, you can use a few tricks. One way is to mash some of the potatoes. This adds creaminess without extra ingredients. Another option is to mix in a little cornstarch. Mix the cornstarch with cold water first, then stir it into the stew. Let it cook for a few more minutes. This will help the stew thicken nicely. You can also let it simmer longer, allowing some liquid to evaporate. Yes, you can easily make Irish Vegetable Stew in a slow cooker. Start by sautéing the onions and garlic in a pan. Then, add all the other ingredients to the slow cooker. Pour in the sautéed onion and garlic. Cook on low for about 6-8 hours or on high for 3-4 hours. The slow cooker will make the flavors blend well. This method is great for busy days! Irish Vegetable Stew lasts about 3-5 days in the fridge. Store it in an airtight container to keep it fresh. Make sure to let it cool down before putting it in the fridge. If it smells off or looks strange, it’s best to throw it away. Always trust your senses when it comes to food safety. Yes, Irish Vegetable Stew is great for meal prep! It holds up well in the fridge. You can make a big batch and portion it out for the week. It’s easy to reheat, and the flavors improve over time. Just keep it in containers for quick meals. This dish is healthy and filling, making it a smart choice for busy schedules. We've explored how to create a hearty Irish vegetable stew. We covered the key ingredients like root veggies and broth. You learned step-by-step instructions, from sautéing aromatics to garnishing with fresh herbs. I shared tips for authentic flavors and easy presentation ideas. Plus, we discussed storage and variations. To cap it off, this stew fits well in meal prep and can adapt to your taste. With these guidelines, you can confidently make and enjoy this dish, bringing warmth to your table.

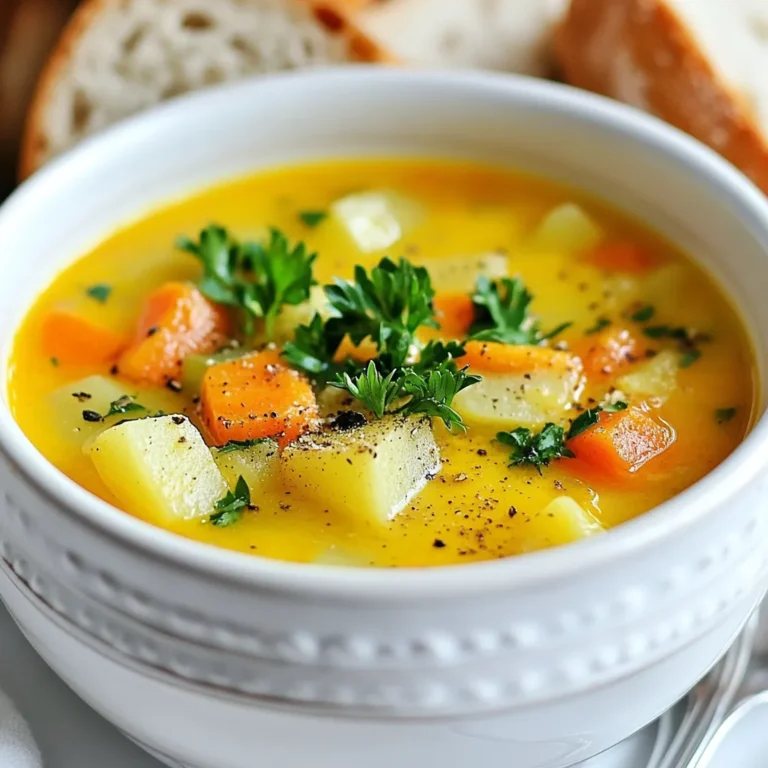
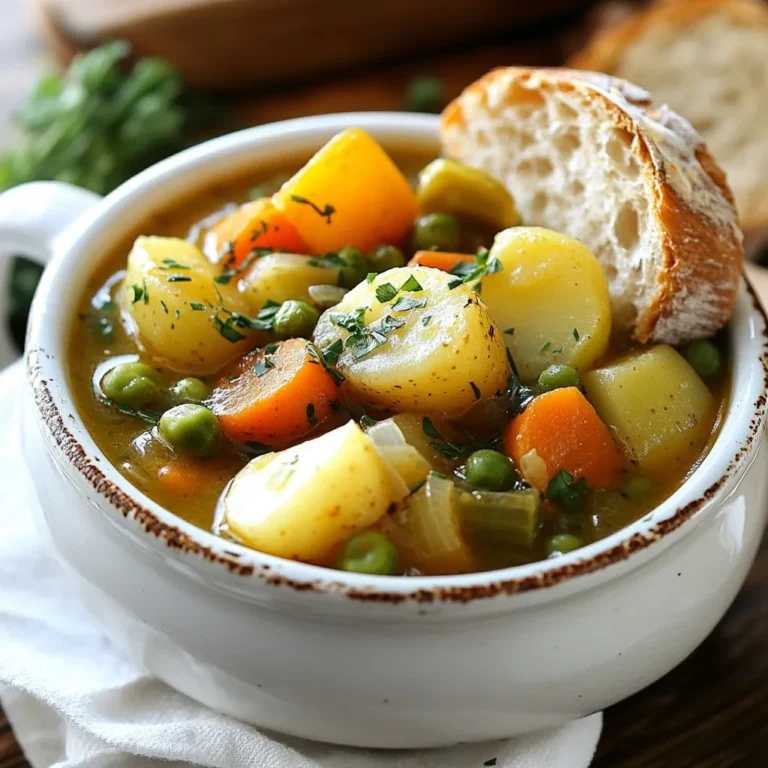
Irish Vegetable Stew Comforting Warmth in a Bowl

PREV 1 … 33 34 35 … 44 NEXT
yummybiterecipes

explore

DessertsDinnerAppetizersDrinks

Our Policies

  • Cookie Policy
  • Copyright Policy
  • Disclaimer
  • GDPR Policy
  • Terms Of Use
Back to Top
  • About
  • Contact Us
  • Privacy Policy
© 2025 yummybiterecipes