FREE DINNER EBOOK! Get your copy!
  • Cookie Policy
  • GDPR Policy
  • Disclaimer
  • Terms Of Use
  • Visit my other site: Fun Cookie Recipes
yummybiterecipes
  • Home
  • Dinner
  • Desserts
  • Drinks
  • Appetizers
  • Contact
  • About
  • Privacy Policy
  • Home
  • Dinner
  • Desserts
  • Drinks
  • Appetizers
  • Contact
  • About
  • Privacy Policy
  • Cookie Policy
  • GDPR Policy
  • Disclaimer
  • Terms Of Use
Visit my other site: Fun Cookie Recipes

HOME / CATEGORIES /

Latest

For this dish, I always choose 8 oz of fettuccine pasta. Fettuccine holds the creamy sauce well. It gives each bite a lovely, velvety texture. You can also use other types, like penne or rotini, if you prefer. I use 1 lb of ground beef for a hearty flavor. Ground beef is great because it cooks quickly and adds richness. For aromatics, I finely dice 1 small onion and mince 2 cloves of garlic. The onion adds sweetness, while garlic gives a nice kick. The sauce is creamy, thanks to 1 cup of heavy cream. Heavy cream makes the sauce rich and smooth. I also add 1 cup of low-sodium beef broth. This adds depth without overpowering the dish. For cheese lovers, I use 1 cup of shredded sharp cheddar cheese and 1/2 cup of finely grated Parmesan cheese. These cheeses melt beautifully and enhance the flavor. To boost the taste, I add 1 teaspoon of Worcestershire sauce. This adds a little umami, making the dish more exciting. I season with salt and pepper to taste, adjusting as needed. Fresh parsley, chopped, is my go-to for garnish. It adds color and a fresh taste to the dish. {{ingredient_image_2}} First, fill a large pot with water. Add salt to the water and bring it to a boil. Once boiling, add 8 oz of fettuccine pasta. Cook it according to the package, usually 8-10 minutes. When done, drain the pasta and set it aside for later. Next, grab a large skillet and heat 1 tablespoon of olive oil over medium heat. Add a finely diced small onion. Sauté it until soft and clear, about 3-4 minutes. Then, add 2 minced garlic cloves. Cook for another minute until you smell the garlic. Now, increase the heat to medium-high. Add 1 lb of ground beef to the skillet. Sprinkle salt and pepper on it. Cook the beef while breaking it apart with a spatula. Brown it well, which should take about 6-8 minutes. If there’s extra fat, drain it before moving on. Lower the heat to medium-low. Pour in 1 cup of heavy cream and 1 cup of low-sodium beef broth. Stir well to combine. Add 1 teaspoon of Worcestershire sauce to boost the flavor. Mix it until everything is smooth. Gradually add 1 cup of shredded sharp cheddar cheese and 1/2 cup of grated Parmesan cheese. Stir continuously until both cheeses melt into the sauce. You want a rich and creamy texture here, so keep mixing! Take your drained fettuccine and toss it directly into the sauce. Stir well to make sure every piece of pasta is coated in that creamy goodness. Taste it and adjust the salt and pepper if needed. Now, scoop the Cheeseburger Alfredo Pasta into bowls. For a bright touch, sprinkle freshly chopped parsley on top. This adds color and a fresh taste, making your dish look inviting. Enjoy! To get the best pasta, cook it until al dente. This means it should be firm but not hard. Salt the water well before adding the fettuccine. This adds flavor right to the pasta. Follow the package time, usually 8-10 minutes. After draining, toss it with a bit of olive oil to prevent sticking. Sharp cheddar gives a great flavor in this dish. It melts well and adds creaminess. For a richer taste, use finely grated Parmesan. Mix both cheeses for depth. Don’t skimp on quality; fresh cheese will make a big difference. Seasoning is key to a tasty dish. Use salt and pepper to enhance the beef and sauce. Worcestershire sauce adds umami, which deepens the flavor. Taste as you go. You can always add more, but you can’t take it out. Serve your pasta in wide, shallow bowls. This makes it look inviting. For added flair, sprinkle extra cheese on top. A dash of chopped parsley adds color and freshness. Pair it with crispy garlic bread to soak up any leftover sauce. Pro Tips Perfect Pasta Cooking: Always cook your pasta in salted water to enhance its flavor. Make sure to reserve a cup of pasta water before draining; it can be used to adjust the sauce's consistency later. Meat Flavor Boost: For an extra depth of flavor, consider adding a splash of soy sauce or a dash of smoked paprika when browning the ground beef. Cheese Melting Trick: To ensure a smooth and creamy sauce, add cheese gradually and stir constantly. This prevents clumping and ensures even distribution throughout the dish. Garnish for Freshness: Fresh herbs like parsley or chives not only add color but also enhance the overall flavor. Add them just before serving for the best impact. {{image_4}} You can make Cheeseburger Alfredo Pasta lighter. Use whole wheat fettuccine for more fiber. Swap ground beef for lean ground turkey or chicken. For the sauce, try using half-and-half instead of heavy cream. This gives you a creamy taste with fewer calories. You can also add more veggies, like spinach or broccoli, for extra nutrients. To create a vegetarian twist, skip the meat. Use mushrooms to add a hearty texture. Cook sliced mushrooms in the skillet until they are brown and tender. Replace beef broth with vegetable broth for flavor. You can add plant-based cheese to keep the creamy texture. This version is both filling and delicious! If you want more flavor, try adding cooked bacon bits. They add a nice crunch and a smoky taste. Another great addition is diced tomatoes. They bring freshness and a bit of acidity to balance the dish. For a spicy kick, mix in some crushed red pepper flakes. Each of these variations can elevate your Cheeseburger Alfredo Pasta to new heights! To keep your Cheeseburger Alfredo Pasta fresh, store it in an airtight container. Make sure the pasta cools to room temperature before sealing it. It can stay good in the fridge for about 3 to 4 days. This way, you can enjoy the creamy goodness later! If you want to freeze it, use a freezer-safe container. It’s best to freeze the pasta without any sauce. This helps keep the texture nice. You can freeze the pasta for up to 2 months. When you're ready to eat, just thaw it overnight in the fridge. To reheat, you can use the microwave or stovetop. If using a microwave, place the pasta in a bowl with a splash of water. Cover it and heat for one to two minutes. Stir halfway through for even warming. If using the stovetop, add a bit of cream or broth to a skillet. Heat on low, stirring until warm. Enjoy your comforting dish again! Yes, you can use any pasta you like! Penne, rigatoni, or even macaroni work well. Just make sure to adjust the cooking time based on the pasta shape. Each type can bring a unique twist to your dish. To make this dish gluten-free, choose gluten-free pasta. Many brands offer great options now. Just follow the cooking instructions on the package. The rest of the ingredients are already gluten-free! This dish pairs well with crispy garlic bread. A fresh garden salad also adds a nice touch. You can serve some steamed veggies for a colorful plate too! Cheeseburger Alfredo Pasta lasts about 3 to 5 days in the fridge. Store it in an airtight container. Just reheat it gently when you're ready to enjoy leftovers. Absolutely! Ground turkey or chicken works great if you want a leaner option. You can also use plant-based meat for a vegetarian twist. Just cook it the same way you would the beef. This blog post covered how to make Cheeseburger Alfredo Pasta. You learned about ingredients like pasta, meat, dairy, and seasonings. I provided step-by-step instructions to create this tasty dish. Tips help you perfect the pasta texture and choose the right cheese. Variations offer healthy and vegetarian options. Lastly, storage info ensures your leftovers stay fresh. In conclusion, enjoy experimenting with this meal. It's simple, versatile, and sure to impress!

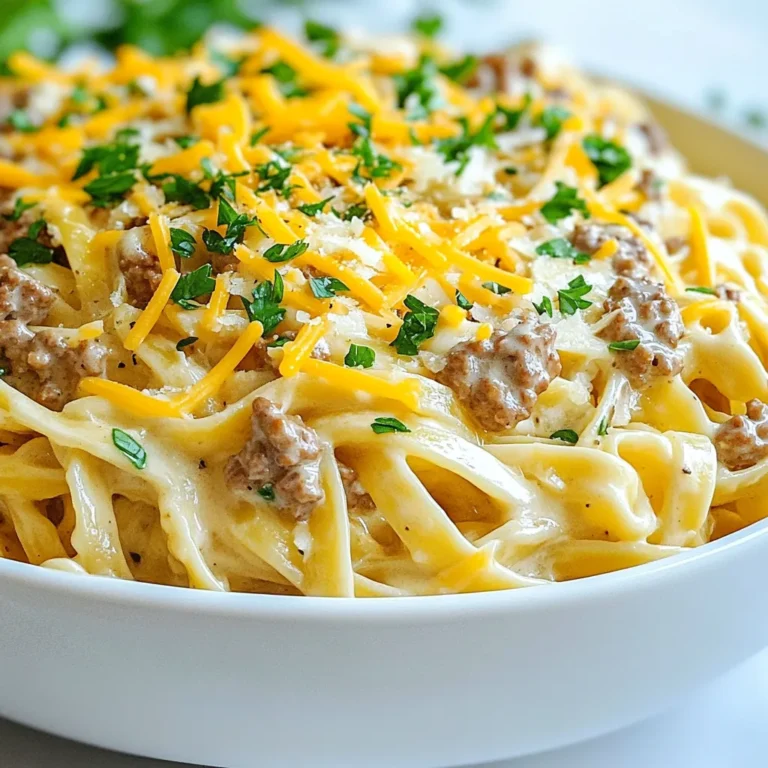
Cheeseburger Alfredo Pasta Creamy and Comforting Dish

- 1 pound ground beef - 4 medium potatoes, thinly sliced - 1 medium onion, diced - 2 cloves garlic, minced - 1 cup shredded cheddar cheese - 1 cup frozen mixed vegetables (peas, corn, carrots) - 1 cup beef broth The main ingredients for this casserole create a hearty dish. Ground beef gives the meal its protein. Potatoes provide a filling base with a creamy texture. Onions and garlic add depth and flavor. Mixed vegetables bring in color and nutrients. Cheese melts perfectly on top, making it delicious. Beef broth ties everything together, keeping it moist. - 1 tablespoon Worcestershire sauce - 2 teaspoons dried oregano - 1 teaspoon paprika - Salt and pepper to taste Seasonings make this dish shine. Worcestershire sauce adds a savory kick. Dried oregano gives an earthy taste. Paprika adds a hint of warmth and color. Salt and pepper bring out all the flavors. Adjust these seasonings to match your taste, but don’t skip them! - 2 tablespoons olive oil Olive oil is key for cooking the beef and veggies. It helps the onions and garlic soften. The oil also prevents sticking in the skillet. Choose high-quality olive oil for better flavor. {{ingredient_image_2}} - Preheat your oven to 375°F (190°C). This heat will cook the dish well. - Wash and slice 4 medium potatoes into thin rounds. Dice 1 medium onion and mince 2 cloves of garlic. - Heat 2 tablespoons of olive oil in a large skillet over medium heat. - Add the diced onion and minced garlic. Sauté this mix for 3-4 minutes. You want the onion to be fragrant and soft. - Now, add 1 pound of ground beef to the skillet. Break the meat into smaller pieces with a spatula. - Cook this for about 5-7 minutes until the beef is brown and no longer pink. Season with salt, pepper, 2 teaspoons of dried oregano, and 1 teaspoon of paprika. - Stir in 1 tablespoon of Worcestershire sauce and 1 cup of frozen mixed vegetables. Cook for 2-3 more minutes until the veggies are warm. Then, take the skillet off the heat. - Grease a 9x13 inch casserole dish. Lay half of the sliced potatoes at the bottom in a single layer. - Spread the cooked beef mixture evenly over the potatoes. - Top this with the rest of the potato slices, creating a second layer. - Carefully pour 1 cup of beef broth over the casserole. Make sure it seeps into the layers for extra flavor. - Cover the dish tightly with aluminum foil. - Place the casserole in the preheated oven. Bake for 30 minutes. This time helps the flavors mix and the potatoes soften. - After 30 minutes, take off the foil. Sprinkle 1 cup of shredded cheddar cheese on top. - Return the casserole to the oven without the foil. Bake for another 15-20 minutes until the cheese is melted and bubbly. The potatoes should be tender when pierced with a fork. - Let the casserole cool for a few minutes before serving. This cooling helps the layers set nicely. To ensure even cooking, layer the potatoes evenly. Start with half the potatoes at the bottom. Spread the beef mixture on top and cover with the rest of the potatoes. This helps the heat circulate well. Timing is key for the best results. Bake the casserole covered for 30 minutes, then uncover for 15 to 20 minutes. This method allows the cheese to melt and the potatoes to tenderize without burning. Using fresh herbs can brighten your casserole. Try adding chopped parsley or thyme before serving. These herbs add a fresh taste and look great on the plate. Experimenting with cheese can also boost flavor. While cheddar is classic, you can mix in mozzarella or gouda. Each cheese brings a unique taste and texture to the dish. Garnishing options can add flair. A sprinkle of fresh parsley or chopped chives makes the dish pop. You can also drizzle a little olive oil on top for shine. Complementary sides can round out the meal. A crisp side salad or steamed veggies work well. The bright colors and flavors will balance the hearty casserole nicely. Pro Tips Layer for Flavor: Ensure even layering of potatoes and beef mixture to allow the flavors to meld beautifully. Cheese Choice: Experiment with different types of cheese such as mozzarella or pepper jack for a unique twist. Vegetable Variations: Add your favorite vegetables like bell peppers or green beans to customize the dish. Rest Before Serving: Let the casserole sit for a few minutes after baking to help the layers firm up for easier serving. {{image_4}} You can switch up the meat in this casserole. Ground turkey or chicken works well. They are leaner options. Using turkey or chicken gives a lighter taste. You can still enjoy great flavor. If you want a vegetarian dish, try lentils or black beans. They add protein and texture. You can also use mushrooms for a hearty bite. Feel free to mix up the veggies in your casserole. Carrots, green beans, or bell peppers add nice color. You can use fresh vegetables if you prefer. For a creamier taste, try adding cream cheese. If you want a dairy-free option, look for dairy-free cheese. It melts well and keeps it creamy. Make the casserole your own with global flavors. For a Mexican twist, add cumin and chili powder. Layer in some salsa for a kick. You could even top it with avocado or cilantro. For an Italian version, use marinara sauce instead of broth. Add Italian herbs like basil and oregano for more flavor. These changes turn a simple dish into something special. To keep your ground beef potato casserole fresh, follow these tips: - Refrigeration: After serving, let the casserole cool down. Store leftovers in an airtight container. It will stay good for 3 to 4 days in the fridge. - Freezing: If you want to save some for later, freeze it! Cut the casserole into portions and wrap each piece tightly in plastic wrap. Then place them in a freezer-safe bag. It can last up to 3 months in the freezer. When it’s time to enjoy leftovers, you have two great options: - Oven: Preheat your oven to 350°F (175°C). Place the casserole in an oven-safe dish, cover it with foil, and heat for about 20-25 minutes. This helps the dish stay moist. - Microwave: For a quick meal, use the microwave. Put a portion on a microwave-safe plate. Heat on medium for 2-3 minutes, checking to make sure it heats evenly. To keep the texture and flavor, avoid overheating. Enjoy each bite just as delicious as the first time! Yes, you can prepare this casserole ahead of time. To do this, cook the beef mixture and layer it with the potatoes. Cover it tightly and store it in the fridge. I suggest making it up to 24 hours in advance. When you're ready to bake, let it sit at room temperature for about 30 minutes. Then, bake as directed. Look for a few signs to check if the casserole is ready. The cheese should be melted and bubbly. You can also poke the potatoes with a fork. They should be soft and tender. If the potatoes feel firm, bake for a little longer. This casserole goes well with many side dishes. A simple green salad can balance the hearty meal. You might also enjoy steamed vegetables or garlic bread. Another great option is a side of coleslaw for some crunch. Yes, you can use different broth options. Chicken broth works well and gives a lighter flavor. Vegetable broth is another great choice for a meat-free option. Just make sure to choose a broth with good flavor to enhance the dish. This blog outlined a simple, delicious ground beef potato casserole. We covered key ingredients, cooking steps, and tips for the best results. I shared variations to customize your dish and how to store leftovers properly. A good casserole brings comfort and joy to the table. Try your favorite ingredients to make it your own. Enjoy cooking, and share your delicious creations with friends and family!

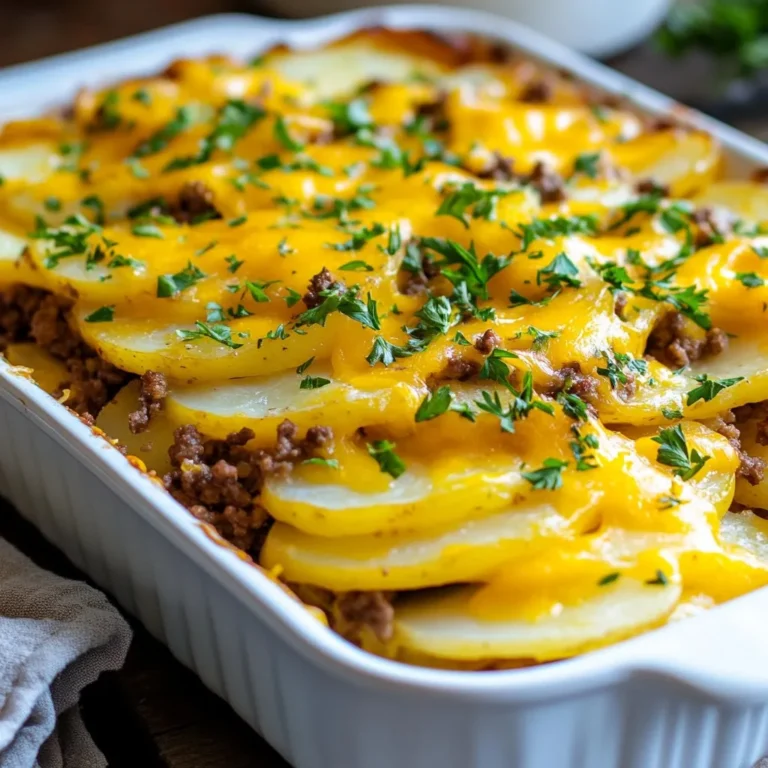
Ground Beef Potato Casserole Flavorful Comfort Dish

- 2 cups cooked and shredded chicken - 1 (8 oz) package of cream cheese, softened - 1 cup shredded sharp cheddar cheese - 1 cup buffalo sauce - 1 cup sour cream - 1/2 cup crumbled blue cheese (optional) - 2 green onions, thinly sliced (for garnish) - Tortilla chips, celery sticks, carrot sticks (for serving) This recipe needs just a few key ingredients to make a tasty dip. Start with cooked chicken. Shredded chicken works best. You can use leftover chicken or rotisserie chicken. Next, grab an 8 oz package of cream cheese. Make sure it is soft. You want it to mix easily. You'll also need a cup of shredded sharp cheddar cheese. This adds flavor and creaminess. Buffalo sauce is a must. One cup adds the perfect kick. If you like it spicy, feel free to add more. Sour cream gives the dip a rich texture. Use one cup for a creamy finish. If you love blue cheese, add half a cup. It adds a nice tangy flavor. For garnish, slice two green onions. They add a fresh touch. Finally, have some tortilla chips, celery sticks, and carrot sticks ready. These are perfect for dipping. {{ingredient_image_2}} To start, you need to mix your base. Take your softened cream cheese, buffalo sauce, and sour cream. Place these in a large bowl. Use an electric mixer or a whisk. Blend until it is smooth. Look for no lumps in the mixture. This step is key for a creamy dip. A smooth base makes the dip much nicer. Next, it’s time to add the main flavors. Stir in the shredded chicken. Then, add both the sharp cheddar cheese and the blue cheese, if you want it. Use a spatula to fold the ingredients together. Be gentle to keep the chicken pieces whole. You want every bit of chicken and cheese to be coated in that creamy sauce. Now, transfer the mixture to your crockpot. Spread it evenly at the bottom. Secure the lid and set the crockpot to low. Cook for 2 to 3 hours. It’s important to stir the dip halfway through. This helps melt the cheese evenly. When it’s done, give it another good stir. Taste it and add more buffalo sauce if you want extra heat. Enjoy your creamy cheesy dip! To make your buffalo chicken dip just right, you can adjust the buffalo sauce. If you love heat, add more sauce. For a milder flavor, use less. You control the spice level! Consider adding other spices too. Garlic powder, onion powder, or smoked paprika can enhance the taste. These spices add depth without overpowering the buffalo flavor. How you present the dip matters! Use a fun bowl to serve it. Arrange colorful veggies and chips around the bowl. This makes it inviting and looks great on the table. For dippers, tortilla chips are classic. Celery sticks and carrot sticks are also great choices. They add crunch and freshness. You can even serve it with pita chips for a twist! You can prepare this dip in advance. Mix all the ingredients and place them in the crockpot. Cover and store it in the fridge overnight. This saves time when you need it! When you're ready to serve, just cook it in the crockpot as directed. If it’s too thick after cooking, stir in a bit of sour cream. For reheating, if you have leftovers, warm them up in the crockpot or microwave. Just add a splash of buffalo sauce to keep it creamy! Pro Tips Use Rotisserie Chicken: For a quick and easy option, use store-bought rotisserie chicken to save time on cooking and shredding. Adjust the Heat: If you like it spicier, feel free to add more buffalo sauce or even some diced jalapeños for an extra kick. Keep it Warm: If serving at a party, keep the dip warm in the crockpot and set it to the 'warm' setting after cooking to maintain the perfect serving temperature. Pairing Options: Experiment with different dippers such as pita chips, pretzels, or even sliced bell peppers for a fun twist on serving. {{image_4}} To make a lighter dip, you can swap regular cream cheese and sour cream for low-fat versions. This change keeps the creamy texture but cuts down on calories. You can also replace the shredded chicken with shredded turkey or even tofu. Tofu is a great option for a plant-based dip. It absorbs flavors well and adds protein. If you want to kick up the flavor, consider adding jalapeños. They add heat and a nice crunch. You can also mix in ranch seasoning for a creamy, tangy twist. Using different types of cheese is fun too. Try pepper jack for a spicy kick, or mozzarella for a milder taste. Each cheese offers a unique flavor that can change your dip experience! To store leftover dip, place it in an airtight container. Make sure the lid is on tight to keep it fresh. The buffalo chicken dip lasts up to four days in the fridge. If you want to enjoy it later, refrigerate it right after serving. To freeze the dip, let it cool completely. Then, transfer it to a freezer-safe container. Label the container with the date for easy tracking. It can last up to three months in the freezer. When you are ready to serve it, thaw it in the fridge overnight. To reheat, place the dip in a pot over low heat. Stir often until it is warm and creamy again. You can also use the microwave, heating it in short bursts. Just remember to stir between each burst to avoid hot spots. Enjoy! No, I do not recommend using raw chicken. It’s best to use cooked and shredded chicken. This ensures the dip cooks evenly and stays safe to eat. Cooked chicken also makes the dish rich and flavorful. You can use rotisserie chicken or bake chicken breasts ahead of time. To make the dip spicier, add more buffalo sauce. You can also mix in some chopped jalapeños or red pepper flakes. If you like a smoky flavor, try adding smoked paprika. Adjust the heat to match your taste. Always taste as you go for the best results. Serve this delicious dip with tortilla chips, celery sticks, and carrot sticks. These options provide a nice crunch and balance the creaminess of the dip. You can also try pita chips or sliced baguette for a twist. Get creative and enjoy your party! This blog post shared a tasty buffalo chicken dip recipe. You learned about the key ingredients and step-by-step instructions. We discussed tips for perfecting the flavor and creative serving ideas. I also covered healthier variations and storage tips for leftovers. In my final thoughts, this dip is a crowd-pleaser. Try it at your next party or game day. You can customize it to fit your taste. Enjoy making and sharing this delicious dish!

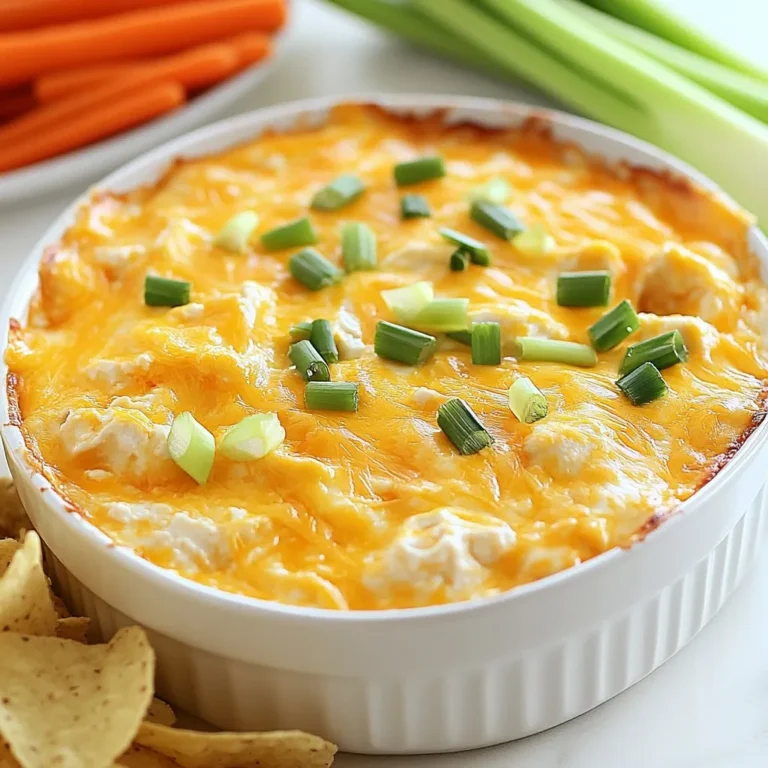
Creamy Cheesy Crockpot Buffalo Chicken Dip Recipe

- 1 ½ cups graham cracker crumbs - ½ cup unsalted butter, melted - 2 cups cream cheese, softened to room temperature - 1 cup granulated sugar - 1 teaspoon pure vanilla extract - 3 large eggs, at room temperature - 1 cup sour cream, at room temperature - 1 cup fresh or frozen cranberries - ½ cup granulated sugar (for cranberry sauce) - 1 teaspoon freshly grated orange zest - 1 tablespoon cornstarch To make this cheesecake, we start with graham cracker crumbs. They create a great base. You mix them with melted butter. This mixture gives the cheesecake a nice crunch. Next, we need cream cheese. It makes the cheesecake rich and creamy. Make sure it is soft. This helps it mix well. You will also need sugar. It adds sweetness. Don’t forget vanilla extract for flavor. The eggs bind everything together. They give the cheesecake its texture. Sour cream makes it even creamier. It also adds a nice tang. Now, let’s talk about cranberries. They bring a tart taste that balances the sweetness. You can use fresh or frozen ones. If you use frozen, no need to thaw first. Finally, we need sugar for the cranberry sauce. It helps the cranberries burst and thicken when cooked. Orange zest adds a bright touch to the sauce. - Fresh cranberries - Mint leaves - Powdered sugar For a beautiful finish, think about garnishes. Fresh cranberries add color and flavor. Mint leaves add a pop of green. A light dusting of powdered sugar gives a sweet touch. These garnishes make your cheesecake look extra special. {{ingredient_image_2}} - Preheat your oven to 325°F (160°C). This step is key for even baking. - In a medium bowl, mix 1 ½ cups graham cracker crumbs with ½ cup melted unsalted butter. - Stir until the crumbs are fully coated. - Firmly press this mix into the bottom of a 9-inch springform pan to create a nice, even layer. - Bake the crust for 10 minutes. Let it cool completely before adding the filling. - In a small saucepan, combine 1 cup of cranberries, ½ cup of granulated sugar, and 1 teaspoon of orange zest. - Cook this mix over medium heat. Stir it occasionally until the cranberries start to burst, about 10-15 minutes. - When thickened, remove the saucepan from heat and let the sauce cool. - In a large bowl, beat 2 cups of softened cream cheese using a hand mixer. Mix until smooth. - Gradually add in 1 cup of granulated sugar and 1 teaspoon of vanilla extract. - Mix until everything is well combined. - Crack in 3 large eggs, adding one at a time. Make sure to mix well after each addition. - Gently fold in 1 cup of sour cream until the mixture is creamy and smooth. - Finally, fold in half of the cooled cranberry sauce into the filling until just combined. Set the rest aside for topping. - Carefully pour the cheesecake batter over the cooled crust. Smooth the surface with a spatula. - Bake for 55-60 minutes. The center should be set but still jiggly when gently shaken. - After baking, turn off the oven and crack the door ajar. Let the cheesecake cool in the oven for about an hour. - Move the cheesecake to the refrigerator and chill for at least 4 hours. For best flavor, let it set overnight. - Avoid overmixing: Mix just enough to combine your ingredients. Overmixing can add too much air and make your cheesecake crack. Aim for a smooth filling but stop mixing as soon as it blends. - Use room temperature ingredients: Make sure your cream cheese, eggs, and sour cream are at room temperature. This helps them mix well and creates a uniform batter. Cold ingredients can form lumps, ruining the texture. - Presentation tips for serving: Serve each slice on a nice dessert plate. Top it with the reserved cranberry sauce for a pop of color. Add a few fresh cranberries and a light dusting of powdered sugar to make it look fancy. - Pairing recommendations with drinks: Pair your cheesecake with a glass of sweet dessert wine or a smooth coffee. The flavors blend well and make your dessert even more enjoyable. Pro Tips Use Room Temperature Ingredients: Make sure your cream cheese, eggs, and sour cream are at room temperature before mixing. This ensures a smoother batter and prevents lumps. Don’t Overmix: When folding in the sour cream and cranberries, mix gently to avoid incorporating too much air, which can cause cracks in your cheesecake. Check for Doneness: The cheesecake is done when the edges are set but the center still has a slight jiggle. It will continue to firm up as it cools. Chill Overnight: For the best flavor and texture, allow the cheesecake to chill in the refrigerator overnight before serving. This helps the flavors meld beautifully. {{image_4}} You can make your cranberry cheesecake even better by adding simple flavors. For example, a pinch of cinnamon or nutmeg can bring warmth. These spices add depth without overpowering the dish. Just a small amount will do! You can also use flavored extracts. Almond extract adds a nice twist. It pairs well with the cream cheese and cranberries. You can experiment with other extracts too. Try coconut or lemon for a fresh take. If you want to change the sweetness, there are great options. Using honey or maple syrup gives a unique flavor. These natural sweeteners can replace granulated sugar easily. Just adjust the amount, as they are sweeter. For a healthier choice, you can try low-sugar or sugar-free options. Products like stevia or erythritol can work well. They keep the cheesecake sweet without added sugar. This way, you can enjoy a treat that fits your diet! To store leftovers, wrap the cheesecake tightly with plastic wrap. This keeps it fresh. Place it in the fridge. It will stay good for about five days. If you want the best taste, eat it within three days. You can freeze cheesecake for longer storage. First, let it cool completely. After it cools, wrap it in plastic wrap and then in aluminum foil. This keeps out air and prevents freezer burn. Store it in the freezer for up to three months. When you’re ready to eat it, thaw the cheesecake in the fridge overnight. This keeps the texture smooth and creamy. Avoid thawing at room temperature to prevent it from getting too soft. Enjoy your cheesecake later! You can use ricotta or mascarpone instead of cream cheese. Both have a creamy texture and mild taste. Ricotta adds a light, fluffy feel. Mascarpone gives a rich, smooth flavor. These options work well in this recipe while keeping it delightful. Check for a slight jiggle in the center. The edges should look set, while the center is still soft. If it shakes gently, it is ready. This jiggle test helps you avoid overbaking. Overbaking can lead to cracks and a dry texture. Yes, making the cheesecake in advance is a smart choice. Prepare it a day before you plan to serve. After baking, cool it in the oven for one hour. Then, chill it in the fridge for at least four hours. For the best taste, let it set overnight. This allows all the flavors to meld perfectly. This blog post covered how to make a delicious cheesecake with cranberries. You learned about key ingredients, like graham cracker crumbs and cream cheese. We went through steps to prepare your crust, make the cranberry sauce, and bake your cheesecake. I shared tips for texture and serving suggestions. You can even try different flavors and sweeteners. Remember to store leftovers properly for freshness. Enjoy creating a tasty dessert that will impress!

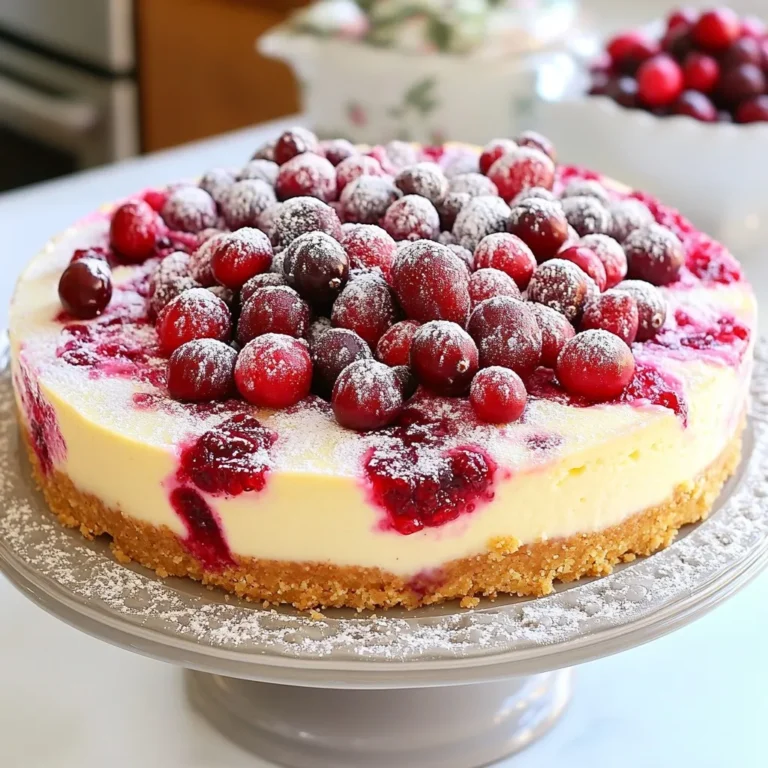
Classic Cranberry Cheesecake Delightful and Simple Recipe

- 8 oz cream cheese, softened to room temperature - 1/2 cup powdered sugar, sifted - 1/4 cup sour cream - 1 tsp vanilla extract The main ingredients are simple but key to your dip. Cream cheese gives the dip its rich base. The powdered sugar adds sweetness, while the sour cream brings tanginess. Vanilla extract adds warm flavor. Together, these create a creamy, delightful mix. - 1 tsp ground cinnamon - 1/2 tsp ground nutmeg - 1/2 cup whipped topping (such as Cool Whip) These flavoring ingredients make a difference. Ground cinnamon gives warmth, perfect for this dish. Nutmeg adds a hint of spice. Folding in whipped topping makes the dip light and fluffy. It’s a sweet treat that feels indulgent! - 4 large flour tortillas - 1/4 cup unsalted butter, melted - Additional cinnamon and sugar for dusting The tortilla dippers are a fun twist. Flour tortillas are soft and perfect for dipping. Brushing with melted butter adds richness. The cinnamon-sugar dusting gives a sweet crunch. These dippers make every bite exciting! {{ingredient_image_2}} 1. Mixing the base ingredients: Start with a medium mixing bowl. Add 8 oz of softened cream cheese, 1/2 cup of sifted powdered sugar, 1/4 cup of sour cream, and 1 tsp of vanilla extract. Then, add 1 tsp of ground cinnamon and 1/2 tsp of ground nutmeg. Use an electric mixer on medium speed. Mix until it becomes smooth and creamy. 2. Folding in the whipped topping: Next, take 1/2 cup of whipped topping, like Cool Whip. Gently fold it into the cream cheese mix using a rubber spatula. This makes the dip light and fluffy. 3. Chilling the dip: Once mixed, cover the bowl with plastic wrap. Chill the dip in the fridge for at least 30 minutes. This helps the flavors blend and taste better. 1. Preheating the oven: While the dip chills, preheat your oven to 350°F (175°C). 2. Preparing and cutting the tortillas: Take 4 large flour tortillas. Brush one side of each with 1/4 cup of melted unsalted butter. In a small bowl, mix some cinnamon and sugar for dusting. Sprinkle this mix over the buttered side of the tortillas. 3. Baking until crispy: Cut each tortilla into wedges or strips, about 8 pieces per tortilla. Place them on a baking sheet lined with parchment paper. Bake in the oven for 10-12 minutes, until golden and crispy. 1. Transferring the dip to a bowl: After chilling, take the cheesecake dip out of the fridge. Transfer it to a colorful bowl for serving. 2. Arranging the churro dippers: Place the churro dippers around the dip. This makes it fun and easy for your guests to grab. 3. Presentation tips: For a nice touch, sprinkle extra cinnamon on top of the dip. You can also add mini chocolate chips or drizzle chocolate syrup over it. Use vibrant plates to create a cheerful vibe. To make your churro cheesecake dip just right, focus on consistency. You want it creamy, not too thick or runny. Start by mixing the softened cream cheese and powdered sugar well. If it feels too stiff, add a bit more sour cream to loosen it. Adjusting sweetness is key. Taste as you go. If you want it sweeter, add more powdered sugar. For a touch of warmth, increase the cinnamon. A little nutmeg also adds depth. Mix-ins can elevate your dip. Try adding mini chocolate chips or crushed toffee bits. These give a fun crunch and extra flavor. Using different extracts can also change the dip's profile. Swap vanilla extract for almond or coconut for a twist. Just a little can make a big difference. For best storage, keep your dip in an airtight container. It stays fresh for about three days in the fridge. Your tortilla dippers can also be stored. Place them in a zip-top bag at room temperature. They stay crispy for a day. If you want to reheat them, pop them in the oven for a few minutes. This keeps them crunchy and warm. Pro Tips Chill for Flavor: Let the cheesecake dip chill for at least 30 minutes to allow the flavors to meld and develop, resulting in a more delicious dip. Perfect Tortilla Dippers: Brush the tortillas liberally with melted butter for an extra crispy texture and ensure an even distribution of the cinnamon-sugar topping. Presentation Matters: Use a colorful bowl for the dip and vibrant plates for serving to create an inviting and festive atmosphere that enhances the overall experience. Experiment with Flavors: Feel free to add other spices to the dip, such as allspice or cardamom, for a unique twist that can elevate the flavor profile of your dessert. {{image_4}} You can easily change the flavor of your churro cheesecake dip. Try making a chocolate churro cheesecake dip. Just mix in some melted chocolate or cocoa powder into the base. The rich chocolate flavor pairs well with the creamy base. Another fun option is pumpkin spice churro dip. Simply add pumpkin puree and pumpkin pie spice to the mix. This gives your dip a warm and cozy flavor, perfect for fall. While churro dippers are great, you can use other fun dippers too. Fruit skewers work well. You can use strawberries, bananas, or even apple slices. The fresh fruit adds a nice contrast to the creamy dip. Graham crackers are another tasty choice. Their crunchy texture pairs perfectly with the smooth dip. You can even break them into smaller pieces for easy dipping. Need to make this dip fit your diet? No problem! For a gluten-free option, swap regular flour tortillas with gluten-free tortillas. They taste just as good and allow everyone to enjoy this treat. If you want a dairy-free dip, use vegan cream cheese and whipped topping. These substitutes keep the dip creamy and delicious without dairy. Enjoy the sweet flavors while meeting your dietary needs! To keep your cheesecake dip fresh, use an airtight container. Glass containers work well, but plastic ones are fine too. The dip lasts about 3-5 days in the fridge. Make sure to cover it tightly to keep it creamy and delicious. To keep tortilla dippers crispy, store them in a paper bag. This lets air in while keeping them crunchy. You can also freeze them. Place them in a freezer bag, and they will last about a month. Just remember to let them cool first before sealing. For best results, reheat tortilla dippers in the oven. Set your oven to 350°F (175°C) and heat for about 5-7 minutes. This will make them crispy again. Avoid the microwave, as it can make them chewy. Enjoy your dip and dippers fresh! You can swap some ingredients for lighter options. Use low-fat cream cheese instead of regular cream cheese. Instead of powdered sugar, try using a sugar substitute. You can also replace sour cream with Greek yogurt for a tangy twist. These swaps help cut calories without losing flavor. Yes, you can make the dip early. Prepare it up to two days ahead. After mixing, store it in an airtight container in the fridge. Just remember to let it chill for at least 30 minutes before you serve. This chilling time helps the flavors blend well. You have many options for dippers. Besides churro dippers, try fresh fruit like apple slices or strawberries. Graham crackers are also a great choice. For a crunchy twist, use pretzels. Each option brings a different taste that pairs well with the dip. To wrap up, we explored how to make a tasty Churro Cheesecake Dip. We covered key ingredients like cream cheese and whipped topping, and we detailed how to create your tortilla dippers. Remember, adjusting sweetness and spice can make this dip unique. Plus, feel free to mix in your favorite flavors or try different dippers. Store any leftovers properly to keep the dip fresh. This treat is not just easy, but also fun to share. Enjoy your delicious creation!

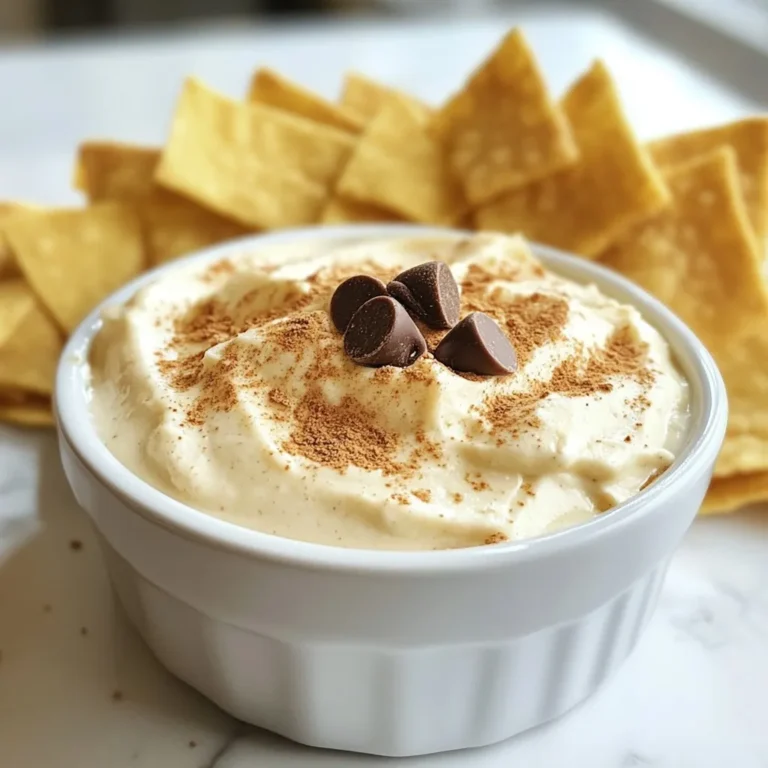
Churro Cheesecake Dip Creamy Delightful Snack

- 1 medium pumpkin (2-3 lbs), peeled, seeded, and cubed - 2 medium sweet potatoes, peeled and diced - 1 large onion, finely chopped - 2 cloves garlic, minced - 4 cups vegetable broth - 1 cup full-fat coconut milk - 1 teaspoon ground ginger - 1 teaspoon ground cumin - 1/2 teaspoon ground cinnamon - Salt and black pepper, to taste - 2 tablespoons extra virgin olive oil The main ingredients of this soup are simple yet rich in flavor. Pumpkin gives it that wonderful earthiness. Sweet potatoes add a touch of sweetness. Onions and garlic bring depth and aroma. The spices enhance the soup, making each bite a delight. - Fresh cilantro leaves - Toasted pumpkin seeds - Coconut cream Garnishes can make a big difference. Fresh cilantro adds a burst of color and flavor. Toasted pumpkin seeds give a nice crunch. Coconut cream can add extra creaminess. You can mix and match these for your perfect bowl of soup. {{ingredient_image_2}} Sautéing the Onions Heat two tablespoons of extra virgin olive oil in a large pot over medium heat. Add one finely chopped onion and sauté for about five minutes. Stir the onions often until they turn soft and clear. This step builds a rich base for your soup. Adding Garlic Next, add two minced garlic cloves to the pot. Sauté for one more minute. You want the garlic to smell fragrant but not brown. This adds a wonderful depth of flavor to our soup. Incorporating Pumpkin and Sweet Potatoes Now, add one medium pumpkin, cut into cubes, and two diced sweet potatoes. Stir well and cook for about five minutes. This helps to slightly soften the vegetables and blend the flavors. Seasoning with Spices Sprinkle in one teaspoon of ground ginger, one teaspoon of ground cumin, and half a teaspoon of ground cinnamon. Add salt and freshly cracked black pepper to taste. Stir everything together to coat the veggies with the spices. This adds warmth and depth to the soup. Simmering the Soup Pour in four cups of vegetable broth and bring the mixture to a gentle boil. Once boiling, reduce the heat to low. Let it simmer uncovered for 20 to 25 minutes. You want the pumpkin and sweet potatoes to be fork-tender. Blending for Smoothness After simmering, use an immersion blender to blend the soup directly in the pot. If you don’t have one, carefully transfer small amounts to a stand blender. Blend until smooth, then return it to the pot. This creates a creamy texture that is so satisfying. Adding Coconut Milk Finally, stir in one cup of full-fat coconut milk. Warm the soup for another five minutes. Taste and adjust the seasoning if needed. The coconut milk gives the soup a rich and creamy feel. Enjoy your delicious creation! Start with the basic spices in the recipe. You can always add more. Taste the soup before serving. If it needs a kick, add more ginger or cumin. A pinch of salt can enhance all the flavors. I like to finish with freshly cracked black pepper for warmth. For a richer texture, use full-fat coconut milk. You can also add more if you like it creamier. Blend the soup until it's completely smooth. This makes it feel luxurious in your mouth. A splash of lemon juice can brighten the flavor too. Chop the pumpkin and sweet potatoes the night before. Store them in the fridge to save time. You can also dice the onion and mince the garlic ahead of time. This way, you're ready to cook without delay. Store-bought vegetable broth can save you time. Just choose a brand with no added sugars or preservatives. It’s a great way to keep the soup quick and easy without losing flavor. Homemade broth is better but not always necessary. Pro Tips Choose the Right Pumpkin: For a sweeter soup, opt for a sugar pumpkin or pie pumpkin, which have a richer flavor compared to larger varieties. Add Depth of Flavor: Roast the pumpkin and sweet potatoes before adding them to the soup for a caramelized flavor that enhances the overall dish. Spice It Up: Feel free to adjust the spices according to your taste. Adding a pinch of cayenne pepper can give the soup a delightful kick! Storage Tips: This soup can be stored in the refrigerator for up to 5 days or frozen for up to 3 months. Just remember to leave out the coconut milk until reheating to maintain its creaminess. {{image_4}} Using Butternut Squash You can swap pumpkin for butternut squash. It gives a sweet and creamy taste. Just peel, seed, and cut it like pumpkin. Use the same amount, about 2-3 pounds. This change keeps your soup rich and vibrant. Incorporating Other Vegetables You can add more veggies for extra flavor. Carrots, parsnips, or even zucchini work well. Chop them into small pieces and add them with the pumpkin and sweet potatoes. This gives your soup a colorful twist and more nutrients. Adding Proteins For a heartier soup, think about adding proteins. Cooked lentils, chickpeas, or shredded chicken blend nicely. Stir them in after blending the soup. This adds texture and makes the meal more filling. Experimenting with Different Spices You can change the flavor profile with spices. Try adding nutmeg for warmth or cayenne for heat. A pinch of smoked paprika can also add depth. Start with a small amount, then adjust to your taste. This makes each bowl unique and exciting. After you finish your soup, let it cool down. Pour it into an airtight container. Store it in the fridge. The soup stays fresh for up to five days. When you want to eat it, just reheat it on the stove. You can freeze this soup for later. Use a freezer-safe container. Leave some space at the top for expansion. The soup will keep well for up to three months. Make sure the soup is cool before freezing. This helps keep the texture nice. You can also freeze it in smaller portions. This way, you can thaw just what you need. To thaw, move the soup to the fridge overnight. For a quick thaw, use the microwave. Reheat on the stove over low heat. Stir often to avoid sticking. Adjust the seasoning after reheating, if needed. To make this soup vegan, use coconut milk. Instead of full-fat coconut milk, choose a light version or plant-based milk. This keeps the soup creamy while keeping it vegan. Coconut milk adds a nice flavor and richness. Yes, you can adjust the spice level. To add heat, try adding red pepper flakes or cayenne pepper. Start with a small amount and add more as needed. This way, you can make it as spicy as you like. You can serve this soup with several tasty sides. Here are some great options: - Crusty bread - Grilled cheese sandwiches - Mixed green salad - Roasted vegetables These dishes pair nicely with the soup and enhance your meal. This blog post shared a simple soup recipe. You learned about key ingredients like pumpkin and sweet potatoes. I covered step-by-step cooking methods, from sautéing to blending. Helpful tips enhanced your flavor and saved time. You can try variations with other vegetables or spices. Lastly, I provided storage advice for leftovers. Make this soup your own and enjoy it with friends. It's an easy way to warm up and share good times. Happy cooking!

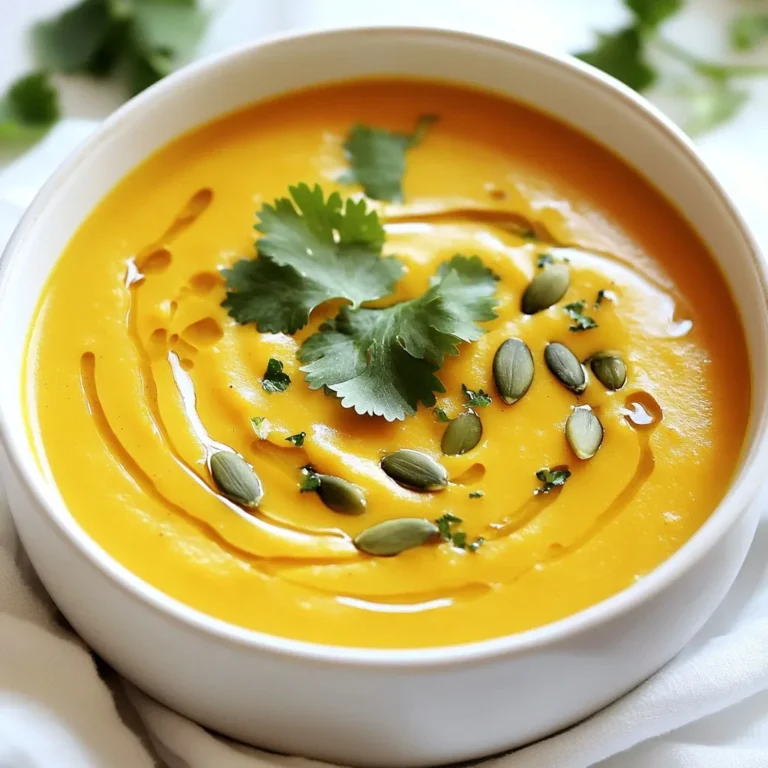
Pumpkin Sweet Potato Soup Rich and Creamy Delight

- 4 skinless, boneless chicken thighs - 1 large onion, finely chopped - 3 cloves of garlic, minced - 1 teaspoon ground cumin - 1 teaspoon ground cinnamon - 1 teaspoon ground ginger - 1 teaspoon ground turmeric - 2 large oranges, zested and juiced - 1/2 cup dried apricots, coarsely chopped The chicken thighs are the star of the dish. They stay moist and tender while cooking. The onion and garlic add a strong base flavor that makes your taste buds dance. The spices are key. Cumin gives warmth, cinnamon adds sweetness, and ginger and turmeric offer depth. Fresh oranges brighten the dish and balance the flavors. Dried apricots add a chewy sweetness that complements the spices. - 2 tablespoons extra-virgin olive oil - 1 cup low-sodium chicken broth - 1/2 cup green olives, pitted and sliced - Salt and pepper, to taste Olive oil is essential for sautéing. It adds richness to the dish. Low-sodium chicken broth keeps the flavors balanced without being too salty. Green olives add a nice briny touch. Salt and pepper enhance all the flavors. Adjust them to your taste for the perfect finish. - Fresh cilantro or parsley, chopped, for garnish - Cooked couscous or rice, for serving Fresh herbs like cilantro or parsley make the dish pop. They add color and freshness. Couscous or rice serves as a great base. They soak up the delicious sauce. Serve the tagine hot, garnished with herbs for a beautiful plate. Enjoy this dish with family or friends for a flavorful meal. {{ingredient_image_2}} Start by heating the olive oil in a large tagine or pot over medium heat. Once the oil shimmers, add the finely chopped onion. Sauté the onion for about five minutes until it becomes soft and clear. Next, stir in the minced garlic. Cook it for one more minute. Be careful not to burn the garlic; you want it fragrant but not browned. Now, season the chicken thighs with salt and black pepper. Place them in the pot and brown each thigh for about four to five minutes on both sides. You want a nice golden color to develop. Sprinkle the ground cumin, cinnamon, ginger, and turmeric over the chicken. Mix well so every piece is coated in those warm spices. Next, pour in the low-sodium chicken broth and the fresh orange juice and zest. This adds brightness to the dish. Bring everything to a gentle simmer. Add the chopped dried apricots and sliced olives to the pot. Stir them gently to combine. These ingredients will add sweetness and saltiness, creating a rich flavor. Cover the tagine or pot with a lid. Lower the heat and let it simmer for 40 to 45 minutes. This slow cooking makes the chicken tender and juicy. After simmering, taste the tagine. Adjust the seasoning with more salt and pepper if needed. For serving, dish out the Moroccan Chicken Orange Tagine over warm couscous or rice. A sprinkle of fresh cilantro or parsley adds a lovely touch. For a beautiful presentation, serve it in individual bowls with citrus slices on the side. Enjoy the vibrant flavors! To make this dish perfect, balance the sweetness and acidity. The fresh oranges add a bright taste, while dried apricots bring sweetness. Adjust the amount of orange juice to match your taste. If you want more zing, add a bit of lemon juice. Choosing the right chicken is key for tenderness. Skinless, boneless chicken thighs work best. They stay juicy and soak up the flavors. Avoid using chicken breasts, as they can dry out during cooking. For tagine-style cooking, a heavy-bottomed pot is best. A Dutch oven also works well. These pots hold heat evenly, ensuring your dish cooks gently. If you have a tagine, use it! It adds a lovely touch to the meal. Gather simple tools for meal prep. A sharp knife helps chop onions and garlic quickly. A cutting board makes the prep easy. For serving, use bowls that show off the colorful dish. Prep ahead of time to save effort. Chop the onions and garlic the night before. You can also zest and juice the oranges in advance. This makes cooking smoother and faster. Use quick cooking techniques for busy days. Instead of simmering for 45 minutes, cut the chicken into smaller pieces. This speeds up the cooking time. Just be sure to check that the chicken is cooked through. Pro Tips Use Fresh Spices: For the best flavor, use freshly ground spices instead of pre-ground ones. This enhances the aroma and taste of your tagine. Let it Marinate: If time permits, marinate the chicken in the spices and orange juice for a few hours or overnight. This will deepen the flavors. Adjust Sweetness: Depending on your preference, you can add more dried apricots or a drizzle of honey for extra sweetness to balance the spices. Garnish Generously: Don’t skip the fresh herbs! They not only add color but also a burst of freshness that complements the rich flavors of the dish. {{image_4}} You can change the protein in this dish. Instead of chicken, try lamb or beef. Both will give a rich taste. Each meat has its own unique flavor that pairs well with the spices. You can also swap out dried apricots for other dried fruits. Consider raisins or figs for a different twist. These swaps keep the dish fresh and exciting. Need a gluten-free option? Use cauliflower rice instead of couscous. It absorbs the sauce well and adds a nice texture. For a vegan dish, replace the chicken with chickpeas or tofu. This keeps the meal hearty and filling. You can also enhance the spices to match the flavors of the original recipe. You can spice it up with Moroccan flair or Mediterranean touches. Add harissa for a kick or fresh herbs like mint for a bright taste. Each region has its own way to make this dish special. Experiment with spices to create your own unique version. The key is to have fun and enjoy the process! To keep your Moroccan Chicken Orange Tagine fresh, let it cool first. Place it in an airtight container. Store it in the fridge for up to three days. If you want to keep it longer, freeze it. Use freezer-safe containers or bags. Squeeze out excess air to avoid freezer burn. When reheating, the oven works best. Preheat your oven to 350°F (175°C). Place the tagine in an oven-safe dish. Cover it with foil to keep moisture in. Heat for about 20-25 minutes. If you use a microwave, transfer a portion to a microwave-safe bowl. Heat it for 2-3 minutes, stirring halfway through. This helps it warm evenly. In the fridge, your tagine lasts about three days. In the freezer, it can last up to three months. Remember to label your containers with the date. This way, you’ll know when to enjoy your delicious meal again. You can enjoy Moroccan Chicken Orange Tagine with a few side dishes. Here are my favorites: - Couscous: Fluffy couscous complements the tagine's flavors well. - Rice: Serve over cooked rice for a filling meal. - Roasted Vegetables: Add some roasted carrots or zucchini for extra flavor. - Bread: Use warm pita or crusty bread to soak up the sauce. These sides enhance the dish and create a well-rounded meal. Yes, you can prepare this tagine ahead of time. Here’s how: - Cook the Tagine: Make the dish as usual and let it cool completely. - Storage: Place it in an airtight container. Store it in the fridge for up to three days. - Freezing: You can freeze the tagine for up to three months. Just thaw it in the fridge before reheating. Making it in advance saves time on busy days, and the flavors get better overnight! You can easily change the spice levels to suit your taste. Here are some tips: - Add Heat: Include a pinch of cayenne pepper or red pepper flakes for a kick. - Reduce Spices: If you want less spice, cut back on cumin or cinnamon. - Taste as You Go: Always taste while cooking. This way, you adjust flavors to your liking. Feel free to play around with spices. Cooking should be enjoyable and personal! This blog post covered how to make a flavorful Moroccan Chicken Orange Tagine. We explored the main ingredients, like chicken thighs, spices, and fresh fruits. You learned step-by-step instructions for cooking and tips to boost flavor. I also shared great variations and storage ideas for leftovers. Remember, you can customize this dish to fit your taste. With simple swaps and smart prep, you can create a tagine that fits your needs. Enjoy cooking and share this delicious meal with friends and family!

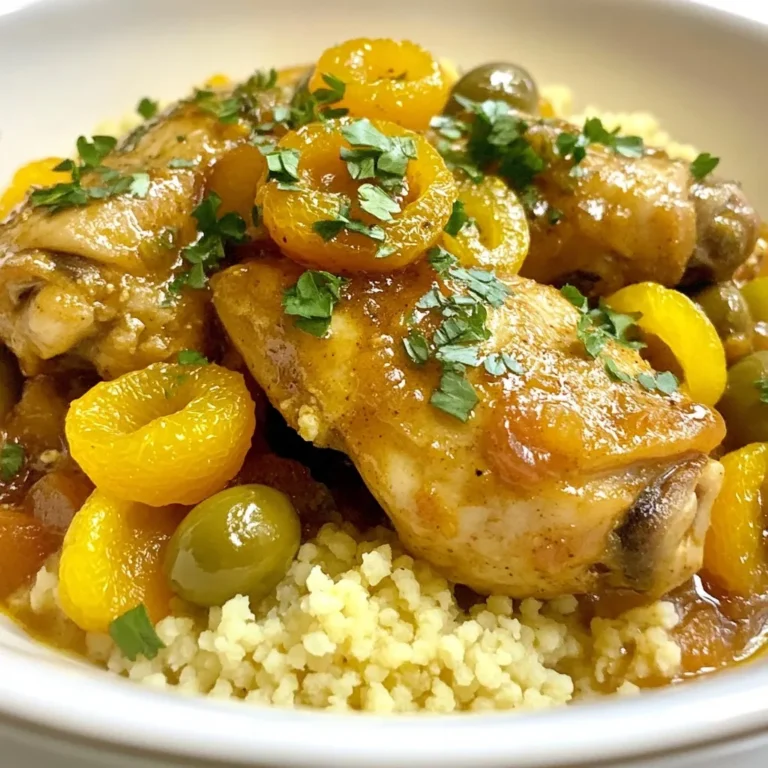
Moroccan Chicken Orange Tagine Flavorful Dinner Dish

- 1 lb Brussels sprouts - 2 tablespoons extra virgin olive oil - 2 tablespoons pure honey - 1 tablespoon Sriracha sauce - 2 cloves garlic - Sea salt and freshly cracked black pepper - 2 tablespoons sesame seeds (optional) - 2 green onions (for garnish) Gathering the right ingredients is key. You need fresh Brussels sprouts. Look for ones that are bright green and firm. The olive oil adds richness. Honey gives a sweet touch, while Sriracha brings heat. Garlic adds depth, and salt and pepper enhance all the flavors. I like to use sesame seeds for crunch. They are optional, but they make a nice addition. Finally, chop green onions for garnish. They add a fresh bite and a pop of color. With these ingredients, you can create a sweet and spicy dish that makes Brussels sprouts shine. {{ingredient_image_2}} 1. Preheat the oven: Start by setting your oven to 400°F (200°C). This temperature helps the Brussels sprouts roast well. 2. Prepare the baking sheet: Grab a baking sheet and line it with parchment paper. This step makes cleanup easy and keeps the sprouts from sticking. 3. Coat the Brussels sprouts: In a large bowl, add 1 lb of trimmed and halved Brussels sprouts. Pour in 2 tablespoons of extra virgin olive oil. Then add 2 tablespoons of pure honey, 1 tablespoon of Sriracha sauce, and 2 cloves of finely minced garlic. Season with sea salt and freshly cracked black pepper. Use a spatula or your hands to mix everything well. Each sprout should be coated in that sweet and spicy mix. 1. Spread on baking sheet: Carefully transfer the coated Brussels sprouts to your prepared baking sheet. Make sure they are in a single layer. This helps them roast evenly. 2. Roasting time and stirring instructions: Place the baking sheet in the oven. Roast the sprouts for about 20 to 25 minutes. Halfway through, stir them gently. This action helps them get that nice golden brown color. 3. Adding sesame seeds: If you want a bit of crunch, sprinkle 2 tablespoons of sesame seeds over the Brussels sprouts in the last 5 minutes of roasting. This will toast them and add great texture. 1. Cooling and transferring to serving dish: Once roasted, take the baking sheet out of the oven. Let the Brussels sprouts cool for a few minutes. Then, transfer them to a serving dish. 2. Garnishing with green onions: Finally, sprinkle 2 finely chopped green onions over the top. This adds a fresh flavor and a pop of color to your dish. How to increase spiciness To make your Honey Sriracha Brussels sprouts hotter, add more Sriracha sauce. You can also sprinkle in some red pepper flakes for an extra kick. Start with a small amount, then taste as you go. Balancing sweetness If the dish is too sweet, add a splash of lime juice. This sour note will help balance the honey's sweetness. You can also add more olive oil to mellow the flavors. Best roasting practices Roasting at 400°F (200°C) works perfectly. This high heat caramelizes the sprouts, giving them a nice crunch. Spread them out in a single layer on the baking sheet. This helps each piece roast evenly. Alternative cooking methods You can also use an air fryer for quick cooking. Set the temperature to 375°F (190°C) and cook for about 15 minutes. Shake the basket halfway through for even browning. Pairing with proteins These Brussels sprouts go well with grilled chicken or salmon. The sweet and spicy sauce complements richer proteins nicely. You can also serve them alongside steak for a robust meal. Presentation tips for serving Serve the Brussels sprouts warm in a colorful bowl. Add lime wedges on the side for a zesty touch. A sprinkle of extra sesame seeds will give a nice finish, making the dish look even more appealing. Pro Tips Adjust the Heat: If you prefer a milder flavor, reduce the amount of Sriracha or substitute it with a sweet chili sauce. Uniform Halves: Make sure to cut the Brussels sprouts into equal halves to ensure they cook evenly and achieve that perfect caramelization. Experiment with Honey: Try using different types of honey, such as clover or wildflower, to add unique flavor notes to your dish. Serve Immediately: For the best taste and texture, serve the Brussels sprouts right after roasting while they are still warm and crispy. {{image_4}} You can change sweeteners in this recipe. Try maple syrup or agave instead of honey. Both will add a different twist. Each sweetener has a unique flavor that pairs well with the Sriracha. You might also swap out the Brussels sprouts for other veggies. Cauliflower and broccoli work great here. They roast nicely and soak up the honey and spice. Experimenting with these swaps can lead to fun new flavors. Adding nuts can enhance the texture and taste of your dish. Almonds and walnuts work well. Just chop them and sprinkle them on before roasting. They add a nice crunch. Cheese is another fantastic addition. Parmesan or feta cheese can bring a creamy richness. You can sprinkle it over the sprouts right before serving. This adds a savory element that balances the sweetness and heat. To store leftovers, place the Brussels sprouts in an airtight container. They will stay fresh in the fridge for about three days. Make sure they cool down to room temperature before sealing the container. This prevents condensation, which can make them soggy. If you want to freeze Brussels sprouts, first blanch them in boiling water for two minutes. Then, cool them in ice water. Drain well, and place them in freezer bags. They can last for about three months in the freezer. When reheating, you can use either the oven or the microwave. The oven helps keep the sprouts crispy. Preheat the oven to 375°F (190°C). Spread the sprouts on a baking sheet and heat for about 10 minutes. The microwave is quicker but may make them soft. If you use the microwave, heat them in short bursts. This keeps some texture while warming them up. To maintain texture and flavor, avoid reheating more than once. Enjoy your Honey Sriracha Brussels sprouts warm for the best taste! - Can I make this dish ahead of time? Yes, you can prepare Honey Sriracha Brussels sprouts ahead of time. You can coat the sprouts with the honey and Sriracha mix. Store them in the fridge for up to a day. Just roast them when you're ready to serve. - Are Brussels sprouts healthy? Absolutely! Brussels sprouts are low in calories and high in vitamins. They have fiber, which is good for digestion. They also contain antioxidants, which help fight disease. - What can I substitute for Sriracha? If you don't have Sriracha, try using another hot sauce. You can also use chili paste or red pepper flakes. Adjust the amount based on how spicy you want it. - Why are my Brussels sprouts soggy? Soggy sprouts often come from excess moisture. Make sure to dry them well after washing. Spread them out on the baking sheet without crowding. This helps them roast better. - How to avoid burning while roasting? To avoid burning, check the sprouts halfway through. Stir them to ensure even cooking. If they are browning too quickly, lower the oven temperature slightly. - What flavor notes can I expect from Honey Sriracha Brussels Sprouts? You will enjoy a mix of sweet and spicy flavors. The honey adds a rich sweetness, while Sriracha brings heat. Garlic adds depth, and sesame seeds give a nice crunch. - How spicy is Sriracha compared to other hot sauces? Sriracha is medium spicy. It has a unique flavor with garlic and sugar. Compared to Tabasco, Sriracha is milder but sweeter. This blog post covered everything you need for Honey Sriracha Brussels sprouts. We explored the ingredients, step-by-step preparation, and roasting tips. I shared how to adjust flavors and suggested fun variations. We also discussed storage and reheating techniques. Try these tips and enjoy your dish even more. Experiment with ingredients and flavors you love. Cooking should be fun, so make it your own! Happy roasting!

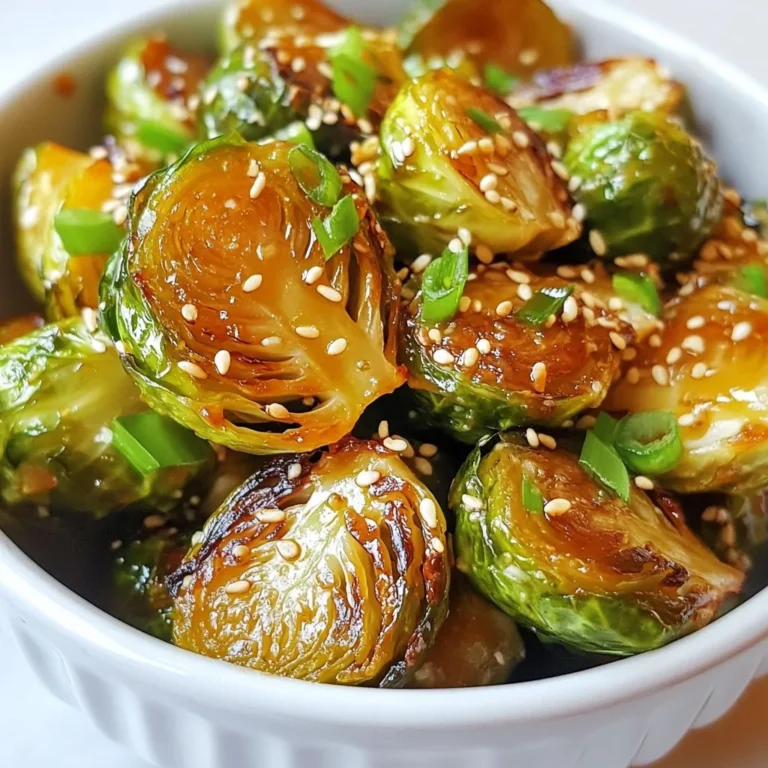
Honey Sriracha Brussels Sprouts Flavorful Roasted Treat

- 1 cup all-purpose flour - 1 cup whole wheat flour - 1 teaspoon baking powder - 1 teaspoon baking soda - ½ teaspoon sea salt - 1 cup granulated sugar For the dry mix, I love using both all-purpose and whole wheat flour. The whole wheat adds a nice, nutty flavor and boosts nutrition. Baking powder and baking soda help the muffins rise. Sea salt balances the sweetness and enhances flavor. Granulated sugar gives the muffins a lovely sweetness and helps them brown. - 2 large eggs, at room temperature - 1 cup plain yogurt - 1/3 cup vegetable oil (or melted coconut oil) - Zest of 1 large lemon - 2 tablespoons freshly squeezed lemon juice For the wet mix, I use room-temperature eggs to help with rising. Yogurt adds moisture and richness. I often choose Greek yogurt for creaminess. Oil adds softness and flavor. Lemon zest and juice provide a bright, fresh taste that pairs perfectly with blueberries. - 1 cup fresh blueberries (or frozen) When it comes to add-ins, I recommend fresh blueberries for the best taste. They burst with flavor as they bake. If fresh berries are hard to find, frozen ones work well too. Just remember to fold them in gently to keep them intact. {{ingredient_image_2}} First, preheat your oven to 350°F (175°C). This helps the muffins bake evenly. While the oven heats, line a standard muffin tin with paper liners. If you don't have liners, grease each cup with cooking spray. This keeps the muffins from sticking. In a large mixing bowl, combine 1 cup of all-purpose flour and 1 cup of whole wheat flour. Add 1 teaspoon of baking powder, 1 teaspoon of baking soda, and ½ teaspoon of sea salt. Whisk these dry ingredients together well. This step is key to having even flavors in your muffins. In a separate bowl, beat 1 cup of granulated sugar with 2 large eggs until the mix is pale and fluffy. Next, add 1 cup of plain yogurt, 1/3 cup of vegetable oil, the zest of 1 large lemon, and 2 tablespoons of freshly squeezed lemon juice. Mix until smooth and creamy. This mixture makes your muffins moist and tasty. Now, pour the wet mixture into the bowl with the dry ingredients. Use a spatula to fold the two together gently. Stop mixing when you see a few lumps; overmixing can make the muffins tough. Then, add 1 cup of fresh blueberries. Fold them in softly to keep them whole. Spoon the batter into the prepared muffin cups. Fill each cup about two-thirds full for the best rise. Place the muffin tin in the oven and bake for 18-20 minutes. To check doneness, insert a toothpick into the center of a muffin. If it comes out clean, they are ready! After baking, remove the muffins from the oven. Let them cool in the tin for about 5 minutes. Then, transfer them to a wire rack. This helps them cool completely. For a nice presentation, arrange the muffins on a platter. A dusting of powdered sugar on top makes them look even more delightful! - Yogurt alternatives: You can use dairy-free yogurt for a vegan option. A thick coconut yogurt works well. If you prefer a lighter taste, try using buttermilk or sour cream. - Oil options for flavor: Instead of vegetable oil, melted coconut oil adds a nice flavor. You can also use olive oil for a richer taste. - Mixing techniques to avoid overmixing: Always mix gently. Overmixing makes muffins tough. Stop mixing when you see small lumps. This keeps your muffins light and fluffy. - Importance of room temperature ingredients: Use eggs and yogurt at room temperature. This helps your batter mix better. It also gives your muffins a soft texture. - Additional spices or zests: Try adding a pinch of cinnamon or nutmeg for a warm flavor. You can also add more lemon zest for extra zing. - Serving suggestions for a delightful experience: Serve your muffins warm with a pat of butter. A drizzle of honey or maple syrup makes them even better. You can also add fresh fruit on the side for a colorful plate. Pro Tips Fresh Blueberries: Always opt for fresh blueberries when possible, as they provide the best flavor and texture. If using frozen, do not thaw them to prevent excess moisture in the batter. Room Temperature Eggs: Using eggs at room temperature helps them blend better into the batter, resulting in a lighter muffin. Take the eggs out of the fridge about 30 minutes before you start baking. Avoid Overmixing: Mix the batter just until combined. Overmixing can lead to dense muffins. A few lumps are perfectly fine! Cooling Time: Let the muffins cool in the tin for a few minutes before transferring to a wire rack. This helps them set and makes them easier to remove without breaking. {{image_4}} You can enhance the taste of your muffins by adding nuts. Walnuts or almonds add a nice crunch. Just chop them up and fold them into the batter. Another fun idea is to swap out blueberries for different berries. Raspberries or strawberries can give a new twist. Each berry brings its own flavor and color to your muffins. If you want a healthier treat, consider reducing the sugar. You can also use sugar alternatives like honey or maple syrup. This helps lower calories without losing taste. Using whole wheat flour is another great option. Whole wheat adds fiber and makes the muffins more filling. You can mix it with all-purpose flour for balance. Making mini muffins is a fun twist. You just need to adjust the bake time. Bake them for about 12-15 minutes instead of 18-20 minutes. Handling the batter is also different for mini muffins. You may need to be a bit gentler to keep them light and fluffy. Enjoy experimenting with these variations! To keep your blueberry lemon yogurt muffins fresh, store them in an airtight container. This helps prevent them from drying out. You can keep them at room temperature for up to three days. Make sure they cool completely before sealing. This ensures they stay soft. If you want to save muffins for later, freezing is a great option. Wrap each muffin in plastic wrap, then place them in a freezer bag. This helps keep them fresh for up to three months. When ready to eat, take a muffin out and thaw it in the fridge overnight. You can also reheat it in the microwave for about 20 seconds. This brings back the warm, fresh taste. Always check your muffins for signs of spoilage. Fresh muffins are soft and moist. If they feel hard or dry, they may be past their prime. Also, watch for mold or strange smells. To keep them fresh longer, store them properly and check them often. Enjoy your muffins at their best! Yes, you can use frozen blueberries. They are safe and easy to find. Frozen berries may burst and color the batter more than fresh berries. This makes them just as tasty, but the look may change. Make sure to mix them in gently. This keeps them intact and avoids a blue batter. If you need a yogurt substitute, try these options: - Sour cream - Buttermilk - Silken tofu (for a vegan option) - Non-dairy yogurt (like almond or coconut yogurt) These choices can match the creaminess of yogurt. They also provide good texture and taste. To make muffins more moist, consider these tips: - Use Greek yogurt for extra creaminess. - Add a bit more oil. - Include more fruit, like mashed bananas or applesauce. - Avoid overmixing the batter. This keeps the muffins light and fluffy. Yes, you can make these muffins gluten-free. Here are some flour options: - Almond flour - Coconut flour - Gluten-free all-purpose flour These flours will change texture slightly. Make sure to add xanthan gum if the mix doesn’t already contain it. This helps bind the ingredients together. These muffins combine simple dry and wet ingredients for great flavor. You can mix them in no time and customize them with your favorite add-ins. We covered tips to keep your muffins fluffy and delicious, and I shared storage solutions for freshness. Now, let your creativity shine with different flavors! Whether you stick to classic blueberries or try nuts and spices, these muffins will please everyone. Enjoy the baking process and share your tasty treats with others.

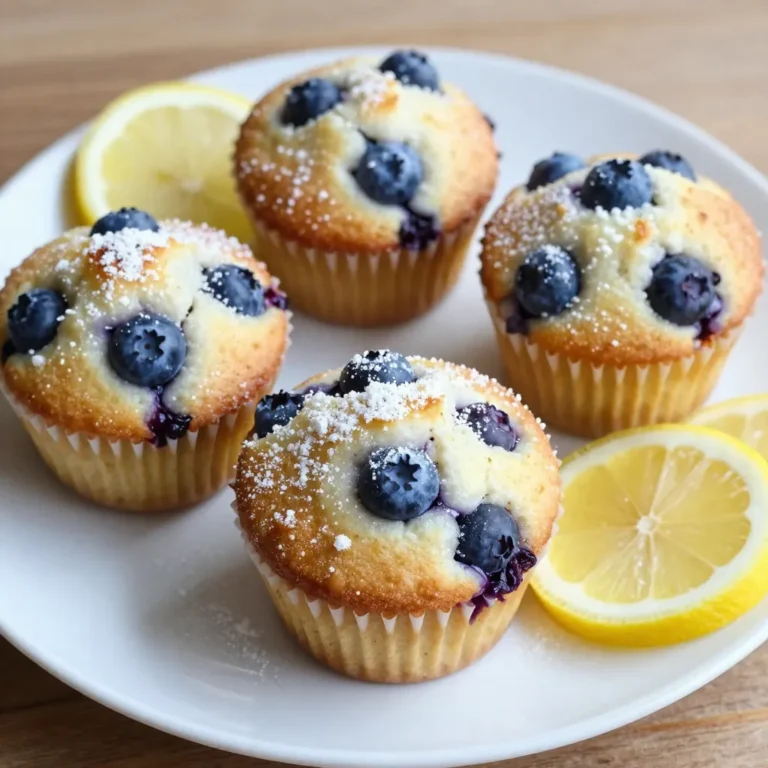
Blueberry Lemon Yogurt Muffins Tasty Morning Treat

- 2 boneless, skinless chicken breasts - 1 cup long-grain rice - 3 cups chicken broth - 4 cloves garlic, minced - 1 cup grated Parmesan cheese - 1 tablespoon olive oil - 1 teaspoon dried oregano - 1 teaspoon paprika - Salt and pepper to taste - 2 cups fresh spinach (or any leafy green) - Fresh parsley, finely chopped (for garnish) This dish serves four people. Each serving has about: - Calories: 450 - Protein: 35g - Carbohydrates: 45g - Fat: 15g - Fiber: 2g You can switch some ingredients if you need to. Here are a few ideas: - Chicken: Use turkey breast or firm tofu for a plant-based option. - Rice: Swap long-grain rice for brown rice or quinoa for more fiber. - Spinach: Use kale or Swiss chard if you have those greens on hand. - Parmesan Cheese: Try Pecorino Romano or nutritional yeast for a vegan option. - Broth: Vegetable broth can replace chicken broth for a lighter flavor. These swaps keep the dish tasty while meeting different dietary needs. {{ingredient_image_2}} Start by patting the chicken breasts dry with a paper towel. This helps the seasonings stick. Next, sprinkle salt, pepper, paprika, and oregano on both sides of the chicken. This mix gives your chicken great flavor. Heat the olive oil in a large skillet over medium-high heat. Once hot, add the seasoned chicken breasts. Sear each side for about 5-6 minutes. You want a nice golden brown crust. After they cook, take the chicken out and place it on a plate. Lower the heat to medium and add minced garlic to the same skillet. Stir for about 1 minute until the garlic smells good, but don’t let it burn. Now, stir in the rice, coating it with the garlic oil. Pour in the chicken broth and bring it to a boil. Place the seared chicken back into the skillet with the rice. Cover and let it simmer on low for 18-20 minutes. This lets the rice soak up all the flavors. After the rice is tender, mix in the fresh spinach and Parmesan cheese. Cover again for 2 minutes so the spinach wilts and the cheese melts. Finally, fluff the rice with a fork, mixing everything together. Adjust the seasoning if needed, then serve it up with a sprinkle of fresh parsley on top. To cook perfect rice, start with rinsing the rice in cold water. This removes excess starch. Use a 1:3 rice-to-broth ratio for great flavor. Bring the broth to a boil before adding the rice. Once you add the rice, cover the pot. Lower the heat and let it simmer for 18-20 minutes. Avoid lifting the lid during this time. This keeps the steam inside, helping the rice cook evenly. You can add more flavor with spices. Try a pinch of red pepper flakes for heat or some thyme for a herbaceous note. A splash of lemon juice brightens the dish. Experiment with spices you love. Just remember, start small. You can always add more, but you can't take it out. For the best sear, use a hot skillet. Heat the olive oil until it shimmers. Dry the chicken well with paper towels before seasoning. This helps achieve that golden crust. Cook the chicken without moving it for 5-6 minutes. This allows the crust to form. Flip it gently to avoid breaking the crust. Always check for doneness. The internal temperature should reach 165°F. Pro Tips Perfectly Cooked Chicken: Use a meat thermometer to ensure your chicken reaches an internal temperature of 165°F (75°C) for safe consumption. Flavorful Rice: Toast the rice in the skillet with the garlic for a couple of minutes before adding the broth to enhance its nutty flavor. Fresh Spinach Substitute: If fresh spinach is unavailable, you can use frozen spinach; just make sure to thaw and drain it well before adding. Garnish for Presentation: Always use freshly chopped parsley as a garnish right before serving to add a pop of color and freshness to the dish. {{image_4}} You can switch up the cheese for fun flavors. Try mozzarella for a stretchy bite. Feta adds a tangy twist, while cheddar gives a sharp taste. Each cheese brings its own character to the dish. Experiment and find your favorite! If you want a healthier option, use quinoa instead of rice. Quinoa cooks well and adds protein. You can also try farro or barley for a nutty flavor. These grains are great for adding texture and nutrition. Boost the meal by adding more veggies. Peas, bell peppers, or carrots work well. You can sauté them with the garlic for added flavor. Leafy greens like kale or Swiss chard also fit nicely. This way, you make the dish colorful and packed with nutrients. To keep your Garlic Parmesan Chicken and Rice fresh, place it in an airtight container. Make sure to cool it down to room temperature first. This helps prevent moisture build-up. Store it in the fridge for up to three days. When you're ready to enjoy your leftovers, transfer the dish to a microwave-safe plate. Cover it with a damp paper towel. Heat it in the microwave for about 2-3 minutes. Stir halfway to ensure even heating. You can also reheat it on the stove. Just add a splash of chicken broth to keep it moist. If you want to freeze the dish, portion it into individual servings. Use freezer-safe containers or bags. Label them with the date. Garlic Parmesan Chicken and Rice can last up to three months in the freezer. When you're ready to eat, thaw it in the fridge overnight before reheating. Yes, you can use frozen chicken for this dish. Just remember to thaw it first. To do this, place the chicken in the fridge overnight. If you are in a hurry, you can use the microwave to defrost it. Once thawed, follow the same steps for seasoning and cooking. This keeps the chicken juicy and tender, just like fresh. This dish pairs well with many sides. Here are some great options: - Steamed broccoli - Roasted carrots - Mixed green salad - Garlic bread - Sautéed zucchini These sides add color and nutrition to your meal. They also balance the rich flavors of the chicken and rice. Absolutely! Garlic Parmesan Chicken and Rice is great for meal prep. You can make a big batch and store it for later. Just follow these tips: - Divide the dish into portions. - Use airtight containers for storage. - Keep it in the fridge for up to four days. - For longer storage, freeze the portions. When you're ready to eat, simply reheat it in the microwave or on the stove. This makes dinner easy and tasty! This blog post covered ingredients, cooking steps, and tips for Garlic Parmesan Chicken and Rice. We explored ingredient options, perfect rice cooking, and meal variations. Remember, you can swap grains or add veggies for nutrition. Proper storage is key for leftovers. Use this dish for easy weeknight meals or meal prep. This recipe makes cooking simple and tasty. Enjoy your time in the kitchen and happy cooking!

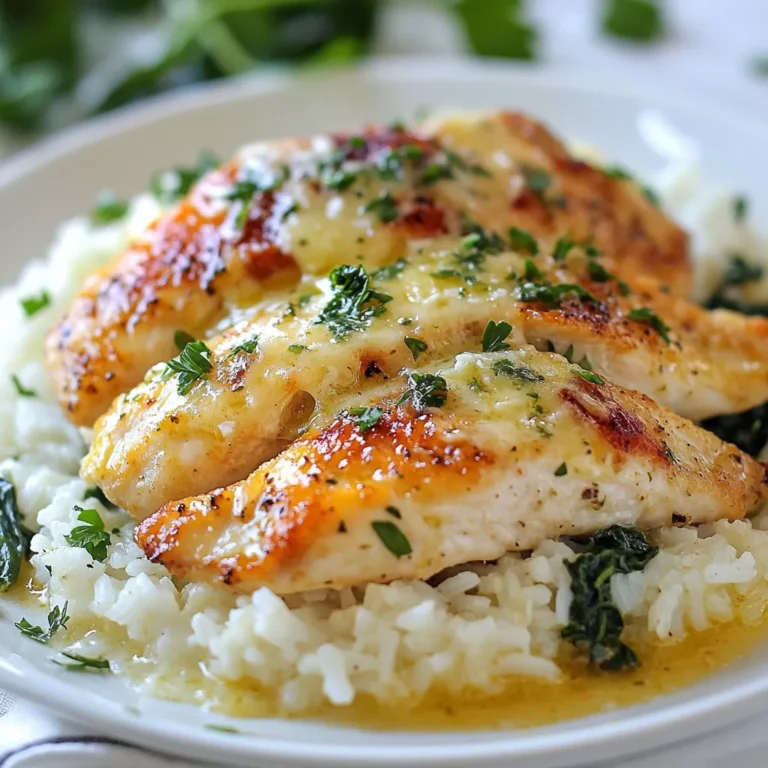
Garlic Parmesan Chicken and Rice Quick and Tasty Meal

PREV 1 … 32 33 34 … 44 NEXT
yummybiterecipes

explore

DessertsDinnerAppetizersDrinks

Our Policies

  • Cookie Policy
  • Copyright Policy
  • Disclaimer
  • GDPR Policy
  • Terms Of Use
Back to Top
  • About
  • Contact Us
  • Privacy Policy
© 2025 yummybiterecipes