FREE DINNER EBOOK! Get your copy!
  • Cookie Policy
  • GDPR Policy
  • Disclaimer
  • Terms Of Use
  • Visit my other site: Fun Cookie Recipes
yummybiterecipes
  • Home
  • Dinner
  • Desserts
  • Drinks
  • Appetizers
  • Contact
  • About
  • Privacy Policy
  • Home
  • Dinner
  • Desserts
  • Drinks
  • Appetizers
  • Contact
  • About
  • Privacy Policy
  • Cookie Policy
  • GDPR Policy
  • Disclaimer
  • Terms Of Use
Visit my other site: Fun Cookie Recipes

HOME / CATEGORIES /

Latest

- 4 large russet potatoes, peeled and diced - 1 medium onion, finely chopped - 3 cloves garlic, minced - 4 cups vegetable broth (low sodium recommended) - 1 cup heavy cream or coconut milk - 1 cup sharp cheddar cheese, shredded - 1 cup fresh kale, finely chopped (optional) - 1 teaspoon dried thyme - 1 teaspoon smoked paprika - Salt and freshly ground black pepper - Fresh chives for garnish I love using fresh ingredients for this soup. The russet potatoes are creamy and hearty. They add a nice texture. The onion and garlic create a strong base. When they cook, they fill your kitchen with a warm aroma. I often choose low-sodium vegetable broth. This helps control the saltiness of the soup. The cream or coconut milk makes it rich and velvety. If you want a dairy-free option, go with coconut milk. It adds a subtle sweetness that pairs well with the savory flavors. Sharp cheddar cheese brings a bold flavor. It melts beautifully into the soup. The fresh kale is optional, but I like to add it. It gives the soup a pop of color and extra nutrients. Thyme and smoked paprika bring warmth and depth. They enhance the overall flavor. Don’t forget to season with salt and pepper to taste. Finally, fresh chives make a lovely garnish. They add a nice touch of freshness. Gather all these ingredients before you start. It makes the cooking process smoother and more enjoyable. Happy cooking! {{ingredient_image_2}} Start by peeling the russet potatoes. Dice them into small, even cubes. This helps them cook evenly. Next, finely chop the onion. Mince the garlic cloves to get a strong flavor. These steps set the base for your soup. In your crockpot, layer the diced potatoes, chopped onion, and minced garlic. Pour in the vegetable broth. Stir the mix gently. This step ensures all the ingredients blend well together. Sprinkle in the dried thyme and smoked paprika. Add salt and pepper to taste. These herbs give the soup a warm and inviting flavor. They enhance the taste of the potatoes wonderfully. Cover the crockpot and set it to cook. Choose low for 6-8 hours or high for 3-4 hours. The potatoes are done when they are soft enough to pierce with a fork. This makes the soup rich and hearty. Once the cooking time is up, grab a potato masher. Gently mash some potatoes in the soup. This creates a creamy texture while leaving some chunks whole. It makes every spoonful exciting and tasty. Now, stir in the heavy cream or coconut milk. Add the shredded cheddar cheese next. If you want, mix in finely chopped kale at this point. It adds color and nutrition to the soup. Let the soup cook on low for another 15-30 minutes. Stir occasionally. This step ensures everything heats through. The cheese will melt nicely into the soup, creating a creamy delight. Before serving, taste the soup. Adjust the seasoning with more salt and pepper if needed. This step makes sure the flavors are just right. Enjoy your delicious and creamy potato soup! If you need a dairy-free soup, use coconut milk instead of heavy cream. This adds a creamy touch without dairy. For cheese, try a dairy-free alternative. You can also swap out sharp cheddar for a milder cheese if needed. Want more flavor? Add extra spices like garlic powder or onion powder. They boost taste without extra effort. Fresh herbs can make a big difference. Chives add a nice crunch and mild onion taste. Try adding parsley or dill for a fresh kick. If you like heat, sprinkle in some crushed red pepper flakes. Smoked paprika gives a lovely smoky flavor. Don’t be afraid to mix and match herbs and spices to suit your taste! A good crockpot is key for this soup. Look for one with a timer. This helps you cook the soup perfectly. A potato masher is great for mashing the potatoes. If you like a smoother texture, use an immersion blender. A sharp knife and cutting board make chopping easy. These tools will help you whip up this creamy delight with ease! Pro Tips Use Fresh Ingredients: Always opt for fresh vegetables and herbs as they enhance the flavor and nutritional value of your dish. Adjust Consistency: If you prefer a thinner soup, simply add more vegetable broth before serving to achieve your desired consistency. Experiment with Spices: Feel free to add your favorite spices or herbs, such as rosemary or chili flakes, for a personal touch. Make it Ahead: This soup tastes even better the next day! Make a big batch and store leftovers in the fridge for a quick meal. {{image_4}} To make a vegan version of this soup, you can easily swap out a few key ingredients. For the cream, use coconut milk instead of heavy cream. This gives you that creamy texture without dairy. For cheese, choose a dairy-free alternative that melts well. You won’t lose flavor this way! - Dairy-Free Cream: Use coconut milk or almond milk. - Cheese Alternative: Use a vegan cheese that melts. - Broth: Ensure your vegetable broth is free from animal products. If you crave extra flavors, try making a loaded potato soup. You can add crispy bacon, which gives a nice crunch. A dollop of sour cream adds creaminess, while green onions bring freshness to each bite. This version is hearty and filling. - Bacon: Cook and crumble over the soup. - Sour Cream: Add a scoop for richness. - Green Onions: Sprinkle on top for a fresh kick. For those who love heat, consider adding a spicy twist to your potato soup. You can mix in jalapeños for a kick. Hot sauce is another great option. Just a few drops can transform your soup into something exciting. - Jalapeños: Chop and stir in for heat. - Hot Sauce: Add to taste for a spicy kick. - Pepper: Use fresh ground black pepper for more spice. These variations let you customize your crockpot potato soup to fit your taste. Enjoy experimenting with new flavors! To store leftover soup, let it cool first. Then, pour it into an airtight container. You can keep it in the fridge for up to three days. Make sure to label the container with the date. This helps you track its freshness. When you're ready to enjoy it again, open the lid carefully to avoid spills. If you want to save the soup for later, freezing is a great option. Pour the cooled soup into freezer-safe bags or containers. Leave some space at the top for expansion. You can freeze it for up to three months. When you want to eat it, move it to the fridge to thaw overnight. This keeps the flavors intact. To reheat, you have a few choices. You can use the stove or microwave. For the stove, pour the soup into a pot and heat on low. Stir it often to avoid burning. If using a microwave, heat it in short bursts. Stir in between to ensure even heating. Always check the temperature before serving. Enjoy your warm bowl of comfort! To thicken potato soup, try these tips: - Mash some of the potatoes in the soup. - Add a slurry of cornstarch and water. - Stir in more cream or cheese. - Use less broth when cooking. These methods boost the soup's texture. Mashing potatoes gives a creamy feel while keeping some chunks for bite. Yes, you can use different potatoes! Here are some great options: - Yukon Gold potatoes add a buttery flavor. - Red potatoes hold their shape well. - Fingerling potatoes bring a unique look. Each type offers a new taste. Just remember to peel and dice them for even cooking. Leftover potato soup will last for about 3 to 5 days in the fridge. Store it in an airtight container. Always check for off smells or changes in texture before eating. Absolutely! Making soup ahead is easy. You can cook it a day or two before serving. Just let it cool, then store it in the fridge. Reheat it on the stove or in the microwave before serving. This will save you time on busy days! This blog post shows you how to make a tasty potato soup. We covered ingredients, step-by-step instructions, and tips for great flavor. You learned how to adapt the recipe with substitutions and variations. You also found answers to common questions about storage and texture. Now, gather your tools and give this soup a try. Enjoy the warmth and flavor of homemade potato soup!

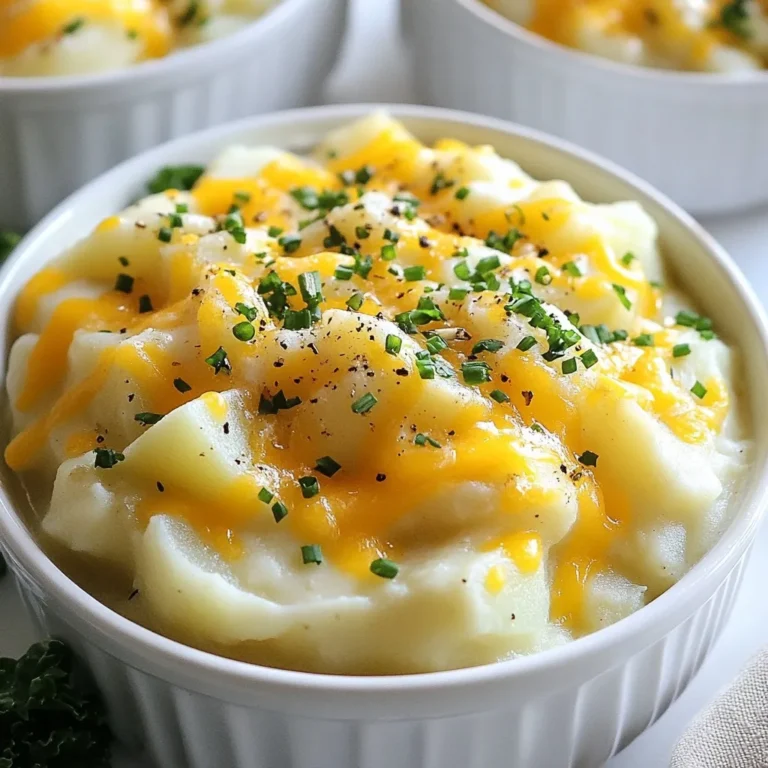
Crockpot Potato Soup Creamy and Flavorful Delight

To make a no-bake strawberry cheesecake, you need a few simple ingredients. Here’s the list: - 1 ½ cups digestive biscuit crumbs - 6 tablespoons unsalted butter, melted - 16 oz cream cheese, softened at room temperature - 1 cup powdered sugar, sifted - 2 teaspoons pure vanilla extract - 1 cup heavy cream, chilled - 2 cups fresh strawberries, hulled and sliced - ¼ cup strawberry jam - Fresh mint leaves for garnish (optional) These ingredients create a rich and creamy cheesecake. The digestive biscuit crumbs give the crust a nice crunch. Unsalted butter helps hold it all together. Cream cheese adds a smooth texture. Powdered sugar sweetens the filling perfectly. Vanilla extract enhances the flavor. Chilled heavy cream makes the filling light and fluffy. Fresh strawberries add a burst of fruity goodness. Strawberry jam gives a sweet glaze on top. Finally, mint leaves add a touch of color and freshness. With these ingredients, you can whip up a delightful dessert that everyone will love. Each bite is a perfect mix of sweet and creamy. Enjoy this treat during a warm day or at a special gathering! {{ingredient_image_2}} To start, grab a medium mixing bowl. Add 1 ½ cups of digestive biscuit crumbs and 6 tablespoons of melted unsalted butter. Mix them well until the mixture feels like wet sand. It should hold together when you squeeze it in your hand. Next, take a 9-inch springform pan. Press the crumb mixture firmly into the bottom of the pan. Use the back of a measuring cup or your fingers to pack it down tightly. This step makes sure your crust is stable. While you work on the filling, place the crust in the fridge to firm up. Now, you’ll need a large mixing bowl. Add 16 oz of softened cream cheese to it. Using an electric mixer, beat the cream cheese on medium speed until it's creamy and smooth. Slowly add 1 cup of sifted powdered sugar and 2 teaspoons of pure vanilla extract. Keep mixing until everything is well combined and you don't see any lumps. In a clean bowl, whip 1 cup of chilled heavy cream with a mixer or whisk. You want to whip it until soft peaks form, which takes about 2-3 minutes. Be careful not to over-whip it. Next, take the whipped cream and gently fold it into the cream cheese mixture using a rubber spatula. Mix until it's well blended but still light and airy. Now, fold in 2 cups of hulled and sliced fresh strawberries, but save a few for later. After combining, pour the cheesecake mixture into your prepared crust. Smooth the top with a spatula to make it nice and even. Cover the springform pan tightly with plastic wrap. Place it in the fridge to chill for at least 4 hours. If you can wait overnight, that’s even better for the best setting. Once the cheesecake has set, it’s time for the final touches. Gently heat ¼ cup of strawberry jam in a small saucepan over low heat until it’s pourable. Drizzle the warmed jam over the cheesecake. Arrange the reserved strawberry slices on top for a beautiful finish. Now, carefully unlock and remove the sides of the springform pan. Slice the cheesecake into wedges and serve it chilled. If you want, add fresh mint leaves as a lovely garnish. Enjoy your delicious treat! To get a creamy texture in your cheesecake, start with room temperature cream cheese. Cold cream cheese can give lumps. Use a mixer on medium speed to blend the cream cheese until smooth. Gradually add the powdered sugar and vanilla extract. This step helps combine everything well for a silky filling. Don't rush this part; it makes all the difference in your cheesecake's texture. Whipping cream is easy if you follow a few steps. Always use chilled heavy cream for the best results. Use a clean bowl and whisk or mixer. Start at a low speed and gradually increase it. Watch closely; stop when you see soft peaks. Soft peaks mean it's ready. Avoid over-whipping, as this can turn the cream into butter. When layering strawberries, slice them evenly for a neat look. Reserve some for the top to make your cheesecake pretty. Gently fold sliced strawberries into the filling; this keeps them whole and maintains their shape. When you pour the filling into the crust, smooth the top with a spatula. This helps the layers stay distinct and gives a lovely presentation when you slice it. Pro Tips Use Room Temperature Cream Cheese: Ensure your cream cheese is softened at room temperature for a smoother texture and easier mixing. This helps achieve a lump-free filling. Chill the Ingredients: Chill your mixing bowls and beaters before whipping the cream. This will help the cream whip up faster and maintain its volume. Don’t Overmix: When combining the whipped cream with the cream cheese mixture, be gentle. Overmixing can deflate the whipped cream, resulting in a denser cheesecake. Let It Set Overnight: For the best texture and flavor, allow the cheesecake to chill overnight. This gives the flavors time to meld and ensures a firmer set. {{image_4}} You can add chocolate for a twist. To make a chocolate version, mix cocoa powder into the cream cheese filling. Use about 1/2 cup of unsweetened cocoa powder. This step adds rich, chocolatey notes to your cheesecake. You can also use chocolate cookie crumbs for the crust. Simply replace the digestive biscuits with chocolate cookies. This combination creates a decadent dessert. Want a gluten-free cheesecake? You can easily swap the digestive biscuits. Use gluten-free cookies or almond flour. If using almond flour, mix it with melted butter to form a crust. This keeps the cheesecake tasty and safe for those avoiding gluten. Just make sure all other ingredients are also gluten-free. You can change up the fruit topping to fit your taste. Try blueberries, raspberries, or peaches for a fun twist. Simply replace the strawberries with your fruit of choice. You can also mix fruits for a colorful look. For a tropical feel, add mango slices. This flexibility makes the cheesecake shine with seasonal fruits. To keep your no-bake strawberry cheesecake fresh, cover it tightly. Use plastic wrap or foil. Store it in the fridge for up to three days. Make sure to keep it in the springform pan or a sealed container. This way, it stays moist and tasty. If you want to save some for later, freezing works well. Slice the cheesecake into wedges. Wrap each slice in plastic wrap and then in foil. This keeps them safe from freezer burn. You can freeze the cheesecake for up to two months. When you're ready to eat, just thaw it in the fridge overnight. You do not need to reheat no-bake cheesecake. It is best enjoyed cold. If you want a softer texture, let it sit at room temperature for about 10-15 minutes before serving. This makes the cheesecake creamy and easy to slice. Enjoy it chilled for the best flavor! Yes, you can use frozen strawberries. Just thaw them first. Drain any excess liquid to avoid a soggy cheesecake. Fresh strawberries taste best, but frozen works in a pinch. The cheesecake needs at least 4 hours to chill. I recommend chilling it overnight for the best results. This time helps it set properly and enhances the flavors. You can use coconut cream or whipped coconut milk as a substitute. These options work well for a similar texture. Make sure to chill them before whipping for the best results. Yes, you can make it dairy-free. Use dairy-free cream cheese and coconut cream instead of heavy cream. This way, you can enjoy the cheesecake without dairy. Absolutely! This cheesecake is perfect for making ahead. It stores well in the fridge for up to 3 days. Just cover it tightly to keep it fresh and tasty. This blog post covered the key steps to make a no-bake strawberry cheesecake. We discussed the ingredients, from cream cheese to fresh strawberries. You learned how to prepare the crust, mix the filling, and layer everything. Tips helped ensure a creamy texture, and we explored fun variations. I hope you feel ready to create this delicious dessert. Enjoy making it your own, and share it with friends!

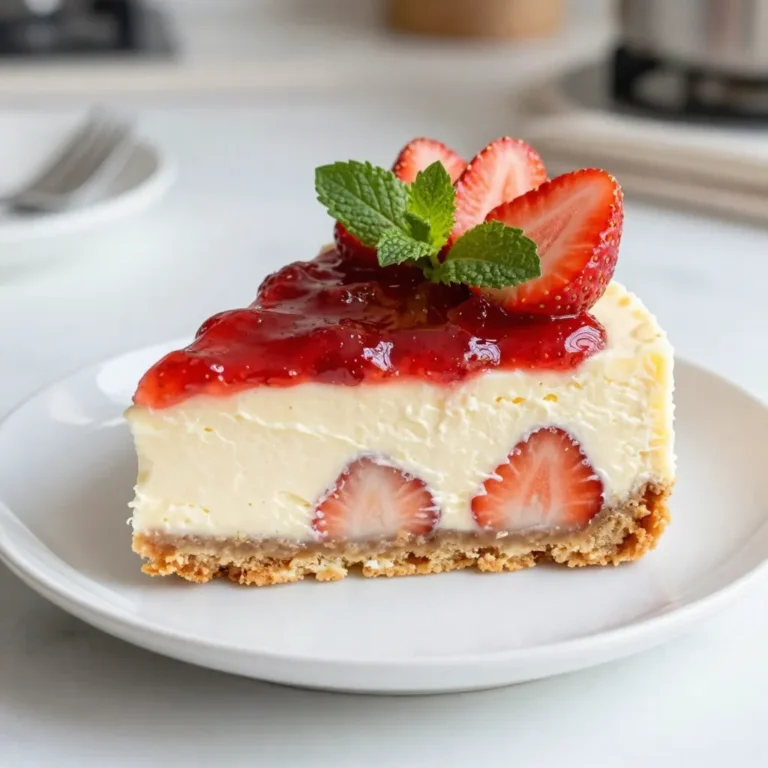
No-Bake Strawberry Cheesecake Easy and Delicious Treat

- 4 large bell peppers (any mix of red, yellow, or green), finely diced - 1 pound ground turkey or beef (your choice of meat) - 1 cup quinoa, thoroughly rinsed and drained - 1 can (15 oz) diced tomatoes, including their juices - 1 can (15 oz) black beans, thoroughly rinsed and drained - 1 cup corn kernels (can be fresh, frozen, or from a can) - 1 medium onion, finely chopped - 2 cloves garlic, minced - 1 teaspoon ground cumin - 1 teaspoon smoked paprika - Salt and black pepper to taste - 1 cup shredded cheese (use cheddar or Monterey Jack for best results) - Fresh cilantro or parsley for garnishing (optional but recommended) The main ingredients create a strong base for your casserole. Fresh bell peppers bring color and crunch. Ground turkey or beef adds heartiness. Quinoa serves as a great, healthy grain. The additional ingredients play a key role too. Diced tomatoes provide moisture and flavor. Black beans boost protein and fiber. Corn adds sweetness and texture. Seasonings and toppings elevate the dish. Onion and garlic give a warm aroma. Ground cumin and smoked paprika add depth. A layer of shredded cheese melts beautifully on top. Fresh herbs like cilantro or parsley brighten your meal. Using these ingredients ensures your stuffed bell pepper casserole is both tasty and filling. Each bite bursts with flavor and comfort. {{ingredient_image_2}} - Preheat your oven to 375°F (190°C). This step is key for even cooking. - In a large skillet, add a little oil and sauté the chopped onion and minced garlic. Cook them for about 3-4 minutes until the onion is soft and fragrant. - Add the ground turkey or beef to the skillet. Break it apart as it cooks. Cook until the meat is browned, about 8-10 minutes. - Next, mix in the diced bell peppers, cumin, smoked paprika, salt, and black pepper. Cook this for 5 minutes, allowing the peppers to soften slightly. - In a large bowl, combine the rinsed quinoa, diced tomatoes (with their juices), black beans, and corn. - Add the cooked meat and vegetable mixture to this bowl. Stir everything together until well mixed. - Transfer the filling into a greased 9x13 inch casserole dish. Spread it evenly across the bottom. - Sprinkle the shredded cheese on top of the casserole. Cover the dish with aluminum foil to keep moisture in. Bake for 30 minutes. - After 30 minutes, remove the foil and continue baking for 10-15 more minutes. Check for bubbling cheese and a golden top. - Pre-chopping ingredients: Chop your bell peppers, onion, and garlic ahead of time. This saves you time when cooking. - Using pre-cooked meat: Consider using leftover chicken or turkey. This cuts down on cooking time and makes your meal quick. - Recommended cheese types: Cheddar and Monterey Jack melt well and add creaminess. Both cheeses work great for this dish. - Adding spices for extra heat: If you like spice, add cayenne pepper or chili powder. Just a little can make your casserole pop! - Garnishing options: Fresh cilantro or parsley brightens the dish. Scatter some on top before serving for color. - Serving suggestions: Serve with a simple salad or some crusty bread. This adds freshness and makes a complete meal. Pro Tips Choose Your Peppers: Mix different colored bell peppers for a vibrant and flavorful dish. Quinoa Cooking: Make sure to rinse the quinoa thoroughly before cooking to remove its natural bitterness. Cheese Choices: Experiment with different cheese types like pepper jack for a spicy kick or mozzarella for a milder flavor. Rest Before Serving: Allow the casserole to rest for a few minutes after baking to help it set and make serving easier. {{image_4}} You can easily make this casserole fit your diet. For a vegetarian or vegan version, swap the ground turkey or beef for lentils or mushrooms. Use a plant-based cheese on top to keep it creamy. This change still packs a punch in flavor and nutrition. If you need a gluten-free option, stick with quinoa and ensure all canned items are labeled gluten-free. This dish stays tasty while meeting your needs. For a Southwest twist, add black olives and jalapeños to the mix. Use taco seasoning instead of cumin and smoked paprika. Top with avocado and fresh lime for a zesty finish. If you crave Italian flavors, switch to Italian seasoning and add diced zucchini. Replace corn with spinach for a fresh touch. Use mozzarella cheese for a gooey layer that melts beautifully. You can also change the grains in this dish. Instead of quinoa, try brown rice or farro. Both add a hearty texture and taste. For beans, feel free to use pinto beans or chickpeas. Each will bring its own flavor and nutrition, making the casserole versatile and exciting. Store your leftover stuffed bell pepper casserole in an airtight container. This keeps it fresh and safe to eat. Let it cool before sealing. It lasts in the fridge for about 3 to 5 days. To freeze, use a sturdy, freezer-safe container. Divide the casserole into portions for easy meals later. Seal tightly to prevent freezer burn. It can stay frozen for up to 3 months. When ready to enjoy, thaw it in the fridge overnight. Reheat leftovers in the oven or microwave. If using the oven, cover it with foil to keep it moist. Bake at 350°F (175°C) until hot, about 20 minutes. If microwaving, use a microwave-safe dish and cover it. Heat for 2 to 3 minutes, stirring halfway through. This keeps the texture nice and tasty. Enjoy your meal! It takes about 15 minutes to prep and 40 minutes to cook. You will spend 55 minutes in total. This includes 30 minutes of baking with foil and an extra 10 to 15 minutes without. Yes, you can use different meats. Ground chicken or pork works well. If you prefer a lighter option, use ground turkey. You can even skip meat for a veggie version. For the best taste, reheat leftovers in the oven. Preheat the oven to 350°F (175°C). Place the casserole in a covered dish. Bake for about 20 minutes. You can also microwave it for quicker heating, but it may not taste as good. Yes, you can prepare it ahead of time. Assemble the casserole, cover it, and store it in the fridge for up to two days. You can also freeze it for longer storage. Just thaw before baking. In this blog post, we covered how to make a delicious stuffed bell pepper casserole. We discussed key ingredients like fresh peppers, ground meat, and quinoa. You learned step-by-step instructions, from prep to baking. Tips on enhancing flavor and storage advice were also included. Now you have the tools to create your own version. Experiment with different flavors and make it unique. Enjoy this easy, tasty meal that suits your taste and needs. Your cooking journey starts here.

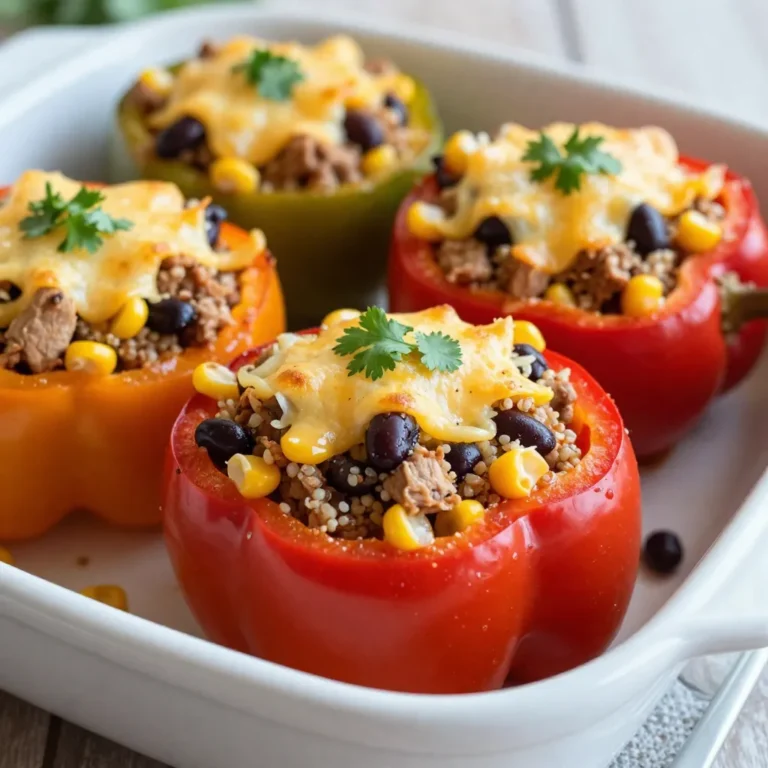
Stuffed Bell Pepper Casserole Flavorful Family Meal

- 1 medium butternut squash, peeled and diced into 1-inch cubes - 1 large apple (preferably Granny Smith or Honeycrisp), cored and diced - 1/4 cup red onion, finely chopped - 2 tablespoons extra virgin olive oil, plus more for brushing - 1 teaspoon ground cinnamon - 1/2 teaspoon ground nutmeg - Kosher salt and freshly cracked black pepper, to taste - 1 cup goat cheese or cream cheese - 1 French baguette, cut into 1/2-inch thick slices - Fresh thyme or parsley, finely chopped, for garnish Choosing fresh produce is key. Look for a butternut squash that feels heavy and has smooth skin. For apples, pick ones that are firm and bright. If you want to mix things up, try using a different type of cheese, like feta or ricotta. You can also add nuts for crunch! {{ingredient_image_2}} 1. Preheat your oven to 400°F (200°C). This step is key for roasting. 2. In a large bowl, mix the diced butternut squash with: - 2 tablespoons extra virgin olive oil - 1 teaspoon ground cinnamon - 1/2 teaspoon ground nutmeg - Kosher salt and freshly cracked black pepper, to taste Toss well until all the squash cubes are coated. 3. Spread the seasoned squash on a baking sheet. Keep it in a single layer. This helps it roast evenly. Bake for 25-30 minutes. Stir halfway through. The squash should be tender and slightly caramelized. Once done, take it out and let it cool. 1. In a separate bowl, combine the roasted butternut squash with: - 1 large apple, diced - 1/4 cup red onion, finely chopped Mix well and taste. Adjust the seasoning if needed. 2. While the squash cools, arrange slices of the French baguette on another baking sheet. Brush each slice lightly with olive oil. This adds flavor and helps it get crispy. 3. Toast the baguette slices in the oven for 5-7 minutes. Watch closely to prevent burning. They should be golden brown and crisp. 4. Once toasted, take the baguette slices out. Spread goat cheese or cream cheese on each slice. The heat will help the cheese soften. 5. Top each cheese-covered slice with a spoonful of the butternut squash and apple mix. Aim for a nice balance of flavors. 6. Finally, garnish each bruschetta with fresh thyme or parsley. This adds a pop of color and flavor. Enjoy your Butternut Squash Apple Bruschetta! It's a delightful mix of sweet and savory flavors. - How to achieve the best texture for butternut squash: For the best texture, cut your butternut squash into 1-inch cubes. This size helps it cook evenly. Roast it at 400°F until tender and lightly caramelized, about 25-30 minutes. Stir halfway through to ensure even cooking. - Cheese recommendations for flavor variations: Goat cheese adds a tangy flavor, while cream cheese offers a creamy texture. You can also try ricotta for a lighter taste or feta for a salty kick. Each cheese brings a unique flavor to the bruschetta. - Avoiding common mistakes while making bruschetta: Don't skip the olive oil on the baguette slices. It helps them toast nicely. Watch the baguette closely while toasting to prevent burning. Also, taste the butternut squash mixture before serving. Adjust the seasoning to your liking. - How to serve and present bruschetta: Arrange your bruschetta on a large serving platter. For a nice touch, drizzle balsamic glaze over them. This adds sweetness and makes the dish look stunning. Serve them warm or at room temperature. - Pairing drinks or sides with the dish: A crisp white wine, like Sauvignon Blanc, pairs well with this dish. If you prefer non-alcoholic options, try sparkling water with a slice of lemon. A simple salad can also complement the bruschetta nicely. - Utilizing leftovers creatively: If you have leftover butternut squash mixture, try using it in a salad or as a topping for baked potatoes. You can also mix it into pasta for a quick meal. The flavors stay great for a few days in the fridge. Pro Tips Choose the Right Apple: Opt for tart apples like Granny Smith or Honeycrisp to balance the sweetness of the butternut squash. Perfectly Toasted Bread: Keep a close eye on the baguette slices while toasting to achieve a perfect golden brown without burning. Customize Your Cheese: Feel free to mix different cheeses, such as feta or ricotta, for varied flavors and textures. Garnish for Flavor: Fresh herbs like thyme or parsley not only add color but also enhance the overall flavor profile of the bruschetta. {{image_4}} You can swap out the cheese for different flavors. Try feta for a salty kick. Cream cheese adds a rich texture. For a sharper taste, use blue cheese. You can also change the bread type. Use sourdough for a tangy base. Ciabatta offers a nice crust. Even gluten-free bread works well for those with dietary needs. Consider seasonal ingredients too. In fall, add roasted pumpkin for a richer taste. In spring, swap apples for fresh pears. Each change brings a new twist to the dish. Want to add some heat? Sprinkle red pepper flakes on top. You can also use smoked paprika for a warm flavor. These spices enhance the dish without overpowering it. Herbs make your bruschetta pop. Fresh basil adds a sweet touch. Rosemary gives it an earthy flavor. Experiment with different herbs to find your favorite blend. For crunch, incorporate nuts or seeds. Toasted walnuts add a rich taste. Pumpkin seeds provide a nice crunch and healthy fats. These additions make your bruschetta even more satisfying. To store leftover bruschetta, place it in an airtight container. This helps keep the flavors fresh. Make sure to separate the toppings from the bread. The bread will get soggy if left in the mix. Leftover bruschetta lasts about three days in the fridge. For the best taste, enjoy it within two days. To maintain freshness, avoid adding the toppings until you're ready to eat. Keep the bruschetta bread and toppings separate. This way, you can toast the bread again for a crisp texture. You can freeze the butternut squash and apple mix. Place it in a freezer-safe bag. Remove as much air as possible before sealing. It can stay in the freezer for up to three months. If you want to freeze the bread, slice it and wrap each piece in plastic. Then, place them in a freezer bag. To reheat, toast the frozen bread directly in the oven. For the squash mix, thaw it in the fridge overnight before reheating. Warm it in a pan on low heat for the best quality. Butternut squash apple bruschetta lasts about 3 days in the fridge. Store it in an airtight container. Ensure the bread stays crispy by keeping it separate. Yes, you can make this dish ahead of time. Roast the squash and prepare the topping. Keep the bread separate until you are ready to serve. If you don't have goat cheese, cream cheese works well. You can also try ricotta or feta for a different taste. This bruschetta is not vegan due to the cheese. However, you can use a vegan cheese alternative to make it suitable for vegan diets. Yes, you can use canned or frozen butternut squash. Just make sure to drain canned squash well and adjust cooking times for frozen squash to ensure it heats through. In this post, we covered how to make delicious butternut squash apple bruschetta. We discussed key ingredients and tips for selecting fresh produce. The step-by-step instructions guided you through preparation, assembly, and baking. You learned cooking tips and serving suggestions for the best taste. Finally, we explored variations, storage, and common questions. Now, you’re ready to make this dish your own. Enjoy experimenting with flavors and impressing your guests!

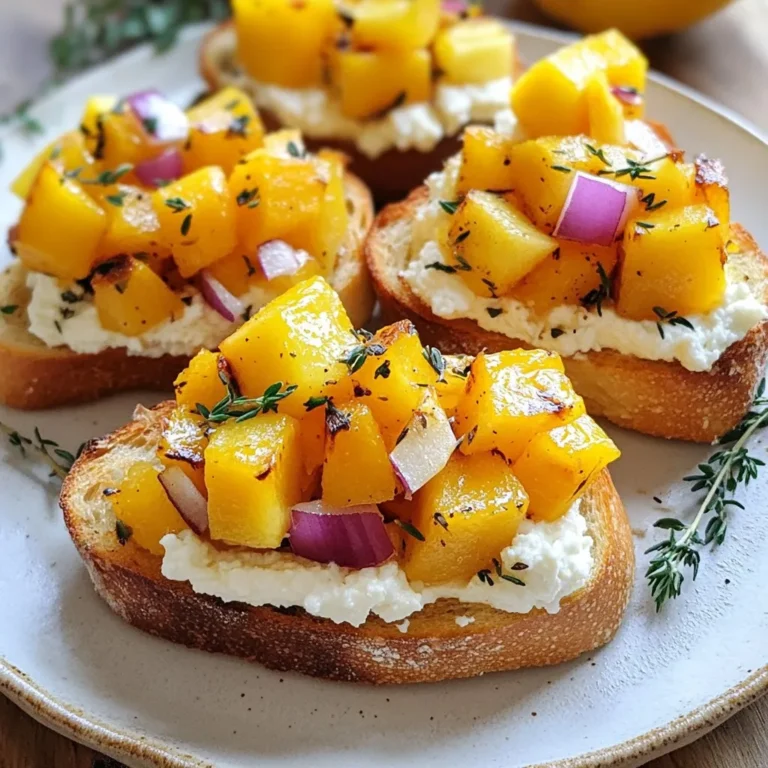
Butternut Squash Apple Bruschetta Flavorful Delight

- 4 cups fresh strawberries, hulled and diced - 2 cups fresh cranberries, rinsed and sorted - 1 large orange, zested and juiced Fresh fruits give your Christmas jam its bright flavor. Strawberries add sweetness, while cranberries provide a nice tartness. The orange zest and juice bring warmth and depth to the mix. Always use ripe, fresh ingredients for the best taste. - 1 cup granulated sugar - 1/4 cup honey - 1 tablespoon freshly squeezed lemon juice - 1 teaspoon ground cinnamon - 1/2 teaspoon ground nutmeg - 1/4 teaspoon ground allspice The sugar and honey sweeten the jam. They balance the tartness of the fruits. Lemon juice helps the flavors pop and adds acidity. Spices like cinnamon, nutmeg, and allspice bring warmth and a festive touch. Adjust these spices to fit your taste. - Use one package (1.75 oz) of fruit pectin (like Sure-Jell) Pectin is key for making your jam thicken. It helps form the gel that holds the jam together. Without it, your jam could end up runny. Following the pectin instructions ensures perfect results every time. Remember, the right amount is crucial for good texture. {{ingredient_image_2}} Sterilizing jars is very important. It keeps your jam safe to eat. If jars aren't clean, germs can spoil your jam. To sterilize your jars, fill a large pot with water. Place your jars and lids in the pot. Boil the water for 10 minutes. Use tongs to remove them carefully. Let them dry on a clean towel. In a large pot, mix the diced strawberries and rinsed cranberries. Add the orange zest and juice, granulated sugar, honey, lemon juice, cinnamon, nutmeg, and allspice. Stir well to combine. Cook this mix over medium heat. Keep stirring often. This helps prevent sticking and burning. Once the mixture boils, add the fruit pectin. Stir it in slowly and well. Let the mix return to a full rolling boil. Boil for 1 to 2 minutes. Keep stirring to avoid burning. You want to see big bubbles pop up. This shows it is cooking well. Carefully ladle the hot jam into your clean jars. Leave about 1/4 inch of space at the top. This space is called headspace. It helps the jam seal properly. Wipe the rims of the jars with a clean cloth. This step removes any sticky bits that can affect the seal. Place the sterilized lids on the jars. Screw on the metal bands until they are just tight. Do not over-tighten. To seal the jars, process them in a boiling water bath. This should last about 10 to 15 minutes. The boiling water helps create a good seal. After processing, carefully remove the jars from the water. Let them cool on a clean towel. You should hear a popping sound. This noise means the jars sealed well. Once cool, check the seals by pressing the center of each lid. If it stays down, the jar is sealed. Store the jars in a cool, dark place. Mistakes while sterilizing Do not skip sterilizing your jars. This step keeps your jam safe. Place the jars in boiling water for 10 minutes. Make sure they are fully submerged. If you leave them in for too little time, they may not be safe. Overcooking the jam Watch your jam closely while it cooks. Overcooking can ruin the taste and texture. Once it reaches a boil, stir continuously. This keeps it from sticking and burning. If you cook too long, your jam may become too thick. Testing for doneness To check if your jam is ready, drop a spoonful on a cold plate. Wait a minute, then run your finger through the jam. If it holds its shape, it’s ready! If it runs back together, boil it for another minute and test again. Adjusting thickness Want your jam thicker? Add a little more pectin. Stir it in and let it boil again. If it’s too thick, add a bit of water or juice. Remember to test it again after adjustments. Creative spice additions Spice can elevate your jam. Try adding a pinch of ginger or cloves for a twist. You can also play with citrus zest. Lemon or lime zest adds bright notes to your jam. Suggestions for higher fruit ratios Want more fruit flavor? Increase the amount of strawberries or cranberries. Use 5 cups of fruit instead of 4 cups of strawberries. This can make your jam fruitier and more vibrant. Just keep the sugar the same for balance. Pro Tips Choose the Right Fruit: For the best flavor, select ripe strawberries and fresh cranberries. Overripe or damaged fruit can affect the taste and texture of your jam. Adjust Sweetness: Feel free to modify the amount of sugar and honey according to your taste preference. You can also substitute with natural sweeteners if desired. Test for Consistency: Always perform the cold plate test to check if your jam has reached the right consistency. If it’s too runny, continue boiling for a few more minutes. Store Properly: After sealing the jars, store them in a cool, dark place. Properly sealed jam can last up to a year, but once opened, refrigerate and consume within a few weeks. {{image_4}} You can get creative with your Christmas jam by using other seasonal fruits. If you like, try adding pears, apples, or even figs. Each fruit brings its own taste. Mixing different fruits helps create unique flavor profiles. For example, combine cranberries with pears for a sweet and tart mix. You can also use frozen fruits if fresh ones are not available. If you want a healthier option, there are many natural sweetener alternatives. You can use maple syrup or agave nectar instead of sugar. Honey is great too! Just remember to adjust the amount to match your taste. Natural sweeteners can change the jam's flavor, so taste as you go. Adding spices can elevate your jam to a new level. Ground cinnamon, nutmeg, and allspice work wonders in this recipe. You can also try using cardamom or ginger for a warm, inviting taste. For a fresh twist, consider incorporating herbs like rosemary or thyme. These herbs add a unique flavor that surprises the palate. Store your Christmas jam in a cool, dark place. The best temperature is around 50-70°F. A pantry or cupboard works well. If kept this way, your jam can last up to one year. After opening, refrigerate it. Use the opened jar within three weeks for best taste. Check for signs of spoilage before using jam. Look for a bulging lid or any leaks. If you see mold on top, do not eat it. If the jam smells off or has a strange texture, it's best to throw it out. When in doubt, throw it out. You can reuse jam jars for other foods. First, wash them in hot soapy water. Rinse well to remove all soap. Sterilize jars again before using them. Boil them in water for ten minutes. Make sure the lids are also clean and fit properly. Homemade Christmas jam can last up to one year if stored well. For best results, keep it in a cool, dark place. Once opened, use it within three weeks. Store it in the fridge after opening. Always check for signs of spoilage before use. Yes, you can replace sugar with other sweeteners. For example, honey or agave syrup works well. Use about 3/4 cup of honey for every cup of sugar. Keep in mind, sweeteners may alter the taste and texture. Adjust the amount of pectin if needed, as some sweeteners have different properties. The best way to sterilize jars is by boiling them. Place the jars and lids in a pot of water. Boil for ten minutes to kill germs. Remove the jars carefully and let them dry on a clean towel. This step is crucial for safe canning. Yes, you can freeze Christmas jam. Freezing is a great option if you have extra jam. Just leave some headspace in the jar to allow for expansion. However, canned jam has a longer shelf life. Canning keeps it safe and ready for use. If your jam doesn't set, don't worry. You can fix it easily. Return the jam to a pot and bring it back to a boil. Add more pectin if needed. Boil for a few minutes and test again. If it still doesn’t set, you may need to repeat this process. In this post, we explored how to make delicious homemade Christmas jam. We covered key ingredients, including fresh fruits and spices, and detailed every step, from sterilizing jars to canning techniques. I shared valuable tips to avoid common mistakes and perfect your jam's taste and texture. Making jam can be fun and rewarding. With these steps, you can create unique flavors and enjoy your treat all year long. Happy jamming!

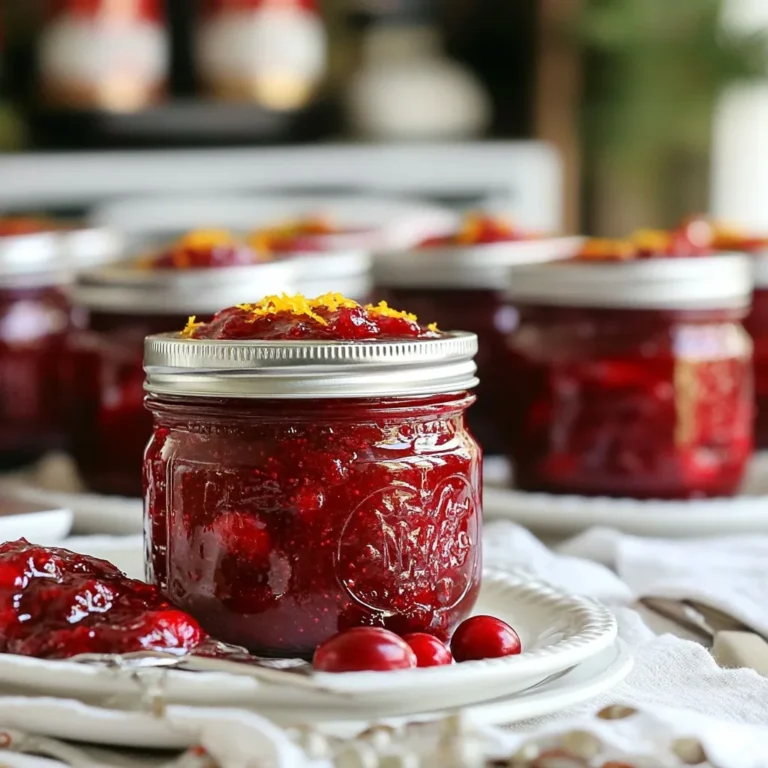
Christmas Jam Canning Simple Tips for Perfection

- 300g whole wheat pasta (preferably penne or fusilli) - 200g ground turkey - 1 tablespoon olive oil - 2 cloves garlic, minced - 1 onion, finely chopped - 1 bell pepper (red or yellow), diced - 1 zucchini, diced - 1 can (400g) diced tomatoes - 1 teaspoon dried oregano - 1 teaspoon dried basil - 1/2 teaspoon red chili flakes (optional for heat) - Salt and pepper to taste - Fresh basil leaves for garnish - Grated parmesan cheese for serving (optional) The main star of this dish is ground turkey. It provides lean protein and a hearty base. Whole wheat pasta adds fiber and keeps you full longer. Olive oil helps sauté the aromatics, adding rich flavor and healthy fats. The garlic and onion create a fragrant base. They enhance the dish's depth. Bell peppers and zucchini add color and crunch. Canned diced tomatoes form the sauce. They provide moisture and tang. Oregano and basil bring classic Italian flavors, while red chili flakes add a kick. Turkey is low in fat and high in protein. It helps build muscle and keeps you energized. Whole wheat pasta gives fiber, aiding digestion and heart health. The colorful veggies, like bell peppers and zucchini, are rich in vitamins. They boost your immune health and keep skin glowing. This dish is not only tasty but also packed with good nutrition. Eating this meal helps you feel great and satisfied. {{ingredient_image_2}} Start by boiling a large pot of salted water. Use enough water so the pasta can float. Add 300g of whole wheat pasta, like penne or fusilli. Check the package for cooking time, usually about 10-12 minutes. You want the pasta to be al dente, which means it should be firm but not hard. Once done, drain the pasta. Be sure to save a cup of the pasta water for later. Set the pasta aside. Next, take a large skillet and heat 1 tablespoon of olive oil over medium heat. Wait until the oil shimmers. Add 1 finely chopped onion and sauté for 2-3 minutes. You want the onion to be soft and translucent. Then, add 2 cloves of minced garlic. Stir for about 1 minute. You should smell the garlic getting fragrant and see it turning a light golden color. Now, turn up the heat to medium-high. Add 200g of ground turkey to the skillet. Use a spatula to break it apart. Cook for 5-7 minutes until the turkey is browned and no longer pink. Then, add a diced bell pepper and a diced zucchini. Sauté these for about 4-5 minutes until they are tender and colorful. Pour in 1 can of diced tomatoes with their juices. Mix in 1 teaspoon of dried oregano, 1 teaspoon of dried basil, and 1/2 teaspoon of red chili flakes if you want some heat. Season with salt and pepper. Let the sauce simmer for 10 minutes, stirring every few minutes. If the sauce is too thick, add some reserved pasta water until it feels just right. Finally, gently fold in the cooked pasta. Make sure each piece is coated in the sauce. Cook everything together for 2 more minutes to heat it through. Serve the turkey pasta in bowls. Add fresh basil leaves and some grated parmesan cheese for extra flavor. Enjoy! Whole wheat pasta adds more fiber and nutrients. It keeps you full longer. When cooking, follow package instructions for al dente. This ensures a nice bite. Pairing it with the turkey and veggies makes every bite delicious. Not everyone likes heat. Start with less chili flakes if you’re unsure. You can always add more later. If you want more spice, try adding fresh jalapeños or a dash of hot sauce. Taste as you go to find your perfect heat level. The sauce is key to this dish. Use fresh herbs like basil or oregano for more taste. A splash of red wine can deepen the flavor, too. If you like it creamy, add a bit of cream or cheese. Remember to stir often while it simmers to mix the flavors well. Pro Tips Use Fresh Herbs: Fresh basil added at the end of cooking enhances the flavor and aroma of your dish significantly. Don’t Overcook the Pasta: Cooking pasta to al dente ensures it retains its texture and absorbs the sauce better. Customize Your Veggies: Feel free to swap in seasonal vegetables like spinach or asparagus for a different flavor profile. Make it Ahead: This dish can be made ahead and stored in the fridge. Reheat gently and add a splash of reserved pasta water to loosen the sauce. {{image_4}} You can switch the turkey for other proteins. Ground chicken or beef works well. For vegans, try lentils or chickpeas. These swaps add unique flavors to the dish. Each protein brings its own taste and texture. Use a similar amount as the turkey. Cook it through to ensure safety. To make this dish vegetarian, skip the turkey and use more veggies. Add mushrooms, spinach, or eggplant. These veggies add depth and richness. You can also use plant-based ground meat. This way, you keep the dish hearty and satisfying. Adjust the spices slightly to enhance the flavors. Use seasonal veggies for fresh taste. In spring, try asparagus or peas. Summer calls for zucchini and tomatoes. In fall, use squash or kale. Winter brings root vegetables like carrots or parsnips. Swapping seasonal veggies keeps the dish exciting year-round. Each season offers new flavor profiles. To keep your Gordon Ramsay inspired turkey pasta fresh, store it properly. Use an airtight container. Place it in the fridge within two hours of cooking. This helps keep the flavors intact and prevents bacteria growth. The pasta can stay fresh in the fridge for up to three days. When you want to enjoy your leftovers, reheating is key. You can use a microwave or a skillet. For the microwave, place the pasta in a bowl. Add a splash of water to help it steam. Heat in 30-second intervals, stirring in between until warm. If using a skillet, add the pasta with a bit of olive oil. Stir over medium heat until heated through. Freezing is a great option for longer storage. Allow the pasta to cool completely before freezing. Transfer it to a freezer-safe container or bag. Make sure to remove as much air as possible. You can freeze it for up to three months. When you’re ready to eat, thaw it in the fridge overnight. Reheat it using the instructions above for a delicious meal ready to go. To make this dish gluten-free, simply swap out the whole wheat pasta for gluten-free pasta. Many stores offer great options made from rice, quinoa, or chickpeas. These alternatives cook similarly, so just follow the package instructions for the best results. Always check for hidden gluten in other ingredients, like sauces or pre-packaged items. Yes, you can prepare this dish ahead of time! Cook the pasta, turkey, and sauce separately. Store each component in airtight containers in the fridge. When you are ready to eat, combine them in a skillet and heat until warm. This method helps the flavors blend nicely. You can use various herbs to boost flavor in this dish. Here are some great options: - Thyme: Adds a nice earthy taste. - Rosemary: Offers a pine-like flavor. - Parsley: Gives a fresh, bright touch. - Cilantro: Adds a unique twist. Feel free to mix and match based on your taste! This blog post covered important ingredients, cooking steps, tips, and storage options. You learned how turkey and veggies boost health, and how to cook pasta perfectly. We shared tips on using whole wheat and adjusting spices for taste. You can also try protein swaps or make it vegetarian. In the end, these ideas will help you cook tasty meals that fit your needs. Enjoy experimenting and make this dish your own!

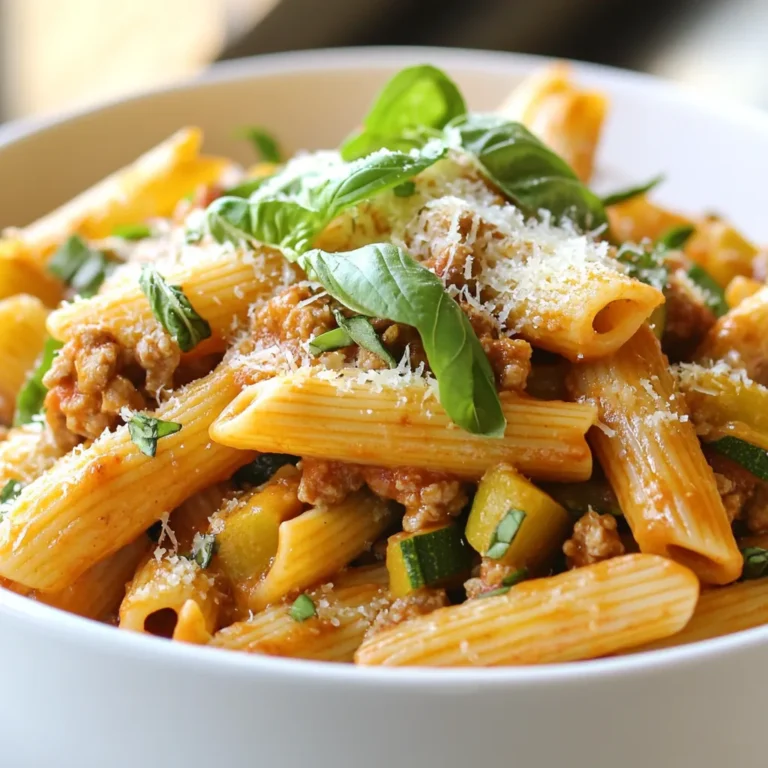
Gordon Ramsay Inspired Turkey Pasta Flavor Burst Dish

To make Honey Feta Sweet Potato Rounds, gather these key ingredients: - 2 medium sweet potatoes, sliced into 1/4 inch thick rounds - 1/2 cup feta cheese, crumbled - 1/4 cup honey - 2 tablespoons extra virgin olive oil - 1 teaspoon ground cinnamon - 1/2 teaspoon sea salt - 1/2 teaspoon freshly cracked black pepper - 1 tablespoon fresh rosemary, finely chopped - 1/4 cup walnuts, chopped (optional for added crunch) These ingredients create a rich blend of flavors. The sweet potatoes provide a creamy base. The feta adds a salty bite, while honey brings sweetness. Olive oil helps the spices stick and enhances taste. Cinnamon and rosemary offer aromatic notes that elevate the dish. Walnuts give a nice crunch, but they are optional. When measuring, be precise. Use a kitchen scale for the feta and honey. This ensures your flavors balance out perfectly. The right mix of sweet and savory makes these rounds truly special. {{ingredient_image_2}} First, preheat your oven to 400°F (200°C). This step helps ensure even cooking. Next, prepare your baking sheet. You can line it with parchment paper or lightly coat it with olive oil. This prevents the sweet potatoes from sticking. Now, let’s coat the sweet potato rounds. Place the sliced sweet potatoes in a large mixing bowl. Drizzle them with olive oil. Then, add cinnamon, sea salt, and black pepper. Toss everything gently. Make sure each slice is evenly coated with the oil and spices. Spread the seasoned sweet potato slices on your prepared baking sheet. Lay them out in a single layer, avoiding overlap. Bake them in the preheated oven for about 20 minutes. Halfway through, flip the rounds to ensure even cooking. They should be tender and golden brown when done. While the sweet potatoes bake, let’s make the honey feta topping. In a small bowl, combine crumbled feta cheese with honey. Stir until smooth. This mixture will create a creamy and sweet topping for the rounds. After baking, remove the sweet potatoes from the oven. Use a spoon to dollop the honey feta mixture onto each round. Cover them nicely with the topping. Return the baking sheet to the oven. Bake for an additional 5-7 minutes. This warms the topping without making it too runny. Once finished, take the baking sheet out of the oven. Sprinkle fresh chopped rosemary and walnuts on top for extra flavor and crunch. If you want, you can skip the walnuts for a nut-free option. Enjoy your sweet potato rounds! To make sweet potatoes crispy yet tender, watch the thickness of your slices. Cut them into 1/4 inch rounds. This size helps them cook evenly. Coat them well with olive oil, salt, and spices. When baking, spread them out on the sheet. Avoid overlap to let hot air circulate. Flip them halfway through cooking for a golden crust. For the honey feta topping, mix feta and honey until smooth. This keeps the topping creamy and thick. If it’s too runny, add a bit more feta. This balance gives a nice contrast to the sweet potato. Feel free to adjust the spices based on your taste. You can add more cinnamon for warmth or even sprinkle some cayenne for heat. Fresh herbs are key. They lift the dish while adding depth. I suggest using rosemary. Its earthy flavor pairs well with sweet potatoes. For drinks, pair these rounds with a light white wine. A crisp sauvignon blanc complements the sweetness. If you prefer non-alcoholic options, a sparkling water with lemon works too. When plating, arrange the sweet potato rounds on a colorful dish. Drizzle extra honey over the top for shine. Add a few sprigs of rosemary for a touch of green. This makes your dish look appealing and inviting. Pro Tips Choose the Right Sweet Potatoes: Select firm, smooth-skinned sweet potatoes for the best texture and flavor. Avoid any with blemishes or soft spots. Adjust the Spice Level: If you enjoy a bit of heat, consider adding a pinch of cayenne pepper to the sweet potato seasoning for a spicy kick. Perfecting the Feta Mixture: For a creamier texture, you can blend the feta and honey in a food processor until smooth rather than mixing by hand. Serving Suggestions: These sweet potato rounds make a fantastic appetizer or side dish. Pair them with a light salad or serve as a topping for crostini. {{image_4}} You can change the cheese for a new twist. Try goat cheese for a tangy flavor. Ricotta can also work well if you want something creamy. For sweetness, swap honey with maple syrup or agave. Each choice adds a unique touch to your sweet potato rounds. Want to spice things up? Add cumin or paprika for extra warmth. These spices give the dish a new depth of flavor. If you enjoy heat, consider adding jalapeños or red pepper flakes. These will kick up the heat and balance the sweetness nicely. Making this dish vegan-friendly is easy. Simply swap feta cheese for a plant-based option. You can also use maple syrup instead of honey for sweetness. If gluten is a concern, this recipe is already gluten-free! Just be sure to check any added ingredients. Enjoying the flavors without worry is possible. To keep your honey feta sweet potato rounds fresh, store them in the fridge. Use an airtight container to avoid moisture. This way, they stay tasty for up to three days. Layer parchment paper between the rounds if you stack them. This helps prevent sticking. For the best reheating, use an oven. Set it to 350°F (175°C). Place the sweet potato rounds on a baking sheet. Heat them for about 10 to 15 minutes. This keeps them crispy outside and soft inside. If you use a microwave, cover them with a damp paper towel. This will help keep them from drying out. You can freeze sweet potato rounds and honey feta. First, cool them completely. Then, place them in a freezer-safe bag. Remove as much air as possible to avoid freezer burn. When you're ready to eat, thaw them in the fridge overnight. Reheat them in the oven for the best texture. Yes, you can make these sweet potato rounds ahead. First, slice the sweet potatoes. Then, coat them with olive oil, cinnamon, salt, and pepper. Place them on a baking sheet and cover with plastic wrap. You can store them in the fridge for up to 24 hours. When you're ready to cook, just bake them as directed. This saves time and makes it easy for gatherings. These sweet potato rounds shine as appetizers or side dishes. For a fun appetizer, arrange them on a platter. Add a drizzle of honey on top for extra sweetness. You can also serve them alongside grilled meats or salads. Their sweet and savory flavors complement many meals. Serve warm for the best taste. Absolutely! You can add your favorite toppings. Try using goat cheese instead of feta for a tangy twist. You can also sprinkle some chili flakes for heat. If you love nuts, add pecans or almonds for crunch. Fresh herbs like thyme or basil can give a new flavor, too. Personalize these sweet potato rounds to fit your taste. In this post, we explored the delicious world of sweet potato rounds topped with honey feta. You learned about the key ingredients and step-by-step instructions for baking. We also shared tips for achieving the perfect texture and flavor variations to try. Remember, you can customize this dish to suit your taste and dietary needs. With proper storage and reheating techniques, you can enjoy these tasty bites multiple times. Dive into your kitchen and create this tasty dish that impresses everyone!

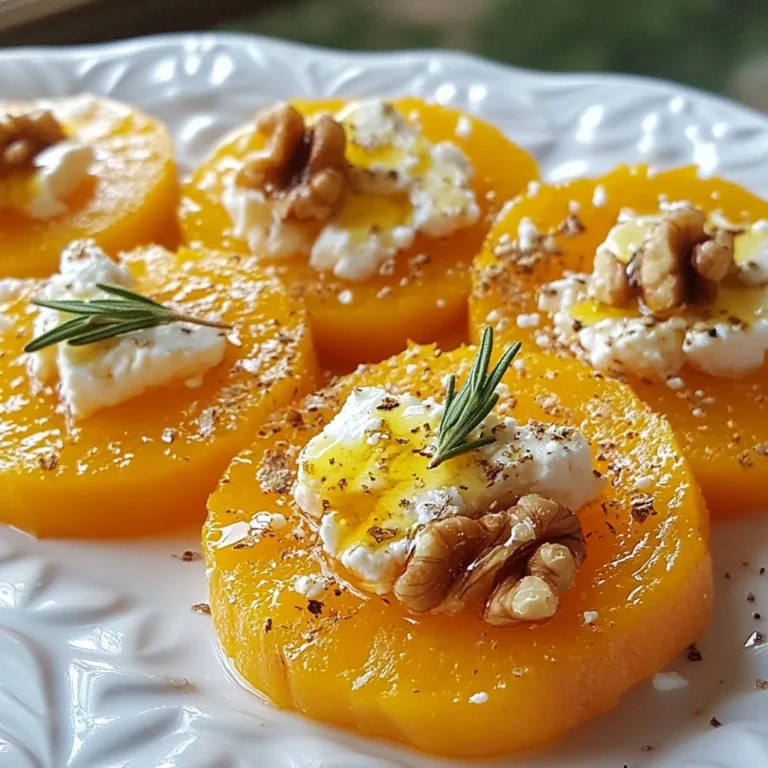
Honey Feta Sweet Potato Rounds Flavorful Delight

- 2 ½ cups all-purpose flour - 1 teaspoon baking powder - ½ teaspoon baking soda - ½ teaspoon salt Measuring dry ingredients is key. It helps your cookies rise and hold shape. Too much flour can make cookies dry. Too little can cause spreading. Always use the spoon-and-level method for best results. - 1 cup unsalted butter, softened - 1 cup granulated sugar - 1 large egg - 2 teaspoons pure vanilla extract - ½ teaspoon almond extract Butter adds richness and flavor. Sugar sweetens and gives texture. Eggs help bind the mix. They also help with a soft, chewy bite. Extracts add extra flavor and depth. They make your cookies stand out. - 1 cup royal icing - Assorted sprinkles or edible glitter Royal icing is great for decorating. It dries hard, which helps designs stay put. Choose sprinkles that match your theme. Edible glitter gives a fancy touch. Use different colors and sizes to make your cookies pop! {{ingredient_image_2}} First, gather your dry ingredients. In a medium bowl, whisk together: - 2 ½ cups all-purpose flour - 1 teaspoon baking powder - ½ teaspoon baking soda - ½ teaspoon salt Make sure they mix well. This step helps the cookies rise evenly. Now, in a large bowl, cream the butter and sugar. Use an electric mixer to beat: - 1 cup unsalted butter, softened - 1 cup granulated sugar Mix on medium speed for about 3-4 minutes. The mix should look light and fluffy. Next, add in the egg and extracts. Stir in: - 1 large egg - 2 teaspoons pure vanilla extract - ½ teaspoon almond extract Continue mixing until everything is smooth. Gradually add the dry mix to the wet mix. Use low speed to combine. Do not over-mix! This keeps the cookies tender. Now, let’s shape the dough. Divide it in half. Shape each half into a disk. Wrap them tightly in plastic wrap. Place in the fridge for at least 1 hour. Chilling firms the dough. This helps the cookies hold their shape while baking. Preheat your oven to 350°F (175°C) while the dough chills. Line two baking sheets with parchment paper. On a floured surface, roll out one disk of dough. Aim for about ¼ inch thickness. Cut out fun shapes with cookie cutters. Place the cut cookies on the baking sheets. Leave about 2 inches of space between each cookie. This allows them to spread. Bake for 8-10 minutes. Look for light golden edges. Once baked, let them cool on the sheets for a few minutes. After that, transfer to a wire rack to cool completely. Once cool, it’s time to decorate! Use royal icing for beautiful designs. Add sprinkles or edible glitter for extra flair. Enjoy your lovely cookies! To get the best texture in your cookies, avoid over-mixing. Mixing too much makes the cookies tough. When you add the dry mix to the wet mix, stir just until combined. This keeps the dough soft and tender. Measuring flour accurately is key too. Use a spoon to fluff your flour, then scoop it into the measuring cup. Level it off with a knife. This small step makes a big difference in your cookie's texture. Using piping bags makes decorating easy and fun. Fill the bag with royal icing and cut a tiny tip. This lets you create pretty designs on your cookies. Practice on parchment paper if you need to. Sprinkles and glitters add flair to your cookies. Try different colors and shapes for fun effects. You can use stars, hearts, or even edible glitter to make your cookies shine. Prevent spreading during baking by chilling your dough. After shaping your cookies, let them rest in the fridge for at least an hour. This keeps them from losing shape while baking. Always chill your dough properly. If the dough is too warm, it will spread out too much. This simple step helps keep your cookies thick and soft. Pro Tips Chill the Dough: Allowing the dough to chill not only firms it up, making it easier to roll out, but also helps the cookies maintain their shape during baking. Use Quality Extracts: Opt for pure vanilla and almond extracts for a richer flavor that elevates your sugar cookies to the next level. Watch the Baking Time: Keep an eye on your cookies as they bake; removing them from the oven just as they start to turn golden will ensure they remain soft and chewy. Decorate with Care: When decorating with royal icing, use a piping bag for precision to create beautiful designs and avoid messiness. {{image_4}} You can make your Royale Sugar Cookies even better by adding some zest or spices. Try mixing in a teaspoon of lemon or orange zest for a bright taste. You can also add spices like cinnamon or nutmeg for warmth. These small tweaks can bring a new life to your cookies. Using flavored extracts is another great way to enhance the flavor. Instead of just vanilla, use peppermint or coconut extract. This simple change can create a fun twist on the classic cookie. Custom cookie shapes can make your cookies special for any occasion. Use cookie cutters to create holiday-themed shapes like stars or trees. You can even make heart shapes for birthdays or anniversaries. These unique shapes add joy to any celebration. If you want to make mini cookies, roll the dough thinner. Cut smaller shapes and reduce the baking time to about 6-8 minutes. Mini cookies are perfect for sharing or serving at parties. For those looking for gluten-free options, substitute all-purpose flour with a gluten-free blend. Make sure it’s a one-to-one blend for best results. This way, everyone can enjoy these cookies without worry. You can also reduce the sugar in your recipe. Try using half the amount or replace it with a sugar substitute like stevia or erythritol. This keeps the cookies sweet but lowers the calories. To keep your Royale Sugar Cookies fresh, store them in airtight containers. This helps keep moisture out and flavor in. If you use cooling racks, cookies may dry out. So, avoid leaving them uncovered. For best results, layer cookies with parchment paper in the container. This prevents sticking and keeps them safe. You can freeze cookie dough before baking. Shape the dough into disks, wrap them in plastic, and store in the freezer. This way, you can bake fresh cookies whenever you want. If you freeze baked cookies, keep them in an airtight container. Decorated cookies can lose their charm when frozen. It’s best to freeze undecorated cookies and ice them once thawed. Royale Sugar Cookies last about one week at room temperature. Store them in a cool, dry place for best results. Look for signs of spoilage like a hard texture or off smell. If cookies become dry or crumbly, it’s time to toss them. Enjoy your cookies fresh for the best taste! Royale sugar cookies are sweet, soft cookies that are perfect for any event. They have a light and fluffy texture. These cookies use butter and sugar to create a rich flavor. They are often decorated with royal icing and sprinkles, adding a festive touch. You can cut them into fun shapes, making them fun for kids and adults. You can use margarine, but it changes the cookies. Margarine makes the cookies softer and less rich. The flavor will not be as good as with butter. If you want a true taste, stick with unsalted butter. This gives you a richer flavor and firmer texture. To make royal icing colorful, use gel food coloring. Gel colors give bright and vivid hues. Start with a small amount and mix it in well. Keep adding until you reach your desired shade. For the best consistency, aim for a smooth, spreadable texture. If the icing is too runny, add more powdered sugar. If it's too thick, add a few drops of water. In this article, we've explored the key ingredients and steps for baking delicious royal sugar cookies. Remember, precise measurements and proper chilling make a big difference. I shared tips for perfecting texture and decorating techniques to avoid common mistakes. Don't forget to try different flavors and shapes to make your cookies unique. Storage and freezing methods will help keep cookies fresh. Enjoy the process and let your creativity shine in every batch! Happy baking!

Royale Sugar Cookies Delightful Holiday Treats

- 2 tablespoons olive oil - 1 medium onion, diced - 2 cloves garlic, minced - 1 bell pepper (any color), diced - 1 jalapeño, seeded and finely minced To start, use olive oil to cook the onion and garlic. These ingredients bring a nice base flavor. Next, the bell pepper adds sweetness and color. The jalapeño gives a nice kick of heat. - 1 teaspoon ground cumin - 1 teaspoon chili powder - 1/2 teaspoon smoked paprika - Salt and pepper, to taste The spices elevate the soup's flavor. Cumin and chili powder add warmth, while smoked paprika offers a hint of smokiness. Adjust salt and pepper to taste, so it fits your preference. - 4 cups chicken broth - 1 can (15 oz) black beans, drained and rinsed - 1 can (15 oz) sweet corn, drained - 2 cups cooked chicken, shredded - 1 can (10 oz) red enchilada sauce The chicken broth forms the soup base. Black beans and sweet corn add texture and heartiness. Shredded chicken makes it filling. Enchilada sauce gives it that rich, zesty flavor. - Fresh cilantro, finely chopped - Ripe avocado slices - Lime wedges For garnishes, fresh cilantro adds a bright taste. Avocado slices provide creaminess. Lime wedges let everyone add a fresh zing to their bowls. This mix of ingredients creates a warm and tasty Chicken Enchilada Soup. Each part works together to give you a bowl full of flavor. {{ingredient_image_2}} 1. Start by heating 2 tablespoons of olive oil in a large pot over medium heat. 2. Add 1 diced onion. Sauté it for about 3-4 minutes until soft and clear. 3. Then, add 2 minced garlic cloves, 1 diced bell pepper, and 1 finely minced jalapeño. 4. Cook these for another 2-3 minutes until they soften slightly. 1. Once your vegetables are ready, sprinkle in 1 teaspoon of ground cumin, 1 teaspoon of chili powder, and 1/2 teaspoon of smoked paprika. 2. Stir well to coat the veggies. Cook for about 1 minute. This helps the spices release their yummy smells. 1. Gradually pour in 4 cups of chicken broth. Mix everything together. 2. Next, add 1 can of black beans, drained and rinsed, and 1 can of sweet corn, drained. 3. Finally, toss in 2 cups of shredded chicken. This can be rotisserie chicken for ease. 1. Now, add 1 can of red enchilada sauce. Stir to blend everything well. 2. Bring the soup to a gentle simmer. 3. Let it cook uncovered for 10-15 minutes. This allows the flavors to get cozy together. 4. Before serving, taste your soup. Adjust the salt and pepper as needed. 5. Serve hot, garnished with fresh cilantro and avocado slices. Don’t forget lime wedges for a zesty touch! To sauté vegetables, use a heavy pot. Heat oil on medium heat. Add onions first. Cook until they turn soft and clear. This takes about three to four minutes. Then, add garlic, bell pepper, and jalapeño. Cook for two to three minutes more. Stir often to keep them from sticking. Want to adjust spice levels? Start with less chili powder. Taste the soup as it cooks. If you want more heat, add more spice later. You can also use fresh jalapeños for a kick. If you want a different protein, try black beans or turkey instead of chicken. You can also use shredded beef. For vegetarian options, use mushrooms or tofu. Want to change up the beans? You can use pinto beans or kidney beans. For more veggies, add zucchini or spinach. Both will add flavor and nutrition. To make the soup look great, serve it in rustic bowls. Top each bowl with cilantro and avocado slices. Arrange the garnishes nicely. You can also sprinkle cheese on top. This adds creaminess and makes it more appealing. Don't forget lime wedges on the side. They add a fresh burst of flavor. Enjoy your Chicken Enchilada Soup! Pro Tips Use Rotisserie Chicken: For a quicker preparation, opt for shredded rotisserie chicken. It saves time and adds a delicious flavor to your soup. Adjust Spice Levels: Feel free to modify the heat by adding more or fewer jalapeños according to your preference. You can also use mild or hot enchilada sauce. Garnish Creatively: Experiment with various garnishes such as sour cream, shredded cheese, or tortilla strips for added texture and flavor. Make it Ahead: This soup stores well, making it perfect for meal prep. Just reheat on the stove and add fresh garnishes before serving. {{image_4}} For a slow cooker version, gather these ingredients: - 2 tablespoons olive oil - 1 medium onion, diced - 2 cloves garlic, minced - 1 bell pepper, diced - 1 jalapeño, minced - 1 teaspoon ground cumin - 1 teaspoon chili powder - 1/2 teaspoon smoked paprika - 4 cups chicken broth - 1 can (15 oz) black beans, drained - 1 can (15 oz) sweet corn, drained - 2 cups cooked chicken, shredded - 1 can (10 oz) red enchilada sauce - Salt and pepper, to taste Cooking Method: 1. Sauté the onion and garlic in olive oil in a pan. 2. Add bell pepper and jalapeño, cooking until soft. 3. Combine all ingredients in the slow cooker. 4. Cook on low for 6-8 hours. 5. Adjust seasoning before serving. For a quick Instant Pot meal, use these ingredients: - 2 tablespoons olive oil - 1 medium onion, diced - 2 cloves garlic, minced - 1 bell pepper, diced - 1 jalapeño, minced - 1 teaspoon ground cumin - 1 teaspoon chili powder - 1/2 teaspoon smoked paprika - 4 cups chicken broth - 1 can (15 oz) black beans, drained - 1 can (15 oz) sweet corn, drained - 2 cups cooked chicken, shredded - 1 can (10 oz) red enchilada sauce - Salt and pepper, to taste Cooking Method: 1. Set your Instant Pot to sauté mode. 2. Sauté onion and garlic in olive oil. 3. Add bell pepper and jalapeño, cooking until soft. 4. Add all other ingredients to the pot. 5. Seal the lid and cook on high for 10 minutes. 6. Let the pressure release naturally for 10 minutes. 7. Adjust seasoning before serving. To make this soup meat-free, follow these tips: - Substitute the chicken with 2 cups of cooked quinoa or lentils. - Use vegetable broth instead of chicken broth. - Add more beans, like pinto or kidney beans, for protein. - Skip the cheese garnishes and add more fresh veggies instead. These changes keep the soup rich in flavor and texture, making it a great option for everyone. To store leftovers, let the soup cool first. Use an airtight container to keep it fresh. This method helps retain the flavor and texture. You can keep it in the fridge for up to three days. Just make sure to label the container with the date. If you want to freeze the soup, use freezer-safe containers. Leave some space at the top, because soup expands when frozen. Thaw the soup in the fridge overnight before reheating. You can heat it on the stove or in the microwave. Stir well to mix everything after reheating. In the fridge, the soup lasts about three days. If you freeze it, it can stay good for up to three months. Always check for signs of spoilage before eating. Look for changes in smell, color, or texture. Enjoy your delicious chicken enchilada soup later with these easy storage tips! To add heat, try these tips: - Add more jalapeños or use spicy salsa. - Include a pinch of cayenne pepper. - Stir in some hot sauce before serving. You can also try spicy chili powder. This soup loves heat. Just be careful not to overdo it. Start small and taste as you go. Yes! Pre-cooked chicken is great for this soup. Using rotisserie chicken saves time and adds flavor. Just shred the chicken and toss it in. You’ll still get a rich taste without all the work. This soup pairs well with: - Fresh tortilla chips for crunch. - A side salad for freshness. - Cornbread for a sweet touch. You can also add toppings like cheese, sour cream, or sliced jalapeños. These sides make the meal even better. Yes, this soup can be gluten-free! Use gluten-free chicken broth and check the enchilada sauce label. Most brands offer gluten-free options. This way, everyone can enjoy it without worry. This blog post detailed how to make Chicken Enchilada Soup. We covered key ingredients like olive oil, chicken broth, and spices. I walked you through easy steps to prepare, cook, and adjust flavors. You learned tips for storing leftovers and making variations, like a slow cooker recipe. Finally, I answered common questions about spice levels and gluten-free options. I hope this soup becomes a favorite in your home. Enjoy experimenting with different flavors and making it your own!

Chicken Enchilada Soup Flavorful and Easy Recipe

For a tasty Chicken Broccoli Potatoes Meal Prep, gather these key ingredients: - 2 cups broccoli florets - 2 medium potatoes, diced into 1-inch cubes - 1 lb boneless, skinless chicken breasts, cut into bite-sized cubes - 3 tablespoons olive oil - 2 garlic cloves, minced - 1 teaspoon onion powder - 1 teaspoon smoked paprika - ½ teaspoon black pepper - Salt, to taste - 1 tablespoon fresh lemon juice - ½ teaspoon red pepper flakes (optional) - Fresh parsley, chopped, for garnish You can add more flavor and texture with these optional ingredients: - Other vegetables like bell peppers or carrots - Different herbs such as thyme or rosemary - Quinoa or brown rice for extra carbs - Greek yogurt for a creamy dressing Each ingredient in this meal serves a purpose: - Broccoli: Full of vitamins C and K, plus fiber. - Potatoes: Provide potassium and energy through carbs. - Chicken: A great source of lean protein for muscle health. - Olive oil: Contains healthy fats that support heart health. - Garlic: Boosts immunity and adds flavor without extra calories. - Onion powder and smoked paprika: Enhance taste with antioxidants. - Black pepper: Aids digestion and adds a bit of heat. - Lemon juice: Offers vitamin C and brightens flavors. - Red pepper flakes: Can give a spicy kick and boost metabolism. - Parsley: Adds freshness and contains vitamins A, C, and K. These ingredients work together to create a balanced meal that is both delicious and nutritious. {{ingredient_image_2}} Start by washing your broccoli. Cut it into small florets. Next, wash the potatoes. Dice them into 1-inch cubes. This size helps them cook evenly. In a large bowl, mix the potatoes and broccoli. Drizzle in 3 tablespoons of olive oil. Add salt, black pepper, onion powder, and smoked paprika. Toss everything well. Use your hands or a spatula. You want all the pieces coated in oil and spices. Preheat your oven to 400°F (200°C). Line a large baking sheet with parchment paper. This makes cleanup a breeze. Spread the seasoned potatoes and broccoli on one half of the baking sheet. Make sure they are in a single layer. This helps them cook evenly. In the same bowl, add your cubed chicken. Mince 2 garlic cloves and add them too. Squeeze in 1 tablespoon of fresh lemon juice. If you like spice, add the red pepper flakes. Mix everything well, so the chicken gets coated. Place the chicken on the other half of the baking sheet. Keep it separate from the vegetables. Bake everything for 25-30 minutes. Check that the chicken is fully cooked. It should reach 165°F (75°C). The potatoes should be tender and golden brown. Once out of the oven, let everything cool for a few minutes. Divide the chicken, broccoli, and potatoes into meal prep containers. For a nice touch, sprinkle some chopped parsley on top. To make it look fancy, layer the chicken and vegetables nicely in each container. Just before you eat, drizzle a little extra lemon juice on top. This adds a fresh burst of flavor. To make meal prep easy, gather all your ingredients first. This saves time as you cook. Chop your veggies and chicken ahead of time. Store them in containers to keep them fresh. You can also cook in batches. Prepare more than one meal at a time. This way, you save effort and energy for future meals. One common mistake is overcrowding the baking sheet. When you pack it too tight, food won’t cook evenly. Instead, spread the chicken and veggies out. This helps them roast nicely. Another mistake is not seasoning enough. Always taste your food as you cook. Adjust with salt and spices to achieve the best flavor. To cook chicken perfectly, cut it into even pieces. This ensures it cooks at the same rate. Use a meat thermometer to check the chicken. It should reach 165°F (75°C). For tender potatoes, choose medium-sized ones. Cut them into 1-inch cubes for even cooking. Bake them until they're golden brown and soft. This method gives you the best texture. Pro Tips Pre-cook Potatoes: For quicker cooking, you can parboil the diced potatoes for about 5 minutes before adding them to the baking sheet. Use Fresh Ingredients: Fresh garlic and herbs significantly enhance the flavor of your dish compared to dried or powdered alternatives. Customize Your Spice Level: Feel free to adjust the amount of red pepper flakes based on your heat preference to make this dish milder or spicier. Meal Prep Magic: This dish keeps well in the refrigerator for up to 4 days, making it perfect for meal prep and on-the-go lunches. {{image_4}} You can swap broccoli for other veggies. Cauliflower adds a nice crunch. Carrots bring a sweet touch, while bell peppers add color and flavor. Spinach is a great leafy green option. Mix and match for a fun twist! Chicken is tasty, but you can try other proteins. Turkey works well and is lean. Tofu or tempeh is perfect for a plant-based choice. Shrimp cooks fast and adds a seafood flavor. Choose what you love! To make the dish pop, think about spices. Adding cumin gives a warm taste. You can try Italian herbs for a fresh vibe. A splash of soy sauce adds depth. Don't forget about lemon zest for a bright kick! To keep your Chicken Broccoli Potatoes Meal Prep fresh, use airtight containers. Glass or BPA-free plastic containers work best. Divide the meal into portions. This helps with serving and keeps food fresh. Label each container with the date. This way, you can track how long it has been stored. Store your containers in the fridge. Keep them away from light and heat sources. When stored properly, your meal prep will last about four days in the fridge. After that, the chicken may dry out, and the veggies may lose their crunch. If you want to keep it longer, consider freezing it. In the freezer, the meal can last up to three months. Just remember to thaw it in the fridge before reheating. To reheat, remove the lid and place the container in the microwave. Heat on high for two to three minutes. Stir halfway through to ensure even heating. The chicken should reach 165°F (75°C). If you prefer the oven, preheat it to 350°F (175°C). Transfer the meal to an oven-safe dish and cover it. Bake for about 15-20 minutes or until heated through. Adding a splash of lemon juice before serving can boost flavor. Enjoy your tasty meal! Yes, you can freeze this meal prep. First, let it cool completely. Then, place portions in airtight containers. Label them with the date. It can stay in the freezer for up to three months. To reheat, thaw in the fridge overnight. Then, warm it in the oven or microwave until hot. Many sides go well with chicken, broccoli, and potatoes. Here are some ideas: - Quinoa: Adds a nutty flavor and extra protein. - Brown rice: A hearty and filling option. - Mixed greens salad: Provides a fresh crunch. - Roasted carrots: Adds a sweet touch. - Garlic bread: A tasty side to soak up flavors. You can easily adjust this meal prep. For gluten-free diets, just ensure your spices are gluten-free. If you want a lower-carb option, swap potatoes for cauliflower. For a vegetarian version, use chickpeas instead of chicken. You can also replace olive oil with avocado oil for those avoiding certain fats. Always check labels for allergens! In this blog post, we explored making Chicken Broccoli Potatoes Meal Prep. You learned about essential and optional ingredients for great flavor and nutrition. We discussed step-by-step instructions for prepping and cooking. I shared tips for effective meal prep and common pitfalls to avoid. You can also find variations and storage advice to keep meals fresh. This meal is flexible and easy to customize, making it a great choice for busy days. Enjoy cooking and eating well!

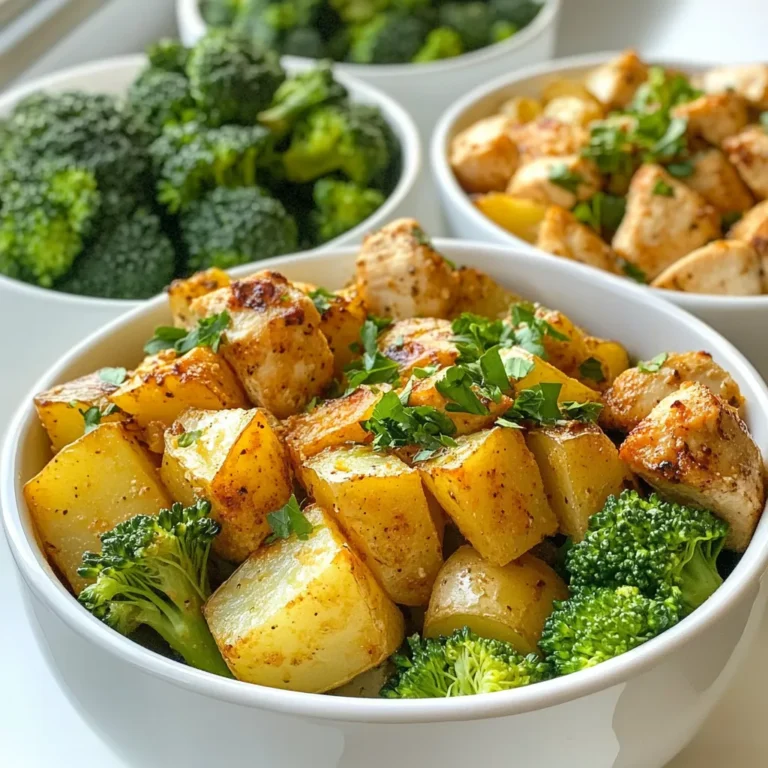
Chicken Broccoli Potatoes Meal Prep Made Simple

PREV 1 … 29 30 31 … 44 NEXT
yummybiterecipes

explore

DessertsDinnerAppetizersDrinks

Our Policies

  • Cookie Policy
  • Copyright Policy
  • Disclaimer
  • GDPR Policy
  • Terms Of Use
Back to Top
  • About
  • Contact Us
  • Privacy Policy
© 2025 yummybiterecipes