FREE DINNER EBOOK! Get your copy!
  • Cookie Policy
  • GDPR Policy
  • Disclaimer
  • Terms Of Use
  • Visit my other site: Fun Cookie Recipes
yummybiterecipes
  • Home
  • Dinner
  • Desserts
  • Drinks
  • Appetizers
  • Contact
  • About
  • Privacy Policy
  • Home
  • Dinner
  • Desserts
  • Drinks
  • Appetizers
  • Contact
  • About
  • Privacy Policy
  • Cookie Policy
  • GDPR Policy
  • Disclaimer
  • Terms Of Use
Visit my other site: Fun Cookie Recipes

HOME / CATEGORIES /

Latest

To make Garlic Herb Roasted Carrots, gather these simple ingredients: - 1 pound baby carrots, thoroughly washed and trimmed - 3 tablespoons extra virgin olive oil - 4 cloves garlic, finely minced - 1 teaspoon dried thyme - 1 teaspoon dried rosemary - 1 teaspoon coarse sea salt - ½ teaspoon freshly ground black pepper - Fresh parsley, finely chopped (for garnishing) These ingredients create a flavorful dish. Baby carrots provide natural sweetness. Olive oil helps the herbs stick and adds richness. Garlic gives the dish a lovely aroma. Dried thyme and rosemary add depth to the flavor. Sea salt enhances all the tastes, while black pepper adds a hint of spice. Finally, fresh parsley brightens the dish and makes it look beautiful. When you combine these ingredients, you create a tasty side that pairs well with many meals. Use this recipe to impress your family or guests. The vibrant colors and inviting scents will surely draw everyone in. {{ingredient_image_2}} 1. Preheat the oven Start by preheating your oven to 425°F (220°C). This heat will help the carrots roast well. 2. Prepare the marinade In a big bowl, mix 3 tablespoons of olive oil, 4 minced garlic cloves, 1 teaspoon each of thyme and rosemary, 1 teaspoon of sea salt, and ½ teaspoon of black pepper. Whisk until it’s all combined. The mixture should smell amazing. 3. Coat the carrots Add 1 pound of baby carrots to the bowl. Toss them well in the marinade. Make sure every carrot gets a nice coat. This is where the flavor starts to build. 1. Arrange on baking sheet Line a baking sheet with parchment paper. Spread the marinated carrots in a single layer. Leave some space between each carrot to help them roast evenly. 2. Oven roasting details Place the baking sheet in your hot oven. Roast the carrots for 25-30 minutes. This time will make them tender and give them a nice caramelized look. 3. Stirring midway for even cooking Halfway through roasting, take the sheet out and gently stir the carrots. This helps them cook evenly and get that golden color all around. 1. Serving suggestions Once the carrots are done, take them out of the oven. Place them on a serving platter. This dish looks great on any table. 2. Garnishing with parsley Finish with a sprinkle of fresh parsley. This adds a pop of color and fresh taste. Your Garlic Herb Roasted Carrots are now ready to enjoy! To get tender carrots, aim for baby carrots. They cook faster and have great flavor. If you use larger carrots, cut them into smaller pieces. This helps them roast evenly. Always wash and trim your carrots before cooking. It makes a big difference in taste. Herbs can change the taste of your dish. If you don't have thyme or rosemary, try oregano or basil. Both work well with carrots. You can also add other vegetables. Sweet potatoes or parsnips roast nicely with carrots. Mix them for a colorful dish. For serving, choose a rustic wooden bowl. It adds a warm, homey feel. You can also use a colorful ceramic dish to show off the bright orange of your carrots. When plating, try stacking the carrots in a fan shape. This makes your dish look fancy and inviting. Pro Tips Choose Fresh Carrots: Opt for fresh, vibrant baby carrots for the best flavor and texture. Look for ones that are firm and free from blemishes. Experiment with Herbs: Feel free to swap out the dried thyme and rosemary for other herbs like dill or oregano to customize the flavor profile to your liking. High Heat is Key: Roasting at a high temperature caramelizes the natural sugars in the carrots, enhancing their sweetness and creating a lovely golden color. Don’t Overcrowd the Pan: Give each carrot enough space on the baking sheet to ensure they roast evenly and achieve that desired crispness. {{image_4}} You can change the flavor of your carrots by using different herbs. An Italian herb blend adds a nice twist. Mix in oregano, basil, and marjoram for a delicious taste. Using fresh herbs can make your dish even tastier. Fresh thyme or rosemary gives a bright flavor that dried herbs can’t match. Just remember to use more fresh herbs than dried. A good rule is three times the amount. Adding a touch of sweetness can enhance the flavor of your roasted carrots. Honey or maple syrup can add a lovely glaze. Just drizzle a bit over the carrots before roasting. You can also mix in other root vegetables. Think parsnips or sweet potatoes. This adds variety and texture to your dish. Just cut them to the same size as your carrots. If you love heat, try adding chili flakes. A pinch can bring a nice kick to your dish. Just be careful not to add too much. Adding citrus zest can brighten up the flavor. Lemon or orange zest can add a fresh taste that pairs well with the garlic. Just sprinkle some on after roasting for a zesty finish. After making Garlic Herb Roasted Carrots, let them cool first. Store leftovers in an airtight container. They stay fresh in the fridge for up to four days. When you're ready to eat, reheat them in the oven at 350°F (175°C) for about 10 minutes. This way, they regain some of their crispy texture. You can freeze roasted carrots if you want to keep them longer. First, let them cool completely. Spread them out on a baking sheet in a single layer. Freeze for about two hours, then transfer them to a freezer bag. Remove as much air as you can to prevent freezer burn. For thawing, take them out a day before and place them in the fridge. You can also reheat them directly from the freezer in the oven. Garlic Herb Roasted Carrots stay fresh for four days in the fridge. If you freeze them, they last for about three months. Check for signs of spoilage, like mold or an off smell. If they look or smell bad, throw them away. Always trust your senses when it comes to food safety. Yes, you can use regular carrots. Just peel and cut them into sticks. Aim for sizes similar to baby carrots. This helps them roast evenly. Regular carrots add good flavor. Roasted carrots can last for about 3 to 5 days in the fridge. Keep them in an airtight container. Check for any signs of spoilage before eating. If they smell bad or look slimy, toss them out. Yes, you can prepare them ahead. Chop and coat the carrots with the marinade. Store them in the fridge for up to 24 hours. This makes the flavors even better. - Tips for pre-roasting: - Marinate the carrots the night before. - Spread them on a baking sheet before roasting. - Add a bit more oil if needed to keep them moist. Garlic Herb Roasted Carrots go well with many dishes. They pair nicely with grilled chicken or roasted meats. They also complement quinoa or rice dishes. Add them to salads for a colorful touch. These carrots add flavor and color to your meal. Roasting baby carrots is easy and rewarding. You learned about simple ingredients and prep steps. The instructions helped you create a tasty dish. Tips on flavors and storage keep your meal fresh. You can mix herbs and even sweeten your carrots. Final thoughts: enjoy being creative with your cooking. Experiment with different flavors and serve your carrots in fun ways. The joy of cooking lies in trying new things, so get started!

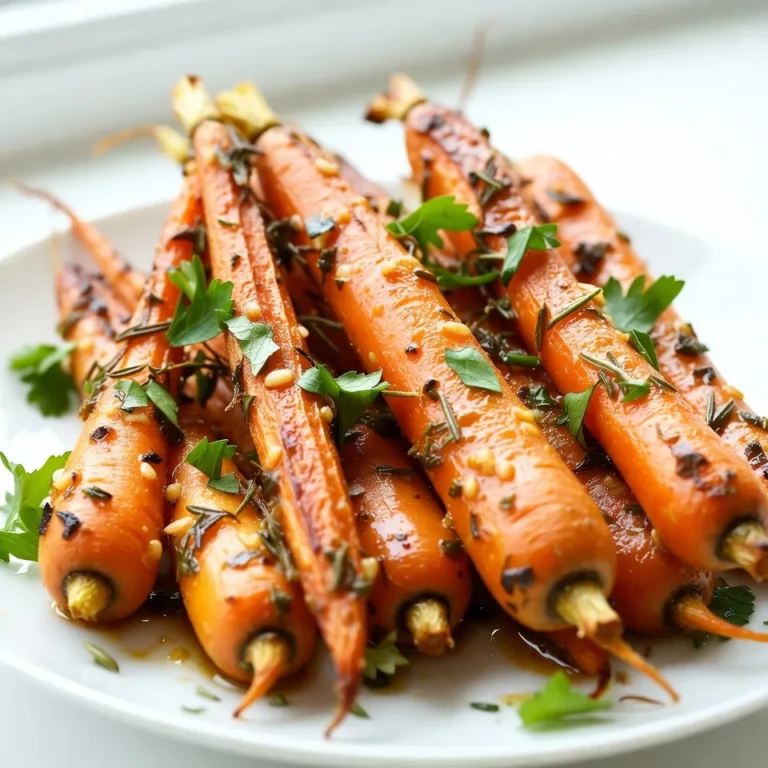
Garlic Herb Roasted Carrots Flavorful and Simple Dish

- 1 can (15 oz) chickpeas, thoroughly drained and rinsed - 1 tablespoon extra virgin olive oil - 1 teaspoon garlic powder - 1 teaspoon smoked paprika - 1 teaspoon ground cumin - ½ teaspoon fine sea salt - ¼ teaspoon freshly ground black pepper - ¼ teaspoon cayenne pepper (optional, for an extra kick) - Fresh parsley, finely chopped (for garnish) To make crispy air fryer chickpeas, you need simple ingredients. Start with a can of chickpeas. These small legumes pack a punch of protein and fiber. Drain and rinse them well to remove excess sodium and improve taste. You want them clean and ready to soak up flavors. Next, grab some extra virgin olive oil. This will help the spices stick to the chickpeas and add a rich flavor. You can use other oils, but olive oil is my favorite for its health benefits. Now, let’s talk seasonings. You will need garlic powder, smoked paprika, ground cumin, fine sea salt, black pepper, and cayenne pepper. Each of these makes your chickpeas pop with flavor! Garlic powder brings a nice aroma, while smoked paprika adds a touch of warmth. Cumin gives a hint of earthiness. If you like heat, include cayenne pepper. Lastly, don’t forget fresh parsley. This herb adds color and a burst of freshness when you serve your snack. Gather these ingredients, and you are ready to make a tasty and healthy snack! {{ingredient_image_2}} - Preheating the air fryer: Start by preheating your air fryer to 400°F (200°C). This step helps the chickpeas cook evenly. Let it heat up for about 5 minutes. - Draining and rinsing the chickpeas: Open a can of chickpeas (15 oz) and drain them well. Rinse them under cold water to remove any canning liquid. - Drying the chickpeas thoroughly: Spread the chickpeas on a clean kitchen towel or paper towels. Pat them dry gently. This step is key to making them crispy. - Combining oil and spices: In a large mixing bowl, add the dried chickpeas. Drizzle in 1 tablespoon of extra virgin olive oil. Sprinkle in 1 teaspoon of garlic powder, 1 teaspoon of smoked paprika, 1 teaspoon of ground cumin, ½ teaspoon of fine sea salt, ¼ teaspoon of black pepper, and ¼ teaspoon of cayenne pepper if you want some heat. - Tossing until evenly coated: Use your hands or a spatula to mix everything well. Make sure each chickpea gets coated with the oil and spices. - Cooking temperature and time: Once your air fryer is preheated, place the chickpeas in the basket. Spread them in a single layer. Cook them for 12-15 minutes. - Shaking the basket for even crispiness: Halfway through cooking, shake the basket gently. This helps them brown and crisp evenly. - Resting the chickpeas post-cooking: After cooking, take the chickpeas out and let them rest for a few minutes. They will get even crunchier as they cool. To get the best crunch from your chickpeas, drying is key. After rinsing your chickpeas, place them on a clean kitchen towel. Pat them gently until they are dry. Any moisture left will make them soggy, so take your time here. Avoid overcrowding in the air fryer. If you pile too many chickpeas in, they won’t cook evenly. Instead, arrange them in a single layer. If needed, cook in small batches. This gives each chickpea room to crisp up nicely. For tasty chickpeas, don't be afraid to play with seasonings. The base recipe uses garlic powder, smoked paprika, and cumin. You can also try new mixes. For a zesty twist, add lemon zest or some chili powder. Adding extra spices really boosts flavor. A pinch of curry powder or a splash of soy sauce can transform your snack. Taste as you go and adjust to your liking. Experiment with fresh herbs or different spice blends. Your chickpeas can be whatever you want! Pro Tips Dry Chickpeas Thoroughly: Make sure to remove as much moisture as possible from the chickpeas after rinsing. This is key for achieving that perfect crunchy texture. Use the Right Seasonings: Experiment with different spices and herbs to customize the flavor of your chickpeas. Try adding nutritional yeast for a cheesy flavor or different peppers for a spicy kick. Avoid Overcrowding: Cook the chickpeas in a single layer in the air fryer. If you have a large batch, it's better to cook in smaller portions to ensure they crisp up nicely. Let Them Rest: After air frying, allow the chickpeas to rest for a few minutes. They will continue to crisp up as they cool, enhancing their crunchiness. {{image_4}} You can change the flavor of your crispy air fryer chickpeas easily. Here are some ways to try: - Italian Seasoning: Use dried oregano, basil, and thyme for a classic taste. - Curry Powder: Add a warm flavor with curry powder for a unique twist. - Taco Seasoning: Mix in taco spice for a fun kick. Fresh herbs can brighten your dish. Fresh parsley adds color and taste. You can also use fresh cilantro or dill. Dried spices give a strong flavor and are easy to store. Use what you like best for your snacks! You can cook chickpeas in many ways. If you don’t have an air fryer, try oven roasting. Here’s how: - Oven Roasting: Preheat your oven to 400°F (200°C). Spread seasoned chickpeas on a baking sheet. Bake for 25-30 minutes until golden. Shake the pan halfway to ensure they cook evenly. Cooking times vary by method. Air frying takes about 12-15 minutes. Oven roasting takes longer, so keep an eye on them. Either way, you'll enjoy a tasty snack! To keep your leftover chickpeas fresh, use an airtight container. Glass or plastic containers work well. Make sure they are completely cool before sealing. This helps avoid moisture build-up. If you have many leftovers, store them in smaller portions for easy snacking later. Store the chickpeas in the fridge. They stay good for about 3 to 5 days. Always check for any off smells or signs of spoilage before eating. For longer storage, freeze the chickpeas in a freezer-safe bag. They can last up to 3 months in the freezer. Just remember to label the bag with the date. To bring back the crispiness, preheat your air fryer to 400°F (200°C). Spread the chickpeas in a single layer in the basket. Heat them for about 5 to 7 minutes. Shake the basket halfway through to ensure they crisp evenly. If you want to use leftover chickpeas in different ways, try adding them to salads or soups. You can also blend them into hummus for a tasty dip. They add a crunchy texture to grain bowls too. Get creative with your leftovers! To make crispy chickpeas, start by drying them well. After you drain and rinse them, spread them on a towel. Pat them dry gently. This step helps remove moisture that can make them soggy. Next, toss them with olive oil and spices. The oil helps with crisping. Make sure to coat each chickpea evenly. When cooking, avoid overcrowding the air fryer. If you pack too many in, they won’t crisp up. Cook them in batches if needed. Shake the basket halfway through cooking. This will help them brown evenly. Yes, you can use dried chickpeas. First, soak them overnight in water. Then, cook them until tender. This usually takes about 1-2 hours. After cooking, drain and dry the chickpeas just like canned ones. You might need to adjust the cooking time in the air fryer. Start with 15-20 minutes and check for crispiness. The best seasonings for chickpeas include garlic powder, smoked paprika, and cumin. These add depth and flavor. You can also try cayenne pepper for heat. If you want something different, try adding curry powder or Italian herbs. For a fresh twist, sprinkle with lemon zest or fresh herbs after cooking. You can create crispy, tasty chickpeas using just a few ingredients and steps. Start by prepping and seasoning the chickpeas. Remember, drying them well makes all the difference. Experiment with flavors by trying different spices or herbs. Whether using an air fryer or oven, both methods can lead to delicious snacks. Don't forget to store leftovers properly for future munching. Enjoy your new go-to snack and make it your own!

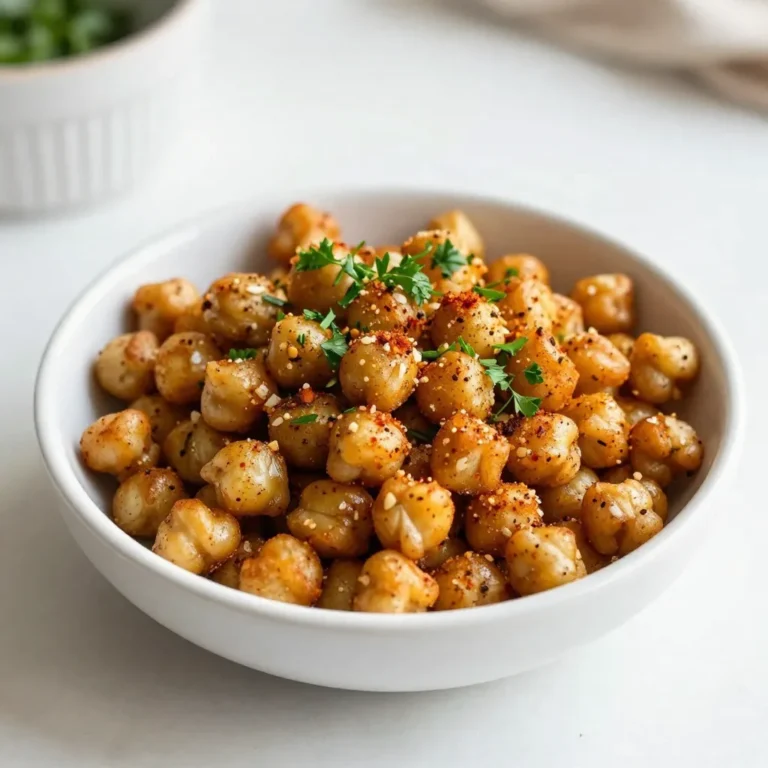
Crispy Air Fryer Chickpeas Tasty and Healthy Snack

To make these tasty pancakes, you need these key ingredients: - 1 cup rolled oats - 1/2 cup pumpkin puree - 1/2 cup cottage cheese - 2 large eggs - 1/4 cup protein powder (vanilla or unflavored) - 1 tsp baking powder - 1/2 tsp pumpkin pie spice - 1/4 tsp salt - Olive oil or cooking spray for frying These main ingredients give the pancakes a great texture and a protein boost. The oats add fiber, while the pumpkin adds moisture and flavor. Cottage cheese makes them creamy and rich in protein. Eggs help bind everything together, and the protein powder adds even more nutrition. You can customize your pancakes with these optional ingredients: - 1-2 tbsp maple syrup (for sweetness) - A handful of nuts like pecans or walnuts - Chocolate chips or dried fruit for extra flavor Adding maple syrup can sweeten the pancakes and enhance their taste. Nuts give a nice crunch and add healthy fats. Chocolate chips can turn these pancakes into a fun treat! Each serving of these high protein pumpkin pancakes is packed with nutrition. Here’s a quick breakdown of what you get: - Calories: About 300 - Protein: Roughly 25g - Carbohydrates: Around 35g - Fat: About 10g These pancakes are not only delicious but also keep you full and energized. The high protein content makes them a smart choice for breakfast. Enjoy this healthy start to your day! {{ingredient_image_2}} To start, gather your ingredients. In a high-speed blender, add: - 1 cup rolled oats - 1/2 cup pumpkin puree - 1/2 cup cottage cheese - 2 large eggs - 1/4 cup protein powder - 1 tsp baking powder - 1/2 tsp pumpkin pie spice - 1/4 tsp salt - 1-2 tbsp maple syrup (if you want it sweeter) Blend these on high. You want a smooth and creamy batter. Make sure there are no lumps left. This step is key for fluffy pancakes. Next, take a non-stick skillet or griddle. Heat it over medium heat. Once warm, coat the surface with olive oil or cooking spray. This helps to keep the pancakes from sticking. Now, pour 1/4 cup of the batter onto the skillet for each pancake. Let them cook undisturbed. You will see bubbles forming on the surface after about 2-3 minutes. The edges will look firmer. This means they are ready to flip. Using a spatula, carefully flip the pancakes over. Cook them on the other side for another 2-3 minutes. You want them golden brown and cooked through. Once cooked, take the pancakes off the skillet. Place them on a warm plate. You can also use a low-temperature oven to keep them warm. Repeat the cooking process with the rest of the batter. These steps will help you make delicious high protein pumpkin pancakes. Enjoy every bite! To get the best pancake texture, blend the batter well. You want it smooth and creamy. If your batter is too thick, add a splash of milk or water. Heat your skillet to medium, not high. This helps cook the pancakes evenly. Flip when bubbles form and edges look set. This timing gives you fluffy pancakes. You can swap some ingredients for healthier options. Use Greek yogurt instead of cottage cheese for extra protein. If you want a dairy-free option, use silken tofu. For oats, try oat flour if you prefer a finer texture. Instead of maple syrup, use mashed banana for natural sweetness. These swaps keep your pancakes tasty and nutritious. Serve your pancakes stacked high on a plate. Drizzle with maple syrup for sweetness. Add a sprinkle of pumpkin pie spice for extra flavor. Want some crunch? Top with toasted pecans or walnuts. Fresh fruit like sliced bananas or berries makes a great addition. Serve with a side of yogurt to boost protein even more. Enjoy this wholesome meal! Pro Tips Use Fresh Pumpkin Puree: For the best flavor and texture, consider using homemade pumpkin puree rather than canned. It can brighten the taste of your pancakes and provide a fresher, more vibrant flavor. Experiment with Spices: While pumpkin pie spice is a classic choice, don’t hesitate to add a pinch of nutmeg or cinnamon for an extra flavor dimension. Tailor the spices to your personal taste for a unique twist. Check Doneness Carefully: To ensure your pancakes are perfectly cooked, check the internal temperature with a food thermometer; they should reach 160°F. This guarantees they are safe to eat and wonderfully fluffy. Make Ahead and Freeze: For a quick breakfast option, make a batch of pancakes ahead of time and freeze them. Simply reheat in the toaster or microwave for a nutritious meal in minutes. {{image_4}} To make these pancakes vegan, replace the eggs and cottage cheese. Use a flax egg instead of eggs. Mix 1 tablespoon of ground flaxseed with 2.5 tablespoons of water. Let it sit for a few minutes to thicken. For the cottage cheese, use silken tofu. Blend it until smooth to mimic the creamy texture. You can still use rolled oats, pumpkin puree, protein powder, and spices. This vegan twist keeps the protein high and the flavor delicious. For a gluten-free version, simply choose gluten-free oats. They work just as well as regular oats. Make sure your protein powder is gluten-free too. Also, check the baking powder to ensure it’s gluten-free. You can use almond flour or coconut flour instead of oats for a different texture. These options keep your pancakes fluffy and light while still being gluten-free. You can easily change the flavor of these pancakes. Add extra spices like cinnamon, nutmeg, or ginger for a warm taste. You can also mix in some chocolate chips for a sweet touch. If you want a fruity twist, add mashed bananas or blueberries to the batter. For nut lovers, toss in chopped walnuts or pecans. Each variation adds a unique flavor to your breakfast treat. Enjoy experimenting with different tastes! To store leftover pancakes, let them cool first. Place them in an airtight container. You can stack them with parchment paper in between to avoid sticking. Keep the container in the fridge. They will stay fresh for about three days. For meal prep, freezing is a great option. Wrap each pancake in plastic wrap. Then, put them in a freezer-safe bag or container. They can last for up to three months in the freezer. When you want them, just take out what you need. To reheat, use the microwave or a skillet. If using the microwave, warm for about 30 seconds. Check them and heat more if needed. For the skillet, heat on medium-low for about one minute per side. This way, the pancakes will regain their fluffy texture. Enjoy them warm for the best taste! These pancakes are high in protein due to key ingredients. First, cottage cheese adds a creamy texture and boosts protein. Second, protein powder contributes even more protein. With two eggs in the batter, you also gain additional protein. The combination of these ingredients gives you a filling meal. Yes, you can use various types of protein powder. Vanilla or unflavored protein works best, but feel free to experiment. Plant-based protein powder is a good choice too. Just keep in mind that some powders can change the pancake's taste or texture. To enhance the pumpkin flavor, add more pumpkin pie spice to the batter. You can also try using fresh pumpkin puree instead of canned. A splash of vanilla extract will boost the pumpkin taste too. Lastly, topping the pancakes with spiced pumpkin seeds can add flavor and crunch. You can tell the pancakes are done when bubbles form on the surface. The edges should look firm and slightly dry. After flipping, cook until the other side turns golden brown. A toothpick inserted in the center should come out clean to ensure they are fully cooked. Yes, you can make these pancakes ahead of time. Prepare the batter and store it in the fridge overnight. Just give it a quick stir before cooking. You can also cook the pancakes in advance and store them. Reheat them in the toaster or microwave when ready to eat. High protein pumpkin pancakes are easy and tasty. We covered key ingredients, step-by-step instructions, and helpful tips. You learned about variations and storage options to keep your pancakes fresh. These pancakes can suit many diets, from vegan to gluten-free. Embrace your creativity and swap in your favorite flavors. Enjoy these nutritious pancakes any time. They boost your energy and health while tasting great. Now, it’s time to cook and savor your delicious creations!

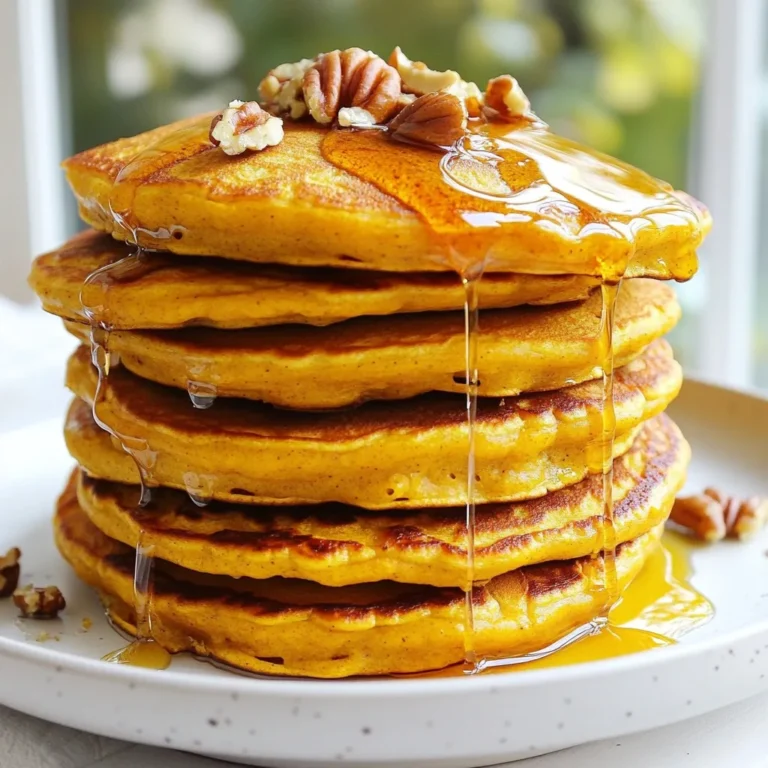
High Protein Pumpkin Pancakes for a Nutritious Breakfast

- 2 cups all-purpose flour - 1/2 cup packed brown sugar - 1 tablespoon baking powder - 1 teaspoon ground ginger - 1 teaspoon ground cinnamon - 1/4 teaspoon ground nutmeg - 1/4 teaspoon ground allspice - 1/2 teaspoon salt - 1/2 cup cold unsalted butter, cubed - 1/2 cup molasses - 1/4 cup heavy cream - 1 large egg - 1/2 cup chopped crystallized ginger (optional) - 1/2 cup powdered sugar - 1-2 tablespoons milk When you want to make gingerbread scones, start with the dry ingredients. Measure out 2 cups of all-purpose flour. This forms the base. Next, add 1/2 cup of packed brown sugar for sweetness. Baking powder helps the scones rise. Use 1 tablespoon of it. Spices give these scones their flavor. Use 1 teaspoon of ground ginger and 1 teaspoon of ground cinnamon. Nutmeg and allspice add depth. Measure 1/4 teaspoon of each. Finally, sprinkle in 1/2 teaspoon of salt to enhance all the flavors. Next, gather the wet ingredients. You need 1/2 cup of cold unsalted butter, cut into cubes. This keeps the scones flaky. Mix it with 1/2 cup of molasses for that rich, dark flavor. Add 1/4 cup of heavy cream and 1 large egg to bind everything. If you love ginger, add 1/2 cup of chopped crystallized ginger for an extra zing. For the glaze, combine 1/2 cup of powdered sugar and 1-2 tablespoons of milk. This will give your scones a sweet finish. Adjust the milk to get the right thickness. With these ingredients ready, you’ll create a festive treat that fills your home with warmth and joy. {{ingredient_image_2}} 1. Preheat your oven to 400°F (200°C). Line a baking sheet with parchment paper. 2. In a large bowl, whisk together: - 2 cups all-purpose flour - 1/2 cup packed brown sugar - 1 tablespoon baking powder - 1 teaspoon ground ginger - 1 teaspoon ground cinnamon - 1/4 teaspoon ground nutmeg - 1/4 teaspoon ground allspice - 1/2 teaspoon salt Mix until everything is well blended and smooth. 3. Next, take 1/2 cup cold, cubed unsalted butter. Add it to the flour mixture. Use a pastry cutter or your fingers to work the butter into the flour. Stop when the mix looks like coarse crumbs. You want small pieces of butter to stay visible. 1. In a separate bowl, whisk together: - 1/2 cup molasses - 1/4 cup heavy cream - 1 large egg Mix until smooth and fully blended. 2. Gradually pour the molasses mix into the flour mix. Use a spatula or wooden spoon to fold them together. If you like, add 1/2 cup chopped crystallized ginger for a fun, sweet kick. 1. Turn the dough out onto a floured surface. Using clean hands, knead it gently just a few times. You want it to come together without overworking it. Shape it into a circle about 1 inch thick. 2. Use a sharp knife to cut the dough into 8 equal wedges, like a pizza. Carefully move each scone to the lined baking sheet. Make sure to leave a little space between each piece. 3. Bake the scones in your preheated oven for 15 to 18 minutes. They should be lightly golden on the edges. Check with a toothpick; it should come out clean when they are done. To make the best gingerbread scones, start with cold butter. Cold butter helps create flaky layers. When you mix it into the flour, it should remain chunky. This leads to a light and airy scone. If your butter is too warm, the scones will not rise well. Next, don’t overwork the dough. Gently mix until the ingredients just come together. Kneading too much can make your scones tough. You want a soft, tender dough. A few light kneads on a floured surface are all you need. Using fresh spices makes a big difference. Always choose high-quality ground ginger, cinnamon, and nutmeg. Fresh spices add depth and warmth. You can also include chopped crystallized ginger. It adds a nice chewy texture and a burst of flavor. If you want to play around, consider adding nuts or dried fruit. Walnuts or pecans can bring a nice crunch. Dried cranberries or raisins add sweetness. These options make your scones even more special. The glaze should be smooth and drizzle-able. Start with powdered sugar and add milk slowly. Mix until you reach your desired thickness. If it’s too thick, add more milk. If it’s too runny, add more powdered sugar. A good glaze enhances the scone's look and taste. It adds a sweet touch that balances the spices in your scones. Pro Tips Chill Your Ingredients: For flakier scones, ensure your butter and cream are cold. This helps create a better texture in the final product. Don’t Overwork the Dough: When mixing the ingredients, only combine until just mixed. Overworking can lead to tough scones. Adjust the Spice Level: Feel free to increase or decrease the amount of spices according to your taste preferences for a more personalized flavor. Use Fresh Ingredients: For the best flavor, use fresh spices and high-quality molasses. This makes a noticeable difference in taste. {{image_4}} You can switch up the classic gingerbread scones in fun ways. Two great options are pumpkin spice and chocolate chip. - Pumpkin spice gingerbread scones: Add pumpkin puree and a blend of warm spices. Use cinnamon, nutmeg, and cloves for that extra cozy flavor. This twist makes your scones taste like fall in every bite. - Chocolate chip gingerbread scones: Mix in semi-sweet chocolate chips for a delightful treat. The chocolate adds a rich, sweet touch to the spiced dough. It’s a hit for both kids and adults. You can also make gingerbread scones fit different diets. Here are some easy swaps: - Gluten-free gingerbread scones: Use gluten-free all-purpose flour in place of regular flour. This way, you keep the same great taste without gluten. Just check your baking powder for gluten-free options. - Vegan gingerbread scones: Swap the egg for a flaxseed egg or applesauce. Use plant-based butter and non-dairy milk. These changes keep your scones light and fluffy while being vegan-friendly. When it comes to serving your gingerbread scones, think about what pairs well. - Pairing with festive beverages: Enjoy your scones with warm apple cider or hot cocoa. The spices in the scones match perfectly with these drinks. - Serving with jam or cream: A dollop of whipped cream or a spread of your favorite jam adds a sweet touch. Try cranberry jam for a holiday twist. This makes your scones even more delightful. After baking your gingerbread scones, store them in an airtight container. Keep the container at room temperature. This will help keep the scones fresh for up to three days. Make sure they cool completely before sealing them. This prevents moisture build-up and keeps them from getting soggy. You can freeze unbaked scones if you want to enjoy them later. After shaping the dough into wedges, place them on a baking sheet. Freeze them for about an hour until firm. Then, transfer the frozen scones to a freezer bag. They can last up to three months in the freezer. When you are ready to bake, do not thaw them. Just bake the frozen scones directly from the freezer. You may need to add a few extra minutes to the baking time. To reheat your scones, use an oven for best results. Preheat the oven to 350°F (175°C). Place the scones on a baking sheet and warm them for about 5 to 10 minutes. You can also use a microwave, but be cautious. Heat them in short bursts of 10-15 seconds to avoid making them tough. Enjoy your warm gingerbread scones! Yes, you can make gingerbread scones ahead of time. Prepare the dough up to the point of cutting it into wedges. Wrap the wedges tightly in plastic wrap. Place them in the fridge for up to 24 hours. You can also freeze them. For freezing, use a freezer-safe bag. Keep them for up to three months. When ready to bake, just add a few extra minutes to the baking time. You can tell when the scones are done baking by looking for a few signs. They should be lightly golden around the edges. A toothpick inserted into the center should come out clean. You can also lightly press the tops. They should feel firm, not doughy. Trust these visual and tactile cues for perfect scones every time. If you do not have crystallized ginger, there are good substitutes. You can use fresh ginger instead. Use about one teaspoon of fresh ginger for every half cup. Another option is ground ginger, using one teaspoon. If you want sweetness, try using diced dried fruit like apricots or raisins. These will add flavor and texture to the scones. This blog post covered how to make delicious gingerbread scones. First, we gathered dry and wet ingredients. Next, I shared step-by-step instructions for baking. We explored tips for the best results and discussed fun variations. Finally, I shared storage advice to keep your scones fresh. Now, you can enjoy warm, spiced scones at any time. Make them for yourself or share with friends. Baking these scones can bring holiday cheer to your kitchen. Happy baking!

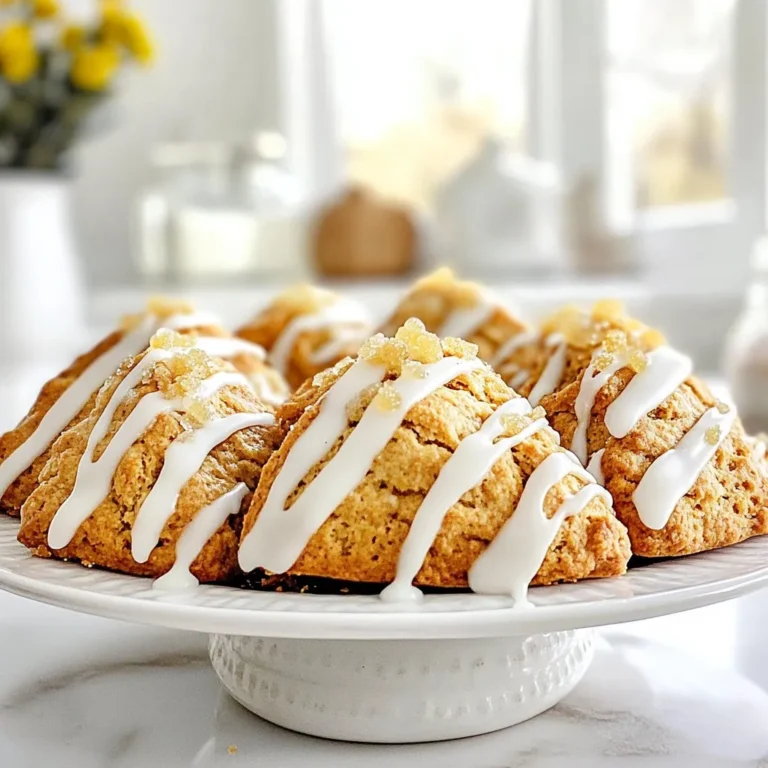
Christmas Bakery Gingerbread Scones Festive Delight

To create a refreshing watermelon feta salad, you need a few simple ingredients. Each one adds its own flavor and texture. Here’s what you’ll need: - 4 cups of seedless watermelon, cut into bite-sized cubes - 1 cup of creamy feta cheese, crumbled - 1/4 cup of fresh mint leaves, coarsely chopped - 1/4 of a red onion, thinly sliced - 2 tablespoons of high-quality olive oil - 1 tablespoon of balsamic vinegar - Salt and pepper to taste These ingredients work together to make every bite a delight. The sweet watermelon pairs well with the salty feta. Mint adds freshness, while red onion gives a nice crunch. Olive oil and balsamic vinegar tie it all together with their rich flavors. Use fresh, high-quality ingredients for the best taste. {{ingredient_image_2}} Start by cutting the watermelon into bite-sized cubes. You need about 4 cups of watermelon. Make sure the pieces are even, so they mix well. Place the cubes in a large mixing bowl. This bowl should be big enough to toss everything later. Next, take 1 cup of creamy feta cheese. Crumble it over the watermelon. Aim for an even sprinkle so every bite has feta. Now, add 1/4 cup of fresh mint leaves. Coarsely chop the mint before adding it. Then, slice 1/4 of a red onion thinly. This adds a nice crunch and flavor. In a small bowl, combine 2 tablespoons of high-quality olive oil with 1 tablespoon of balsamic vinegar. Add a pinch of salt and some freshly cracked black pepper. Whisk these together until they mix well. This dressing adds richness and tang. Drizzle the dressing over the watermelon mix. Gently toss everything together. Be careful not to mash the watermelon. You want the salad to stay fresh and bright. Taste it and adjust with more salt or vinegar if needed. Let your salad sit for about 10 minutes. This resting time helps the flavors blend together. It makes the salad more tasty. After that, it’s ready to serve! When picking a watermelon, look for one that feels heavy. It should have a uniform shape and a yellow spot on one side. This spot shows where it rested on the ground. A dull skin means it is ripe. Avoid shiny watermelons; they are often not sweet. If you tap it, a deep sound means it is ready to eat. You can change the salad's taste by tweaking the ingredients. If you want more sweetness, add a bit of honey or extra watermelon. For a tangier flavor, use more balsamic vinegar. Adding a pinch of chili flakes can give it a spicy kick. Always taste as you go. This way, you can find what you love best. To impress your guests, serve the salad in a large, shallow bowl. This makes it look fresh and inviting. Top it with whole mint leaves for a burst of color. You can also sprinkle extra feta on top for added richness. A drizzle of olive oil just before serving makes it shine. Simple touches like these take your salad from good to great! Pro Tips Choose Ripe Watermelon: Look for a watermelon that feels heavy for its size and has a uniform shape. The underside should have a creamy yellow spot where it sat on the ground, indicating ripeness. Use Fresh Ingredients: For the best flavor, opt for fresh mint and high-quality feta cheese. This will elevate the overall taste of your salad. Chill Before Serving: Refrigerate the salad for at least 30 minutes before serving. This enhances the refreshing qualities and melds the flavors beautifully. Experiment with Add-Ins: Feel free to add other ingredients such as arugula, cucumber, or even avocado to customize the salad to your taste! {{image_4}} You can easily add other ingredients to this salad. Try diced cucumber for crunch. Cherry tomatoes add color and a sweet taste. Red bell pepper gives a nice pop. Each addition brings its unique flavor and texture. Mix and match to find your favorite combo! While the balsamic dressing is tasty, you can switch it up. A lemon vinaigrette works well. Just mix fresh lemon juice with olive oil. You can also add honey for a hint of sweetness. Try a yogurt dressing for a creamy touch. Each dressing changes the salad’s vibe! If you want a vegan version, swap feta cheese for tofu. Crumbled firm tofu mimics that creamy texture. Use a vegan balsamic dressing or lemon juice. This way, everyone can enjoy the salad. Don’t be afraid to get creative with your choices! To keep your watermelon feta salad fresh, store it in a sealed container. Use glass or plastic containers that fit well. Avoid metal containers as they can alter the taste. Place the salad in the fridge right after serving. This way, it stays cool and tasty. If stored correctly, the salad lasts about 2 to 3 days in the fridge. The watermelon can release water, making the salad watery. To prevent this, keep the dressing separate until ready to eat. This helps maintain freshness. This salad is best served cold, so no need to heat it. If you have leftovers, enjoy them chilled. Before serving, taste it again. You might need to add more salt, pepper, or a splash of vinegar. This can help refresh the flavors. Yes, you can make this salad ahead. However, I recommend not mixing the dressing until right before serving. This keeps the watermelon fresh and crisp. If you mix it too early, the watermelon can get soggy. You can prep all the other ingredients, like cutting the watermelon and crumbling the feta, in advance. You can use many herbs in this salad. Basil is a great choice for a sweet note. Cilantro adds a unique flavor that works well too. You could even try dill for a fresh twist. Feel free to mix and match herbs based on your taste. Yes, this salad is a great option for weight loss. It is low in calories and high in water content. Watermelon keeps you hydrated, while feta adds protein and flavor. This means you can enjoy a tasty dish without many calories. Absolutely! If you want a dairy-free option, try using avocado or a plant-based cheese. Goat cheese is another tasty alternative. It has a similar creamy texture and adds a tangy flavor. Just choose whatever you like best. This salad is packed with health benefits. Watermelon is hydrating and rich in vitamins A and C. Feta cheese provides protein and calcium. Mint helps with digestion and adds freshness. Together, they make a nutritious dish that supports overall health while tasting delightful. This blog post shows how to make a tasty watermelon and feta salad. We covered ingredients, step-by-step instructions, and tips for a great result. You can customize the salad with extra veggies or different dressings. Store leftovers well to keep them fresh. Enjoy this refreshing salad at your next meal. It’s simple, healthy, and delicious! Try it out and impress your friends and family.

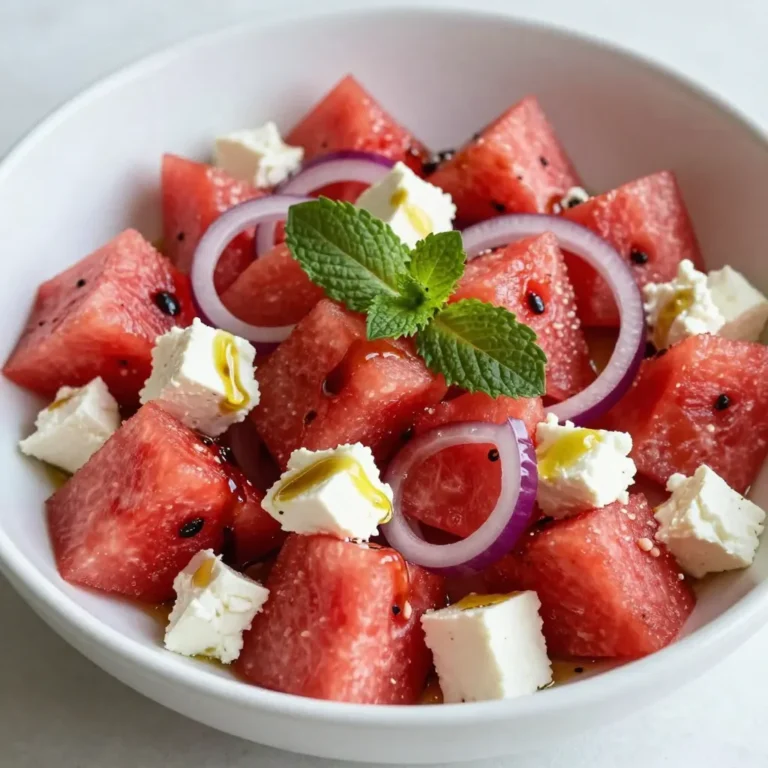
Summer Watermelon Feta Salad Refreshing and Simple Dish

- 1 ½ cups all-purpose flour - ½ teaspoon baking soda - ½ teaspoon salt - ½ cup unsalted butter, softened - ½ cup packed brown sugar - ½ cup granulated sugar - 1 large egg - 1 teaspoon pure vanilla extract - 1 cup semi-sweet chocolate chips - 1 cup mini marshmallows - 1 cup graham cracker crumbs For those who prefer different measurements, here's how to convert: - 1 ½ cups = 360 mL - ½ teaspoon = 2.5 mL - 1 cup = 240 mL - ½ cup = 120 mL - 1 large egg = about 50 grams - 1 teaspoon = 5 mL You can easily swap some ingredients if you like. Here are some ideas: - Use coconut oil instead of butter for a dairy-free option. - Replace granulated sugar with coconut sugar for a richer flavor. - Try using almond flour instead of all-purpose flour for a gluten-free treat. - If you want a different flavor, use white chocolate chips instead of semi-sweet. - You can use regular marshmallows instead of mini ones, just cut them into smaller pieces. {{ingredient_image_2}} Start by preheating your oven to 350°F (175°C). You want a warm oven to bake these bars. Next, grab a 9x9-inch baking pan. Lightly grease it or line it with parchment paper. This helps the bars come out easily after baking. In a medium bowl, add 1 ½ cups of all-purpose flour, ½ teaspoon of baking soda, and ½ teaspoon of salt. Whisk these dry ingredients together until they mix well. This step is key for even baking. In a large mixing bowl, take ½ cup of softened unsalted butter. Add ½ cup of packed brown sugar and ½ cup of granulated sugar. Use an electric mixer on medium speed. Mix for about 2 to 3 minutes. The mixture should become light and fluffy. Now, add 1 large egg and 1 teaspoon of pure vanilla extract to the butter-sugar mix. Blend these together until everything is smooth. This will make the batter rich and tasty. Gradually mix the dry flour mixture into the wet ingredients. Stir until just combined. Be careful not to overmix, as it can make the bars dense. You want a nice, soft batter. Next, gently fold in 1 cup of semi-sweet chocolate chips and 1 cup of graham cracker crumbs using a spatula. Keep a handful of each for topping. Spread half of the cookie batter into the prepared baking pan. Press it down evenly for a solid base. Sprinkle 1 cup of mini marshmallows evenly on the first layer of cookie batter. Top this with your reserved chocolate chips and graham cracker crumbs. Carefully spoon the rest of the cookie batter over the marshmallow layer, covering it as much as you can. Place the pan in the oven and bake for 25-30 minutes. The edges should be golden brown. The center should feel set when you touch it. Once baked, take the pan out of the oven. Let the bars cool completely in the pan. This step helps them hold their shape when you cut them. Slice into squares or rectangles to serve. For a fun touch, add more mini marshmallows and chocolate chips on top. Enjoy them warm or with a scoop of vanilla ice cream! To get the best texture in your S’mores cookie bars, use soft butter. This helps create a nice, fluffy mix. Do not overmix the batter after adding the flour. This keeps your bars light and chewy. The right balance of chocolate, marshmallows, and graham crumbs makes each bite special. Also, let the bars cool completely before slicing. This helps them hold their shape. Baking time is key. Set your timer for 25 minutes first. Check the edges; they should be golden brown. The center should feel set but not hard. If your oven runs hot, check them a bit earlier. Use a toothpick; if it comes out clean, your bars are ready. Keep an eye on them to avoid overbaking. Overbaking makes them dry and crumbly, not chewy. For a fun touch, serve the warm bars with extra mini marshmallows and chocolate chips on top. This adds a nice look and extra flavor. You can also pair them with a scoop of vanilla ice cream. The cold ice cream melts into the warm bars, creating a delicious mix. If you want to impress guests, cut the bars into fun shapes using cookie cutters. Pro Tips Chill the Dough: If you have time, chill the cookie dough for about 30 minutes before baking. This helps the bars maintain their shape and prevents them from spreading too much in the oven. Use Fresh Ingredients: Always opt for fresh marshmallows and chocolate chips for the best flavor and texture. Stale ingredients can affect the overall taste of your bars. Check for Doneness: To ensure your bars are perfectly baked, use a toothpick to check the center. It should come out with a few moist crumbs, but not wet batter. Layering Technique: When layering, make sure to spread the top layer gently to avoid disturbing the marshmallows and chocolate chips underneath. This keeps all the deliciousness intact! {{image_4}} You can switch up the chocolate to suit your taste. Use dark chocolate or milk chocolate chips instead of semi-sweet. For a fun twist, try white chocolate chips or even a mix of chocolates. Each type adds a new layer of flavor, making your S’mores cookie bars special. If you want to cut sugar, use honey or maple syrup. These options give a different sweetness and can add unique flavors. You can also try coconut sugar for a more natural choice. Just remember to adjust the wet ingredients since liquid sweeteners change the batter's texture. Adding nuts or fruits can give your bars a tasty crunch. Try chopped walnuts, pecans, or almonds for a nutty flavor. For fruit, you can add dried cherries or cranberries. These additions will enhance the texture and offer new flavors, making your bars truly unique. To make gluten-free S’mores cookie bars, just swap the all-purpose flour for a gluten-free blend. Many blends work well in cookie recipes. Ensure that your graham cracker crumbs are also gluten-free. This way, everyone can enjoy these delicious treats without worry. To keep your S’mores Cookie Bars fresh, store them in an airtight container. This helps maintain their soft texture. Place a layer of parchment paper between layers if you stack them. They stay fresh at room temperature for up to five days. If you want them to last longer, refrigerate them. They can stay good for about a week in the fridge. You can freeze S’mores Cookie Bars for later. First, let them cool completely. Then, cut them into squares. Wrap each square tightly in plastic wrap. Place the wrapped bars in a freezer-safe bag or container. They can last up to three months in the freezer. When you’re ready to enjoy them, just thaw them in the fridge overnight. To enjoy your S’mores Cookie Bars warm, preheat your oven to 350°F (175°C). Place the bars on a baking sheet. Cover them lightly with foil to keep them moist. Heat for about 10 minutes. You can also microwave them. Just place one bar on a plate and heat for 10 to 15 seconds. Enjoy that gooey goodness! You can tell when the bars are done by checking the edges. They should look golden brown. The center should feel set but not too firm. If you gently press the center, it should spring back slightly. This process usually takes about 25 to 30 minutes in the oven. Yes, you can use any type of graham crackers you like. Honey, cinnamon, or even chocolate-flavored ones work great. The taste will change a bit, but that adds fun to your recipe. Just crush them to make crumbs before mixing. To make them vegan, replace the butter with vegan butter. Use a flax egg instead of a regular egg. Mix one tablespoon of ground flaxseed with three tablespoons of water. Let it sit for five minutes to thicken. You can also choose dairy-free chocolate chips for a complete vegan treat. These bars taste great on their own, but you can add more fun. Serve them warm with a scoop of vanilla ice cream. A drizzle of chocolate sauce or a sprinkle of extra mini marshmallows also adds a nice touch. You can even pair them with a glass of milk for a classic combo. You learned how to make tasty S’mores Cookie Bars from scratch. We covered key ingredients, step-by-step mixing, and baking tips. Remember to experiment with different chocolates and toppings for fun flavors. Store them well, and they’ll stay fresh. Making these bars should be enjoyable and easy. Get creative and share your cookies with friends! Enjoy every bite of your delicious creation!

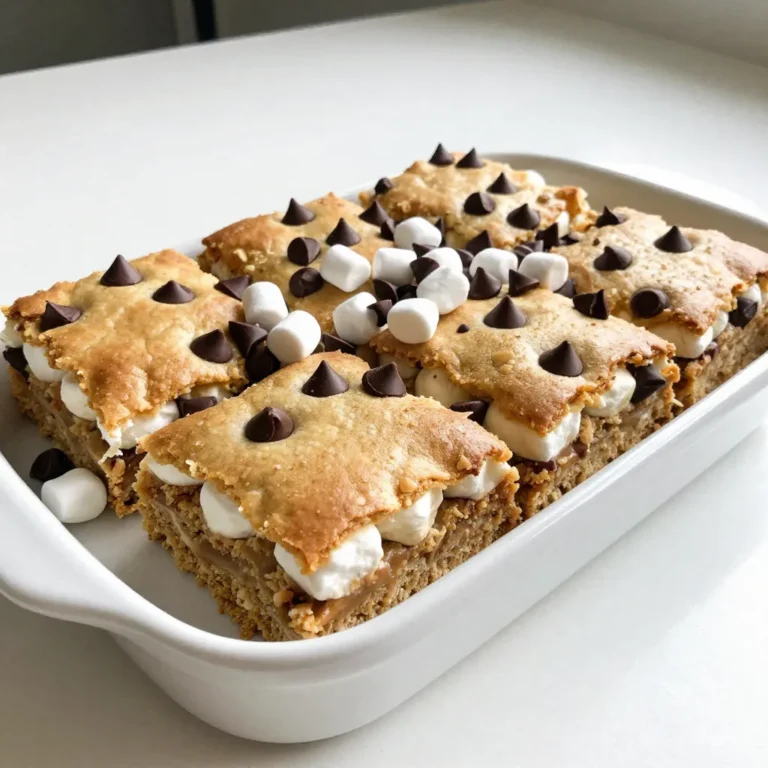
S’mores Cookie Bars Irresistible and Simple Treat

- 1 cup pretzel rods - 1 cup semi-sweet chocolate chips - 1 tablespoon coconut oil (or vegetable shortening) - 1/2 cup crushed toppings (choose from sprinkles, crushed nuts, crushed cookies, or sea salt) I love using these simple ingredients for chocolate dipped pretzel rods. The pretzel rods give a nice crunch. The semi-sweet chocolate chips melt perfectly and add rich flavor. Coconut oil makes the chocolate smooth. You can use vegetable shortening, too! You can get creative with your toppings. I like sprinkles for color. Crushed nuts add a nice crunch. Crushed cookies bring sweetness. Sea salt gives a tasty contrast. Choose what you love most! Gather these items, and you’re ready to make a fun snack. The best part? You can customize it to your taste! Whether you want sweet or salty, these ingredients help you create something delicious. {{ingredient_image_2}} To start, you need to combine the chocolate chips and coconut oil in a microwave-safe bowl. The coconut oil helps the chocolate melt smoothly and gives it a nice shine. Microwave this mixture in 30-second intervals. After each interval, stir the chocolate well. Keep doing this until the chocolate is fully melted and smooth. You want it to look glossy and creamy. Now it’s time to dip the pretzels. Grab a pretzel rod and hold it by one end. Dip it into the melted chocolate, swirling gently. Aim to cover about two-thirds of the pretzel. Watch out for drips! Let any extra chocolate fall back into the bowl. This ensures an even coat. While the chocolate is still wet, you can add toppings. This is the fun part! You can roll the pretzel in crushed nuts or sprinkle some colorful sprinkles on top. Do this right away to make sure the toppings stick. Cover the chocolate completely to make it look and taste great. Next, prepare a baking sheet by lining it with parchment paper. Place your coated pretzel rods on this sheet. Keep dipping and topping until all your pretzels are done. Let them sit at room temperature for about 30 minutes. If you want to speed things up, put them in the fridge for about 10 minutes. This helps the chocolate set quickly. To get the best dip, hold the pretzel rod by one end. This way, you can control the depth of the chocolate. Aim to dip two-thirds of the rod. Swirl it gently to coat evenly. To avoid too much chocolate, let the excess drip back into the bowl. You can tilt the rod slightly while doing this. This leaves a nice, smooth finish. For a fun look, serve your pretzel rods on a colorful platter. You can drizzle more melted chocolate over them for a fancy touch. Consider adding whole pretzel rods beside the dipped ones for extra flair. Use different colored sprinkles to create a festive vibe. If your chocolate does not set, check the cooling method. Try placing the rods in the fridge for ten minutes. This speeds up hardening. For unwanted chocolate drips, use a small knife to scrape off the extra chocolate. You can also gently shake the pretzel to remove any drips before it sets. Pro Tips Choose Quality Chocolate: Opt for high-quality semi-sweet chocolate chips to enhance the flavor of your pretzel rods. A richer chocolate will elevate the overall taste. Experiment with Toppings: Don’t hesitate to mix and match toppings! Combine sprinkles with crushed nuts or add a sprinkle of sea salt for a unique flavor profile. Keep Chocolate Warm: If the chocolate starts to cool and thicken while dipping, microwave it for a few seconds to regain that smooth, pourable consistency. Use Parchment Paper: Always line your baking sheet with parchment paper to prevent the pretzel rods from sticking and to make cleanup a breeze. {{image_4}} You can choose from several types of chocolate for your pretzel rods. Each type brings its own taste. - Milk chocolate: This chocolate is creamy and sweet. It pairs well with salty pretzels. - Dark chocolate: Dark chocolate adds a rich, bold flavor. It is less sweet than milk chocolate. - White chocolate: This chocolate is sweet and smooth. It creates a lovely contrast with pretzels. You can also explore flavored chocolates. Think about adding flavors like mint, orange, or even caramel. These chocolates can make your pretzel rods stand out. Toppings can change your pretzel game. You can use many unique toppings to make them special. - Toffee bits: These add a sweet crunch. - Dried fruit: Try cranberries or apricots for a fruity twist. - Crushed cookies: Oreos or graham crackers can add fun texture. Mixing different toppings can boost flavor. For example, try adding nuts and sprinkles together. This creates a colorful and tasty treat. You can customize pretzel rods for special events. This adds a personal touch. - Holiday-themed pretzel rods: Use red and green sprinkles for Christmas. For Halloween, try orange and black toppings. - Customized pretzel rods for events: For birthdays, use sprinkles that match the party theme. For weddings, you might dip in white chocolate and add gold or silver accents. These variations make your chocolate dipped pretzel rods perfect for any occasion. They become not just a snack but a fun part of the event! To keep your chocolate dipped pretzel rods fresh, store them in a cool, dry place. Avoid heat and humidity. This helps the chocolate stay firm and not melt. For the best results, use an airtight container. A container with a tight seal keeps air out and moisture in. You can also layer the rods between parchment paper. This protects the chocolate from sticking together. Chocolate dipped pretzel rods last about 1 to 2 weeks at room temperature. Make sure they are in a cool spot, away from sunlight. If you want to keep them longer, you can freeze them. Wrap each pretzel rod in plastic wrap. Then, place them in a freezer-safe bag or container. They can stay fresh for up to 3 months in the freezer. When you’re ready to eat them, just take them out and let them thaw. The chocolate on your pretzel rods can take about 30 minutes to set at room temperature. If you want to speed this up, pop them in the fridge for around 10 minutes. This makes the chocolate firm up faster. Just make sure not to leave them too long, or they might get too cold and lose that nice shine. Yes, you can use white chocolate if you prefer. Just remember that it will change the taste. White chocolate is sweeter and creamier than semi-sweet chocolate. You can follow the same steps for melting and dipping. It works well with the crunchy pretzels. You can find pre-made chocolate-dipped pretzel rods at many stores. Look in the snack aisle or the bakery section. Online retailers like Amazon also have great options. Check local candy shops or specialty stores too. They often have unique flavors and toppings. This blog post covered how to make tasty chocolate-dipped pretzel rods. We discussed the needed ingredients and gave step-by-step instructions. I shared tips for dipping, adding toppings, and setting your treats. You learned about variations with different chocolates and toppings, plus storage advice. Now you can create amazing snacks for any event. Enjoy making these fun treats and impress your friends and family!

Chocolate Dipped Pretzel Rods Irresistible Sweet Snack

- 2 large flatbreads - 1 cup cooked shredded chicken - ½ cup BBQ sauce - 1 cup shredded mozzarella cheese - ¼ cup red onion, thinly sliced - ½ cup sweet corn - ¼ cup fresh cilantro - 1 tablespoon olive oil - Salt and pepper What proteins can I use instead of chicken? You can use turkey or pulled pork. These options bring a new taste. What if I want a different BBQ sauce? Try a honey BBQ for sweetness or a spicy sauce for heat. Each choice adds a unique twist. Can I use other cheeses? Absolutely! Cheddar or pepper jack can work well here. Both melt nicely and add flavor. {{ingredient_image_2}} First, preheat your oven to 425°F (220°C). This step is key for a crispy flatbread base. While the oven heats, mix your shredded chicken with the BBQ sauce in a bowl. Make sure the chicken is well-coated. This adds a rich flavor that everyone loves. Next, place the flatbreads on a large baking sheet. Brush a thin layer of olive oil over each flatbread. This helps them crisp up nicely. Then, spoon the BBQ chicken mixture onto the flatbreads. Spread it evenly, but leave some space at the edges. Now, sprinkle a generous amount of shredded mozzarella cheese on top of the chicken. This cheese will melt and create a gooey texture. After that, add thin slices of red onion and sweet corn. These toppings bring sweetness and crunch to every bite. Pop the flatbread pizzas in the preheated oven. Bake for about 10-12 minutes. You’ll know they are done when the cheese is melted and bubbly. The edges of the flatbread should turn golden and crispy. Once they're out of the oven, sprinkle fresh chopped cilantro on the pizzas. This adds a pop of color and freshness. Cut the flatbreads into wedges or squares, and they are ready to serve hot! Enjoy your flavorful BBQ chicken flatbread pizza! To get a nice crispy flatbread, start with a layer of olive oil. This simple step helps the bread crisp up in the oven. Brush a thin layer of oil on each flatbread. It adds flavor and keeps the edges crunchy. For baking, set your oven to 425°F (220°C). This high heat cooks the flatbread quickly and makes it crispy. Bake for about 10-12 minutes. Look for golden edges and bubbling cheese. This shows they are ready to enjoy. You can adjust the seasoning for more taste. A pinch of salt and some black pepper makes a big difference. Try adding smoked paprika or garlic powder for extra kick. For toppings, consider adding bell peppers, jalapeños, or even pineapple. Each option adds a new flavor and texture. Experiment with different combinations until you find your favorite. Presentation matters for meals like BBQ chicken flatbread pizza. Serve it on a wooden board for a rustic look. Garnish with extra cilantro for color and freshness. Pair your flatbread with sides like a fresh salad or sliced veggies. You can also offer a small bowl of BBQ sauce for dipping. This adds a fun touch to your meal. Pro Tips Use Fresh Ingredients: Opting for fresh herbs and quality BBQ sauce can significantly enhance the flavor profile of your flatbread pizza. Experiment with Cheese: While mozzarella is classic, trying a blend of cheeses like cheddar or gouda can add a unique twist to the pizza. Customize Your Toppings: Feel free to add other toppings such as jalapeños, bell peppers, or avocado for extra flavor and texture. Monitor Baking Time: Keep an eye on the flatbreads in the oven to prevent burning; every oven can vary slightly in temperature. {{image_4}} You can easily change the BBQ chicken flatbread to fit different tastes. If you want a vegetarian option, use mushrooms and bell peppers. They add great flavor and texture. You can try different sauces too. A spicy chipotle sauce or a sweet teriyaki sauce can create a fun twist. BBQ chicken flatbread can have a global flair. You can make it Italian by adding pesto and mozzarella. For a tropical vibe, use mango salsa and grilled pineapple. These ideas let you explore new flavors while enjoying a familiar dish. You can also spice it up with jalapeños or curry powder for a kick! You can serve BBQ chicken flatbreads in fun ways. Try making individual mini flatbreads for gatherings. They are easy to hold and eat. If you want something different, create calzone-style flatbreads. Simply fold the flatbread over the filling and bake it. This makes a delicious, cheesy pocket perfect for dipping! To keep your BBQ chicken flatbread pizza fresh, refrigerate leftovers right away. Store them in an airtight container. This keeps moisture out and flavor in. You can also wrap the flatbreads tightly in plastic wrap. Use them within three days for the best taste. To reheat your pizza, the oven is best. It keeps the flatbread crispy. Preheat your oven to 375°F (190°C). Place the flatbread on a baking sheet and heat for about 8-10 minutes. If you use a microwave, the flatbread may get soggy. If you must use the microwave, heat in 30-second intervals. You can freeze your flatbread pizza before or after baking. For freezing before baking, wrap each flatbread tightly in plastic wrap. Then, place them in a freezer-safe bag. To freeze after baking, let it cool first. Wrap it well and store it in the freezer. To thaw, move the pizza to the fridge overnight. You can also use the microwave on the defrost setting. Once thawed, reheat in the oven for the best results. BBQ chicken flatbread pizza lasts about 3 to 4 days in the fridge. Store it in an airtight container. This keeps it fresh and tasty. Always check for any unusual smells or changes in texture before eating. If it looks or smells off, toss it out. Reheat it in the oven for the best taste. This helps keep the flatbread crispy. Yes, you can use store-bought BBQ sauce. It saves time and is very convenient. Look for sauces that are thick and flavorful. Some great brands include Sweet Baby Ray's and Stubb's. These brands offer a wide range of flavors. They can enhance the taste of your flatbread pizza. Just pour it over the shredded chicken. Mix well for a yummy result. If you want alternatives to chicken, there are plenty of choices. You can use cooked turkey for a lean option. For a vegetarian meal, try using jackfruit or mushrooms. Both add great texture. Tofu is another option that soaks up flavor well. These swaps make the dish fit different diets. Feel free to get creative with flavors and toppings! This blog post covered everything you need for BBQ chicken flatbread pizza. You learned about key ingredients, step-by-step instructions, and tips for the best results. You can customize it with your favorite toppings or different flavors. Don’t forget about storing and reheating leftovers effectively. I hope this inspires you to make your own delicious flatbread pizza. Enjoy cooking and sharing your creation!

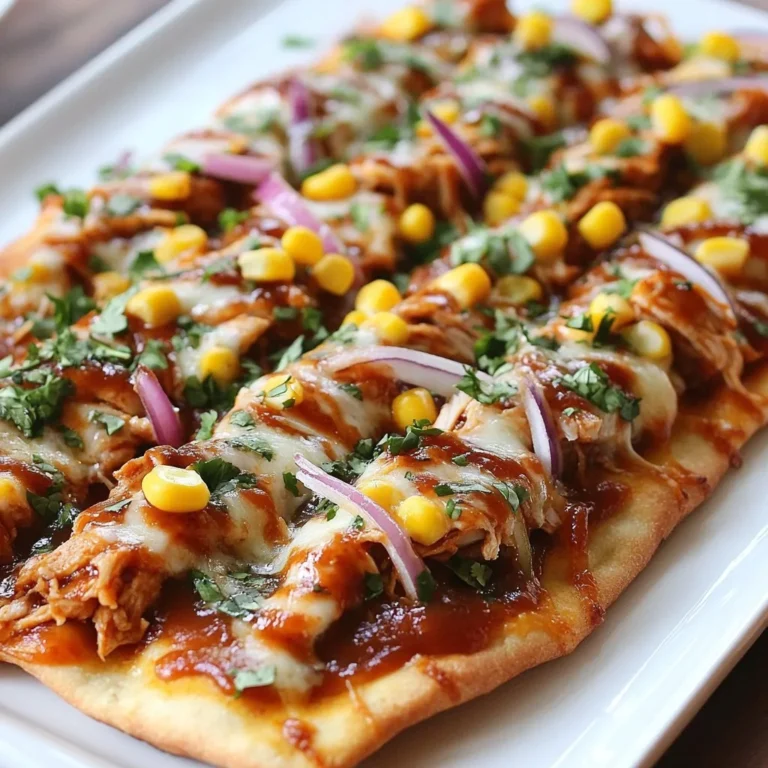
BBQ Chicken Flatbread Pizza Flavorful and Fun Meal

- Oreo Cookie Crust - 1 ½ cups Oreo cookie crumbs - 5 tablespoons unsalted butter, melted - Cheesecake Filling Components - 2 cups cream cheese, softened - 1 cup granulated sugar - 1 teaspoon pure vanilla extract - 2 large eggs, at room temperature - ¼ cup sour cream - 1 tablespoon unsweetened cocoa powder - 1 teaspoon red food coloring - Toppings and Garnishes - 1 cup crushed Oreos (for topping) - Whipped cream (for garnish) - Fresh mint leaves (for garnish) The ingredients shine in this Red Velvet Oreo Cheesecake. The Oreo crust gives a sweet and crunchy base. Next, the cheesecake filling uses creamy cheese for a rich texture. Sugar adds sweetness, while eggs help set the filling. The sour cream gives a nice tang, balancing flavors well. The cocoa powder deepens the taste, and red food coloring makes it vibrant. Topping with crushed Oreos adds crunch. Whipped cream and mint leaves finish the dessert beautifully. Each layer comes together, creating a dessert that delights the eyes and the taste buds. {{ingredient_image_2}} To start, preheat your oven to 325°F (160°C). In a medium bowl, mix 1 ½ cups of Oreo cookie crumbs with 5 tablespoons of melted unsalted butter. Ensure all crumbs are coated well. Then, press this mixture firmly into the bottom of a 9-inch springform pan. This will be your crust. Bake it in the oven for about 10 minutes, then take it out and let it cool completely. In a large bowl, beat 2 cups of softened cream cheese with an electric mixer. Start on medium speed until it’s creamy and smooth. Gradually add in 1 cup of granulated sugar, mixing until there are no lumps left. Next, stir in 1 teaspoon of pure vanilla extract. Add 2 large eggs one at a time, mixing on low speed after each addition. Finally, mix in ¼ cup of sour cream gently. Now, sift in 1 tablespoon of unsweetened cocoa powder into the cheesecake filling. Add 1 teaspoon of red food coloring to achieve that famous red hue. Mix until the color is even throughout. Then, fold in 1 cup of crushed Oreos with a spatula, spreading them evenly in the batter. Carefully pour the cheesecake filling over your cooled crust. Smooth the top with your spatula. Bake in the preheated oven for 45 to 50 minutes. The edges should be set, and the center will have a slight jiggle. After baking, turn off the oven and crack the door open. Let the cheesecake cool in the oven for about 1 hour. Once cooled, move it to the fridge for at least 4 hours, or overnight for best results. - Cream cheese temperature: Start with room temperature cream cheese. Cold cream cheese makes lumps. - Mixing techniques: Use a mixer on medium speed. Mix until smooth, but don’t overmix. - Importance of cooling in the oven: After baking, turn off the oven. Crack the door open to cool slowly. This helps prevent cracks. - Checking for doneness: Look for set edges and a jiggly center. The center should not be completely firm. - Whipped cream application: Use a piping bag for neat dollops. This adds elegance to your cheesecake. - Garnishing with mint: Add fresh mint leaves on top. They brighten the look and add color. Pro Tips Use Room Temperature Ingredients: Make sure your cream cheese and eggs are at room temperature before mixing. This helps achieve a smooth and creamy cheesecake without lumps. Don’t Overmix: When adding the eggs and sour cream, mix just until combined. Overmixing can incorporate too much air, causing the cheesecake to crack during baking. Chill Thoroughly: For the best texture and flavor, allow your cheesecake to chill in the refrigerator for at least 4 hours, or overnight if possible. This helps it set properly and enhances the flavors. Garnish Wisely: Add whipped cream and crushed Oreos just before serving to maintain their texture. Fresh mint leaves not only add color but also a refreshing flavor contrast. {{image_4}} You can easily change the flavor of your Red Velvet Oreo Cheesecake. Here are some ways: - Adding different extracts: Try using almond or mint extract for a twist. Each extract brings a new flavor. Start with a teaspoon and taste as you mix. This small change can make your cheesecake unique. - Swapping Oreos for another cookie type: Instead of regular Oreos, use mint or peanut butter cookies. This swap changes the whole taste. You can even try gluten-free cookies for a fun option. You can also adapt this cheesecake to fit your diet. Here’s how: - Gluten-free options: Use gluten-free Oreo cookies for the crust. This way, everyone can enjoy your cheesecake. Make sure to check the label for gluten-free assurance. - Dairy-free alternatives: Substitute cream cheese with dairy-free cream cheese. Use coconut cream instead of sour cream for a smooth texture. These swaps keep the cheesecake rich and creamy without dairy. To keep your Red Velvet Oreo Cheesecake fresh and tasty, try these tips: - Refrigeration duration: Place the cheesecake in the fridge. It lasts about 5 to 7 days. Make sure to cover it well with plastic wrap or foil to prevent drying. - Freezing options: You can freeze the cheesecake for up to 3 months. Slice it into pieces first. Wrap each slice in plastic wrap, then in foil. This helps keep it fresh and easy to thaw. If you want to enjoy your cheesecake again, reheating is simple: - Best methods for texture preservation: Use the oven for a gentle heat. Preheat it to 300°F (150°C). Place the cheesecake on a baking sheet. Warm it for about 10 to 15 minutes. This keeps the texture creamy and smooth. Avoid using the microwave, as it can make the cheesecake rubbery. Yes, you can make this cheesecake early. It actually tastes better after chilling. I suggest making it a day before you plan to serve it. This gives the flavors time to meld. After baking, cool it completely. Then, wrap it tightly in plastic wrap and refrigerate. When you're ready to serve, just add your toppings! If you want a natural option, use beet juice. It gives a nice red color. You can also try pomegranate juice or raspberry puree. These options add flavor and color. Just remember to adjust the amount to get the right shade. This cheesecake lasts about 5 to 7 days in the fridge. Store it in an airtight container to keep it fresh. If you want to keep it longer, you can freeze it. Just wrap it well and it can last for about 3 months in the freezer. When you're ready to enjoy it, thaw it in the fridge overnight. This blog post guides you through making a Red Velvet Oreo Cheesecake. We covered each step, from mixing the crust to baking your cheesecake. I shared tips for perfect texture and even baking. You can also explore fun flavor twists and dietary swaps. Remember, proper storage keeps your cheesecake fresh and tasty. Making this dessert is fun and rewarding. Try it out and enjoy!

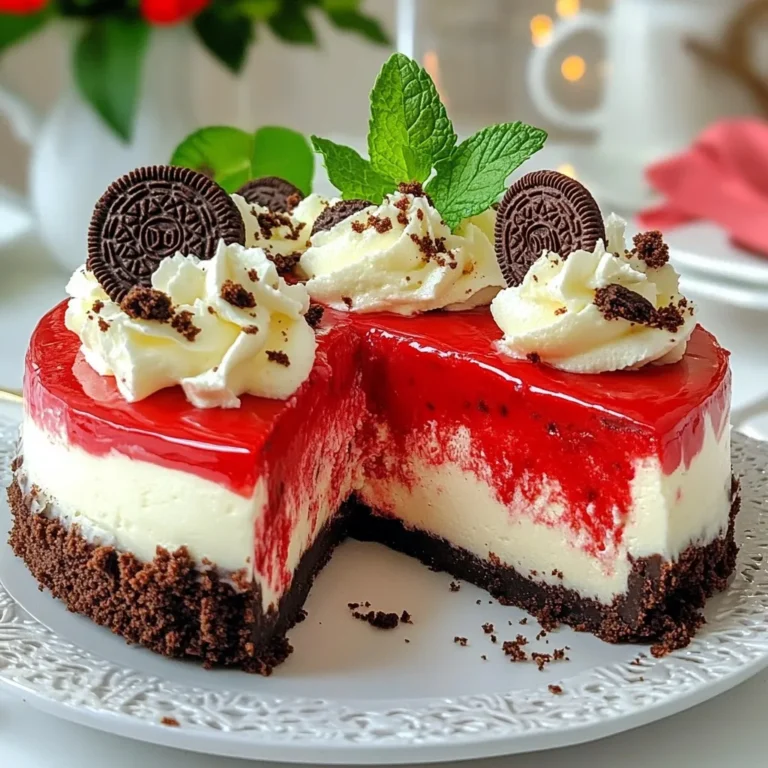
Red Velvet Oreo Cheesecake Delightful and Easy Recipe

- 2 tablespoons olive oil - 1 medium onion, diced - 2 cloves garlic, minced - 3 medium carrots, sliced - 3 celery stalks, sliced - 1 teaspoon dried thyme - 1 teaspoon dried rosemary - 6 cups chicken broth - 2 cups cooked chicken, shredded - 1 cup frozen peas - Salt and pepper to taste Each ingredient plays a key role in the flavor and texture of the dish. The olive oil helps sauté the veggies, while onion and garlic add a savory base. Carrots and celery bring sweetness and crunch. The chicken broth is the heart of the soup, giving it depth. Shredded chicken adds protein, and peas provide a pop of color. Seasoning with salt and pepper rounds out all the flavors. - 2 cups all-purpose flour - 1 tablespoon baking powder - 1 teaspoon salt - 3 tablespoons unsalted butter, melted - 1 cup milk For the dumplings, flour gives structure, and baking powder helps them rise. Salt enhances the taste, while butter adds richness. Milk binds everything together, creating a soft, fluffy texture. - Adjusting servings: You can easily double or halve the recipe. Just keep the same ratios. - Ingredient alternatives: Use vegetable broth for a vegetarian option. Swap in any cooked protein you like. For a gluten-free version, use a gluten-free flour blend. If you're out of milk, try unsweetened almond milk or water. These tips let you customize the dish to your taste and pantry needs. Enjoy making this warm, comforting meal! {{ingredient_image_2}} To start, heat 2 tablespoons of olive oil in a large pot over medium heat. Add 1 diced onion and sauté for about 5 minutes. The onion should turn translucent. Next, add 2 minced garlic cloves and cook for another minute. This step adds a wonderful aroma to your dish. Now, incorporate 3 sliced carrots and 3 sliced celery stalks into the pot. Continue to sauté for 5 to 7 minutes. This softens the vegetables. Stir in 1 teaspoon of dried thyme and 1 teaspoon of dried rosemary. These herbs boost the flavor. Pour in 6 cups of chicken broth and raise the heat to bring it to a gentle boil. Once boiling, lower the heat to a simmer. Add 2 cups of shredded cooked chicken and 1 cup of frozen peas. Season with salt and pepper to your taste. Let this simmer while you prepare the dumpling batter. In a separate medium bowl, mix 2 cups of all-purpose flour, 1 tablespoon of baking powder, and 1 teaspoon of salt. Whisk these dry ingredients until they are well combined. Then, pour in 3 tablespoons of melted unsalted butter and 1 cup of milk. Stir gently until the mixture comes together. Don't overmix; it’s fine if there are a few lumps. Now it's time to cook the dumplings. Use a spoon to drop generous spoonfuls of dumpling batter into the simmering broth. Aim for about 10 to 12 dumplings. Once they are in the pot, cover it with a lid. Cook the dumplings undisturbed for 15 to 20 minutes, depending on their size. They should puff up and be fully cooked through. After cooking, gently stir the chicken and broth mixture to combine everything. Taste and adjust the seasoning as needed. Seasoning is key to great chicken and dumplings. Start with salt and pepper. Taste as you cook. This helps you find the right balance. Use fresh herbs when possible. Thyme and rosemary add depth. You can also add a splash of lemon juice for brightness. For broth, homemade is the best. If you need to use store-bought, choose low-sodium for better control. Simmering for longer will deepen the flavor. To make fluffy dumplings, avoid overmixing the batter. Mix just until combined. It's okay if there are lumps. Overmixing makes them dense. Let the batter rest for a few minutes. This allows the baking powder to activate. Cook the dumplings for 15 to 20 minutes. They should puff up and feel light. Keep the lid on while cooking. This traps steam and helps them cook evenly. For a beautiful presentation, use deep bowls. Ladle in the chicken and broth first. Then, add the dumplings on top. Garnish with fresh parsley for color. This adds a pop of green. Serve with crusty bread on the side. It’s perfect for soaking up that rich broth. Consider a light salad or steamed vegetables to balance the meal. Enjoy your comforting dish! Pro Tips Use Fresh Herbs: Fresh thyme and rosemary can elevate the flavor of your chicken and dumplings. Consider using them instead of dried herbs for a more vibrant taste. Don’t Overmix Dumpling Batter: To achieve fluffy dumplings, mix the batter just until combined. A few lumps are perfectly fine; overmixing can lead to tough dumplings. Adjust Seasoning to Taste: Always taste your broth before serving. Depending on the saltiness of your chicken broth, you may need to adjust the seasoning to achieve the perfect balance. Make it a One-Pot Meal: For added flavor and nutrition, consider adding other vegetables like green beans or corn to the chicken broth mixture before adding the dumplings. {{image_4}} You can switch up chicken and dumplings in many ways. For a classic dish, use tender chicken, like rotisserie. You can try different proteins too. Think turkey or even shrimp for a twist. What if you want some heat? Add diced jalapeños or cayenne pepper to spice it up. A dash of hot sauce can also do the trick. This gives your dish a new layer of flavor. Want a lighter meal? You can substitute some ingredients. Use skinless chicken breast instead of dark meat. Swap heavy cream with low-fat milk for a creamy touch. If you need gluten-free options, try almond or coconut flour for the dumplings. Mix in a gluten-free baking powder. For dairy-free, use almond milk or oat milk to keep it tasty. Chicken and dumplings appear in many cultures. Try the Chinese version. Use dumplings filled with ground chicken and veggies. Cook them in broth for a warming soup. You can also look to Italy. Their gnocchi is a great choice. Make a rich sauce with tomatoes and spices to mix with chicken. Each variation brings new tastes to your table. To store your chicken and dumplings, wait until it cools. Then, place it in an airtight container. This helps keep it fresh. Store it in the fridge. It will last up to four days. You can enjoy it again without losing much flavor. Freezing is a great option for longer storage. First, let it cool completely. Then, portion it into freezer-safe containers. Make sure to leave some space for expansion. It can last in the freezer for up to three months. When you’re ready to eat, thaw it in the fridge overnight. Reheat slowly on the stove to keep the dumplings soft. To reheat, use gentle heat. You can warm it on the stove over low heat. Stir often to help it heat evenly. If it's too thick, add a splash of broth or water. You can also microwave it in short bursts. Stir in between to keep the flavor intact. Enjoy your comforting meal just like the first time! To make chicken and dumplings, you start by cooking the base. First, heat olive oil in a large pot. Add diced onion and sauté for about five minutes. Then, add minced garlic and cook for one more minute. Next, toss in sliced carrots and celery, cooking until they soften. Stir in dried thyme and rosemary, then pour in chicken broth. Let it boil, then reduce the heat and add shredded chicken and frozen peas. While it simmers, mix flour, baking powder, and salt in a bowl. Add melted butter and milk, stirring until just combined. Drop spoonfuls of batter into the pot, cover, and cook for 15-20 minutes until puffed and cooked through. Yes, using cooked chicken saves time. Pre-cooked chicken, like rotisserie chicken, works well. It adds flavor and cuts down on prep time. This method makes the dish easier and quicker to prepare, especially for busy days. You can skip the step of cooking raw chicken, making the process more straightforward. You can enhance your chicken and dumplings with various herbs and spices. Consider adding fresh parsley or chives for brightness. A pinch of cayenne pepper can add subtle heat. You can also try adding bay leaves while simmering for depth. Fresh thyme or basil can bring a lovely aroma to the dish. Experimenting with these flavors can turn a classic meal into a delightful experience. In this article, we explored how to make comforting chicken and dumplings. We reviewed essential ingredients, step-by-step instructions, and tips for a tasty dish. You learned how to customize flavors and make healthier versions. Remember to store leftovers properly and reheat without losing taste. Cooking can be fun and rewarding, so gather your ingredients and try it out. Enjoy the process and delight in your delicious creation!

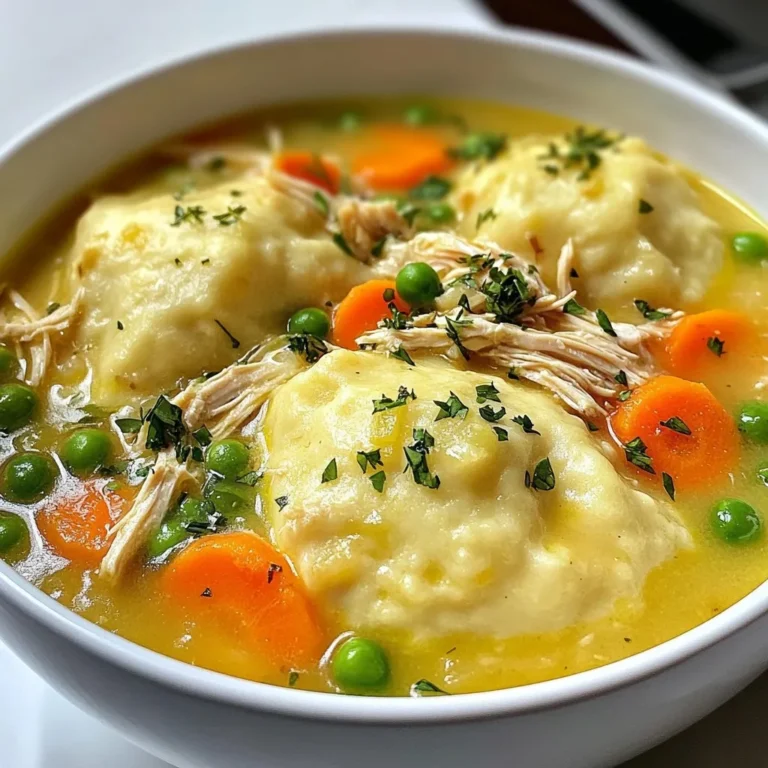
Classic Chicken & Dumplings Comforting Home Recipe

PREV 1 … 27 28 29 … 44 NEXT
yummybiterecipes

explore

DessertsDinnerAppetizersDrinks

Our Policies

  • Cookie Policy
  • Copyright Policy
  • Disclaimer
  • GDPR Policy
  • Terms Of Use
Back to Top
  • About
  • Contact Us
  • Privacy Policy
© 2025 yummybiterecipes