FREE DINNER EBOOK! Get your copy!
  • Cookie Policy
  • GDPR Policy
  • Disclaimer
  • Terms Of Use
  • Visit my other site: Fun Cookie Recipes
yummybiterecipes
  • Home
  • Dinner
  • Desserts
  • Drinks
  • Appetizers
  • Contact
  • About
  • Privacy Policy
  • Home
  • Dinner
  • Desserts
  • Drinks
  • Appetizers
  • Contact
  • About
  • Privacy Policy
  • Cookie Policy
  • GDPR Policy
  • Disclaimer
  • Terms Of Use
Visit my other site: Fun Cookie Recipes

HOME / CATEGORIES /

Latest

- 4 cups milk (whole, almond, oat, or any dairy alternative) - 1 cup heavy cream - 1/2 cup unsweetened cocoa powder - 1 cup semi-sweet chocolate chips - 1/2 cup granulated sugar (adjust to taste) - 1 teaspoon pure vanilla extract - 1/4 teaspoon sea salt - Whipped cream and chocolate shavings for garnish To measure liquids, use a clear cup with markings. Pour slowly to avoid spills. For dry ingredients, use a dry measuring cup. Scoop the ingredient and level it off with a knife. This keeps your amounts accurate. If you want dairy-free hot chocolate, use almond or oat milk. For a lower sugar option, try a sugar substitute like stevia. You can also skip the heavy cream for a lighter drink. These swaps still keep the taste rich and tasty. {{ingredient_image_2}} Start by pouring 4 cups of milk and 1 cup of heavy cream into your Instant Pot. Select the Sauté function. This warms the milk mixture. Stir occasionally for about 5 minutes. Keep an eye on it to prevent sticking. You want it warm but not boiling. Once warm, turn off the Sauté function. This step is crucial to avoid overheating the milk. Next, get a mixing bowl. Sift together 1/2 cup of unsweetened cocoa powder, 1/2 cup of granulated sugar, and 1/4 teaspoon of sea salt. Sifting is key here. It helps blend the dry ingredients well. This way, your hot chocolate will be smooth. If you skip this step, you might find clumps in your drink. Now, whisk the dry mixture into the warm milk and cream. Stir continuously as you add it. This avoids clumps and creates a velvety texture. Once combined, add 1 cup of semi-sweet chocolate chips and 1 teaspoon of pure vanilla extract. Stir until the chocolate melts. After that, secure the lid on the Instant Pot. Make sure the valve is set to sealing. Select the Manual or Pressure Cook setting. Set the timer for 5 minutes. When cooking is done, perform a quick release. Move the valve to the venting position. Be careful; steam will escape. Once the pressure is gone, open the lid and stir the hot chocolate. Taste it and adjust sweetness by adding more sugar if you like. Finally, pour the hot chocolate into mugs. Top with whipped cream and chocolate shavings for a beautiful finish. Enjoy your rich and creamy creation! To avoid clumps in your hot chocolate, mix your dry ingredients well. Sift the cocoa powder and sugar together. This step breaks up any lumps. After mixing, add the dry mix slowly to the warm milk and cream. Whisk continuously as you pour in the dry mix. This method helps blend the ingredients smoothly. If you see any clumps, keep whisking until the mix is velvety and smooth. You can add more flavor to your hot chocolate. Try a pinch of cinnamon or nutmeg for a warm spice. A few drops of peppermint extract can give a refreshing twist. You can also add a splash of brewed coffee for a mocha flavor. For an extra rich taste, consider using dark chocolate chips instead of semi-sweet. Each of these additions can take your hot chocolate to new heights. For a beautiful presentation, pour your hot chocolate into mugs. Top each with a generous swirl of whipped cream. Sprinkle chocolate shavings or mini marshmallows on top. You can also use candy canes for a festive touch. Serve with a side of cookies or a slice of cake for a cozy treat. This way, your hot chocolate will not just taste great but also look inviting. Pro Tips Use Quality Chocolate: Opt for high-quality semi-sweet chocolate chips for a richer flavor and smoother texture in your hot chocolate. Adjust Sweetness: Start with less sugar and gradually add more to suit your taste preferences, ensuring your hot chocolate is just right. Experiment with Flavors: Consider adding a pinch of cinnamon or a splash of peppermint extract for a delightful twist on traditional hot chocolate. Garnish Creatively: Get creative with toppings like marshmallows, crushed candy canes, or a drizzle of caramel for an extra special treat. {{image_4}} You can easily change the flavor of your hot chocolate. Here are some fun ideas: - Mint: Add 1/4 teaspoon of peppermint extract for a cool twist. - Caramel: Stir in 1/4 cup of caramel sauce for a sweet touch. - Spicy: Mix in a pinch of cayenne pepper or cinnamon for warmth. These flavors transform your drink into a new treat each time. You can adjust the ingredients for different diets. For a vegan version, use almond or oat milk and skip the heavy cream. For keto, replace sugar with a low-carb sweetener like erythritol. To make it low-fat, use skim milk and reduce the cream. Each option still gives a tasty hot chocolate experience. Scaling the recipe is simple. To make two servings, cut all the ingredients in half. For eight servings, double the amounts. Just remember to adjust the cooking time as needed. This way, you can enjoy hot chocolate for any occasion, big or small! To store your leftover hot chocolate, let it cool first. Pour it into a clean container. Use a jar or a sealed bowl. Cover it tightly with a lid. Place it in the fridge. This keeps it fresh for about three days. When you're ready to enjoy it again, just reheat. The best way to reheat hot chocolate is on the stove. Pour the hot chocolate into a pot. Heat it over low to medium heat. Stir often to avoid burning. You can also use a microwave. Heat it in short bursts, about 30 seconds. Stir in between bursts. This keeps the texture creamy and smooth. You can freeze hot chocolate if you want to save some for later. Pour it into ice cube trays or freezer-safe bags. Leave some space in the containers. Liquid expands when it freezes. To thaw, place it in the fridge overnight. You can also use the microwave. Just be careful to stir well after thawing. You can make this hot chocolate ahead of time! Just prepare it and let it cool. Pour it into a container with a lid. Store it in the fridge for up to three days. When you want to enjoy it, simply reheat it in the Instant Pot or on the stove. Stir it well to mix any settled ingredients. Homemade hot chocolate stays fresh for about three days in the fridge. After that, it may lose flavor and texture. If you want to keep it longer, consider freezing it. Just pour it into an airtight container. It can last up to three months in the freezer. Thaw it in the fridge before reheating. If your hot chocolate is too thick, add more milk or cream. Stir it in slowly until you reach your desired consistency. If it is too thin, you can thicken it by cooking it a bit longer. You can also add a small amount of cocoa powder for more depth. Adjust to your taste! Yes, you can use this recipe on the stovetop! Start by warming the milk and cream in a pot over medium heat. Stir it often to avoid burning. Mix the dry ingredients in a bowl, then whisk them into the warm milk. Add chocolate chips and vanilla, stirring until melted. Enjoy your stovetop version! In this blog post, we explored the best hot chocolate recipe and its key ingredients. I shared tips for measuring and substituting, ensuring everyone can enjoy this treat. The step-by-step instructions simplify the cooking process, and helpful tips enhance flavor and consistency. Plus, we discussed variations and storage tips. Hot chocolate can be a special moment, bringing joy to anyone. You can tailor it to your taste and share it with loved ones. Enjoy creating your perfect cup!

Instant Pot Hot Chocolate Rich and Creamy Delight

- 2 cups cream cheese, softened - 1 cup granulated sugar - 1 teaspoon pure vanilla extract - 1/2 teaspoon sea salt - 3 large eggs, room temperature - 1 1/4 cups heavy cream - 1/4 cup all-purpose flour, sifted - Zest of 1 lemon, finely grated The main star of this cheesecake is cream cheese. It gives that rich and creamy texture. Sugar adds sweetness, while vanilla brings a warm flavor. Sea salt helps balance the sweetness and enhances the taste. Eggs make the cheesecake set perfectly. Heavy cream adds extra creaminess, and flour gives it structure. Finally, lemon zest brightens the flavors and adds a fresh touch. - Fresh berries for topping - Honey or maple syrup for drizzling - A sprig of mint for garnish These optional ingredients can elevate your cheesecake. Berries add color and a burst of tartness. Honey or maple syrup gives a sweet contrast. Mint adds freshness and looks great on the plate. - Use dairy-free cream cheese for lactose intolerance. - For a lower sugar option, use a sugar substitute. - Swap all-purpose flour for a gluten-free blend. These swaps let everyone enjoy this cheesecake. Adjusting the recipe can fit many diets. Just ensure to use the right amounts for the best results. {{ingredient_image_2}} Start by preheating your oven to 400°F (200°C). Grab a 9x5 inch loaf pan. Line it with parchment paper. Make sure some paper hangs over the sides. This helps you lift the cheesecake out easily later. In a large mixing bowl, add 2 cups of softened cream cheese. Use an electric mixer to beat it until smooth, about 2 minutes. Next, add 1 cup of granulated sugar. Mix until creamy and well blended. Now, add 1 teaspoon of pure vanilla extract and 1/2 teaspoon of sea salt. Beat until smooth. Crack in 3 large eggs, one at a time. Mix well after each egg. This ensures a creamy batter. Slowly pour in 1 1/4 cups of heavy cream. Mix on low speed until blended. Sift 1/4 cup of all-purpose flour and the zest of 1 lemon over the batter. Gently fold these in with a spatula. Stop as soon as no dry flour shows. Pour the batter into your prepared loaf pan. Smooth the top with a spatula. Bake in the oven for 40-45 minutes. It should be puffed and golden brown on top. The edges will feel firm, but the center may jiggle a bit. When it’s done, turn off the oven. Leave the cheesecake inside with the door slightly open for 1 hour. This helps it cool slowly and prevents cracks. After an hour, take it out and let it cool at room temperature. Once cool, chill the cheesecake in the fridge for at least 4 hours. For best flavor, let it sit overnight. When ready to serve, lift it from the pan using the parchment paper. Slice it into generous pieces and enjoy! To get the best texture in your cheesecake, use room temperature cream cheese. This helps it mix smoothly. Beat the cream cheese for two minutes until creamy. Gradually add sugar and keep mixing for a rich flavor. Fold in flour gently. Overmixing can lead to a dense cake. The lemon zest adds a nice brightness. Bake until golden brown on top, but the center should still jiggle a bit. One common mistake is not preheating the oven. Always preheat to 400°F (200°C). Lining the loaf pan with parchment paper is key for easy removal. Don't skip this step! Adding eggs too fast can also cause lumps. Add them one at a time, and mix well. If you skip the cooling step, cracks may form. Let the cheesecake cool in the oven with the door ajar for one hour. When serving, lift the cheesecake out using the parchment paper. Slice it into generous pieces. For a beautiful presentation, serve it on a rustic wooden board. Top with fresh berries or a drizzle of honey for added flavor. A sprig of mint can give it a fresh look. Pair your cheesecake with a cup of coffee or herbal tea for a perfect end to your meal. Pro Tips Use Room Temperature Ingredients: Ensure that your cream cheese, eggs, and heavy cream are at room temperature. This helps create a smoother batter, resulting in a creamier cheesecake. Don’t Overmix: When folding in the flour and lemon zest, be gentle and stop mixing as soon as no dry flour is visible. Overmixing can incorporate too much air, leading to cracks during baking. Cooling Gradually: Allow the cheesecake to cool in the oven with the door ajar after baking. This gradual cooling helps prevent cracks and maintains a smooth texture. Chill Overnight: For the best flavor and texture, chill the cheesecake overnight. This allows the flavors to meld beautifully and results in a firmer slice when served. {{image_4}} You can add a twist to your Basque cheesecake easily. Try mixing in different flavors. For a fruity touch, add 1/2 cup of fresh berries or pureed fruit. Raspberries or strawberries work great. You can also add 1/4 cup of cocoa powder for a chocolate cheesecake. Another fun option is to mix in 1 tablespoon of espresso powder for a coffee flavor. These additions can enhance the taste and make each cheesecake unique. If you need a gluten-free option, swap the all-purpose flour with a gluten-free blend. Look for blends that work well for baking. Many have a similar texture to regular flour. You can also use almond flour or coconut flour. Just remember, these flours may change the texture a bit. Keep an eye on the baking time, as gluten-free options can cook faster. How you serve your cheesecake can change the whole experience. For a casual setting, slice your cheesecake and serve it on a rustic wooden board. Top it with fresh berries or a drizzle of honey for flair. If you're feeling fancy, add a dollop of whipped cream or a scoop of ice cream on the side. You can also sprinkle some crushed nuts or chocolate shavings for added crunch. Each style brings a new fun to this rich dessert. To keep your loaf pan Basque cheesecake fresh, store it in the fridge. Use an airtight container or cover it tightly with plastic wrap. This keeps moisture out and the cake fresh. If you use the parchment paper to lift the cheesecake out, fold it over the top. This adds an extra layer of protection. You can freeze the cheesecake if you want to save some for later. First, let it cool completely in the fridge. Then, wrap it well in plastic wrap. Place it in a freezer-safe bag or container. This helps avoid freezer burn. When ready to eat, thaw it in the fridge overnight before serving. When stored properly, the cheesecake lasts about a week in the fridge. If you freeze it, it can last up to three months. Just remember to check for any odd smells or changes in texture before eating. Enjoy your rich and creamy delight anytime! Yes, you can use other pans. A round cake pan works well, too. Just adjust the baking time. A springform pan is great for easy removal. Make sure to grease any pan you use. This will help prevent sticking. Look for a puffed top that is golden brown. The edges should be firm, but the center will jiggle slightly. This jiggle shows it will set as it cools. If you want a firmer cheesecake, bake it a few more minutes. Just be careful not to overbake. There are many fun toppings to try! Fresh berries add color and taste. A drizzle of honey gives a sweet touch. You can also use chocolate sauce for an indulgent flavor. A sprinkle of lemon zest adds brightness. Get creative with your favorites! This blog post covered how to make a delicious loaf pan Basque cheesecake. We explored key ingredients and optional ones for flavor. You learned about preparation, mixing the batter, baking, and cooling. I shared tips for perfect texture, common mistakes to avoid, and serving ideas. You also discovered variations for flavored and gluten-free options. Finally, we discussed proper storage and answered your FAQs. With this knowledge, you can create a cheesecake that impresses everyone. Enjoy your baking adventure!

Loaf Pan Basque Cheesecake Rich and Creamy Delight

To make a delicious Creamy Chicken Gnocchi Soup, gather these key ingredients: - 1 tablespoon extra virgin olive oil - 1 medium onion, finely diced - 2 cloves garlic, minced to a paste - 2 medium carrots, peeled and diced - 2 celery stalks, diced - 1 pound chicken breast, cut into bite-sized pieces - 4 cups low-sodium chicken broth - 1 teaspoon dried thyme - 1 teaspoon dried oregano - Salt and freshly cracked black pepper to taste - 1 package (16 ounces) potato gnocchi - 1 cup heavy cream - 2 cups fresh baby spinach - ½ cup freshly grated Parmesan cheese These ingredients create a rich and creamy soup that is perfect for any meal. If you want to take your soup to the next level, consider adding: - Fresh herbs like parsley or basil for garnish - A splash of lemon juice for brightness - Red pepper flakes for a bit of heat - Mushrooms for an earthy note These additions can enhance the flavor and make your soup truly special. When choosing your ingredients, look for: - Firm, vibrant vegetables without blemishes - Chicken breasts that are pink, not gray - Fresh herbs that smell strong and fragrant - Gnocchi that are soft and not sticky Fresh ingredients make a big difference in taste. Always choose the best for your soup. {{ingredient_image_2}} Start by gathering your ingredients. You need olive oil, an onion, garlic, carrots, celery, and chicken. Heat one tablespoon of olive oil in a large pot over medium heat. Once hot, add the finely diced onion. Cook it for about 3-4 minutes until it becomes soft and smells great. Next, add two minced garlic cloves, two diced carrots, and two diced celery stalks. Stir these veggies for around five minutes. This step helps build a strong flavor base. Now, it’s time to add the chicken. Cut one pound of chicken breast into bite-sized pieces. Add the chicken to the pot and cook for about 5-7 minutes. Make sure it turns white and is no longer pink. Sprinkle in one teaspoon each of dried thyme and dried oregano. Season with salt and freshly cracked black pepper to taste. After the chicken cooks, pour in four cups of low-sodium chicken broth. Bring the mix to a gentle boil. Once it boils, turn down the heat and let the soup simmer for about 10 minutes. This simmering lets all the flavors blend nicely. Next, it's time for the gnocchi. Add one package (16 ounces) of potato gnocchi to the pot. Cook for about 3-5 minutes. You’ll know they’re ready when they float to the top. This is a sign they are cooked through and delicious. Now for the creamy part! Stir in one cup of heavy cream and two cups of fresh baby spinach. Cook for an additional 2-3 minutes. The spinach will wilt and brighten the soup. Finally, remove the pot from heat. Add half a cup of freshly grated Parmesan cheese. Stir until the cheese melts into the soup. Taste your soup and feel free to add more salt or pepper if you like it spicier. Serve your creamy chicken gnocchi soup hot in bowls. For a nice touch, sprinkle more Parmesan on top and add some fresh herbs if you wish. Enjoy your cozy meal! To boost flavors, always start with fresh ingredients. Fresh herbs like thyme and oregano add brightness. Use good quality chicken broth for a rich base. You can also add a splash of lemon juice for a zesty kick. If you like heat, try a pinch of red pepper flakes. Remember, seasoning is key; taste and adjust as you go. Cooking gnocchi is simple if you follow a few steps. First, add them to the soup when it simmers. They usually take about 3-5 minutes to cook. Watch for them to rise to the top; this means they are done. Overcooking can make them mushy, so keep an eye on them. You want them soft but still firm. If your soup is too thick, add more chicken broth or a splash of water. Stir it well until you reach the desired consistency. For a thicker soup, let it simmer longer to reduce liquid. You can also mash a few pieces of gnocchi against the pot to thicken it naturally. Just remember to taste as you adjust! Pro Tips Use Fresh Ingredients: The flavor of your soup will greatly improve by using fresh vegetables and herbs. Whenever possible, choose organic produce for the best taste. Adjust the Creaminess: If you prefer a lighter soup, you can substitute half of the heavy cream with low-fat milk or a dairy-free alternative, maintaining a similar texture without the extra calories. Gnocchi Cooking Tip: To ensure your gnocchi are perfectly cooked, avoid overcooking them; they are ready when they float to the surface of the soup. Season to Taste: Always taste your soup before serving and adjust the seasoning with additional salt, pepper, or herbs to enhance the overall flavor profile. {{image_4}} You can make this soup lighter. Use low-fat milk instead of heavy cream. Try using skinless chicken breasts to cut down on fat. You can also add more veggies, like zucchini or bell peppers, to boost nutrition. Using less olive oil while cooking helps too. To create a vegetarian version, swap the chicken with mushrooms or tofu. Use vegetable broth instead of chicken broth. For a vegan touch, use cashew cream or coconut milk instead of heavy cream. Make sure to use plant-based gnocchi, as some brands contain egg. Want more flavor? Add fresh herbs like basil or parsley. A squeeze of lemon juice brightens up the soup. You can also sprinkle in some red pepper flakes for a little heat. Consider adding a bay leaf during cooking for deeper flavor. Each of these options can change your soup in a great way. To keep your creamy chicken gnocchi soup fresh, let it cool first. Once cool, pour it into an airtight container. Make sure to leave some space at the top for expansion. Store it in the fridge for up to three days. If you want to enjoy it later, freezing is a great option. When you're ready to enjoy your leftover soup, reheat it on the stove. Pour it into a pot over low heat. Stir it gently to prevent sticking. Heat until it is warm but not boiling. If the soup is too thick, add a splash of broth or cream to get your desired texture. For long-term storage, pour the cooled soup into freezer-safe bags. Remove as much air as possible before sealing. Label the bags with the date. You can freeze it for up to three months. To reheat, thaw it in the fridge overnight. Then reheat on the stove as described above. Yes, you can use other meats. Turkey, pork, or even sausage works well. Each meat gives the soup a different flavor. Chicken remains a top choice for its mild taste and quick cooking time. If you want a lighter option, use half-and-half. Coconut cream is another good substitute. You can also mix milk with a bit of cornstarch for thickness. Each option changes the soup's creaminess, so choose what suits your taste. This soup stays fresh for about 3 to 4 days in the fridge. Store it in an airtight container for the best results. If it lasts longer, the gnocchi might get too soft. Yes, you can make it ahead. In fact, it often tastes better the next day. Just cook the gnocchi right before serving to keep them tender. This blog covered all you need for creamy chicken gnocchi soup. We talked about key ingredients, cooking steps, and tips to enhance flavors. I shared ideas for variations and ways to store leftovers. You can try different meats or make it vegetarian. Remember, a little tweak can change the whole dish! With these tips, you can create a warm, tasty soup any day. Enjoy making your own delicious version!

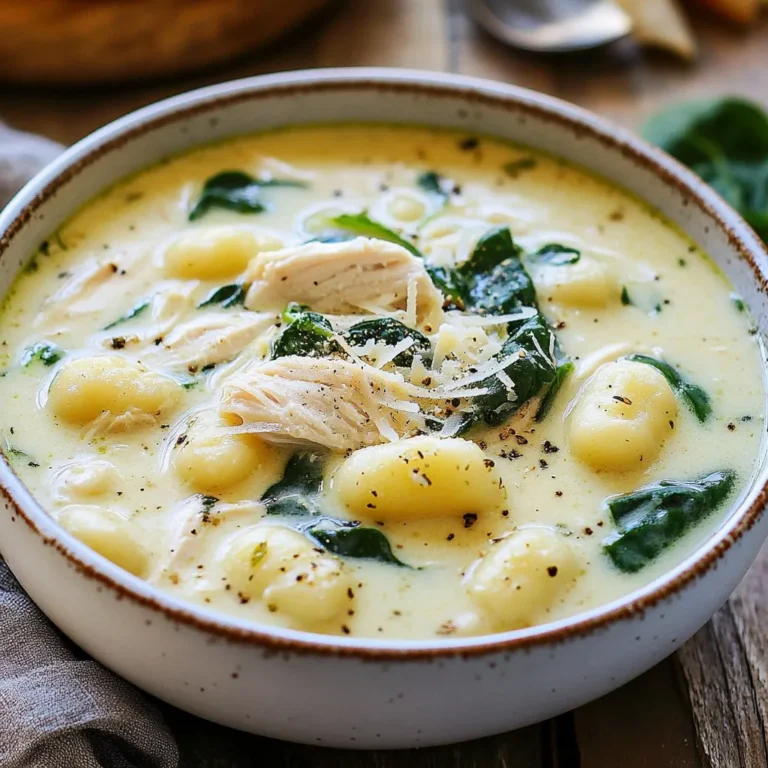
Creamy Chicken Gnocchi Soup Simple and Cozy Recipe

- Butter, sugars, and eggs You need 1 cup of unsalted butter. It should be soft, not melted. Add 1 cup of packed brown sugar and 1/2 cup of granulated sugar. This mix gives the cookies a sweet and rich flavor. Use 2 large eggs to bind everything together. - Dry ingredients: flour, baking soda, and salt For the dry mix, you need 3 cups of all-purpose flour. This helps the cookies hold their shape. Add 1 teaspoon of baking soda to help them rise and 1/2 teaspoon of salt to balance the sweetness. - Other ingredients: chocolate chips, Oreo cookies, and sprinkles You will add 1 cup of semi-sweet chocolate chips for extra chocolatey goodness. Use 1 package of Halloween-themed Oreo cookies, which is about 15 cookies. If you want a festive touch, add 1/2 cup of Halloween sprinkles. - Notes on ingredient substitutions If you need to swap some items, you can use coconut oil instead of butter. Brown sugar can be replaced with white sugar if needed. For a gluten-free option, use gluten-free flour. {{ingredient_image_2}} First, get a large bowl. Use an electric mixer to cream together the softened butter, brown sugar, and granulated sugar. Mix until the mix is light and fluffy, which takes about 2-3 minutes. Next, add the eggs one at a time. Ensure each egg mixes in fully before the next. Then, stir in the vanilla extract until it blends well. In another bowl, whisk together the all-purpose flour, baking soda, and salt. Once mixed, slowly add this dry mix into the wet mix. Stir just until combined. Don't overmix! This keeps your cookies soft and tender. Finally, gently fold in the chocolate chips and sprinkles, if you want an extra festive touch. Now comes the fun part! Use a cookie scoop or a tablespoon to take a portion of dough, about 2 tablespoons. Flatten the dough in your palm. Place one Halloween Oreo in the center of the flattened dough. Carefully wrap the dough around the cookie, sealing it completely. Make sure no Oreo is showing. Arrange the stuffed cookie balls on your prepared baking sheet. Leave about 2 inches between each ball. This space allows them to spread while baking. Preheat your oven to 350°F (175°C). Line a baking sheet with parchment paper to prevent sticking. Place your stuffed cookies on the sheet. Bake them for 10-12 minutes. Look for edges that turn golden brown. The centers should stay soft and slightly underbaked. Once baked, let the cookies cool on the baking sheet for 5 minutes. After that, move them to a wire rack to cool completely. This helps them firm up. Enjoy the warm, gooey goodness! To get the best cookies, do not overmix the dough. When you combine the dry and wet ingredients, mix just until you see no flour. Overmixing can make cookies tough. The key is to keep it light and fluffy. Baking temperature is very important. Set your oven to 350°F (175°C) and watch the time. Bake the cookies for 10-12 minutes. The edges should be golden, but the centers should look soft. This helps keep the cookies chewy and tasty. For a fun Halloween touch, arrange your cookies on a spooky plate. You can use a black or orange platter to fit the theme. To make them look even better, dust the tops with powdered sugar. It gives a ghostly look that kids will love! You can also add Halloween sprinkles on top before baking. This adds color and fun to each cookie. Serve them with a glass of cold milk. This makes for a perfect spooky snack! Pro Tips Chill the Dough: For even thicker cookies, refrigerate the dough for at least 30 minutes before baking. This helps prevent spreading and enhances the texture. Use Fresh Oreos: Ensure your Halloween-themed Oreos are fresh for the best taste. Stale cookies may not have the same delightful crunch and flavor. Experiment with Fillings: Try using different flavored Oreos or add a layer of caramel or peanut butter inside for a unique twist on these stuffed cookies. Keep an Eye on Baking Time: Since ovens vary, start checking your cookies a minute or two before the suggested baking time to avoid overbaking. {{image_4}} You can change the flavor of your Halloween Oreo stuffed cookies. Try using different Oreo flavors like mint, peanut butter, or red velvet. Each flavor adds a fun twist. You can also mix in other treats. Mini candy bars or chocolate chunks work great. Just chop them up and add to the dough for extra flavor. If you need gluten-free cookies, swap the all-purpose flour for a gluten-free blend. Make sure to check the blend has xanthan gum for texture. For vegan cookies, use plant-based butter and flax eggs instead of regular eggs. Just mix one tablespoon of ground flaxseed with three tablespoons of water for each egg. This keeps the cookies tasty and friendly for all diets! To keep your Halloween Oreo stuffed cookies fresh, follow these tips: - Cool Completely: Let the cookies cool fully before storing. This helps prevent moisture. - Airtight Containers: Use airtight containers to keep air out. This keeps cookies soft. - Layer with Parchment: If stacking, place parchment paper between cookies. This stops sticking. - Store in a Cool Place: Keep cookies in a cool spot, away from sunlight. This helps maintain freshness. You can freeze both unbaked and baked cookies with ease. - Unbaked Cookies: Scoop the cookie dough balls and freeze them on a baking sheet. Once solid, transfer to a freezer-safe bag. They can stay fresh for up to three months. - Baked Cookies: Let the cookies cool, then place them in a freezer-safe bag. They’ll last up to three months, too. - Thawing Tips: For best results, thaw cookies overnight in the fridge. You can also warm them in the oven for a few minutes at 350°F. This brings back their fresh-baked taste. Yes, you can use regular Oreos. The taste will still be great. The spooky theme is fun, but the flavor remains the same. If you prefer, try any Oreo flavor you like! Look at the edges of the cookies. They should be golden brown. The centers will stay soft and slightly underbaked. This is perfect for a chewy texture. If you wait too long, the cookies may harden. If your dough feels too sticky, add a little more flour. Start with one tablespoon at a time. Mix well after each addition. Be careful not to add too much at once. Your cookies need the right balance! Yes, you can make the dough ahead of time. Just wrap it tightly in plastic wrap. Store it in the fridge for up to three days. You can also freeze the dough for up to three months. When ready to bake, just let it thaw overnight in the fridge. You now know how to make delicious stuffed cookies. We covered the key ingredients, from butter to sprinkles, and detailed the steps for preparing the dough and stuffing the cookies. I shared tips for perfect texture and creative ways to present your treats. I also provided ideas for variations and storage methods to keep your cookies fresh. Enjoy experimenting with flavors and making these cookies your own!

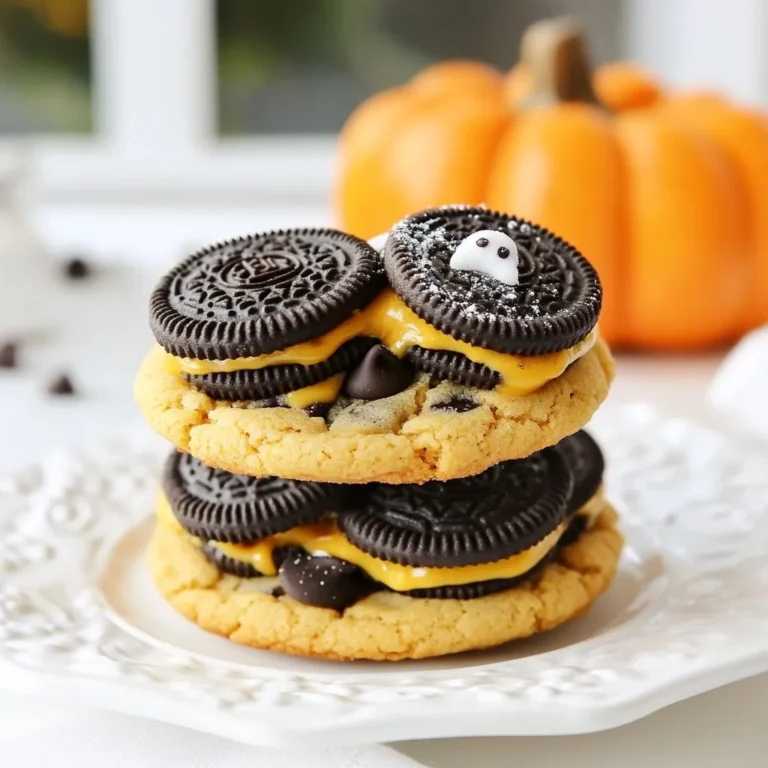
Halloween Oreo Stuffed Cookies Tasty Holiday Treat

- 2 cups brewed coffee, cooled to room temperature - 1 cup milk or your preferred dairy-free alternative - 1/4 cup sweetened condensed milk - 1 teaspoon vanilla extract - Ice cubes To make a great Baileys iced coffee, start with brewed coffee. This is the base of your drink. Choose a coffee you enjoy. Let it cool to room temperature so it blends well. Next, you need milk. You can use regular milk or a dairy-free option. Almond or oat milk works well. Add sweetened condensed milk for sweetness. This adds creamy richness to the drink. A teaspoon of vanilla extract gives it a nice flavor boost. Lastly, don’t forget the ice cubes. They chill your drink and make it refreshing. - Whipped cream - Chocolate shavings - Cocoa powder Toppings can take your Baileys iced coffee to the next level. A dollop of whipped cream adds a creamy finish. Chocolate shavings give it a rich look and taste. A sprinkle of cocoa powder adds a touch of bitterness, balancing the sweetness. You can mix and match these toppings to suit your taste. Enjoy crafting your perfect drink! {{ingredient_image_2}} To make Baileys iced coffee, start with the right coffee blend. Look for a medium roast. It gives a nice balance of flavor. I love using a dark roast for a bolder taste. Brew two cups of your chosen coffee. Let it sit to cool to room temperature. This step is key! Cooling prevents melting the ice too fast. Now, let’s mix the ingredients. In a large pitcher, add the cooled coffee. Pour in one cup of milk or dairy-free milk. Next, add 1/4 cup of sweetened condensed milk. This adds great creaminess. Don’t forget one teaspoon of vanilla extract for flavor! Use a whisk or spoon to stir the mixture well. You want everything to blend smoothly. This step is important for a nice texture. Grab a tall glass and fill it with ice cubes. The ice should fill the glass to the top. Now, slowly pour the creamy coffee mixture over the ice. Fill the glass three-quarters full. This keeps it chilled and refreshing. Top it off with a generous dollop of whipped cream. It makes the drink feel fancy! For the final touch, sprinkle some chocolate shavings or cocoa powder on top. This adds a beautiful look and extra flavor. Enjoy your Baileys iced coffee! Adjusting sweetness to taste You can make your Baileys Iced Coffee just right for you. Start with the sweetened condensed milk. If you like it sweeter, add more. If you want it less sweet, use less. Taste as you go. This way, you can find the perfect balance. Choosing the right milk alternatives If you want a dairy-free option, there are many choices. Almond milk, oat milk, or coconut milk all work well. Each one gives a different taste. Almond milk is nutty, while coconut milk adds creaminess. Choose the one you enjoy most. Additional flavorings to consider You can boost flavor with extras. A pinch of cinnamon adds warmth. A splash of caramel or hazelnut syrup brings sweetness. Experiment with your favorites. Each addition makes your drink unique. How to create a frothier drink To get a frothier drink, whisk the milk before adding it to coffee. You can also use a frother. This adds air and makes your drink light and fluffy. A frothy drink feels special and looks great topped with whipped cream. Pro Tips Chill Your Coffee: To enhance the creaminess of your iced coffee, make sure to let your brewed coffee cool completely before mixing it with the other ingredients. Customize Your Milk: Feel free to experiment with different types of milk, such as almond, oat, or coconut milk, to find the perfect flavor profile that suits your taste. Layer Your Ingredients: For a visually appealing drink, consider layering your coffee mixture and ice cubes before adding whipped cream on top. Garnish Creatively: In addition to chocolate shavings or cocoa powder, try using crushed nuts or a drizzle of caramel sauce for a unique twist on your iced coffee delight. {{image_4}} You can make Baileys Iced Coffee even more fun. Here are two tasty ideas: - Mocha Baileys Iced Coffee: Start with your regular recipe. Add 2 tablespoons of chocolate syrup to the coffee mix. It gives a rich chocolate flavor. Stir well before pouring. You will have a sweet mocha treat! - Baileys Iced Coffee with Caramel or Hazelnut: Mix 2 tablespoons of caramel or hazelnut syrup into the coffee blend. This twist adds a lovely sweetness. Drizzle extra syrup on top of the whipped cream for a nice touch. Your drink will look and taste amazing! If you want a dairy-free option, there are many great choices. Here are a few plant-based milks: - Almond milk: This milk is light and nutty. It pairs well with coffee. - Oat milk: Creamy and smooth, oat milk gives a rich texture. - Coconut milk: It adds a lovely tropical taste. Use the creamy version for the best result. For a vegan whipped cream, look for brands made from coconut or almond milk. They add a nice finish to your drink. You can also whip coconut cream for a homemade version. Just chill the can overnight, scoop it out, and whip until fluffy. These variations and alternatives let you enjoy Baileys Iced Coffee in many ways. You can store mixed Baileys iced coffee, but it’s best to drink it fresh. If you have leftovers, put them in a sealed container. This keeps the coffee from getting too strong. Store it in the fridge for up to two days. However, the taste may change after a day or so. For the best results, keep the ingredients separate. Store brewed coffee and milk in their own containers. This way, the flavors stay fresh. Mix them right before you drink. Enjoy your Baileys iced coffee within 24 hours for the best taste. If you plan a gathering, make it ahead. You can mix the coffee and milk a few hours early. Just remember to chill it well. Serve it cold over ice for a refreshing treat. This drink is perfect for hot summer days. It’s also great as a fun dessert drink for parties. Baileys Iced Coffee is a creamy, cold drink that blends coffee with Baileys Irish Cream. You start with brewed coffee, cooled to room temperature. Then, you mix in milk, sweetened condensed milk, and vanilla extract. The result is a rich and smooth coffee drink. Serve it over ice and top it with whipped cream and chocolate shavings for a special touch. Yes, you can. Use plant-based milk like almond, oat, or coconut milk. These options still give a creamy texture. You can also find dairy-free whipped cream for the topping. This way, you can enjoy a tasty drink that fits your diet. Baileys Iced Coffee lasts about 1 to 2 days in the fridge. Store it in a sealed container. If you see changes in smell or taste, it's best to throw it out. Always check before you drink. Absolutely! Decaffeinated coffee works well in this recipe. It gives you the same great flavor without the caffeine kick. If you prefer to enjoy Baileys Iced Coffee at night, decaf is a smart choice. Just brew it as you normally would, and follow the recipe steps. In this post, we explored making Baileys Iced Coffee. We covered key ingredients like brewed coffee, milk, and sweetened condensed milk. You learned the steps for brewing and mixing. We also shared tips to enhance flavor and enjoyed variations for everyone. Remember, adjusting sweetness and trying different toppings can create a unique drink just for you. Whether you choose dairy or not, this recipe is fun and flexible. Enjoy your delicious creation, and share it with friends for a perfect treat!

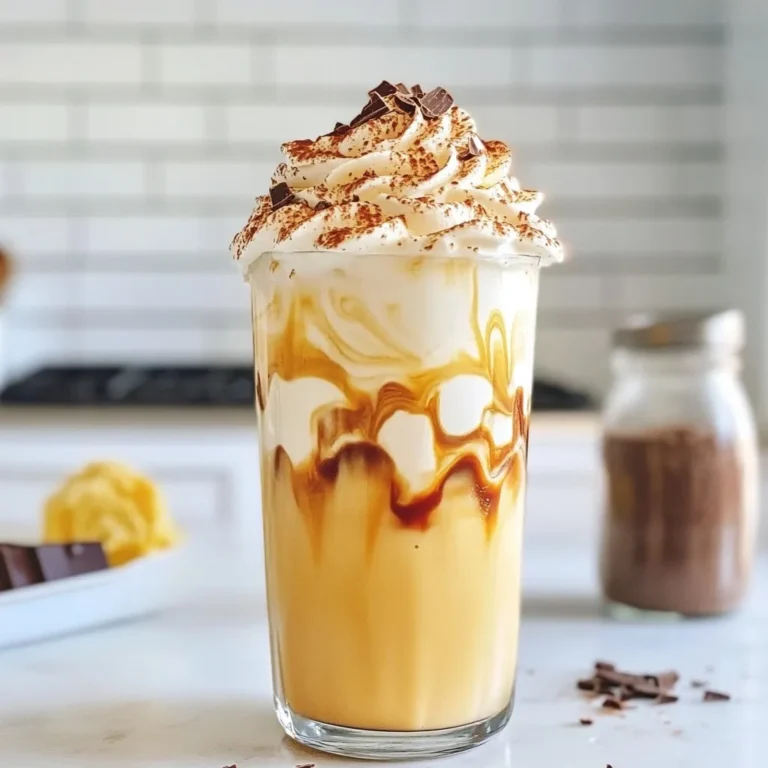
Baileys Iced Coffee Perfect Refreshing Summer Drink

To make Halloween Cream Cheese Swirl Brownies, you need fresh ingredients. Here’s what you will need: - 1 cup unsalted butter, melted - 2 cups granulated sugar - 1 teaspoon pure vanilla extract - 4 large eggs, at room temperature - 1 cup all-purpose flour - 1 cup unsweetened cocoa powder - 1/2 teaspoon baking powder - 1/4 teaspoon fine sea salt - 1 cup semi-sweet chocolate chips - 8 oz cream cheese, softened to room temperature - 1/2 cup powdered sugar - 1 teaspoon freshly grated orange zest - 1 tablespoon Halloween-themed sprinkles For some fun twists, you can try adding different flavors. You could use mint extract instead of vanilla. Or swap in nuts for some crunch. If you want a pumpkin flavor, try adding pumpkin spice to the cream cheese mix. These simple changes can make your brownies unique and festive! {{ingredient_image_2}} First, preheat your oven to 350°F (175°C). This step is key for even baking. Next, line a 9x13 inch baking pan with parchment paper. Make sure to leave some paper hanging over the edges. This makes it easy to lift out the brownies later. Start by mixing your wet ingredients. In a large bowl, pour in the melted butter. Add the granulated sugar and mix until smooth. You can use an electric mixer or a whisk for this. Next, add the vanilla extract. Then crack in the eggs, one at a time. Mix well after each egg. This helps make your batter fluffy. In another bowl, combine the dry ingredients. Mix the all-purpose flour, cocoa powder, baking powder, and sea salt together. Whisk them well until there are no clumps. Now, gently fold the dry mix into the wet ingredients. Use a spatula and stir carefully. Avoid overmixing. You want to see no flour streaks but keep it light. Finally, add the chocolate chips to the batter. Stir them in gently so they spread evenly throughout the mix. For the cream cheese swirl, start by softening the cream cheese. In a new bowl, beat the cream cheese until it is ultra-smooth. Next, add the powdered sugar and orange zest. Mix until fluffy and well-combined. Now, it's time to layer the mixtures. Pour half of the brownie batter into your prepared pan. Spread it out evenly. Next, dollop spoonfuls of the cream cheese mixture on top. To create a marbled effect, use a knife or skewer. Gently swirl the cream cheese into the brownie batter. Next, pour the rest of the brownie batter over the cream cheese. If you want, save a little batter for decoration. Use a toothpick or knife again to swirl through the top layer for a nice design. - Bake the brownies at 350°F (175°C) for 30-35 minutes. This time ensures a moist center. - To check if the brownies are done, insert a toothpick into the center. It should come out with a few crumbs. If it’s wet, bake a little longer. - Mix the wet ingredients until smooth. This helps create a fluffy texture. - When adding the dry ingredients, fold them in with a spatula. Stir just until you no longer see flour. This keeps your brownies soft and chewy. Remember, overmixing can lead to tough brownies. Pro Tips Use Room Temperature Ingredients: Ensure that your eggs and cream cheese are at room temperature for a smoother batter and cream cheese mixture. Don’t Overmix the Batter: To maintain a fudgy texture, mix the brownie batter just until the dry ingredients are incorporated. Overmixing can lead to cakey brownies. Swirling Technique: For the best marbling effect, use a knife or skewer to gently swirl the cream cheese mixture into the brownie batter without fully blending it. Cooling Time: Allow the brownies to cool completely before cutting to ensure clean edges and to prevent them from falling apart. {{image_4}} You can make these Halloween cream cheese swirl brownies fit different diets. For a gluten-free option, swap the all-purpose flour with a gluten-free blend. Be sure to choose one that works well for baking. For those who want dairy-free brownies, use a dairy-free cream cheese. There are several brands available that taste great. You may also replace the butter with coconut oil for a dairy-free fat. These changes keep the brownies tasty while making them suitable for more people. Want to change up the flavors? You can add different tastes to your brownies. One fun idea is to mix in a bit of mint extract. This gives a fresh twist to the classic chocolate flavor. You can also add crushed nuts for some texture. Walnuts or pecans work well. If you like fruit, try adding some chopped cherries or raspberries to the batter. For a festive touch, consider using pumpkin spice in the cream cheese mix. You can even top your brownies with caramel or chocolate drizzle for extra sweetness. These ideas make your Halloween brownies even more special and unique. To keep your Halloween cream cheese swirl brownies fresh, use an airtight container. Place parchment paper between layers to avoid sticking. Store the brownies at room temperature for up to three days. If you want them to last longer, consider the fridge, where they can stay good for about a week. Just remember, chilling can change the texture slightly, making them firmer. Freezing is a great option for these brownies. Allow them to cool completely before freezing. Cut them into squares and wrap each piece in plastic wrap. Then, place the wrapped brownies in a freezer-safe bag or container. They can last up to three months in the freezer. When you’re ready to enjoy, thaw them in the fridge overnight, or let them sit at room temperature for a few hours. You can even warm them in the microwave for a few seconds for that fresh-out-of-the-oven taste! You can use ricotta cheese or mascarpone as a cream cheese substitute. Both have a similar texture. They will give a different taste but can still be yummy. You can even try a vegan cream cheese if you want a dairy-free option. Yes, you can make these brownies a day or two ahead. Just store them in an airtight container. They taste great even after a day. You can also freeze them for up to three months if you want to save some for later. To check if your brownies are done, insert a toothpick in the center. If it comes out with a few moist crumbs, they are ready. If it comes out wet, bake for a few more minutes. Be careful not to overbake, or they will be dry. To get a nice swirl, dollop the cream cheese mixture evenly on top of the brownie batter. Use a knife or skewer to gently swirl it in. Don't overdo the swirling; you want to see both the brownie and cream cheese layers. This guide covers all you need to make delicious brownies. You learned about the right ingredients and how to mix them. I shared tips for baking and offered ways to customize your treats. Storing and freezing brownies keeps them fresh for longer. With these steps, you can enjoy great results every time. Now, get baking and create your own tasty masterpieces! Enjoy the process and share your delicious brownies with friends.

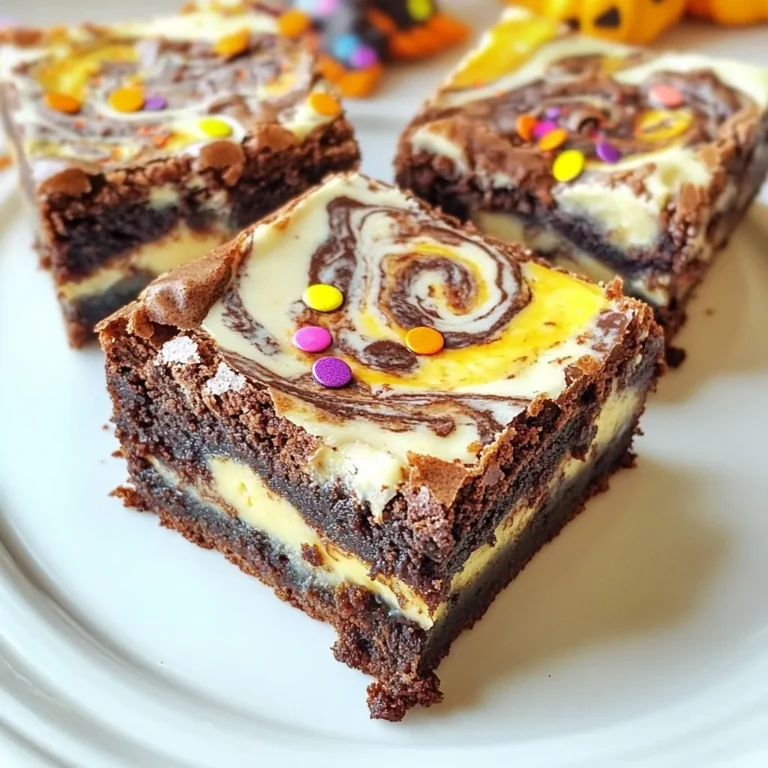
Halloween Cream Cheese Swirl Brownies Delightful Treat

- 1 box brownie mix (plus required eggs, oil, and water as specified on the box) - 1 cup graham cracker crumbs - 1/2 cup unsalted butter, melted - 1 cup mini marshmallows - 1 cup milk chocolate chips - 1/2 teaspoon vanilla extract - A pinch of salt To create S’mores brownie bars, you need a few key ingredients. First, grab a box of brownie mix. Make sure you have the eggs, oil, and water needed for that mix. Next, you will need graham cracker crumbs. These will form the base of your dessert. For the crust, combine the graham cracker crumbs with melted butter. This mix gives a rich and buttery flavor. Next, we add toppings. You'll need mini marshmallows and milk chocolate chips. These will melt and create that classic S’mores experience. Don't forget to enhance your brownie batter with a bit of vanilla extract and a pinch of salt. This simple addition makes a big difference in taste. Gather these ingredients, and you’re ready to make a delicious treat! {{ingredient_image_2}} 1. Preheat oven and prepare baking pan Start by preheating your oven to 350°F (175°C). This step is key for even baking. Grease a 9x13 inch baking pan lightly. You can also line it with parchment paper. Leave some paper hanging over the sides. This makes it easy to lift out your bars later. 2. Make the graham cracker crust In a mixing bowl, combine 1 cup of graham cracker crumbs with 1/2 cup of melted unsalted butter. Mix until all crumbs are coated. Press this mixture firmly into the bottom of your prepared pan. Make sure it is compact and even. This crust gives a nice, crunchy base. 3. Prepare and pour brownie batter In another bowl, prepare 1 box of brownie mix according to the package instructions. You will also need to add the required eggs, oil, and water. To enhance flavor, add 1/2 teaspoon of vanilla extract and a pinch of salt. Mix well until smooth. Pour the brownie batter evenly over the graham cracker crust. 1. Bake the brownie layer Place the pan in the preheated oven. Bake for about 20-25 minutes. To check if it’s done, insert a toothpick into the center. It should come out with a few moist crumbs. This means your brownies are fudgy and perfect. 2. Add toppings and bake again Once you take the brownies out of the oven, sprinkle 1 cup of milk chocolate chips and 1 cup of mini marshmallows on top. The heat will start to melt them. Return the pan to the oven for another 5-7 minutes. Keep a close eye until the marshmallows puff and turn golden. 3. Cool and cut into squares After baking, let the S'mores brownie bars cool in the pan for about 10 minutes. Then, move them to a wire rack to cool completely. Once cool, use the parchment paper to lift the brownies out of the pan. Cut them into squares or bars before serving. Enjoy the gooey, chocolatey goodness! To get the right texture in your S’mores brownie bars, use the toothpick test. This test helps you know when your brownies are done. Insert a toothpick into the center. If it comes out with a few moist crumbs, they are perfect. If it’s clean, the brownies may be dry. Baking time is key. Aim for about 20-25 minutes for the brownie layer. Ovens can vary, so check a few minutes early. The edges should look set, while the center may appear slightly soft. This means you will get that fudgy texture. Want to add more depth of flavor? Try mixing in a bit of coffee or espresso powder into the brownie batter. It enhances the chocolate taste without being too strong. You can also use dark chocolate chips instead of milk chocolate for a richer flavor. If you need substitutions for ingredients, that’s easy too. You can use a gluten-free brownie mix if you prefer. Swap out regular butter for coconut oil to make it dairy-free. Both changes keep the bars delicious. Pro Tips Chill the Brownies: For cleaner cuts, refrigerate the brownies for about an hour after they have cooled completely. This helps firm them up, making it easier to cut into perfect squares. Use Quality Chocolate: Opt for high-quality chocolate chips for a richer flavor. The chocolate is a key component, so choosing the best will elevate your S’mores brownie bars. Experiment with Toppings: Feel free to customize your S’mores brownie bars with additional toppings like crushed nuts, toffee bits, or a drizzle of caramel for extra decadence. Keep an Eye on the Marshmallows: When baking the marshmallows, watch them closely to prevent burning. They should be golden and puffy, but not charred. {{image_4}} You can make your S’mores brownie bars even more fun with different toppings. Try using dark chocolate or white chocolate chips instead of milk chocolate. Each option gives a unique taste. You can also mix in peanut butter chips for a nutty twist. If you want to get creative, use flavored marshmallows. Choices like chocolate or strawberry marshmallows can add a new layer of flavor. It’s a simple way to change the whole vibe of your dessert. If you need gluten-free options, swap the brownie mix for a gluten-free version. Many brands offer great gluten-free brownie mixes. You can also crush gluten-free graham crackers for the crust. For vegan substitutes, use a plant-based brownie mix and flax eggs instead of regular eggs. Melted coconut oil can replace butter. These tweaks keep the taste while meeting dietary needs. Everyone can enjoy these delicious bars! To keep your S’mores brownie bars fresh, store them in an airtight container. This prevents them from drying out. You can use a glass or plastic container with a tight lid. If you stack the bars, place parchment paper between layers to avoid sticking. Keep them at room temperature for up to four days. You can freeze S’mores brownie bars to enjoy later. First, let them cool completely. Then, wrap each bar in plastic wrap and place them in a freezer-safe bag. This keeps them fresh for up to three months. When you're ready to eat them, take the bars out and let them thaw in the fridge overnight. For a quick option, you can also thaw them at room temperature for about an hour. Enjoy your treat whenever you want! Can I use homemade brownie mix? Yes, you can use homemade brownie mix. Just follow your favorite recipe. Make sure it has the same texture as store-bought mixes. How do I know when they are done? You can check if they are done by using a toothpick. Insert it into the center of the brownies. If it comes out with a few moist crumbs, they are ready. Can I make these in advance? Absolutely! You can make these in advance. Just store them in an airtight container. They will stay fresh for a few days. What can I serve with S’mores Brownie Bars? These bars pair well with ice cream or whipped cream. You can also serve them with hot chocolate for a cozy treat. You learned how to make S’mores Brownie Bars from start to finish. We covered ingredients, preparation, baking steps, and valuable tips. Remember to test for texture while baking. Feel free to explore different toppings and dietary options. Store them well for lasting freshness or freeze for later. Enjoy these sweet treats; they are sure to impress! Happy baking!

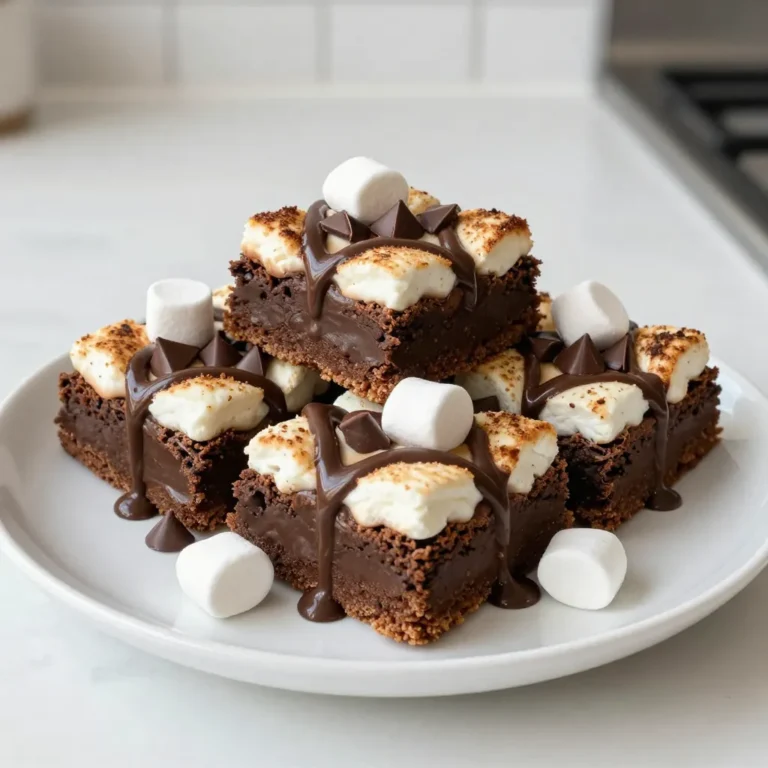
S’mores Brownie Bars Irresistible Chocolate Treat

- 1 lb ground chicken - 1/3 cup buffalo sauce (mild or hot) - 1 tablespoon olive oil - 2 cloves garlic, minced - 1/2 teaspoon onion powder - 1/2 teaspoon smoked paprika - Lettuce leaves (romaine or butter) The main ingredients give your wraps a great taste. Ground chicken is lean and easy to cook. Buffalo sauce adds heat and flavor. Olive oil helps to sauté the garlic and chicken. Garlic brings a strong aroma. Onion powder and smoked paprika add depth to the dish. The lettuce serves as a fresh, crunchy wrap. - Blue cheese or ranch dressing - Green onions, sliced - Shredded carrots These optional ingredients let you customize your wraps. Blue cheese or ranch dressing adds creaminess. Green onions provide a fresh crunch. Shredded carrots add color and sweetness. Use these extras to enhance the taste and presentation. - Turkey or tofu instead of chicken - Homemade buffalo sauce You can easily swap the chicken for turkey or tofu. This makes the dish suitable for different diets. If you want to control the heat, try making your own buffalo sauce. This way, you can adjust the flavors to your liking. {{ingredient_image_2}} 1. Start by heating a large skillet over medium heat. Add 1 tablespoon of extra virgin olive oil. 2. Once the oil is hot, add 2 cloves of minced garlic. Sauté for about 1 minute. You want it fragrant, not browned. 3. Next, add 1 pound of ground chicken to the skillet. Use a wooden spoon to break it apart. Cook for 5 to 7 minutes until it’s browned and no longer pink. Stir occasionally for even cooking. 4. Now, sprinkle in 1/2 teaspoon of onion powder and 1/2 teaspoon of smoked paprika. Add a pinch of salt and black pepper. Stir well to coat the chicken with the spices. 1. Gradually pour in 1/3 cup of buffalo sauce. Mix it in thoroughly with the chicken. 2. Let the mixture simmer for 2 to 3 minutes. This helps to blend the flavors and heat everything through. 1. Select a head of romaine or butter lettuce. Gently separate the leaves and rinse them. 2. Take a leaf and spoon about 2 to 3 tablespoons of the buffalo chicken mixture into the center. 3. To finish, add a sprinkle of 1/4 cup of sliced green onions and 1/4 cup of shredded carrots on top. If you like, drizzle some blue cheese or ranch dressing over it for extra flavor. Now, fold the sides of the lettuce leaf over the filling and enjoy these tasty bites! To get a nice, even browning on your chicken, use medium heat. This helps the meat cook through without burning. Make sure to break the chicken into small pieces while it cooks. This ensures each bite is tasty and well-seasoned. Adjusting spice levels is simple. If you want it milder, use less buffalo sauce. A mild buffalo sauce can still pack flavor without too much heat. For those who love spice, go for the hot version. You can also add cayenne pepper to kick it up a notch. For a great presentation, serve the wraps on a big platter. Arrange the lettuce wraps neatly. Add extra shredded carrots and green onions around the edges. This makes the dish look colorful and inviting. Consider serving blue cheese or ranch dressing on the side. This creamy touch adds a rich flavor contrast. You can also pair these wraps with a fresh salad or crunchy veggie sticks for a full meal. To store leftovers, place the chicken mixture in an airtight container. Keep it in the fridge for up to three days. Make sure to store the lettuce leaves separately. This keeps them crisp and fresh. When you're ready to eat, reheat the chicken mixture in a skillet. Heat it on low until warm. Avoid high heat to keep the chicken juicy. You can also use the microwave, but stir it every 30 seconds for even warming. Pro Tips Choose Your Heat Level: Select a buffalo sauce that matches your preferred spice level; milder sauces are great for those who enjoy less heat, while hotter options will satisfy the spice lovers. Fresh Herbs for Extra Flavor: Consider adding fresh herbs like cilantro or parsley to the wraps for an additional layer of flavor and freshness. Make Ahead: Prepare the buffalo chicken mixture in advance and store it in the refrigerator. This makes for a quick assembly when you're ready to eat! Experiment with Dressings: While blue cheese and ranch dressings are classic choices, try experimenting with other dressings like a spicy yogurt sauce or a zesty vinaigrette for a unique twist. {{image_4}} You can switch up the ground chicken in these wraps. Try ground turkey for a leaner choice. Ground beef adds richness and flavor. For a plant-based meal, use crumbled tofu or lentils. Each protein gives a unique taste and texture to your wraps. Buffalo sauce comes in different heat levels. Choose mild if you prefer less heat. For a spicy kick, go for hot buffalo sauce. You can even mix both for a balanced flavor. Adjust the heat to match your taste buds. Feel free to load up on veggies. Add diced bell peppers for crunch. Cucumbers add a refreshing taste. You can also throw in avocado for creaminess. Top your wraps with green onions and shredded carrots for color. Mix and match to create your perfect wrap! To keep your ingredients fresh, store each item separately. Place the ground chicken mixture in an airtight container. Refrigerate it for up to three days. Store the lettuce leaves in a sealed bag with a damp paper towel. This keeps them crisp. The green onions and shredded carrots can stay in the fridge in their own containers. This method helps maintain their crunch and flavor. When it's time to enjoy your wraps again, reheating is easy. You can use a skillet over low heat. Stir the chicken filling often until it warms through. Alternatively, you can microwave it in a bowl. Cover the bowl with a damp paper towel to keep moisture in. Heat in short bursts of 30 seconds, stirring in between. This ensures even warming without drying out the chicken. For the best taste, eat prepared wraps within one day. If you store them in the fridge, they may lose their crispness. If you want to save them longer, consider storing the filling and lettuce separately. This way, you can enjoy fresh wraps anytime. Yes, you can prepare Buffalo Chicken Lettuce Wraps ahead of time. Cook the chicken mixture and let it cool completely. Store it in an airtight container in the fridge. It stays fresh for about 3 days. When ready to eat, just reheat the chicken in a pan or microwave. Assemble the wraps with fresh lettuce before serving for the best taste. Absolutely! These wraps are great for meal prep. You can make a large batch of the chicken mixture. Store it in portions for the week. This saves time and keeps meals healthy. You can easily grab the chicken and lettuce when you're ready to eat. Plus, the flavors get better as they sit. You can serve a variety of sides with these wraps. Here are some tasty options: - Vegetable sticks: Carrots, celery, or bell peppers add crunch. - Fruit salad: A light and refreshing complement. - Chips: Tortilla chips or pita chips for a fun crunch. - Dips: Serve with extra blue cheese or ranch for dipping. - Salad: A simple green salad pairs well too. These sides make your meal complete and enjoyable! You now have a clear plan for making delicious Buffalo Chicken Lettuce Wraps. We covered key ingredients like ground chicken and buffalo sauce, along with helpful tips for preparing and storing your wraps. You learned how to customize the heat and even substitute proteins. I hope you feel inspired to create your own wraps that suit your taste. Remember, these wraps are not only fun to make, but they are also a great choice for healthy meals. Enjoy your cooking!

Buffalo Chicken Lettuce Wraps Healthy Flavorful Meal

- 1 tablespoon olive oil - 1 pound Italian sausage (sweet or spicy) - 1 medium onion, finely diced - 3 cloves garlic, minced - 3 medium carrots, peeled and diced - 2 stalks celery, diced - 6 cups chicken broth - 1 cup ditalini pasta - 1 cup heavy cream - 1 cup grated Parmesan cheese - 1 teaspoon dried thyme - 1 teaspoon dried oregano - Salt and freshly ground black pepper - Fresh parsley, finely chopped Choose high-quality ingredients to enhance flavor. Look for fresh vegetables, firm sausage, and good broth. Freshly grated Parmesan adds a rich taste. Opt for low-sodium chicken broth for better control of salt. For gluten-free versions, use gluten-free pasta or rice. For a vegetarian option, swap sausage with plant-based meat or mushrooms. You can use vegetable broth instead of chicken broth. Swap heavy cream for coconut milk or cashew cream for a dairy-free choice. {{ingredient_image_2}} Start by heating one tablespoon of olive oil in a large pot over medium heat. Once the oil shimmers, add one pound of Italian sausage, breaking it apart with a wooden spoon. Cook this for about 5 to 7 minutes. Stir often until it turns brown and is fully cooked. Next, add in one finely diced onion, three minced garlic cloves, three diced carrots, and two diced celery stalks. Sauté this mix for about 5 minutes. You want the veggies to become tender and fragrant. Now, pour in 6 cups of chicken broth and turn up the heat. Bring the mix to a rolling boil. Once boiling, toss in 1 cup of ditalini pasta and reduce the heat to medium. Cook the pasta according to the package directions, usually about 8 to 10 minutes. Stir occasionally to stop it from sticking. After your pasta is cooked, lower the heat again. Stir in 1 cup of heavy cream and 1 cup of grated Parmesan cheese. Mix well until the cheese melts into the soup and makes it creamy. If it’s too thick, add a bit more broth or water. Season the soup with 1 teaspoon of dried thyme, 1 teaspoon of oregano, and salt and pepper to taste. Let it simmer for an extra 5 minutes to blend all the flavors. Finally, take the pot off the heat. Serve each bowl with a sprinkle of chopped parsley for a fresh touch. - Heat olive oil on medium heat. - Cook the sausage for 5 to 7 minutes. - Sauté the veggies for about 5 minutes. - Boil the broth and pasta for 8 to 10 minutes. - Simmer the soup with seasonings and cream for 5 minutes. - Large heavy-bottomed pot - Wooden spoon for stirring - Measuring cups and spoons - Knife and cutting board for chopping - Ladle for serving the soup To make Creamy Parmesan Sausage Ditalini Soup shine, use fresh ingredients. Fresh herbs, like thyme and parsley, bring bright flavors. Choose high-quality Parmesan cheese for a rich taste. Sauté the sausage until it’s browned, adding depth to the soup. Stir often to let the vegetables cook evenly. Each step builds layers of flavor in your dish. For a creamy soup, add the heavy cream after cooking the pasta. This keeps the cream from curdling. If it gets too thick, add extra chicken broth or water. For a silkier texture, blend a small portion of the soup and stir it back in. This adds body while keeping some chunks for texture. Avoid cooking the pasta too long. You want it al dente, which means it should still have a slight bite. If you overcook it, the pasta can turn mushy. Another mistake is not seasoning enough. Tasting as you cook is key. Adjust salt and pepper to enhance the flavors. Lastly, don’t skip the final simmer. This melds all the flavors together, making the soup truly delicious. Pro Tips Use Quality Ingredients: Always choose high-quality Italian sausage and fresh herbs for the best flavor in your soup. Adjust Thickness: If your soup is too thick after adding cream, simply add a bit more chicken broth or water to achieve your desired consistency. Perfectly Cooked Pasta: To prevent mushy pasta, cook the ditalini just until al dente before adding the cream; it will continue to cook slightly in the soup. Enhance with Toppings: For added flavor and visual appeal, consider topping each bowl with extra Parmesan and a drizzle of olive oil before serving. {{image_4}} Sausage can change the whole taste of your soup. I love using Italian sausage, either sweet or spicy. Sweet sausage gives a mild flavor. Spicy sausage adds a kick that wakes up your taste buds. You can also try other types, like chorizo for a smoky touch. Chicken or turkey sausage works too for a leaner choice. Each type gives a unique flavor profile and can change how rich the soup feels. Feel free to add more veggies to your soup. Spinach or kale can boost nutrition and color. You can swap the carrots or celery for zucchini or bell peppers. Each veggie adds different flavors and textures. If you want a heartier soup, try adding potatoes or corn. You can even toss in some beans for extra protein. The options are endless, so mix and match to find your favorite blend. If you want a lighter soup, use half-and-half or a lower-fat cream. You can also replace heavy cream with coconut milk for a dairy-free option. For dairy-free cheese, try nutritional yeast or vegan cheese. This gives a cheesy flavor without the cream. You can still keep it rich and tasty while making it fit your dietary needs. Don’t be afraid to experiment! To keep your soup fresh, let it cool first. Divide it into smaller containers. Use airtight containers for the best results. Label each container with the date. Store it in the fridge for up to three days. For longer storage, consider freezing it. For freezing, use freezer-safe containers. Leave some space at the top. This allows the soup to expand as it freezes. When you want to eat it, take it out of the freezer. Place it in the fridge overnight to thaw. If you're in a hurry, you can thaw it in the microwave. Make sure to stir often for even thawing. Reheat your soup on the stove for the best taste. Pour it into a pot and warm it over low heat. Stir often to prevent sticking. If the soup is too thick, add a bit of broth or water. You can also use the microwave. Heat it in short bursts, stirring in between. This keeps the flavor and texture just right. Yes, you can! Other small pasta shapes work well. Try elbow macaroni or small shells. Just make sure to adjust the cooking time based on the pasta. If you pick a larger shape, cook it a bit longer. Remember, the goal is tender pasta that blends well with the soup. To add spice, use spicy Italian sausage. You can also add red pepper flakes or diced jalapeños. Start with a small amount and taste as you go. You can always add more spice, but it's hard to take it out. Enjoy a warm kick with each spoonful! This soup pairs great with crusty bread. A nice slice of sourdough or a warm baguette works well. You can also serve a simple salad with a light dressing on the side. These options balance the soup's creaminess and make for a complete meal. Enjoy! This blog post provided a complete guide to making Creamy Parmesan Sausage Ditalini Soup. We discussed key ingredients, cooking steps, and tips for great flavor. I shared ways to tailor the soup for dietary needs and how to store it well. In conclusion, with the right ingredients and steps, you can craft a warm bowl of happiness. Enjoy the cooking process and make this soup your own!

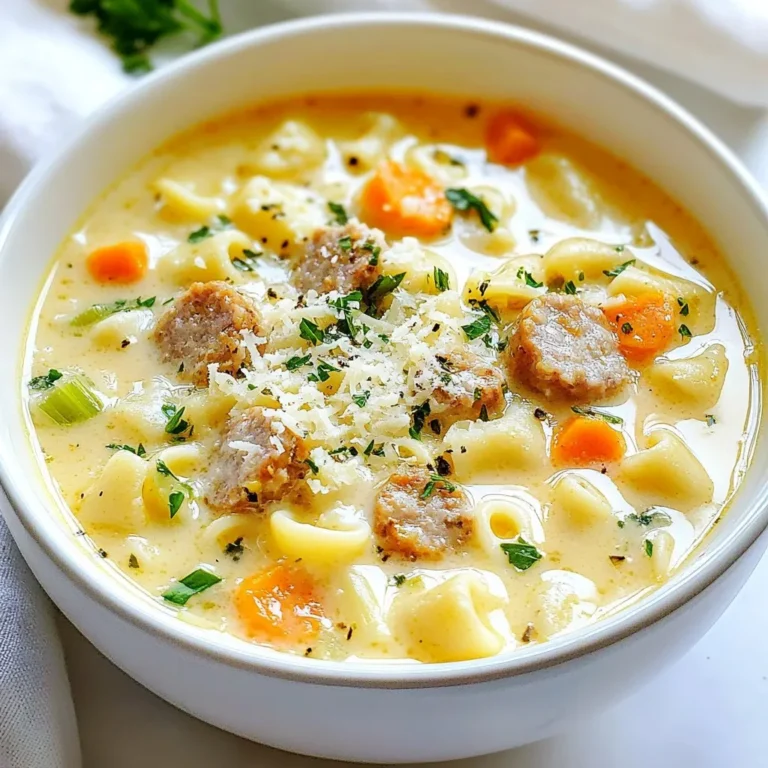
Creamy Parmesan Sausage Ditalini Soup Delight

To make the Apple Cinnamon German Pancake, gather these items: - 3 large eggs - 1 cup whole milk - 1 cup all-purpose flour - 1 teaspoon vanilla extract - 2 tablespoons granulated sugar - 1/2 teaspoon salt - 1 teaspoon ground cinnamon - 2 medium apples (preferably Granny Smith), peeled, cored, and thinly sliced - 2 tablespoons unsalted butter - Powdered sugar, for dusting - Maple syrup, for serving If you need to swap ingredients, here are some ideas: - You can use almond milk instead of whole milk for a dairy-free option. - If you don’t have all-purpose flour, try using whole wheat flour. - For a lower sugar option, you can use honey or maple syrup instead of granulated sugar. - Instead of Granny Smith apples, you may use Honeycrisp or Fuji for a sweeter taste. Using fresh ingredients makes a big difference. Fresh apples give the pancake a juicy flavor. They cook down nicely and add a nice texture. Dried apples can work, but they lack moisture. If you use dried apples, soak them in warm water for 15 minutes. This helps them soften and adds a bit of moisture back into the dish. Fresh ingredients always taste better, so I recommend sticking to them when possible! {{ingredient_image_2}} First, preheat your oven to 425°F (220°C). This hot oven helps the pancake rise well. While the oven is heating, place a cast-iron skillet or an oven-safe dish inside. The warm skillet creates a nice, crispy edge on your pancake. In a large bowl, whisk together 3 large eggs and 1 cup of whole milk. You want them mixed well. Then, add in 1 cup of all-purpose flour, 1 teaspoon of vanilla extract, 2 tablespoons of granulated sugar, 1/2 teaspoon of salt, and 1 teaspoon of ground cinnamon. Keep whisking until the batter is smooth and free of lumps. This step is key for a light and fluffy pancake. Once your batter is ready, carefully take the hot skillet out of the oven using oven mitts. Quickly add 2 tablespoons of unsalted butter to the skillet and swirl it around until it melts. Pour the batter into the hot skillet, spreading it evenly. Now, take 2 medium apples that you’ve peeled, cored, and thinly sliced. Arrange the apple slices on top of the batter in a circular pattern. This way, each slice will cook nicely. Return the skillet to the oven and bake for 20-25 minutes. The pancake should puff up and turn golden-brown. When it’s done, take it out and let it cool for a minute. Dust with powdered sugar and serve warm with maple syrup for a delightful breakfast! To make your pancake fluffy, use fresh eggs. They help the pancake rise. Whisk the eggs and milk well. Mix until smooth, with no lumps. This will give you air in the batter. Preheat your skillet in the oven. A hot skillet creates a golden crust. When adding the batter, work fast. Don't let the batter sit too long. The heat helps it puff up nicely. One common mistake is not preheating the skillet. A cold skillet will yield a flat pancake. Another mistake is overmixing the batter. Mix just until combined; lumps are fine. Also, don't skip the apples. They add moisture and flavor. Lastly, avoid opening the oven door too early. This can cause your pancake to deflate. Serve your pancake warm for the best taste. Dust it with powdered sugar for sweetness. Drizzle rich maple syrup on top for added flavor. For a fresh look, add apple slices on the side. A sprinkle of cinnamon also enhances its appeal. Enjoy it with a cup of coffee or tea for a cozy breakfast. Pro Tips Use Room Temperature Ingredients: Allow your eggs and milk to come to room temperature before mixing. This helps to create a smoother batter and contributes to a fluffier pancake. Don’t Overmix the Batter: Mix the batter just until combined. Overmixing can lead to a dense pancake instead of a light and airy one. Experiment with Apples: While Granny Smith apples are tart and great for this recipe, feel free to mix in other varieties like Honeycrisp or Fuji for a different flavor profile. Serve Immediately: This pancake is best served fresh out of the oven. The longer it sits, the more it will deflate, so be ready to serve as soon as it's cooled slightly. {{image_4}} You can choose many apple types for this pancake. Granny Smith apples are my favorite. They add a nice tartness that pairs well with the sweet pancake. Honeycrisp apples are also great; they bring a juicy sweetness. Fuji apples work well, too, with their crisp texture. Try mixing different apples for a fun twist. Combine tart and sweet apples to create a balanced flavor. Want to add more texture? Consider adding nuts. Chopped walnuts or pecans give a nice crunch. They also enhance the flavor. If you want to add other fruits, sliced pears or berries are great choices. Berries can add a burst of color and flavor. Just remember to keep the fruit pieces small so they cook evenly. If you need a gluten-free option, substituting the flour is easy. Use a gluten-free all-purpose flour blend. These blends work well in most recipes. You might also try almond flour for a nutty flavor. Just keep in mind that the texture may change slightly. Adjust the liquid in the batter if needed for the right consistency. Enjoy your tasty pancake without worry! To keep your pancake fresh, let it cool completely. Cover it tightly with plastic wrap or foil. Place the wrapped pancake in the fridge. It will stay fresh for up to three days. If you have slices, store them in an airtight container. This keeps them moist and tasty. When you want to eat your leftovers, use the oven to reheat. Preheat your oven to 350°F (175°C). Place the pancake on a baking sheet and cover it with foil. Heat for about 10 to 15 minutes. This method helps keep the pancake fluffy. You can also use a microwave. Heat slices for about 30 seconds, but they may not be as fluffy. You can freeze the pancake for later. First, let it cool. Cut it into slices. Wrap each slice in plastic wrap. Place the wrapped slices in a freezer bag. Make sure to remove as much air as possible. The pancake can be frozen for up to three months. When you’re ready to eat, thaw in the fridge overnight and reheat. Enjoy your delicious breakfast anytime! Yes, you can! Make the batter the night before. Store it in the fridge to keep it fresh. When you are ready, preheat your oven and pour the batter into the hot skillet. This will save you time in the morning and still give you a tasty pancake. I recommend using Granny Smith apples. They have a nice tartness that pairs well with the sweet batter. Other good choices include Honeycrisp or Fuji apples. These apples hold their shape well when baked, giving you bites of tender fruit in every slice. Keep an eye on the pancake as it bakes. It should puff up and turn a golden-brown color. A toothpick inserted in the center should come out clean. If it has a slight jiggle, it may need a few more minutes. Enjoy the smell as it bakes; this is a good sign it’s almost ready! This post covered key steps to making the perfect pancake. We explored ingredients, mixing, baking, and serving. I shared tips for fluffiness and common mistakes to dodge. You learned about different apple types and how to store leftovers. Now, you have the tools to create tasty pancakes. Enjoy experimenting with variations that fit your taste. Following these steps will help you serve delicious pancakes every time. Happy cooking!

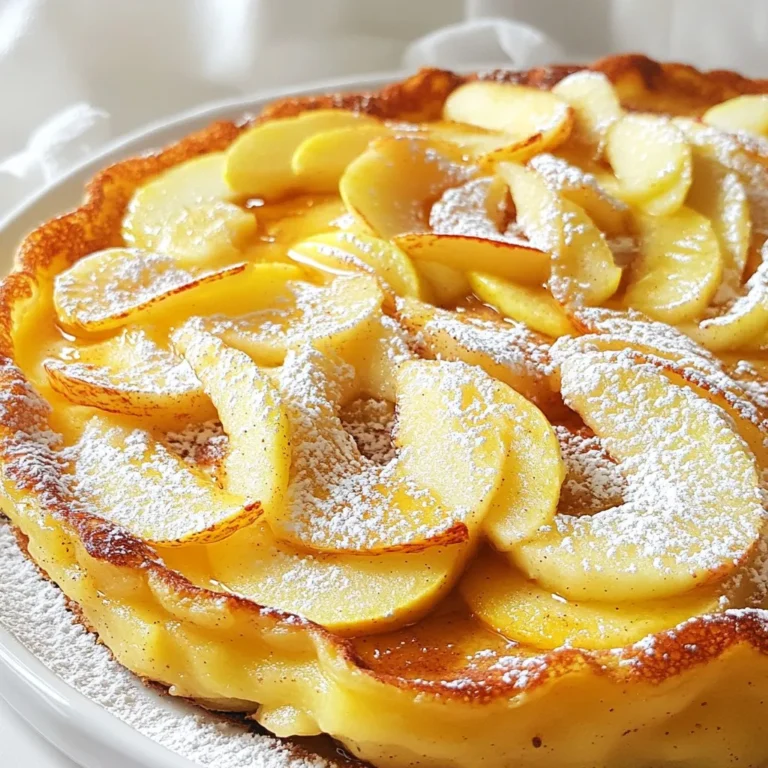
Apple Cinnamon German Pancake Flavorful Breakfast Dish

PREV 1 … 26 27 28 … 44 NEXT
yummybiterecipes

explore

DessertsDinnerAppetizersDrinks

Our Policies

  • Cookie Policy
  • Copyright Policy
  • Disclaimer
  • GDPR Policy
  • Terms Of Use
Back to Top
  • About
  • Contact Us
  • Privacy Policy
© 2025 yummybiterecipes