FREE DINNER EBOOK! Get your copy!
  • Cookie Policy
  • GDPR Policy
  • Disclaimer
  • Terms Of Use
  • Visit my other site: Fun Cookie Recipes
yummybiterecipes
  • Home
  • Dinner
  • Desserts
  • Drinks
  • Appetizers
  • Contact
  • About
  • Privacy Policy
  • Home
  • Dinner
  • Desserts
  • Drinks
  • Appetizers
  • Contact
  • About
  • Privacy Policy
  • Cookie Policy
  • GDPR Policy
  • Disclaimer
  • Terms Of Use
Visit my other site: Fun Cookie Recipes

HOME / CATEGORIES /

Latest

- 4 large ears of corn, husked and carefully halved lengthwise - 4 tablespoons unsalted butter, softened to room temperature - 2 tablespoons honey, preferably raw for depth of flavor - 1 teaspoon smoked paprika for that rich, smoky essence - 1 teaspoon cayenne pepper (feel free to adjust based on your spice preference) - 1 teaspoon garlic powder for added savoriness - Salt and freshly cracked black pepper to taste - Fresh cilantro or parsley, finely chopped, for a vibrant garnish - Lime wedges, for zesty serving Tips for Selecting the Best Corn When picking corn, look for bright green husks. The kernels should be plump and firm. Avoid corn with brown spots or dry silk. Fresh corn is sweet and juicy. How to Choose the Right Type of Honey For this recipe, raw honey works best. It has a richer flavor. You can also try clover or wildflower honey. Always taste before you buy to find your favorite. {{ingredient_image_2}} - Prepping the grill or oven Start by preheating your grill or oven to 400°F (200°C). This step gets the heat just right for cooking your corn ribs evenly. A hot grill or oven ensures that your corn gets that nice char and flavor. - Making the spicy honey butter mixture In a small bowl, mix together 4 tablespoons of softened unsalted butter, 2 tablespoons of honey, 1 teaspoon of smoked paprika, 1 teaspoon of cayenne pepper, and 1 teaspoon of garlic powder. Add salt and freshly cracked black pepper to taste. Stir until smooth and well-combined. This mixture will give your corn its spicy and sweet kick! - Preparing the corn ribs Take 4 large ears of corn and husk them. Slice each ear in half lengthwise to create 8 corn ribs. Be careful while cutting; you want them to be even for cooking. - Grilling the corn ribs Place the corn ribs directly on the hot grill grates. Grill for about 15-20 minutes. Make sure to turn them halfway through. This way, you get nice char marks and even cooking. When they are tender, they are ready to eat! - Oven roasting the corn ribs If you prefer, you can roast the corn ribs in the oven. Place them on a baking sheet and roast for about 25-30 minutes. Flip them once for even cooking. Check for tenderness to know when they are done. - Brushing with additional butter Once the corn ribs are off the heat, brush them again with the spicy honey butter mixture. This adds extra flavor and keeps them moist. - Garnishing and serving suggestions For the final touch, sprinkle chopped fresh cilantro or parsley on top. Serve your corn ribs with lime wedges on the side. The lime adds a zesty kick that pairs well with the sweet and spicy flavors. Enjoy your tasty dish! To get the flavor just right, adjust the cayenne pepper. If you like heat, add more. For a milder dish, use less. Balancing sweetness and spiciness is key. Honey adds sweetness, while cayenne brings heat. Taste your butter mix before using it. This way, you can find the perfect blend for your taste. Knowing when the corn is done is simple. Look for tender kernels and nice char marks. You can also poke a kernel with a fork. If it’s soft and juicy, it’s ready! To keep moisture during grilling, brush the corn ribs well with butter. This helps lock in flavor and keeps them juicy. Corn ribs taste great with fresh lime wedges. The zestiness of lime cuts through the sweetness. For a fun twist, try serving with a spicy dipping sauce. You can also garnish with fresh cilantro or parsley for color. Present them on a wooden board for a rustic look. Enjoy the fun of sharing this dish with friends! Pro Tips Choose the Right Corn: For the best flavor and texture, select sweet, fresh corn that feels firm to the touch and has bright green husks. Adjust Spice Level: Feel free to modify the amount of cayenne pepper based on your heat preference; you can also add a pinch of chili powder for extra depth. Grilling vs. Roasting: Grilling will impart a smokier flavor, while roasting in the oven provides a sweeter taste. Choose based on your desired outcome! Extra Butter for Serving: Save some of the spicy honey butter to drizzle on top just before serving for an added burst of flavor. {{image_4}} You can make spicy honey butter corn ribs even better. Try adding different spices like chili powder or cumin. Both spices give a nice twist. Chili powder adds heat, while cumin brings earthiness. You can also use flavored butters. Herbed butter adds a fresh touch. Mix in herbs like thyme or rosemary for added depth. These small changes create a whole new taste experience. If you want a vegan version, swap the butter and honey. Use coconut oil or vegan butter instead of regular butter. For honey, try maple syrup or agave nectar. These choices keep the flavor while being plant-based. For gluten-free corn ribs, this recipe is already safe. Corn is naturally gluten-free, so enjoy without worry. Serve corn ribs with sauces or dips for more flavor. Try a spicy mayo or a creamy ranch dip. Both add a fun twist. You can also incorporate corn ribs into salads or bowls. Slice them and mix with fresh greens, beans, or grains. This makes a tasty, colorful dish that impresses. To store leftovers, let the corn ribs cool first. Place them in an airtight container. They will stay fresh for up to three days in the fridge. If you have leftover spicy honey butter, keep it in a separate container. It can also last up to a week when stored properly. To reheat corn ribs, use an oven or grill. Preheat your oven to 350°F (175°C). Place the corn ribs on a baking sheet. Heat for about 10 minutes until warm. This method keeps them tender and tasty. If using a grill, heat it to medium. Grill the corn ribs for about 5 minutes, just until warm. For quick serving tips, drizzle some extra spicy honey butter on top. This adds flavor and makes them even more delightful! The best way to cook corn ribs is on a grill or in an oven. Grilling gives them a nice char and smoky flavor. Set your grill to 400°F. Grill the corn ribs for 15-20 minutes. Turn them halfway for even cooking. If using an oven, roast them at the same temperature for about 25-30 minutes. Flip them once to cook evenly. I do not recommend using frozen corn for this recipe. Fresh corn has a sweet flavor and nice texture. Frozen corn can be mushy and less tasty. If you cannot find fresh corn, try to use canned corn with good drainage. To check if your corn is sweet, taste a kernel raw. Sweet corn should have a crisp and juicy bite. The kernels should also be plump and full. If it tastes starchy or bland, it may not be sweet enough for this dish. Yes, you can make the spicy honey butter ahead of time. Just mix all the ingredients and store it in the fridge. It will keep well for up to a week. Before using, let it sit at room temperature for a bit. This helps it spread easily on the corn ribs. Corn ribs go well with grilled meats like chicken or steak. They also pair nicely with salads and dips. Try serving them with a fresh salsa or guacamole. For a fun twist, add them to tacos for a sweet and spicy kick. You now have all the tools to make tasty corn ribs. Start with fresh corn and create a great spicy honey butter. Follow our steps for grilling or roasting to get the best flavor. Use our tips for spice and moisture to perfect your dish. Remember, you can customize it to fit your tastes. Enjoy your corn ribs with fun sides and creative presentations. With a bit of care, your corn ribs will impress everyone at the table. Happy cooking!

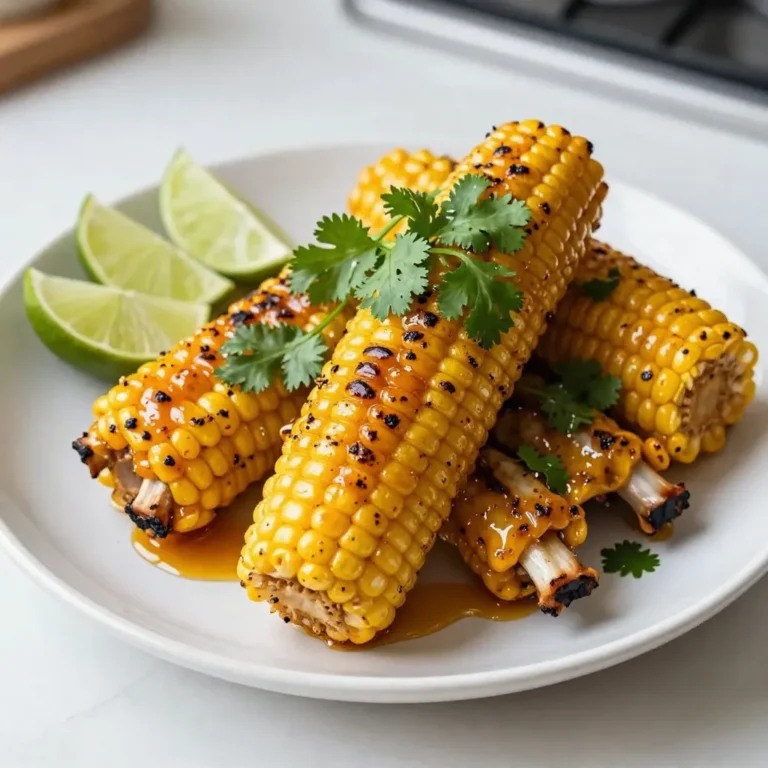
Spicy Honey Butter Corn Ribs Flavorful Grilled Dish

- 1 cup heavy whipping cream (divided) - 1/2 cup whole milk - 1/3 cup granulated sugar - 1/2 cup semi-sweet chocolate chips - 1/4 cup unsweetened cocoa powder - 1 teaspoon pure vanilla extract - 1/4 teaspoon peppermint extract - A pinch of salt - Whipped cream for topping - Crushed peppermint candies for garnish - Mini marshmallows (optional) Gather these simple ingredients to create your peppermint hot cocoa chocolate mousse cups. Each item plays a key role in building rich flavor and a smooth texture. The heavy whipping cream gives a fluffy base, while the semi-sweet chocolate chips provide a deep chocolate taste. Whole milk keeps the mousse creamy, and granulated sugar adds sweetness. Unsweetened cocoa powder intensifies the chocolate flavor, while pure vanilla and peppermint extracts bring warmth and festive cheer. Don't forget the toppings! Whipped cream adds a light, airy finish. Crushed peppermint candies give a nice crunch and brightness. Mini marshmallows are optional but fun for a cozy touch. With these ingredients, your mousse cups will look and taste amazing! {{ingredient_image_2}} To start, combine the chocolate chips, heavy cream, and whole milk in a small saucepan. Use low heat to melt the chocolate. Stir the mixture continuously until it becomes smooth. This step is key for a rich texture. Once melted, take it off the heat and let it cool for a few minutes. In a medium bowl, whisk together the granulated sugar, unsweetened cocoa powder, vanilla extract, peppermint extract, and a pinch of salt. This combination adds depth to your mousse. Gradually mix in the cooled chocolate mixture, whisking until it becomes creamy and fully blended. This will form the base of your mousse. Next, take the remaining heavy cream and pour it into a clean bowl. Use a handheld mixer or a whisk to beat the cream until stiff peaks form. Be careful not to overwhip it. You want it to be fluffy, not grainy. This whipped cream adds lightness to your mousse. Now, gently fold the whipped cream into the chocolate mixture. Use a spatula for this step. Fold carefully to avoid deflating the whipped cream. Continue folding until the mixture is smooth and well combined. You should not see any streaks of whipped cream in the chocolate. Portion the mousse into dessert cups or small glasses. Cover each cup with plastic wrap and place them in the refrigerator. Chill the cups for at least two hours. This allows the mousse to set firmly, making it easy to enjoy. When you are ready to serve, take the mousse cups out of the fridge. Top each cup with whipped cream. Then, sprinkle crushed peppermint candies over the top. If you like, add mini marshmallows for extra fun. These toppings make the mousse look festive and delicious. To avoid overwhipping your cream, focus on the signs of a perfect texture. You'll know you’re there when the cream holds soft peaks. This means the cream should look thick but still have a little bounce. If you whip too long, the cream will turn grainy and may turn into butter. Keep your eye on it and stop as soon as it looks fluffy. How you present your mousse cups makes a big difference. Use a decorative tray to serve them. It adds a festive touch. You can even place a peppermint stick in each cup for a fun twist. For extra flair, sprinkle cocoa powder or chocolate shavings around the plate. This makes the dessert look chic and inviting. When folding the whipped cream into the chocolate mixture, use a spatula. It’s important to be gentle. Start by adding a small amount of whipped cream to the chocolate base. Fold it in lightly. Then, gradually add the rest of the whipped cream. This technique keeps the mousse airy. Avoid stirring too hard, as it can deflate the whipped cream. Pro Tips Use Fresh Ingredients: Always opt for fresh heavy cream and high-quality chocolate chips for the best flavor and texture in your mousse. Chill Your Tools: For an even fluffier whipped cream, chill your mixing bowl and beaters in the refrigerator before whipping. Be Gentle When Folding: When combining the whipped cream with the chocolate mixture, use a gentle folding motion to maintain the light and airy texture. Let It Set: Allow the mousse to chill for a full 2 hours or more to achieve the perfect consistency before serving. {{image_4}} You can switch up the flavor of your mousse easily. Try using different extracts. Instead of peppermint, use almond or hazelnut extracts for a unique twist. Just a few drops can change the whole taste. Keep the same base recipe and see what you like best! Toppings can make your mousse even more fun. Instead of whipped cream, use chocolate ganache. This rich topping adds a new layer of flavor. You can also add chocolate shavings or colorful sprinkles for extra flair. Each topping gives a different look and taste to your mousse cups. Want a dairy-free option? It’s simple! Substitute heavy cream and milk with plant-based cream and milk. Almond milk or coconut cream works well. This way, everyone can enjoy your peppermint hot cocoa chocolate mousse cups, regardless of dietary needs. To store your mousse cups, cover each cup with plastic wrap. Place them in the fridge. This keeps them fresh and tasty. Make sure they sit flat to avoid spills. Always chill for at least two hours before serving. This helps the mousse set and taste better. Can you freeze mousse cups? Yes, you can! However, I suggest only freezing for a short time. If you freeze them, cover tightly with plastic wrap and then foil. When you want to enjoy them, move them to the fridge to thaw overnight. This keeps the texture nice and creamy. How long do mousse cups stay fresh? In the fridge, they can last up to four days. After that, they may lose their flavor and texture. If you freeze them, aim to eat them within a month for the best taste. Always check for any changes in smell or look before eating! Yes, you can make these mousse cups ahead of time. Prepare them up to two days before you plan to serve. Store them covered in the fridge. This allows the flavors to blend and the mousse to set well. Just add toppings right before serving for the best taste. You can use coconut cream or full-fat yogurt instead of heavy whipping cream. Coconut cream adds a nice flavor and works well in desserts. Full-fat yogurt gives the mousse a creamy texture but may make it a bit less rich. Both options will change the flavor slightly. To boost the peppermint flavor, add an extra drop of peppermint extract. You can also mix in crushed peppermint candies into the mousse. If you want a lighter flavor, use peppermint-infused whipped cream as a topping. Experiment to find what you enjoy the most! Yes, you can use sugar substitutes like stevia or erythritol. These options can keep the mousse sweet without extra calories. Keep in mind, some sugar substitutes may change the texture slightly. Make sure to adjust the amount based on the brand's sweetness. If you don’t have dessert cups, use small glasses or even coffee mugs. You can also layer the mousse in a larger bowl for a shared dessert. Get creative with what you have on hand. Just be sure to chill it well before serving! In this post, we explored how to make delicious Peppermint Hot Cocoa Chocolate Mousse Cups. You learned about the key ingredients, step-by-step instructions, and helpful tips. Remember to fold gently for a fluffy texture. You can also try different flavors or toppings to make it your own. Keep your mousse chilled for the best taste. With these insights, you’re set to impress friends and family with this sweet treat. Enjoy every creamy bite!

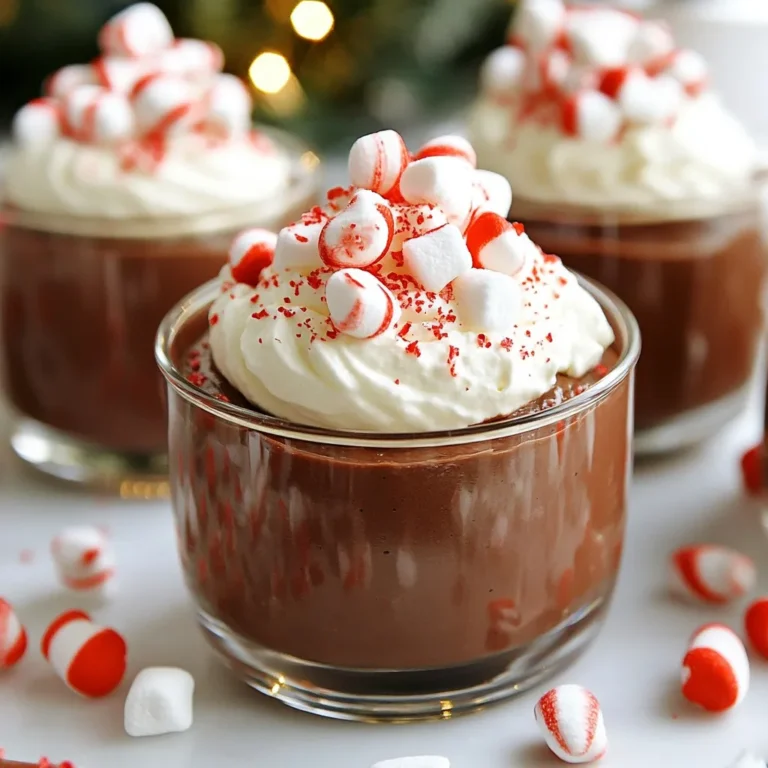
Peppermint Hot Cocoa Chocolate Mousse Cups Delight

- 1 cup eggnog (store-bought or homemade) - 1/2 cup milk - 1/4 cup vanilla syrup - 1/2 teaspoon ground nutmeg - 1/4 teaspoon ground cinnamon - 1/2 cup heavy cream - 3-4 sugar cookies, crushed (plus extra for garnish) - Whipped cream for topping - Cinnamon stick (for garnish, optional) This cocktail blends rich eggnog with sweet milk and vanilla syrup. The spices of nutmeg and cinnamon add warmth. Heavy cream makes it creamy. Sugar cookies bring in a festive crunch. Use whipped cream on top for a fluffy touch. You can add more crushed sugar cookies and a cinnamon stick for a pretty finish. This drink is easy to make. Each sip tastes like a holiday party. {{ingredient_image_2}} Start by mixing your eggnog and milk in a blending pitcher. Pour in 1 cup of eggnog and 1/2 cup of milk. Next, add 1/4 cup of vanilla syrup. This syrup adds a lovely sweetness. Then, sprinkle in 1/2 teaspoon of ground nutmeg and 1/4 teaspoon of ground cinnamon. Use a whisk to mix all the ingredients together. Whisk until the mixture is smooth and well combined. The spices will give it a warm, festive flavor that you will love. In a medium bowl, pour in 1/2 cup of heavy cream. Use an electric mixer to whip it. Stop when soft peaks form. This means it should look fluffy, not stiff. Careful not to over-whip the cream. You want it to stay light and airy. Gently fold the whipped cream into the eggnog mixture. Use a spatula to combine them without deflating the cream. This step makes your cocktail creamy and rich. Now it’s time to add the fun! Stir in 3-4 crushed sugar cookies into the eggnog mix. This will add a sweet crunch. Carefully divide the cocktail mixture between your favorite glasses, filling them halfway. Top each glass with a generous dollop of whipped cream. This creates a fluffy finish. For the final touch, sprinkle some more crushed sugar cookie on the whipped cream. If you like, add a cinnamon stick as a garnish. Serve your festive cocktails right away and enjoy the sweet holiday flavors! When picking eggnog, you have two main choices: store-bought or homemade. Store-bought eggnog is quick and easy. Just look for quality brands with real ingredients. Homemade eggnog gives you control over flavor and sweetness. You can make it richer by using heavy cream. To enhance flavor, add a splash of vanilla extract or a pinch of salt. You can also mix in a little maple syrup for a unique twist. Experiment to find what you love best! Whipping cream is key for this cocktail. Start with cold heavy cream. Use an electric mixer on medium speed. Stop when you see soft peaks. That means it’s light and airy! Avoid over-whipping. If you whip too much, it can turn grainy. Gently fold the whipped cream into the eggnog mix. A spatula works best for this. Be careful not to deflate the cream. This keeps your drink fluffy and light. Presentation makes your cocktail shine! Use fun glasses that fit the holiday spirit. You can also rim the glasses with crushed sugar cookies for extra flair. For toppings, go wild! Whipped cream is a must, but try adding more crushed cookies on top. A cinnamon stick adds a lovely touch, too. You can even sprinkle a bit of nutmeg for extra flavor and color. Your guests will be impressed! Pro Tips Choose Quality Eggnog: For the best flavor, select a high-quality eggnog, whether store-bought or homemade. This will ensure a rich and creamy base for your cocktail. Whip Cream to Perfection: Be cautious when whipping the cream. Stop as soon as soft peaks form to maintain a light and airy texture, which will enhance the drink's overall mouthfeel. Experiment with Flavors: Feel free to customize your cocktail by adding a splash of your favorite liquor, like bourbon or rum, for an added kick. Just remember to adjust the sweetness accordingly. Garnish Creatively: Get creative with your garnishes! Besides crushed sugar cookies and cinnamon sticks, consider adding a sprinkle of cocoa powder or a drizzle of caramel for a unique touch. {{image_4}} You can add spirits to make this cocktail even more festive. Rum or bourbon works great. Start with one ounce per glass. This addition gives your drink a warm kick. For a balanced flavor, choose a spirit that complements the spices. Rum adds sweetness, while bourbon gives a rich depth. Always taste as you mix. You want the spirit to enhance, not overpower. If you want a dairy-free drink, try almond or oat milk. These options work well in place of regular milk. They keep the drink creamy without dairy. For eggnog, look for dairy-free varieties. Many brands offer delicious options. They taste great and keep the same festive spirit. Spice can take your drink to the next level. Try adding a dash of cardamom or ginger. These spices give a warm and unique twist. You can also experiment with infusions. Soak spices in the eggnog for a few hours. This adds a deep flavor that surprises your taste buds. Enjoy mixing and finding what works best for you! To keep your Winning Sugar Cookie Eggnog Cocktail fresh, store it in the fridge. Use an airtight container. This keeps the flavors intact and prevents spills. Your cocktail stays good for up to three days after making it. However, the whipped cream may lose its fluffiness. You can always whip more cream before serving. You can prepare parts of this cocktail ahead of time. Mix the eggnog, milk, vanilla syrup, nutmeg, and cinnamon. Store this mix in the fridge for up to two days. When you’re ready to serve, whip the cream and fold it in. Add crushed sugar cookies just before serving for the best taste. This way, your cocktail stays fresh and tasty! Yes, you can use store-bought eggnog. Look for one that is thick and creamy. Some brands add extra flavors or spices that can enhance your drink. Always check the label for quality ingredients. If you can, choose organic or natural options to keep it pure and tasty. You can keep this cocktail in the fridge for up to three days. Store it in a sealed container to keep it fresh. The flavors will blend better over time, but the whipped cream may lose its fluffiness. Give it a gentle stir before serving again. Yes, you can make a non-alcoholic version. Just skip any alcohol and add more eggnog or milk. You can also add a splash of vanilla extract for extra flavor. This way, everyone can enjoy the sweet, festive taste of this cocktail! In this post, we explored how to make a delicious eggnog cocktail. We covered the key ingredients, from eggnog to sugar cookies, and how to whip the cream for the best texture. I shared tips on choosing eggnog and garnishing for impressive presentations. Remember, you can customize your drink with different spices or alcohol types. Whether you enjoy this drink fresh or store it, you now have the tools to impress. Enjoy your eggnog adventure!

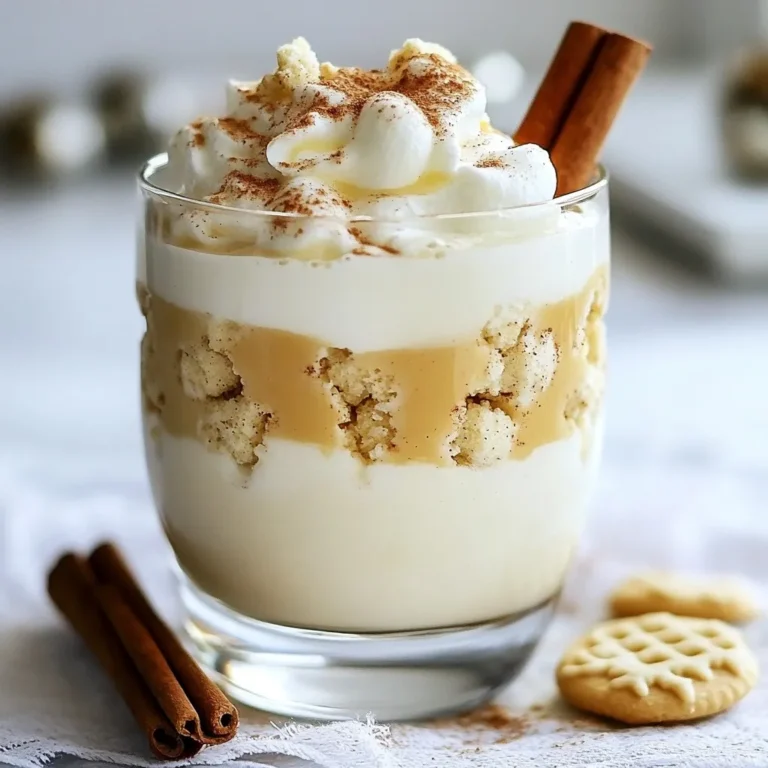
Winning Sugar Cookie Eggnog Cocktail Delight

To make classic snickerdoodle cookies, you need these key ingredients: - 2 3/4 cups all-purpose flour - 2 teaspoons cream of tartar - 1 teaspoon baking soda - 1/4 teaspoon salt - 1 cup unsalted butter, softened to room temperature - 1 1/2 cups granulated sugar - 2 large eggs - 1 teaspoon pure vanilla extract - 1/4 cup granulated sugar (for rolling) - 2 tablespoons ground cinnamon (for rolling) If you have allergies, here are some easy swaps: - Gluten-Free Flour: Use a gluten-free blend instead of all-purpose flour. - Dairy-Free Option: Replace butter with a dairy-free alternative like coconut oil or vegan butter. - Egg Substitute: Use flax eggs (1 tablespoon of flaxseed meal with 2.5 tablespoons of water) for an egg-free option. Make sure you check labels for hidden allergens! A few ingredients stand out for their flavor: - Cream of Tartar: This gives snickerdoodles their unique tang. It helps the cookies rise. - Cinnamon: The warm spice adds that classic snickerdoodle taste. It makes them smell amazing too. - Unsalted Butter: Using unsalted butter allows you to control the salt level. It also makes the cookies rich and soft. These ingredients work together to create that soft, chewy texture we all love! {{ingredient_image_2}} Start by preheating your oven to 375°F (190°C). This step is crucial. It ensures your cookies bake evenly. While the oven heats, prepare your baking sheets. Line them with parchment paper. This paper helps prevent the cookies from sticking. You can also use a silicone baking mat if you have one. Both options work well to create that perfect cookie base. Now, let’s mix the dry ingredients. Take a medium bowl and whisk together 2 3/4 cups of all-purpose flour, 2 teaspoons of cream of tartar, 1 teaspoon of baking soda, and 1/4 teaspoon of salt. Make sure everything blends well. Set this bowl aside for later. In a large mixing bowl, cream 1 cup of softened unsalted butter and 1 1/2 cups of granulated sugar. Use an electric mixer on medium speed. Beat until the mix is light and fluffy, which takes about 3-4 minutes. Once fluffy, add 2 large eggs one by one. Mix after each egg. Then, pour in 1 teaspoon of pure vanilla extract and mix for another 30 seconds. Gradually add the dry mix to the wet mix. Gently stir with a spatula or wooden spoon. Be careful not to overmix. This step is key for soft cookies. Let’s shape the cookies! Grab a tablespoon or a cookie scoop. Spoon out portions of dough and roll them into balls with your hands. After shaping, roll each ball in a mixture of 1/4 cup granulated sugar and 2 tablespoons ground cinnamon. Make sure each ball gets fully coated. Place the cinnamon-sugar-coated dough balls on your prepared baking sheets. Space them about 2 inches apart. This space allows the cookies to spread while baking. Bake in your preheated oven for 8-10 minutes. Look for lightly golden edges and soft centers. Once baked, let the cookies cool on the sheets for about 5 minutes. Then, transfer them to a wire rack to cool completely. Enjoy the sweet smell as they cool! To get the best texture for your snickerdoodles, use soft butter. It helps the cookies stay soft. Make sure to cream the butter and sugar well. This makes the cookies light and fluffy. Do not overmix the dough after adding flour. Overmixing can make cookies tough. Chill your dough for 30 minutes if it feels too soft. Chilling helps cookies hold their shape while baking. When you roll the dough into balls, make them even. This ensures they bake at the same rate. One common mistake is not measuring flour correctly. Too much flour can make cookies dry. Always spoon flour into your measuring cup, then level it off. Another mistake is skipping the cream of tartar. It gives snickerdoodles their signature tangy taste. If you run out, you can use baking powder, but the flavor may change. Lastly, don’t bake cookies too long. This can lead to over-baked cookies. To know when your snickerdoodles are done, watch the edges. They should be lightly golden. The centers may look soft but should not be shiny. When you press down gently, they should spring back. This means they are set but still soft. After baking, let them cool on the tray for five minutes. This helps them finish cooking. Then, move them to a wire rack to cool completely. Pro Tips Chill the Dough: For extra chewy snickerdoodles, chill the dough for 30 minutes before baking. This helps the cookies maintain their shape and enhances their flavor. Use Fresh Cinnamon: To maximize the flavor of your cinnamon sugar, use freshly ground cinnamon. It has a more robust flavor compared to pre-ground options. Don’t Overbake: Keep an eye on the cookies while they bake. They should be slightly soft in the center when you take them out; they will continue to cook on the baking sheet. Experiment with Flavors: Add a pinch of nutmeg or a splash of almond extract for a unique twist on traditional snickerdoodles. These additions can elevate the flavor profile beautifully. {{image_4}} You can make a gluten-free version of snickerdoodles. Use a gluten-free flour blend. This blend should have xanthan gum for the best texture. Follow the same recipe steps, and you’ll create delicious cookies without gluten. Mix in chocolate chips for a fun twist. Add about 1 cup of semi-sweet chocolate chips to the dough. Stir them in after combining the dry and wet ingredients. The chocolate adds a rich flavor that pairs perfectly with the cinnamon. You can personalize your snickerdoodles by adding nuts or dried fruits. Walnuts or pecans offer a nice crunch. Dried cranberries or raisins add sweetness and a chewy texture. Add about 1/2 cup of your choice to the dough. This makes each bite unique and fun! To keep your baked snickerdoodles fresh, store them in an airtight container. This will help maintain their soft texture. Place parchment paper between layers to avoid sticking. Keep the cookies at room temperature for up to a week. If you want to enjoy them later, freezing is a great option. You can freeze both cookie dough and baked cookies. For dough, shape it into balls, then place them on a baking sheet. Freeze until solid, then transfer them to a freezer bag. This way, you can bake fresh cookies anytime. For baked cookies, let them cool completely before placing them in an airtight container. They can last up to three months in the freezer. Snickerdoodles stay fresh for about a week at room temperature. If you freeze them, they keep their taste and texture for three months. Just remember to thaw them in the fridge or at room temperature for the best results. Enjoy your cookies at their best! Snickerdoodle cookies get their chewiness from a mix of ingredients and baking methods. The cream of tartar is key. It helps create a soft texture. Using softened butter also plays a big role. It traps air when you mix, making the cookies light. When you bake them, the edges set first. The centers stay soft and chewy. Yes, you can make Snickerdoodles ahead of time. You have two great options. First, you can prepare the dough and chill it in the fridge. This helps the flavors meld. You can bake them later, fresh and warm. Second, you can bake the cookies and store them. Just keep them in an airtight container. They stay fresh for several days. If your Snickerdoodle dough feels too dry, don’t worry! There are simple fixes. Start by adding a bit of milk, one tablespoon at a time. Mix gently until the dough feels softer. Another option is to add an extra egg yolk. This adds moisture and richness. Just be careful not to overmix. You want the dough to be soft but not sticky. We covered the key ingredients for snickerdoodles, and how to prepare them step by step. You now know tips to avoid common mistakes and achieve the best texture. Different variations, like gluten-free options and add-ins, make these cookies fun and unique. Don't forget about storage tips to keep them fresh. Enjoy baking and sharing these delightful cookies! Trust me, your friends and family will love them. Keep trying new flavors and methods to make your cookie game even better.

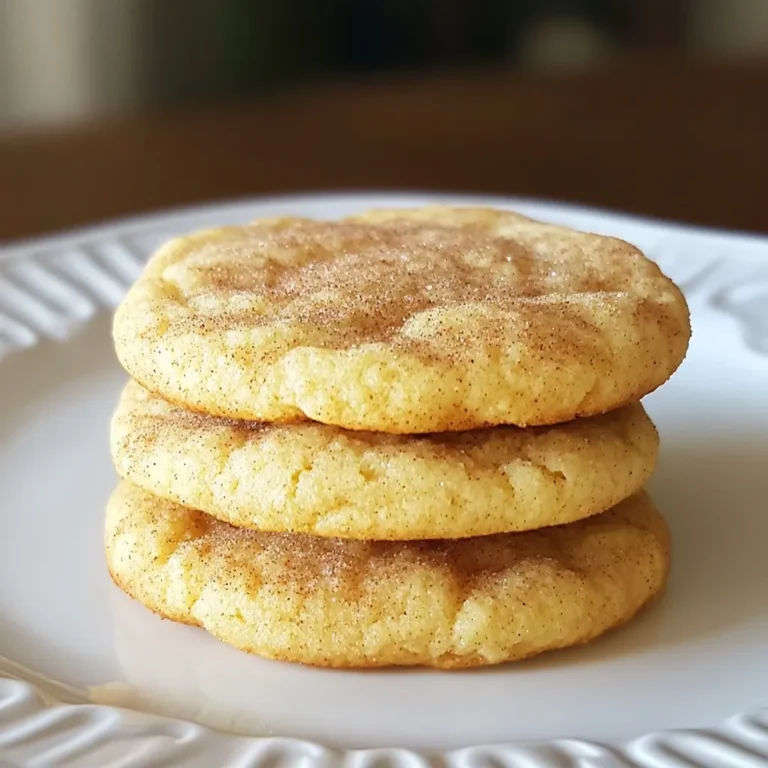
Classic Snickerdoodle Cookies Simple and Sweet Treat

To make these chewy brown butter blondies, you'll need: - 1 cup (2 sticks) unsalted butter - 1 ½ cups packed brown sugar - ½ cup granulated sugar - 2 large eggs - 2 teaspoons vanilla extract - 2 cups all-purpose flour - 1 teaspoon baking powder - ½ teaspoon baking soda - ½ teaspoon salt - 1 cup chocolate chips (choose between milk or dark) - ½ cup chopped walnuts (optional) You can make easy swaps for some ingredients: - Use salted butter instead of unsalted. Just skip the added salt. - Swap granulated sugar for coconut sugar for a new twist. - Replace all-purpose flour with gluten-free flour for a gluten-free option. - If you don’t have eggs, use ½ cup unsweetened applesauce per egg. To make these blondies truly special, consider using: - High-quality unsalted butter for the best flavor. - Pure vanilla extract instead of imitation vanilla for depth. - Name-brand chocolate chips for a richer taste. - Fresh walnuts for added crunch and flavor. These choices will enhance your blondies and give them a gourmet touch. {{ingredient_image_2}} Start by preheating your oven to 350°F (175°C). This step is key for even baking. While it heats, prepare a 9x13 inch baking pan. You can grease it with butter or line it with parchment paper. This makes it easy to remove the blondies later. Next, let’s brown the butter. In a medium skillet, melt the sticks of unsalted butter over medium heat. Stir often and watch closely as the butter foams and changes color. This process takes about 5-7 minutes. You want it to turn a nice golden-brown. Once it’s browned, remove it from heat and let it cool slightly. This helps keep your eggs from cooking when added. In a large mixing bowl, combine the brown butter with both sugars: the packed brown sugar and the granulated sugar. Whisk or mix them together until smooth and creamy. Next, add in the two large eggs, one at a time. Mix well after each egg. Finally, stir in the vanilla extract for extra flavor. Now, combine the dry ingredients. In a separate bowl, whisk together the all-purpose flour, baking powder, baking soda, and salt. This ensures they mix well. Gradually add this dry mixture to your wet mix. Stir gently until just combined. Avoid over-mixing to keep the blondies chewy. Now fold in the chocolate chips and optional chopped walnuts until evenly distributed. Pour the batter into your prepared pan, spreading it out evenly. Bake in the preheated oven for 20-25 minutes. You’ll know they are done when the edges are light golden brown. A toothpick should come out with a few moist crumbs. After baking, take the pan out of the oven. Let it cool on a wire rack for at least 10 minutes. If you used parchment paper, lift the blondies out for cooling. Once cooled, cut them into squares or rectangles. Enjoy the chewy goodness of your blondies! To get that perfect chewy texture, brown the butter well. This step adds depth and richness. You want it to be golden brown, not burnt. Mix the wet and dry ingredients gently. Over-mixing leads to a denser blondie. Bake until the edges are light brown and a toothpick shows a few moist crumbs. One common mistake is overbaking. If you bake too long, your blondies will dry out. Always cool them for at least 10 minutes before cutting. This helps them set properly. Not using enough brown sugar can also lead to a less chewy texture. Stick with the recipe for the best results. Use a medium-sized skillet for browning the butter. A large mixing bowl is ideal for blending ingredients. A whisk works well for mixing sugars and eggs. I recommend a rubber spatula for folding in the chips and nuts. Lastly, a 9x13 inch baking pan is perfect for even baking. Pro Tips Butter Browning: Ensure you stir the butter continuously while browning to prevent it from burning. The goal is a deep golden color with a nutty aroma. Egg Temperature: Using room temperature eggs will help them incorporate better into the batter, resulting in a smoother texture. Measuring Flour: For the best results, spoon the flour into your measuring cup and level it off with a knife. This prevents packing and ensures accurate measurements. Cooling Time: Allow the blondies to cool completely before cutting to achieve cleaner edges and prevent them from falling apart. {{image_4}} You can add nuts or dried fruits to your blondies for extra flavor. Walnuts work great, but feel free to try pecans or almonds. If you prefer dried fruits, consider adding raisins or cranberries. These ingredients add texture and burst of flavor. Just fold in about half a cup along with the chocolate chips. You will enjoy the added crunch or chewiness. Enhancing flavors can take your blondies up a notch. Try adding spices like cinnamon or nutmeg for warmth. A touch of sea salt can deepen the sweet flavor. For an exciting twist, use almond or hazelnut extract instead of vanilla. Just one teaspoon can change the whole taste profile. Experiment with these flavors to find your perfect combination. Chocolate is a classic addition to blondies. You can switch up the type of chocolate chips you use. Dark chocolate gives a rich taste, while milk chocolate adds sweetness. For a fun twist, chop up your favorite chocolate bar instead. Toss in white chocolate chips or even butterscotch chips for a different flavor. Mixing different types of chocolate can create a layered taste experience in every bite. To keep your blondies fresh, store them in an airtight container. Place a piece of parchment paper between layers to prevent sticking. They will stay good for about 3 to 5 days at room temperature. If you want them to last longer, consider refrigerating them for up to a week. If you want to freeze your blondies, let them cool completely. Once cool, cut them into squares. Wrap each piece tightly in plastic wrap. Then, place them in a freezer-safe bag or container. They can stay in the freezer for about 2 to 3 months. When you're ready to enjoy, simply thaw them at room temperature. To reheat your blondies, you can use the microwave or the oven. For the microwave, heat for about 10-15 seconds. Check to see if they are warm enough. If you prefer the oven, preheat it to 350°F (175°C) and warm them for about 5-10 minutes. This will make them soft and gooey again, just like fresh! The key to chewy blondies lies in the ingredients and mixing method. The brown sugar adds moisture and a rich flavor. The melted brown butter gives a nutty taste and helps create a soft texture. Mixing the wet and dry ingredients gently is crucial. If you over-mix, the blondies can become tough. The slight underbaking also helps keep them chewy. Yes, you can swap sugars! Using all brown sugar makes them richer and chewier. If you prefer a lighter flavor, you can use all granulated sugar. Mixing both sugars gives a balanced sweetness. Just remember that brown sugar is moist, while granulated sugar is dry. This balance impacts the final texture. Check your blondies around the 20-minute mark. The edges should turn light golden brown. Insert a toothpick in the center; it should come out with a few moist crumbs. If it’s too wet, bake a bit longer. You want them firm but still soft to ensure chewiness. You can use margarine or coconut oil as a substitute. However, the flavor will change. Margarine lacks the rich taste of brown butter. Coconut oil adds a hint of coconut. If you want the same richness, try using ghee. Ghee is clarified butter, and it gives a similar flavor profile. In this post, we covered the key ingredients for making delicious blondies, along with useful substitutions. You learned step-by-step how to bake and cool them for the best texture. I shared tips to avoid common mistakes and enhance flavors, plus how to store your treats properly. Remember, blondies should be chewy and full of flavor. Don’t hesitate to experiment with different add-ins. Happy baking, and enjoy your sweet treats!

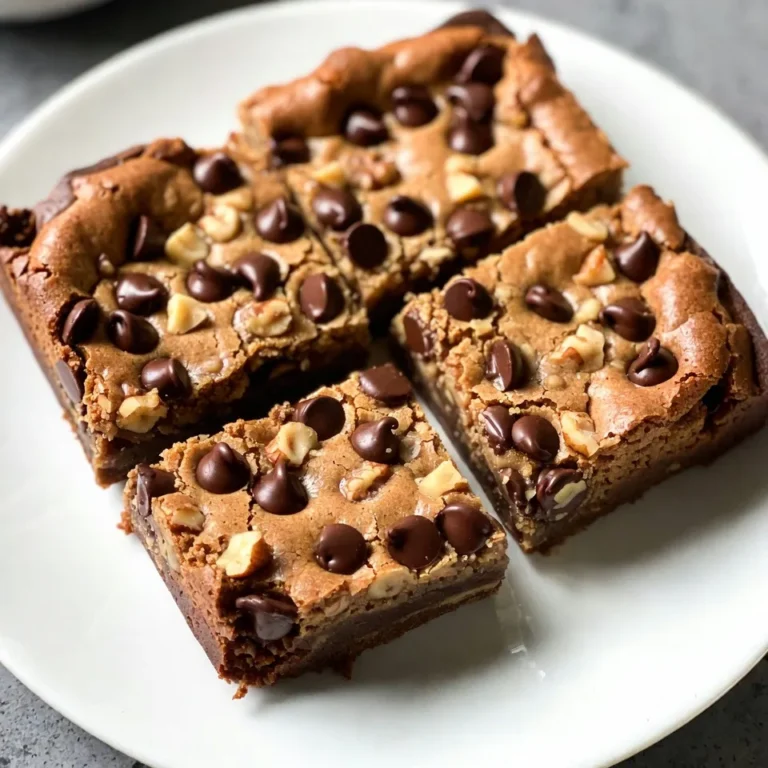
Chewy Brown Butter Blondies Irresistibly Delicious Treat

- 1 cup fresh or frozen cranberries Cranberries are the star of this dish. They bring a tart flavor and vibrant color. If you use frozen cranberries, thaw them before cooking. - 1/2 cup granulated sugar Sugar balances the tartness of the cranberries. It helps to create a sweet filling that tastes amazing. - 1/2 cup cream cheese, softened at room temperature Cream cheese adds creaminess to the roll-ups. If you want a lighter option, use low-fat cream cheese. - 1/4 cup Greek yogurt (plain or vanilla) Greek yogurt adds tang and creaminess. It also boosts protein in this treat. - 1/4 teaspoon ground cinnamon Cinnamon adds warmth and spice. It enhances the flavor of the cranberries and makes the dish feel festive. - 1 tablespoon honey Honey is a natural sweetener that adds depth. It pairs well with cream cheese and yogurt. - 6 large flour tortillas Flour tortillas provide a soft and flexible base. They hold the filling well and roll up easily. - 1/2 cup chopped pecans (optional for crunch) Pecans add a nice crunch to the roll-ups. You can skip them if you prefer a softer texture. - Fresh mint leaves for garnish (optional for presentation) Mint leaves brighten up the dish. They add a pop of color and a fresh taste. {{ingredient_image_2}} To make the cranberry filling, combine 1 cup of cranberries and 1/2 cup of sugar in a medium saucepan. Cook this over medium heat for about 8-10 minutes. Stir it often. You want to see the cranberries burst and the mixture thicken. The filling is ready when it looks thick and sticky. Once it thickens, take it off the heat and let it cool completely. For a great cream cheese mix, start with 1/2 cup of cream cheese. Make sure it is at room temperature. This step is key. Cold cream cheese will not blend well. Use an electric mixer or a sturdy spatula. Add 1/4 cup of Greek yogurt, 1/4 teaspoon of ground cinnamon, and 1 tablespoon of honey. Mix until it is smooth and creamy. You should not see any lumps. Now, let’s assemble the roll-ups. Take a large flour tortilla and lay it flat on a clean surface. Use a spatula to spread the cream cheese mixture evenly over the tortilla. Make sure to cover the entire surface. Next, add a spoonful of the cooled cranberry mixture on top. If you like a crunch, sprinkle some chopped pecans on now. Start rolling the tortilla from one edge. Roll it tightly to keep the filling inside. This step is important for good bite-sized pieces. Once you have rolled all the tortillas, slice each roll into bite-sized pieces, about 1-2 inches thick. This makes it easy to serve and eat. To serve, arrange the sliced roll-ups on a colorful platter. For a festive look, garnish with fresh mint leaves. You can enjoy these roll-ups chilled from the fridge or at room temperature. They are perfect for any gathering! To make great roll-ups, start with even filling. Spread the cream cheese mixture from edge to edge. This way, every bite has flavor. For the cranberry layer, place a good spoonful in the center. Don’t overload it; keep it balanced. To prevent the tortillas from tearing, warm them slightly. You can do this in the microwave for just a few seconds. A warm tortilla is more flexible and easier to roll. You can prepare these roll-ups in advance. Make the cranberry filling and cream cheese mix a day before. Store them in separate containers in the fridge. When you’re ready, assemble the roll-ups. For pre-assembled roll-ups, wrap them tightly in plastic wrap. This keeps them fresh and prevents drying out. They can last in the fridge for up to two days. Want to spice things up? Consider adding a pinch of nutmeg or ginger to the cream cheese mix. This adds warmth and depth to the flavor. You can also try adding different ingredients. For a twist, include chopped apples or even dried fruit. These add sweetness and texture. You can also use nuts other than pecans, like walnuts or almonds, for crunch. Pro Tips Use Fresh Cranberries: If available, opt for fresh cranberries for a brighter flavor and a more vibrant color in your roll-ups. Chill Before Serving: Allow the roll-ups to chill in the refrigerator for at least 30 minutes before serving. This will help the flavors meld together and make them easier to slice. Add a Zing: For a tangy twist, consider adding a splash of orange or lemon juice to the cranberry mixture for extra brightness. Customize Your Nuts: If you prefer a different type of nut, feel free to substitute chopped walnuts or almonds for pecans to suit your taste. {{image_4}} You can change the filling to match your taste. Here are some fun ideas: - Fruit Fillings: Use fruits like strawberries, blueberries, or apples for a twist. Mash or slice them to fit nicely in the roll-ups. - Savory Options: For a non-sweet version, try cream cheese with herbs and spices. Add cooked chicken or roasted veggies for a hearty snack. If you need a gluten-free option, there are many tortillas available. Look for brands like Mission or Udi’s. They make great gluten-free tortillas that taste good. For the cream cheese, you can use dairy-free cream cheese. Brands like Tofutti or Kite Hill work well. They give you the same creamy texture without dairy. Make these roll-ups fit the season! You can add flavors like pumpkin spice or nutmeg for fall. During winter holidays, try adding peppermint extract to the cream cheese mix. You can also customize these rolls for different events. Use colors and flavors that match the theme of your party. For example, red and green for Christmas or bright pastels for spring gatherings. To keep your Festive Cranberry Roll Ups fresh, store them in an airtight container. This helps prevent them from drying out. Place a piece of parchment paper between layers if you stack them. I recommend storing them in the fridge. They will stay good for about 3 to 5 days this way. Check for any signs of spoilage before eating. If you want to store the roll ups for longer, freezing is a great choice. First, wrap each roll tightly in plastic wrap. Then, place the wrapped roll ups in a freezer-safe bag or container. This method helps avoid freezer burn. You can freeze them for up to 2 months. When you're ready to enjoy them, take the roll ups out of the freezer. Place them in the fridge overnight to thaw. If you're in a rush, you can thaw them at room temperature for a couple of hours. Enjoy your tasty treat! Yes, you can use frozen cranberries. To prepare them, first, thaw the berries in the fridge overnight. You can also place them in a bowl of cold water for about an hour. Once thawed, drain any excess water. Cook them exactly like fresh cranberries. They will burst and thicken just as well. If you want a dairy-free option, try using cashew cream. Blend soaked cashews with a bit of lemon juice and a splash of water. For vegan cream cheese, look for store-bought alternatives made from nuts or soy. These substitutes will still give you that creamy texture you want. The roll ups last about three days in the fridge. Store them in an airtight container to keep them fresh. If they start to get soggy, try to eat them sooner. They taste best when enjoyed fresh. Yes, you can prepare these roll ups ahead of time. Assemble them and keep them in the fridge for up to a day. Just make sure to wrap them tightly. This way, they stay fresh until your gathering. You can also slice them just before serving for easy eating. These roll ups pair well with many things. Serve them with a fruit dip or a yogurt sauce. They also go great with a cheese platter or a salad. Their sweet and tangy flavor makes them a hit at any event or party. These cranberry cream cheese roll ups are fun to make and share. We covered all the important parts, from ingredients to storage. I hope you see how simple it is to create these tasty bites. You can change the fillings or keep them classic. With these tips, your roll ups will impress. Enjoy experimenting and serving them at your next event!

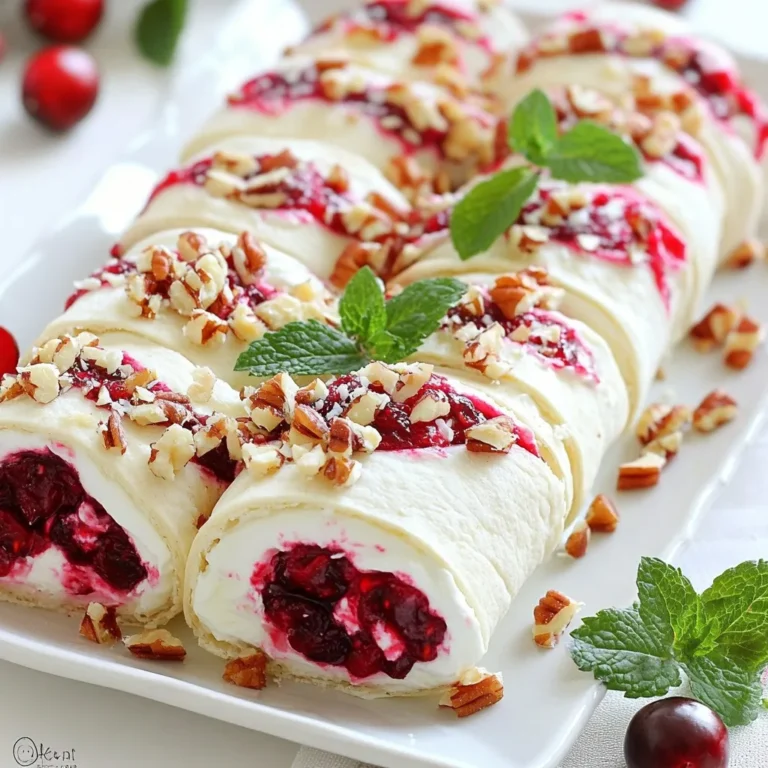
Festive Cranberry Roll Ups Easy and Delicious Treat

- 2 lean turkey or chicken sausages, sliced into bite-sized pieces - 1 red bell pepper, chopped - 1 yellow bell pepper, chopped - 1 zucchini, sliced into half-moons - 1 cup broccoli florets - 1 small red onion, thinly sliced - 2 cloves garlic, minced - 1 tablespoon olive oil - 1 teaspoon Italian seasoning blend - ½ teaspoon smoked paprika - Salt and freshly ground black pepper to taste - Fresh parsley, finely chopped (for garnish) Gathering the right ingredients is key for a great dish. Choose lean turkey or chicken sausages for a healthier protein. Fresh vegetables add color and nutrients. Bell peppers, zucchini, and broccoli bring a nice mix of flavors and textures. Don’t forget the garlic and onion for depth. The olive oil helps cook everything just right. Italian seasoning and smoked paprika add warmth and zest. Finally, salt and pepper enhance flavors. Fresh parsley not only looks good but also adds freshness. With this list, you're ready to create a fantastic, healthy dinner! {{ingredient_image_2}} - Washing and Chopping Vegetables Start by washing all your vegetables under cool water. This step is key for keeping them clean. Chop the red and yellow bell peppers into small pieces. Slice the zucchini into half-moons. Cut the broccoli into small florets. This makes them easier to cook and eat. - Slicing Sausages Take your turkey or chicken sausages and slice them into bite-sized pieces. This helps them cook faster and blend well with the veggies. - Heating the Pan Grab a large skillet or sauté pan. Pour in 1 tablespoon of olive oil. Heat it over medium heat until it shimmers. This means it's ready for cooking. - Cooking the Sausage Add the sliced sausages to the hot pan. Cook them for about 4-5 minutes. Stir them occasionally until they turn golden brown. This step adds a nice flavor. - Adding Aromatics and Vegetables Once the sausages are cooked, add 2 cloves of minced garlic and the sliced red onion. Sauté these for about 2 minutes. You want the onion to become soft and fragrant. - Completing the Dish Now, stir in the chopped red and yellow bell peppers, zucchini, and broccoli. Sprinkle in 1 teaspoon of Italian seasoning and ½ teaspoon of smoked paprika. Season with salt and pepper. Cook everything together for 8-10 minutes. Stir often until the veggies are tender-crisp and the sausage is fully cooked. After this, your Healthy Sausage and Veggies is ready to serve! Achieving Tender-Crisp Vegetables To get tender-crisp veggies, don't overcook them. Stir-fry the vegetables for about 8-10 minutes. This keeps them vibrant and slightly crunchy. Start with the harder veggies, like broccoli. Add the softer ones, like bell peppers, later. This helps all the vegetables cook evenly. Ensuring Sausage is Fully Cooked Cook the sausage until it is golden brown and heated through. This usually takes about 4-5 minutes. Stir often to cook evenly. Always check that the sausage reaches an internal temperature of 165°F. This ensures safety and great flavor in your dish. Garnishing Ideas A sprinkle of fresh parsley adds color and flavor. You can also use some grated Parmesan cheese for a savory touch. If you like heat, add a pinch of red pepper flakes. These simple garnishes can elevate your meal. Plating Tips Serve the stir-fry in shallow bowls. This allows you to show off the bright colors of the veggies. For a fun twist, layer the ingredients in the bowl. Start with a bed of veggies and top with sausage. This makes each bite a delight! Pro Tips Choose Your Sausage Wisely: Opt for lean turkey or chicken sausages that are seasoned well for maximum flavor without excess fat. Cut Vegetables Evenly: Ensure all vegetables are cut to a similar size to promote even cooking and achieve that perfect tender-crisp texture. Mind the Heat: Cooking over medium heat allows the sausage to brown nicely while preventing the vegetables from overcooking. Garnish for Freshness: A sprinkle of fresh parsley not only adds color but also enhances the overall flavor profile of the dish. {{image_4}} - Alternative Sausages for Healthier Options You can swap turkey sausage for chicken sausage. Chicken sausage has less fat. For a plant-based choice, try vegan sausages. They add flavor without meat. Look for options that are low in sodium and sugar. - Other Vegetable Combinations Feel free to mix in your favorite veggies. Carrots, green beans, or snap peas work well. You can also add spinach or kale for more greens. Just remember to adjust cooking time for softer vegetables. - Gluten-Free Options This dish is naturally gluten-free if you use gluten-free sausages. Always check the labels. Use gluten-free soy sauce or tamari for added flavor if desired. - Vegetarian Alternatives To make this dish vegetarian, skip the sausage. Use tempeh or tofu instead. Slice them into bite-sized pieces and sauté until golden. This keeps the dish hearty and filling without meat. - Refrigeration Guidelines: - Let the dish cool down to room temperature. - Transfer leftovers to an airtight container. - Store in the fridge for up to 3 days. - Freezing Instructions: - Cool the dish completely before freezing. - Use freezer-safe containers or bags. - Label with the date. - Store for up to 3 months. - Best Methods for Reheating: - For stovetop, heat in a skillet over medium heat. - For microwave, use a microwave-safe dish and cover. - Tips to Maintain Texture: - Add a splash of water or broth while reheating. - Stir occasionally to heat evenly. - Avoid overheating to keep the veggies crisp. This dish has about 300 calories per serving. A lot of this comes from the turkey sausage and veggies. Turkey sausage is leaner than pork sausage. It gives you protein without too many calories. The veggies add fiber and vitamins but are low in calories. This meal is a great choice if you watch your calories. Yes, you can make this recipe ahead. Cook the sausage and veggies, then cool them down. Store them in the fridge for up to three days. When you are ready to eat, simply reheat in a pan. It will save you time on busy nights. You can use many types of veggies in this stir-fry. Here are some ideas: - Carrots, sliced thin - Snap peas, whole - Cauliflower, cut into florets - Spinach, added last To spice up your dish, try adding ginger or chili flakes. These can bring a new taste to your stir-fry. You can also switch the Italian seasoning for a curry blend for a different flavor. If you like it mild, skip the chili flakes. For more heat, add a pinch more. You can also serve with hot sauce on the side. This way, everyone can adjust to their liking. This blog post covered how to make a tasty dish with turkey or chicken sausages and fresh veggies. You learned about the key ingredients, cooking steps, and helpful tips for great texture. We explored variations for dietary needs and how to store leftovers safely. With these easy instructions, you can create a delicious meal that suits your taste. Try out the ideas and make it your own. Enjoy cooking and sharing this dish with others!

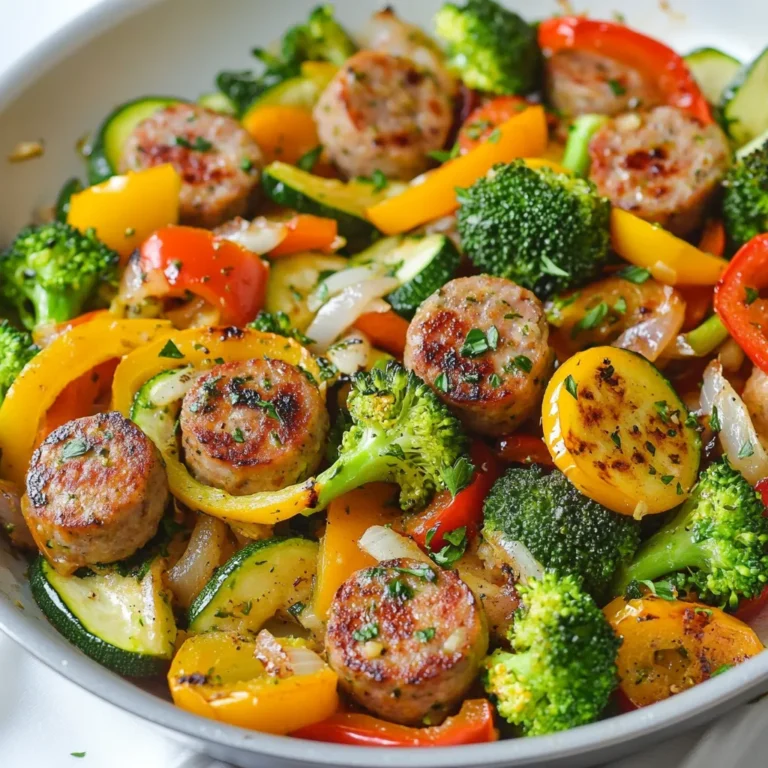
Healthy Sausage and Veggies Fantastic Dinner Idea

To make this delightful Cinnamon Roll French Toast Bake, you will need: - 2 cans of refrigerated cinnamon rolls (with icing) - 6 large eggs - 1 cup milk (your choice) - 1 teaspoon pure vanilla extract - 1 teaspoon ground cinnamon - 1/4 teaspoon nutmeg (optional) - 1/4 cup maple syrup (pure for best flavor) - Butter or cooking spray (for greasing the dish) To add more flavor and texture, consider these garnishes: - Chopped pecans - Chopped walnuts These nuts add a nice crunch and work well with the soft rolls. If you need to change some ingredients, here are some good swaps: - Use almond milk or oat milk instead of dairy milk. - Replace eggs with flax eggs for a vegan option. - Use honey or agave syrup instead of maple syrup for sweetness. Feel free to mix and match! The goal is to create a dish you love. {{ingredient_image_2}} First, preheat your oven to 350°F (175°C). Grab a 9x13 inch baking dish. Grease it well with butter or cooking spray. This step helps the cinnamon rolls not stick. A good greasing makes cleanup easier too. Next, open the cans of cinnamon rolls. Use kitchen scissors or a knife to cut each roll into quarters. This makes them bite-sized and easier to coat. Spread the quartered rolls evenly in the prepared dish. Leave some space between them for even baking. In a large bowl, whisk together 6 large eggs and 1 cup of milk. Add 1 teaspoon of pure vanilla extract for sweetness. Then mix in 1 teaspoon of ground cinnamon. If you like, add 1/4 teaspoon of nutmeg for a warm flavor. Finally, stir in 1/4 cup of maple syrup. Whisk until it’s well mixed and frothy. Now, carefully pour the custard mixture over the cinnamon roll pieces. Use a spatula or your hands to press down lightly. This helps each piece absorb the mixture. Place the dish in your preheated oven and bake for 25-30 minutes. Look for a golden brown top and a center that is firm. Once baked, take the dish out and let it cool for 5-10 minutes. While it cools, warm the icing from the cinnamon rolls in the microwave for 10-15 seconds. This makes it easier to drizzle. Pour the warmed icing over the bake. For some crunch, sprinkle chopped pecans or walnuts on top. Cut into squares and serve warm. Pair it with extra maple syrup for those who want more sweetness. Enjoy! To get the best bake, follow these steps: - Preheat your oven to 350°F (175°C). This ensures even cooking. - Space out the cinnamon roll pieces in the dish. Crowding them can lead to soggy sections. - Bake for 25-30 minutes, watching for a golden top. The center should not jiggle. - Let it cool for 5-10 minutes before serving. This helps the dish set. Avoid these common mistakes for a great bake: - Skipping the greasing step can cause sticking. Always grease your dish! - Cutting the cinnamon rolls too small can lead to uneven baking. Aim for quarters. - Not pressing down the rolls after pouring the custard can leave some dry. Make sure every piece gets coated. - Forgetting to warm the icing makes drizzling harder. A quick heat in the microwave helps. Serve your cinnamon roll bake warm for the best taste. The ideal temperature is around 130°F (54°C). This keeps the flavors bright and the icing gooey. If you like, add extra maple syrup on the side. It adds a nice touch! Enjoy your bake as a cozy breakfast or brunch treat. Pro Tips Use Day-Old Cinnamon Rolls: If you have leftover cinnamon rolls from a previous day, they will work perfectly for this recipe as they will absorb the custard mixture better. Experiment with Flavors: Try adding a splash of orange juice or some zest to the custard mix for a unique twist on the classic flavor. Check for Doneness: Use a toothpick to check the center of the bake. If it comes out clean, it's ready; if not, give it a few more minutes in the oven. Garnish Wisely: Add fresh fruit like sliced strawberries or blueberries on top for a pop of color and freshness that complements the sweetness. {{image_4}} You can change the flavor of your cinnamon roll French toast bake easily. Try these ideas: - Chocolate Chip: Add chocolate chips for a rich twist. - Pumpkin Spice: Use pumpkin puree and add pumpkin spice for fall vibes. - Apple Cinnamon: Mix in diced apples and extra cinnamon for a fruity touch. - Berry Bliss: Toss in fresh or frozen berries for a burst of flavor. These variations keep your breakfast exciting and fun! You can make this recipe a bit lighter with these swaps: - Eggs: Use egg whites or a flaxseed mixture instead of whole eggs. - Milk: Try almond milk or oat milk for a dairy-free option. - Cinnamon Rolls: Use whole grain or low-sugar cinnamon rolls. - Maple Syrup: Swap maple syrup for honey or agave nectar for less sugar. These changes help you enjoy the dish while being mindful of health. Toppings can elevate your French toast bake. Here are some yummy ideas: - Whipped Cream: A dollop of whipped cream adds sweetness and fun. - Fresh Fruit: Serve with bananas, strawberries, or blueberries for freshness. - Yogurt: A scoop of Greek yogurt adds creaminess and protein. - Nut Butters: Drizzle almond or peanut butter for extra flavor. These toppings make your meal more vibrant and delicious! Store any leftover Cinnamon Roll French Toast Bake in an airtight container. Keep it in the fridge for up to three days. If you want to keep it longer, you can freeze it. To reheat, place a portion on a microwave-safe plate. Heat it on high for 30-60 seconds. Check to see if it's warm all the way through. If you prefer the oven, preheat it to 350°F. Bake for about 10-15 minutes until warm. If you want to freeze this dish, let it cool completely first. Cut it into squares and wrap each piece in plastic wrap. Then place the wrapped pieces in a freezer bag. Store in the freezer for up to three months. When ready to eat, thaw in the fridge overnight before reheating. Yes, you can make this dish ahead of time. Prepare it up to step 4. Cover the dish and store it in the fridge overnight. In the morning, just bake it as directed. This saves time and makes breakfast easier. You have many choices for milk alternatives. Use almond milk, soy milk, or oat milk. Each option gives a different flavor, but they all work well. Just pick your favorite. To check if it's done, look for a golden brown top. The center should not jiggle. You can insert a knife or toothpick into the center. If it comes out clean, it's ready. Yes, homemade cinnamon rolls are great for this bake. Just cut them into quarters like store-bought rolls. They will add a personal touch to your dish and make it even more special. Absolutely! You can add fruits like berries, bananas, or apples. Just fold them in with the cinnamon roll pieces. This adds flavor and a nice texture to your breakfast bake. In this post, we explored how to make a delicious Cinnamon Roll French Toast Bake. We covered key ingredients, optional garnishes, and suggested substitutions. You now have step-by-step instructions for baking, tips for perfecting your dish, and variations to try. Don’t forget about storage options and FAQs for your convenience. Enjoy this simple, tasty treat with friends or family. Happy baking!

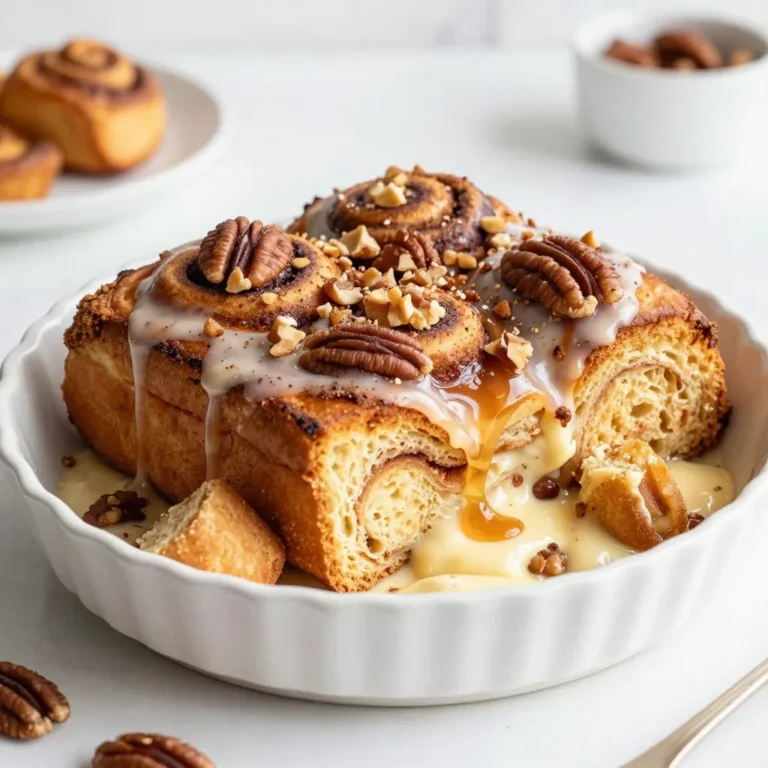
Cinnamon Roll French Toast Bake Delightful Breakfast

- 2 cups cooked chicken, shredded (preferably rotisserie for added flavor) You need cooked chicken for this dish. I like using rotisserie chicken. It adds great taste and saves time. - 3 cups marinara sauce (homemade or store-bought) Next, you need marinara sauce. You can use store-bought or make your own. Either way, it adds the perfect flavor to the casserole. - 1 cup mozzarella cheese, shredded - 1 cup Parmesan cheese, grated Cheese makes this dish creamy and delicious. Use shredded mozzarella for stretchiness and grated Parmesan for a rich taste. - 1 teaspoon Italian seasoning (dried herbs blend) - ½ teaspoon garlic powder - ½ teaspoon onion powder - 1 cup panko breadcrumbs (for extra crunch) - 2 tablespoons fresh parsley, chopped (for garnish) - Salt and black pepper to taste For flavor, you’ll add Italian seasoning, garlic powder, and onion powder. Panko breadcrumbs give a lovely crunch on top. Lastly, fresh parsley adds color and freshness. Don’t forget to add salt and black pepper for taste! {{ingredient_image_2}} First, set your oven to 375°F (190°C). Use cooking spray or olive oil to lightly grease a 9x13 inch casserole dish. This step helps the casserole not stick to the dish. In a big mixing bowl, add 2 cups of shredded chicken. You can use rotisserie chicken for great flavor. Next, pour in 3 cups of marinara sauce and add 2 cups of cooked pasta. I like penne or rotini for this recipe. Mix in ½ cup of mozzarella cheese, ½ cup of Parmesan cheese, 1 teaspoon of Italian seasoning, ½ teaspoon of garlic powder, and ½ teaspoon of onion powder. Season with salt and black pepper. Stir until everything is well combined. Now, carefully transfer your chicken and pasta mixture into the greased casserole dish. Use a spatula to spread it evenly across the bottom. This helps each bite taste great. In a separate bowl, mix the rest of the mozzarella cheese, remaining Parmesan cheese, and 1 cup of panko breadcrumbs. Stir these until they blend well. Evenly sprinkle this mixture over the chicken and pasta layer. Make sure every part is covered for extra crunch. Cover the dish with aluminum foil. This prevents the top from getting too brown. Place it in the oven for 20 minutes. After that, take off the foil and bake for another 15 to 20 minutes. Look for a golden brown topping that is crispy. Once done, let it cool for about 5 minutes before serving. For a nice touch, sprinkle fresh parsley on top before you serve. Use cooked chicken for this casserole. I like rotisserie chicken for its rich flavor. Shred it into bite-sized pieces. This saves time and adds a great taste. You can also use leftover chicken if you have it. Just make sure it is well-seasoned. To get that nice crunch, use panko breadcrumbs. They are lighter and crispier than regular ones. Mix them with the remaining mozzarella and Parmesan cheese. This combo forms a golden crust that makes every bite better. Sprinkle it evenly over the chicken layer. Make sure you cover all areas to avoid sogginess. Store leftovers in an airtight container in the fridge. It stays fresh for about three days. When reheating, place it in the oven. Heat it at 350°F (175°C) until warm. This keeps the topping crispy. Avoid using the microwave, as it can make the crust soggy. Serve this dish with a simple green salad. A light vinaigrette works well to balance the flavors. You can also add garlic bread for a filling meal. For drinks, a chilled white wine or sparkling water pairs nicely. Enjoy the flavors together for a complete dining experience. Pro Tips Use Rotisserie Chicken: For added flavor and convenience, use rotisserie chicken instead of cooking your own. This saves time and enhances the overall taste of the casserole. Homemade Marinara Sauce: If you have time, try making your own marinara sauce. Fresh ingredients can elevate the dish and give it a personal touch. Crispy Topping: For an extra crispy topping, broil the casserole for the last few minutes of baking. Just keep an eye on it to prevent burning! Make Ahead: This casserole can be assembled a day in advance and stored in the fridge. Just bake it when you're ready to serve for a quick and easy meal. {{image_4}} You can make a tasty vegetarian version of this casserole. Instead of chicken, use 2 cups of cooked mushrooms or zucchini. The marinara sauce and cheese bring all the flavors together. You still get that lovely baked topping, making it just as comforting. For a healthy twist, add 2 cups of fresh spinach to the chicken mix. The spinach wilts down and adds a nice color. It also brings extra nutrients to your meal. Just mix it in with the chicken, sauce, and pasta before baking. If you enjoy some heat, add red pepper flakes to the chicken mix. Start with 1/2 teaspoon and adjust to your taste. You can also use spicy marinara sauce for an extra kick. This variation adds a fun twist to the classic dish while keeping the same creamy, cheesy goodness. After you enjoy your Chicken Parmesan Casserole, cool the leftovers to room temp. Place the casserole in an airtight container. This helps keep the flavors fresh. You can store it in the fridge for up to three days. When you want to eat it again, check that it smells good before reheating. If you want to save some for later, freezing is a great option. Wrap the casserole tightly in plastic wrap and then in aluminum foil. This prevents freezer burn. You can freeze it for up to three months. When you're ready to eat it, just thaw it in the fridge overnight before reheating. To warm up the casserole, preheat your oven to 350°F (175°C). Remove any foil and plastic wrap. Cover the dish with foil to keep it moist. Bake for about 20-25 minutes. You can also microwave individual servings for about 2-3 minutes. Just make sure it’s hot all the way through before serving. Yes, you can use frozen chicken for this dish. Just remember to thaw it first. Use the fridge or cold water method for safe thawing. Cooked chicken works best, so you can use rotisserie chicken if you have it. This adds flavor and saves time. Penne or rotini pasta is best for this casserole. Both types hold sauce well. Their shapes let you scoop up chicken and cheese with each bite. You can also use any pasta you have at home, as long as it is cooked. Chicken Parmesan Casserole lasts about 3 to 4 days in the fridge. Store it in an airtight container to keep it fresh. If you want to enjoy it later, freeze it for up to 3 months. Just thaw before reheating. Yes, you can prepare this casserole ahead of time. Assemble it earlier in the day or even a day before. Cover it with foil and store it in the fridge. Bake it when you're ready to serve. This makes dinner easy and stress-free! This blog post covered everything you need to make a tasty Chicken Parmesan Casserole. We discussed the key ingredients, from the chicken to the sauce and cheese. You learned step-by-step instructions to assemble and bake your dish. Tips on choosing the best chicken and perfecting that crunchy topping can make a big difference. In the end, enjoy the leftovers or try fun variations like vegetarian or spicy. Cooking should be fun and easy! So go ahead and make this dish your own.

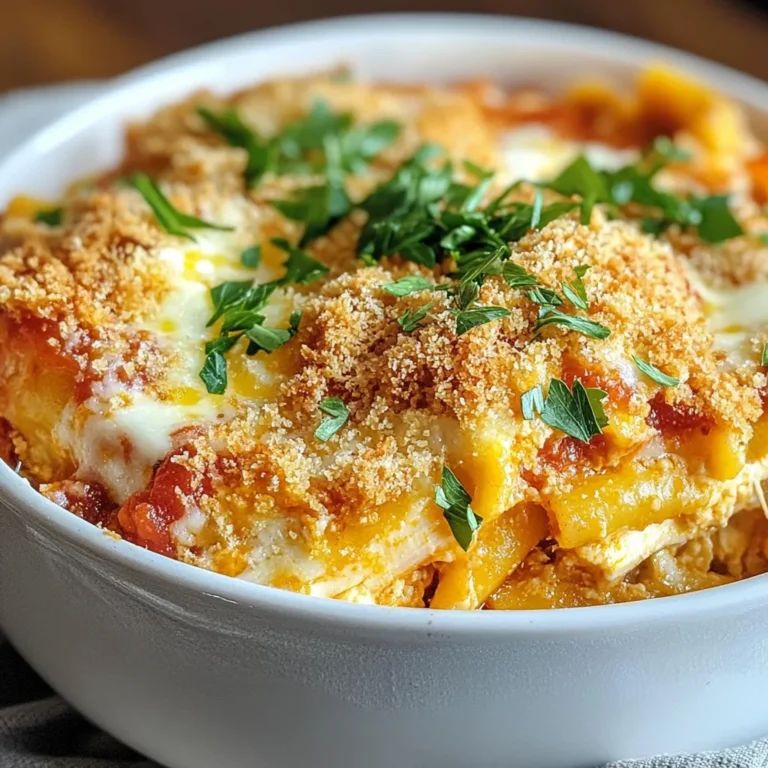
Savory Chicken Parmesan Casserole Easy Dinner Idea

- 4 boneless, skinless chicken breasts - 1 cup cream cheese, softened - 1 cup shredded cheddar cheese - 1/2 cup diced jalapeños - 1/2 teaspoon garlic powder - 1/4 teaspoon smoked paprika - Salt and pepper to taste - 1 cup breadcrumbs (optional) - 2 tablespoons olive oil To make Jalapeño Popper Stuffed Chicken, gather these ingredients. You need four chicken breasts. Make sure they are boneless and skinless for easier preparation. Cream cheese adds a rich, creamy texture. Cheddar cheese brings a sharp, tasty flavor. Diced jalapeños give the dish its signature heat. You can use fresh jalapeños for more spice or pickled ones for a milder kick. Garlic powder and smoked paprika add depth to the flavor. Don’t forget salt and pepper to season well. Breadcrumbs are optional but help create a nice crunch. Lastly, olive oil is perfect for sautéing the chicken. Having these ingredients ready will make cooking much smoother. Enjoy this flavorful meal idea that is sure to impress! {{ingredient_image_2}} - Preheat your oven to 375°F (190°C). This step is key for even cooking. - In a medium bowl, mix the cream cheese, cheddar cheese, diced jalapeños, garlic powder, smoked paprika, salt, and pepper. Blend until creamy. - Take a chicken breast and slice it gently on one side. Make a pocket but don’t cut through. - Spoon the jalapeño cheese mixture into the pocket. Press it in gently to fit all the filling. - Heat olive oil in a large skillet over medium-high heat. - When the oil is hot, add the stuffed chicken breasts. Sear them for about 3-4 minutes on each side. Look for a nice golden color. - Once browned, move the skillet to the preheated oven. Bake for 20-25 minutes. Check that the internal temperature hits 165°F (75°C). - After baking, let the chicken rest for 5 minutes. This helps the filling set and makes serving easier. To achieve perfect stuffing, make sure the cheese mixture is creamy. Blend cream cheese and cheddar well. When you create the pocket in the chicken breast, cut deep but not all the way through. This keeps the filling inside. The recommended temperature for chicken doneness is 165°F (75°C). Use a meat thermometer to check. Insert it into the thickest part of the chicken. This ensures your meal is safe to eat and juicy. For serving, slice the stuffed chicken in half. This shows off the gooey filling. Arrange the halves on a nice platter for a great look. Garnishing suggestions include freshly chopped cilantro or parsley. You can also add a lemon wedge on the side. This adds color and freshness to your dish. Consider serving it with mixed greens or a light salad for balance. Pro Tips Choose Your Jalapeños: Use fresh jalapeños for a spicier kick or pickled jalapeños for a milder flavor. Adjust according to your heat preference. Seal the Filling: When creating the pocket in the chicken breasts, ensure it's deep enough to hold the filling without cutting through the other side. This helps keep the filling intact while cooking. Breadcrumb Option: If you enjoy a crispy texture, don't skip the breadcrumb coating. It adds a delightful crunch to the outside of the chicken. Resting Period: Allow the stuffed chicken to rest after baking. This helps the juices redistribute and makes the chicken more tender and flavorful. {{image_4}} You can change up the flavors of your jalapeño popper stuffed chicken. Here are some fun swaps: - Alternatives for jalapeños: If you want less heat, try using bell peppers. For more spice, use serrano peppers. Both add great flavor. - Different cheese options: You can mix in cream cheese with pepper jack for a spicy kick. Alternatively, mozzarella gives a nice stretch without added heat. You don’t have to bake the chicken if you want a different style. Here are two fun methods: - Grilling instead of baking: Preheat your grill to medium heat. Sear the stuffed chicken on each side for about 5-6 minutes. Close the lid and cook until the chicken reaches 165°F (75°C). - Air fryer method instructions: Preheat your air fryer to 375°F (190°C). Place the stuffed chicken in the basket in a single layer. Cook for 18-20 minutes. Check to ensure the chicken is cooked through. To keep your jalapeño popper stuffed chicken fresh, follow these steps: - Refrigeration: Place leftovers in an airtight container. This helps keep the chicken moist. Store it in the fridge for up to 3 days. Make sure it cools down before sealing. This prevents moisture buildup inside the container. - Freezing Instructions: If you want to save it for longer, freeze the stuffed chicken. Wrap each piece in plastic wrap, then place it in a freezer bag. Remove as much air as you can from the bag. This keeps the chicken from getting freezer burn. You can freeze it for up to 3 months. When you are ready to enjoy your leftovers, here are some easy methods to reheat them: - Oven: Preheat your oven to 350°F (175°C). Place the chicken in a baking dish and cover it with foil. Heat for about 20-25 minutes, or until it warms through. - Microwave: For a quicker method, place a piece on a microwave-safe plate. Heat on high for 1-2 minutes. Check to make sure it is hot all the way through. - Skillet: You can also reheat in a skillet. Heat a little olive oil over medium heat. Add the chicken and cover. Cook for about 5-7 minutes, or until warmed through. This method keeps the outside nice and crispy. Can I make this recipe ahead of time? Yes, you can prepare the stuffed chicken in advance. After stuffing the chicken breasts, cover them with plastic wrap. Store them in the fridge for up to 24 hours. When ready to cook, take them out and let them sit at room temperature for about 15 minutes before cooking. This way, they heat evenly. What can I serve with stuffed chicken? There are many great sides for this dish. I enjoy serving it with: - Mixed greens salad - Roasted vegetables - Garlic bread - Rice or quinoa These sides balance the flavors and add freshness to the meal. How do I know when the chicken is fully cooked? Use a meat thermometer to check. The chicken should reach an internal temperature of 165°F (75°C). Another way to check is to cut into the chicken. The juices should run clear, not pink. This ensures your chicken is safe to eat and perfectly cooked. This blog post covered making Jalapeño Popper Stuffed Chicken. You learned about the tasty ingredients and steps to prepare it. I shared cooking tips and how to present the dish well. We discussed variations and ways to store leftovers too. Now, you can impress your family with this delicious meal. Enjoy trying this recipe, and make it your own! Happy cooking!

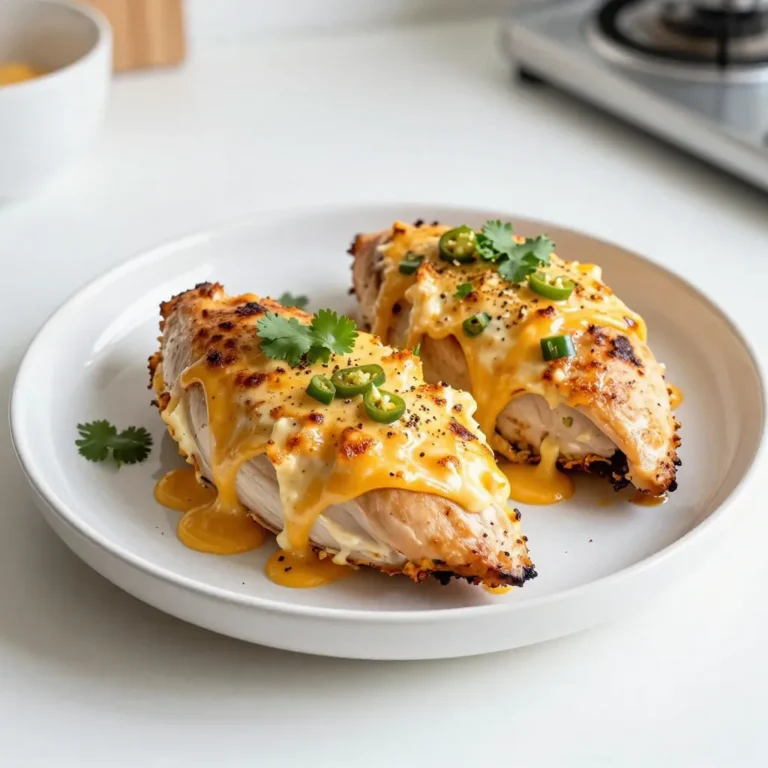
Jalapeño Popper Stuffed Chicken Flavorful Meal Idea

PREV 1 … 25 26 27 … 44 NEXT
yummybiterecipes

explore

DessertsDinnerAppetizersDrinks

Our Policies

  • Cookie Policy
  • Copyright Policy
  • Disclaimer
  • GDPR Policy
  • Terms Of Use
Back to Top
  • About
  • Contact Us
  • Privacy Policy
© 2025 yummybiterecipes