FREE DINNER EBOOK! Get your copy!
  • Cookie Policy
  • GDPR Policy
  • Disclaimer
  • Terms Of Use
  • Visit my other site: Fun Cookie Recipes
yummybiterecipes
  • Home
  • Dinner
  • Desserts
  • Drinks
  • Appetizers
  • Contact
  • About
  • Privacy Policy
  • Home
  • Dinner
  • Desserts
  • Drinks
  • Appetizers
  • Contact
  • About
  • Privacy Policy
  • Cookie Policy
  • GDPR Policy
  • Disclaimer
  • Terms Of Use
Visit my other site: Fun Cookie Recipes

HOME / CATEGORIES /

Latest

- 1 lb beef flank steak, thinly sliced against the grain - 2 cups fresh broccoli florets - 2 tablespoons soy sauce - 1 tablespoon oyster sauce (optional) - 2 tablespoons cornstarch - 2 tablespoons vegetable oil - 2 cloves garlic, finely minced - 1 tablespoon ginger, freshly grated - 1/4 cup beef broth (or water) - Salt and pepper to taste - Sesame seeds - Green onions, finely chopped When I make One Pan Beef and Broccoli, I love using fresh ingredients. The beef flank steak gives a great flavor. Slicing it thin helps it cook fast and tender. Fresh broccoli adds color and crunch. I often use soy sauce for a savory taste. The oyster sauce is optional but adds depth. Cornstarch helps the beef get that nice sear. For extra flavor, I add garlic and ginger. They give the dish a warm aroma. Beef broth or water keeps it moist. I always season with salt and pepper to enhance taste. Garnishing is fun! I love a sprinkle of sesame seeds for crunch. Chopped green onions also brighten the dish. These small touches make it look great and taste even better! To start, we need to prepare the beef. Take 1 lb of beef flank steak, and slice it thinly against the grain. This helps make the meat tender. Next, place the beef in a mixing bowl. Add 2 tablespoons of cornstarch to the beef. Toss it well so each piece gets coated. This coating gives the beef a nice sear when cooked. Now, add salt and pepper to taste. This simple seasoning enhances the flavor of the meat. Once your beef is ready, it’s time to cook. Heat 1 tablespoon of vegetable oil in a large skillet over medium-high heat. Wait until the oil shimmers. Carefully add the beef slices in a single layer. Sear the beef for about 2-3 minutes, until browned. Avoid overcrowding the pan. If you have too much beef, cook it in batches. Once browned, remove the beef from the pan and set it aside. Now, let’s make the kitchen smell amazing! In the same skillet, add another tablespoon of oil. Toss in 2 cloves of minced garlic and 1 tablespoon of freshly grated ginger. Stir for about 30 seconds until they smell great. Be careful not to burn them; that can ruin the dish. Next, it’s time for the broccoli! Add 2 cups of fresh broccoli florets to the skillet. Stir-fry for about 2-3 minutes. You want the broccoli to be tender but still bright green. After that, return the beef to the skillet. Pour in 2 tablespoons of soy sauce and, if you like, 1 tablespoon of oyster sauce. Add 1/4 cup of beef broth or water to the mix. Stir everything together to coat the beef and broccoli in the sauce. Let it cook for an additional 2-3 minutes until the beef is cooked through and the sauce thickens slightly. Finally, taste your dish! Adjust the seasoning if needed. You can add more soy sauce or broth to suit your taste. Once finished, let the skillet sit for a minute. This helps the flavors meld beautifully. To keep broccoli bright and crunchy, cook it quickly. Here’s how: - Use high heat: Stir-fry the broccoli on medium-high heat. - Add it at the right time: When the garlic and ginger smell great, add the broccoli. - Cook for just 2-3 minutes: You want it tender but still crisp. Timing is key. If you add the beef back too soon, the broccoli may overcook. Wait until the broccoli is bright green before mixing everything together. To make your dish even tastier, try these tips: - Add sauces: Consider using hoisin sauce or chili paste for more depth. - Adjust soy sauce: Start with a little soy sauce, then taste and add more if needed. These small changes can take your dish from good to great. Make sure to balance the flavors to suit your taste. Avoiding mistakes can make all the difference. Here are two key points: - Don’t overcrowd the pan: If you add too much beef at once, it will steam instead of sear. Cook in batches if needed. - Watch the garlic and ginger: They cook fast. Stir quickly and don’t let them burn. Burnt garlic can make your dish taste bitter. By following these tips, you can create a delicious One Pan Beef and Broccoli that impresses everyone! {{image_4}} You can change the beef to chicken or tofu. Chicken works well with this dish. Just slice it thin and follow the same steps. Tofu is a great choice too. Use firm tofu, and press it to remove water. Cut it into cubes and pan-fry until golden. Both options taste great with the sauce. For a meatless version, try using mushrooms or tempeh. Both add a nice texture. You can also mix in other veggies like bell peppers or snap peas. This keeps your meal fresh and fun. You can switch up the sauce to explore new flavors. Try adding teriyaki or hoisin sauce for a sweet twist. You can also use chili paste for some heat. Mixing sauces can create a unique taste. When choosing sauces, you can go homemade or store-bought. Homemade sauces let you control the ingredients. Store-bought sauces are quick and easy. Just check the label for added sugars and preservatives. If you want to swap out broccoli, many veggies work well. Snap peas, green beans, or bok choy can fit nicely. These will add crunch and color to your meal. You can also change the seasonings to make it your own. Add sesame oil for a nutty flavor. You can use garlic powder or onion powder if you don’t have fresh garlic. Experimenting with these swaps keeps your dish exciting and new every time you make it. Store your One Pan Beef and Broccoli in an airtight container. This keeps the dish fresh. Make sure it cools down before sealing. You can safely eat it within 3 to 4 days. If you wait longer, the quality may drop. To keep the beef tender, reheat on the stovetop. This method warms it evenly. Use low heat and add a splash of water or broth. Stir to mix flavors well. If you use a microwave, heat in short bursts. Check often to avoid overcooking the beef. You can freeze One Pan Beef and Broccoli for later. First, let it cool completely. Then, place it in a freezer-safe container. You can freeze it for up to 2 months. When ready to eat, thaw in the fridge overnight. Reheat on the stovetop for the best taste. Yes, you can use frozen broccoli. It cooks faster than fresh. - Cooking tips: - Thaw broccoli before cooking. - Add it to the pan later. - Cook for just 2-3 minutes. - Check it often to avoid overcooking. This dish pairs well with several sides. Here are some tasty options: - Steamed white or brown rice. - Quinoa for a healthy twist. - Noodles, like rice or egg noodles. - A simple green salad for crunch. - Egg rolls or spring rolls for a fun side. Making this dish gluten-free is easy. Just swap a few items. - Soy sauce: Use tamari or coconut aminos. - Oyster sauce: Look for a gluten-free version or skip it. - Beef broth: Check labels to ensure it's gluten-free. These changes keep the taste while making it safe for gluten-free diets. In this blog post, we explored how to make One Pan Beef and Broccoli. We covered main ingredients, step-by-step cooking methods, tips for success, and fun variations. Remember, cooking is about experimenting to find what you like. Don’t hesitate to customize your meal to suit your taste. Whether you stick to the recipe or try something new, you’ll enjoy a delicious dish. Start cooking, and enjoy your time in the kitchen!

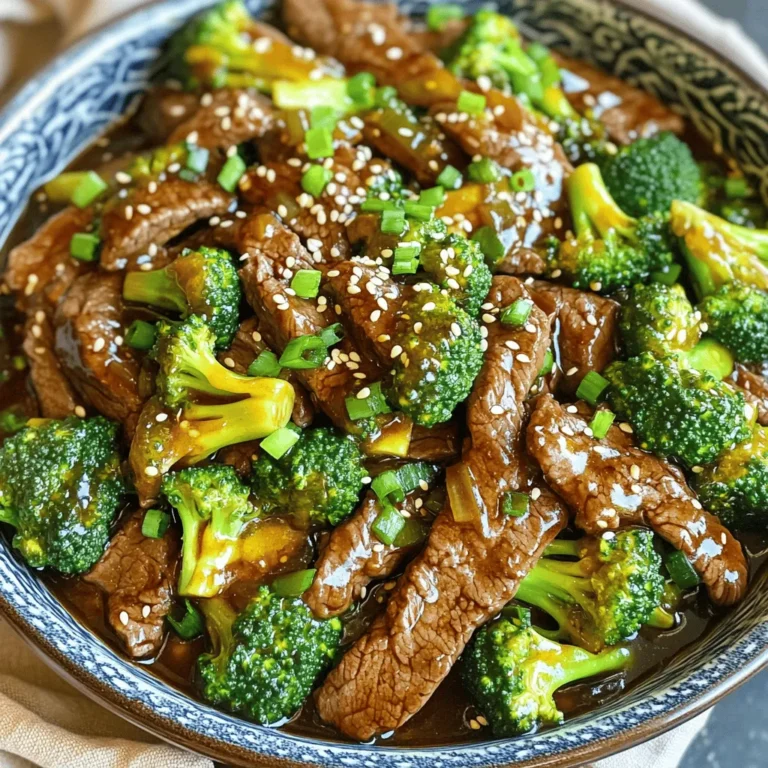
One Pan Beef and Broccoli Quick and Flavorful Meal

- 1 tablespoon olive oil - 1 medium onion, diced - 3 cloves garlic, minced - 2 carrots, sliced into rounds - 2 celery stalks, sliced - 1 teaspoon dried thyme - 1 teaspoon dried oregano - 1/2 teaspoon freshly cracked black pepper - 6 cups low-sodium chicken broth - 2 cups cooked, shredded chicken - 2 cups egg noodles - 1 cup frozen peas - Salt, to taste - Fresh parsley, chopped You can add extra veggies for more flavor. Consider these: - Spinach or kale for greens - Corn for sweetness - Bell peppers for crunch and color This soup packs a nutritious punch! Here are some benefits: - Chicken is a great protein source. It helps build muscles and keeps you full. - Carrots have beta-carotene, which is good for your eyes. - Celery is low in calories and high in fiber. It helps digestion. - Garlic boosts your immune system and adds flavor. - Parsley is rich in vitamins A and C. It also adds a fresh taste. Using low-sodium broth helps control salt intake. This soup is not just tasty; it's good for you! Enjoy making it as a comforting meal. {{ingredient_image_2}} 1. Start by setting your Instant Pot to 'Sauté' mode. 2. Add 1 tablespoon of olive oil and let it heat. 3. Once the oil shimmers, add 1 medium diced onion. 4. Sauté the onion for about 3 minutes. It should be soft and see-through. 5. Add 3 cloves of minced garlic, 2 sliced carrots, and 2 sliced celery stalks. 6. Sauté these together for 2 more minutes until they soften. 7. Sprinkle in 1 teaspoon of dried thyme, 1 teaspoon of dried oregano, and 1/2 teaspoon of black pepper. 8. Stir to mix and toast the spices for 30 seconds. 1. Carefully pour in 6 cups of low-sodium chicken broth. 2. Use a spatula to scrape any bits off the bottom of the pot. 3. Add 2 cups of cooked shredded chicken. 4. Secure the lid and set the valve to 'Sealing.' 5. Pressure cook on 'High' for 7 minutes. 1. When cooking ends, turn the valve to 'Venting' for a quick steam release. 2. Stand back to avoid the hot steam. 3. Open the lid and stir in 2 cups of egg noodles. 4. Switch the Instant Pot back to 'Sauté' mode. 5. Cook for 5 to 7 minutes, stirring until the noodles are tender. 6. In the last minute, fold in 1 cup of frozen peas. 7. Adjust salt to taste before serving. 8. Ladle the soup into bowls and garnish with fresh parsley. Enjoy! To make your soup great, start with fresh ingredients. Use a good chicken broth. I prefer low-sodium for better control of salt. Stir the spices well to bring out their flavors. Remember to sauté the onion until soft. This adds depth to your soup. One common mistake is overcooking the noodles. They can turn mushy if left too long. Keep an eye on the timer when cooking. Another mistake is not scraping the pot. Those bits add great taste to your soup. Lastly, don’t skip the fresh parsley. It adds color and flavor! To boost the flavor, try adding fresh herbs like dill or basil. A splash of lemon juice can brighten the taste. You can also add a dash of hot sauce for a kick. If you want creaminess, stir in a little heavy cream at the end. These tweaks make your soup even better! Pro Tips Fresh Herbs for Flavor: Adding fresh herbs like dill or thyme at the end of cooking can enhance the flavor profile and add a fresh touch to your soup. Customizable Ingredients: Feel free to swap in your favorite vegetables or use leftover turkey instead of chicken for a holiday twist on this classic soup. Perfecting the Noodles: To prevent overcooked noodles, add them just before the end of the cooking time and monitor closely for your desired texture. Storage Tips: This soup stores well in the refrigerator for up to 3 days; however, the noodles may absorb some broth, so consider cooking them separately if making ahead. {{image_4}} You can change the protein in this soup. Use turkey instead of chicken. Cooked ham or even tofu works well too. For a heartier option, try adding cooked sausage. Each choice gives a unique taste. You can mix and match as you like. If you want a vegetarian soup, skip the chicken. Use vegetable broth instead of chicken broth. Add more veggies like bell peppers, zucchini, or mushrooms. Chickpeas or lentils can add protein. This version is just as cozy and tasty. While egg noodles are classic, you can swap them out. Try whole wheat or gluten-free noodles. Rice noodles are another great option. You can even use spiralized zucchini for a low-carb twist. Each noodle brings a different texture and flavor to the soup. To store your chicken noodle soup, let it cool first. Once cooled, transfer it to an airtight container. Place it in the fridge, where it can last for up to four days. If you need to store it longer, consider freezing it. If you want to freeze your soup, make sure to use a freezer-safe container. Leave some space at the top for expansion. The soup can stay fresh for up to three months in the freezer. To avoid mushy noodles, freeze the soup without the noodles. Cook the noodles separately later. When you are ready to eat your soup, take it out of the fridge or freezer. If frozen, let it thaw in the fridge overnight. To reheat, use a pot on the stove over medium heat. Stir often to heat evenly. You can also use the microwave, but check it every minute to avoid hot spots. Enjoy your warm soup! Yes, you can use frozen chicken. Just increase the cooking time to about 10-12 minutes. This will ensure the chicken cooks fully. After cooking, shred the chicken before adding the noodles. It will still taste great! To make this soup gluten-free, swap the egg noodles for gluten-free pasta. Many brands offer gluten-free noodles that work well. Also, check the chicken broth label to ensure it is gluten-free. Your soup will still be cozy and delicious! If you want a thicker soup, you have a few options. You can mix a tablespoon of cornstarch with water and stir it in. Let it cook for a few more minutes until it thickens. Another way is to add more noodles. They will soak up some broth and make it thicker. In this blog post, I covered the key ingredients for a delicious soup and their health benefits. I shared step-by-step instructions to make it easy for you. You learned helpful tips and tricks to enhance flavor and avoid common mistakes. We explored tasty variations and detailed how to store leftovers properly. Remember, with these guidelines, you can create a soup that fits your taste and needs. Enjoy making it your way!

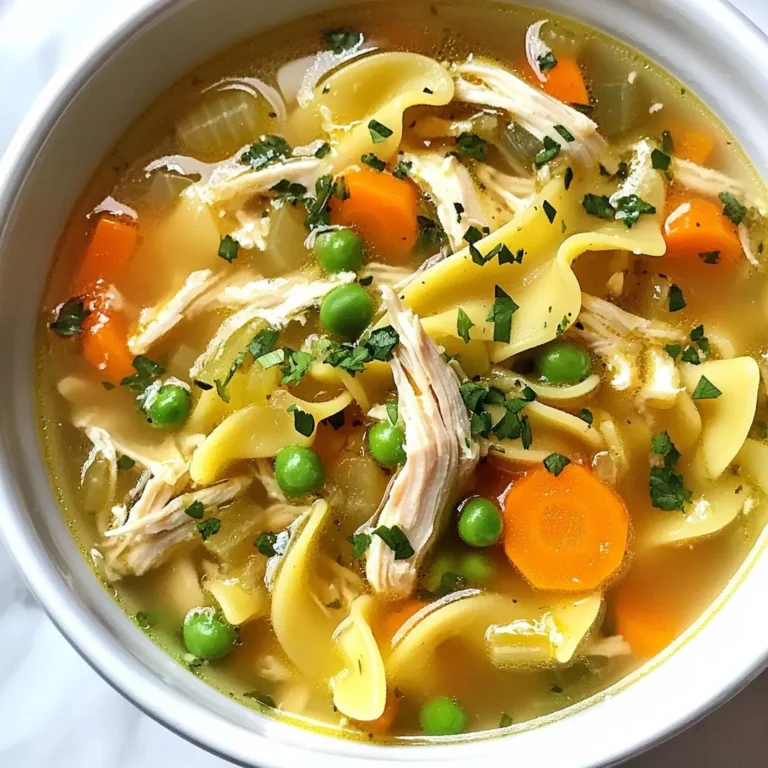
Instant Pot Chicken Noodle Soup Easy and Quick Recipe

- 1 cup orzo pasta - 2 tablespoons olive oil - 3 cloves garlic, minced - 2 cups vegetable broth - 1 cup heavy cream - 1 cup freshly grated Parmesan cheese - 1 teaspoon Italian seasoning - Salt to taste - Freshly ground black pepper to taste - Fresh parsley, finely chopped (for garnish) Each ingredient plays a vital role in the flavor and texture of creamy garlic Parmesan orzo. - Orzo pasta is small and rice-shaped. It cooks quickly and absorbs flavors well. - Olive oil adds richness and helps sauté the garlic. - Garlic gives a strong, aromatic base. It transforms the dish from simple to savory. - Vegetable broth enhances the overall taste, adding depth without meat. - Heavy cream creates the creamy texture we love. It makes the dish rich and satisfying. - Parmesan cheese adds a salty, nutty flavor. Freshly grated cheese melts better and tastes great. - Italian seasoning brings a mix of herbs that complements the other flavors. - Salt and pepper enhance all the tastes. Adjust these to suit your preference. - Fresh parsley adds color and a hint of freshness as a garnish. You can swap ingredients based on what you have or your taste. - Orzo can be replaced with any small pasta like couscous or ditalini. - Olive oil can be swapped for butter for a richer flavor. - Vegetable broth can be replaced with chicken broth for more depth. - Heavy cream can be substituted with half-and-half or a plant-based cream. - Parmesan cheese can be replaced with Pecorino Romano for a sharper taste. - Italian seasoning can be made from dried basil, oregano, and thyme if you don’t have it. - Fresh parsley can be swapped for chives or basil for a different twist. These substitutions keep the dish tasty while making it easier to use what you have on hand. 1. Heat 2 tablespoons of olive oil in a large saucepan over medium heat. 2. Add 3 cloves of minced garlic. Sauté for about 1 minute until fragrant. 3. Be careful not to burn the garlic, as this can change the taste. 4. Add 1 cup of orzo pasta. Stir it in the garlic oil for 2-3 minutes. 5. Pour in 2 cups of vegetable broth and bring it to a boil. 6. Once boiling, reduce the heat to low and cover the pan. 7. Let it simmer for 10-12 minutes. Stir occasionally to prevent sticking. 8. After cooking, stir in 1 cup of heavy cream and 1 cup of grated Parmesan. 9. Add 1 teaspoon of Italian seasoning. Season with salt and pepper to taste. 10. Cook for an additional 2-3 minutes over low heat, stirring constantly. 11. Once creamy, remove from heat. Taste and adjust seasoning if needed. 12. Serve warm, garnished with chopped parsley for a fresh touch. To cook orzo perfectly, follow these tips: - Toast the Orzo: Toasting the orzo in oil enhances its nutty flavor. - Use Broth: Cooking in vegetable broth adds depth to the dish. - Stir Regularly: Stirring often helps prevent the orzo from sticking. - Monitor Cooking Time: Check the orzo to avoid overcooking. It should be al dente. Here are some common mistakes and how to avoid them: - Burning Garlic: Always sauté garlic on medium heat and watch closely. - Not Stirring: Forgetting to stir can lead to clumps and uneven cooking. - Too Much Liquid: Adding too much broth can make the dish soupy. - Skipping Seasoning: Always taste and adjust salt and pepper before serving. - Overcooking: Keep an eye on the orzo to ensure it stays tender, not mushy. To make your orzo creamy, use heavy cream. This adds richness and a smooth feel. Stir the cream in slowly and let it heat through. It should not boil. Grated Parmesan also helps with creaminess. It melts well and binds the sauce nicely. If you want a lighter dish, try half-and-half instead of cream. Just remember, you’ll lose some richness. For extra flavor, consider adding a pinch of nutmeg. This warm spice pairs well with the cream. You can also add lemon zest for brightness. Just a bit goes a long way. Fresh parsley not only adds color but also a fresh taste. You can sprinkle it on top right before serving. If you like heat, consider adding red pepper flakes. They give a nice kick. To speed up cooking, use a kettle for the broth. Boiling it first saves time. You can also prep your ingredients beforehand. Mince the garlic and chop the parsley ahead of time. This helps keep things moving in the kitchen. If you are short on time, use pre-grated Parmesan. It saves a few minutes, but fresh is always best for flavor. {{image_4}} You can boost the nutrition of creamy garlic Parmesan orzo by adding vegetables. Spinach is a great choice. It wilts down nicely and adds color. You can also use peas for a sweet pop. Broccoli florets work well too; they add a nice crunch. Just add them when the orzo cooks in the broth. This way, they will soften but still keep some texture. To make this dish heartier, consider adding protein. Grilled chicken or shrimp complements the creamy sauce. You can also use chickpeas for a plant-based option. Just stir them in when adding the cream and cheese. This makes the meal filling and satisfying. It’s perfect for a family dinner or a cozy night in. Experimenting with cheese can add new flavors to your orzo. Instead of Parmesan, try goat cheese for a tangy twist. Feta cheese also works well; it adds a salty bite. For a richer taste, use Gruyere or aged cheddar. Each cheese brings its unique flair while keeping the dish creamy. Don’t be afraid to mix and match! To keep your creamy garlic Parmesan orzo fresh, store it in an airtight container. Let it cool first, then seal it tightly. You can place it in the fridge for up to three days. Keeping it sealed helps prevent it from drying out or absorbing other smells from the fridge. Always label your container with the date to track freshness. When you are ready to enjoy leftovers, reheat the orzo gently. I recommend using a saucepan over low heat. Add a splash of vegetable broth or cream to keep it creamy. Stir it often to warm it evenly without burning. You can also microwave it. Just cover it and heat in short bursts, stirring in between. This helps maintain the dish's rich flavor. If you want to freeze the creamy garlic Parmesan orzo, use a freezer-safe container. It can last up to three months in the freezer. When freezing, leave some space at the top of the container. This allows for expansion as it freezes. To thaw, place it in the fridge overnight. Once thawed, reheat as mentioned above for the best taste. To make this dish vegan, swap the heavy cream for coconut cream or cashew cream. Use nutritional yeast instead of Parmesan cheese for a cheesy flavor. You can also add vegan butter for richness. These changes keep the creamy texture while keeping it plant-based. Yes, you can prepare Creamy Garlic Parmesan Orzo ahead of time. Cook it, let it cool, and store it in an airtight container in the fridge. It stays fresh for about three days. Reheat it gently on the stove, adding a splash of broth or water to bring back the creaminess. Creamy Garlic Parmesan Orzo pairs well with many dishes. You can serve it with grilled chicken or roasted vegetables for a complete meal. It also goes great with a fresh salad or crusty bread on the side. This adds variety and makes your meal more satisfying. This blog covered everything you need for Creamy Garlic Parmesan Orzo. We listed ingredients, shared step-by-step cooking methods, and highlighted common mistakes. You learned tips for texture, flavor, and even shortcuts. We also explored fun variations and storage ideas to keep it fresh. In summary, this dish is easy and packed with flavor. Enjoy making it your own and share it with friends!

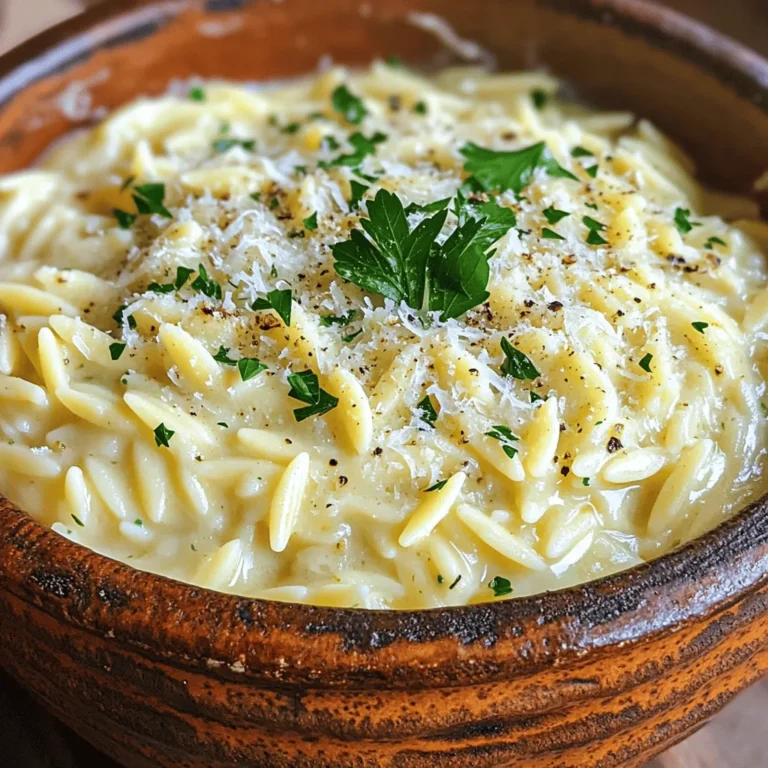
Creamy Garlic Parmesan Orzo Flavorful and Easy Recipe

To make Pumpkin Crunch Cake Bars, you need key ingredients. Here they are: - 2 cups pumpkin puree - 1 cup granulated sugar - 1 teaspoon pure vanilla extract - 2 large eggs - 1 teaspoon ground cinnamon - 1/2 teaspoon ground nutmeg - 1/2 teaspoon ground ginger - 1/2 teaspoon salt - 1 1/2 cups all-purpose flour - 1 teaspoon baking powder - 1/2 teaspoon baking soda - 1 cup cream cheese, softened to room temperature These ingredients create a rich, moist base for your cake bars. You can add some optional ingredients for extra flavor: - 1 cup chopped pecans (for added crunch) Chopped pecans bring a nice texture and nutty taste. You can skip them if you prefer a simpler version. If you don’t have some ingredients, here are some easy swaps: - Use brown sugar instead of granulated sugar for a deeper flavor. - Substitute almond extract for vanilla extract to change the taste. - If you lack cream cheese, try using Greek yogurt for a creamy texture. These substitutions keep your bars delicious while fitting your pantry items. First, turn on your oven and set it to 350°F (175°C). While it heats, grab a 9x13 inch baking pan. Grease the pan with butter or cooking spray. This helps the bars come out easily later. In a large bowl, add 2 cups of pumpkin puree, 1 cup of granulated sugar, 1 teaspoon of pure vanilla extract, and 2 large eggs. Use a whisk to mix until smooth. In another bowl, combine 1 teaspoon of ground cinnamon, 1/2 teaspoon each of ground nutmeg and ground ginger, and 1/2 teaspoon of salt. Add 1 1/2 cups of all-purpose flour, 1 teaspoon of baking powder, and 1/2 teaspoon of baking soda. Mix well. Gradually add this dry mix to the pumpkin mix. Stir gently and don’t overmix. If you want some crunch, fold in 1 cup of chopped pecans. Pour the batter into the greased pan, spreading it out evenly. In a separate bowl, beat 1 cup of softened cream cheese with an electric mixer until creamy. Gradually add 3 cups of powdered sugar and 1 teaspoon of milk. Mix until it is light and spreadable. Spoon dollops of this cream cheese mixture over the pumpkin batter. Take a knife or spatula and gently swirl it into the batter. This will create a beautiful marbled look. Place the pan in the oven and bake for 35-40 minutes. Check with a toothpick. It should come out clean when the bars are done. Keep an eye on it towards the end so they do not overcook. After baking, take the pan out and let it cool completely on a wire rack. Once cool, slice the bars into squares and enjoy! To get the best texture, do not overmix your batter. Mix until just combined. This ensures your cake bars stay soft and moist. If you want extra crunch, add chopped pecans. They give a nice bite and contrast to the smooth pumpkin base. One common mistake is forgetting to preheat the oven. Always preheat to 350°F (175°C) before baking. This helps your bars cook evenly. Another mistake is not greasing your pan well. If the pan is not greased, your bars may stick. Lastly, avoid using cold cream cheese. It should be at room temperature for easy mixing. To boost flavor, try adding a bit of maple syrup to the pumpkin mixture. It adds a lovely depth. For presentation, dust the finished bars with powdered sugar. A sprinkle of cinnamon on top makes them look festive. Use a decorative platter to serve them, and your guests will be impressed! {{image_4}} To make gluten-free pumpkin crunch cake bars, use gluten-free flour instead of all-purpose flour. Many brands work well in baking. Make sure the flour blend has xanthan gum for structure. Follow the rest of the recipe as is. You will still enjoy a soft, tasty treat without the gluten. To create a vegan version, swap out the eggs. Use 1/4 cup of unsweetened applesauce per egg. Instead of cream cheese, use a vegan cream cheese or a coconut-based option. Make sure the sugar is vegan-friendly, too. These swaps keep the bars plant-based and delicious. You can play with flavors in your pumpkin crunch cake bars. Add chocolate chips for a sweet twist. Mix in some chopped walnuts for a nutty crunch. If you love spices, try adding cardamom or allspice. Each change adds a new layer of flavor to this simple recipe. To keep your Pumpkin Crunch Cake Bars fresh, store them in an airtight container. Place parchment paper between layers to prevent sticking. Keep them at room temperature for up to three days. If you want them to last longer, refrigerate for up to a week. This will preserve the flavors and texture nicely. If you want to freeze these delicious bars, cut them into squares first. Wrap each piece tightly in plastic wrap, then place them in a freezer-safe bag. This helps to keep them fresh for up to three months. When you’re ready to enjoy, simply thaw them in the fridge overnight. To reheat, place the bars in the microwave for 10-15 seconds. This warms them up nicely without drying them out. You can also enjoy them cold, as the flavors stay lovely even straight from the fridge. If you like, add a dollop of whipped cream on top for a tasty treat! To cut these cake bars, let them cool completely. Use a sharp knife for clean cuts. You can also run the knife under hot water before slicing. This helps prevent sticking. For even slices, measure and mark before cutting. Yes, you can make these bars ahead. They taste great after a day in the fridge. Just wrap them tightly in plastic wrap or foil. This keeps them fresh. You can also freeze them for longer storage. Just thaw in the fridge before serving. Check if the bars are done by inserting a toothpick in the center. If it comes out clean, they are ready. The edges will look slightly golden, and the top will feel set. Keep an eye on them during the last few minutes of baking. Absolutely! Canned pumpkin works great in this recipe. It saves time and is easy to find. Just make sure to use pure pumpkin puree, not pumpkin pie filling. This ensures your bars have the right flavor and texture. You learned about making delicious Pumpkin Crunch Cake Bars. We covered the key ingredients, step-by-step baking, and clever tips for the best results. You saw how to make gluten-free and vegan versions, plus how to store them properly. With these tips, you can create tasty bars that impress everyone. Keep experimenting with flavors and enjoy baking!

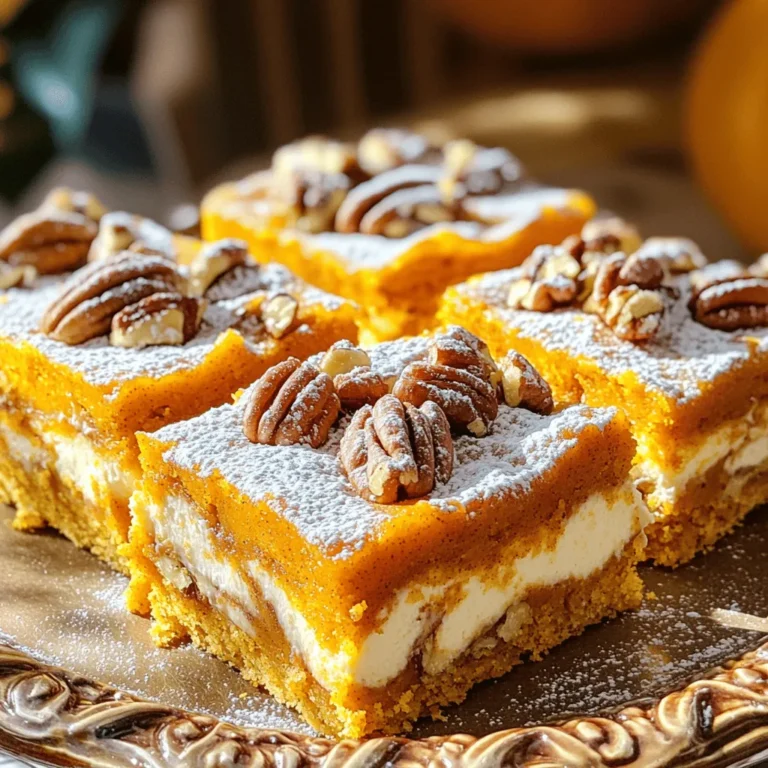
Pumpkin Crunch Cake Bars Simple and Tasty Recipe

- 1 cup plain yogurt - 1 cup granulated sugar - 1/4 cup vegetable oil - 2 large eggs - Zest of 1 large lemon - 1 teaspoon pure vanilla extract - 2 cups all-purpose flour - 2 teaspoons baking powder - 1/2 teaspoon fine sea salt - 1 cup fresh blueberries - 1/4 cup freshly squeezed lemon juice To make the Blueberry Lemon Yogurt Loaf, you will need a few key ingredients. Each plays an important role in flavor and texture. Yogurt, sugar, and oil give the loaf moisture and a rich taste. Yogurt adds creaminess and tang. Sugar sweetens the loaf just right. Oil makes it tender. Eggs and lemon zest help bind the mixture and add lift. Eggs create a fluffy loaf. Lemon zest brings a bright flavor. Flour, baking powder, and salt form the base. Flour gives structure. Baking powder helps the loaf rise. Salt enhances the overall taste. Blueberries and lemon juice are the stars of the show. Blueberries add sweetness and burst with flavor. Lemon juice brightens every bite. Gather these ingredients to create a delightful loaf that everyone will love! {{ingredient_image_2}} - Prepping the loaf pan First, preheat your oven to 350°F (175°C). Grease a 9x5-inch loaf pan with butter or non-stick spray. This helps the loaf come out easily after baking. - Mixing wet ingredients In a large bowl, mix 1 cup of Greek yogurt, 1 cup of granulated sugar, and 1/4 cup of vegetable oil. Whisk these together until you see a smooth and creamy mix. It should look nice and shiny. Next, add two large eggs one at a time. Whisk well after each egg. Then, stir in the zest of 1 lemon and 1 teaspoon of vanilla extract. Make sure everything is mixed well. - Incorporating dry ingredients In another bowl, combine 2 cups of all-purpose flour, 2 teaspoons of baking powder, and 1/2 teaspoon of fine sea salt. Slowly fold this dry mix into the wet mixture using a spatula. Stop mixing when no dry spots are left; be gentle. Overmixing can make the loaf tough. Finally, fold in 1 cup of fresh blueberries carefully, so they don’t break apart. - Pouring batter into the pan Pour the batter into your prepared loaf pan. Spread it out evenly with a spatula. This helps the loaf bake evenly. - Baking time and doneness test Place the pan in your preheated oven. Bake for 50-60 minutes. To test if it’s done, insert a toothpick into the center. If it comes out clean or with a few moist crumbs, your loaf is ready. - Combining lemon juice and powdered sugar While the loaf bakes, prepare a lemon glaze. In a small bowl, mix 1/4 cup of freshly squeezed lemon juice with 1 cup of powdered sugar. Whisk until it is smooth and free of lumps. - Drizzling over the cooled loaf Once the loaf is baked and cooled for about 10 minutes, transfer it to a wire rack. Drizzle the lemon glaze over the cooled loaf. Let it soak in for about 5-10 minutes before slicing. This adds a sweet and tangy touch to your delicious loaf. To get the best texture in your loaf, use room temperature ingredients. When your yogurt and eggs are at room temperature, they mix better. This helps the batter rise and keeps it light. Next, when you add blueberries, use a gentle folding technique. This means you carefully mix the blueberries into the batter without squishing them. It keeps the berries whole and juicy. One big mistake is overmixing the batter. When you mix too much, the loaf can become dense. Mix just until the dry ingredients disappear. Another mistake is not checking for doneness correctly. Use a toothpick to test the center. If it comes out clean or with a few crumbs, your loaf is ready. If it has wet batter, it needs more time. Pro Tips Use Room Temperature Eggs: Room temperature eggs incorporate better into the batter, resulting in a lighter loaf. Don't Overmix the Batter: Gently fold the dry ingredients into the wet to prevent a dense loaf; overmixing can develop gluten, leading to a tougher texture. Fresh vs. Frozen Blueberries: If using frozen blueberries, make sure to thaw and pat them dry to avoid excess moisture in the batter. Glaze While Warm: Drizzling the lemon glaze over the loaf while it's still warm allows it to soak in, enhancing the flavor and moisture. {{image_4}} You can make this blueberry lemon yogurt loaf even better! - Adding nuts or seeds: Walnuts or almonds add a nice crunch. Try adding 1/2 cup of chopped nuts into the batter. Sunflower seeds can also give a great texture. - Substituting other fruits: If you love other fruits, use them! Raspberries or diced strawberries work well. Just swap the blueberries with the same amount of your chosen fruit. You can easily adjust this recipe for different diets. - Gluten-free options: Use a gluten-free flour blend instead of all-purpose flour. It will still taste great! - Dairy-free substitutions: To make this loaf dairy-free, swap the yogurt with a plant-based yogurt. Coconut yogurt adds a nice flavor and creaminess. You can store your Blueberry Lemon Yogurt Loaf in two ways: at room temperature or in the fridge. If you plan to eat it within two days, keep it at room temperature. Wrap it in plastic wrap or foil to keep it fresh. If you want to enjoy it later, store it in the fridge. This keeps it moist longer. For longer storage, you can freeze the loaf. Wrap it tightly in plastic wrap, then in foil. It can last up to three months in the freezer. When you’re ready to eat it, just thaw it overnight in the fridge. To reheat the loaf, use the microwave or the oven. If you choose the microwave, slice the loaf and heat for about 15-20 seconds. This helps keep it moist. If you prefer the oven, set it to 350°F (175°C) and warm the slices for 5-10 minutes. After reheating, you can serve it with a drizzle of lemon glaze or a dollop of yogurt. This adds a nice touch and enhances the flavor. Enjoy your tasty loaf warm! Yes, you can use frozen blueberries. Just thaw them and pat them dry. This helps keep the batter from getting too wet. Frozen blueberries work well and give you that same juicy burst. The loaf stays fresh for about 3 to 5 days at room temperature. Store it in an airtight container to keep it moist. If you want it to last longer, you can freeze it for up to 3 months. Yes, you can! Use dairy-free yogurt like almond or coconut yogurt. This keeps the recipe creamy. You can also use plant-based milk in place of yogurt if needed. This loaf pairs well with tea or coffee. You can also enjoy it with whipped cream for a sweet touch. Adding a dollop of yogurt on top makes it even better. If you want more flavor, try serving it with fresh fruit or a berry compote. In this article, we explored how to make a delicious Blueberry Lemon Yogurt Loaf. We covered key ingredients, from yogurt to blueberries, and shared step-by-step instructions for creating the batter and baking the loaf. I provided tips to achieve the perfect texture and avoid common mistakes. We also discussed fun variations, storage practices, and answered some FAQs. This recipe is easy and adaptable. Enjoy this tasty treat with family and friends. Happy baking!

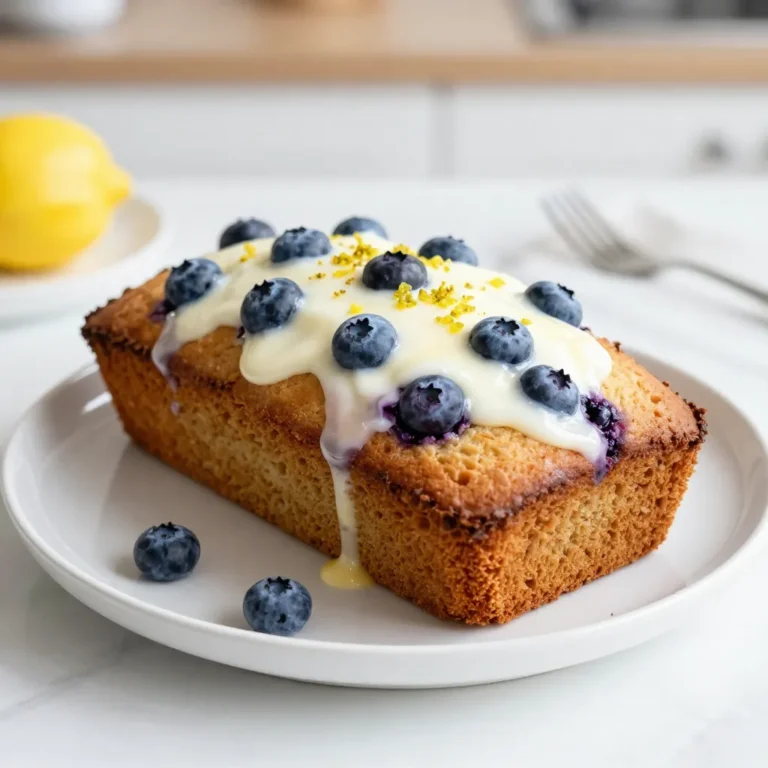
Blueberry Lemon Yogurt Loaf Tasty and Easy Recipe

- 2 large apples (Honeycrisp or Granny Smith) - 1 cup all-purpose flour - 1 teaspoon baking powder - 1 teaspoon ground cinnamon - 1/4 teaspoon freshly grated nutmeg - 1/2 teaspoon salt - 1/2 cup milk (whole or 2%) - 1 large egg - 1 cup panko breadcrumbs - Oil for deep frying - Powdered sugar for dusting (optional) You can switch the apple types for varied tastes. Try Fuji apples for sweetness or tart Granny Smith for a zing. For gluten-free options, use almond flour or a gluten-free flour blend. Both will work well! Fresh apples should feel firm and smooth. Look for bright colors and no soft spots. The variety changes the flavor. Honeycrisp apples are sweet and crisp, while Granny Smith is tart and refreshing. Choose what you love! To start, take your apples and core them. Then, slice them into rings about 1/4 inch thick. This thickness helps them cook evenly and stay crisp. After slicing, use a paper towel to pat the rings dry. This step is key, as it helps the batter stick better. First, gather your dry ingredients. In a medium bowl, mix together the flour, baking powder, cinnamon, nutmeg, and salt. Whisk them well to blend the flavors. Next, in a separate bowl, combine the milk and the egg. Whisk until smooth. Slowly pour the wet mixture into the dry mix. Stir gently until the batter is smooth and free of lumps. The right consistency is thick enough to coat the apple rings. Now, it's time to heat the oil. In a large deep frying pan, warm the oil over medium heat. Aim for a temperature of about 350°F (175°C). You want enough oil to cover the apple rings halfway. Once the oil is hot, dip each apple ring into the batter. Let any extra batter drip off, then roll it in the panko breadcrumbs. Press lightly to coat evenly. Carefully place the coated rings into the hot oil. Fry them in batches to avoid overcrowding. Cook for about 2-3 minutes on one side. Flip them and fry until they are golden brown and crisp all over. When done, use a slotted spoon to remove the rings. Place them on a plate lined with paper towels to absorb any excess oil. To make your crispy fried cinnamon apple rings extra crunchy, always use panko breadcrumbs. They create a light and airy crust that regular breadcrumbs can't match. When you fry, make sure the oil is hot enough, around 350°F (175°C). This helps the batter set fast, locking in moisture and ensuring a crunchy bite. For a fun presentation, serve the apple rings on a colorful platter. You can drizzle warm caramel sauce over them and sprinkle extra cinnamon for a beautiful look. Pair with a scoop of vanilla ice cream or a dollop of whipped cream. These add both taste and visual appeal. Watch out for overcrowding the frying pan. If you add too many rings at once, they can steam instead of fry. This leads to soggy apple rings. Also, be sure to dry the apple rings properly with a paper towel. Moisture can prevent the batter from sticking, which affects crispiness. {{image_4}} You can easily change the taste of your crispy fried cinnamon apple rings. One fun idea is to add spices like cardamom or ginger to the batter. These spices give a nice twist to the classic flavor. You might also want to try infusing the batter with a little vanilla extract. This adds a warm, sweet note that pairs well with apples. If you're looking for a healthier option, consider baking the apple rings instead of frying them. This method cuts down on oil and calories. Simply coat the apple rings in batter and place them on a baking sheet. Bake at 400°F until they are crisp. Another option is to use coconut oil for frying. It has a high smoke point and adds a subtle flavor that complements the apples. The crispy fried apple rings are great on their own, but you can make them even better. Try serving them with a homemade caramel or chocolate dip. These sweet dips enhance the flavor and make a fun treat. You can also pair the rings with ice cream for a delightful dessert. The warm apple rings contrast nicely with cold ice cream, creating a delicious experience. Store any leftover apple rings in an airtight container. This keeps them fresh. Place them in the fridge. They will last for about 2-3 days. To keep them crispy, layer the rings between paper towels. This absorbs moisture and helps maintain their crunch. The best way to reheat crispy apple rings is in the oven. Preheat your oven to 350°F (175°C). Place the apple rings on a baking sheet. Heat them for about 10 minutes. This restores their crispiness well. The microwave can make them soggy. If you must use it, heat in short bursts. Check often to avoid losing texture. You can freeze fried apple rings! To freeze, let them cool completely. Place them in a single layer on a baking sheet. Freeze for 1-2 hours. Once they are firm, transfer them to a freezer bag. Squeeze out the air before sealing. To thaw, place them in the fridge overnight. Reheat in the oven to bring back the crunch. Crispy Fried Cinnamon Apple Rings taste best on the day they are made. If you have leftovers, store them in an airtight container. Keep them at room temperature for up to one day. For longer storage, place them in the fridge. They can last for about three days in the fridge. Reheating helps bring back some crispiness. Yes, you can make the batter ahead of time! Combine the dry ingredients in one bowl and the wet in another. Mix only when you are ready to fry the apple rings. This keeps the batter fresh and fluffy. If you mix too early, the batter may lose its rise from the baking powder. Several tasty dipping sauces go well with apple rings. Here are some popular options: - Caramel sauce for a sweet touch - Creamy vanilla yogurt for a fresh flavor - Chocolate sauce for a rich treat - Maple syrup for a classic pairing These sauces add flavor and make the apple rings even more fun to eat! In this post, I shared how to make crispy fried cinnamon apple rings. We explored key ingredients and offered tips for fresh apples, batter preparation, and frying. I highlighted common mistakes to avoid and shared tasty variations for enjoying your treat. Remember, achieving that perfect crunch comes from using panko breadcrumbs and frying at the right temperature. Enjoying apple rings can be a fun treat, whether baked or fried, so get creative with flavors and toppings. Happy cooking!

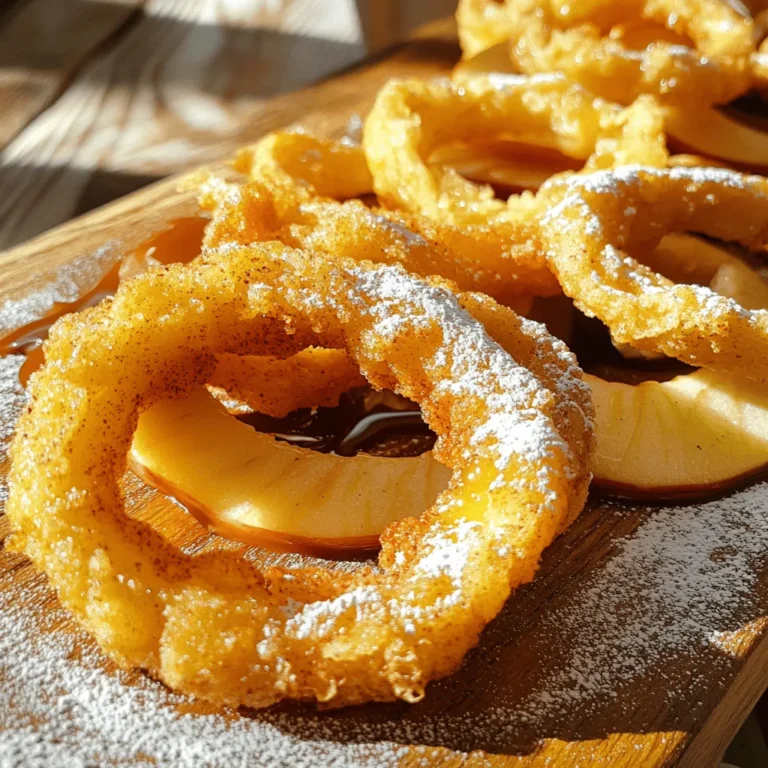
Crispy Fried Cinnamon Apple Rings Delightful Snack Recip

- 1 cup shredded mozzarella cheese - 1/4 cup honey - 1 cup almond flour These three items are the heart of your cheesy bites. The shredded mozzarella cheese gives them a melty texture. Honey adds a nice sweetness that balances the cheese. Almond flour keeps the bites light and gluten-free. - Alternative cheeses: You can try cheddar or gouda for a different taste. - Potential spices or herbs: Add garlic powder or Italian herbs for extra flavor. Using different cheeses or spices can change the taste. Feel free to mix and match to find your favorite flavor. - Mixing bowl - Baking sheet - Parchment paper These tools help you make the bites easily. The mixing bowl is for combining ingredients. The baking sheet holds the bites while they cook. Using parchment paper prevents sticking and makes clean-up simple. 1. First, preheat your oven to 375°F (190°C). This heat will turn our cheesy bites golden. 2. Line a baking sheet with parchment paper. This helps the bites not stick and cooks them evenly. 3. In a large mixing bowl, add 1 cup of shredded mozzarella cheese and 1 cup of almond flour. 4. Mix them with your hands or a fork. Make sure the cheese is well coated with the almond flour. 1. Next, drizzle 1/4 cup of honey over the cheese and flour mix. 2. Stir the mix well until it becomes sticky. This is what will help our bites hold together. 3. Now, with clean hands, grab some of the mix. Roll it into small balls, about the size of a golf ball. 4. Place each ball on the prepared baking sheet, leaving space between them. 1. Place the baking sheet in the preheated oven. Bake for 10-12 minutes. 2. Watch them closely. You want them golden brown and slightly puffed up. 3. Once done, take them out and let them cool on the baking sheet for a few minutes. This step helps them firm up before serving. To get the right stickiness, mix the almond flour and cheese well. You want them to blend smoothly. When adding honey, drizzle it evenly. This helps the dough stick together nicely. If the mixture seems dry, add a bit more honey. Avoid over-baking for the best bites. Keep a close watch during the last few minutes. They should be golden brown, not dark. If they puff up too much, they may dry out. These cheesy bites pair well with many foods. Fresh veggies, like carrots and celery, add crunch. You can also serve them with cheese platters for a fun mix. For dipping sauces, try honey mustard or ranch. A spicy aioli will also lift the flavor. You can even use salsa for a zesty twist. An appealing display makes these bites even better. Use a colorful platter to arrange the cheesy bites. Drizzle extra honey on top for a sweet touch. Garnish with sesame seeds or fresh herbs. This adds flavor and makes your dish pop. Serve warm for the best taste and texture. {{image_4}} You can change the cheese for different flavors. Use cheddar for a sharp taste or cream cheese for creaminess. If you need a dairy-free option, try vegan cheese. It melts well and keeps the bites cheesy. For gluten-free needs, almond flour works great. You can also use coconut flour or a gluten-free blend. Just keep in mind the texture may change a bit. Adding spices can make these bites special. Try garlic powder for a savory kick or chili flakes for heat. A pinch of paprika adds a nice color too. Fresh herbs like rosemary or thyme can give a fresh taste. If you want more sweetness, add a drizzle of maple syrup. This can change the flavor to a sweet treat. You can also mix in some cinnamon for warmth. You can turn these cheesy bites into a meal. Serve them with a fresh salad or some roasted veggies. They make a great side dish too! For parties, change how you present them. Use skewers to make bite-sized appetizers. You can also arrange them on a platter with dips. Drizzle more honey on top for a fancy touch! Store your honeyed cheesy bites in the refrigerator. Place them in an airtight container. This keeps them fresh for up to three days. If you want to keep them even tastier, let them cool completely before storing. This prevents moisture build-up that can make them soggy. For longer storage, you can freeze the cheesy bites. First, let them cool down completely. Then, arrange them in a single layer on a baking sheet. Freeze them for about an hour, then transfer them to a freezer bag. They can last for up to three months. When you’re ready to eat, reheat them in the oven. Preheat your oven to 350°F (175°C) and bake for about 10 minutes. This makes them warm and crispy again. Honeyed cheesy bites can last up to three days in the fridge. If frozen, they last about three months. Watch for signs of spoilage. If they develop a strange smell or look different, it’s best to throw them out. Always trust your senses to keep your snacks safe and tasty! Yes, you can use other types of honey. Each kind has its own flavor. For example, clover honey is mild and sweet. Buckwheat honey is rich and bold. These flavors can change how your cheesy bites taste. Try different honey to find your favorite. Yes, you can make these bites vegan! Substitute mozzarella cheese with a vegan cheese alternative. For the honey, use agave syrup or maple syrup. Almond flour is already vegan, so you can keep that. These swaps keep the bites tasty and plant-based. You can adjust the sweetness by changing the honey amount. Add more honey for a sweeter bite. If you prefer less sweetness, use less honey. You can also mix in spices like cinnamon or cayenne for a fun twist. Taste as you go to find your perfect balance. These bites pair well with many dips. Try serving them with marinara sauce or ranch dressing. You can also offer honey mustard for a sweet kick. For sides, fresh veggies or a simple salad work great. Get creative and enjoy the flavors together! You learned how to make tasty cheesy bites using simple ingredients. We covered key tools, preparation steps, and baking tips. Each section helps you create the perfect dish. Feel free to adjust flavors and serve them how you like. With these tips, you'll impress friends and family. Enjoy your cheesy bites, and don't hesitate to get creative!

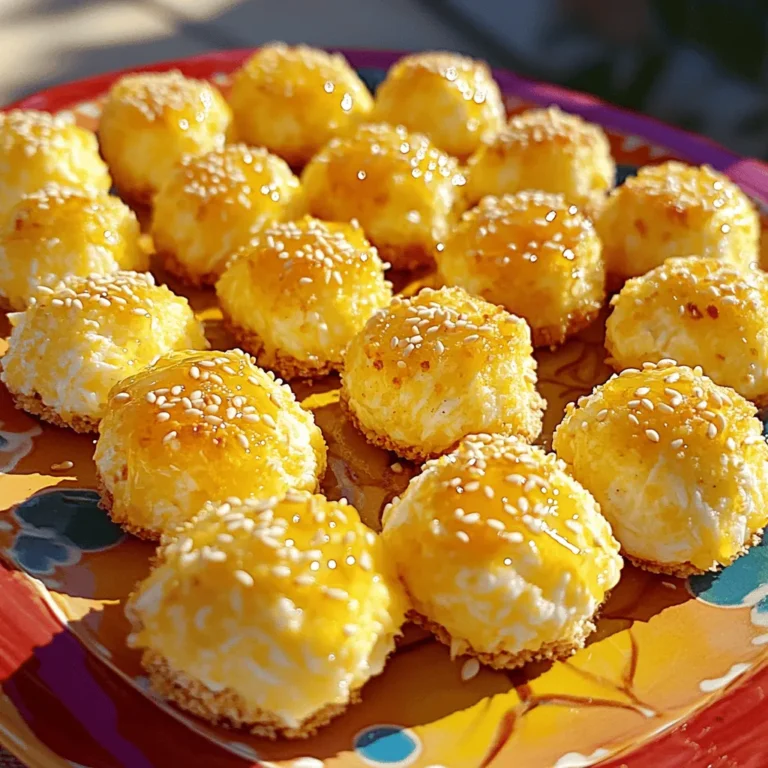
Honeyed 3-Ingredient Cheesy Bites Delicious Snack

- 1 cup dark chocolate (70% cocoa), finely chopped - ½ cup unsalted butter, cubed - ¾ cup powdered sugar, sifted - ¼ cup cocoa powder, plus extra for dusting - 3 large eggs, at room temperature - 1 teaspoon pure vanilla extract - ¼ teaspoon fine sea salt - Whipped cream or vanilla ice cream - Fresh berries or mint leaves for garnish When making flourless chocolate lava cakes, the right ingredients matter a lot. You want a rich taste and a perfect texture. Start with high-quality dark chocolate. I use chocolate with 70% cocoa for that deep flavor. The unsalted butter adds a creamy touch, while sifted powdered sugar sweetens it just right. Cocoa powder gives our cakes a strong chocolate taste. It also helps with the texture. The eggs are key for binding everything together. Room temperature eggs mix better with the batter. Pure vanilla extract boosts the flavor, making it more enjoyable. A pinch of fine sea salt balances the sweetness. For serving, I love to add whipped cream or a scoop of vanilla ice cream. They make a great match with the warm cakes. Fresh berries or mint leaves add a pop of color and freshness. These optional touches make your dessert feel special. {{ingredient_image_2}} Start by preheating your oven to 425°F (220°C). Next, take four 6-ounce ramekins. Grease each ramekin with unsalted butter. Make sure to cover the sides and bottom well. This helps the cakes come out easily. Then, dust the insides of the ramekins with cocoa powder. This step prevents sticking and adds extra chocolate flavor. Grab a microwave-safe bowl. Place the finely chopped dark chocolate and cubed unsalted butter in it. Heat the bowl in the microwave on medium power. Do this in 30-second intervals. Stir the mixture after each interval. You want it melted and smooth, but be careful not to overheat it. A smooth consistency is key for your lava cakes. Once your chocolate and butter mix is ready, add the sifted powdered sugar. Stir until it blends in and no lumps remain. Next, sift in the cocoa powder. Mix it well until fully incorporated. Now, it’s time for the eggs. Add them one at a time, stirring well after each. Follow this with the pure vanilla extract and fine sea salt. You want a silky smooth batter, so take your time mixing. Carefully divide your batter into the prepared ramekins. Fill each one about ¾ full. Place the ramekins on a baking sheet for easy handling. Bake in your preheated oven for 12-14 minutes. The sides should be set, while the center remains soft and slightly jiggly. Avoid overbaking to keep that perfect lava effect. After baking, take the ramekins out and let them cool for 1 minute. Use a small knife to run around the edges of each cake. This helps to loosen them. Now, gently invert each ramekin onto a plate. You may need to tap it lightly to release the cake. Serve the lava cakes right away. Watch the rich, gooey center flow as you cut into them. For an extra treat, add a dollop of whipped cream or a scoop of creamy vanilla ice cream. To get that warm, gooey center, timing is key. Bake your cakes for 12 to 14 minutes. The edges should be firm, while the middle stays soft. A little jiggle in the center shows it's still runny. If you bake too long, you lose that lava effect. If you want a dairy-free treat, swap out the butter for coconut oil. It works well and adds a hint of flavor. For gluten-free options, make sure your cocoa powder is certified gluten-free. This keeps your dessert safe for those with gluten sensitivities. Want to make your lava cakes even richer? Add a teaspoon of espresso powder to the batter. It deepens the chocolate taste without making it taste like coffee. You can also try vanilla bean paste or a dash of cinnamon for a unique twist. These small changes can elevate your dessert to new heights. Pro Tips Use High-Quality Chocolate: The flavor of your lava cake heavily depends on the chocolate you choose. Opt for a good quality dark chocolate (70% cocoa or higher) for the richest taste. Room Temperature Eggs: Ensure your eggs are at room temperature before mixing. This helps them incorporate better into the batter, resulting in a smoother texture. Mind the Baking Time: Keep a close eye on your cakes as they bake. For that perfect gooey center, pull them out while the edges are set but the center is still soft and jiggly. Rest Before Serving: Allow the cakes to cool for just one minute before inverting. This helps them hold their shape while still being warm enough for the lava effect to flow beautifully. {{image_4}} You can add fun flavors to your lava cakes. Try adding a few drops of orange or mint essence. These flavors make the cake taste fresh and exciting. You can also use different types of chocolate. White or milk chocolate gives a sweeter taste. Mix and match to find your favorite flavor! If you want a vegan treat, swap eggs and butter. Use flax eggs or applesauce instead of eggs. For butter, try coconut oil or vegan margarine. You can also choose healthier sweeteners. Instead of powdered sugar, use coconut sugar or maple syrup for a natural touch. These swaps keep the taste rich while making it a bit healthier. Transform your lava cake into a sundae! Add a scoop of ice cream on top. You can drizzle chocolate sauce or caramel over the cake. Fresh berries also make a great topping. They add color and a bit of tartness. Experiment with different sauces to find what you love! To keep leftover lava cakes fresh, follow these easy steps: - Refrigeration: Place your cooled lava cakes in an airtight container. Store them in the fridge for up to three days. This keeps them moist. - Freezing: For longer storage, wrap each cake tightly in plastic wrap. Then, place them in a freezer-safe bag. They can last up to three months in the freezer. When you want to enjoy your lava cakes again, reheating is key. Here’s how: - Optimal Texture: Preheat your oven to 350°F (175°C). Place the ramekins on a baking sheet. Heat for about 10-12 minutes. This helps the center stay gooey. - Avoiding Overcooking: Keep an eye on them while they heat. You want the edges warm, but the center should still be soft. Check them a few minutes early to ensure perfect results. Enjoying these cakes again is easy with the right storage and reheating methods! The lava center forms during baking. You want a soft center and set sides. When you bake the cakes, the heat cooks the edges while the center stays gooey. This happens because of the batter's moisture and the chocolate’s melting point. If you overbake, the center cooks through, and you lose that lava effect. Timing is key! Bake for 12-14 minutes for the best results. Keep an eye on the cakes as they bake. Yes, you can prepare the batter ahead of time. Mix the batter and store it in the fridge. Just remember to fill the ramekins only when ready to bake. This keeps the texture perfect. You can prepare the ramekins by greasing and dusting them with cocoa powder. Bake them straight from the fridge, but add a minute or two to the bake time. Serve the cakes warm right after baking. The gooey center flows out when you cut into them. I love adding a scoop of creamy vanilla ice cream or a dollop of whipped cream. For a nice touch, sprinkle cocoa powder or powdered sugar on the plate. You can add fresh berries or a mint leaf for extra flair. This makes each plate look fancy and inviting! We covered the key ingredients, steps, and tips for making flourless chocolate lava cakes. I shared how to melt chocolate, prepare the batter, and bake them to perfection. Remember, timing and ingredient choices matter for the best lava center. You can explore variations and substitutions to fit your taste. Follow these methods to impress your family or guests. Enjoy every gooey bite of your creation!

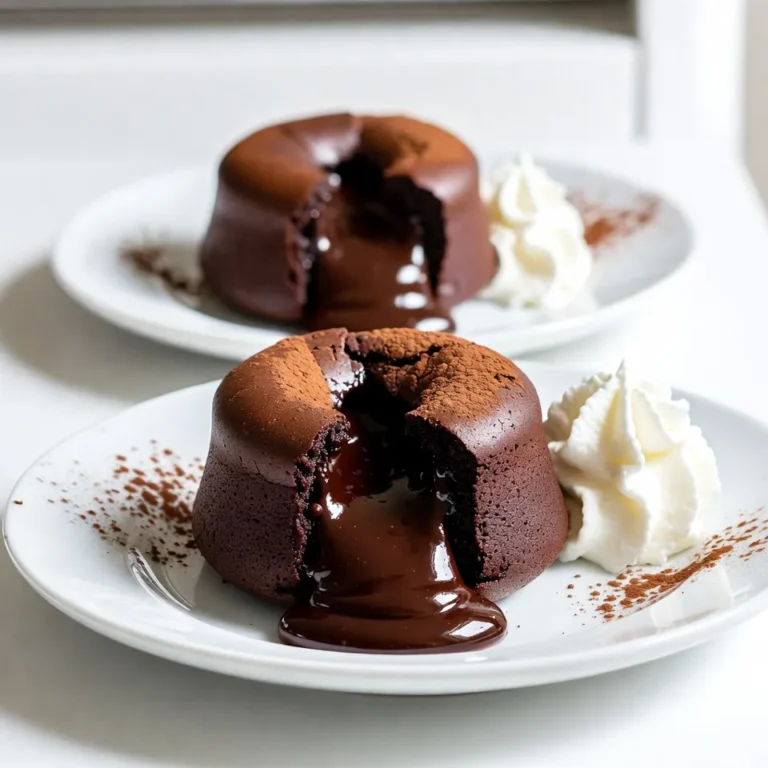
Flourless Chocolate Lava Cakes Rich and Decadent Delight

To make this Mexican street corn salad, you need some fresh items: - 4 ears of sweet corn, husked and silk removed - 1/2 cup crumbled queso fresco (or feta as a substitute) - 1/4 cup creamy mayonnaise - 2 tablespoons tangy sour cream - 1 tablespoon freshly squeezed lime juice - 1 teaspoon smoked chili powder - 1/2 teaspoon garlic powder - 1/4 cup fresh cilantro, finely chopped - Salt and pepper to taste - 1/4 cup finely diced red onion These ingredients create a bright and tasty dish that excites your palate. The sweet corn is the star, while the cheese adds a creamy touch. Each ingredient plays a key role in the flavor. You can add some extra flavor with these options: - Sliced jalapeños for heat - Avocado for creaminess - Cherry tomatoes for freshness Feel free to mix in what you like. These add-ins can make your salad unique and more personal. If you can’t find something, here are some swaps: - Use feta cheese if you can't find queso fresco. - Substitute Greek yogurt for mayonnaise for a lighter touch. - Lime juice can be replaced with lemon juice. These substitutions keep the salad tasty while accommodating your needs. Always adjust to what you have on hand. Start by boiling a large pot of water. Once the water bubbles, add the husked corn. Cook it for 5 to 7 minutes. The corn should be tender but still crisp. After cooking, take the corn out and let it cool. Use a sharp knife to slice off the kernels. Make sure to get all the sweet corn off the cob. In a big mixing bowl, combine the freshly cut corn, crumbled queso fresco, diced red onion, and chopped cilantro. Stir gently to mix them. In a smaller bowl, whisk together the mayonnaise, sour cream, lime juice, smoked chili powder, and garlic powder. Mix until it is smooth and creamy. Pour the dressing over the corn mix. Use a spatula or wooden spoon to toss everything together. Make sure all the corn and veggies are covered with the creamy dressing. Add salt and pepper to taste. If you love heat, fold in sliced jalapeños for a spicy kick. Cover the bowl and chill it in the fridge for at least 15 minutes. This helps all the flavors come together. Enjoy your vibrant and tasty salad! To make your Mexican street corn salad even tastier, try these tips: - Use fresh corn for the best sweet flavor. - Grill the corn instead of boiling it. This gives a nice smoky taste. - Add lime zest for more citrus flavor. It brightens up the dish nicely. - If you love spice, toss in extra smoked chili powder or diced jalapeños. How you serve your salad matters! Here are some fun ideas: - Use a colorful bowl to display the salad. It looks more inviting. - Top with extra crumbled queso fresco and cilantro for a pop of color. - Serve with lime wedges on the side. This lets everyone add more lime if they want. - For a festive touch, place the salad in a hollowed-out bell pepper or avocado half. Pair your salad with these foods for a great meal: - Serve alongside grilled chicken or shrimp for a full meal. - It goes well with tacos or burritos as a side dish. - Use it as a topping for nachos for a fun twist. - Enjoy it at a picnic or barbecue; it’s a great dish to share! {{image_4}} To make a spicy version, add more heat. You can mix in sliced jalapeños. This gives the salad a nice kick. You might also try using spicy chili powder instead of smoked chili powder. This small change can really amp up the flavor. Each bite will be exciting! You can easily make this salad vegetarian or vegan. For a vegan option, replace mayonnaise and sour cream with plant-based versions. Look for vegan mayo and dairy-free sour cream in stores. You can still enjoy the creamy texture without dairy. Just ensure the cheese you choose is vegan too. Feel free to mix in different ingredients to suit your taste. You can add black beans for protein and fiber. Diced bell peppers can add a nice crunch and color. Avocado is also a great choice. It adds creaminess and healthy fats. Don't be afraid to get creative! To keep your Mexican street corn salad fresh, store it in an airtight container. Use a glass or plastic container with a tight lid to prevent air from getting in. Place the salad in the fridge right after serving. This helps keep the flavors bright and the texture crisp. If you have extras, do not mix in the jalapeños until you are ready to serve. This keeps the salad from getting too spicy or soggy. This salad is best served cold. If you want to warm it up, do so gently. Place it in a microwave-safe dish. Heat it for about 15-20 seconds on low power. Stir it well to avoid hot spots. However, I recommend enjoying it cold for the best taste and texture. You can store this salad in the fridge for up to three days. After that, the corn may lose its crunch and the flavors might fade. If you start to see any signs of spoilage, like an off smell or discoloration, it's best to throw it out. Storing your salad properly helps you enjoy this delightful dish for days to come! You can make this salad a day in advance. Just follow the recipe and chill it. The flavors will blend well overnight. Store it in an airtight container in the fridge. Before serving, add extra cheese and cilantro for a fresh touch. Yes, you can skip the mayonnaise. Use plain yogurt or extra sour cream instead. This will keep the salad creamy. The taste changes a bit, but it stays delicious and fresh. Feta cheese is a great substitute for queso fresco. It has a similar texture and tangy flavor. You can also use goat cheese for a creamier taste. Just crumble it over the salad to get that nice finish. Absolutely! If you like it spicy, add extra smoked chili powder. You can also mix in diced jalapeños for more heat. Adjust the amount based on your taste. This will give your salad a nice kick. Store leftovers in an airtight container in the fridge. Keep it cool for up to three days. The salad may lose some crunch, but it still tastes great. Just give it a stir before serving. Yes, frozen corn works well in this recipe. Just thaw it and drain any excess water. You can skip the boiling step. It will still taste fresh once you mix it with the other ingredients. This salad pairs well with grilled meats or tacos. It also complements spicy dishes nicely. Serve it at barbecues or picnics for a fun twist. Your guests will love the bright flavors! This blog post covered how to make a delicious Mexican Street Corn Salad. We explored fresh ingredients, optional add-ins, and substitutions. I shared step-by-step cooking instructions and helpful tips for enhancing flavor and presentation. You learned variations to suit different diets and storage practices for longevity. In closing, this salad is simple and fun to make. It's perfect for any occasion. Enjoy experimenting with flavors and make this recipe your own!

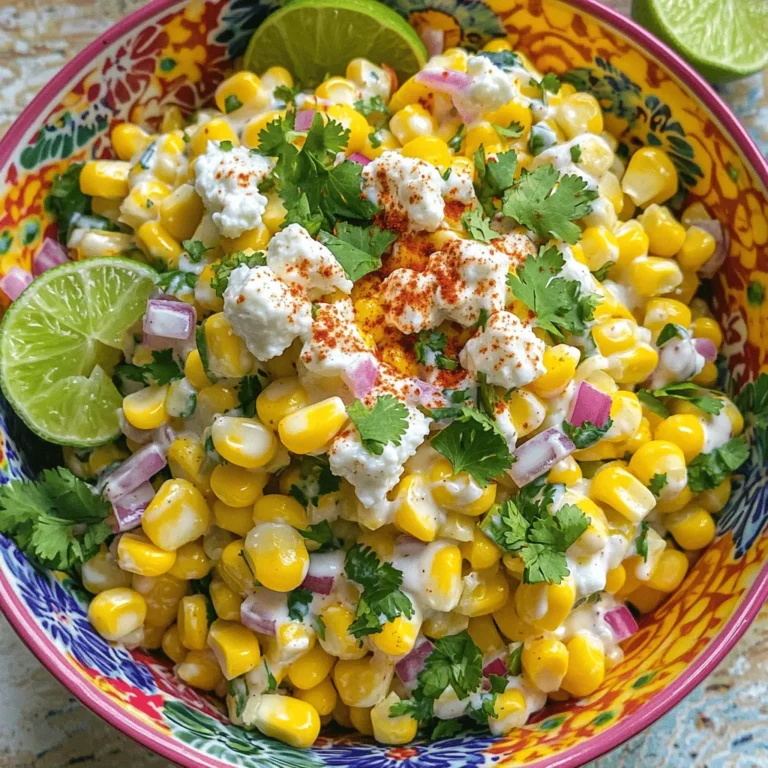
Mexican Street Corn Salad Flavorful and Fresh Delight

- 2 cups sweet corn kernels - 1 cup shredded mozzarella cheese - 1/2 cup all-purpose flour - 1/2 cup panko breadcrumbs - 1/4 cup finely chopped green onions - 1/4 cup freshly grated Parmesan cheese - 1 teaspoon garlic powder - 1 teaspoon smoked paprika - 1/2 teaspoon salt - 1/4 teaspoon freshly ground black pepper - 2 large eggs, beaten - Vegetable oil for frying Using fresh corn truly makes a difference. Fresh corn tastes sweet and bright. Frozen corn can work if fresh is not available. Just ensure it is fully thawed before using. Quality cheese also affects the flavor. I prefer a good mozzarella for stretch and creaminess. Freshly grated Parmesan adds a rich depth. Measuring corn kernels is simple. Use a measuring cup and fill it loosely. If you need to substitute cheese, try cheddar or gouda. Both melt well and add unique flavors. Always adjust the amount to your taste. To start, combine the sweet corn kernels, shredded mozzarella cheese, and chopped green onions in a large bowl. Add the grated Parmesan cheese, garlic powder, smoked paprika, salt, and black pepper. Mixing well is key. This ensures each bite is packed with flavor. After mixing the dry ingredients, pour in the beaten eggs. Stir again until everything is evenly coated. Next, gradually add the all-purpose flour, stirring as you go. This creates a sticky dough that holds together. Now, it’s time to shape the bites. Take small portions of the dough and roll them into balls. Aim for about 1 inch in diameter for that perfect size. Once shaped, roll each ball in panko breadcrumbs. This step gives them a crunchy exterior that everyone loves. Frying is where the magic happens! Heat vegetable oil in a deep frying pan over medium heat until it reaches about 350°F (175°C). It’s important not to overcrowd the pan. Lower the corn cheese bites into the hot oil in small batches. Fry them for about 3-4 minutes. Look for a golden brown color; that means they are crispy and ready. Use a slotted spoon to remove the bites and place them on a plate lined with paper towels. This helps absorb any extra oil, keeping them light and crispy. Repeat until all the bites are cooked. To make your corn cheese bites extra crispy, use panko breadcrumbs. They create a great crunch. You can also mix regular breadcrumbs with panko for a unique texture. When frying, heat your oil to 350°F (175°C). This temperature helps get the bites golden and crisp without soaking them in oil. Fry them in small batches. This keeps the oil temperature steady. Pair your crispy corn cheese bites with delicious dips. Spicy marinara or garlic aioli works well. These dips add flavor and excitement. For presentation, use a colorful platter. Arrange the bites neatly and add a side of dip. Top them with chopped green onions for a nice touch. Serve them right away to keep them crispy. If your bites turn out soggy, check the frying temperature. Oil that is too cool will absorb into the bites. If they are unevenly cooked, make sure to flip them halfway through frying. This ensures every side gets golden brown. Also, don't overcrowd the pan. This allows hot oil to circulate and cook evenly. {{image_4}} You can change up the flavors in your crispy corn cheese bites easily. Adding spices and herbs can make a big difference. Try adding a pinch of cayenne for heat. You can also mix in some fresh cilantro or parsley for a fresh taste. If you love bold flavors, consider adding chili powder or cumin. You can also incorporate other cheeses. While mozzarella gives great meltiness, try using cheddar for a sharper taste. Feta cheese can add a tangy twist. Mixing cheeses will create unique flavors in each bite. If you want gluten-free bites, you can swap all-purpose flour with gluten-free flour. You can also use gluten-free panko breadcrumbs for the crunch. This way, everyone can enjoy these tasty bites. For vegetarian options, you can leave out the eggs. Use a flaxseed meal mixture instead. Mix one tablespoon of flaxseed with three tablespoons of water. Let it sit for five minutes to thicken. This will help bind your mixture without using eggs. You can make crispy corn cheese bites in different ways. Baking is a healthier option. Preheat your oven to 400°F (200°C). Place the bites on a lined baking sheet and spray with cooking oil. Bake for about 20 minutes or until golden. If you prefer frying, make sure your oil is hot enough. Aim for 350°F (175°C) for perfect frying. If you want to use an air fryer, it’s easy too! Preheat the air fryer to 375°F (190°C). Arrange the bites in a single layer and spray with oil. Cook for about 10-12 minutes, flipping halfway through. This method gives you a nice crunch without much oil. To keep leftover crispy corn cheese bites fresh, store them in an airtight container. This helps maintain their texture and flavor. Place a paper towel in the container to absorb moisture. This prevents sogginess. These bites will stay good for about 2-3 days in the fridge. To reheat without losing crispiness, use an oven or an air fryer. Preheat your oven to 350°F (175°C). Place the bites on a baking sheet and heat for about 10-12 minutes. In an air fryer, set it to 350°F (175°C) and heat for 5-7 minutes. Both methods help keep the bites crispy. You can freeze both uncooked and cooked bites. For uncooked bites, place them on a baking sheet in a single layer. Freeze until firm, then transfer to a freezer bag. For cooked bites, allow them to cool completely. Then, store in an airtight container or freezer bag. Thaw uncooked bites in the fridge overnight before frying. For cooked bites, reheat directly from frozen, following the reheating techniques mentioned above. Crispy Corn Cheese Bites are small, fried snacks made from sweet corn and cheese. The bites have a golden, crunchy outside and a warm, cheesy inside. They are perfect for sharing at parties or gatherings. With the blend of mozzarella and Parmesan, they burst with flavor. Each bite offers a delightful crunch from the panko breadcrumbs. You can enjoy them with your favorite dipping sauce, like marinara or garlic aioli. Yes, you can prepare the mixture ahead of time. Mix the ingredients and form the balls. Place them on a tray and cover them. Store the tray in the fridge for up to 24 hours. When you are ready to fry, take them out and heat the oil. You can also freeze the uncooked bites. Just freeze them on a tray first, then transfer to a bag. Fry them straight from the freezer when you're ready. To adjust the spice level, you can add more or less smoked paprika. If you want heat, add some cayenne pepper or red pepper flakes. Mixing in jalapeño or diced green chilies can also spice things up. For milder bites, reduce the amount of paprika or skip it entirely. Taste the mixture before frying to ensure the flavor is just right. These crispy corn cheese bites are fun to make and eat. We covered key ingredients, fresh choices, and precise measurements. Next, we walked through preparation and frying methods to achieve that perfect crunch. I shared tips for serving and storage so you can enjoy them later. Try experimenting with flavors and different cooking methods. Enjoy making and sharing these bites at your next gathering!

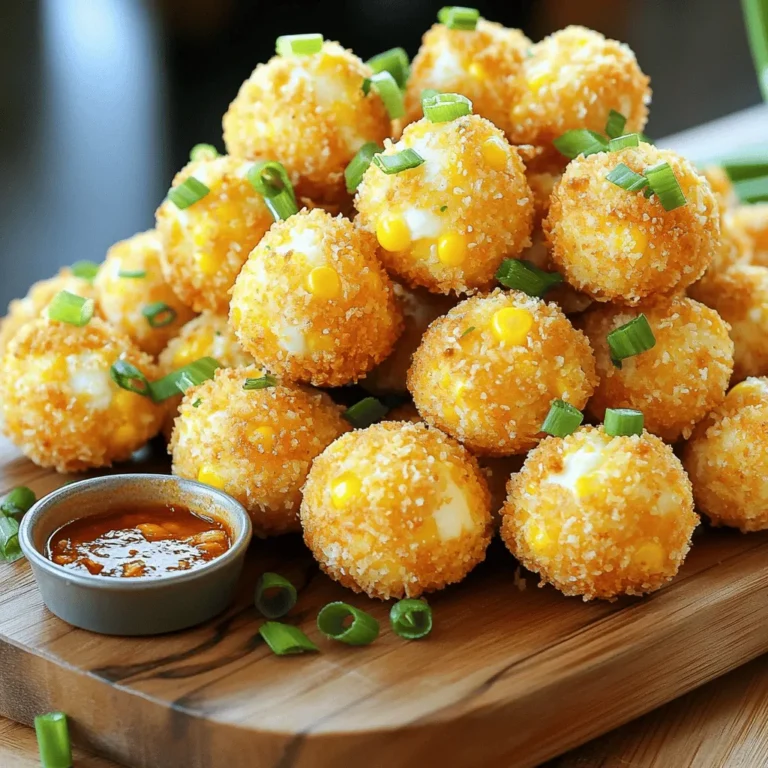
Crispy Corn Cheese Bites Perfect for Any Gathering

PREV 1 … 18 19 20 … 44 NEXT
yummybiterecipes

explore

DessertsDinnerAppetizersDrinks

Our Policies

  • Cookie Policy
  • Copyright Policy
  • Disclaimer
  • GDPR Policy
  • Terms Of Use
Back to Top
  • About
  • Contact Us
  • Privacy Policy
© 2025 yummybiterecipes