FREE DINNER EBOOK! Get your copy!
  • Cookie Policy
  • GDPR Policy
  • Disclaimer
  • Terms Of Use
  • Visit my other site: Fun Cookie Recipes
yummybiterecipes
  • Home
  • Dinner
  • Desserts
  • Drinks
  • Appetizers
  • Contact
  • About
  • Privacy Policy
  • Home
  • Dinner
  • Desserts
  • Drinks
  • Appetizers
  • Contact
  • About
  • Privacy Policy
  • Cookie Policy
  • GDPR Policy
  • Disclaimer
  • Terms Of Use
Visit my other site: Fun Cookie Recipes

HOME / CATEGORIES /

Latest

- 4 large flour tortillas - 1 cup cooked chicken breast, shredded - 1/2 cup black beans, rinsed and drained - 1/2 cup corn (canned or frozen) - 1 ripe avocado, sliced - 1/2 cup shredded cheese (cheddar or Mexican blend) - 1 cup fresh spinach leaves - 2 tablespoons salsa (mild or spicy, according to preference) - Salt and pepper to taste - 1 tablespoon sour cream (for serving) - Chopped cilantro (for garnish) - Jalapeños (for heat) - Diced tomatoes (for freshness) - Add lime juice for zest - Use garlic powder for depth - Sprinkle cumin or chili powder for warmth These ingredients make a tasty and fun wrap. You can mix and match based on what you have at home. Feel free to add your favorite toppings or veggies! 1. Start with a clean surface. Lay one flour tortilla flat on your cutting board. 2. Use a sharp knife to cut from the center to the edge. Make a ‘T’ shape, but don't cut all the way through. This cut helps with folding later. 3. In a bowl, mix shredded chicken, black beans, corn, sliced avocado, and cheese. 4. Add salt and pepper to taste. If you want a kick, drizzle salsa over the mix. Stir gently to combine. 1. Take the bottom section of the tortilla. Fold it up towards the middle. 2. Next, fold the left section of the ‘T’ over the top of the folded part. 3. Finally, fold the right section over the top too. This creates a neat wrap. 4. Repeat this for the rest of the tortillas and filling. Use all your ingredients. 1. Heat a non-stick skillet over medium heat. Make sure it’s hot. 2. Place your wraps seam side down in the skillet. Cook each wrap for 2-3 minutes. 3. Flip the wraps and cook the other side until golden brown and crispy. 4. Remove the wraps from the skillet. Let them cool for a minute. 5. Slice each wrap in half for serving. These wraps look great and taste even better! Enjoy your meal! To master the wrap, start with your cut. Make a 'T' shape in the tortilla. This cut gives you sections to fold. Place your filling in the three sections. Start with the bottom section first. Fold it up over the filling. Then, fold the left side over. Finally, fold the right side over. This technique keeps your filling snug and secure. For the best crispiness, use a non-stick skillet. Heat it to medium before adding your wraps. Place the wraps seam side down in the pan. This helps seal the edges while cooking. Cook for 2-3 minutes on each side. You want them golden brown and crispy. If you want extra crisp, press down gently with a spatula. Dipping sauces can enhance your wrap. Salsa is a classic choice. You can use mild or spicy salsa based on your taste. Sour cream is also great for creaminess. You might like guacamole for added flavor. For something different, try a ranch or yogurt dip. Pair your wraps with a fresh salad or chips for a complete meal. {{image_4}} You can make this wrap without meat. Use more beans and veggies. Try using: - 1 cup cooked quinoa - 1 cup sautéed mushrooms - 1 cup diced bell peppers - 1 ripe tomato, chopped - 1/2 cup shredded cheese These options keep it filling and fun! Add some hummus for creaminess. If you want to change the protein, go for it! You have many tasty choices: - Ground turkey or beef - Shredded pork - Tofu, pressed and seasoned - Grilled shrimp Each protein adds a unique flavor. You can spice it up based on your mood. Spices can change the whole wrap game. Here are some ideas: - Add cumin for warmth - Try chili powder for heat - Use garlic powder for depth - A pinch of smoked paprika adds richness Feel free to mix and match spices. This way, your wraps will always taste new! To store leftover wraps, let them cool completely. Place them in an airtight container. You can keep them in the fridge for up to three days. Make sure to separate layers with parchment paper to avoid sticking. When it’s time to eat leftovers, reheat them in a skillet. Heat on medium for about 2-3 minutes per side. This keeps the wrap crispy. You can also use a microwave for quick reheating. Just cover them with a damp paper towel to avoid dryness. To freeze your wraps, first, let them cool. Wrap each one tightly in plastic wrap. Then, place them in a freezer-safe bag. They can last up to three months in the freezer. When ready to eat, thaw in the fridge overnight before reheating. The TikTok Tortilla Wrap Hack is a fun way to make tasty wraps. You take a tortilla and cut it in a ‘T’ shape. This lets you fold the tortilla with layers of filling. You can stuff it with chicken, beans, cheese, and more. This hack helps you create a neat, easy-to-eat wrap that looks great and tastes amazing. Yes, you can use many types of tortillas. Flour tortillas are soft and flexible. Corn tortillas are a good option too, but they may crack. Whole wheat tortillas add a health twist. You can even try flavored tortillas, like spinach or sun-dried tomato, to add fun flavors. You can get creative with your wrap! Here are some ideas: - Protein: Use turkey, ham, or tofu instead of chicken. - Veggies: Add bell peppers, onions, or cucumbers for crunch. - Cheese: Try pepper jack, feta, or goat cheese for new flavors. - Sauces: Swap salsa for ranch, hummus, or guacamole. Mix and match these ideas to make your perfect wrap! This guide covered the essential ingredients and cooking steps for the TikTok tortilla wrap hack. You learned how to prepare, assemble, and cook to achieve perfect crunchiness. I shared tips for variations and suggested popular dips. Proper storage and reheating methods can keep leftovers tasty. Remember, creativity is key! Customize your wraps with your favorite flavors and proteins. Enjoy making these fun, tasty meals whenever you like!

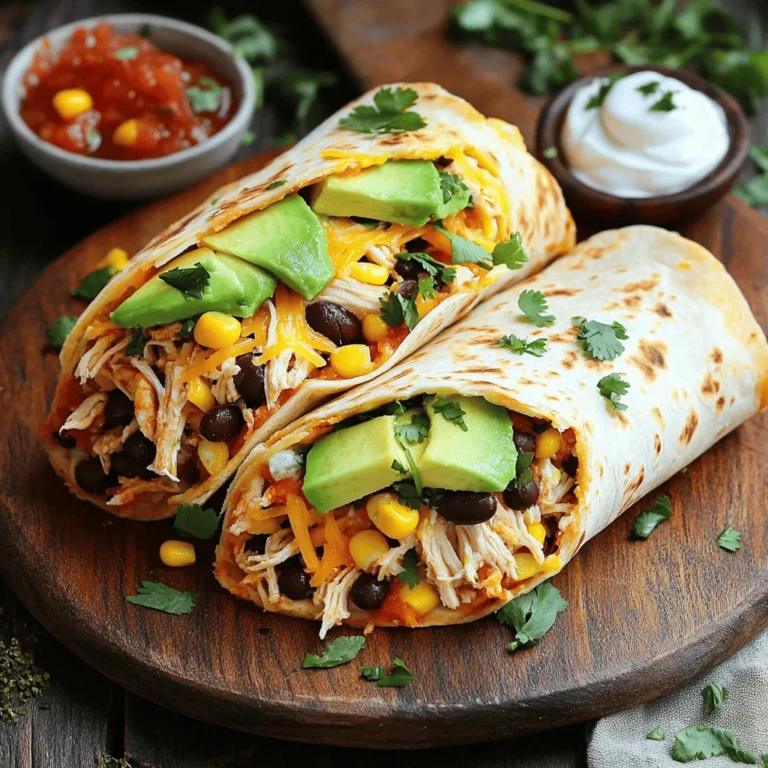
TikTok Tortilla Wrap Hack Easy and Fun Recipe

To make the Fluffy Pancake Casserole, gather these ingredients: - 2 cups all-purpose flour - 2 tablespoons granulated sugar - 1 tablespoon baking powder - 1 teaspoon baking soda - ½ teaspoon fine sea salt - 2 cups buttermilk (or regular milk with a splash of vinegar) - 2 large eggs, at room temperature - 4 tablespoons unsalted butter, melted and slightly cooled - 1 teaspoon pure vanilla extract - 1 cup blueberries (fresh or thawed frozen) - Maple syrup for serving You can swap ingredients if needed: - Flour: Use whole wheat flour for a nuttier flavor. - Sugar: Honey or maple syrup can replace granulated sugar. - Buttermilk: Regular milk with lemon juice works well. - Blueberries: Try raspberries or chopped strawberries instead. Fresh ingredients make a big difference in taste. Here’s how to pick them: - Blueberries: Choose firm, plump berries with a deep color. - Eggs: Look for eggs with clean, uncracked shells. - Butter: Use unsalted butter for better control over salt levels. - Milk: Check the expiration date for freshness. To start, gather all your ingredients. You will need flour, sugar, baking powder, baking soda, and salt. Next, grab buttermilk, eggs, melted butter, and vanilla extract. Don't forget the blueberries! Preheat your oven to 350°F (180°C) and grease your baking dish. 1. Mix Dry Ingredients (5 minutes): In a large bowl, whisk together the flour, sugar, baking powder, baking soda, and salt. Make sure everything blends well. 2. Mix Wet Ingredients (5 minutes): In another bowl, whisk the buttermilk, eggs, melted butter, and vanilla. Blend until it looks smooth. 3. Combine Ingredients (5 minutes): Pour the wet mixture into the bowl with dry ingredients. Stir gently with a spatula. The batter can be lumpy; that’s okay! 4. Add Blueberries (2 minutes): Carefully fold the blueberries into the batter. Be gentle so you don’t crush them. 5. Pour Batter (3 minutes): Transfer the batter to your greased baking dish. Use a spatula to spread it evenly. 1. Bake (25-30 minutes): Place your dish in the oven. Check for a golden top. Insert a toothpick in the center; it should come out clean. 2. Cool (10 minutes): Once baked, take the casserole out. Let it cool in the dish for about 10 minutes. This helps it set before you slice it. Now, your fluffy pancake casserole is ready to enjoy! To get the fluffiest pancake casserole, use room temperature eggs. Cold eggs can make the batter dense. Mix the wet and dry ingredients gently. A few lumps are okay; they help keep the casserole light. Avoid overmixing. If you mix too much, you lose that airy texture. One common mistake is using cold ingredients. Always use room temperature eggs and buttermilk. This helps the batter mix better. Another mistake is overbaking. Check your casserole a few minutes early. If it’s golden brown and a toothpick comes out clean, it’s done! Lastly, don’t skip greasing the baking dish. A non-stick surface keeps your casserole from sticking. Serve warm slices drizzled with maple syrup. Fresh blueberries on top add color and flavor. For extra sweetness, dust the top with powdered sugar. You can also pair it with crispy bacon or savory sausage. A side of yogurt or fresh fruit adds a nice touch, too! {{image_4}} You can switch up the fruit in your pancake casserole. Try using sliced strawberries, diced apples, or ripe bananas. Each fruit adds a unique taste. For a tropical twist, use pineapple or mango. These fruits work well with the fluffy texture. Just remember to adjust the cooking time if you add more moisture. If you need a gluten-free option, swap all-purpose flour for a gluten-free blend. Many brands offer great alternatives. For a dairy-free version, you can use almond milk or oat milk. Substitute butter with coconut oil or a plant-based butter. These changes keep your casserole tasty and light. Get creative with flavors! Add a teaspoon of cinnamon for warmth. A splash of almond extract can bring a nutty note. Try mixing in some chocolate chips for a sweet twist. You can even fold in nuts like walnuts or pecans for crunch. These combinations let you make a casserole that suits your taste perfectly. To keep your fluffy pancake casserole fresh, let it cool first. Once cool, slice it into squares. Place the slices in an airtight container. You can store it in the fridge for up to three days. If you want to keep it longer, freezing is a great option. To reheat your pancake casserole, take a slice out of the fridge. You can use a microwave or an oven. If using a microwave, warm it for 30-60 seconds. For the oven, preheat to 350°F (180°C) and bake for about 10 minutes. This way, it stays soft and warm. If you want to freeze the casserole, wrap each slice in plastic wrap tightly. Then, place the wrapped slices in a freezer bag. Make sure to label the bag with the date. You can freeze the casserole for up to three months. When you're ready to eat, thaw it overnight in the fridge before reheating. Yes, you can prepare the casserole ahead of time. Mix the batter and store it in the fridge overnight. This way, you save time in the morning. Just pour it into the baking dish and bake when ready. If you don't have buttermilk, use regular milk with a splash of vinegar. Mix 2 cups of milk with 1 tablespoon of vinegar. Let it sit for five minutes. This makes a great buttermilk substitute that works well in the recipe. The casserole is ready when the top is golden brown and a toothpick comes out clean. Insert the toothpick into the center. If it comes out with wet batter, bake for a few more minutes. Be patient; it will be worth the wait! This blog post shared how to create a fluffy pancake casserole. You learned about the key ingredients, helpful cooking steps, and tips for perfect texture. Remember to choose fresh ingredients for the best flavor. We also covered variations to suit your diet and ideas for storing leftovers. With these instructions, you can enjoy a delicious dish. Try experimenting with flavors and have fun in the kitchen. Enjoy your cooking adventure!

Fluffy Pancake Casserole Easy Family Breakfast Delight

- 2 cups cooked chicken, shredded - 1/2 cup buffalo sauce - 1 cup cream cheese, softened - 1 cup shredded cheddar cheese The main ingredients for Cheesy Buffalo Chicken Burritos are simple but packed with flavor. First, use cooked chicken. You can shred it yourself or buy it pre-cooked. Then, add buffalo sauce. This sauce gives the burritos their bold kick. Next, cream cheese adds a smooth texture. It helps bind everything together. Finally, shredded cheddar cheese brings a rich, cheesy flavor that ties it all up. - 1/2 cup crumbled blue cheese - Additional toppings like ranch dressing, shredded lettuce, diced tomatoes, and sliced green onions Optional add-ins give you room to play. Crumbled blue cheese adds a sharp taste that pairs well with buffalo sauce. You can also choose toppings. Ranch dressing cools the spice. Shredded lettuce adds crunch, while diced tomatoes bring freshness. Sliced green onions add a nice pop of color and flavor. - 4 large flour tortillas - Olive oil for grilling For the tortillas, go with large flour tortillas. They wrap around the filling nicely. To grill them, use olive oil. This oil helps achieve a golden-brown, crispy finish. Warming the tortillas briefly makes them easier to roll. It keeps your filling secure and creates a delightful bite. First, take a large mixing bowl. Add 2 cups of shredded chicken. Next, pour in 1/2 cup of buffalo sauce. Then, add 1 cup of softened cream cheese. Mix everything well until it is smooth and creamy. Make sure all the chicken gets coated. After that, gently fold in 1 cup of shredded cheddar cheese. If you like blue cheese, add 1/2 cup of crumbled blue cheese too. This step makes the filling rich and flavorful. Now, it’s time to prepare your tortillas. Warm 4 large flour tortillas for easier handling. You can microwave them for about 20-30 seconds. Alternatively, heat them on a dry skillet over low heat for a few seconds. This makes them soft and flexible. Once warm, take each tortilla and spread 1/4 of the chicken mixture horizontally in the center. Leave about an inch of space at each edge to help with rolling. Next, let’s roll those burritos! Start by drizzling a little ranch dressing over the chicken mixture. Then, add a handful of shredded lettuce, diced tomatoes, and sliced green onions on top. To wrap the burrito, fold the edges of the tortilla inward. After that, roll it tightly from the bottom up. Make sure the filling stays secure inside. This technique keeps all the tasty bits in place. Finally, it’s time to grill the burritos. Heat a medium skillet over medium heat. Add a drizzle of olive oil to the skillet. Place the burritos seam-side down in the skillet. Grill them for about 3-4 minutes on each side. You want them to turn golden brown and crispy. Once grilled, remove the burritos from the skillet. Let them cool for a minute before slicing each burrito in half for serving. Enjoy your delicious Cheesy Buffalo Chicken Burritos! To get the best shredded chicken, cook it in a few ways. You can boil it, bake it, or use a slow cooker. Boiling is fast and keeps the chicken moist. Baking adds flavor but takes longer. A slow cooker is great for busy days. For shredding, you can use two forks, your hands, or a stand mixer. Two forks work well for small amounts. Your hands can shred larger pieces easily. A stand mixer is best for big batches, just use the paddle attachment. Choosing the right buffalo sauce makes a big difference. I suggest Frank's RedHot or Crystal Hot Sauce. They have great flavor and heat. You can also add extra spices for more kick. Try garlic powder, onion powder, or even smoked paprika. These spices can really boost the taste. Serve your burritos on a big platter to impress guests. Add a small bowl of ranch dressing for dipping. For garnish, use fresh cilantro or extra green onions. They add color and freshness to your dish. You can also add a side of crunchy veggies for a fun touch. {{image_4}} You can make your burritos spicy or mild. Just adjust the amount of buffalo sauce. For more heat, add extra sauce. If you prefer a milder flavor, use less. You can also use different sauces, like BBQ, for a twist. For those who want a vegetarian option, try using jackfruit instead of chicken. Shred the jackfruit and mix it with buffalo sauce. You get a great texture and flavor without meat. Cheese is key to making these burritos tasty. You can swap cheddar for pepper jack or Monterey Jack. Pepper jack adds a nice kick, while Monterey Jack is creamy and mild. If you need a dairy-free option, look for dairy-free cheese. Many brands offer tasty alternatives. Just make sure they melt well, so your burritos stay creamy. Want a low-carb option? Use lettuce wraps instead of tortillas. They are fresh and crunchy. Just fill the leaves like you would a tortilla for a lighter meal. You can also experiment with different types of tortillas. Try whole wheat, spinach, or even corn tortillas. Each adds its own flavor and texture to your burritos. To keep your Cheesy Buffalo Chicken Burritos fresh, store them in the fridge. Use an airtight container to prevent drying. This helps keep them tasty for up to three days. When ready to eat, reheat them in the microwave. Heat for about one to two minutes. If you want a crispy finish, use a skillet. Just heat it on medium and grill for a few minutes on each side. You can freeze burritos before or after grilling. If you freeze them before grilling, wrap each burrito tightly in plastic wrap. Then, place them in a freezer-safe bag. They will last up to three months. If you freeze them after grilling, let them cool first. Then, wrap and bag as before. When it's time to eat, thaw the burritos in the fridge overnight. For quick reheating, use the microwave. Heat for two to three minutes or until hot. If you want that crispy crust, warm them in a skillet. Grill for about four to five minutes on each side. Enjoy your tasty burritos! Yes, you can use rotisserie chicken. It saves time and adds great flavor. Shred the chicken into bite-sized pieces before mixing it with the buffalo sauce and cream cheese. This makes the process quick and easy. Plus, using rotisserie chicken gives you that rich, roasted taste. You can serve these burritos with a variety of sides. Here are a few ideas: - Crispy tortilla chips with salsa - A fresh green salad - Celery sticks and carrot sticks with ranch dressing - Extra ranch or blue cheese dressing for dipping These sides balance the spicy flavor of the burritos. To add more heat, try these options: - Use a hotter buffalo sauce. - Mix in diced jalapeños or crushed red pepper flakes. - Add a few drops of hot sauce to the chicken mixture. These tweaks will kick up the spice level. Adjust the heat to fit your taste. Yes, you can prepare the burritos ahead. Assemble them, then wrap each one in plastic wrap. Store them in the fridge for up to 24 hours. When ready to eat, grill them straight from the fridge. They will still taste fresh and delicious. This is a great way to save time on busy days. You can create delicious Cheesy Buffalo Chicken Burritos by following these easy steps. Start with cooked chicken, buffalo sauce, and cream cheese. Add optional ingredients like blue cheese for extra flavor. Roll your tortillas, grill them to a perfect crisp, and enjoy! Remember, you can customize these burritos with spice levels, cheese choices, and different wraps. Store leftovers well or freeze them for later. Happy cooking!

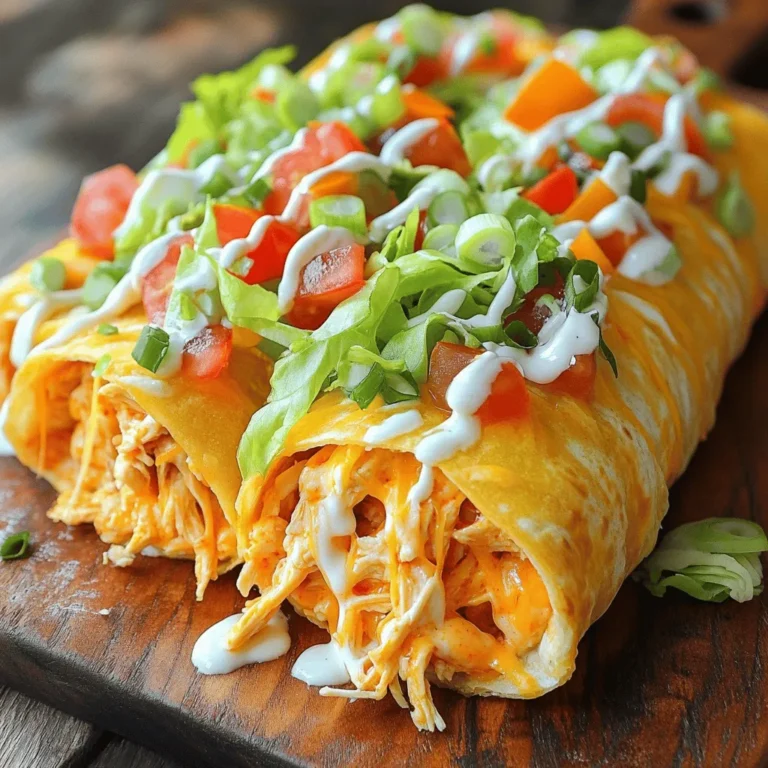
Cheesy Buffalo Chicken Burritos Easy and Flavorful Meal

- 1 lb Brussels sprouts - 4 cloves garlic - 1/3 cup Parmesan cheese - 3 tablespoons extra virgin olive oil - 1 teaspoon kosher salt - 1/2 teaspoon black pepper - 1/4 teaspoon red pepper flakes (optional) - Fresh parsley (for garnish) Garlic Parmesan Roasted Brussels Sprouts need fresh, bright ingredients. Start with 1 lb of Brussels sprouts. Trim and halve them for even cooking. Next, use 4 cloves of garlic, minced finely. Garlic gives a bold flavor that makes this dish shine. You will also need 1/3 cup of finely grated Parmesan cheese. This cheese adds a rich taste and a crispy texture. Don't forget 3 tablespoons of extra virgin olive oil. This oil helps the sprouts roast nicely and adds healthy fats. For seasoning, gather 1 teaspoon of kosher salt and 1/2 teaspoon of black pepper. These enhance the natural flavors. If you like spice, add 1/4 teaspoon of red pepper flakes. This is optional but gives a nice kick. Finally, fresh parsley is perfect for garnish. It adds color and freshness to your dish. With these ingredients, you're ready to make a delicious side that everyone will love. {{ingredient_image_2}} Start by trimming the ends of the Brussels sprouts. Cut them in half to help them cook evenly. Next, take the garlic cloves and mince them finely. This will add great flavor to your dish. In a large bowl, combine the halved Brussels sprouts with the minced garlic. Add the olive oil, kosher salt, black pepper, and red pepper flakes if you want some heat. Toss everything together until each sprout is well-coated with the oil and spices. Preheat your oven to 400°F (200°C). Line a baking sheet with parchment paper. Spread the Brussels sprouts evenly in a single layer on the sheet. Roast them for about 20-25 minutes. Halfway through, take them out and toss again to make sure they roast evenly. In the last five minutes of roasting, sprinkle the grated Parmesan cheese over the sprouts. This will melt and turn a lovely golden color. Once done, remove them from the oven and add fresh parsley for a bright finish. Enjoy the crunchy, cheesy goodness! To get the best results, space the Brussels sprouts well. A little room helps them roast evenly. When you roast them, they need air to become crisp. If they touch, they might steam instead. This can lead to a soft texture. Toss the sprouts halfway through cooking. This step helps them brown evenly. It allows each side to get that nice golden color. Just take them out, give them a gentle stir, and put them back in. Timing is key for adding Parmesan cheese. Sprinkle it on during the last five minutes of roasting. This allows the cheese to melt and get crispy. You want that perfect cheesy layer on top. You can swap the Parmesan for other cheeses, too. Try Pecorino Romano for a sharper taste. If you prefer a milder option, use Grana Padano. Each change gives a new twist to the dish. Don’t hesitate to add more flavor! You can mix in spices like garlic powder or smoked paprika. These will make the sprouts even tastier. If you need to make changes for diet needs, consider other options. Use olive oil instead of butter for a vegan choice. You can also skip cheese and add nutritional yeast for a cheesy flavor without dairy. These swaps help everyone enjoy this dish! Pro Tips Choose Fresh Brussels Sprouts: Look for firm, bright green Brussels sprouts with tightly packed leaves for the best flavor and texture. Don't Skip the Toss: Tossing the Brussels sprouts halfway through roasting ensures even cooking and helps achieve that perfect crispness. Experiment with Cheese: Try adding different cheeses like Pecorino Romano or a sprinkle of feta for a unique twist on the classic Parmesan flavor. Serving Suggestions: These roasted Brussels sprouts pair wonderfully with grilled meats or as a topping for grain bowls, adding both flavor and nutrition. {{image_4}} If you can't find Brussels sprouts, try these options: - Broccoli florets - Cauliflower florets - Green beans - Asparagus For vegan cheese, consider using: - Nutritional yeast - Vegan Parmesan - Cashew cheese - Almond cheese To brighten the dish, add citrus flavors. Squeeze some lemon or lime juice over the sprouts before serving. This adds a fresh zing. You can also mix in different herbs and spices. Try: - Thyme for earthiness - Rosemary for a strong flavor - Paprika for a smoky touch For special occasions, serve Brussels sprouts in a large bowl. Drizzle extra olive oil on top for a lovely finish. Garnish with fresh parsley for color. These sprouts pair well with main dishes like: - Grilled chicken - Roast beef - Quinoa salad Feel free to experiment and find your favorite way to enjoy this dish! After you cook your Brussels sprouts, let them cool. Place them in a container. Seal it tightly. Store the container in your fridge. They stay fresh for up to three days. To keep them tasty, avoid stacking them too high. This way, they won’t get soggy. To reheat your Brussels sprouts, use the oven. Preheat it to 350°F (175°C). Spread the sprouts on a baking sheet. Bake them for about 10 minutes. This helps keep their crunch. You can also use a skillet. Heat a little oil over medium heat and toss the sprouts. This gives them a nice, crisp finish. You can freeze cooked Brussels sprouts. First, let them cool completely. Place them in a freezer bag, removing as much air as possible. They can stay frozen for up to three months. If you want to freeze raw sprouts, wash and trim them first. Blanch them in boiling water for three minutes, then cool in ice water. After that, freeze them in a bag. When you are ready to use them, thaw overnight in the fridge. Reheat as you like. Brussels sprouts take about 20 to 25 minutes to roast at 400°F (200°C). It's key to check them halfway through cooking. Toss the sprouts to help them roast evenly. This promotes a nice golden-brown color and a crisp texture. Yes, you can prep the Brussels sprouts ahead. Trim and halve them, then store in the fridge for a day. Keep the garlic, oil, and seasonings separate. On cooking day, mix everything and roast. This saves time and keeps them fresh. These Brussels sprouts pair well with many dishes. Try them with roasted chicken or grilled salmon. They also work great alongside quinoa or rice dishes. For a complete meal, serve them with a simple salad to balance the flavors. This blog post outlined a simple recipe for Garlic Parmesan Roasted Brussels Sprouts, starting with essential ingredients and clear preparation steps. You learned how to roast Brussels sprouts perfectly and explore flavor variations. Remember to use fresh herbs or different cheeses to enhance taste. With these tips, you can create a delicious dish easily. Enjoy serving it with your favorite meals or at special events. Happy cooking!

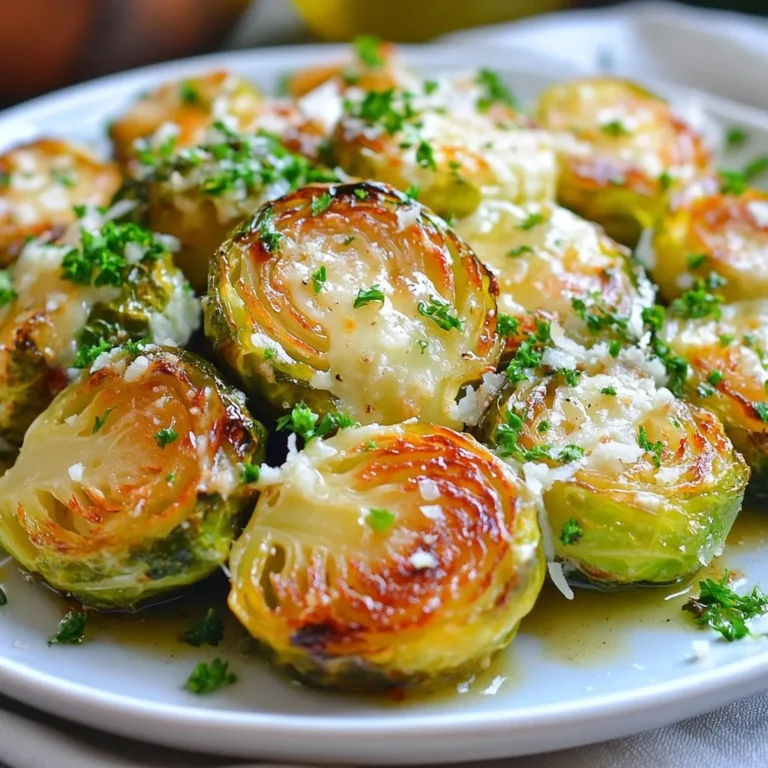
Garlic Parmesan Roasted Brussels Sprouts Delight

- 1 cup coconut water - 1/2 cup cranberry juice - 1/2 cup sparkling water - 1 tablespoon freshly squeezed lime juice - 1 tablespoon agave syrup (optional) - 1/4 teaspoon peppermint extract The main ingredients give the Winter Wonderland Mocktail its bright and refreshing taste. Coconut water adds a light and tropical flavor. Cranberry juice provides a sweet and tart punch. Sparkling water adds fizz and fun. Fresh lime juice brightens the drink and balances the sweetness. Agave syrup can sweeten it more, but it is not a must. Peppermint extract gives this mocktail its festive, minty scent. - Fresh mint leaves - Edible glitter - Lime slices Garnishes make the drink look special. Fresh mint leaves add a pop of green and a lovely aroma. Edible glitter adds a magical touch that sparkles in your glass. Lime slices on the rim not only look pretty but also add more lime flavor. These garnishes make your drink feel like a true winter wonderland treat! {{ingredient_image_2}} 1. Start with a large pitcher. 2. Pour in 1 cup of coconut water. 3. Next, add 1/2 cup of cranberry juice. 4. Squeeze in 1 tablespoon of fresh lime juice. 5. If you like it sweeter, add 1 tablespoon of agave syrup. 6. Stir well until all the drinks mix together. 1. Carefully add 1/4 teaspoon of peppermint extract to the pitcher. 2. Stir the mixture again. 3. Taste it. If it needs more mint, add a bit more peppermint. 1. Take your glasses and fill them with ice cubes. 2. Pour the mocktail mixture over the ice until each glass is two-thirds full. 3. Slowly add sparkling water to each glass for a nice fizz. 4. Use a straw or spoon to gently stir the drink. 5. If you want a special touch, add a pinch of edible glitter. 6. Finish by garnishing with fresh mint leaves and a slice of lime. To make the best Winter Wonderland Mocktail, keep a few tips in mind. First, when you mix your drinks, use a gentle stirring motion. This helps keep the fizz alive. If you stir too hard, the bubbles can disappear. Second, balance the flavors well. You want the sweetness from the agave syrup and the tartness from the cranberry juice to blend perfectly. Start with a little syrup. You can always add more if needed. To make your mocktail look magical, consider using edible glitter. Just a pinch adds sparkle and fun to each glass. When you add the glitter, do it right before serving. This keeps it floating nicely. For garnishes, fresh mint leaves add a pop of green. Lime slices on the rim look bright and fresh. You can even add a few cranberries for extra color. Choosing the right glass makes a difference. Use clear glasses to show off the drink's colors. Tall glasses work well for this mocktail. Fill each glass with ice before pouring in your mix. This keeps the drink cold. For snacks, pair your mocktail with winter treats like cheese platters or spiced nuts. They balance the drink's sweetness and add a festive touch. Pro Tips Adjust the Sweetness: Feel free to modify the amount of agave syrup to match your preference for sweetness. Start with a small amount and add more if desired. Chill the Ingredients: For an extra refreshing mocktail, chill the coconut water and cranberry juice beforehand, or use frozen fruits instead of ice cubes to keep the drink cold without diluting it. Experiment with Flavors: Don't hesitate to add your favorite flavors! Try substituting the peppermint extract with other extracts like vanilla or almond for a unique twist. Garnish Creatively: Enhance the visual appeal by using various garnishes such as pomegranate seeds or edible flowers alongside mint and lime slices for a festive presentation. {{image_4}} You can switch coconut water for other bases. Try using sparkling apple cider for a sweet twist. Or opt for lemonade for a citrusy taste. Each choice brings a new vibe to the mocktail. You can also use different fruit juices. Orange juice adds brightness, while pomegranate juice gives a rich color. Mix and match your favorites to create a unique drink. Add seasonal spices for a cozy feel. A sprinkle of cinnamon or nutmeg can warm up the drink. You can also try a dash of ginger for a spicy kick. Creating layered mocktails is a fun way to impress guests. Pour juices slowly over a spoon to keep them separate. This gives a beautiful, colorful effect in the glass. Incorporating flavored syrups can enhance your mocktail. Try vanilla or hazelnut syrup for extra sweetness. You can also use mint syrup to boost the peppermint flavor. Combining with herbal teas adds depth to the drink. Brew some chamomile or peppermint tea and chill it. Mix it into your mocktail for a soothing touch. To store leftover mocktail mixture, pour it into a clean container. Use a jar with a lid or a pitcher. This keeps the drink fresh and safe. If you have fresh ingredients left, like mint and lime slices, store them separately. Place mint in a glass of water in the fridge. Wrap lime slices in plastic wrap. This helps them stay fresh longer. The shelf life of the mocktail ingredients varies. Coconut water and cranberry juice last about 5 to 7 days in the fridge once opened. Keep the mixture sealed tightly to maintain flavor. If you want to extend freshness, store it in smaller containers. This reduces air exposure and slows spoilage. To refresh leftovers, give the mocktail a good stir before serving. You may need to add some ice if it has warmed up. If it tastes flat, pour in a splash of sparkling water to restore fizz. For a nice touch, add fresh mint leaves and lime slices again when serving. This keeps the drink looking lively and inviting. Yes, you can make the Winter Wonderland Mocktail ahead of time. Mix the coconut water, cranberry juice, lime juice, and agave syrup in a pitcher. Store it in the fridge. Add the peppermint extract and sparkling water just before serving. This keeps the drink fresh and fizzy. If you don't have peppermint extract, try using mint leaves. Muddle fresh mint leaves in the pitcher for a great flavor. You may also consider using mint syrup for sweetness and flavor. Just adjust to taste. Absolutely! The Winter Wonderland Mocktail is kid-friendly. It has no alcohol and uses fun ingredients. Kids love the bright colors and sparkling bubbles. It is a great choice for holiday gatherings with family. To reduce the sweetness, skip the agave syrup. You can also add more lime juice for a tangy kick. Adjust the cranberry juice to balance the flavors. Taste as you mix to get it just right. While this mocktail is refreshing cold, you can serve it warm. Heat the coconut water and cranberry juice gently. Add lime juice and mint for flavor. Skip the sparkling water and serve it in warm mugs. It’s a cozy twist for chilly nights! This mocktail blends coconut water, cranberry juice, and lime for a refreshing drink. You can adjust the sweetness and add flavors like peppermint. Garnish with mint and edible glitter for flair. Overall, serve this easy drink for any gathering. Show off your skills and impress your guests with creativity. Try variations and enjoy the vibrant taste. Remember, never hesitate to make it your own!

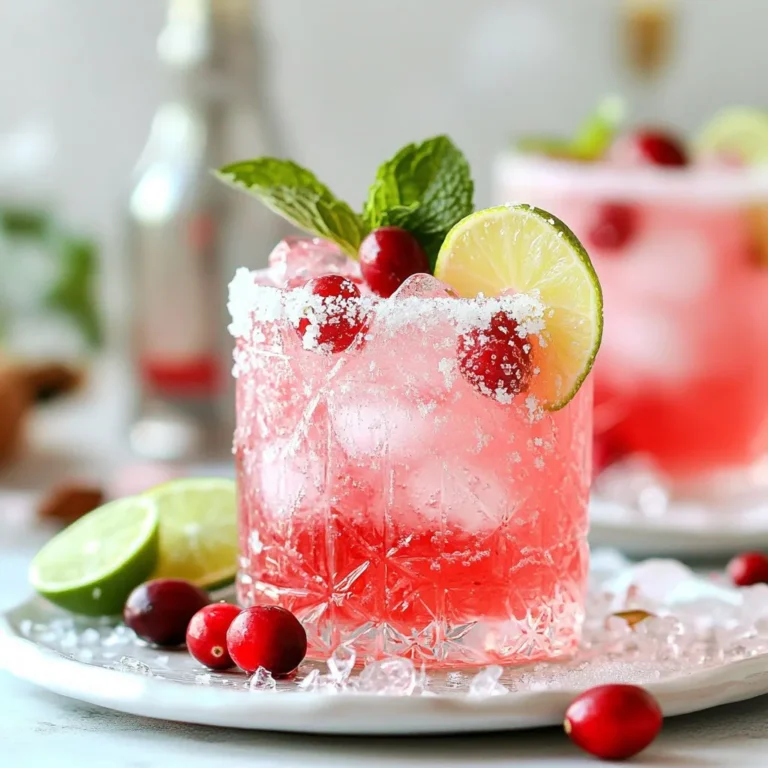
Winter Wonderland Mocktail Refreshing Holiday Drink

- 1 cup cooked quinoa - 2 large eggs - 1/2 cup black beans, rinsed and drained - 1 small avocado, diced - 1/2 cup cherry tomatoes, halved - 1/4 cup Greek yogurt - 2 tablespoons chopped fresh cilantro - 1 tablespoon fresh lime juice - Salt and freshly ground black pepper to taste - Chili flakes (optional) The ingredients in these breakfast bowls offer a great mix of protein and flavor. Quinoa serves as a solid base. It’s packed with protein and gives you energy. Eggs add more protein and healthy fats. Black beans bring fiber and texture. Avocado adds creaminess and healthy fats. Cherry tomatoes provide sweetness and color. Greek yogurt gives a lovely tang and creaminess. This breakfast bowl is not just tasty; it’s also nutritious. Each serving has about 20 grams of protein. It includes healthy fats from avocado and yogurt. Plus, you get fiber from beans and quinoa. This meal keeps you full and satisfied. - Small pot for boiling eggs - Large mixing bowl for combining ingredients - Spoon for scooping and mixing - Knife for chopping vegetables - Cutting board for safety These tools make cooking easier. A pot helps you boil the eggs perfectly. A mixing bowl allows you to combine all ingredients well. A knife and cutting board help you chop safely and effectively. With these tools, you'll have a smooth cooking experience! To cook the eggs, start by boiling water in a small pot. Once it reaches a rolling boil, gently lower the eggs in with a spoon. Let them cook for 6-7 minutes for that perfect soft-boiled egg. This way, the yolk stays runny and rich. After cooking, move the eggs to a bowl of cold water. This stops the cooking and makes peeling easier. Once cool, peel and slice the eggs in half. If you don’t have cooked quinoa, follow the package instructions. This usually takes around 15 minutes. Rinse the quinoa before cooking for the best taste. After cooking, fluff it with a fork. In a large mixing bowl, combine the fluffy quinoa with black beans, diced avocado, and halved cherry tomatoes. Add lime juice for zest and season with salt and pepper. Be gentle when mixing to keep the avocado intact. Now comes the fun part—assembling your bowls! Start by spooning the quinoa mixture into two serving bowls. This will be your base. Carefully place the sliced eggs on top. Add a dollop of Greek yogurt in the middle for creaminess. Finish with a sprinkle of chopped cilantro for freshness. If you like it spicy, add chili flakes for a kick. Serve right away for a delightful and nutritious breakfast! To make the best quinoa, rinse it first. This removes any bitter taste. Cook it in water at a 1:2 ratio. Bring it to a boil, then lower the heat. Cover it and let it simmer for about 15 minutes. Fluff it with a fork when done. For a perfectly ripe avocado, look for one that feels slightly soft but not mushy. If it’s hard, let it sit at room temperature for a few days. You can speed up ripening by placing it in a brown paper bag with a banana. You can swap quinoa for brown rice or farro for a different taste. If you need a vegan option, replace eggs with tofu or chickpeas. Add nuts or seeds for extra crunch. Try tempeh or chicken for even more protein. To boost protein, consider adding cheese or cottage cheese. You can also add nuts like almonds or walnuts. Each option can enhance the flavor and keep you full longer. Arrange your ingredients in colorful layers. Start with quinoa, then add beans, avocado, and tomatoes. Place the eggs right on top for a nice look. Use a spoon for the yogurt to make it stand out. Using bright colors makes the bowl more appealing. For example, red tomatoes and green avocado create a nice contrast. Garnish with cilantro for a pop of freshness. A sprinkle of chili flakes adds color and zest! {{image_4}} For a vegetarian twist, swap the eggs for other protein sources. Great options include: - Chickpeas: Rinse and use them for a hearty base. - Tofu: Sauté it for added flavor and texture. - Hemp seeds: Sprinkle them for a nutty crunch. You can also boost the veggie content. Try adding: - Spinach: Toss in fresh or sautéed for extra greens. - Bell peppers: They add color and sweetness. - Zucchini: Grate or dice it for a fresh bite. To make this bowl vegan, replace the eggs and Greek yogurt. Here’s how: - Scrambled tofu: This gives a similar texture to eggs. - Vegan yogurt: Use coconut or almond-based options for creaminess. For toppings, consider: - Nuts or seeds: They provide healthy fats and protein. - Avocado: Always a great choice! - Salsa: Add some spice and flavor. Spice things up by adding flavors from around the world. Some ideas include: - Cumin or coriander: They add warmth and depth. - Sriracha or harissa: For a spicy kick. - Soy sauce: A splash can give an Asian twist. You can take inspiration from cultures too. Try: - Mexican: Top with pico de gallo and cilantro. - Mediterranean: Add olives and feta cheese. - Indian: Mix in curry powder and fresh herbs. To keep your breakfast bowls fresh, store them in airtight containers. This helps keep out air and moisture. It’s best to refrigerate them right after serving. Leftovers can last in the fridge for up to three days. Make sure to check for any signs of spoilage before eating. When it’s time to enjoy your leftovers, I suggest reheating in the microwave. Place the bowl in the microwave and heat for about one to two minutes. Stir halfway through to heat evenly. Avoid overcooking; you want to keep the texture and flavor intact. If you prefer, you can also reheat in a small pan on low heat. Preparing these bowls in advance saves time on busy mornings. Cook the quinoa and eggs ahead of time. Store each ingredient separately in the fridge. This way, you can mix and match as you like. Portion out servings into containers for easy grab-and-go meals. It makes breakfast simple and tasty! Yes, you can make these bowls ahead. Cook the quinoa and beans the night before. Store them in the fridge. You can also boil the eggs ahead. Just keep them in cold water until you're ready to eat. When serving, simply reheat the quinoa and beans. Add fresh toppings like avocado and yogurt right before enjoying. If you want options besides eggs, consider using tofu or tempeh. Both are rich in protein. You can also add cottage cheese or chickpeas for protein boosts. Another option is to sprinkle nuts or seeds on top. They add crunch and healthy fats. To serve four, double the ingredients. Use 2 cups of quinoa and 4 eggs. Add 1 cup of black beans, and double the avocado and tomatoes. This makes enough for everyone. You can also mix the ingredients in a large bowl and serve it family-style. Yes, you can lower the carbs by swapping quinoa for cauliflower rice. This keeps the bowl light. You could also reduce the number of beans. Focus more on the eggs and avocado. Adding leafy greens like spinach can also enhance nutrition while keeping carbs low. These breakfast bowls combine health and taste with simple ingredients. We explored each step, from cooking eggs to layering your bowl. I shared tips for perfecting each element and suggested fun variations. Incorporating these bowls into your routine can make mornings enjoyable and healthy. Try customizing your dish with unique flavors that suit your taste. Enjoy nourishing meals that boost your day!

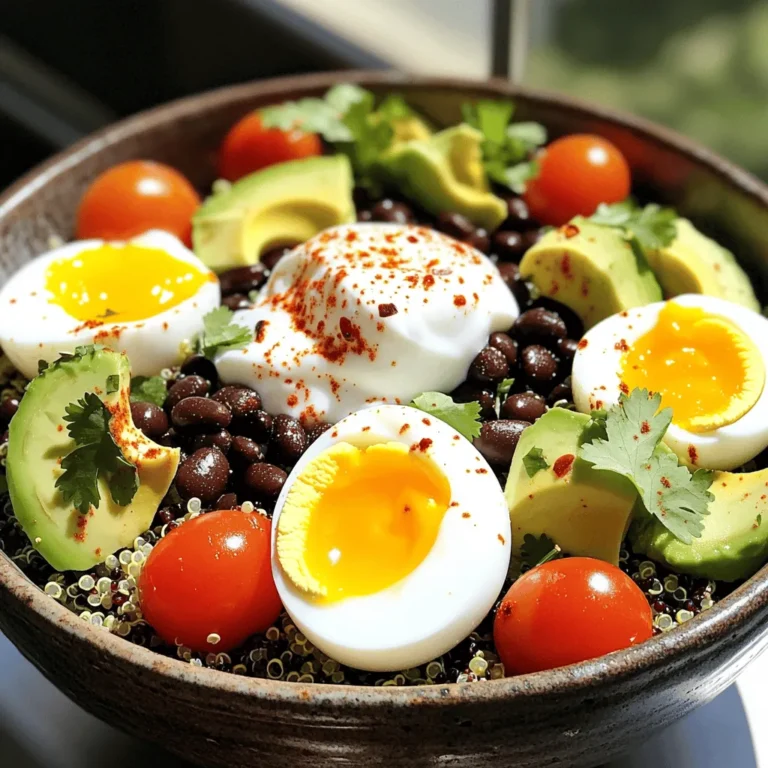
Easy High-Protein Breakfast Bowls Quick and Delicious Meal

- 4 large yellow onions, thinly sliced - 4 cloves garlic, minced - 4 cups low-sodium beef broth - 1 cup vegetable broth French onion soup shines with its simple yet rich flavor. The star of this dish is the yellow onion. When cooked slowly, it becomes sweet and deeply flavorful. You will need four large yellow onions. Slice them thinly to help them cook evenly. Garlic adds a nice punch. Four cloves, minced, will do the trick. Next, the broth. Four cups of low-sodium beef broth create a savory base. If you prefer a lighter taste, add one cup of vegetable broth. This mix gives depth without overpowering the sweet onions. - 2 cups shredded Gruyère cheese - 1 cup shredded mozzarella cheese Cheese is key to a great French onion soup. Gruyère cheese is the classic choice. Its nutty flavor melts beautifully over the soup. You need two cups of shredded Gruyère. To add a stretchy texture, use one cup of mozzarella cheese. This combination makes each bite rich and creamy. - 1 tablespoon olive oil - 1 tablespoon unsalted butter - 2 teaspoons dried thyme - 1 teaspoon granulated sugar - Salt and freshly ground black pepper to taste The right seasonings enhance the soup's flavor. Start with one tablespoon of olive oil and one tablespoon of unsalted butter. This blend helps caramelize the onions. Add two teaspoons of dried thyme for a herby note. A teaspoon of granulated sugar helps caramelize the onions further, balancing their flavor. Lastly, season with salt and freshly ground black pepper to taste. Adjust these to your liking. A pinch here or there can make all the difference! First, I heat a large skillet over medium heat. I add one tablespoon of olive oil and one tablespoon of unsalted butter. Once the butter melts, I toss in four large yellow onions that I have thinly sliced. I cook these onions for about ten minutes, stirring now and then. I want them to soften up a bit. Next, I add four minced garlic cloves and one teaspoon of granulated sugar to the skillet. The sugar helps the onions caramelize nicely. I keep cooking them for about 15 to 20 minutes. I stir often, watching for that beautiful golden brown color. This step brings out their sweet flavor, making the soup rich and tasty. Once my onions are caramelized, I transfer them to the crockpot. Then, I pour in four cups of low-sodium beef broth and one cup of vegetable broth. I sprinkle in two teaspoons of dried thyme, adding even more flavor. Next, I season the mix with salt and freshly ground black pepper to taste. I gently stir everything together until it is well combined. Now, I cover the crockpot with its lid. I set it to cook on low heat for six to eight hours. If I am in a hurry, I can set it on high for three to four hours instead. Slow cooking is key here; it allows all those flavors to blend and deepen. After the cooking time is up, I taste the soup to check the seasoning. If it needs more salt or pepper, I add a little more to fit my taste. This simple step ensures that my French onion soup is just right before serving. To get that rich, sweet flavor, timing is key. Start cooking the onions on medium heat. Stir them often to help them cook evenly. This will take about 25 to 30 minutes. If you see them starting to burn, lower the heat. You want them golden brown, not black. Want to boost the taste? Try adding herbs like rosemary or bay leaves. These can add depth to your soup. You can also mix broth types. Using chicken broth with beef broth can give a nice twist. Feel free to adjust the salt and pepper to fit your taste. The best bread for this soup is a French baguette. Slice it into thick pieces. After broiling, the bread becomes crunchy and perfect for soaking up the soup. For garnish, use fresh thyme sprigs. They add a pop of color and flavor. Serve in oven-safe bowls for a fun touch. {{image_4}} To make this soup vegetarian, swap the beef broth for vegetable broth. This simple change keeps the flavor rich and hearty. For the cheese, you can use a blend of mozzarella and a creamy cheese like fontina. Both options melt well and add a nice touch. While Gruyère is a classic choice, you can experiment with other cheeses. Try using sharp cheddar for a bolder taste. Provolone adds a nice stretch, and even goat cheese can bring a tangy flair. Just remember to choose cheeses that melt well. You can boost this soup's flavor by adding proteins or vegetables. Shredded chicken or cooked lentils work great for extra protein. If you want to add veggies, consider mushrooms or spinach. Both add nutrients and depth. Just mix them in with the onions while they cook for an even more flavorful dish. How long does it last? You can keep your Crockpot French onion soup in the fridge for about 3 to 4 days. Make sure it cools down first. This will help keep it fresh. Proper container recommendations? Use an airtight container. Glass or plastic works well. This keeps out air and helps avoid any bad smells. Best practices for freezing soup? If you want to freeze your soup, let it cool completely. Pour it into freezer-safe bags or containers. Leave some space at the top. This allows for expansion when it freezes. Thawing and reheating tips? When you want to eat it, take the soup out of the freezer. Move it to the fridge for a day to thaw. You can also thaw it in a bowl of cold water. For reheating, use a pot on low heat. Stir often to avoid burning. Creative ways to use leftover soup? You can turn your soup into a tasty risotto or pasta sauce. Just add some cooked rice or pasta to it. Top it with more cheese and broil until bubbly. You can also use it as a base for a savory stew. Just add vegetables or meat for a new meal! Yes, you can use other onions. Sweet onions, like Vidalia, work well. Red onions add a slight tang. Each type of onion gives a unique taste. Try using shallots for a milder flavor. Remember, the key is to caramelize them properly. Caramelization brings out the sweet flavor you want in the soup. You can store leftover soup for up to five days in the fridge. Make sure to use an airtight container. This keeps the soup fresh and tasty. If you want to keep it longer, consider freezing it. Frozen soup lasts up to three months. Just remember to cool it completely before freezing. This helps prevent ice crystals from forming. Reheat the soup on the stove for best results. Use low heat and stir often. This prevents the soup from sticking to the pot. You can also use the microwave. Heat it in short bursts, stirring in between. This helps the soup heat evenly. If you want to enjoy your soup like fresh, place cheesy toast on top just before serving! This blog covered how to make delicious French onion soup. We discussed key ingredients like onions, garlic, and broth. We explored cheese choices and how to season your soup perfectly. The step-by-step guide helped with caramelizing and combining the ingredients. Tips for perfecting flavor and variations offered fun twists. Lastly, we talked about storage and reheat methods. Enjoy your cooking adventure with this classic dish!

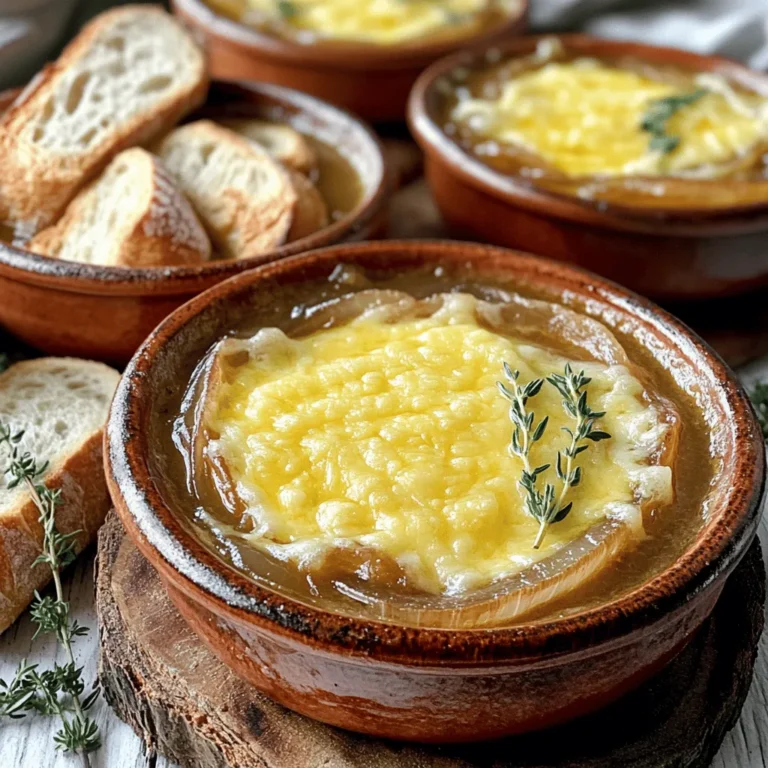
Crockpot French Onion Soup Simple and Rich Delight

- 1 ½ cups graham cracker crumbs - ½ cup unsalted butter, melted - 2 tablespoons brown sugar - 16 oz cream cheese, softened at room temperature - 1 cup granulated sugar - 2 large eggs - 1 teaspoon pure vanilla extract - 1 teaspoon ground cinnamon - 2 cups apples, peeled and diced (about 2 medium apples) - ½ cup caramel sauce (plus extra for drizzling) - ½ cup chopped nuts (optional; use pecans or walnuts) These ingredients work together to create a sweet and creamy treat. The graham cracker crumbs form a crunchy base. Unsalted butter helps bind the crust. Brown sugar adds a hint of caramel flavor. Cream cheese makes the filling rich and creamy. Granulated sugar sweetens it up. Eggs give the bars structure. Vanilla extract adds warmth, while ground cinnamon gives a nice spice. For the apple element, pick your favorites. I enjoy using tart apples for a nice contrast. The caramel sauce brings everything together. If you love nuts, sprinkle some on top for crunch. Each ingredient matters in making these bars a hit! {{ingredient_image_2}} 1. Preheat the oven and prepare the baking dish: Start by preheating your oven to 350°F (175°C). Take an 8x8-inch baking dish and line it with parchment paper. Make sure the edges hang over the sides. This helps with easy removal later. 2. Make the graham cracker crust: In a medium bowl, mix 1 ½ cups of graham cracker crumbs, ½ cup of melted unsalted butter, and 2 tablespoons of brown sugar. Stir until it feels like wet sand. Press this mixture firmly into the bottom of the baking dish. This crust will hold all the yummy filling. 3. Bake the crust and prepare the filling: Bake the crust in the oven for 8 minutes. Once done, take it out and let it cool while you make the cheesecake filling. 1. Beat the cream cheese and incorporate sugars: In a large bowl, beat 16 oz of softened cream cheese with an electric mixer for about 2-3 minutes. Add in 1 cup of granulated sugar, mixing until fluffy and fully combined. 2. Add eggs, vanilla, and cinnamon: Now, add 2 large eggs one by one. Mix slowly after each egg. Then, add 1 teaspoon of pure vanilla extract and 1 teaspoon of ground cinnamon. Make sure everything is mixed well. 3. Fold in apples and caramel, pour over crust: Gently fold in 2 cups of peeled and diced apples and ½ cup of caramel sauce. Be careful not to overmix. Pour this yummy filling over the cooled graham cracker crust. For some crunch, you can sprinkle ½ cup of chopped nuts on top if you like. 1. Bake and check for doneness: Place the dish back in the oven and bake for 30-35 minutes. The edges should set, but the center can still jiggle a bit. It will firm up as it cools. 2. Cool to room temperature, then chill: After baking, let the cheesecake bars cool in the dish until they reach room temperature. Then, transfer them to the refrigerator. Chill for at least 2 hours before serving. These steps will guide you to create the perfect caramel apple cheesecake bars that taste like fall! - Ensuring smooth cream cheese mixture: Start with cream cheese at room temperature. This helps it blend easily. Use an electric mixer for 2-3 minutes until smooth. Scrape down the sides to mix well. - Tips for folding in apples: After mixing the filling, add the apples gently. Use a spatula to fold them in. Don’t stir too hard; you want to keep the apples intact for nice bites. - How to achieve the perfect bake: Bake at 350°F (175°C) for 30-35 minutes. The edges should look set. The center will jiggle slightly. It firms up as it cools. - Presentation ideas for serving: Place the cheesecake bars on a pretty platter. Drizzle with extra caramel sauce. Sprinkle crushed nuts on top for texture. Add thin apple slices around the edges for color. - Ideal pairings with beverages: These bars pair well with warm cider or pumpkin spice latte. A cup of coffee also complements them nicely. - Suggested garnishes for added flavor: Top each bar with whipped cream. A sprinkle of ground cinnamon adds warmth. You can also add a pinch of sea salt for a sweet-salty twist. Pro Tips Use Room Temperature Ingredients: Make sure your cream cheese is softened to room temperature for easier blending, resulting in a smooth and creamy filling. Choose the Right Apples: Opt for tart apples like Granny Smith or Honeycrisp for a balance of flavors that complement the sweetness of the caramel. Don’t Overmix: When folding in the apples and caramel, be gentle to avoid breaking up the apple pieces and maintain a pleasing texture. Chill Before Serving: Allow the cheesecake bars to chill completely for at least 2 hours; this helps the flavors meld and makes them easier to cut into clean squares. {{image_4}} You can mix up the flavor of your caramel apple cheesecake bars by adding different fruits. Try pears or peaches for a sweet twist. Each fruit brings its own flavor and texture. Apples are great, but exploring other options can surprise your taste buds. You can also change the nuts you use. Instead of pecans or walnuts, consider almonds or macadamia nuts. Each nut offers a unique crunch and flavor. This small change can make a big difference in your dessert. If you need a gluten-free option, look for gluten-free graham crackers. Many brands offer tasty alternatives. You can enjoy the same crust flavor without gluten. For a dairy-free version, use a cream cheese substitute. There are great non-dairy cream cheeses made from nuts or soy. These options keep the creamy texture while catering to dietary needs. To keep your caramel apple cheesecake bars fresh, store them in the refrigerator. - Use an airtight container: Place the bars in a container with a tight lid. This keeps them moist and prevents them from absorbing other smells. - Layer with parchment paper: If stacking, use parchment paper between layers. This prevents sticking and makes it easy to serve. For longer storage, you can freeze the bars. - Wrap tightly: Use plastic wrap or aluminum foil to cover the bars completely. - Store in a freezer-safe container: This helps prevent freezer burn. - Label with the date: This way, you know when to use them by. If you freeze your cheesecake bars, thaw them before eating. - Thaw in the fridge: Place the bars in the fridge overnight for a slow thaw. This keeps them from getting too mushy. - Quick thaw method: If you need them fast, leave them at room temperature for about 2 hours. To reheat, use one of these methods: - Microwave: Heat on low power for about 10-15 seconds. Check often to avoid overheating. - Oven: Preheat your oven to 300°F (150°C). Heat the bars for about 10-15 minutes. This will help keep the crust crisp. Now, your caramel apple cheesecake bars will be ready to enjoy anytime! I recommend using tart apples like Granny Smith. Their tangy flavor balances the sweet caramel. Honeycrisp apples also work well for a crisp texture. You want apples that hold their shape during baking. Yes, you can! These bars store well. Make them a day or two before your event. Just keep them in the fridge. Allowing them to chill helps the flavors meld beautifully. To adjust sweetness, you can cut back on the granulated sugar. You might also add less caramel sauce. Taste the filling before baking to find your perfect level of sweetness. Absolutely! You can use applesauce or a flaxseed mixture as an egg substitute. Mix one tablespoon of ground flaxseed with three tablespoons of water. Let it sit for a few minutes until it thickens. This makes for a great binding agent. This article covers a delicious cheesecake bar recipe from start to finish. You learned about key ingredients, preparation steps, and baking techniques to create a tasty treat. I shared helpful tips for baking and serving, along with variations and storage advice. Keep these ideas in mind as you bake. With a few simple steps and ingredients, you’ll impress everyone with your cheesecake bars. Enjoy making this dessert, and feel free to experiment with flavors!

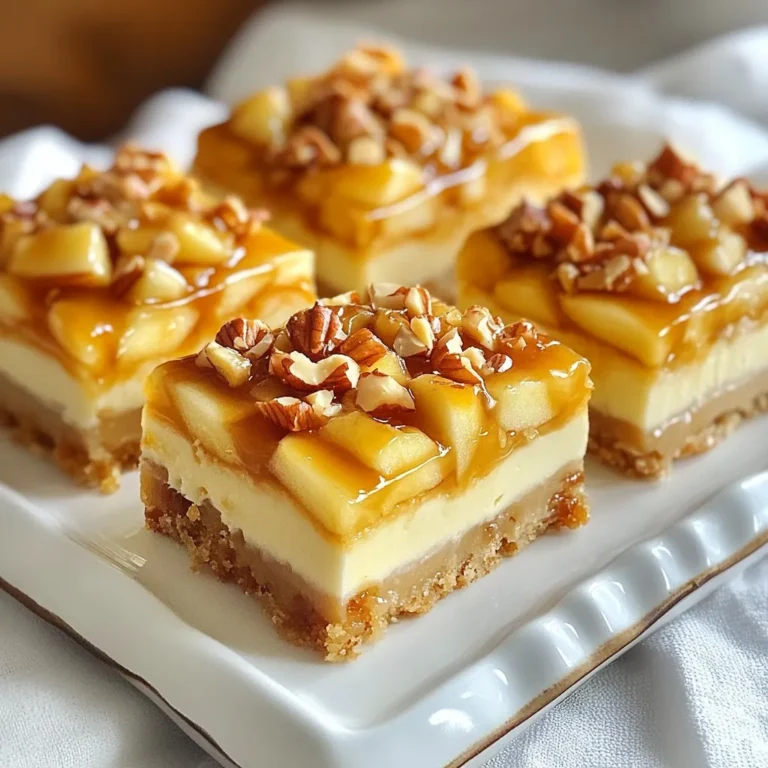
Caramel Apple Cheesecake Bars Tasty Fall Treat

To make S'mores No-Churn Ice Cream, you need these key ingredients: - 2 cups heavy cream, chilled - 1 can (14 oz) sweetened condensed milk - 1 teaspoon pure vanilla extract - 1/2 cup crushed graham crackers, plus extra for garnish - 1/2 cup mini marshmallows - 1/2 cup semi-sweet chocolate chips or chopped chocolate bars - A pinch of flaky sea salt These ingredients combine to create a creamy and delicious treat. The heavy cream gives it a rich base. Sweetened condensed milk adds sweetness and a smooth texture. You can make this dessert even more fun with optional garnishes. Here are some ideas: - Extra crushed graham crackers for crunch - More mini marshmallows for a gooey touch - A drizzle of chocolate sauce for sweetness These add-ons make your ice cream look and taste great. They give it a campfire vibe that matches the s'mores theme. If you don't have all the ingredients, here are some substitutes: - Use whipped topping instead of heavy cream if you're short on time. - Coconut milk can replace sweetened condensed milk for a dairy-free option. - For a gluten-free version, choose gluten-free graham crackers. When making this ice cream, keep the cream chilled. This helps it whip better and gives you a light texture. Always fold gently to keep the airy feel. Enjoy making this easy, tasty ice cream! {{ingredient_image_2}} Start with a large mixing bowl. Pour in 2 cups of chilled heavy cream. Use an electric mixer and whip the cream on medium-high speed. Keep whipping until you see stiff peaks. This will take about 3-4 minutes. Be careful not to overwhip, or the cream can get grainy. In a separate medium bowl, mix 1 can of sweetened condensed milk, 1 teaspoon of pure vanilla extract, and a pinch of flaky sea salt. Whisk these together until smooth. This mix will add sweetness and depth to your ice cream. Now, gently fold the whipped cream into the condensed milk mix. Start with a small amount of whipped cream. This lightens the mix. Use a rubber spatula and fold in a circular motion. Be gentle to keep the air in the cream. Next, fold in 1/2 cup of crushed graham crackers, 1/2 cup of mini marshmallows, and 1/2 cup of chocolate chips. Make sure they mix well without breaking the marshmallows. This mix gives the ice cream that classic s'mores taste. Transfer the ice cream mix into a clean airtight container. Smooth the top with your spatula. Press down gently to remove any air pockets. Seal the container tightly and place it in the freezer. Let it freeze for at least 4-6 hours. It should be solid and easy to scoop. When you're ready to serve, scoop the ice cream into bowls or cones. For a fun touch, sprinkle more crushed graham crackers and mini marshmallows on top. You could also drizzle some chocolate for extra sweetness. Enjoy your delicious s'mores no-churn ice cream! To get the best whipped cream, start with chilled cream. Use a clean bowl and beaters. Whip on medium-high speed. Watch for stiff peaks, which take about 3-4 minutes. Stop right when it looks fluffy. If you whip too long, it becomes grainy. This step is key for creamy ice cream. One big mistake is overmixing. When adding whipped cream to the condensed milk, be gentle. Use a rubber spatula to fold. If you stir too hard, you lose the air. Another mistake is not chilling your tools. Cold bowls and beaters help the cream whip better. Lastly, make sure to freeze the ice cream long enough. If not, it will be too soft. When serving, scoop the ice cream into bowls or cones. For a fun touch, use waffle cones in tall glasses. Top with toasted marshmallows for a campfire feel. Sprinkle with extra graham crackers and chocolate drizzle for added flair. These simple ideas make your dessert look great and taste even better! Pro Tips Chill Your Tools: Before whipping the heavy cream, chill your mixing bowl and beaters in the freezer for about 10-15 minutes. This helps the cream whip up faster and achieve a better volume. Flavor Variations: Experiment with different flavors by adding a splash of your favorite extract (like almond or mint) to the sweetened condensed milk mixture for a unique twist on classic s'mores. Presentation Matters: For an appealing presentation, serve the ice cream in clear dessert cups or waffle cones, and top with a drizzle of chocolate sauce and extra mini marshmallows. Storage Tips: To keep your ice cream fresh, press a piece of parchment paper directly onto the surface of the ice cream before sealing the container. This helps prevent ice crystals from forming. {{image_4}} You can change the flavor of your S'mores no-churn ice cream easily. Try adding flavored extracts. Almond or coconut extracts can add a unique touch. You can also mix in peanut butter for a nutty twist. Chocolate lovers will enjoy adding cocoa powder for a richer taste. Just remember to balance sweetness when adding new flavors. For a vegan version, swap the heavy cream with coconut cream. This gives it a rich texture. Use a plant-based sweetened condensed milk instead of the regular one. There are many brands that offer great options. Check labels to find one with no dairy. You can still enjoy the graham crackers, marshmallows, and chocolate. Just ensure they are vegan-friendly. You can make your ice cream even more exciting by adding mix-ins. Chopped nuts like almonds or pecans add crunch. You can also fold in fresh fruits like strawberries or banana slices for a fruity twist. Dried fruits like raisins or cranberries can also be fun. These additions make your ice cream unique and delicious. To keep your S'mores no-churn ice cream fresh, use an airtight container. Make sure the lid seals tightly. This stops ice crystals from forming and keeps the texture smooth. Before sealing, smooth the top of the ice cream with a spatula. This helps keep air out. Your ice cream can last up to two weeks in the freezer. However, for the best taste, aim to eat it within a week. Over time, flavors may fade. If you notice any ice crystals or freezer burn, it's time to toss it. Always label and date your container for easy tracking. When you are ready to enjoy your ice cream, take it out of the freezer. Let it sit at room temperature for about 5 to 10 minutes. This short wait helps soften the ice cream. If you thaw it too long, it may become too soft. Scoop quickly and enjoy! Yes, you can try using coconut cream or whipped topping. Both options can work well. Coconut cream adds a nice flavor, but it may change the taste. Whipped topping gives a lighter texture. However, heavy cream gives the best creamy texture. Serve this ice cream in bowls or cones. For a fun twist, use waffle cones. You can top it with extra mini marshmallows, chocolate drizzle, or more crushed graham crackers. This makes it look special and inviting. You can even use a tall glass to hold the cones for a fun presentation. You can keep this ice cream for about two to three weeks. After that, it may lose its texture and flavor. To keep it fresh, make sure to seal it tightly. Use an airtight container to prevent ice crystals from forming. If you notice any ice crystals, just mix the ice cream before serving for a smoother texture. You now have everything you need to create delicious S'mores No-Churn Ice Cream. We discussed key ingredients, tips for making the ice cream, and storage advice. Remember, you can customize this treat with flavors or add-ins that you love. Keep it fun and share it with friends. Enjoy making this easy dessert and impress everyone with your skills. Dive back into your kitchen and start your ice cream adventure today!

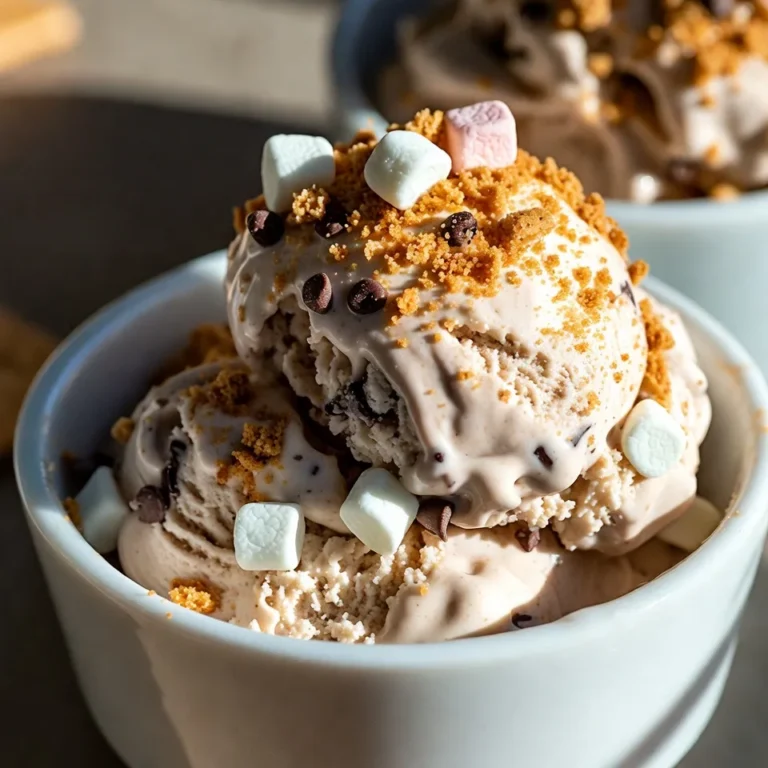
S’mores No-Churn Ice Cream Delightfully Easy Recipe

- 12 ounces fusilli or rotini pasta - 1 cup cherry tomatoes, halved - 1 cup fresh mozzarella balls, bocconcini - 1 cup fresh arugula - ½ cup fresh basil leaves, roughly torn - ½ cup sun-dried tomatoes, julienned - ¼ cup extra virgin olive oil - 2 tablespoons balsamic vinegar - 1 teaspoon honey - Salt and freshly ground black pepper to taste - Optional: crushed red pepper flakes In this Caprese Pasta Salad, the main ingredients create a colorful and tasty dish. The fusilli or rotini pasta gives a nice twist that holds the dressing well. I love the juicy cherry tomatoes; they add sweetness and freshness. Fresh mozzarella balls, or bocconcini, provide creamy bites that make every forkful delightful. You get a peppery crunch from the arugula, which balances the flavors. The fresh basil leaves bring an aromatic touch that brightens the salad. Sun-dried tomatoes add a rich, tangy flavor that makes it unique. Now, let’s talk about the dressing. Extra virgin olive oil gives a smooth texture and rich taste. Balsamic vinegar adds a sweet and tart punch. Honey complements the vinegar and rounds out the flavors. Seasoning with salt and pepper is important to enhance all the tastes. If you like a bit of heat, crushed red pepper flakes can be a great addition. Mix all these ingredients, and you’ll have a vibrant and delicious salad that shines on any table. {{ingredient_image_2}} To start, fill a large pot with water. Add a generous pinch of salt. Bring the water to a rolling boil. Once boiling, add 12 ounces of fusilli or rotini pasta. Cook it according to the package instructions until it's al dente. This usually takes about 8 to 10 minutes. After cooking, carefully drain the pasta. Rinse it under cold water to stop the cooking process. This step cools the pasta quickly and helps it stay firm. In a large mixing bowl, add the cooled pasta. Next, add 1 cup of halved cherry tomatoes, 1 cup of fresh mozzarella balls, and 1 cup of fresh arugula. Then, toss in ½ cup of roughly torn basil leaves and ½ cup of julienned sun-dried tomatoes. Mix everything gently. This helps to ensure that all the ingredients blend well together. You want every bite to be full of flavor. Grab a small bowl and whisk together ¼ cup of extra virgin olive oil, 2 tablespoons of balsamic vinegar, and 1 teaspoon of honey. Add a good pinch of salt and freshly ground black pepper. If you like a bit of heat, sprinkle in some crushed red pepper flakes. This will give your dressing a nice kick. Adjust the spice level to fit your taste. Now it's time to dress the salad. Pour the dressing over your pasta mixture. Use a gentle folding motion to toss everything together. You want the pasta and veggies to be well coated. After tossing, taste the salad. Adjust the seasoning if needed. For best results, cover the bowl with plastic wrap or a lid. Chill the salad in the refrigerator for at least 30 minutes. This allows the flavors to meld and taste even better. Adjusting Seasoning to Taste Always taste your salad before serving. You may want to add more salt or pepper. If it needs sweetness, add a bit of honey. Each bite should burst with flavor. Enhancing Flavor with Cheese For extra richness, add Parmesan cheese. Grate it finely and sprinkle it on top. The salty, nutty flavor will make your salad even better. Serving Suggestions Serve your salad in a large, shallow bowl. This showcases the colorful ingredients beautifully. You can also use individual bowls for a personal touch. Garnishing Ideas Add whole basil leaves on top for a fresh look. You might also sprinkle more cheese for style and taste. A drizzle of balsamic glaze adds a nice finish too. Prepping Ingredients Ahead Chop your veggies and cheese in advance. Store them in the fridge to save time. You can even cook the pasta a day before. Quick Cooling Methods After cooking the pasta, rinse it under cold water. This cools it quickly and stops cooking. You can also spread it out on a baking sheet. This helps it cool faster too. Pro Tips Choose the Right Pasta: Fusilli or rotini are excellent choices for this salad because their twists and grooves hold onto the dressing and ingredients better than flat pasta. Fresh Ingredients Matter: Use the freshest cherry tomatoes and mozzarella balls you can find to enhance the flavor and texture of your salad. Customize Your Greens: Feel free to substitute arugula with other greens like spinach or mixed salad greens for a different flavor profile. Chill for a Flavor Boost: Allowing the salad to chill for at least 30 minutes helps the flavors meld, making each bite more delicious. {{image_4}} You can boost your Caprese Pasta Salad with proteins. This makes it heartier and more filling. - Grilled Chicken: Add sliced grilled chicken for a tasty twist. The smoky flavor pairs well with the salad. - Chickpeas or Beans: If you want a plant-based option, add chickpeas or beans. They provide protein and a nice texture. You can also mix in more vegetables. This adds color and crunch to your salad. - Bell Peppers: Chop bell peppers for a sweet crunch. They add a pop of color and flavor. - Spinach or Kale: Toss in fresh spinach or kale for extra nutrients. Both greens blend well with the other ingredients. Switch up your dressing for new flavors. This can change the whole taste of your salad. - Lemon Vinaigrette: A bright lemon vinaigrette gives a fresh zing. It complements the tomatoes and cheese beautifully. - Creamy Italian Dressing: For a richer taste, use creamy Italian dressing. It makes the salad smooth and flavorful. Storing Caprese pasta salad properly keeps it fresh and tasty. - Refrigeration Tips: Place the salad in an airtight container. This helps prevent moisture loss and keeps flavors intact. Always store it in the fridge right after serving to avoid spoilage. - Duration of Freshness: Enjoy your salad within 3 days for the best taste. After that, the ingredients may start to lose their crunch. You can enjoy Caprese pasta salad cold or at room temperature. - Best Methods for Maintaining Flavor: If you want to warm it up, use a microwave on low heat. Heat it just enough to take the chill off. This way, the flavors stay bright and fresh. - Serving After Refrigeration: Before serving, give the salad a gentle toss. This redistributes the dressing and ingredients. If it seems a little dry, add a splash of olive oil or balsamic vinegar for added moisture. Can I make it vegan? Yes, you can make this salad vegan! Simply replace the mozzarella with a plant-based cheese. You can also use a nut-based cheese for added flavor. How long can I store leftovers? You can store leftovers in the fridge for up to three days. Make sure to keep it in a sealed container to maintain freshness. Is it possible to use a different type of pasta? Absolutely! You can use any pasta shape you like. Penne, farfalle, or even whole wheat pasta work great too. What to do if it’s too salty? If your salad turns out too salty, add more pasta or fresh veggies. You can also add a splash of vinegar to balance the flavor. How to prevent sogginess? To prevent sogginess, rinse the pasta in cold water after cooking. This stops the cooking process and helps keep it firm. What dishes pair well with Caprese Pasta Salad? This salad pairs well with grilled chicken, garlic bread, or a light soup. The fresh flavors complement many dishes. Can it be served warm? You can serve it warm, but I recommend it cold for the best flavor. Chilling the salad enhances the taste of the ingredients. This blog covered the essential ingredients for a delicious Caprese Pasta Salad. You learned how to cook pasta, mix fresh veggies, and whip up a tasty dressing. We also shared tips for perfecting your salad and ways to store it. You can enjoy different variations with proteins or veggies. Always remember to chill your salad for the best flavor. With these simple steps, you can create a meal that impresses everyone. Enjoy making it, and happy cooking!

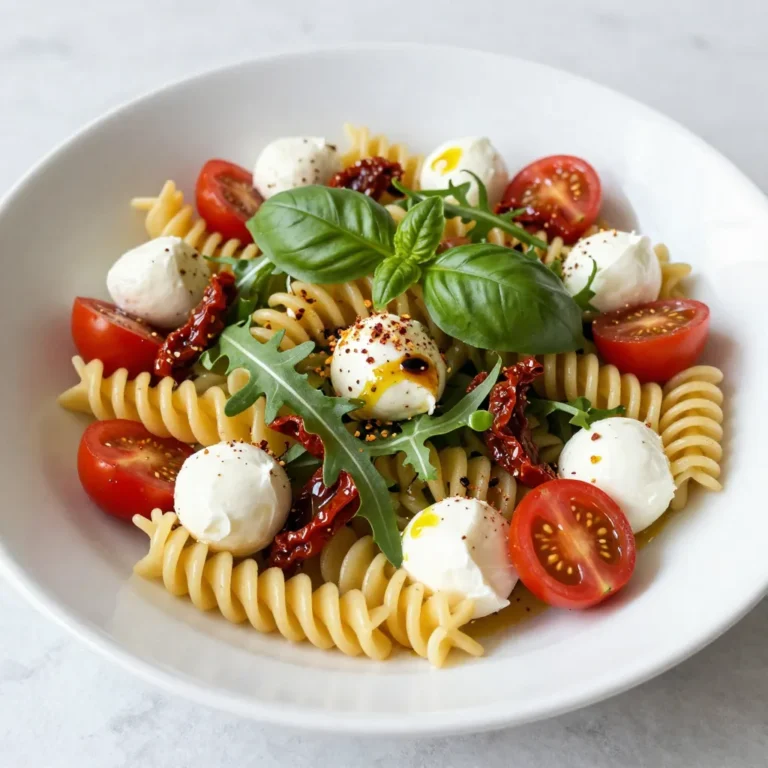
Caprese Pasta Salad Fresh and Flavorful Delight

PREV 1 … 16 17 18 … 44 NEXT
yummybiterecipes

explore

DessertsDinnerAppetizersDrinks

Our Policies

  • Cookie Policy
  • Copyright Policy
  • Disclaimer
  • GDPR Policy
  • Terms Of Use
Back to Top
  • About
  • Contact Us
  • Privacy Policy
© 2025 yummybiterecipes