FREE DINNER EBOOK! Get your copy!
  • Cookie Policy
  • GDPR Policy
  • Disclaimer
  • Terms Of Use
  • Visit my other site: Fun Cookie Recipes
yummybiterecipes
  • Home
  • Dinner
  • Desserts
  • Drinks
  • Appetizers
  • Contact
  • About
  • Privacy Policy
  • Home
  • Dinner
  • Desserts
  • Drinks
  • Appetizers
  • Contact
  • About
  • Privacy Policy
  • Cookie Policy
  • GDPR Policy
  • Disclaimer
  • Terms Of Use
Visit my other site: Fun Cookie Recipes

HOME / CATEGORIES /

Latest

- 2 sleeves of Ritz crackers - 1 cup creamy peanut butter - 1 cup milk chocolate chips - 1/2 cup chopped nuts (use walnuts, pecans, or your favorite nuts) The main ingredients are simple and easy to find. Ritz crackers give a nice crunch. Creamy peanut butter adds rich flavor. Milk chocolate chips bring sweetness. Chopped nuts add a fun texture. - Sea salt - Powdered sugar You can enhance your cookies with sea salt. A sprinkle brings out the chocolate taste. Powdered sugar adds a sweet touch and a lovely look. - Present these cookies on a decorative platter. - Add a small bowl of mixed nuts on the side for extra crunch. Serving ideas make your cookies shine. Use a fun plate to show them off. The mixed nuts add a nice contrast and flavor. Everyone will enjoy these simple yet tasty treats! {{ingredient_image_2}} - Set temperature to 350°F (175°C). - Take a Ritz cracker and spread creamy peanut butter on one side. - Place another cracker on top to make a sandwich. Repeat this for all crackers. - Use a microwave-safe bowl to hold the milk chocolate chips. - Melt in 30-second bursts, stirring after each. Keep going until the chocolate is smooth. - Dip each peanut butter sandwich in the melted chocolate. Make sure it is coated well. - Gently shake off any extra chocolate before placing them back on the baking sheet. - Line a baking sheet with parchment paper. Place the coated sandwiches on it, spaced apart. - Bake for 6-8 minutes, just until the chocolate looks set. - Let the cookies cool on the baking sheet for a few minutes. - Transfer them to a wire rack to cool completely. For the best cookies, bake them for 6 to 8 minutes. Watch closely. The chocolate should look set but not hard. This keeps the cookies soft and chewy. To get the right chocolate coating, dip each cracker sandwich fully. Shake off extra chocolate gently. A smooth coat looks nice and tastes great. For nuts, walnuts and pecans work well. They add crunch and flavor. You can also mix in almonds or hazelnuts. These will give your cookies a new twist. Try alternative toppings like sprinkles or crushed candies. They add color and fun. You can also use sea salt to balance the sweetness. Do not overcrowd the baking sheet. Space them out to allow even baking. If they are too close, they may stick together. Let the cookies cool properly. If you move them too soon, they may break. Allow them to cool on the baking sheet for a few minutes first. Then, transfer them to a wire rack. This helps them stay firm and tasty. Pro Tips Use Room Temperature Ingredients: Ensure your peanut butter is at room temperature for easier spreading on the crackers. Experiment with Chocolate: Try using dark chocolate or white chocolate for a different flavor twist in your cookies. Chill for Better Coating: Refrigerate the assembled cracker sandwiches for about 10 minutes before dipping to help the chocolate set better. Storage Tips: Store your cookies in an airtight container at room temperature to maintain freshness and prevent them from getting soggy. {{image_4}} You can change the nut butter for fun flavors. Almond butter gives a sweet touch. It adds a nutty twist. Cashew butter is another great choice. It has a creamy taste that blends well. Both options work great in the Ritz Cracker Cookies. Adding flavorings can boost your cookies. A splash of vanilla extract adds warmth. It makes the cookies taste even better. If you like mint, try mint extract. It gives a fresh and cool flavor. Just a little goes a long way. Want a healthier snack? You can use sugar-free chocolate options. This swaps out some sugar while keeping the taste. You can also use whole grain Ritz crackers. They add fiber and nutrients. Both changes help make this treat a bit better for you. To keep your Ritz cracker cookies fresh, store them in an airtight container. Place a piece of parchment paper between layers to avoid sticking. Keep them in a cool, dry place. These cookies stay tasty for about a week if stored properly. Yes, you can freeze these cookies! To freeze them, first let the cookies cool completely. Then, wrap each cookie in plastic wrap. Place the wrapped cookies in a freezer bag to protect them from air. They stay good in the freezer for up to three months. For thawing, take the cookies out and let them sit at room temperature for about 30 minutes. This way, they regain their softness. Enjoy your treats anytime! Yes, you can use other crackers. Try saltines or even graham crackers. Each gives a unique taste. Look for options that are sturdy, so they hold up well. These cookies contain common allergens. They have peanuts and chocolate. If you have allergies, check labels carefully. Choose nut-free chocolate if needed. To make gluten-free cookies, use gluten-free crackers. Brands like Schär or Glutino offer great options. Make sure the chocolate chips are also gluten-free. If your chocolate isn’t melting, check the microwave settings. Use short bursts of heat. Stir often to help it melt evenly. If it seizes, add a tiny bit of oil. In this blog post, I covered how to make tasty Ritz Cracker Cookies. We explored the main ingredients, like Ritz crackers and chocolate chips, and shared step-by-step instructions. I also offered tips for texture, flavor, and storage options. Remember, practice helps you perfect these treats. Don't hesitate to experiment with different nut butters or toppings. You can create your own delicious twist. Enjoy making these cookies, and share them with friends for a fun treat!

Ritz Cracker Cookies Simple and Tasty Treats

- 1 medium head of cauliflower, cut into bite-sized florets - 1 cup all-purpose flour (substitute with gluten-free flour if needed) - 1 cup milk (choose dairy or any plant-based alternative) - 1 cup breadcrumbs (use panko for an extra crunchy finish) - 1 teaspoon garlic powder - 1 teaspoon onion powder - 1 teaspoon smoked paprika - 1/2 teaspoon salt - 1/4 teaspoon black pepper - 1/2 cup buffalo sauce (or your preferred hot sauce) - 2 tablespoons olive oil - Fresh parsley, finely chopped (for garnish) To create crispy cauliflower wings, you need fresh cauliflower florets. I always recommend using a medium head of cauliflower. Make sure to cut it into bite-sized pieces. This helps them cook evenly. Next, prepare the wet mixture. Combine the flour and milk in a bowl. I like to add garlic powder, onion powder, smoked paprika, salt, and black pepper. This gives your wings a great flavor. Mix until smooth. For the crunch, use breadcrumbs. I suggest panko breadcrumbs for extra crispiness. These create a perfect outer layer. Don’t forget the buffalo sauce! It adds spice and tang. You can use your favorite brand or make your own. The olive oil helps the wings brown nicely. Finally, fresh parsley is a great garnish. It adds color and freshness to your dish. These ingredients come together for a flavorful delight that everyone will enjoy. Start by trimming the cauliflower. Cut it into bite-sized florets. This size helps them cook evenly and stay crispy. Once you cut the florets, place them in a large mixing bowl. This keeps your workspace tidy and organized. Next, make the batter. In a separate bowl, whisk together the flour and milk. You can use dairy or any plant-based milk you like. Then add garlic powder, onion powder, smoked paprika, salt, and black pepper. Mix until the batter is smooth. You want it to be slightly thick, so it clings well to the cauliflower. Now, it’s time to coat the cauliflower. Dip each floret into the batter. Make sure to cover every part so it gets a good flavor. Let any extra batter drip off. This step helps avoid sogginess. Then, take the breadcrumbs and place them in a shallow dish. Roll each battered floret in the breadcrumbs, ensuring they are fully covered. This gives a crunchy outer layer that makes each bite delicious. Before you cook, preheat your air fryer to 400°F (200°C). This takes about five minutes. It helps the wings get crispy. Lightly spray the air fryer basket with cooking spray to keep the wings from sticking. Arrange the coated cauliflower wings in a single layer. Avoid overcrowding, as this can lead to uneven cooking. If you have a lot, cook in batches. Lightly spray the tops of the florets with olive oil for extra crispness. Air fry the wings for about 12-15 minutes. Shake the basket halfway through cooking. This helps them brown evenly. You want them to turn golden and crispy. After air frying, it’s time for the sauce. In a large mixing bowl, add the air-fried cauliflower. Pour the buffalo sauce over them. Gently toss the wings until every piece is well-coated in sauce. For the final touch, return the coated wings to the air fryer. Cook them for an additional 2-3 minutes. This helps set the buffalo sauce and adds to the flavor. To make your cauliflower wings crispy, use panko breadcrumbs. They are coarser and give a great crunch. For the best texture, spray the florets with oil. This helps them crisp up nicely in the air fryer. Want more flavor? You can change the spices to suit your taste. Add more garlic powder for extra zing. You can also try different herbs. Fresh herbs like parsley or thyme boost flavor. If you love heat, mix in a bit of cayenne pepper or chili powder. You can even drizzle different sauces on top after cooking. Do not overcrowd the air fryer. If you stack the wings, they won’t cook evenly. It’s better to cook in small batches. This way, each floret gets enough hot air. Shake the basket halfway through cooking. This ensures they brown evenly on all sides. {{image_4}} You have many options for sauce. Buffalo sauce is a classic choice, but you can try other hot sauces too. Consider using a sweet chili sauce for a different kick. You can also swap it out for BBQ sauce. Teriyaki sauce adds a sweet and savory flavor. Mix things up to match your taste! If you need gluten-free wings, don’t worry! You can use gluten-free flour instead of all-purpose flour. Many brands make great gluten-free options. For the breadcrumbs, look for gluten-free panko. This will keep your wings crispy and delicious without any gluten. To make this recipe vegan, use plant-based milk. Almond milk or oat milk work great. You can also skip any animal products. Just make sure your breadcrumbs are vegan-friendly. This way, you can enjoy tasty wings that fit your diet! To keep your cauliflower wings fresh, store them in the fridge. Place them in a sealed container. Make sure it has an airtight seal. This helps prevent moisture. Enjoy the wings within three days for the best taste. If you want to store them longer, consider freezing. When reheating, use an air fryer. This keeps the wings crispy. Preheat your air fryer to 350°F (175°C). Heat the wings for about 5 to 7 minutes. Shake the basket halfway through. This ensures even heating. You can also use a microwave, but this may make them soft. If you use the microwave, heat in short bursts to avoid sogginess. You can freeze both cooked and uncooked wings. If freezing cooked wings, let them cool first. Place them in a freezer-safe bag. Remove as much air as possible. For uncooked wings, freeze them before frying. Lay them flat on a baking sheet until frozen. Then, transfer to a bag. To thaw, leave them in the fridge overnight. For quick thawing, use the microwave on low for a few minutes. To make your cauliflower wings extra crispy, focus on the batter and breadcrumb coating. - Use panko breadcrumbs for a crunchier texture. - Ensure the batter is thick enough to stick well. - Shake off excess batter before coating in breadcrumbs. - Lightly spray the air fryer basket with oil to prevent sticking. - Spray the tops of the wings with olive oil for golden color. These steps help achieve a delightful crunch that enhances the overall flavor. Yes, you can make these cauliflower wings ahead of time. - Prepare the cauliflower and coat it in batter and breadcrumbs. - Store the un-cooked wings in the fridge for up to 24 hours. - If you want longer storage, freeze the un-cooked wings for up to a month. - Just remember to thaw them in the fridge before cooking. This makes it easy to enjoy crispy wings any time! Several dipping sauces complement cauliflower wings nicely. - Classic ranch dressing adds a creamy touch. - Blue cheese dressing offers a tangy flavor. - Pair with a spicy buffalo or BBQ sauce for a bold kick. - Serve with celery sticks for crunch. These sauces enhance the experience and make each bite exciting! Cauliflower wings are a tasty and healthy snack. We discussed the key ingredients, like fresh cauliflower, flour, and buffalo sauce. I shared simple steps to prepare, coat, and air-fry for that crispy texture. You also have tips for flavor enhancements and variations for vegan or gluten-free diets. Lastly, I covered proper storage and reheating methods. Enjoy making your wings, and feel free to get creative with your flavors!

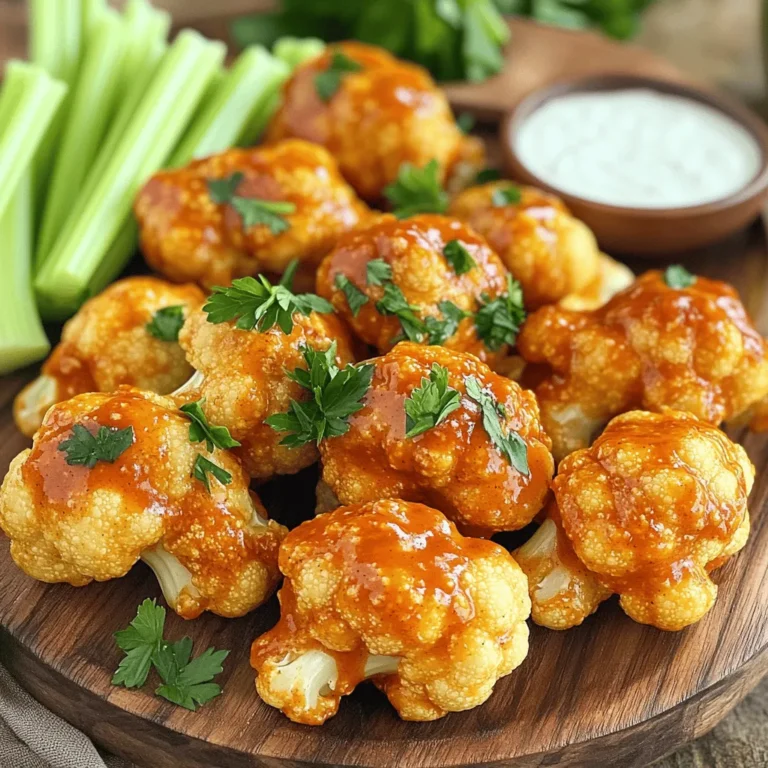
Crispy Air Fryer Cauliflower Wings Flavorful Delight

- 1 lb thinly sliced beef (sirloin or ribeye) - ¼ cup soy sauce - 2 tablespoons brown sugar - 1 tablespoon sesame oil - 3 cloves garlic, finely minced - 1 teaspoon fresh ginger, grated - 1 tablespoon rice vinegar - 2 cups cooked jasmine rice - 1 cup fresh bean sprouts - ½ cup scallions, chopped (green parts only) - 1 tablespoon sesame seeds - Salt and freshly ground pepper to taste - 1 teaspoon gochujang (Korean chili paste) for added heat - Sliced radishes for garnish - Mixing bowl for marinade - Skillet for cooking - Pot for blanching sprouts Gather all these ingredients and equipment before you start. This makes cooking easier and more fun. Use fresh beef for the best taste. If you want heat, don't skip the gochujang. It adds a nice kick. Blanching the bean sprouts keeps them crispy. Remember to rinse them under cold water after cooking. This step is key. It helps keep their crunchiness. Use a large skillet for even cooking of the beef. Enjoy the process of making these Korean BBQ Beef Bowls! To start, you need to make the marinade. First, combine these ingredients in a medium bowl: - ¼ cup soy sauce - 2 tablespoons brown sugar - 1 tablespoon sesame oil - 3 cloves garlic, finely minced - 1 teaspoon fresh ginger, grated - 1 tablespoon rice vinegar - 1 teaspoon gochujang (optional) Whisk these together until the sugar dissolves. This mix adds great flavor to the beef. Next, coat 1 pound of thinly sliced beef in this marinade. Make sure each piece gets the mix. Let the beef sit for at least 30 minutes at room temperature. For more flavor, refrigerate it for up to 2 hours. Now, heat a large skillet over medium-high heat. Add a tablespoon of cooking oil. Once hot, add the marinated beef. Spread it out evenly in the pan. Sauté for about 3-4 minutes until browned and tender. Stir often to avoid overcooking. Remove it from heat while it’s still juicy. While the beef marinates, prepare the bean sprouts. Bring a pot of water to boil. Blanch 1 cup of fresh bean sprouts for 1-2 minutes. This helps them stay crisp. After blanching, drain them and rinse under cold water. This stops the cooking process. To build your bowls, start with a scoop of jasmine rice at the bottom. Then, add the sautéed beef on top. Let the savory juices soak into the rice. Next, layer the blanched bean sprouts and chopped scallions over the beef. For the final touch, sprinkle sesame seeds and add sliced radishes for extra color. Drizzle a bit of sesame oil on top for flavor. To make the marinade your own, play with the ingredients. You can reduce the soy sauce for less salt. Add more brown sugar if you like it sweet. Want extra crunch? Toss in some chopped nuts or crispy onions. For spice, add more gochujang. This gives the dish a nice kick. To cook beef perfectly, heat your skillet well. Use medium-high heat to sear the beef fast. This keeps it juicy and tender. Avoid overcrowding the pan. If you add too much beef at once, it will steam instead of sear. For sautéing, use oils with high smoke points. Canola or avocado oil works best. They won’t burn and will add good flavor. Make your bowls pop with color! Serve them on a bright plate or wooden platter. Start with a mound of rice, then layer the beef on top. Top it with sprouts and scallions for crunch. Finish with sesame seeds and radish slices for color. You can drizzle extra sesame oil on top for a shiny finish. It makes the dish look great and taste better. {{image_4}} You can swap beef for tofu or tempeh. These options absorb flavors well. For tofu, use firm or extra-firm. Press it to remove excess water before cooking. Recommended sauces and flavors: - Use the same marinade with soy sauce. - Add maple syrup instead of brown sugar for sweetness. - Enhance with sesame oil and garlic. - A sprinkle of nutritional yeast gives a cheesy flavor. Try alternatives to jasmine rice. Quinoa is a great choice. It adds protein and a nutty flavor. Cauliflower rice is another option. It’s low in carbs and high in fiber. Adding grains: - Cook quinoa according to package instructions. - Grate cauliflower and sauté briefly for a tender bite. Korean food varies by region. Each area has unique flavors and ingredients. In Jeolla Province, use more fermented foods for tang. In Busan, add seafood for a fresh twist. Unique ingredients or toppings to try: - Kimchi for a spicy kick. - Pickled vegetables for crunch. - Sesame leaves for a fresh herbal taste. To keep your Korean BBQ beef bowls fresh, store them in airtight containers. Make sure the beef and rice cool down before sealing. This helps prevent sogginess. You can safely eat leftovers within three days. After that, the taste may fade. You can freeze assembled bowls, but wait until they cool. Divide portions in freezer-safe containers. Leave some space at the top for expansion. For best flavor, eat frozen bowls within one month. When you’re ready to eat, thaw them in the fridge overnight. To reheat, use a microwave or stovetop. If using a microwave, cover the bowl with a damp paper towel. This keeps the beef juicy. For stovetop, add a splash of water in a pan. Heat on low until warm, stirring gently. This keeps the rice from drying out. Enjoy your meal with the same great taste! To add spice, you can adjust the gochujang in the marinade. Start with more gochujang for a bigger kick. You can also add red pepper flakes or sliced fresh chili for more heat. Just remember to taste as you go! Yes, you can! Chicken works well and cooks fast. Tofu is a great choice for a vegetarian option. Just make sure to marinate them the same way as beef for full flavor. I recommend jasmine rice for its soft texture and aroma. You can also use short-grain rice for stickiness. Cook the rice fluffy so it soaks in the beef juices. Store leftovers in the fridge for up to three days. Check for any off smells or changes in color to see if they are spoiled. If the rice feels hard, it's best to toss it. You can serve kimchi for a tangy crunch. Pickled vegetables add a nice touch, too. Try some steamed broccoli or a simple salad to balance the meal. Korean BBQ Beef Bowls are easy to make and full of flavor. We explored key ingredients like beef, soy sauce, and optional spices. I shared step-by-step instructions on marinating and cooking the beef. Consider adding your spin with vegetarian options or different grains. Proper storage also ensures great taste later. Enjoy experimenting with flavors, and remember—personalizing your dish makes it special. Happy cooking!

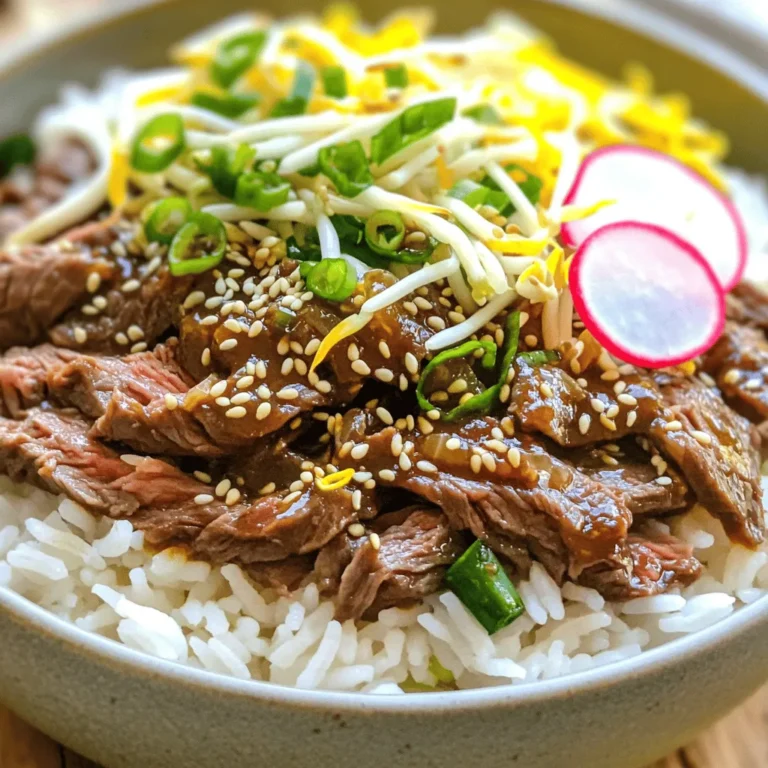
Korean BBQ Beef Bowls Flavorful and Simple Recipe

To make chocolate covered pumpkin strawberries, gather these simple ingredients: - 1 cup fresh strawberries, thoroughly washed and dried - ½ cup pure pumpkin puree - 1 cup dark chocolate chips - 1 tablespoon coconut oil - 1 teaspoon pumpkin spice blend (a mix of cinnamon, nutmeg, ginger, and clove) - Coarse sea salt, for garnish (optional) Using fresh strawberries is key for this treat. Look for firm, ripe ones. You can swap dark chocolate chips for milk chocolate or white chocolate if you prefer. Pure pumpkin puree gives the best flavor, but you can use pumpkin pie filling in a pinch. Coconut oil makes the chocolate shiny and smooth, but you can use vegetable oil instead. If you want a different spice flavor, try just cinnamon or ginger. Pumpkin brings rich nutrients like vitamin A and fiber. It’s perfect for fall and adds a warm flavor. Strawberries are juicy and sweet, making them a great match for pumpkin. They are also high in vitamin C. This recipe combines the best of both worlds. You'll enjoy a unique treat that’s not only tasty but also healthy! {{ingredient_image_2}} Start by washing your strawberries. Use cold water and rinse them well. Next, dry them completely. Any water left on the strawberries can stop the chocolate from sticking. I like to place them on a clean towel. Let them sit for a few minutes to absorb any extra moisture. Once they are dry, set them aside and get ready to make the pumpkin mixture. In a medium bowl, mix together the pure pumpkin puree and pumpkin spice. This spice blend includes cinnamon, nutmeg, ginger, and clove. Stir the two ingredients until they blend well. The mix should be smooth and creamy. Set this bowl aside for later. This pumpkin mixture adds a lovely fall flavor to your treat. Now it's time to melt the dark chocolate chips. Take a microwave-safe bowl and add the chocolate chips and coconut oil. The coconut oil helps the chocolate melt smoothly. Heat the bowl in the microwave. Do this in 30-second bursts. After each round, take the bowl out and stir the chocolate. Keep melting until it is smooth and fully melted. Be careful not to overheat the chocolate, as it can burn easily. Once melted, you are ready to dip your strawberries! To get a smooth chocolate coating, start with dry strawberries. If they have water, the chocolate won't stick. Make sure to dry them well. Melt the chocolate slowly in the microwave. Heat it in short bursts and stir in between. This keeps the chocolate from burning. Adding coconut oil makes the chocolate smoother. It also helps the chocolate shine. Adding pumpkin spice to the pumpkin mix gives a warm flavor. Use a small spoon to spread it over the chocolate. A tiny pinch of coarse sea salt on top adds a nice touch. It balances the sweetness. You can also add colorful sprinkles or edible flowers for a fun look. Present the strawberries on a decorative platter for a festive vibe. To save time, wash and dry the strawberries first. While they dry, mix the pumpkin and spice. Melt the chocolate while the pumpkin mix cools. This way, you can dip the strawberries right after. You can also prepare the pumpkin mix ahead of time and store it in the fridge. This makes it easy to whip up these treats anytime. Pro Tips Dry Strawberries Thoroughly: Make sure your strawberries are completely dry before dipping them in chocolate. Any moisture can cause the chocolate to seize or not adhere properly. Use Quality Chocolate: Opt for high-quality dark chocolate for the best flavor. The richness of the chocolate will complement the pumpkin flavor wonderfully. Experiment with Spices: Feel free to adjust the pumpkin spice blend according to your taste. Adding more cinnamon or nutmeg can enhance the fall flavor profile. Chill for Perfect Set: Ensure you chill the strawberries long enough for the chocolate to set completely. This makes them easier to handle and eat. {{image_4}} You can make your chocolate covered pumpkin strawberries even more fun. Try adding a dash of vanilla extract to the pumpkin mix. This small change adds a nice sweetness. You can also think about using different spices. Nutmeg or allspice can give a warm taste. If you love a kick, add a pinch of cayenne pepper. This will surprise your taste buds! While dark chocolate is rich and tasty, don't stop there! You can use milk chocolate for a creamier treat. This adds sweetness and pairs well with pumpkin. If you're a fan of white chocolate, give it a try! It provides a nice contrast to the pumpkin flavors. Just melt it the same way as dark chocolate, and you will have a treat that looks stunning! These chocolate covered pumpkin strawberries fit many events. For a fall gathering, place them on a pretty platter with autumn leaves. You can also serve them at Halloween parties. They will be a hit among kids and adults alike! For a romantic touch, add a drizzle of extra chocolate on top. This makes them perfect for date nights or anniversaries. To keep your chocolate-covered pumpkin strawberries fresh, store them in an airtight container. Layer the strawberries between sheets of parchment paper. This prevents them from sticking together. Place the container in the fridge. Avoid storing them in a warm place, as heat can melt the chocolate. When stored properly, chocolate-covered strawberries last up to three days in the fridge. After that, the texture and taste may change. For the best flavor and crunch, enjoy them within the first day or two. Freezing chocolate-covered strawberries is possible for longer storage. First, place them on a baking sheet lined with parchment paper. Freeze them until solid, about one hour. Once frozen, transfer the strawberries to a freezer bag. Remove as much air as possible before sealing. They can last up to two months in the freezer. Remember to thaw them in the fridge before serving. Yes, you can use frozen strawberries. However, they may become mushy when thawed. For the best taste and texture, use fresh strawberries. Fresh strawberries hold their shape well and give you that perfect crunch with each bite. This treat is naturally gluten-free! All the ingredients, like dark chocolate chips and pure pumpkin puree, do not contain gluten. Just check the labels to ensure there are no hidden gluten sources. Always confirm that your chocolate chips are marked gluten-free for peace of mind. To melt chocolate smoothly, use a microwave-safe bowl. Combine dark chocolate chips with a tablespoon of coconut oil. Heat in the microwave for 30 seconds. Stir the mixture, then heat again for 30 seconds if needed. Stir until it’s completely melted and smooth. This method prevents the chocolate from burning. In this post, I covered key ingredients for chocolate-covered strawberries, step-by-step instructions, and helpful tips. I also shared variations and storage info. You can make delicious treats for any event. Choose good quality ingredients and store them well. Don’t be afraid to try different flavors or toppings! Enjoy creating your own unique twist on this classic snack. With some practice, you’ll impress everyone with your tasty treats!

Chocolate Covered Pumpkin Strawberries Easy Treat

- 1 lb Brussels sprouts, trimmed and halved - 3 tablespoons extra virgin olive oil - 2 tablespoons pure honey - 2 tablespoons Sriracha sauce - 1 tablespoon low-sodium soy sauce or tamari - 2 cloves garlic, finely minced - Sea salt and freshly cracked pepper, to taste - 2 tablespoons sesame seeds, toasted - Fresh cilantro, roughly chopped The main ingredients are key to this dish. First, Brussels sprouts are the star. Their natural sweetness shines through when roasted. The olive oil helps them roast evenly and adds a rich flavor. Honey sweetens the dish and balances the heat. Sriracha sauce brings a spicy kick that makes this dish exciting. For the additional ingredients, soy sauce or tamari adds umami. Garlic gives a warm, savory note. Adding sea salt and pepper enhances all the flavors. Finally, for garnishes, toasted sesame seeds add a nice crunch. Fresh cilantro brings a bright, herbal taste. Together, these ingredients make Honey Sriracha Brussels sprouts a tasty and colorful side dish. Start by trimming the ends off the Brussels sprouts. Then, cut each one in half. This helps them cook evenly. Next, preheat your oven to 425°F (220°C). A hot oven ensures perfect roasting. In a large bowl, add the halved Brussels sprouts. Pour in 3 tablespoons of extra virgin olive oil. Sprinkle with sea salt and cracked pepper. Toss them well to coat. Place the sprouts on a baking sheet lined with parchment. Keep them in a single layer for even roasting. Bake for 20 to 25 minutes. Stir them halfway through for best results. You want them golden brown and crispy. While the sprouts roast, mix the glaze. In a small bowl, whisk together 2 tablespoons of honey and 2 tablespoons of Sriracha sauce. Add 1 tablespoon of soy sauce and 2 minced garlic cloves. Blend until smooth. When the Brussels sprouts are ready, take them out of the oven. Drizzle the honey Sriracha glaze over the sprouts. Toss gently to coat every piece. Return the baking sheet to the oven for another 5 to 7 minutes. This helps the glaze caramelize. When done, sprinkle with toasted sesame seeds and chopped cilantro before serving. To get the best texture from your Brussels sprouts, roast them in a single layer. This helps them cook evenly. If they overlap, some sprouts may steam instead of roast, losing that crispy bite. Stir the sprouts halfway through cooking. This simple step makes sure every piece gets that golden color. You can adjust the sweetness or spice of the glaze. If you want it sweeter, add more honey. For more heat, just add extra Sriracha. You can also swap the olive oil for another oil, like avocado oil or sesame oil. Each option brings a unique taste to the dish. Serve the Honey Sriracha Brussels sprouts in a shallow bowl. This highlights their bright colors. Add a sprinkle of sesame seeds on top for crunch. A scattering of fresh cilantro gives a nice pop. For a fresh twist, include a wedge of lime on the side. This adds a zesty kick that pairs well with the sweetness. {{image_4}} You can make your Honey Sriracha Brussels sprouts even better. Adding citrus can enhance their taste. A squeeze of lime or orange juice adds a bright twist. The tanginess balances the sweet heat of the sauce. You can also mix in other spices. Try garlic powder, smoked paprika, or cumin for extra depth. If you need gluten-free options, use tamari instead of soy sauce. Tamari gives the same great flavor without gluten. For vegan substitutions, replace honey with maple syrup. It keeps the sweetness while making the dish plant-based. Want a crunch? Add nuts like almonds or cashews. They add texture and flavor. You can mix in other vegetables too. Carrots, bell peppers, or sweet potatoes work well. This gives you a colorful and tasty dish. To keep your Honey Sriracha Brussels sprouts fresh, use airtight containers. Glass or plastic containers work well. Make sure they are sealed tightly. Place the sprouts in the fridge right after they cool down. This helps keep them crispy. When reheating, I suggest using the oven. This method helps maintain the texture. Set your oven to 350°F (175°C). Place the sprouts on a baking sheet and heat for about 10 minutes. If you want to use the microwave, do it in short bursts. Check often to avoid sogginess. If you want to freeze them, the first step is to cool them completely. Spread them on a baking sheet in a single layer. Freeze until solid, then transfer to a freezer bag. When you want to eat them, thaw in the fridge overnight. Reheat as mentioned before for the best taste. To cut the heat, you can reduce the amount of Sriracha. Start with one tablespoon instead of two. You can also add more honey to balance the spice. Mixing in some lime juice adds freshness and reduces heat. If you're looking for alternatives, use sweet chili sauce or barbecue sauce. Both add tasty flavor without too much heat. You can use frozen Brussels sprouts, but they will cook a bit differently. Frozen sprouts have more moisture, which may affect crispiness. Thaw them before roasting for better results. Pat them dry with a towel to remove excess water. This helps them roast evenly and get that nice golden color. These sprouts pair well with many dishes. Try serving them with grilled chicken or fish for a complete meal. They also match nicely with rice or quinoa. For a fun twist, add them to tacos or grain bowls. You can even serve them as a side with a zesty lime wedge for extra flavor. We explored how to make tasty Honey Sriracha Brussels sprouts. You learned about key ingredients like Brussels sprouts, olive oil, and honey. I shared steps for prepping, seasoning, and roasting them perfectly. We also discussed how to customize flavors and store leftovers. Enjoy experimenting with this dish. It’s simple, fun, and packs a flavor punch. Now, go and create your own version of this great side!

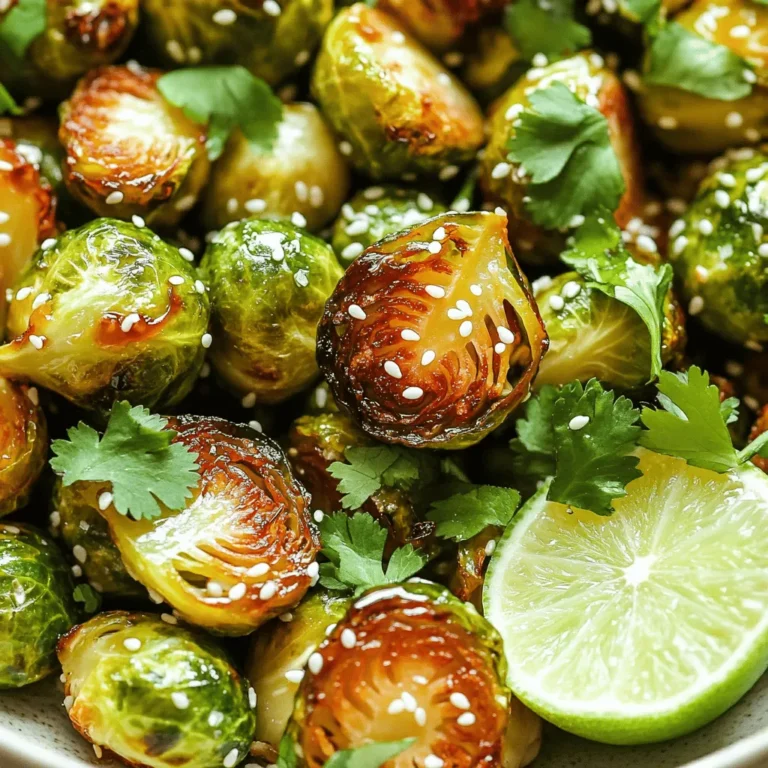
Honey Sriracha Brussels Sprouts Flavorful Roasted Dish

- 2 ripe avocados - 1 cup cherry tomatoes, halved - 1 cup fresh mozzarella balls (bocconcini), halved - ¼ cup fresh basil leaves, finely chopped - 2 tablespoons balsamic glaze - 1 tablespoon extra virgin olive oil - Sea salt and freshly cracked black pepper For Caprese stuffed avocados, fresh and quality ingredients matter. The ripe avocados serve as the creamy base for our dish. I pick avocados that yield slightly when pressed, showing they are ready. Next, I choose sweet cherry tomatoes. Halving them brings out their juicy goodness. The fresh mozzarella balls add a delightful creaminess, while the basil adds a burst of flavor. Balsamic glaze gives a sweet tang that ties everything together. Extra virgin olive oil adds richness. Finally, I season with sea salt and black pepper to enhance all the flavors. Each ingredient plays a key role in making this dish delicious and fresh. To start, slice the ripe avocados in half lengthwise. Hold the avocado steady and cut down to the pit. Rotate your knife around the pit to create two halves. Next, carefully remove the pit with a spoon or knife. If you want more filling, scoop out a small amount of the flesh to enlarge the cavity. This extra space lets you add more delicious Caprese mixture. Set the avocado halves aside on a plate. In a mixing bowl, combine one cup of halved cherry tomatoes, one cup of halved fresh mozzarella balls, and ¼ cup of finely chopped fresh basil. This colorful mix brings the dish to life. Drizzle two tablespoons of balsamic glaze and one tablespoon of extra virgin olive oil over the mixture. Season it with sea salt and freshly cracked black pepper. Gently fold the ingredients together until they are well mixed. This allows all the flavors to blend nicely. Now it's time to fill the avocado halves. Use a spoon to scoop out the Caprese mixture and place it into each avocado half. Make sure each half is overflowing with the vibrant mix. For a finishing touch, drizzle any remaining balsamic glaze over the stuffed avocados. This adds an extra burst of flavor and makes them look great. If you like, you can also place whole basil leaves on top for a pop of fresh color. Enjoy this delightful dish! To make Caprese stuffed avocados, you need ripe avocados. Here’s how to choose them: - Ripeness guide: Gently squeeze the avocado. It should feel slightly soft but not mushy. If it’s hard, leave it to ripen for a few days. If it’s too soft, it might be overripe. - Tips for selecting ingredients: Choose avocados that have a rich, dark green color. Ideal avocados are firm but yield to gentle pressure. If you see any dark spots, avoid those. Serving your dish well makes it more enjoyable. Here are some ideas to make your Caprese stuffed avocados look great: - Serving suggestions: Use a beautiful serving platter. Place the stuffed avocados on it, making them the star of the show. - How to enhance visuals with garnishes: Drizzle extra virgin olive oil and balsamic glaze around the platter. Scatter whole basil leaves around the avocados for a pop of color. This not only looks nice but adds aroma too. {{image_4}} You can have fun by changing the cheese in this dish. Mozzarella is classic, but you can try feta or goat cheese. Both add a unique flavor. If you want a creamier taste, use burrata. Substituting tomatoes is another great idea. Instead of cherry tomatoes, try bell peppers or cucumbers. You can also mix in some roasted red peppers for a smoky twist. These swaps keep the dish fresh and exciting. If you follow a vegan diet, you can easily adapt this recipe. Swap mozzarella for vegan cheese or add avocado to boost creaminess. Use a balsamic reduction made from plant-based ingredients. For those on a low-carb diet, skip the tomatoes or use fewer. You can fill the avocados with just cheese and basil. This keeps the dish light while still being full of flavor. Store leftovers in an airtight container. This keeps them fresh longer. You can also wrap each avocado half tightly in plastic wrap. Keep them in the fridge for up to two days. To maintain freshness, add a bit of extra lime juice. This helps slow browning. Avoid stacking avocados to prevent bruising. Can you freeze stuffed avocados? No, it’s best not to freeze them. The texture will change and become mushy. Instead, make the filling and freeze it. You can then stuff fresh avocados when ready to eat. For reheating thawed filling, place it in a microwave-safe dish. Heat for 30 seconds. Stir and check if it’s warm enough. If not, heat in 10-second bursts. Enjoy your fresh Caprese flavors! Yes, you can prepare these avocados ahead of time. I suggest making the Caprese mixture a few hours before serving. Store the filling in the fridge to keep it fresh. However, wait to fill the avocados until just before serving. This way, the avocado stays bright and green, not brown. If you have leftovers, you can keep them in an airtight container for one day. Just remember that the texture may change slightly. If you don’t have balsamic glaze, you can use balsamic vinegar instead. Just drizzle a bit over the filling. You can also try a lemon vinaigrette for a zesty twist. Another option is to use a store-bought dressing, like Italian or pesto. Each of these choices adds a different flavor, so feel free to mix it up! Caprese stuffed avocados are great for many occasions. They shine as an appetizer at dinner parties or BBQs. You could also serve them as a light lunch or a side dish. Pair them with crusty bread or a light salad to complete the meal. For an extra touch, drizzle olive oil and balsamic glaze around the platter for a beautiful display. Don't forget to add whole basil leaves for a pop of color! These Caprese Stuffed Avocados are easy to make and tasty. You can fill ripe avocados with a mix of fresh tomatoes, mozzarella, and basil. Remember to choose the best avocados for great flavor. Use balsamic glaze for a delicious finish. Feel free to try different ingredients to suit your taste. With these tips, you can impress your guests or enjoy a healthy meal. Keep leftovers fresh in the fridge. Happy cooking!

Caprese Stuffed Avocados Flavorful and Fresh Delight

- 1 cup all-purpose flour (heat-treated for safety) - 1/2 cup unsalted butter, softened - 1/2 cup packed brown sugar - 1/4 cup granulated sugar - 2 tablespoons pure vanilla extract - 1/4 teaspoon fine salt - 1/2 cup mini chocolate chips - 1 cup cream cheese, softened - 1/2 cup powdered sugar - 1/4 cup milk (or more as needed for desired consistency) Gather these simple ingredients before you start. The flour needs heat treatment to keep it safe. Softened butter and cream cheese mix well, so let them sit out a bit. The sugars will add that sweet taste you love. Vanilla extract gives it a nice aroma and flavor. Don't forget the salt; it enhances the sweetness. Mini chocolate chips are a fun surprise in every bite. Lastly, milk helps you adjust the dip's creaminess. These ingredients come together for a sweet and creamy treat! {{ingredient_image_2}} - Step 1: Mix cream cheese and butter In a large bowl, combine 1 cup of cream cheese and 1/2 cup of softened butter. Use an electric mixer to blend them until creamy and smooth. This will form the base of your dip. - Step 2: Add sugars and vanilla Next, add 1/2 cup of packed brown sugar and 1/4 cup of granulated sugar. Then, pour in 2 tablespoons of pure vanilla extract. Mix everything on medium speed until it is well combined and smooth. - Step 3: Incorporate heat-treated flour Now, take 1 cup of heat-treated flour and add it slowly to your mixture. Use low speed on the mixer to combine it gently. Stop mixing as soon as it is blended. This ensures that the dip stays soft and tasty. - Step 4: Fold in chocolate chips With a spatula, carefully fold in 1/2 cup of mini chocolate chips. This adds a delightful crunch and sweetness to every bite. - Step 5: Adjust consistency with milk If the dip is too thick, add 1/4 cup of milk, one tablespoon at a time. Stir gently until you reach the creamy texture you want. - Step 6: Serve and garnish Spoon the dip into a nice serving bowl. For a pretty touch, sprinkle extra mini chocolate chips on top. This makes it look fun and inviting! Start with room temperature cream cheese and butter. This step helps create a smooth dip. Cold cream cheese can make mixing hard, leaving lumps. For flour safety, heat-treat it. Spread the flour on a baking sheet and bake it at 350°F for five minutes. This kills any harmful bacteria. Let it cool before adding it to your dip. Serve your dip with fun dippers. Some great choices are graham crackers, apple slices, salty pretzels, or crunchy carrots. These add different textures and flavors. For a stunning display, place the dip in a nice bowl. Surround it with your dippers on a colorful platter. This invites everyone to dig in! Add a sprinkle of chocolate chips on top for a little flair. Pro Tips Heat-Treat Your Flour: To ensure safety when consuming raw cookie dough, always heat-treat your all-purpose flour before using it in this dip. Customize Your Dippers: Get creative with your dippers! Try using pretzel crisps, fruit slices, or even mini waffles for a unique taste experience. Storage Tips: Store any leftover dip in an airtight container in the refrigerator for up to 5 days. Just stir it well before serving again. Make It Vegan: Substitute the cream cheese with a vegan alternative and use coconut oil instead of butter for a delicious vegan version of this dip. {{image_4}} You can switch up the classic cookie dough dip in fun ways. One tasty option is the peanut butter chocolate chip dip. Just mix in half a cup of creamy peanut butter along with your other ingredients. This makes a rich, nutty treat that pairs perfectly with sweet chocolate chips. Another fun twist is to add nuts or coconut. You can fold in a half cup of chopped nuts like walnuts or pecans for extra crunch. Shredded coconut can add a tropical flair. Both options make the dip even more interesting and flavorful. If you have dietary needs, you can still enjoy this dip. For a gluten-free option, just use gluten-free flour. Many brands make a great choice that works well in this recipe. It keeps the dip soft and tasty without gluten. For dairy-free alternatives, swap cream cheese and butter with plant-based versions. There are many great dairy-free cream cheeses now. Use coconut oil or vegan butter for a delicious, creamy base. This way, everyone can enjoy the dip, no matter their diet! To keep your chocolate chip cookie dough dip fresh, store it in an airtight container. This helps to lock in moisture and flavor. Make sure the dip is cooled before sealing. Place it in the fridge right after serving. Yes, you can freeze cookie dough dip! Just scoop it into a freezer-safe container. Seal it tightly to prevent freezer burn. When you want to enjoy it again, let it thaw in the fridge overnight before serving. When stored properly, the dip lasts up to a week in the fridge. If you freeze it, it can last for about three months. Signs of spoilage include a sour smell or a change in color. If the dip looks dry or has mold, it’s best to throw it out. Always trust your senses when checking food freshness. Can I eat raw cookie dough dip? Yes, you can eat the dip. It is safe because we heat-treat the flour. This step kills harmful bacteria. Enjoy it with dippers or by the spoonful! How long does the dip take to make? The dip takes just 15 minutes to make. It is quick and easy. You can whip it up in no time for a sudden craving or surprise guests. What can I substitute for cream cheese? You can use Greek yogurt or mascarpone cheese as a swap for cream cheese. Both will keep the dip creamy. They also add a unique flavor twist. What to do if the dip is too thick? If your dip is thick, add milk a tablespoon at a time. Mix gently until it reaches your desired creaminess. This will make it easier to scoop. How to fix over-sweetened dip? If the dip is too sweet, add a pinch of salt. This can balance the flavors. You can also mix in more unsweetened cream cheese to help tone it down. This dip is easy to make and fun to enjoy. You learned the key ingredients and steps, plus helpful tips. Using the right mix and serving options makes it even better. Feel free to try different flavors and use substitutes. Remember to store it well for the best taste. Whether for a party or a snack, this cookie dough dip will please everyone. Get creative and enjoy your tasty treat!

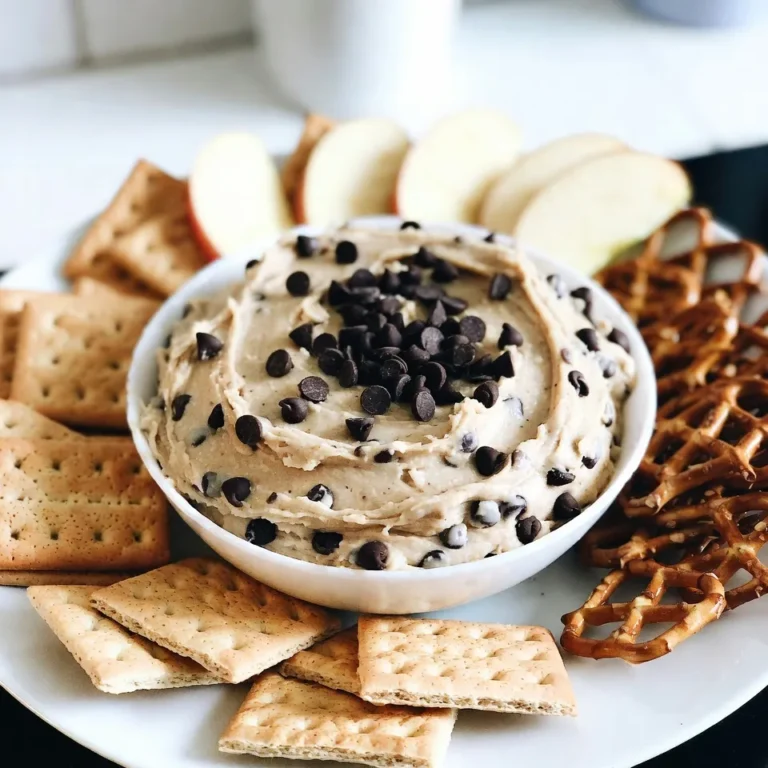
Chocolate Chip Cookie Dough Dip Scrumptious Delight

Gather these key items for your gyros: - 2 boneless, skinless chicken breasts, thinly sliced - 2 tablespoons extra virgin olive oil - 1 tablespoon fresh lemon juice - 1 teaspoon dried oregano - 1 teaspoon garlic powder - Salt and freshly cracked black pepper to taste - 4 large pita breads or wrap bread - 1 cup creamy tzatziki sauce - 1 cup romaine lettuce, finely shredded - 1 medium ripe tomato, diced - ½ cucumber, thinly sliced - ¼ red onion, finely sliced These ingredients blend to create a fresh and tasty meal. To boost taste and texture, consider adding: - Feta cheese, crumbled - Fresh dill or parsley for garnish These extras make your gyros even more special. You can also whip up a simple tzatziki sauce with: - 1 cup Greek yogurt - 1 medium cucumber, grated - 1-2 cloves garlic, minced - 1 tablespoon fresh dill, chopped - Salt and pepper to taste Tzatziki adds a creamy, tangy kick to your wraps. Start by making the marinade. In a medium bowl, mix 2 tablespoons of olive oil, 1 tablespoon of lemon juice, 1 teaspoon of dried oregano, and 1 teaspoon of garlic powder. Add salt and pepper to taste. Next, add the thinly sliced chicken breasts to the bowl. Stir well to coat each piece. Cover the bowl with plastic wrap, then place it in the fridge. Let the chicken marinate for at least 30 minutes. This step helps the chicken soak up all the great flavors. After marinating, heat a non-stick skillet over medium-high heat. Once it's hot, add the marinated chicken slices in a single layer. Cook them for about 6 to 8 minutes. Make sure to turn them occasionally so they cook evenly. You want the chicken to be golden brown and fully cooked through. When done, remove the chicken from the skillet and set it aside. Next, warm the pita breads. Take a dry skillet and heat it over medium heat. Place the pita breads in the skillet for about 1 to 2 minutes on each side. You want them to be soft and pliable. This makes it easier to fold the gyros later. Now it’s time to put everything together. Take a warm pita and spread a good amount of tzatziki sauce in the center. Next, layer the cooked chicken on top. Add a handful of shredded romaine lettuce, diced tomatoes, cucumber slices, and red onion. If you like, sprinkle some crumbled feta cheese on top for extra taste. To wrap the gyro, fold the pita in half, enclosing all the yummy filling. To make serving easier, wrap the open end with parchment paper or foil. This keeps the gyro intact. Serve your Greek chicken gyros right away for the best flavor and texture. Enjoy this quick and flavorful meal! To make the chicken tasty, marinate it well. Use a medium bowl to mix: - 2 tablespoons extra virgin olive oil - 1 tablespoon fresh lemon juice - 1 teaspoon dried oregano - 1 teaspoon garlic powder - Salt and freshly cracked black pepper Add the sliced chicken and coat it well. Cover the bowl and chill for at least 30 minutes. This helps the flavors soak in. If you can marinate longer, like 2 hours or overnight, that’s even better. When cooking chicken, heat your skillet first on medium-high. This step helps brown the chicken. Add the marinated slices in one layer. Cook for about 6-8 minutes. Turn the chicken often to cook evenly. Look for a golden brown color and ensure it is fully cooked. Use a meat thermometer to check. The chicken should reach 165°F for safety. Warm pita bread to make it soft and easy to fold. Use a dry skillet over medium heat. Heat each pita for 1-2 minutes on both sides. This step makes your wraps more enjoyable. Soft pitas will hold the filling better. If you like, you can also toast the pita for a crispy touch. {{image_4}} If you want to make a vegetarian gyro, use grilled vegetables. Try zucchini, bell peppers, and eggplant. You can also use marinated tofu or tempeh for a protein boost. For a vegan option, skip the feta cheese and tzatziki. Instead, blend cashews with garlic, lemon juice, and herbs for a creamy spread. Chicken is great, but other proteins work well too. You can swap chicken for lamb or beef if you prefer red meat. Shrimp is another tasty choice; just grill it quickly for a light meal. For a plant-based option, consider chickpeas. Roasted chickpeas add a nice crunch and flavor. You can easily swap ingredients to match your taste. Instead of romaine lettuce, use spinach or arugula for a peppery kick. If you don’t have fresh dill, parsley or mint will add a fresh flavor. Switch out the tomato for roasted red peppers for a sweet touch. You can even use whole wheat pita for more fiber. Store your leftover chicken gyros in an airtight container. This keeps them fresh for about 3 days in the fridge. If you have extra tzatziki sauce, store that separately. Make sure to cover it well to prevent it from absorbing smells. You can freeze the cooked chicken separately. Place it in a freezer bag and remove as much air as you can. It lasts about 3 months in the freezer. When ready to eat, thaw it in the fridge overnight before reheating. Do not freeze the assembled gyros, as the pita will become soggy. To reheat, warm the chicken in a skillet over low heat. This keeps it juicy. You can also microwave it for about 1 minute, but watch it closely. If you have leftover pita bread, warm it in a dry skillet for a minute on each side. This way, it stays soft and tasty. Enjoy your gyros fresh and hot! You can serve Greek chicken gyros with a few tasty sides. I love pairing them with a fresh Greek salad. A simple salad with cucumbers, tomatoes, olives, and feta works great. You can also add crispy roasted potatoes or a side of hummus with pita chips. These sides keep the meal light and flavorful. Yes, you can prepare parts of the gyros ahead of time. Marinate the chicken earlier in the day or even the night before. Cook the chicken and store it in the fridge for up to two days. Warm it up when you are ready to assemble the gyros. You can also slice the veggies in advance. Just keep them in an airtight container. Making tzatziki sauce is easy! You need just a few ingredients. Combine 1 cup of Greek yogurt, 1 grated cucumber, 1 tablespoon of olive oil, 1 tablespoon of fresh lemon juice, and 1 minced garlic clove. Mix well and season with salt and pepper. Let it chill in the fridge for at least 30 minutes. This allows the flavors to meld. Yes, there are gluten-free pita bread options available. Look for brands that make gluten-free wraps or pita. You can also use lettuce leaves instead of bread for a lighter option. This way, you still get the same great flavors without gluten. Greek chicken gyros are tasty and easy to make. We covered the main and optional ingredients, along with tzatziki sauce. I shared step-by-step instructions for marinating, cooking, and wrapping the gyros. Tips helped ensure perfect chicken and pita preparation. Variations allow for vegetarian options and ingredient swaps. Lastly, we discussed storage and reheating tips to enjoy gyros later. Now you can create your own delicious Greek chicken gyros. Enjoy the process and share this tasty dish with others!

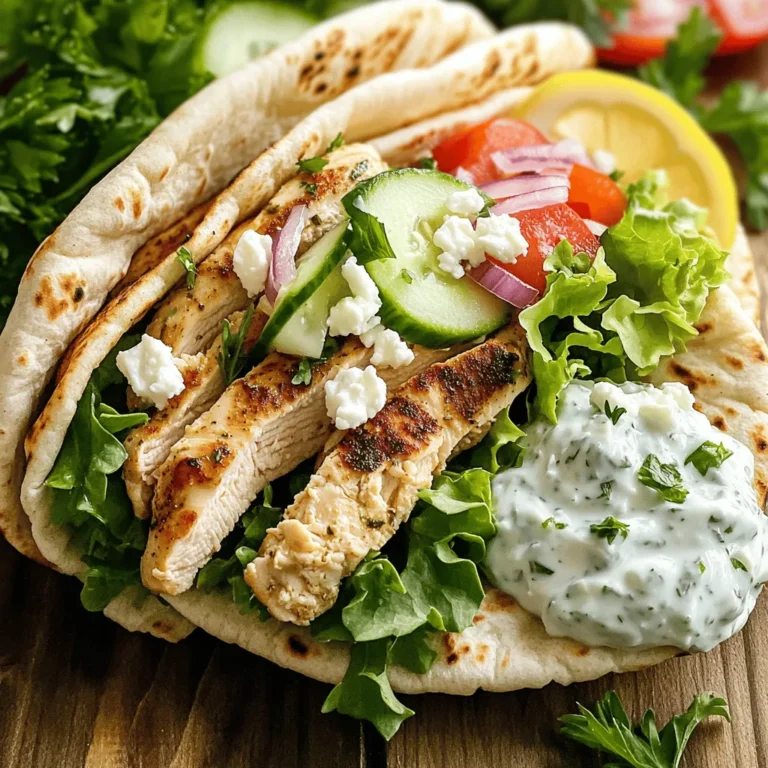
Easy Greek Chicken Gyro Wraps Quick and Flavorful Meal

- Ripe mango - Ripe avocado - Black beans - Red bell pepper - Cherry tomatoes - Red onion - Fresh cilantro - Lime juice - Extra virgin olive oil - Salt and pepper - Optional: Jalapeño This salad is a feast for your eyes and taste buds. You need ripe mango and avocado for a creamy texture. Use one can of black beans, as they add protein and fiber. The red bell pepper brings a sweet crunch, while cherry tomatoes add juicy bursts. Red onion gives a nice zing, and fresh cilantro adds brightness. Don't forget the lime juice; it brings acidity. Extra virgin olive oil adds richness and depth to the dish. Add salt and pepper for flavor. For a spicy kick, include a minced jalapeño. This ingredient is optional, but it balances the sweetness of the mango. Each ingredient plays a vital role in making this salad fresh and flavorful. Enjoy gathering these ingredients for a vibrant mix! Start by dicing the ripe mango into bite-sized pieces. I love the sweet taste and bright color it adds. Next, take your ripe avocado and chop it into similar-sized cubes. Be gentle, as you want to keep the avocado intact for a nice look. Now, grab a can of black beans. Rinse them well under cold water. This step helps remove excess salt and keeps your salad fresh. Drain them thoroughly before using. Chop the red bell pepper into small pieces. This adds a nice crunch and sweetness. Then, halve the cherry tomatoes to release their juicy flavor. Next, finely chop the red onion for that zing. Lastly, don’t forget to chop the fresh cilantro. It brings a lovely herbal note to the dish. In a large mixing bowl, combine the diced mango, avocado, and the rinsed black beans. This mixture will be the base of your salad. Next, add in the diced red bell pepper and halved cherry tomatoes. If you like some heat, fold in the minced jalapeño. It will give your salad a nice kick! In a small bowl, whisk together the juice of one lime, extra virgin olive oil, salt, and pepper. This zesty dressing will tie all the flavors together. Make sure to mix it well so the flavors blend nicely. Drizzle the dressing over your salad mixture. Use a spatula or wooden spoon to gently toss everything together. Be careful not to mash the avocado; you want it to stay in nice pieces. Finally, sprinkle the fresh cilantro on top. Give it one last gentle toss to mix it in. Enjoy this vibrant and fresh mango avocado black bean salad! For a beautiful display, you can serve this salad in a large bowl or on individual plates. Using a big bowl lets everyone scoop their own portions. If you use plates, it looks fancy and is easy to share. Garnish each serving with fresh cilantro leaves and lime wedges. This adds a pop of color and extra flavor. A nice touch makes your dish more inviting. If you like spice, add minced jalapeño to your salad. It gives a nice kick! Start with a small amount, then taste. You can always add more if you want more heat. Feel free to try other herbs instead of cilantro. Fresh parsley or basil can give a new twist. Mixing up the herbs keeps things exciting. To keep your avocado intact, be gentle when mixing. Use a spatula or wooden spoon to fold the ingredients. This way, the avocado stays in nice pieces, not mush. When you dress the salad, pour a little at a time. Toss gently to coat everything evenly. This helps every bite taste great without sogginess. {{image_4}} You can easily adapt this Mango Avocado Black Bean Salad to fit many diets. It is naturally vegan and gluten-free, making it a great choice for many. If you want more protein, try adding grilled chicken or shrimp. These options will make the salad heartier and more filling. You can add different fruits for a twist. Pineapple or papaya brings a fun sweetness. They pair well with the creamy avocado and tangy lime. You can also switch the beans. Try kidney beans or chickpeas for a unique taste and texture. Incorporating seasonal fruits and veggies can elevate your salad. In summer, add fresh corn or zucchini. In fall, consider roasted sweet potatoes or apples. These ingredients will keep your salad fresh and exciting all year round. To keep your mango avocado black bean salad fresh, store it in an airtight container. This helps prevent air from spoiling the ingredients. If you have leftovers, try to use them within two days. - Avoid adding dressing until you're ready to eat. This keeps the salad crisp. - If you notice browning on the avocado, sprinkle some lime juice on top. This slows down oxidation. For long-term storage, freezing is not ideal for the whole salad. The texture of avocado and tomatoes changes when frozen. - If you want to prepare ahead, freeze the dressing separately. Mix lime juice and olive oil in a small container. - You can also freeze black beans if you have extra. Just rinse and drain them well before freezing. By following these tips, you can enjoy your mango avocado black bean salad fresh or save components for later use! To make this salad, start by gathering your ingredients. You will need diced mango, diced avocado, black beans, red bell pepper, cherry tomatoes, red onion, and fresh cilantro. 1. In a bowl, add the mango, avocado, and black beans. 2. Then add the diced red bell pepper and halved cherry tomatoes. 3. If you like spice, mix in minced jalapeño. 4. In a small bowl, whisk lime juice, olive oil, salt, and pepper. 5. Drizzle this dressing over the salad. 6. Toss gently to combine. Be careful not to mash the avocado. 7. Finish with fresh cilantro on top. Yes, you can make this salad ahead of time. Prepare the salad base without the dressing and avocado. Store it in the fridge for a day. When ready to serve, add the avocado and dressing. This keeps the avocado fresh and prevents it from browning. If you need a substitute for black beans, try kidney beans or chickpeas. Both options work well and add protein. Make sure to rinse and drain them before adding to the salad for the best taste. To pick ripe mangoes, look for fruit that gives slightly when you press it. The skin should be a mix of green and yellow. For avocados, choose ones that feel soft but not mushy. Dark skin often indicates ripeness, but check for firmness. Yes, this recipe is very customizable. It is naturally vegetarian and can be made vegan by using oil. For gluten-free diets, this salad is safe. You can also add grilled chicken or shrimp for extra protein. Adjust ingredients to fit your taste and dietary needs! This salad is a fresh mix of ripe mango, avocado, and black beans. I shared steps for prep, mixing, and dressing. You can add your twist with spices or herbs. Remember, gentle mixing keeps the avocado intact. Store leftovers well to enjoy later. Feel free to customize it to your taste and dietary needs. Explore flavors and enjoy experimenting! Making this salad can offer a delicious upgrade to your meals. Enjoy creating and sharing this healthy dish!

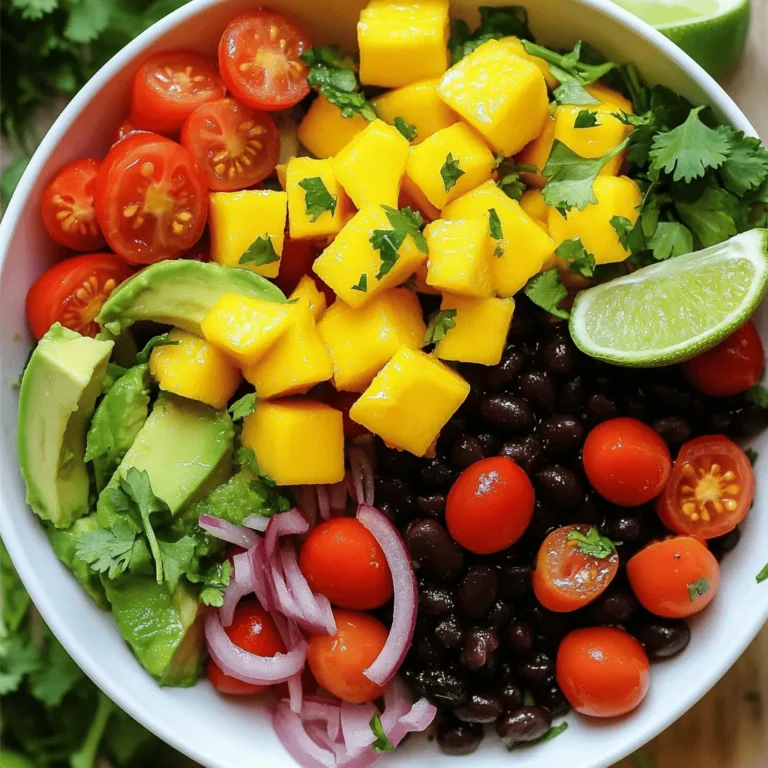
Mango Avocado Black Bean Salad Fresh and Flavorful Dish

- 2 medium zucchinis, spiralized into zoodles - 1 lb large shrimp, peeled and deveined - 3 tablespoons olive oil - 4 cloves garlic, minced - 1 teaspoon red pepper flakes - Juice of 1 lemon - Zest of 1 lemon - Salt and pepper to taste - ¼ cup fresh parsley, finely chopped - ¼ cup grated Parmesan cheese (optional) This dish offers a healthy balance. Each serving has about: - Calories: 250 - Protein: 20g - Carbohydrates: 10g - Fat: 15g - Fiber: 3g Shrimp adds protein, while zoodles keep it light. Olive oil provides healthy fats. If you want to change things up, consider these swaps: - Zucchini: Use yellow squash for a different flavor. - Shrimp: Swap shrimp for chicken or tofu. - Olive oil: Use avocado oil for a different taste. - Lemon juice: Lime juice works well too. - Parmesan: Nutritional yeast is a great dairy-free option. These substitutions help cater to your taste and dietary needs while keeping the dish delicious. First, take two medium zucchinis and spiralize them into zoodles. A spiralizer helps make perfect noodle shapes. If you don't have one, you can use a vegetable peeler to create thin strips. Set the zoodles aside once you finish. Next, heat two tablespoons of olive oil in a large skillet over medium heat. When the oil is hot, add four minced garlic cloves and one teaspoon of red pepper flakes. Cook this mix for about one minute. The garlic should smell nice and turn a light gold. Now, raise the heat to medium-high. Add one pound of peeled and deveined shrimp to the skillet. Sprinkle some salt and pepper on top. Cook the shrimp for about two to three minutes on each side. They will turn pink and opaque when they are done. Once the shrimp are cooked, move them to a plate. Keep the garlic oil in the skillet. Add one tablespoon of olive oil and the zoodles. Sauté the zoodles for two to three minutes. You want them to be tender but still crunchy. Then, lower the heat and bring the shrimp back to the skillet. Squeeze the juice of one lemon over everything and add the lemon zest. Mix gently for one more minute. Finally, stir in ¼ cup of chopped parsley. Taste and add more salt or pepper if needed. Serve the zoodles and shrimp on plates. If you like, sprinkle some grated Parmesan cheese on top for extra flavor. To cook zoodles well, start with fresh zucchinis. Choose firm ones without soft spots. Spiralize them just before cooking. This keeps them fresh and crunchy. When cooking, don’t overdo the heat. A few minutes is all you need. You want them tender, not mushy. Sauté them quickly after cooking shrimp. This way, they soak up all the lovely flavors. Look for shrimp that are pink and shiny. The smell should be clean, like the sea. Avoid any shrimp with a strong fishy odor. If you can, buy shrimp that are wild-caught. They usually taste better than farmed shrimp. Check for the size too; larger shrimp work best in this dish. A good skillet is key for this recipe. It allows you to cook the shrimp and zoodles evenly. A spiralizer helps create perfect zoodles. You can use a handheld one or a countertop version. Make sure you have a sturdy spatula for flipping shrimp. Lastly, have a citrus juicer handy for the lemon juice. It makes squeezing easier and cleaner. {{image_4}} You can swap shrimp for other proteins. Chicken or scallops work well. Tofu is a great option for a plant-based dish. Cook these proteins the same way as shrimp. Just ensure they reach a safe temp for eating. Each protein brings a different taste to the dish. Want to add more veggies? Try bell peppers, spinach, or cherry tomatoes. These add color and nutrients. Just sauté them briefly with the zoodles. You can also mix in some broccoli or asparagus. This makes your meal even more vibrant and healthy. Do you like it spicy? Increase the red pepper flakes. You can also add fresh chili for more heat. If you want less spice, cut the flakes in half. For a milder taste, try adding a splash of cream. This will balance the flavors nicely. Adjust the spice to suit your taste buds. To keep your Shrimp Scampi Zoodles fresh, store leftovers in an airtight container. Place the zoodles and shrimp together if you plan to eat them soon. They will stay good in the fridge for about 2 days. If you want to keep them longer, separate the zoodles from the shrimp. Zoodles can get soggy if stored too long. When you are ready to eat, you can reheat your leftovers on the stove or in the microwave. To reheat on the stove, place the zoodles and shrimp in a pan over low heat. Stir to warm them evenly. If using the microwave, heat in short bursts of 30 seconds. Check often to avoid overcooking. I do not recommend freezing the cooked zoodles. They can turn mushy when thawed. However, you can freeze cooked shrimp. Place them in a freezer-safe bag and remove as much air as possible. They can last in the freezer for up to 3 months. When ready to use, thaw shrimp in the fridge overnight before cooking or reheating. Zoodles are noodles made from zucchini. You spiralize zucchini to create long, thin strands. Zoodles are a great low-carb and gluten-free alternative to pasta. They are light and soak up flavors well. Using zoodles makes dishes like shrimp scampi healthier and more fun. You can prep some parts ahead. Spiralize the zoodles and store them in the fridge. Cook the shrimp and store them separately. When ready to eat, just sauté the zoodles and mix in the shrimp. This way, you keep the meal fresh and tasty. Avoid cooking the zoodles too early, as they can get soggy. This dish is already gluten-free if you use zoodles. Just skip the Parmesan cheese if you're sensitive to dairy. You can also use gluten-free alternatives for any other toppings. That way, everyone can enjoy this tasty meal without worry. In this blog post, we covered zoodles with shrimp, highlighting key ingredients, preparation steps, and useful tips. You learned about ingredient substitutions, cooking techniques, and how to store leftovers. Variations allow you to customize this dish by adding different proteins or adjusting flavors. I hope you feel ready to create a tasty meal that fits your taste. Enjoy making your zoodles with shrimp and share your experience!

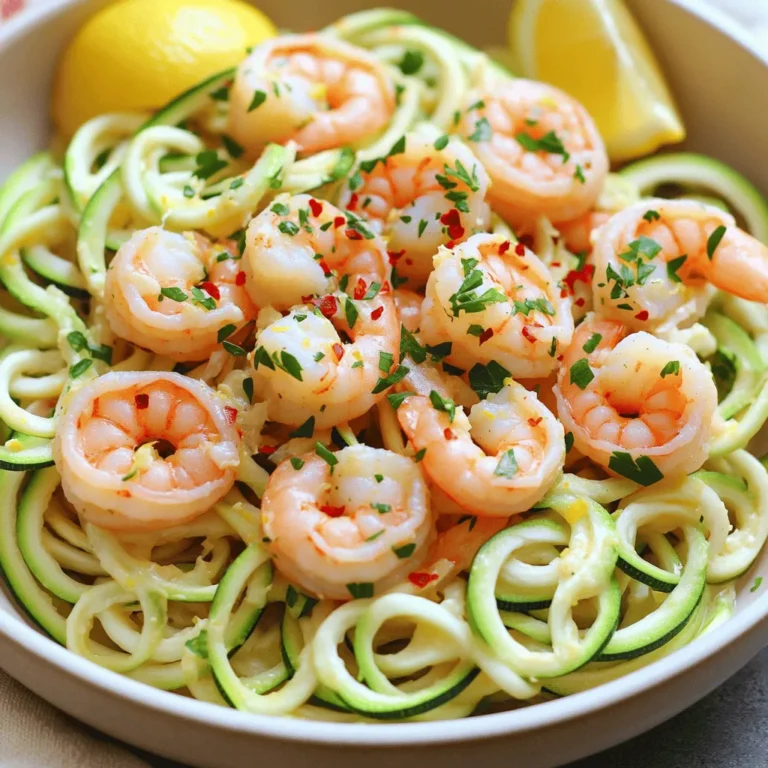
Savory Shrimp Scampi Zoodles Quick and Easy Meal

PREV 1 … 15 16 17 … 44 NEXT
yummybiterecipes

explore

DessertsDinnerAppetizersDrinks

Our Policies

  • Cookie Policy
  • Copyright Policy
  • Disclaimer
  • GDPR Policy
  • Terms Of Use
Back to Top
  • About
  • Contact Us
  • Privacy Policy
© 2025 yummybiterecipes