FREE DINNER EBOOK! Get your copy!
  • Cookie Policy
  • GDPR Policy
  • Disclaimer
  • Terms Of Use
  • Visit my other site: Fun Cookie Recipes
yummybiterecipes
  • Home
  • Dinner
  • Desserts
  • Drinks
  • Appetizers
  • Contact
  • About
  • Privacy Policy
  • Home
  • Dinner
  • Desserts
  • Drinks
  • Appetizers
  • Contact
  • About
  • Privacy Policy
  • Cookie Policy
  • GDPR Policy
  • Disclaimer
  • Terms Of Use
Visit my other site: Fun Cookie Recipes

HOME / CATEGORIES /

Latest

- 1 lb flank steak, thinly sliced against the grain - 3 cups fresh broccoli florets - 2 tablespoons vegetable oil - 3 cloves garlic, finely minced - 1 tablespoon fresh ginger, grated - 1/4 cup low-sodium soy sauce - 2 tablespoons oyster sauce - 2 tablespoons brown sugar - 1 tablespoon cornstarch - 1 teaspoon sesame oil - Cooked white rice or noodles - Sesame seeds for garnish - 2 green onions, finely sliced, for garnish This simple recipe is packed with flavor and is easy to make. You can find flank steak at most grocery stores. It cooks fast and tastes great when sliced against the grain. Broccoli adds a nice crunch. You can use fresh florets for the best taste. For the marinade, you mix soy sauce, oyster sauce, brown sugar, cornstarch, ginger, and sesame oil. This mix gives the beef a rich flavor. The brown sugar adds a hint of sweetness. Cornstarch helps thicken the sauce later. When serving, you can choose rice or noodles. Both options work well with this dish. The sesame seeds and green onions on top make it look nice and add extra flavor. Enjoy making this at home! - In a medium bowl, mix soy sauce, oyster sauce, brown sugar, cornstarch, ginger, and sesame oil. - Add thinly sliced flank steak to the bowl. Coat each piece well in the marinade. - Let the beef sit for 15 minutes. This helps the meat soak up the flavors. - Fill a pot with water and bring it to a rolling boil. - Add the fresh broccoli florets to the boiling water. Blanch for about 2 minutes. - When the broccoli is bright green and slightly tender, drain it in a colander. Set it aside. - In a large skillet, heat 1 tablespoon of vegetable oil over high heat. - Add the marinated beef in a single layer. Cook for 2-3 minutes, stirring occasionally. - Once the beef is browned, remove it from the skillet and set it aside on a plate. - In the same skillet, add the other tablespoon of vegetable oil. - Add minced garlic and sauté for about 30 seconds, stirring to keep it from burning. - Return the cooked beef to the skillet with the garlic. - Add the blanched broccoli to the skillet. Pour in beef broth. - Toss everything together and let it simmer for 3-5 minutes. Stir occasionally until the sauce thickens. - Serve the beef and broccoli over cooked white rice or noodles. - Garnish the dish with sesame seeds and finely sliced green onions. Enjoy the flavors! High heat is key for browning your beef. This step gives your dish great flavor and texture. Start by making sure your skillet or wok is very hot. When the oil shimmers, add your beef in a single layer. This helps it sear well. Don't crowd the pan, or your beef will steam instead of brown. The perfect crunch in broccoli comes from proper blanching. Bring a pot of water to a rolling boil. Add your broccoli florets for about 2 minutes. They should turn bright green and be slightly tender but still crisp. Drain them right away to stop the cooking process. This keeps the broccoli vibrant and crunchy. To elevate the taste of your beef and broccoli, consider adding extra spices. A pinch of red pepper flakes adds heat. You could also drizzle a bit of hoisin sauce for sweetness. Experiment with flavors like sesame seeds or fresh herbs like cilantro. These touches can make your dish truly shine! {{image_4}} You can make this dish even better by adding more veggies. Try using bell peppers. They add color and sweetness. Carrots are also great. Slice them thin for a nice crunch. Snap peas work well, too. They bring a fresh taste and a pop of green. Mixing in these veggies makes your meal healthier and more colorful. If you want to switch things up, try different proteins. Chicken is a good choice. Use thin slices just like the beef. Tofu is a great option for a plant-based meal. It soaks up the flavors well. Shrimp cooks quickly and adds a nice seafood twist. Each protein gives a new taste to this classic dish. For those who need a gluten-free meal, there are easy swaps. Instead of regular soy sauce, use gluten-free soy sauce. It tastes similar and works well in the dish. You can also find gluten-free oyster sauce. These changes keep the flavor while making it safe for everyone to enjoy. To store your beef and broccoli, let it cool first. Place leftovers in an airtight container. This keeps the dish fresh and tasty for up to three days. Store it in the fridge. When ready to eat, just check for any signs of spoilage. You can freeze this dish, too! Let it cool completely, then transfer to a freezer-safe container. Seal it tightly to avoid freezer burn. It can last up to three months. When ready to enjoy, thaw it in the fridge overnight before reheating. To reheat, use a skillet over medium heat. Add a splash of beef broth or water to keep it moist. Stir often until heated through. You can also use the microwave, but do it in short bursts. Cover the dish to hold in moisture. This way, your beef and broccoli stay flavorful and tender. Yes, you can use frozen broccoli. It saves time and is easy to find. Just remember that frozen broccoli may be softer than fresh. To use it, skip the blanching step. Instead, add the frozen broccoli directly to the pan when you combine everything. It will cook through in the sauce. You have many options! You can use sirloin, ribeye, or even ground beef. If you want a lighter protein, try chicken or tofu. Each option will change the taste a bit, but they will still be delicious. Just adjust cooking times based on what you choose. Leftovers can last in the fridge for about 3 to 4 days. Make sure to store them in an airtight container. If you want to keep them longer, you can freeze the dish. It will stay good in the freezer for about 2 to 3 months. When reheating, use low heat to keep the meat tender. This recipe showcases a simple way to make a delicious dish with flank steak and fresh broccoli. You can prepare it with easy steps, ensuring tasty results. Remember, marinating the beef adds flavor, and blanching the broccoli keeps it crisp. Whether you stick to the basics or try variations, this meal fits your needs. Enjoy your creation with rice or noodles, and don’t forget the garnish! Cooking can be fun and rewarding—give it a try!

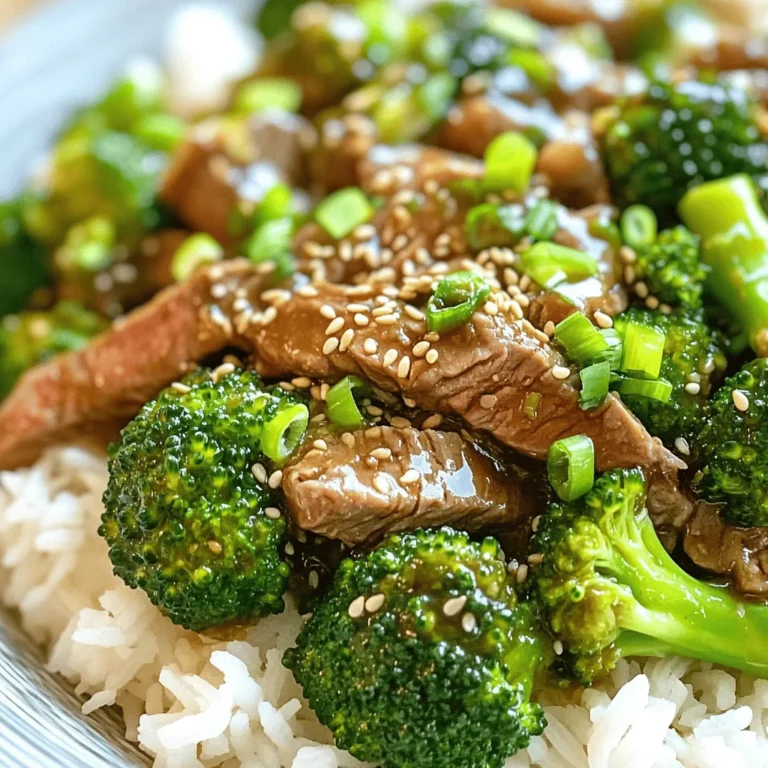
Beef & Broccoli Better Than Takeout Simple Recipe

- 2 cups all-purpose flour - 1 cup fresh blueberries - 1/2 cup granulated sugar - 1/2 cup unsalted butter, melted - 2 large eggs - 1/2 cup milk or buttermilk - Zest of 1 lemon - 2 tablespoons fresh lemon juice - 1 tablespoon baking powder - 1/2 teaspoon sea salt - 1/4 teaspoon baking soda - 1/3 cup all-purpose flour - 1/4 cup granulated sugar - 1/4 cup brown sugar, packed - 1/4 cup unsalted butter, melted - 1/2 teaspoon ground cinnamon These ingredients make the best blueberry lemon crumb muffins. Each one plays a key role. The flour gives structure. The blueberries add a burst of flavor. The lemon zest and juice brighten the taste. For the crumb topping, the mix of sugars and butter creates a sweet, crunchy layer. The cinnamon adds warmth and depth. You can find fresh blueberries at local farmers' markets. They are juicier and sweeter. Make sure your butter is unsalted for better control over the muffin flavor. Using buttermilk gives the muffins a tender crumb. If you can't find it, regular milk works too. Gather these ingredients before you start. This way, you will have everything ready for your baking adventure! Start by preheating your oven to 375°F (190°C). This step is key for even baking. Prepare your muffin tin by lining it with paper liners or greasing it. This will help keep the muffins from sticking. In a medium bowl, mix together 1/3 cup of all-purpose flour, 1/4 cup of granulated sugar, 1/4 cup of brown sugar, melted butter, and 1/2 teaspoon of ground cinnamon. Use a fork or your fingers to blend until the mixture looks crumbly. Set this aside for later. In a large bowl, whisk together 2 cups of all-purpose flour, 1 tablespoon of baking powder, 1/2 teaspoon of sea salt, and 1/4 teaspoon of baking soda. Make sure these dry ingredients are well mixed. This helps the muffins rise nicely. In another bowl, whisk together the melted butter, 1/2 cup of granulated sugar, 2 large eggs, 1/2 cup of milk (or buttermilk), lemon zest, and fresh lemon juice. Mix until it is smooth and all ingredients are combined. Pour the wet mixture into the bowl with the dry ingredients. Stir gently just until combined. It's okay if the batter is a bit lumpy. This keeps the muffins light and fluffy. Carefully fold in 1 cup of fresh blueberries. Take care not to crush them. These berries will burst with flavor in every bite, adding a fresh taste to the muffins. Spoon the batter into the prepared muffin cups. Fill each cup about 2/3 full to allow for rising. Now, sprinkle the crumb topping generously over each muffin. Let some fall into the batter for added texture. Put the muffin tin in the preheated oven and bake for 20-25 minutes. They are done when the tops are golden brown. A toothpick should come out clean when inserted into the center. Once baked, remove the muffins from the oven. Let them cool in the tin for about 5 minutes. Then, transfer them to a wire rack to cool completely. This helps keep the texture just right before serving. To keep your muffins fluffy, avoid over-mixing the batter. Mix just until everything combines. A few lumps are okay! Over-mixing can make the muffins dense. Gentle hands lead to tender muffins. Using fresh blueberries gives the best flavor. If you use frozen berries, do not thaw them. Thawing can make them mushy. Add them straight from the freezer to the batter. This keeps them intact and juicy. Baking time can change based on where you live. If you are at a higher altitude, muffins may bake faster. Start checking for doneness a few minutes early. Look for golden tops and a clean toothpick. Adjust your oven temperature if needed. Every oven can be a bit different! {{image_4}} You can switch out the blueberries for other fruits. Raspberries, blackberries, or strawberries work well. Each fruit adds its unique taste. Try chopped peaches or apples for a fun twist. Just ensure the fruit is fresh for the best flavor. If you need gluten-free muffins, use a gluten-free flour blend. This will still give you a good rise. For a dairy-free option, replace the milk with almond or coconut milk. You can also use coconut oil instead of butter. These swaps keep the muffins tasty and friendly for everyone. You can spice up your muffins with extra flavor. Add a pinch of nutmeg or ginger for warmth. A splash of vanilla extract brightens each bite. Try mixing in lemon zest or orange zest for a citrus boost. These small changes can make a big difference in taste. Store your blueberry lemon crumb muffins at room temperature. Place them in an airtight container. This keeps them moist for up to three days. If you want to enjoy them fresh, you might cover them with a kitchen towel instead. This helps retain moisture while allowing them to breathe a bit. For long-term storage, freezing muffins works best. Allow the muffins to cool completely first. Wrap each muffin tightly in plastic wrap. Then, place them in a freezer-safe bag. They can last for up to three months in the freezer. When you're ready to eat, just thaw at room temperature or microwave for a quick treat. To warm your muffins, preheat your oven to 350°F (175°C). Place the muffins on a baking sheet. Heat them for about 10 minutes. You can also microwave them for about 15-20 seconds. This makes them warm and soft, just like fresh out of the oven! Muffins are done when they are golden brown on top. You can also check with a toothpick. Insert it into the center of a muffin. If it comes out clean, they are ready. Another sign is the muffins spring back when lightly touched. Yes, you can use frozen blueberries! Just toss them in a bit of flour first. This helps keep them from sinking to the bottom. Do not thaw them; add them directly to the batter. This keeps them plump and juicy. You can use regular milk mixed with vinegar or lemon juice. Combine 1/2 cup of milk with 1/2 tablespoon of vinegar. Let it sit for five minutes before using. Another option is plain yogurt mixed with water. This also works well in the recipe. You can make them healthier by using whole wheat flour instead of all-purpose flour. You can also reduce the sugar by a few tablespoons. Try using applesauce instead of some butter. This adds moisture while cutting down on fat. These muffins pair well with coffee or tea. You can also serve them with fresh fruit or yogurt. For a special touch, drizzle honey over them. They make a great snack or breakfast treat alongside a refreshing lemonade. You now have a full guide to making delicious blueberry lemon crumb muffins. We covered the key ingredients, step-by-step instructions, and helpful tips. You learned how to ensure fluffiness and the best ways to store your muffins. Remember, you can modify the recipe to fit your needs or preferences. These muffins are versatile and tasty. Whether you enjoy them fresh or frozen, they are sure to please. Get ready to impress friends and family with your baking skills!

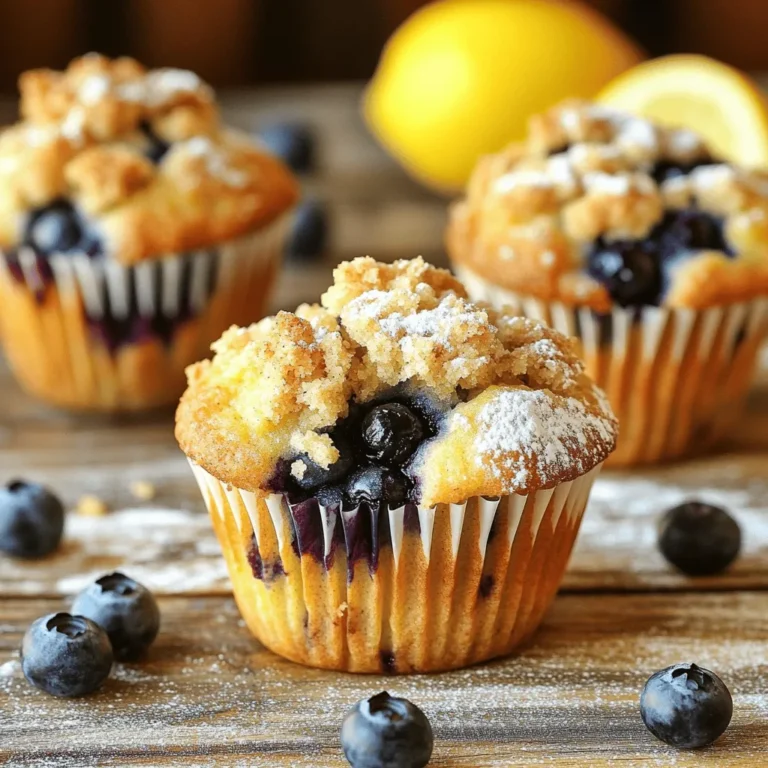
Blueberry Lemon Crumb Muffins Bakery Delight Recipe

- Chicken and Broth Components - 2 boneless, skinless chicken breasts - 4 cups low-sodium chicken broth - 1 cup water - Flavoring and Creamy Elements - 2 packs ramen noodles (discard seasoning packets) - 1 tablespoon olive oil - 3 cloves garlic, minced - 1 teaspoon fresh ginger, minced - 1 tablespoon soy sauce - 1 teaspoon sesame oil - 1 cup heavy cream - 1/2 cup grated Parmesan cheese - Vegetables and Garnishes - 1 cup baby spinach - 1/2 cup cherry tomatoes, halved - Salt and pepper to taste - Green onions, sliced (for garnish) - Sesame seeds (for garnish) This Marry Me Chicken Ramen is packed with flavor and comfort. The chicken makes the broth rich and tasty. The garlic and ginger add zest. I love how the cream and cheese make it so creamy. Each bite is a hug in a bowl! The fresh spinach and tomatoes brighten the dish. They add color and nutrition. It’s a simple recipe, but it feels special. I always get excited to serve it at dinner. You can also change the veggies to match your taste. Enjoy making this dish! {{ingredient_image_2}} Start by seasoning the chicken breasts with salt and pepper. Use enough to cover the surface. Heat olive oil in a large pot over medium-high heat. Once hot, add the chicken breasts. Sear them for about 5-6 minutes on each side until golden brown. This gives the chicken great flavor. After searing, remove the chicken from the pot. Place it on a plate and leave it to rest. This helps keep it juicy and tender for later. In the same pot, add minced garlic and ginger. Sauté them for about one minute. You want them fragrant but not burned. This brings out their natural flavors. Next, pour in the chicken broth and water. Use a wooden spoon to scrape any brown bits from the bottom of the pot. These bits add great flavor. Bring the mixture to a gentle simmer. Once the broth is simmering, return the seared chicken to the pot. Cover it and let it simmer for 15-20 minutes. After cooking, remove the chicken again. Use two forks to shred it into bite-sized pieces. Return the shredded chicken to the pot. Now stir in heavy cream and grated Parmesan cheese. Mix well and let the cheese melt into the broth. This creates a rich, creamy texture. While the chicken cooks, prepare the ramen noodles. Follow the package instructions carefully. This ensures they cook just right. After cooking, drain the ramen noodles. Set them aside for later. This way, they won’t get mushy in the broth. In serving bowls, divide the cooked ramen noodles evenly. This ensures everyone gets a fair share. Ladle the creamy chicken broth over the noodles. Make sure each bowl has plenty of chicken and colorful veggies. Finish with sliced green onions and sesame seeds for crunch. Now you have a warm, inviting dish ready to enjoy! Ensuring Tenderness To keep your chicken tender, use boneless, skinless breasts. Sear them on medium-high heat for about 5-6 minutes per side. This locks in moisture and flavor. Let the chicken rest after cooking. This step keeps it juicy. Seasoning Advice Season the chicken generously with salt and pepper. Don't be shy! This step builds a great base flavor. Feel free to add garlic powder or onion powder for extra depth. Recommendations for Extra Ingredients To boost the broth’s flavor, add mushrooms, carrots, or a dash of chili flakes. These ingredients add layers of taste. Fresh herbs like cilantro or basil can also brighten the dish. Adjusting Flavor Profile If you want a richer broth, try adding more soy sauce. A splash of fish sauce can add umami too. Taste as you go, and adjust to your liking. Avoiding Overcooking Follow package instructions closely. Ramen cooks fast, usually 3-4 minutes. Drain and rinse them in cold water. This stops the cooking process and helps prevent mushy noodles. Alternative Noodles If you want a change, try udon or soba noodles. They offer different textures and flavors. Just ensure you adjust the cooking time as needed. Pro Tips Choose Quality Chicken: Use fresh, high-quality chicken breasts for the best flavor and texture. Organic or free-range options are often more tender and flavorful. Customize Your Broth: Feel free to add extra spices or herbs to the broth, such as lemongrass or star anise, for a unique twist on the flavor profile. Perfectly Cooked Noodles: Avoid overcooking the ramen noodles; they should be al dente. They will continue to cook slightly when added to the hot broth. Garnish Generously: Don't skimp on the green onions and sesame seeds! They add not only flavor but also a nice crunch and visual appeal to your dish. {{image_4}} You can switch up the chicken for other proteins. Shrimp or tofu works great. Both add a different taste and texture. If you use shrimp, cook it for a shorter time. Tofu can be sautéed until it's crispy for added crunch. For a vegetarian twist, skip the chicken and use mushrooms or tempeh. Both add a rich flavor. You can also use vegetable broth instead of chicken broth. This keeps the dish hearty and satisfying without meat. Feel free to spice things up! Add a pinch of red pepper flakes for heat. Or mix in some curry powder for warmth and depth. These spices can transform the flavor of your ramen. You can also swap in other vegetables. Bell peppers or broccoli add crunch and color. Carrots provide sweetness. Just remember to cook them until tender, so they blend well with the creamy broth. Serve your ramen with a side of steamed edamame or a crisp salad. These sides add freshness and balance to the meal. They make your dinner feel complete and satisfying. Top your ramen with lime wedges or fresh herbs like cilantro. These will enhance the flavors of your dish and add brightness. Don't forget to offer extra chili sauce for those who love a kick! - Storing Leftovers: After enjoying your Marry Me Chicken Ramen, let it cool. Transfer the leftovers to an airtight container. This helps keep it fresh. Make sure to store it in the fridge within two hours of cooking. - Duration of Freshness: Your leftovers will stay good for about 3 to 4 days. If you want to keep them longer, consider freezing them instead. - Best Practices for Freezing: To freeze your ramen, let it cool completely. Portion the ramen into freezer-safe containers. Avoid adding the toppings before freezing. This keeps them fresh and tasty. - Reheating Tips: When you’re ready to eat, thaw the ramen overnight in the fridge. - Stovetop vs. Microwave: The stovetop is best for reheating. Use a pot over medium heat. Add a splash of water or broth to help it heat evenly. Stir often to prevent sticking. The microwave works too, but stir halfway to ensure even heating. - Maintaining Texture and Flavor: To keep your ramen delicious, add a bit of extra broth when reheating. This keeps it creamy and prevents it from drying out. Enjoy your meal just like it was fresh! Yes, you can make Marry Me Chicken Ramen ahead of time. Prepare the chicken and broth as usual. Let them cool before storing. Place your ramen noodles in a separate container. This keeps them from becoming soggy. When you are ready to eat, reheat the broth and chicken in a pot over medium heat. Cook the noodles as per package instructions. Combine everything just before serving for the best taste. If you need a substitute for heavy cream, try coconut milk or oat milk. Coconut milk will give a rich, creamy texture. Oat milk also works well, but it is lighter. Keep in mind that these options may change the flavor slightly. For a thicker option, consider using Greek yogurt mixed with a bit of water. This can mimic the creaminess you want. Yes, Marry Me Chicken Ramen is great for meal prep. Divide the dish into individual portions after cooking. Store the chicken broth and noodles separately to maintain freshness. Use airtight containers for best results. It can last in the fridge for about three days. When you’re ready, simply reheat and enjoy a quick, tasty meal. This blog post covered how to make a tasty Marry Me Chicken Ramen. We discussed key ingredients, from chicken to broth and noodles. I provided step-by-step cooking instructions to help you gain confidence in the kitchen. You also learned tips for perfect chicken and broth, plus ways to customize your dish. In my final thoughts, feel free to be creative with flavors and toppings. Enjoy this comforting meal and share it with others!

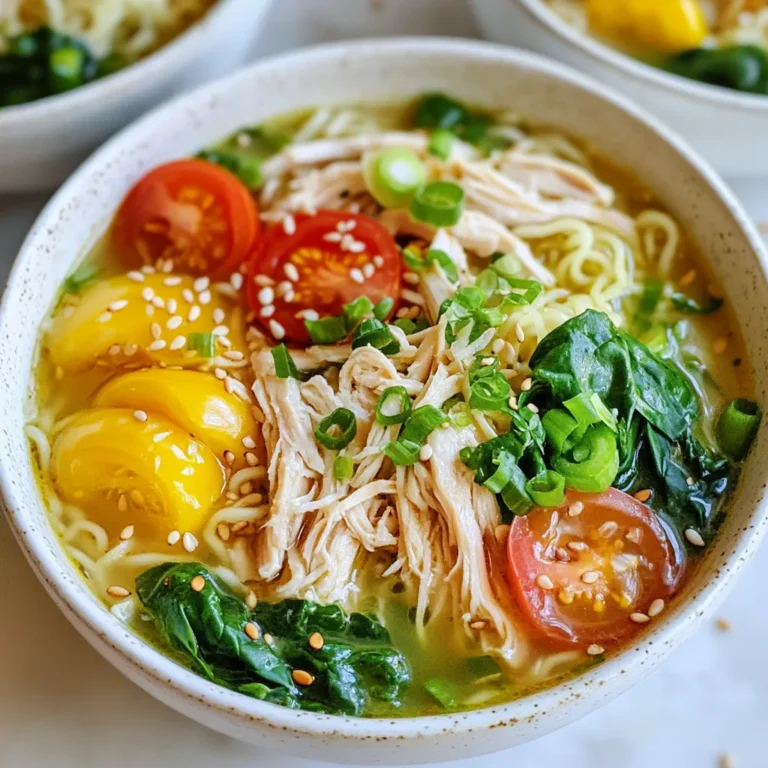
Marry Me Chicken Ramen Simple and Tasty Dinner

- 2 cans (14.5 oz each) diced tomatoes, undrained - 4 cups vegetable broth - 1 medium onion, diced - 3 cloves garlic, minced - 1 tablespoon dried basil - 1 teaspoon dried oregano - 1 teaspoon granulated sugar - Salt and pepper to taste - 2 cups cheese tortellini (fresh or frozen) - 1 cup heavy cream or coconut cream for a vegan alternative - 1 cup fresh spinach, roughly chopped - Grated Parmesan cheese for serving (optional) - Fresh basil leaves for garnish Gathering the right ingredients is key for this creamy tomato basil tortellini soup. Start with two cans of diced tomatoes. They provide a rich base for your soup. Add four cups of vegetable broth for depth and flavor. Next, chop one medium onion and mince three cloves of garlic. These aromatics will bring warmth to your dish. For herbs, you need one tablespoon of dried basil and one teaspoon of dried oregano. A teaspoon of granulated sugar helps balance the acidity of the tomatoes. Don’t forget salt and pepper to taste. You’ll also need two cups of cheese tortellini. You can use fresh or frozen, depending on what you have. The creamy element comes from one cup of heavy cream, or you can use coconut cream for a vegan option. To finish, gather one cup of fresh spinach, roughly chopped. Optional garnishes include grated Parmesan cheese and fresh basil leaves. These last touches add flavor and color to your soup. 1. Start by adding the diced tomatoes and vegetable broth into your slow cooker. This forms the base of your soup. 2. Next, chop your onion and mince the garlic. Add them to the cooker for a tasty aroma. 3. Now, sprinkle in dried basil, dried oregano, granulated sugar, and a pinch of salt and pepper. Stir well to mix everything together. 1. Cover your slow cooker and set it to cook on low for about 4 hours or on high for 2 hours. This helps the onion soften and flavors to blend. 2. Once the time is up, add cheese tortellini to the soup. Make sure they are fully submerged. Cover and cook on low for an extra 30 minutes or until the tortellini is soft. 3. After the tortellini is ready, stir in heavy cream (or coconut cream for a vegan option) and the fresh spinach. Let it warm for 5-10 minutes until the spinach wilts and the soup is hot. 4. Taste your soup and adjust the seasoning. You can add more salt, pepper, or sugar if you want. 5. Serve hot with a sprinkle of grated Parmesan cheese and some fresh basil leaves on top to make it look great. - Selecting the right tortellini: For this soup, choose cheese tortellini. Fresh tortellini gives a nice bite. If using frozen, ensure they are not overcooked. - Adjusting seasoning to taste: Taste the soup before serving. You might want more salt or pepper. A pinch of sugar can balance the acidity of the tomatoes. - Garnishing ideas for presentation: Garnish with fresh basil leaves and grated Parmesan cheese. A drizzle of olive oil adds a lovely shine. - Cooking times for different settings: If on low, cook for about 4 hours. On high, it takes about 2 hours. Adjust based on your slow cooker. - Ensuring even flavor distribution: Stir the soup halfway through cooking. This mixes the flavors well and helps the tortellini cook evenly. - Choosing the right slow cooker size: A 6-quart slow cooker works best for this recipe. It allows space for all the ingredients to mix well. {{image_4}} You can easily boost the flavor of your soup. Adding more vegetables is one smart way. Think about carrots, bell peppers, or zucchini. They add color and nutrition. You can also try protein options. Cooked chicken or sausage work great. For a vegetarian twist, use chickpeas or lentils. Next, let’s talk spices. You can change the taste by adding different herbs. Try thyme or rosemary for a new flavor. A pinch of red pepper flakes adds heat. Adjust the seasoning to fit your taste. Don't be afraid to experiment! If you want a vegan version, swap out a few key ingredients. Use coconut cream instead of heavy cream. Also, select dairy-free tortellini. Many brands offer great options. For a gluten-free meal, check for gluten-free tortellini. Many stores have tasty alternatives. These swaps keep your soup delicious while meeting your dietary needs. Enjoy the creamy goodness without worry! To keep your soup fresh, store leftovers in the fridge. Use a clean, airtight container. This helps keep the soup for up to five days. Let the soup cool first before sealing it. If you want to save it longer, consider freezing. Pour the cooled soup into freezer-safe bags or containers. Leave some space at the top for expansion. It can last in the freezer for up to three months. To reheat, use a medium pot. Pour the soup in and warm it over low heat. Stir often to keep it from sticking. You can also use the microwave. Just heat it in short bursts, stirring in between. For best results, store the soup in glass containers. They heat evenly and do not stain. Make sure to seal them well to keep out air. Enjoy your soup warm and full of flavor! Can I use fresh tomatoes instead of canned? Yes, you can use fresh tomatoes. You will need about 4-5 medium tomatoes. Chop them and add them to the slow cooker. Fresh tomatoes will add a bright taste to your soup. How long can I store the soup? You can store the soup in the fridge for up to 5 days. Make sure to put it in an airtight container. If you want to keep it longer, freeze it for up to 3 months. Is it possible to make this recipe on the stovetop? Yes, you can make this soup on the stovetop. Start by sautéing the onion and garlic in a pot. Then add the diced tomatoes and broth. Simmer for 20 minutes before adding the tortellini and cream. What can I use instead of heavy cream? You can use coconut cream for a dairy-free option. You can also use milk or half-and-half for a lighter version. Each will change the flavor and texture a bit. Can I use frozen spinach instead of fresh? Yes, frozen spinach works well. Just thaw it first and drain any excess water. Add it at the same time as fresh spinach. How to adjust for different types of broth? You can use chicken broth or beef broth instead of vegetable broth. Just keep in mind that it will change the flavor. Adjust the seasoning to balance the taste if needed. This soup offers a mix of fresh flavors and easy prep. We used diced tomatoes, broth, and spices to build a tasty base. Then we added cheese tortellini and spinach for a satisfying twist. You can customize the recipe with veggies, proteins, or seasoning change-ups. Don’t forget to store leftovers properly and enjoy them later! This dish is versatile and perfect for any meal. Try these steps and enjoy your slow cooker creation. Healthy, simple, and delicious!

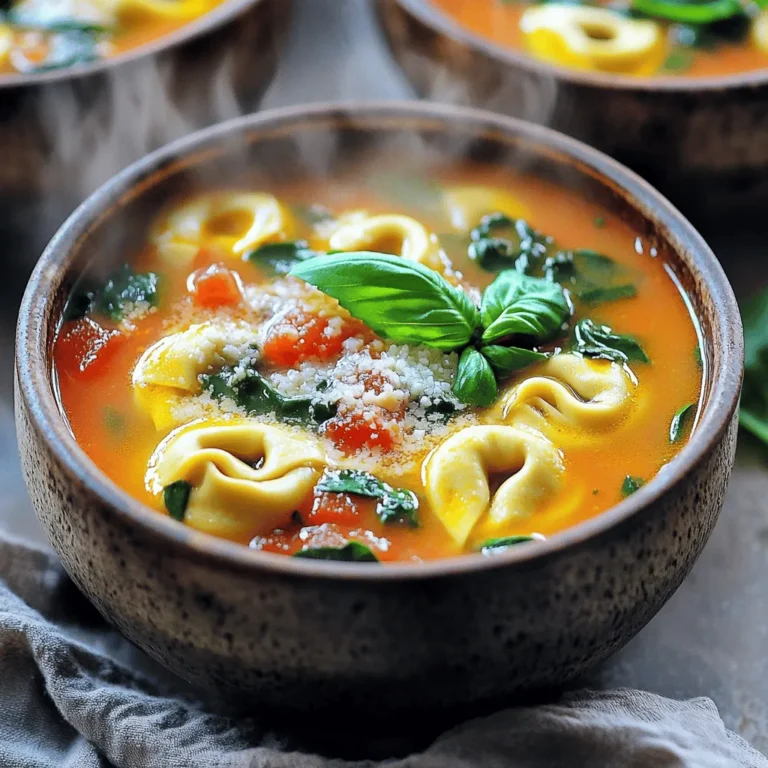
Slow Cooker Creamy Tomato Basil Tortellini Soup Delight

- 1 cup cream cheese, softened - 1/2 cup pumpkin puree - 1/2 cup powdered sugar - 1 teaspoon pumpkin pie spice - 1/2 teaspoon vanilla extract - 1 cup graham cracker crumbs (+ extra for coating) - 1 cup white chocolate chips - 1 tablespoon coconut oil (optional) - Crushed pecans or walnuts for optional coating Each ingredient plays a key role in the flavor and texture of the truffles. The cream cheese adds creaminess, while pumpkin puree gives that rich fall taste. Powdered sugar sweetens the mix, and pumpkin pie spice brings warmth. Graham cracker crumbs add a nice crunch, complementing the smooth, sweet chocolate coating. You can swap cream cheese for vegan cream cheese for a dairy-free option. If you don't have pumpkin puree, mashed sweet potato works well. For a sugar-free treat, use a sugar substitute in place of powdered sugar. You can also leave out the coconut oil if you prefer a thicker coating. I recommend using Philadelphia cream cheese for its smooth texture. Libby's pumpkin puree is a great choice, as it has a consistent flavor. For white chocolate chips, Ghirardelli or Nestlé are reliable brands that melt well. If you choose to add nuts, look for fresh pecans or walnuts from Diamond or Fisher for the best crunch and flavor. Start by softening your cream cheese. I use an electric mixer for this part. Beat it until it's smooth and creamy. You want no lumps. Next, add the pumpkin puree. Then, mix in the powdered sugar, pumpkin pie spice, and vanilla extract. Blend until your mixture is creamy and well combined. Finally, gently fold in half a cup of graham cracker crumbs. This adds a nice texture to the filling. Once your mixture is ready, cover the bowl with plastic wrap. Place it in the refrigerator for about 30 minutes. Chilling helps firm up the mixture. This makes it easier to form the truffles later. You want it to be just firm enough to handle. After chilling, take the bowl out of the fridge. Use a tablespoon to scoop out portions of the mixture. Roll each portion into a small ball in your hands. You should get about 12 truffles. Place these balls on a parchment-lined baking sheet. Once all the truffles are formed, put the baking sheet back in the fridge for another 15 minutes. This helps them hold their shape. While the truffles chill, it's time to melt the white chocolate chips. If you want a smoother finish, add a tablespoon of coconut oil. Use a microwave-safe bowl for this. Heat in 30-second intervals, stirring in between. Stop when the chocolate is completely smooth. Now, dip each chilled truffle into the melted chocolate. Make sure they are fully coated. For a fun twist, roll them in crushed pecans or walnuts. Place the truffles back on the baking sheet and let them set in the fridge for at least 30 minutes. Enjoy your pumpkin cheesecake truffles once the chocolate hardens! To get that creamy, dreamy texture, always start with room temperature cream cheese. This helps mix it smoothly with the other ingredients. After mixing, chill the mixture for about 30 minutes. This step helps firm it up, making it easy to roll into balls. When you roll the truffles, make sure your hands are slightly damp. This prevents sticking. If the mixture seems too soft, add a bit more graham cracker crumbs to help. Melting chocolate can be tricky, but I have some tips to help. Use a microwave-safe bowl and heat the chocolate in short bursts, about 30 seconds at a time. Stir between each interval to ensure even melting. If you add coconut oil, it helps the chocolate become smooth and shiny. Avoid overheating the chocolate, as it can seize up. If it does, try adding a bit of vegetable oil to rescue it. If your truffles are too soft, try chilling them longer before rolling. If your chocolate coating is too thick, add more coconut oil when melting. If the chocolate doesn't stick to the truffles, make sure they are cold before dipping. Also, rolling the truffles in crushed nuts can add great texture and flavor. If you notice any lumps in your cream cheese mixture, just blend it longer until smooth. {{image_4}} You can change up the flavor of your pumpkin cheesecake truffles easily. Try adding chocolate to the mix. Just blend in some cocoa powder or melted chocolate. This adds a rich touch. You can also use different spices. Try cinnamon or nutmeg for a warm twist. These flavors pair well with pumpkin. You can even mix in some caramel for a sweet surprise. Coating is key to making your truffles pop. While white chocolate is great, dark chocolate works too. It gives a bittersweet flavor that balances the sweetness. You can also roll your truffles in cocoa powder. This creates a nice dusting that adds a rich look. For crunch, use crushed nuts like pecans or walnuts. They add texture and flavor. Sprinkles can also add a fun touch for special occasions. Presentation is important for making your truffles shine. Arrange them on a nice plate. You can sprinkle any leftover crushed nuts around them for flair. Drizzling melted chocolate on top adds a fancy touch. Serve the truffles chilled for the best flavor. Pair them with a warm drink like spiced cider or coffee. This balance of flavors makes for a cozy treat that everyone will love. Store your pumpkin cheesecake truffles in an airtight container. This keeps them fresh and tasty. Place wax paper between layers to avoid sticking. Keep them in the fridge where they stay cool and firm. In the fridge, truffles last about a week. They stay safe and delicious for this time. If you freeze them, they can last up to three months. Make sure to wrap them well to prevent freezer burn. No need to reheat truffles. They taste best cold and firm. If they seem soft, put them back in the fridge for a bit. This helps them regain their shape and texture before serving. Yes, you can use cream cheese frosting. It adds sweetness and creaminess. The truffles may be softer, so reduce the pumpkin puree. This helps keep the texture right. You can use butternut squash puree or sweet potato puree. Both have a similar taste and texture. They will also give a nice fall flavor to your truffles. Yes, these truffles can be gluten-free. Just choose gluten-free graham crackers. Make sure to check the labels on all other ingredients too. Yes, you can make these truffles ahead of time. They store well in the fridge for up to a week. You can also freeze them for longer storage. Just make sure to let them thaw in the fridge before serving. Making truffles is a fun and easy process. We covered the ingredients, including swaps and brand tips. The step-by-step instructions will help you mix, chill, and coat your truffles with ease. I've shared tips for perfect texture and melting chocolate. You can try various flavors and coatings for a unique taste. Remember to store them properly for the best shelf life. Enjoy making these delightful treats that you can share or keep for yourself!

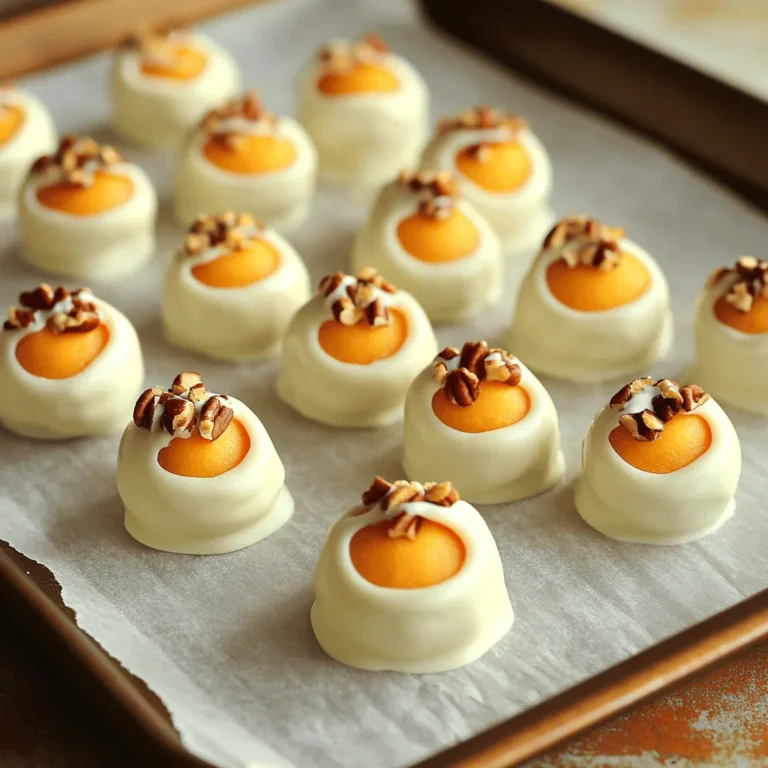
Pumpkin Cheesecake Truffles Rich and Creamy Treat

- 1 lb ground beef - 1 medium onion, finely chopped - 2 cloves garlic, minced - 2 medium carrots, diced into small cubes - 2 celery stalks, diced - 1 bell pepper, chopped (choose your favorite color for vibrancy) - 1 medium zucchini, diced - 1 can (14.5 oz) diced tomatoes, including the juice - 4 cups beef broth (homemade or store-bought) - 1 cup frozen corn kernels - 1 cup green beans, cut into 1-inch pieces The heart of this soup is the ground beef and fresh vegetables. The ground beef adds richness and flavor. I love using a mix of veggies like carrots, celery, and zucchini. They bring color and nutrients to the dish. The canned tomatoes add sweetness and acidity, while the beef broth gives depth. - 1 teaspoon dried oregano - 1 teaspoon dried basil - 1/2 teaspoon salt (adjust to taste) - 1/2 teaspoon freshly ground black pepper - 2 tablespoons olive oil - Fresh parsley, chopped (for garnish) Seasoning is key to a great soup. Oregano and basil give it an Italian flair. Salt and pepper help balance the flavors. A drizzle of olive oil adds a touch of richness. I love to finish the soup with fresh parsley. It adds a bright color and fresh taste. {{ingredient_image_2}} Start by heating 2 tablespoons of olive oil in a large pot over medium heat. Add 1 medium onion, finely chopped, and sauté for about 3-4 minutes. You want the onion to become soft and clear. Next, add 2 cloves of minced garlic. Cook it for 1 more minute until it smells great. Then, we add 1 pound of ground beef to the pot. Use a wooden spoon to break the meat into smaller pieces. Cook it for about 5-7 minutes until it turns brown. If there is fat, drain it away. Now it’s time to add some color and nutrition. Toss in 2 diced carrots, 2 diced celery stalks, and 1 chopped bell pepper. Sauté these veggies for about 5 minutes, or until they start to soften. Next, stir in 1 diced zucchini, 1 can of diced tomatoes (with juice), and 4 cups of beef broth. Don’t forget to add 1 cup of frozen corn and 1 cup of green beans cut into 1-inch pieces. Season everything with 1 teaspoon of dried oregano, 1 teaspoon of dried basil, ½ teaspoon of salt, and ½ teaspoon of black pepper. Mix it all well. Raise the heat until the soup starts to gently boil. Once it boils, reduce the heat to low to let it simmer. Leave the pot uncovered for about 25-30 minutes. This allows the flavors to mix and deepen. Before you serve, taste the soup. Adjust the seasoning with more salt or pepper if needed. This step makes sure your soup is just right for your taste. To taste and adjust seasoning, follow these steps: - After simmering, take a spoonful of the soup. - If it needs more flavor, add a pinch of salt or pepper. - For added depth, try adding more herbs like thyme or rosemary. Using fresh herbs can brighten your soup. Fresh parsley on top adds color and flavor too. You can also add a splash of lemon juice for brightness. Using a heavy-bottomed pot helps cook the soup evenly. This pot keeps heat steady and prevents burning. When browning ground beef, there are a few options: - You can use a skillet or a Dutch oven. - Break the beef into small pieces to ensure even cooking. - Sear it well to develop rich flavors. These techniques will help you create a comforting and tasty soup. Enjoy experimenting and finding your favorite flavors! Pro Tips Use Fresh Ingredients: Opt for fresh vegetables whenever possible to enhance the flavor and nutritional value of your soup. Customize Your Veggies: Feel free to substitute or add any seasonal vegetables you prefer, such as bell peppers, peas, or potatoes, to make the soup your own. Make it Ahead: This soup tastes even better the next day, so consider making a batch in advance to allow the flavors to meld together. Freeze for Later: Portion out any leftovers and freeze them for a quick meal option on busy days—just reheat and enjoy! {{image_4}} You can change the protein in this soup. Instead of ground beef, try ground turkey or chicken. These options are leaner and still tasty. They add their own great flavor. You can also switch up the vegetables. Use different colors of bell peppers for a fun look. Add leafy spinach for a pop of green. Other options include peas, broccoli, or even sweet potatoes. Each vegetable adds its own twist to the soup. If you need to make this soup gluten-free, just use gluten-free beef broth. Most broths are safe, but check the label to be sure. You can also skip any ingredients that contain gluten. For a vegetarian or vegan option, leave out the meat. Use plant-based meat or just add more beans. Lentils work well too. You can use vegetable broth instead of beef broth. This still gives the soup great flavor and keeps it hearty. To store your hearty hamburger vegetable soup in the fridge, let it cool first. Once cool, pour it into a container. Make sure it has a tight lid. This keeps the soup fresh and tasty. You can store it for up to three days. I recommend using glass or BPA-free plastic containers. They are safe and easy to clean. If you plan to eat some later, try to store it in smaller portions. This will make reheating easier and faster. If you want to keep your soup for a longer time, freezing is a great option. Let the soup cool completely before freezing. Pour the soup into freezer-safe bags or containers. Leave some space at the top, as the soup will expand when frozen. This will help avoid spills. For best quality, eat the soup within three months. When you're ready to eat it, take it out of the freezer. You can reheat it in the fridge overnight. If you’re in a hurry, you can reheat it straight from the freezer. Just place it in a pot over low heat. Stir often until it is hot and ready to serve. Homemade hamburger vegetable soup lasts about 3 to 4 days in the fridge. Store it in an airtight container. For freezing, you can keep it for up to 3 months. Just let it cool before you freeze it. When ready to eat, thaw in the fridge overnight before reheating. Yes, you can make this soup ahead of time! Cook it up to two days in advance. Let it cool, then store it in the fridge. The flavors will blend and taste even better. To heat, warm it on the stove until hot. Stir often to keep it from sticking. This soup pairs well with several side dishes. Try crusty bread for dipping. A simple salad also works great. You can even serve it with grilled cheese sandwiches for a fun twist. Each option adds to your meal and keeps it hearty! In this blog post, we explored how to make a hearty hamburger vegetable soup. I guided you through key ingredients like ground beef, fresh veggies, and tasty seasonings. We discussed cooking techniques and helpful tips for flavor. You also learned about storage, freezing, and how to adapt the recipe. Homemade soup warms your heart and fills your belly. Try these steps to create a dish that your family will love. Enjoy your cooking!

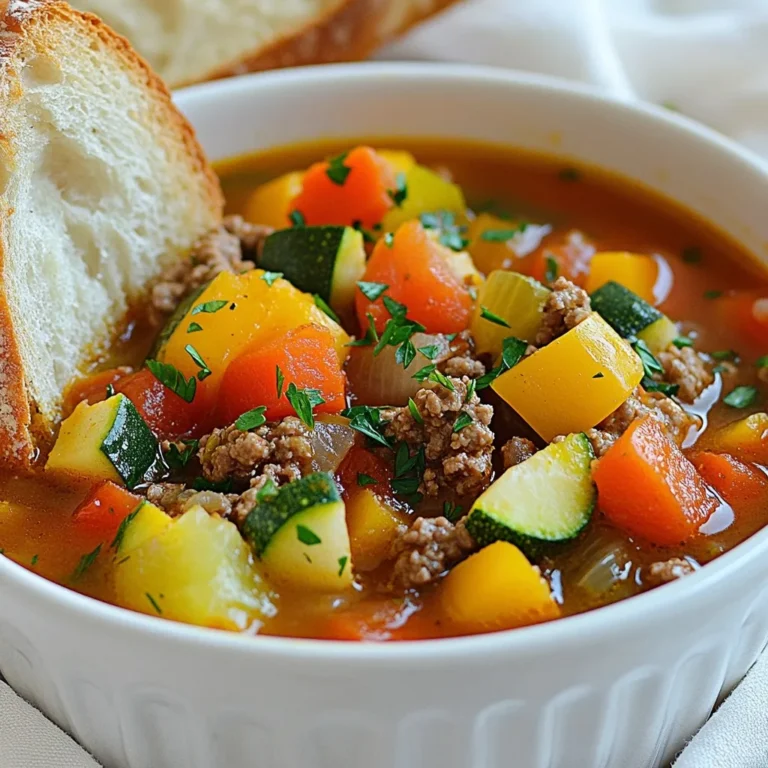
Hearty Hamburger Vegetable Soup One-Pot Wonder

- 2 cups all-purpose flour - 1 cup granulated sugar - 1/2 cup unsalted butter - 1 cup canned pumpkin puree - 2 large eggs - 8 oz cream cheese - 1/4 cup powdered sugar - 1 tablespoon milk - 1 teaspoon baking powder - 1 teaspoon baking soda - 1/2 cup chopped walnuts or pecans Having the right ingredients makes all the difference in your baking. First, you need all-purpose flour. It helps the cake rise and gives it a nice texture. Granulated sugar adds sweetness. Use unsalted butter for a rich taste. The canned pumpkin puree is key for flavor and moisture. Eggs bind everything together. For the creamy filling, soft cream cheese is a must. It adds a rich, tangy flavor. Powdered sugar sweetens the filling, and milk ensures it stays smooth. If you're feeling adventurous, consider optional add-ins. Baking powder and baking soda help the cake rise more. Chopped walnuts or pecans add a nice crunch. You can mix and match to suit your taste. Gather these ingredients, and you’re on your way to making a delicious pumpkin cream cheese coffee cake! 1. Preheat your oven to 350°F (175°C). This helps the cake rise well. 2. Grease a 9x13 inch baking pan with butter or line it with parchment paper. This makes it easy to remove the cake later. 3. In a large bowl, sift together the flour, sugar, baking powder, baking soda, cinnamon, nutmeg, and salt. Sifting helps mix the dry ingredients well. 1. In another bowl, cream the softened butter for about 2-3 minutes until light and fluffy. 2. Add pumpkin puree, eggs, and vanilla extract to the butter. Mix until the mixture is smooth. 3. Gradually add the dry ingredients to the wet ingredients. Use a spatula to mix until just combined. A few lumps are okay. 1. Pour half of the pumpkin batter into the prepared pan. Spread it evenly. 2. Drizzle half of the cream cheese mixture over the pumpkin batter layer. 3. Add the rest of the pumpkin batter. Gently swirl the remaining cream cheese mixture into the top using a knife. This creates a nice marbled effect. 4. If you like, sprinkle chopped nuts on top for an extra crunch. 1. Bake in the preheated oven for 30-35 minutes. Check the cake with a toothpick. It should come out clean when done. 2. Once baked, let the cake cool in the pan for about 10-15 minutes. 3. Transfer the cake to a wire rack to cool completely before serving. How to avoid overmixing To avoid overmixing, mix the wet and dry ingredients just until combined. When you see a few lumps, stop mixing. This helps keep your coffee cake light and fluffy. Checking for doneness To check if the cake is done, insert a toothpick in the center. If it comes out clean, your cake is ready. Keep an eye on it during the last few minutes to avoid over-baking. Additional spices to consider You can add extra spices for more flavor. Try a pinch of ground ginger or allspice. These spices add warmth and depth to your cake. How to customize the cream cheese layer To customize the cream cheese layer, add a splash of vanilla or almond extract. You can also mix in some lemon zest for a fresh twist. These small changes can make a big difference. Serving suggestions and dusting techniques Serve the cake on nice plates, dusted with powdered sugar. This gives it a lovely look. You can also drizzle some caramel sauce on top for extra sweetness. Accompaniments to enhance the dessert experience Pair your coffee cake with a scoop of vanilla ice cream or a dollop of whipped cream. A hot cup of coffee or tea complements the flavors well. Enjoying it this way makes each bite even better. {{image_4}} You can make this coffee cake even more fun. Try adding chocolate chips for a sweet twist. The rich chocolate complements the pumpkin flavor nicely. You can also mix in fruits like cranberries or apples. Their tartness adds a nice contrast to the sweet cake. If you need gluten-free options, use gluten-free flour instead of all-purpose flour. The texture will still be great, and everyone can enjoy it! For vegan-friendly options, swap eggs for flax eggs and use plant-based butter. Replace cream cheese with a dairy-free cream cheese alternative for a tasty treat. Using fresh pumpkin gives a lovely flavor. You can roast and puree your pumpkin for this recipe. If you prefer ease, canned pumpkin works just as well. You can also spice things up by adding seasonal spices. Try ginger or allspice for an extra kick. Store your pumpkin cream cheese coffee cake at room temperature for up to three days. Wrap it tightly in plastic wrap. This keeps it moist and fresh. Make sure to place it in a cool area away from direct sunlight. If you notice any leftover cream cheese filling, cover that as well to maintain its texture and flavor. For long-term storage, freeze the cake. Slice it into pieces for easier serving later. Wrap each piece tightly in plastic wrap and then in aluminum foil. This double-wrapping prevents freezer burn. You can freeze it for up to three months. When you're ready to enjoy it again, simply remove a slice and let it thaw in the fridge overnight. To reheat your cake, preheat your oven to 350°F (175°C). Place the slice on a baking sheet. Cover it with foil to keep it moist. Warm it for about 10-15 minutes. This method helps to maintain the cake's soft texture. You can also use a microwave. Heat it for 10-15 seconds, but be careful not to overheat. Enjoy your cake warm for the best flavor! Can I use fresh pumpkin instead of canned? Yes, you can use fresh pumpkin. First, cook the pumpkin until soft, then mash it. Strain out extra water to avoid a runny batter. This option adds a fresh taste. How can I make this recipe healthier? You can swap some ingredients for healthier options. Use whole wheat flour instead of all-purpose. Replace sugar with honey or maple syrup. You can also use low-fat cream cheese for the filling. What to do if the cake is too dense? If your cake is dense, you may have overmixed the batter. Mix only until the ingredients combine. Also, make sure your baking powder and baking soda are fresh. These help the cake rise. How to fix cracks in the cake top? To fix cracks, bake on a lower shelf in the oven. This helps the cake cook evenly. You can also cover the cake with a light glaze or frosting to hide cracks. What drinks pair best with pumpkin cream cheese coffee cake? Coffee is a classic choice. It complements the flavors well. Try pairing it with chai tea or warm apple cider. These drinks add a nice touch to your dessert. How should I serve leftovers? Store leftovers in an airtight container at room temperature for a few days. You can also refrigerate them for longer freshness. Serve cold or warm them in the microwave for a few seconds before enjoying. This pumpkin cream cheese coffee cake is a treat you can’t miss. We covered the key ingredients, step-by-step instructions, helpful baking tips, and exciting variations. Now you know how to make it your own! Remember, storing it properly keeps it fresh. Enjoy this cake with your favorite drink, or share it with friends. Baking can be fun and easy, especially with this recipe in hand. Get in the kitchen and create something delicious today!

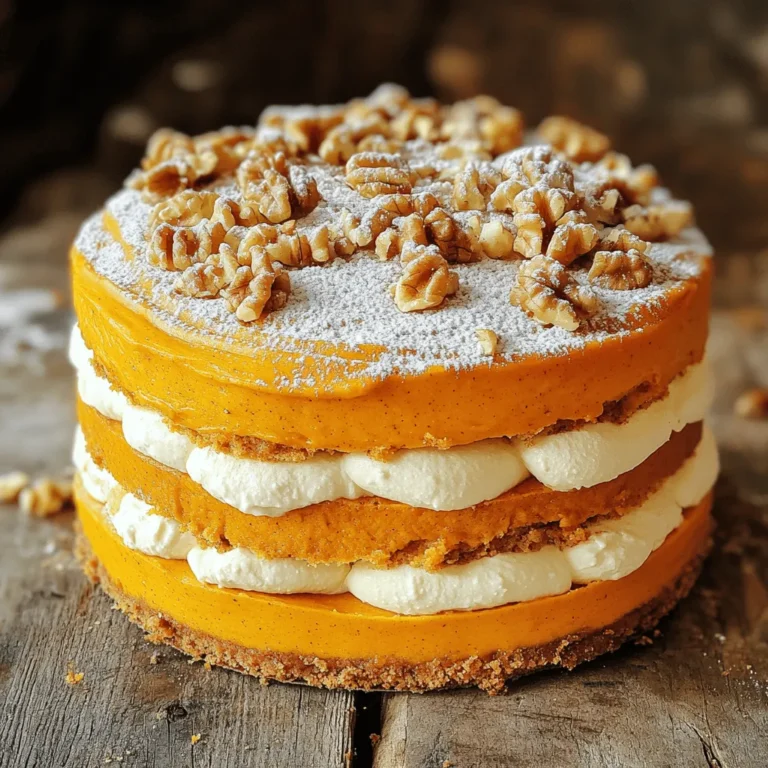
Pumpkin Cream Cheese Coffee Cake Delightful and Easy

- 1 baguette, cut into 1-inch thick slices - 12 oz shrimp, peeled and deveined - 4 tablespoons unsalted butter, melted - 4 cloves garlic, minced - 2 tablespoons fresh parsley, finely chopped - 1 teaspoon lemon juice - Salt and freshly ground black pepper to taste - 1 cup shredded mozzarella cheese Fresh vs. Frozen Shrimp: Fresh shrimp has a sweeter taste and a firmer texture. Frozen shrimp is often just as good if you thaw it properly. Look for shrimp labeled as "wild-caught" for better flavor. Butter Alternatives: If you want a lighter option, try using olive oil or a plant-based butter. This change will still give you a rich taste without the extra calories. Herb Substitutions: If you don’t have parsley, you can use basil or cilantro. Both herbs add a fresh flavor. You can also add dried herbs like oregano for a different twist. These tips can help you choose the best ingredients for your Air Fryer Garlic Butter Shrimp Toasts. Enjoy cooking and experimenting! To start, I melt 2 tablespoons of butter in a medium skillet over medium heat. Once the butter melts, I add 4 cloves of minced garlic. I sauté the garlic for about 1-2 minutes. I stir occasionally to keep it from burning. The garlic should smell fragrant and soft, not brown. Next, I add 12 ounces of peeled and deveined shrimp to the skillet. I season them with salt and black pepper. I cook the shrimp for 3-4 minutes. I know they are done when they turn pink and opaque. After cooking, I remove the skillet from heat. I stir in 1 teaspoon of lemon juice and 2 tablespoons of chopped parsley. Now, I preheat the air fryer to 370°F (188°C). This helps the toast get that crispy texture. While it preheats, I take the remaining melted butter and mix it with a pinch of salt. I brush each side of the baguette slices with this garlic butter. After the air fryer is hot, I arrange the buttered baguette slices in the basket. I make sure they do not overlap. I cook them for about 3 minutes until they turn golden brown. Once they are crispy, I remove them carefully. I top each slice with the garlic shrimp mixture. Then, I sprinkle a cup of shredded mozzarella cheese on top. I place the toasts back in the air fryer for another 3-4 minutes. I check that the cheese is melted and bubbly before serving. To keep your bread crispy, brush it lightly with garlic butter. Avoid soaking it too much. Place the bread in a single layer in the air fryer. This helps it cook evenly. For the shrimp, look for a nice pink color. It should be opaque all the way through. This shows they are perfectly cooked. Set your air fryer to 370°F (188°C) for the best results. Preheating is key to getting that nice, crisp toast. Do not overcrowd the basket. Give each piece space so air can flow around. If you have a lot to cook, do it in batches. This keeps everything evenly cooked. For a beautiful presentation, arrange the toasts on a nice platter. A lemon wedge on the side adds a nice touch. It also gives a fresh flavor when squeezed. Garnish with more chopped parsley for color. Pair your shrimp toasts with a simple salad or a light dip, like garlic aioli, for a complete meal. {{image_4}} You can make this dish fit your needs. For a gluten-free version, use gluten-free bread. This way, you keep the flavor and texture. If you want to switch up the seafood, try scallops or crab instead of shrimp. You can also use veggies like bell peppers or zucchini for a lighter option. Just chop them small and sauté them in the garlic butter. To give these toasts a kick, add spices like red pepper flakes or smoked paprika. You can also mix in a bit of lemon zest for extra brightness. If you love cheese, consider using a blend of mozzarella and parmesan. This will add a depth of flavor that you will enjoy. For sauces, a drizzle of sriracha or a garlic aioli can add an exciting twist. If you don’t have an air fryer, no worries! You can bake these toasts in the oven. Preheat your oven to 400°F (200°C). Place the buttered baguette slices on a baking sheet. Bake them for about 5 minutes until they are crispy. After topping with shrimp and cheese, return them to the oven and bake for another 5-7 minutes. Keep an eye on them to ensure the cheese melts and bubbles nicely. To keep your garlic butter shrimp toasts fresh, use an airtight container. Glass or plastic containers work well. Place the toasts in a single layer if possible. Store them in the fridge for up to three days. This helps keep the flavors intact and prevents sogginess. When you're ready to enjoy the leftovers, you can reheat them in either the air fryer or the microwave. For the air fryer, set it to 350°F (175°C). Heat the toasts for about 3-5 minutes until warmed through. In the microwave, place the toasts on a microwave-safe plate. Heat in 30-second intervals until hot. Be careful not to overheat as this can make the bread tough. Yes, you can freeze shrimp toasts! To do this, let them cool completely first. Place the toasts in a single layer on a baking sheet and freeze for about 1-2 hours. Once frozen, transfer them to a freezer-safe bag or container. This way, they won't stick together. You can freeze them for up to a month. When ready to eat, reheat directly from the freezer. Just add a few extra minutes to the air fryer cooking time. You can make shrimp toast using your oven. Preheat your oven to 375°F (190°C). Prepare the baguette slices as you would for the air fryer. Brush them with garlic butter and place them on a baking sheet. Bake for about 10 minutes or until golden brown. For the shrimp, sauté them in a pan as usual. Once the bread is toasted, top each slice with the shrimp and cheese. Bake in the oven for another 5-7 minutes until the cheese melts. Yes, you can use cooked shrimp. It can save time, but be careful. Pre-cooked shrimp does not need long cooking. Just warm it up with the garlic and butter for 2 minutes. This keeps the shrimp juicy. However, overcooking might make it rubbery. Always check the shrimp's texture before serving. There are many great sides for shrimp toasts. Consider a light salad with greens and lemon vinaigrette. You can also serve it with garlic aioli for dipping. Another great option is a bowl of soup, like tomato or chowder. For a more filling meal, serve with roasted vegetables or coleslaw. This blog post covered how to make garlic butter shrimp toasts. We explored the ingredients, gave tips for success, and provided step-by-step instructions. I shared variations for different diets and explained how to store and reheat your leftovers. With these easy recipes and tricks, you can create delicious shrimp toasts. Enjoy these flavorful bites at your next meal or gathering. Happy cooking!

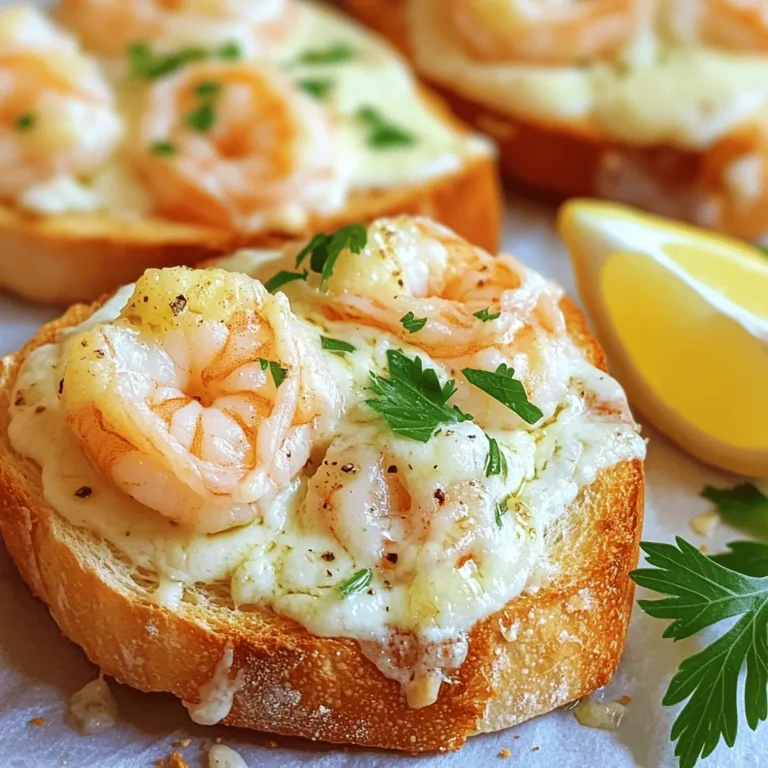
Air Fryer Garlic Butter Shrimp Toasts Savory Delight

- 1 lb boneless, skinless chicken breasts, cut into bite-sized pieces - 12 oz fettuccine pasta - 2 tablespoons Cajun seasoning The chicken is the star of this dish. It should be juicy and tender. Cajun seasoning adds bold flavor, making every bite exciting. I prefer using fettuccine pasta due to its wide shape, which holds the sauce well. - 1 cup heavy cream - 1 cup grated Parmesan cheese - 4 cups chicken broth Heavy cream gives the sauce its rich and creamy texture. The Parmesan cheese adds a salty, nutty flavor that works perfectly with the Cajun spices. Chicken broth is the base of our sauce and enhances the overall taste. - 4 cloves garlic, minced - 1 cup cherry tomatoes, halved - 1 cup fresh spinach - Salt and pepper to taste Garlic brings a wonderful aroma. Cherry tomatoes add a sweet burst to the dish. Fresh spinach not only adds color but also packs in nutrients. Season with salt and pepper to balance all flavors. Cooking the Chicken Start by heating the olive oil in a large pot over medium heat. When the oil is hot, add the chicken pieces. Cook for about 5 to 7 minutes, stirring often. You want the chicken to be golden brown and fully cooked. Once done, take the chicken out of the pot and set it aside. Seasoning Tips Generously sprinkle Cajun seasoning on the chicken before cooking. This gives the dish its bold flavor. If you want more heat, add a bit extra. Importance of Garlic Garlic adds a rich, fragrant taste to the dish. It enhances the flavors and makes the meal more delicious. Using fresh garlic is best for this recipe. Cooking Time After removing the chicken, add the minced garlic back into the pot. Cook it for about 30 seconds. Stir constantly to avoid burning. You want it fragrant but not brown. Scraping the Pot Pour in the chicken broth. Use a wooden spoon to scrape the brown bits off the bottom of the pot. These bits add great flavor to your broth. Bringing to a Boil Bring the broth to a rolling boil. This step is crucial before adding the pasta. It ensures everything cooks evenly. Tips for Al Dente Once the broth is boiling, add the fettuccine pasta. Stir it occasionally. Cook until it’s al dente, about 9 to 12 minutes. Timing and Stirring Keep an eye on the pasta during this time. Stir regularly to prevent it from sticking together. Integrating the Cream Lower the heat after the pasta is cooked. Return the chicken to the pot. Slowly pour in the heavy cream, stirring gently. Cheese Blending Techniques Sprinkle the grated Parmesan cheese into the pot. Mix it well until the sauce is creamy and the cheese melts smoothly. Incorporating Spinach Now, fold in the fresh spinach. Stir gently until the spinach wilts and blends into the sauce. This adds color and nutrients to your dish. Timing for Tomatoes Next, add the halved cherry tomatoes. Stir them in and cook for another minute to warm them through. Adjusting Flavor Taste the dish and add salt and pepper as needed. This final seasoning step helps to bring all the flavors together. Importance of Resting Period Remove the pot from heat. Let it sit for a couple of minutes. This resting period allows the sauce to thicken and will make serving easier. One-Pot Advantages One-pot meals save time and clean-up. You cook everything in one pot. This means fewer dishes to wash, and you get all the flavors mixed together. Plus, the pasta absorbs the sauce, making it extra tasty. Preventing Sticking To stop your pasta from sticking, stir often while it cooks. Use enough liquid in the pot. This keeps the pasta moving and helps it cook evenly. A splash of olive oil can also help. Just a teaspoon or two will do. Spicy Variations If you like heat, add more Cajun seasoning or some hot sauce. You can also try red pepper flakes for a kick. These spices will add more depth and excitement to your dish. Additional Herbs to Consider Fresh herbs can boost your flavors. Try adding thyme or oregano during cooking. Fresh basil is great too, added just before serving. These herbs add freshness and color to your meal. Garnishing Ideas Garnish your dish with fresh parsley for a pop of color. A sprinkle of extra Parmesan cheese looks nice too. For a fun touch, add sliced green onions on top. These make your meal look fancy and appealing. Serving Suggestions Serve the creamy Cajun chicken Alfredo in deep bowls. This keeps everything warm and makes it easier to eat. Pair it with crusty bread to soak up the sauce. A side salad adds crunch and freshness. {{image_4}} - Shrimp or Sausage: You can swap chicken for shrimp or sausage. Shrimp cooks fast and adds a nice touch. Use large shrimp and sauté them for about 3-5 minutes. If you choose sausage, slice it and cook it until browned. Both options bring a different flavor to the dish. - Vegetarian Options: To make it veggie-friendly, skip the meat. Use mushrooms or zucchini for a hearty bite. You can even add chickpeas for protein. The dish will still be creamy and satisfying without the meat. - Gluten-Free Alternatives: If you're avoiding gluten, use gluten-free pasta. Many brands offer great options that taste good. Brown rice or chickpea pasta work well, too. Just keep an eye on cooking times, as they may vary. - Alternative Shapes and Types: While fettuccine is a classic, you can try other shapes. Penne, rotini, or even farfalle work great in this dish. Choose what you like best or what you have on hand. - Adding Different Cheeses: For a twist, mix in different cheeses. Try mozzarella for a stretchy texture or goat cheese for a tangy kick. This will change the flavor but keep it creamy. - Dairy-Free Options: If you want a dairy-free sauce, use coconut milk or cashew cream. These options still give a rich taste. Make sure to adjust seasonings to balance the flavors. - Store leftovers in airtight containers for best quality. - Let the dish cool before sealing to avoid steam buildup. - Use within 3-4 days for the best taste. - To freeze, place cooled servings in freezer-safe bags. - Remove as much air as possible to prevent freezer burn. - Use within 2-3 months for optimal flavor. - Reheat in a pot over low heat, stirring often. - Add a splash of chicken broth for moisture. - Avoid the microwave to prevent dryness. You can make your own Cajun seasoning at home. Just mix: - 1 tablespoon paprika - 1 teaspoon cayenne pepper - 1 teaspoon garlic powder - 1 teaspoon onion powder - 1 teaspoon dried thyme - 1 teaspoon oregano - 1 teaspoon black pepper - 1 teaspoon salt This mix gives a nice kick. You can also use other spice blends like Creole seasoning or Old Bay if you prefer. Yes, you can use whole wheat pasta. It adds fiber and nutrients. Whole wheat pasta has a nutty flavor and can be a great choice. You may need to cook it for a few extra minutes. Check the package for exact time. To make a lighter version, reduce the heavy cream. Use half-and-half or a mix of milk and Greek yogurt. You can also cut back on cheese. Adding more veggies can make the dish heartier without extra calories. Try using zucchini or bell peppers. Pair this dish with a fresh salad. A simple green salad with vinaigrette works great. You can also serve crusty bread. Garlic bread or a baguette is perfect for soaking up the sauce. Yes, you can cook chicken from frozen. Just add a few extra minutes to cooking time. Make sure the chicken reaches 165°F (75°C) for safety. However, the texture may change slightly and be less tender. When possible, use fresh chicken for the best results. In this post, we explored making a delicious Creamy Cajun Chicken Alfredo. We covered key ingredients like chicken, pasta, and Cajun spices. We detailed steps, from cooking the chicken to creating the creamy sauce. You learned tips for perfect flavor and presentation. Keep these techniques in mind as you cook. Enjoying your meal is rewarding. Try your own twists and share with friends. Cooking is fun, and everyone loves a great dish!

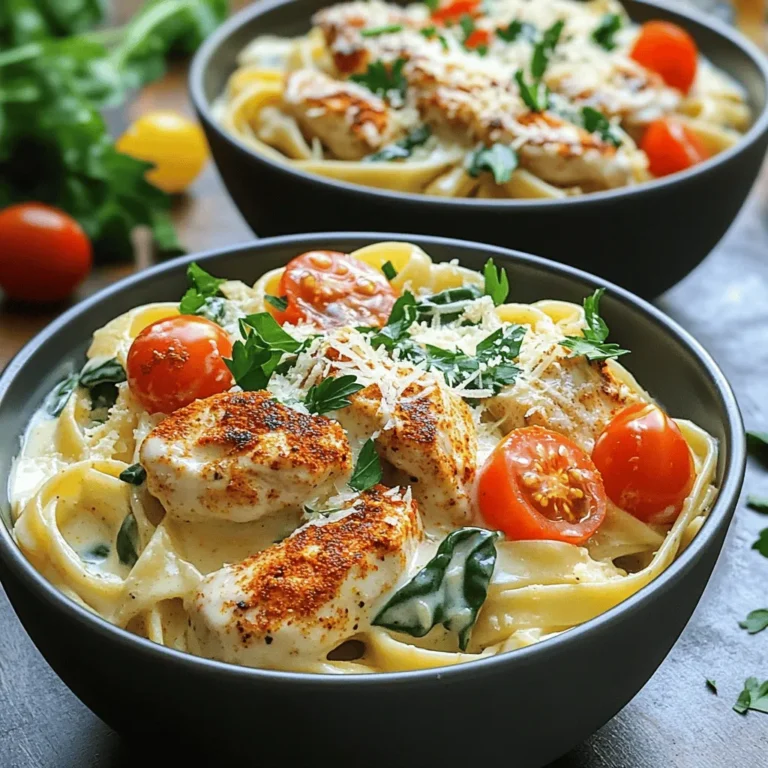
Creamy Cajun Chicken Alfredo One Pot Delight

- Cottage cheese: 2 cups - Unsweetened cocoa powder: 1/2 cup - Sweetener: 1/4 cup honey or maple syrup - Flavor enhancers: 1 teaspoon vanilla extract, 1/4 teaspoon salt - Dark chocolate chips: 1/2 cup - Milk alternative: 1/4 cup almond milk - Garnishes: Fresh berries, shaved dark chocolate Cottage cheese is the star of this mousse. It adds creaminess and protein. You can choose low-fat or full-fat based on what you like. The unsweetened cocoa powder gives it a rich chocolate taste. Sweeteners like honey or maple syrup help balance the cocoa’s bitterness. The vanilla extract and salt round out the flavors. They make every bite even better. For a twist, add dark chocolate chips. They melt into the mousse, enhancing the chocolate flavor. If you prefer a creamier texture, use almond milk or your favorite milk alternative. Fresh berries and shaved chocolate make great garnishes. They add color and a little freshness. Once you have these ingredients, you're ready to make a mousse that is not only high in protein but also rich in taste. - Add 2 cups of cottage cheese to a blender. - Blend until smooth and creamy. This will be the base for your mousse. - Combine 1/2 cup of cocoa powder, 1/4 cup of honey or maple syrup, 1 teaspoon of vanilla extract, and 1/4 teaspoon of salt in the blender. - Blend until smooth. This adds rich flavor to your mousse. - In a microwave-safe bowl, add 1/2 cup of dark chocolate chips and 1/4 cup of almond milk. - Microwave in 15-second intervals, stirring until fully melted and smooth. This creates a silky texture. - Pour the melted chocolate into the blended cottage cheese mixture. - Blend again until well combined. Make sure there are no lumps left. - Transfer the mousse into serving bowls or glasses. - Cover and refrigerate for at least 1 hour. This helps it set and thicken. - Once ready to serve, top each portion with fresh berries and shaved chocolate. - Present it beautifully for your guests. Enjoy every bite! To get a creamy mousse, blend the cottage cheese well. You want no lumps. Make sure to scrape down the sides of the blender so all the cheese mixes in. If you want a thicker mousse, chill it longer. Adjust the chilling time to get your perfect texture. Before you chill the mousse, taste it. If it needs more sweetness, add honey or maple syrup. Blend again to mix it well. You can also keep it less sweet if that’s your thing. Just start with less sweetener, and adjust as you like. For a fun twist, add fresh fruits like berries or nuts on top. This adds color and crunch. You can also get creative with how you present the mousse. Use pretty glasses or bowls to make it look fancy. A sprinkle of shaved chocolate makes it even better! {{image_4}} You can make your mousse even more exciting by adding flavors. A few drops of almond or peppermint extract can bring a new twist. If you enjoy warm spices, try adding a pinch of cinnamon or a dash of espresso powder. These additions will enhance the rich chocolate taste and surprise your taste buds. If you're looking for vegan options, swap the dairy ingredients. Use dairy-free chocolate and a sweetener like agave syrup. This way, you can enjoy a creamy mousse without any animal products. For those who want to reduce sugar, consider using low-sugar sweeteners. You can adjust the flavors based on your dietary needs without losing that delightful taste. You can also switch up the base of your mousse. Instead of cottage cheese, use Greek yogurt for a tangy flavor and creamy texture. If you want a different sweetener, try stevia or agave syrup. These swaps help you cater to different diets while keeping the mousse delicious and satisfying. To keep your Cottage Cheese Chocolate Mousse fresh, store leftovers in airtight containers. This will prevent any odors from other foods in your fridge. It stays fresh for about 3 to 5 days. Always check for any changes in smell or texture before eating. Yes, you can freeze this mousse! Freezing allows you to enjoy it later. To freeze, place it in a sturdy container. Leave some space at the top for expansion. When you are ready to eat, move it to the fridge to thaw overnight. Avoid microwaving it directly, as this can change its texture. After refrigeration, the mousse may be a bit firmer. To enhance the texture, stir it gently. If it feels too thick, add a splash of almond milk and mix well. For the best experience, serve it chilled in pretty bowls. Top with fresh berries and shaved chocolate for a delightful touch. Cottage cheese chocolate mousse is a rich, creamy dessert made with simple ingredients. It blends cottage cheese, cocoa powder, honey, vanilla, and a touch of salt. The cottage cheese gives it a protein boost while keeping it smooth and decadent. To make your mousse creamy, use high-quality cottage cheese. Blend it well until smooth. Stop to scrape the sides of the blender to mix everything. This helps avoid lumps and makes your mousse silky. Yes, you can make this mousse ahead of time. After blending, pour it into bowls and cover. Refrigerate for at least one hour. It keeps well for up to three days in the fridge, so it’s perfect for meal prep. This mousse is great for many diets. It is gluten-free and can be low-carb if you use a low-carb sweetener. It’s also high in protein, thanks to the cottage cheese, making it a healthy treat. You can adjust the sweetness by tasting the mousse before chilling. Add more honey or maple syrup if you want it sweeter. You can also use stevia or agave syrup as alternatives for a different flavor. This blog post explored how to make a delicious cottage cheese chocolate mousse. We covered the main ingredients, step-by-step instructions, and tips for the perfect texture. You can adjust sweetness and even swap ingredients to fit your diet. The options for variations and serving ideas let you get creative. Try this mousse and enjoy your tasty treat. It’s easy to make and great for sharing!

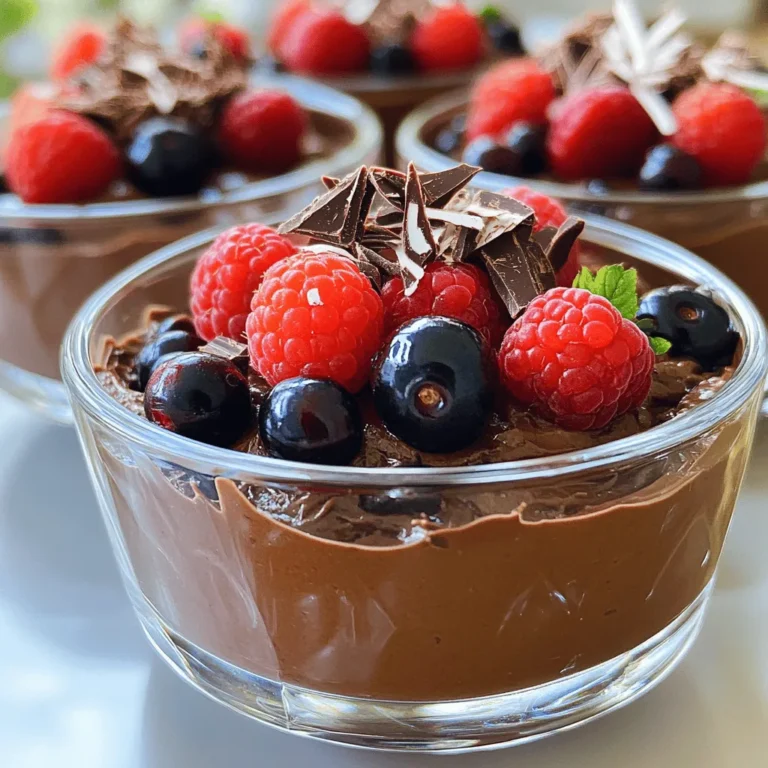
Cottage Cheese Chocolate Mousse High Protein Delight

PREV 1 … 13 14 15 … 44 NEXT
yummybiterecipes

explore

DessertsDinnerAppetizersDrinks

Our Policies

  • Cookie Policy
  • Copyright Policy
  • Disclaimer
  • GDPR Policy
  • Terms Of Use
Back to Top
  • About
  • Contact Us
  • Privacy Policy
© 2025 yummybiterecipes