FREE DINNER EBOOK! Get your copy!
  • Cookie Policy
  • GDPR Policy
  • Disclaimer
  • Terms Of Use
  • Visit my other site: Fun Cookie Recipes
yummybiterecipes
  • Home
  • Dinner
  • Desserts
  • Drinks
  • Appetizers
  • Contact
  • About
  • Privacy Policy
  • Home
  • Dinner
  • Desserts
  • Drinks
  • Appetizers
  • Contact
  • About
  • Privacy Policy
  • Cookie Policy
  • GDPR Policy
  • Disclaimer
  • Terms Of Use
Visit my other site: Fun Cookie Recipes

HOME / CATEGORIES /

Latest

- 1 cup fresh spinach, finely chopped - 1 cup canned artichoke hearts, well-drained and chopped - 1 cup cottage cheese - 1/2 cup cream cheese, softened at room temperature - 1/2 cup shredded mozzarella cheese - 1/4 cup grated Parmesan cheese - 2 cloves garlic, minced - 1 tablespoon freshly squeezed lemon juice - Salt and freshly ground black pepper, to taste - 1 teaspoon olive oil (for sautéing) Using fresh ingredients makes a big difference. Fresh spinach brings color and taste. It adds a bright, earthy flavor. Fresh lemon juice gives a zing that lifts the dip. Canned artichokes are fine, but fresh ones add more depth. The cheeses should be fresh too. They melt better and taste creamier. When you use fresh ingredients, you make every bite special. Want a dairy-free version? You can swap cottage cheese for tofu. Silken tofu blends well and adds creaminess. For cream cheese, look for nut-based options. They work great in dips. Instead of mozzarella, use vegan cheese shreds. Nutritional yeast can add a cheesy flavor without dairy. Always check labels to ensure they fit your diet. These swaps let everyone enjoy the dip, no matter their needs. First, heat 1 teaspoon of olive oil in a medium skillet. Use medium heat to warm the oil. Once hot, add 2 cloves of minced garlic. Sauté the garlic for about 1 minute. You want it to smell great but not burn. Next, add 1 cup of finely chopped spinach to the skillet. Cook the spinach for 3-4 minutes. Stir it occasionally until it wilts completely. Once it’s done, take the skillet off the heat and let the spinach cool a bit. In a large mixing bowl, combine 1 cup of cottage cheese and 1/2 cup of softened cream cheese. Add 1/2 cup of shredded mozzarella cheese and 1/4 cup of grated Parmesan cheese. Pour in 1 tablespoon of freshly squeezed lemon juice. Use a fork or hand mixer to blend it all together. Mix until the cheese becomes smooth and creamy. Then, take the cooled spinach and the chopped artichoke hearts, which should be 1 cup, and fold them into the cheese mixture. Stir gently so everything mixes well. Finally, taste your mix and add salt and freshly ground black pepper as needed. Preheat your oven to 350°F (175°C). Take the spinach and artichoke dip mixture and put it in a baking dish. Spread it out evenly across the dish. Bake it in the oven for 20-25 minutes. Look for bubbling and a golden top, which means it’s ready. After baking, let the dip cool for a few minutes. This helps the flavors settle. Now, you are ready to serve your tasty dip! To make your dip super creamy, use full-fat cottage cheese. This adds richness. Blend it well with softened cream cheese. A hand mixer works best for a smooth blend. If you want extra creaminess, add a splash of heavy cream. This will make your dip velvety. Seasoning is key to a tasty dip. Use fresh garlic for a strong flavor. Mince it finely to release more oils. Add salt and pepper to taste. Don't forget the lemon juice; it brightens the dip. You can also try mixing in some red pepper flakes for a kick. Store leftovers in an airtight container. This keeps it fresh for up to three days. To reheat, warm it in the oven at 350°F. Cover it with foil to prevent drying. Heat until it’s bubbly and warm throughout. You can also microwave it, but stir often to prevent hot spots. {{image_4}} You can easily boost the flavor of your dip. Try adding vegetables like bell peppers, mushrooms, or even sun-dried tomatoes. Chop them finely and sauté them with garlic before mixing into the dip. This adds color and texture, making the dip even more appealing. You can also add broccoli for a crunchy bite. Remember, the goal is to keep the mix creamy while enhancing the taste. While this recipe uses cottage cheese, you can experiment with other cheeses. Cream cheese adds richness, while adding a sharp cheddar can give a nice kick. Feta cheese offers a tangy twist, and goat cheese adds creaminess and depth. Mix and match any combination you like. Just keep the total amount of cheese around two cups for the best texture. If you like a little heat, add some red pepper flakes or hot sauce. A pinch of smoked paprika can also add a warm flavor without too much spice. Fresh herbs like thyme or chives can bring freshness. Try adding a squeeze of lime juice for a zesty brightness. Just remember to adjust the salt level when you add extra ingredients. Each tweak can make your dip uniquely yours! For my spinach artichoke cottage cheese dip, I love using fun dippers. Here are my top picks: - Tortilla chips - Pita bread triangles - Carrot sticks - Celery sticks - Bell pepper strips - Crackers These dippers work great and add a nice crunch. You can mix and match to find your favorite. Make your dip look as good as it tastes! Here are some simple ideas: - Serve the dip warm on a colorful platter. - Surround it with your chosen dippers for a bright display. - Sprinkle extra grated Parmesan cheese on top for a fancy touch. - Add fresh herbs like parsley or basil for extra color. A beautiful presentation makes the dip even more inviting for guests! Pairing drinks with your dip can enhance the experience. I enjoy these options: - Crisp white wine, like Sauvignon Blanc - A light beer, such as a lager - Sparkling water with a slice of lemon You can also serve this dip as a side dish. It goes well with grilled chicken or fish. Enjoy it as a starter at your next gathering! Yes, you can make this dip ahead of time. Prepare the dip and store it in the fridge. Cover it tightly with plastic wrap or a lid. This way, it stays fresh. When you are ready to eat, just bake it. It will taste great even after a day in the fridge. Yes, you can freeze this dip. Place it in an airtight container. Make sure to leave some space at the top for expansion. It can last up to three months in the freezer. When you want to enjoy it, thaw it in the fridge overnight. Then, bake it as usual. If you don't have cottage cheese, you have options. You can use ricotta cheese for a similar texture. Cream cheese can also work, but it will be richer. Greek yogurt is another great choice. It adds a nice tang and creaminess. This article covered the key ingredients, step-by-step instructions, and helpful tips for making Spinach Artichoke Cottage Cheese Dip. We explored how to use fresh ingredients and noted dairy-free options. I shared steps for a creamy texture and tasty seasonings. Remember, you can customize this dip with veggies and cheeses. Whether for a party or a quiet snack, it delivers great flavor. Enjoy creating your dip and impressing your friends!

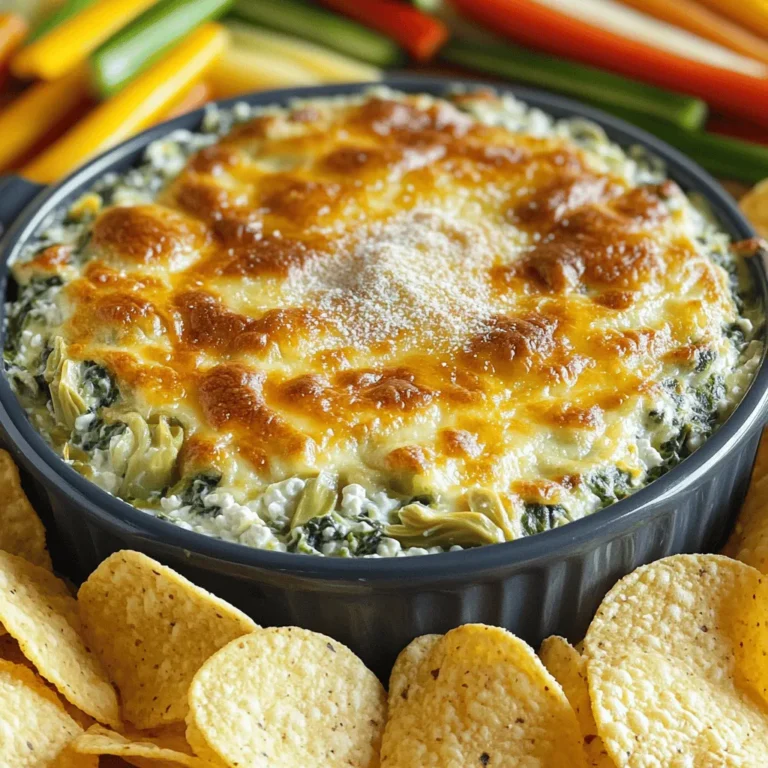
Savory Spinach Artichoke Cottage Cheese Dip Recipe

To make the best Air Fryer Apple Hand Pies, you need a few simple ingredients. Here’s what you will need: - 2 medium apples, peeled, cored, and diced - 1 tablespoon fresh lemon juice - 1 teaspoon ground cinnamon - 1/2 teaspoon ground nutmeg - 1/4 cup packed brown sugar - 1 tablespoon cornstarch - 1 package of pre-made pie crusts (contains 2 crusts) - 1 egg, beaten (for egg wash) - 1 tablespoon granulated sugar (for sprinkling) These ingredients blend together to create a sweet, warm filling wrapped in a crispy crust. The apples bring a natural sweetness, while lemon juice adds a nice zing. The spices like cinnamon and nutmeg give it that cozy feel, perfect for any season. Brown sugar helps to caramelize the filling, making each bite a treat. Using pre-made pie crusts saves time and makes it easy. The egg wash gives the pies a golden color, while the sugar on top adds a lovely crunch. Gather these ingredients, and you're ready to start your delicious apple pie adventure! {{ingredient_image_2}} To start, grab a medium bowl. Mix the diced apples with the lemon juice, ground cinnamon, ground nutmeg, brown sugar, and cornstarch. Stir until all the apples are coated. This step is key! Let the mixture sit for about 15 minutes. Resting helps the flavors blend and deepen. You will smell the warm spices and sweet apples come alive. Next, take your pre-made pie crusts. Lightly flour a clean surface for rolling. Roll out the crusts until they are nice and thin. Use a round cutter or the rim of a bowl to cut out circles, about 5 inches wide. You should get eight circles. This will form the base for your hand pies. Now, preheat your air fryer to 350°F (175°C). This step ensures your air fryer is hot when you cook the pies. While it heats, place about one tablespoon of apple filling in the center of each circle. Fold the crust over the filling to create a half-moon shape. Seal the edges by crimping with a fork or using your fingers. This step keeps the filling inside while cooking. Brush the top of each hand pie with the beaten egg. This gives them a lovely golden color. Sprinkle a bit of granulated sugar on top for extra crunch. Arrange the hand pies in a single layer in the air fryer. Depending on your fryer, you may need to cook in batches. Air fry for 10-12 minutes. Look for a golden brown color and crispy texture. Once done, carefully remove the hand pies and let them cool for a few minutes on a wire rack. To get a crispy crust, start with cold pie dough. Chill your dough for 30 minutes before rolling it out. This helps keep the fat from melting too fast. Use a light touch when rolling. Too much pressure can make the crust tough. Make sure to crimp the edges well. This stops the filling from leaking out. Want to kick up the flavor? Try adding a pinch of ginger for warmth. You can also mix in some vanilla extract with the apples. For nut lovers, chopped walnuts or pecans add a nice crunch. A drizzle of caramel sauce in the filling gives a sweet twist. Experiment with flavors to find your favorite! If your filling leaks, don’t worry. First, check that you sealed the edges well. If it happens, simply use a bit of cornstarch to thicken the filling. This helps keep it from running out. If it still leaks, place a piece of parchment paper under the pies in the air fryer. This will catch any drips and make cleanup easier. Pro Tips Choose the Right Apples: Opt for a mix of sweet and tart apples like Granny Smith and Honeycrisp for a balanced flavor profile in your hand pies. Seal It Well: Make sure to crimp the edges tightly to prevent any of the delicious filling from leaking out during cooking. Experiment with Spices: Feel free to add a pinch of ginger or cloves to the filling for an extra depth of flavor that complements the apples beautifully. Keep an Eye on Cooking Time: Since air fryers can vary in performance, start checking your hand pies a couple of minutes before the recommended time to avoid overcooking. {{image_4}} You can switch out apples for other fruits. Pears, peaches, or berries work well. Each fruit brings its own flavor. For example, pears add a soft sweetness. Berries offer a nice tartness. Just make sure to adjust sugar based on the fruit's sweetness. You can boost the taste by adding caramel or raisins. Drizzle some caramel inside the pie for a rich flavor. Raisins add chewiness and sweetness. Mix them with apples before filling the crust. These small changes make a big difference. For vegan or gluten-free options, use alternative crusts. You can find gluten-free crusts at many stores. For a vegan filling, skip the egg wash. Use a plant-based milk instead. You can also add maple syrup for sweetness in the filling. These swaps keep the joy of hand pies for everyone. To keep your hand pies fresh, follow these simple steps: - Refrigeration: Place leftover hand pies in an airtight container. They stay good for about 3 days in the fridge. - Freezing: For longer storage, freeze them. Wrap each pie tightly in plastic wrap, then in foil. They last up to 3 months in the freezer. When you're ready to eat them again, just thaw overnight in the fridge. To enjoy your hand pies at their best, reheating is key. Here’s how: - Air Fryer: Preheat your air fryer to 350°F (175°C). Cook for about 3-5 minutes until warm and crispy. - Oven: Preheat your oven to 350°F (175°C). Place the pies on a baking sheet and heat for 10-12 minutes. Both methods bring back that delightful crunch and warm apple filling. Enjoy! Yes, you can use homemade pie crust. Making your own crust can add a special touch. To make a simple pie crust, you need: - 1 1/4 cups all-purpose flour - 1/2 cup unsalted butter, chilled and diced - 1/4 teaspoon salt - 1/4 cup cold water To prepare the crust, mix flour and salt. Cut in butter until the mix looks like crumbs. Add cold water, a little at a time, until the dough forms. Roll it out and cut it into circles like you would with pre-made crust. This way, you can control the ingredients and flavor to your liking. Cooking these apple hand pies in the air fryer takes about 10-12 minutes at 350°F (175°C). Preheat your air fryer before placing the pies inside. This helps them cook evenly and become golden brown. Keep an eye on them as they cook. Every air fryer is a bit different, so check for that crispy look. Yes, you can freeze these hand pies. To freeze, let them cool completely first. Then, place them in a single layer on a baking sheet and freeze until solid. After that, transfer them to a freezer-safe bag or container. They will stay fresh for about two months. When you're ready to eat, bake them straight from the freezer, adding a few extra minutes to the cooking time. This keeps them tasty and ready to enjoy! You’ve learned how to make delicious hand pies with simple ingredients. We covered the apple filling, pie crust prep, and air frying steps. You now know tips for the perfect crust and how to troubleshoot issues. Variations expand your choices with different flavors and dietary options. Remember, these hand pies store well, and reheating them keeps them tasty. Enjoy the process and share your creations with others. Hand pies are fun, easy, and a delight to eat. Happy cooking!

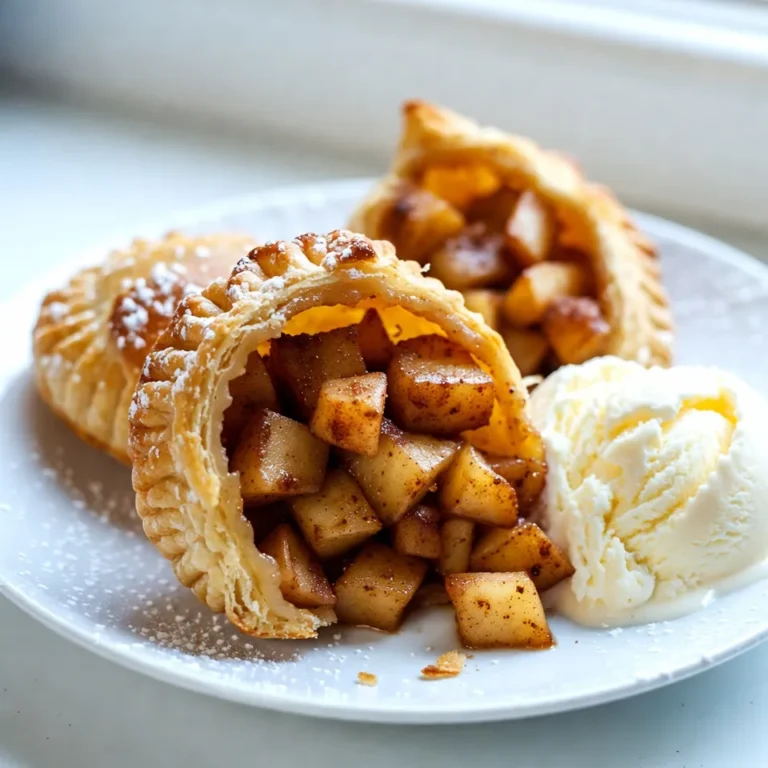
Air Fryer Apple Hand Pies Tasty and Easy Delight

- 8 oz egg noodles or rice noodles - 1 cup mixed bell peppers, diced - 1 cup zucchini, cut into half-moon slices - 1 cup snap peas, trimmed - 1/2 cup roasted peanuts - 3 green onions, finely chopped - 2 tablespoons vegetable oil - 2 cloves garlic, minced - 1 inch piece of fresh ginger, grated - 3 tablespoons soy sauce - 2 tablespoons hoisin sauce - 1 tablespoon sesame oil - 1 tablespoon rice vinegar - 1 teaspoon red pepper flakes Kung Pao noodles are quick and fun to make. The main ingredients are simple. You’ll need noodles, bell peppers, and zucchini. Each adds great taste and color. The bell peppers give sweetness. Use red, yellow, and green for the best mix. Zucchini adds a nice crunch. Together, they make the dish bright and fresh. Next, add snap peas for extra texture. They are sweet and crisp. Roasted peanuts bring a nutty flavor. They also add a fun crunch. Don’t forget the green onions. They add a mild onion taste and a pop of green. For the sauce, you’ll need a mix of flavors. Vegetable oil is key for stir-frying. Garlic and ginger bring warmth and depth. Soy sauce and hoisin sauce add saltiness and sweetness. Sesame oil gives a rich, nutty taste. Rice vinegar adds a tangy kick. Use red pepper flakes for heat. Adjust them to match your spice level. Gather all these ingredients, and you are ready to cook. This dish is not only tasty but also colorful and fun to eat. Enjoy making and sharing it! - Cook 8 oz of egg noodles or rice noodles according to the package instructions. - Once cooked, drain them in a colander and set aside. - Heat 2 tablespoons of vegetable oil in a wok or skillet over medium-high heat. - Add 2 cloves of minced garlic and 1 inch of grated ginger. Sauté for 30 seconds until fragrant. - Stir in 1 cup of diced bell peppers, 1 cup of zucchini cut into half-moons, and 1 cup of trimmed snap peas. Stir-fry for 3-4 minutes until the vegetables are tender but still crisp. - Lower the heat to medium and toss in the reserved cooked noodles. Mix everything well to combine. - In a small bowl, whisk together 3 tablespoons of soy sauce, 2 tablespoons of hoisin sauce, 1 tablespoon of sesame oil, 1 tablespoon of rice vinegar, and 1 teaspoon of red pepper flakes. - Pour the sauce over the noodle and vegetable mixture. Toss to coat each noodle strand evenly. - Finally, fold in 1/2 cup of roasted peanuts and the chopped white parts of 3 green onions. Cook for an additional 1-2 minutes to meld the flavors together. - Taste and season with salt and freshly ground black pepper as needed. - Use pre-cut vegetables to save time on chopping. - Cook noodles in advance to speed up the process. When I make Kung Pao Noodles, I often buy pre-cut bell peppers and zucchini. This choice cuts my prep time in half. Cooking the noodles ahead lets me go straight to stir-frying. - Use high heat for quick cooking. - Stir-frying ensures crisp vegetables and perfect noodles. High heat is key. It keeps veggies bright and crunchy. I heat my wok until it shimmers before adding oil. This method helps lock in flavors and color. - Adjust the spice level to suit your taste. - Use fresh ingredients for the best flavor. I love spice, so I add extra red pepper flakes. If you prefer less heat, start with one teaspoon. Fresh veggies and herbs make a big difference. They add vibrant taste and texture to the dish. {{image_4}} You can switch up the protein in your Kung Pao noodles. Adding chicken, tofu, or shrimp can enhance the dish. - Chicken: Use diced boneless chicken thighs or breasts. Cook them in the wok first until golden brown. - Tofu: Choose firm or extra-firm tofu. Cut it into cubes and sauté until crispy. - Shrimp: Shrimp cooks quickly. Add it to the wok just after the garlic and ginger. If you prefer vegetarian options, tofu is a great choice. It absorbs flavors well and adds protein. Feel free to swap in seasonal vegetables for your Kung Pao noodles. This keeps the dish fresh and exciting. - Seasonal Veggies: Try broccoli, carrots, or snap peas depending on the season. They all add color and crunch. - Different Peppers: Use jalapeños for heat or poblano for a smoky flavor. Bell peppers can also be mixed for a colorful look. Experimenting with veggies makes your dish unique each time. You can make your own Kung Pao sauce for a personal touch. This lets you control the flavors. - Homemade Sauce: Mix soy sauce, hoisin sauce, sesame oil, and rice vinegar. Adjust the ratios to your taste! - Spicy or Sweet: Add more red pepper flakes for heat or honey for sweetness. This can change the whole dish. Feel free to get creative with your sauce! It’s a fun way to make the dish your own. To keep your Kung Pao noodles fresh, store leftovers in an airtight container. This helps prevent moisture and keeps the flavors intact. You can safely refrigerate them for up to three days. After that, the noodles may lose their texture and taste. When reheating, use the stovetop for the best results. Heat a little oil in a pan and toss in the noodles. Stir them often to warm evenly. This method helps avoid sogginess in the noodles. If using a microwave, add a splash of water and cover the bowl. Heat in short bursts, stirring in between to ensure even warming. Yes, you can easily make Kung Pao Noodles vegetarian. Here are some options for replacing meat: - Use tofu for protein. Firm tofu works best. - Try tempeh, which has a nice texture. - Add more vegetables like mushrooms or eggplant for extra flavor. - Use chickpeas for a hearty twist. To make Kung Pao Noodles spicier, consider these suggestions: - Add extra red pepper flakes to the sauce. - Include sliced fresh chili peppers. Thai bird chilies are great. - Use spicy chili oil when you stir-fry. - Try a dash of sriracha or hot sauce for heat. If you have nut allergies or dietary preferences, consider these alternatives: - Sunflower seeds provide a nice crunch. - Use pumpkin seeds for a different flavor. - Try crispy chickpeas for added protein. - Opt for toasted sesame seeds for a nutty taste. You can create delightful Kung Pao Noodles using simple ingredients and steps. We covered the key items, from noodles to sauces. Quick cooking tips help you save time. Remember, you can customize your dish with proteins and veggies. Proper storage keeps leftovers fresh. Enjoy experimenting with flavors and make this recipe your own. With practice, you'll master a beloved dish that fits your taste!

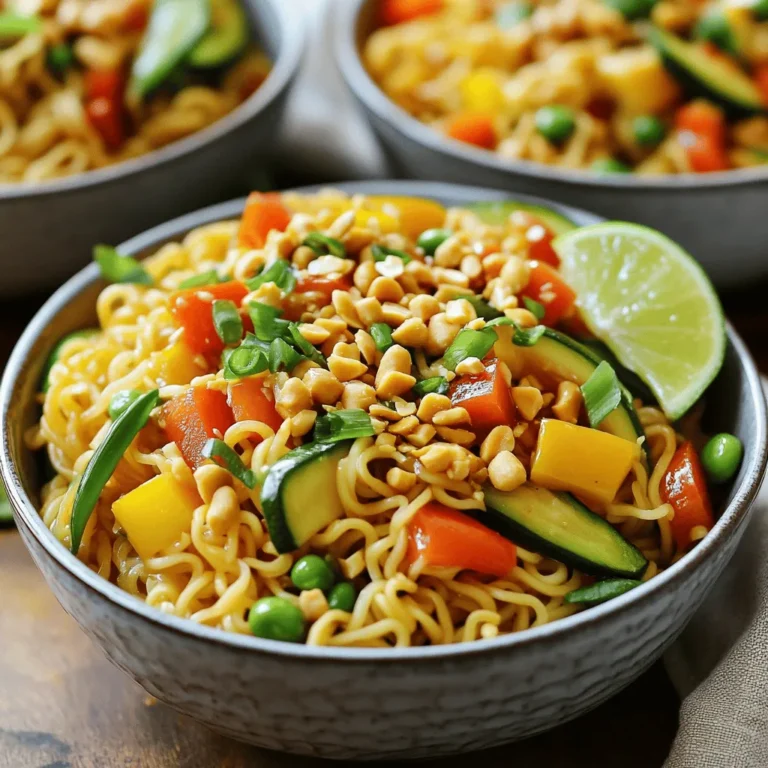
Kung Pao Noodles Quick and Flavorful Dinner Recipe

- 2 pounds chicken wings - 1 cup all-purpose flour - 1 tablespoon lemon pepper seasoning I love using fresh chicken wings for this recipe. They are juicy and tender. All-purpose flour helps create the crispy outer layer. Lemon pepper seasoning adds that bright, zesty flavor we all crave. - 1 teaspoon garlic powder - 1 teaspoon onion powder - ½ teaspoon cayenne pepper (optional, for a kick) Garlic powder gives a nice depth. Onion powder adds sweetness. If you enjoy heat, cayenne pepper can spice things up. - ½ cup melted butter - Zest of 1 lemon - Juice of 1 lemon Melted butter makes the sauce rich and smooth. Lemon zest brings out a fresh aroma. Fresh lemon juice adds a tangy kick that balances the flavors perfectly. 1. Preheat your oven to 425°F (220°C). 2. Line a large baking sheet with parchment paper. This makes cleanup easy and helps with sticking. 3. In a big bowl, mix the flour, baking powder, lemon pepper seasoning, garlic powder, onion powder, cayenne pepper, and a pinch of salt. Whisk them well until they blend. 1. Rinse each chicken wing under cold water. 2. Pat them dry with paper towels. This step is key for crispy wings. 3. Toss the dry wings in the flour mixture. Coat them fully and shake off any extra flour. 1. Arrange the wings in a single layer on the baking sheet. Make sure they have space. 2. Bake for 40-45 minutes. Flip the wings halfway through to brown them evenly. 1. While the wings bake, mix melted butter, lemon juice, and lemon zest in a small bowl. Whisk until combined. 1. Once the wings are golden, take them out of the oven. 2. Transfer the wings to a large bowl and pour the lemon butter sauce over them. 3. Toss the wings gently to coat in the sauce. 4. Serve hot, garnished with fresh parsley for color and taste. To get perfectly crispy lemon pepper wings, start by drying your wings. Dry wings allow for better crisping. After rinsing them, pat them with paper towels. This small step makes a big difference. Next, focus on the coating technique. Mix flour and baking powder with care. Toss your wings in this mixture until they are coated evenly. Shake off any extra flour. Too much flour leads to clumps and soggy wings. Want to add some heat? Sprinkle in cayenne pepper. It gives your wings a spicy kick that pairs well with lemon. Adjust the amount to fit your taste. You can also try other seasonings. Garlic powder and onion powder mix well with lemon pepper. Don’t hesitate to get creative with your favorite spices! When serving your wings, arrange them on a colorful platter. Add lemon wedges around the platter. This not only looks nice but adds fresh flavor too. For an extra touch, garnish with chopped parsley. It adds a pop of color and freshness to your dish. Presenting your wings well makes them even more appetizing. {{image_4}} To make spicy lemon pepper wings, add more heat. You can adjust the cayenne pepper in the flour mix. Start with 1 teaspoon for a good kick. If you want it hotter, try using chili powder too. You can also toss the wings in hot sauce after baking. This gives them a bold flavor. You can use different methods to cook your wings. The air fryer is one of my favorites. Preheat your air fryer to 400°F (200°C). Cook the wings for 25-30 minutes, shaking the basket halfway through. This method gives you that crispy texture with less oil. Grilling is another great option. Heat your grill to medium-high. Place the wings on the grill and cook for about 15-20 minutes. Flip them often to avoid burning. You can even add lemon slices on the grill for extra flavor. If you want to change the sauce, there are many options. You can try using honey mustard for a sweet twist. Barbecue sauce also pairs well with lemon pepper. For a tangy flavor, use ranch dressing or a spicy buffalo sauce. Mix and match to find your favorite combination! To keep your crispy lemon pepper wings fresh, use proper storage containers. I recommend airtight containers or resealable bags. Make sure the wings cool completely before sealing them. Place a paper towel inside to absorb extra moisture. This helps keep the wings crispy. When you want to enjoy your leftover wings, reheating is key. The best way to retain crispiness is by using an oven or an air fryer. Preheat the oven to 375°F (190°C). Place the wings on a baking sheet and heat for about 10-15 minutes. If using an air fryer, set it to 375°F (190°C) for 5-7 minutes. Both methods will help keep your wings crunchy. If you want to freeze your wings, it’s easy! First, let them cool completely. Then, place them in a single layer on a baking sheet. Freeze for about an hour. Once they are firm, transfer them to airtight bags. Be sure to remove any air to prevent freezer burn. To thaw, place the wings in the fridge overnight. Then, reheat them as noted above for the best results. Bake your wings for 40 to 45 minutes. This time gives them a nice, golden color. Halfway through, flip them to ensure they cook evenly. This will help them get extra crispy. Yes, you can use frozen wings. Just remember to thaw them first. Thawing helps the wings cook evenly. Pat them dry before coating them. If you skip this step, they may not get crispy. Serve your wings with tasty sides. Here are some great ideas: - Celery sticks - Carrot sticks - Blue cheese dressing - Ranch dressing - Fresh lemon wedges These sides add crunch and flavor to your meal. Enjoy your crispy lemon pepper wings with your favorite dips! This article covered how to make crispy lemon pepper wings. We discussed key ingredients, from chicken wings to our zesty lemon butter sauce. I shared simple steps to prepare, coat, and bake your wings for the best results. You learned effective tips for crispiness and flavor enhancement. Plus, I provided variations and storage advice. Enjoying these wings can be a fun experience. With some practice, you'll master this dish and impress everyone at your next gathering. Enjoy your cooking journey!

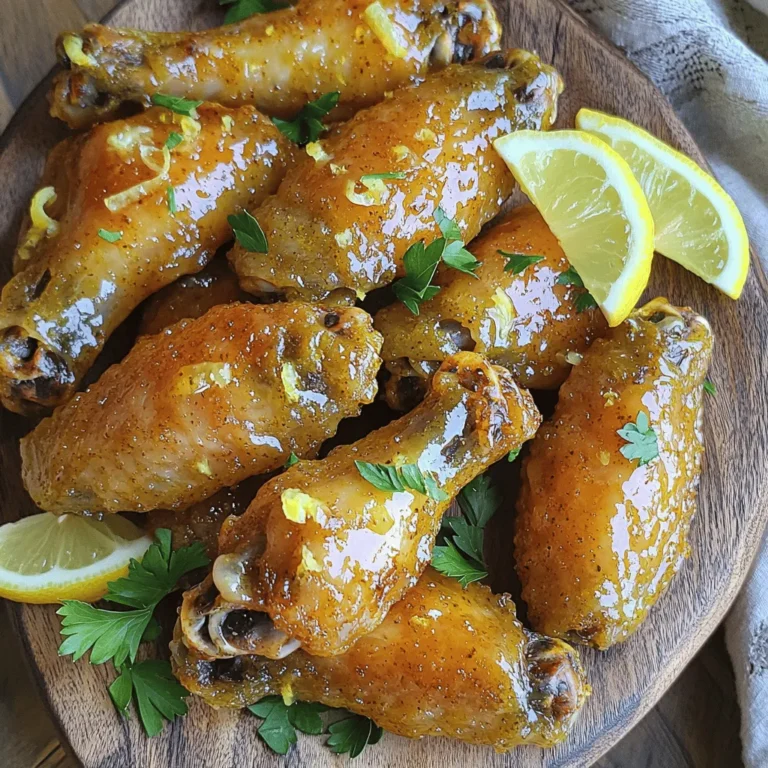
Crispy Lemon Pepper Wings Easy Flavorful Recipe

To make Big Mac sliders, gather these fresh and tasty ingredients: - Ground beef, seasonings, and condiments - 1 pound ground beef - 1 teaspoon garlic powder - 1 teaspoon onion powder - 1 teaspoon smoked paprika - Salt and pepper to taste - ¼ cup mayonnaise - 2 tablespoons ketchup - 1 tablespoon yellow mustard - Slider buns and cheese details - 8 slider buns - 4 slices of cheddar cheese, each halved - Fresh toppings and garnish options - 1 cup shredded lettuce - ½ cup diced pickles - ½ cup diced tomatoes - Sesame seeds (for garnish) These ingredients come together to create sliders that are full of flavor. The beef mixture is seasoned perfectly, while the toppings add crunch and freshness. Use fresh ingredients for the best taste. Enjoy these sliders as a fun snack or a meal any day! {{ingredient_image_2}} 1. Preheat the Oven: Start by setting your oven to 350°F (175°C). This helps the sliders cook evenly. Line a baking dish with parchment paper. This keeps the sliders from sticking. 2. Mixing the Ground Beef: In a large bowl, combine 1 pound of ground beef with 1 teaspoon each of garlic powder, onion powder, and smoked paprika. Add salt and pepper to taste. Mix gently with your hands or a spoon. Make sure not to overmix. This keeps the patties tender and juicy. 3. Forming and Cooking the Slider Patties: Divide the beef mixture into 8 equal parts. Shape each part into small patties. Make them a bit bigger than the buns. They will shrink while cooking. Heat a skillet over medium-high heat. Cook the patties for 3-4 minutes on each side. They should be nicely browned and cooked through. In the last minute of cooking, place a half slice of cheddar cheese on each patty. This will melt perfectly. 1. Slicing the Buns: Take 8 slider buns and slice them in half horizontally. Spread a layer of mayonnaise on the bottom half of each bun. This adds creaminess and flavor. 2. Adding Patties and Toppings: On each bun bottom, place a hot cheeseburger patty. Drizzle with ketchup and yellow mustard. Top with shredded lettuce, diced pickles, and diced tomatoes. These fresh toppings give a nice crunch. 1. Baking Time and Temperature: Place the assembled sliders in the preheated oven. Bake for about 10 minutes. The buns should be golden and warm. Be careful not to dry them out. 2. Serving Suggestions and Presentation Tips: Once baked, remove the sliders from the oven. Let them cool for a minute. Serve warm on a large platter. You can garnish with extra cucumber slices and cherry tomatoes. This makes the dish look inviting. Consider serving with small cups of extra sauces for dipping. - Ensuring perfectly cooked patties: Cook the patties for 3-4 minutes on each side over medium-high heat. Use a meat thermometer to check for doneness. Aim for 160°F (71°C) to ensure they are safe to eat. - Cheese melting techniques: Add cheese during the last minute of cooking. Cover the skillet with a lid to trap heat, helping the cheese melt evenly. - Best accompaniments for sliders: Pair your sliders with crispy fries or onion rings. A side salad adds freshness too. - Creative presentation ideas: Arrange sliders on a large platter. Garnish with cucumber slices and cherry tomatoes. Use small cups for dipping sauces to make it fun. - Overmixing the beef: Mix the beef just until combined. Overmixing makes the patties tough. - Cooking patties unevenly: Make sure your skillet is hot before adding the patties. This helps them cook evenly and develop a nice crust. Pro Tips Don’t Overmix the Beef: Mix the ground beef just until the spices are incorporated to keep your patties tender and juicy. Cheese Melting Hack: Cover the skillet with a lid for the last minute of cooking to help the cheese melt evenly over the patties. Customize Your Toppings: Feel free to add other toppings like crispy bacon, onions, or jalapeños for an extra kick or flavor. Keep Buns Fresh: To prevent the slider buns from getting soggy, toast them lightly before assembling the sliders. {{image_4}} If you want a lighter slider, try lean beef. Ground turkey or chicken works well too. These alternatives cut down on fat while keeping the flavor. For a plant-based option, use black beans or chickpeas. You can mash and season them just like beef. This makes a tasty vegan slider that everyone can enjoy. To make your sliders pop, add spices to the beef mix. A dash of cayenne gives a nice kick. You can also create a secret sauce by mixing mayo, ketchup, and spices. This adds creaminess and flavor. Don't forget toppings! Try avocado, jalapeños, or crispy onions. Each adds a unique twist to your sliders. You can cook sliders in different ways. Grilling gives a smoky flavor, perfect for summer. Just keep an eye on the heat to avoid burning. If you prefer, skillet cooking is quick and easy. Simply brown the patties in a non-stick pan. You can also bake them in the oven. This method is great for cooking many sliders at once. Just watch for the buns to turn golden. To keep your Big Mac sliders fresh, store them in the fridge. Place them in an airtight container. This method helps keep the flavors intact. You can also wrap them tightly in plastic wrap. For best taste, eat them within three days. For reheating, you have a few options. You can use the microwave, but this may make the buns chewy. A better choice is the oven. Preheat it to 350°F (175°C) and warm the sliders for about 10 minutes. This keeps the buns soft and the cheese melty. If you want to keep your sliders longer, freezing is a great option. To freeze, wrap each slider in plastic wrap. Then place them in a freezer-safe bag. This helps prevent freezer burn. You can freeze them for up to three months. When you’re ready to eat, thaw them overnight in the fridge. After thawing, you can reheat them in the oven. This keeps the texture and flavor nice. Avoid using the microwave to thaw, as it can make them soggy. In the fridge, your Big Mac sliders last about three days. In the freezer, they can last up to three months. Always check for signs of spoilage before eating. Look for mold or an off smell. If you notice any, it’s best to throw them away to stay safe. What can I substitute for ground beef? You can use ground turkey or chicken instead of ground beef. These meats are leaner but still tasty. For a vegetarian option, try black beans or lentils. They pack flavor and protein. You can also use plant-based meat alternatives that mimic beef. Can I make sliders ahead of time? Yes, you can! Prepare the patties and buns in advance. Store the patties in the fridge for up to 24 hours. You can also assemble the sliders and cover them tightly. Just bake them right before serving. How do I ensure sliders are juicy? To keep sliders juicy, do not overmix the beef. Mix just until combined. Form the patties gently, making them slightly larger than the buns. Cook them on medium heat to avoid drying out. Add cheese near the end of cooking for extra creaminess. What is the nutritional value of these sliders? Each slider has about 200 calories, depending on toppings. They include protein from beef and cheese. The veggies add vitamins and fiber. Check the labels of condiments for added sugars and calories. Where can I buy ingredients? Most ingredients are at your local grocery store. Check the meat section for ground beef. You can find slider buns in the bread aisle. Fresh toppings like lettuce and tomatoes are usually near the produce section. Typical pricing for slider ingredients and variations Ground beef costs around $5-$7 per pound. Slider buns are about $3 for a pack of 8. Cheese slices can be $2-$4. Fresh veggies are usually $1-$3 each. Prices may vary based on your location and store. We covered how to make delicious sliders step by step. You learned about the key ingredients, preparation methods, and cooking tips. I also shared variations to suit different diets. Remember, the right toppings and cooking techniques make your sliders shine. Enjoy making these tasty treats at home. With practice, you’ll perfect your slider skills and impress your friends and family. Happy cooking!

Big Mac Sliders Simple and Tasty Recipe Guide

1. 1 cup unsalted butter, softened to room temperature 2. 3/4 cup granulated sugar 3. 3/4 cup packed brown sugar 4. 1 large egg, at room temperature 5. 2 teaspoons pure vanilla extract 6. 2 tablespoons finely ground espresso coffee 7. 2 1/4 cups all-purpose flour 8. 1 teaspoon baking soda 9. 1/2 teaspoon salt 10. 1 1/2 cups semi-sweet chocolate chips 11. 1/2 cup chopped nuts (optional; walnuts or pecans are excellent choices) If you need to swap some items, here are a few options: - You can use coconut oil instead of butter for a dairy-free choice. - For a lower sugar option, try using coconut sugar in place of brown sugar. - Use a flax egg (1 tablespoon ground flaxseed + 3 tablespoons water) as a vegan egg substitute. - Swap semi-sweet chocolate chips with dark or milk chocolate chips based on your taste. Espresso adds rich flavor and depth to cookies. Here are some benefits: - It enhances chocolate taste, making it more intense. - Espresso can boost your mood with its coffee aroma. - The caffeine in espresso gives a slight energy lift. - It adds complexity to your baked goods, making them more gourmet. Using espresso in your cookies will impress everyone! Enjoy your baking adventure with these ingredients! Start by preheating your oven to 350°F (175°C). Grab two baking sheets and line them with parchment paper. This step keeps the cookies from sticking and helps them bake evenly. Having a clean space helps you focus and enjoy the process. Next, in a large bowl, add 1 cup of softened butter, 3/4 cup granulated sugar, and 3/4 cup packed brown sugar. Use an electric mixer to cream these together for 3-5 minutes. The mix should be light, fluffy, and pale. Then, crack in 1 large egg and add 2 teaspoons of pure vanilla extract. Beat these in until smooth. Now, it’s time to add 2 tablespoons of finely ground espresso coffee. Stir gently to mix it in well. The espresso will boost the chocolate flavor and add depth. In a separate bowl, whisk together 2 1/4 cups of all-purpose flour, 1 teaspoon baking soda, and 1/2 teaspoon salt. Gradually add this dry mix to the butter blend. Keep the mixer on low speed to avoid overmixing. Finally, fold in 1 1/2 cups of semi-sweet chocolate chips and, if you like, 1/2 cup of chopped nuts. Make sure everything is evenly mixed. Using a tablespoon or cookie scoop, drop rounded balls of dough on the baking sheets. Space them about 2 inches apart. This space allows them to spread while baking. Place the sheets in the oven and bake for 10-12 minutes. The edges should turn golden brown, while the centers stay soft. Once baked, remove the sheets from the oven. Let the cookies cool on the sheet for about 5 minutes. This helps them set. Finally, transfer the cookies to a wire rack to cool completely. Enjoy these delightful treats with a cup of coffee! To get the best cookie texture, start with room temperature butter. It helps mix well with sugars. Cream the butter and sugars until fluffy. This adds air to your dough. Mix the dry and wet ingredients carefully. Overmixing makes cookies tough. Bake until the edges are golden but the center is soft. This keeps them chewy! You can add more flavor to your cookies easily. Try using different nuts like pecans or almonds. You can also mix in white chocolate chips for a sweet twist. For a richer taste, add a pinch of sea salt on top before baking. It brings out the chocolate flavor. Experiment with spices like cinnamon for an extra kick! A few common mistakes can spoil your cookies. Make sure your oven is preheated. A cold oven leads to uneven baking. Don’t skip the parchment paper; it helps prevent sticking. Avoid using cold eggs straight from the fridge. They can affect the dough's texture. Lastly, remember to space out your cookie dough on the sheets. Too close means they will merge while baking! {{image_4}} If you want nut-free cookies, simply skip the nuts. The cookies will still taste great. You won’t lose any flavor or texture without them. Some people prefer them this way, especially if they have allergies. You can use many types of chocolate in these cookies. Semi-sweet chocolate chips work best, but feel free to mix it up. Dark chocolate adds a rich taste. Milk chocolate gives a sweeter flavor. You can even use white chocolate for a fun twist! Just remember to keep the amount the same. To make these cookies gluten-free, swap the all-purpose flour for a gluten-free blend. Many brands offer great options that work well in baking. You will still enjoy the same rich flavor and texture. Just make sure to check that your chocolate chips are also gluten-free. To keep your espresso chocolate chip cookies fresh, store them in an airtight container. You can layer them with parchment paper to prevent sticking. Make sure to keep the container in a cool, dry place. Avoid sunlight, as it can change the cookie's texture and flavor. If you want to keep them even fresher, you can freeze the cookies. Just wrap them tightly in plastic wrap or foil before putting them in a freezer bag. When stored properly, these cookies can last for about one week at room temperature. If you freeze them, they can last for up to three months. Just remember to let them cool completely before freezing. If you notice any changes in smell or texture, it’s best to toss them out. To enjoy your cookies warm, preheat your oven to 350°F (175°C). Place the cookies on a baking sheet and heat for about 5 minutes. This helps bring back their soft texture. You can also use a microwave, but heat them for only a few seconds. Be careful not to overheat, or they may become hard. Enjoy your warm cookies with a cup of coffee for a true treat! Yes, you can skip the espresso. The cookies will still taste great. You can add more vanilla instead. This will keep the flavor rich. To freeze cookies, let them cool first. Then, place them in a single layer. Use a freezer-safe bag or container. Label it with the date. They freeze well for up to three months. To make fewer cookies, simply divide the ingredient amounts by half. For example, use half a cup of butter. Adjust the egg by using just one egg yolk. This will help keep the dough moist. You can use instant coffee in place of espresso. Use the same amount as the espresso. While the flavor may not be as strong, it will still add a nice coffee taste. The best texture comes from a mix of ingredients. Using both brown sugar and granulated sugar helps. Brown sugar adds moisture, while granulated sugar makes them crisp. Adding chopped nuts also gives a delightful crunch. In this blog post, we explored the key ingredients for baking cookies, including espresso benefits and substitutions. I provided step-by-step instructions for mixing, baking, and tips for perfect texture. Variations for nut-free, gluten-free, and chocolate options help suit different tastes. We also discussed storage practices to keep your cookies fresh. Baking cookies can be easy and fun. With the right tips, you can create delicious treats every time. Enjoy baking and sharing your tasty creations!

Espresso Chocolate Chip Cookies Bakery Delightful Treat

- 2 pounds boneless, skinless chicken breasts - 1 medium onion, finely diced - 3 cloves garlic, minced - 2 cans (15 oz each) white beans - 1 can (14 oz) diced green chilies The main ingredients are the heart of this chili. You need chicken breasts for protein, onion for flavor, and garlic for depth. White beans add creaminess, while green chilies bring a mild heat. Each component works together to create a satisfying meal. - Ground cumin - Chili powder - Smoked paprika - Salt and freshly ground black pepper - Juice of 1 lime Seasonings bring the dish to life. Ground cumin adds warmth, while chili powder gives it a kick. Smoked paprika enhances the chili with a slight smokiness. Salt and pepper balance flavors, and lime juice adds brightness. These elements combine to create a rich, flavorful experience. - Fresh cilantro - Shredded Monterey Jack cheese - Additional lime wedges Garnishes can elevate your chili. Fresh cilantro adds a burst of color and freshness. Shredded Monterey Jack cheese gives a creamy finish. Lime wedges allow you to add extra zest just before enjoying. These simple touches make your dish look and taste even better. - Season and prepare chicken breasts Start by seasoning 2 pounds of chicken breasts. Use salt, pepper, ground cumin, chili powder, and smoked paprika. Make sure all sides are coated well with the spices. This helps bring out the flavors. - Layer ingredients in the slow cooker Place the seasoned chicken breasts at the bottom of your slow cooker. Next, add a layer of 1 diced onion and 3 cloves of minced garlic. Then, add 2 cans of white beans, 1 can of diced green chilies, and 1 cup of corn. Layer them evenly over the chicken. - Pour chicken broth over the layers Carefully pour 4 cups of low-sodium chicken broth over the layers in the slow cooker. This will keep everything moist and flavorful as it cooks. - Set slow cooker to desired cooking time (low/high) Cover your slow cooker with the lid. Set it to cook on low for 6 to 8 hours or high for 4 hours. The longer cooking time on low will deepen the flavors. - Shred chicken and mix before serving About 30 minutes before serving, shred the chicken with two forks right in the slow cooker. Mix it well with the other ingredients. This ensures every bite has juicy chicken. - Add lime juice and adjust seasoning Squeeze the juice of 1 lime into the chili. Taste and adjust the seasoning with more salt and pepper if needed. Let it cook for another 30 minutes to meld the flavors. This dish not only tastes great but also fills your kitchen with a wonderful aroma. Enjoy! - To shred chicken easily, use two forks. Pull the chicken apart gently. - For a finer texture, let the chicken cool slightly before shredding. - If you want more spice, add jalapeños or a hot sauce. - Taste the chili as it cooks. Adjust spices to your liking. - Try adding a pinch of cayenne pepper for heat. - A teaspoon of oregano can add depth to the flavor. - For a thicker chili, mash some beans with a fork. - You can also add cornmeal or masa harina to thicken it. - Serve with tortilla chips for a crunchy side. - A fresh salad pairs well and adds brightness. - Top with avocado slices for creaminess. - Consider a dollop of sour cream or Greek yogurt on top. {{image_4}} You can switch out the chicken for turkey. Turkey gives a similar taste but is leaner. You can also use tofu for a plant-based option. Tofu absorbs flavors well, making it a great choice. For beans, try black beans or pinto beans. They both add a unique twist. You can also add different veggies, like bell peppers or zucchini, for extra color and nutrition. Want more heat? Add spicy chilies or a splash of hot sauce. This will spice things up. For a creamier chili, mix in cream cheese or sour cream. These ingredients give a rich texture that many love. You can also blend in some cheese for added flavor. Monterey Jack works great, but feel free to experiment! This chili can easily be made gluten-free. Just check your broth and any canned goods. Many brands offer gluten-free options. If you want a vegan version, swap the chicken broth for vegetable broth. Use tofu or chickpeas in place of chicken. This way, you keep the protein and flavor without the meat. You can store your slow cooker white chicken chili in the fridge for up to four days. To keep it fresh, place it in an airtight container. This helps to prevent moisture loss and keeps the chili tasty. If you plan to eat it later, make sure it cools down before sealing it. To freeze chili, let it cool to room temperature first. Then, pour it into freezer-safe bags or containers. Make sure to leave some space for expansion. Label the bags with the date. You can freeze it for up to three months. When you’re ready to eat, place it in the fridge overnight to thaw. Then, reheat it in a pot on the stove or in the microwave. When reheating, use low heat to maintain the flavors. Stir the chili often to ensure even heating. If it seems too thick, add a splash of chicken broth or water. This keeps it creamy and prevents it from sticking. Always taste before serving, adjusting the salt or spices as needed. You can serve this chili with many tasty sides. Here are some ideas: - Cornbread for a sweet touch - Tortilla chips for crunch - Rice for a hearty base - A fresh green salad for balance - Sliced avocado for creaminess These sides will enhance the flavors of your chili. Yes, you can swap the chicken for other meats. Here are some options: - Turkey for a leaner choice - Pork for a rich flavor - Beef for a heartier meal - Tofu for a plant-based option Just adjust the cooking time based on your meat choice. Want more heat? Here are some tips: - Add diced jalapeños or serranos - Mix in some hot sauce - Use spicy chili powder - Incorporate cayenne pepper Start small and taste as you go to avoid overpowering the dish. Absolutely! Here are some great tips for meal prep: - Prepare the chili a day ahead and refrigerate - Store it in an airtight container - Let the flavors develop overnight You can enjoy it fresh the next day or freeze it for later. This chili is easy to make and packed with flavor. By using simple ingredients, you can whip up a comforting meal that everyone will enjoy. Remember, adjust spices and toppings to your taste. This dish is versatile with many variations. It also stores well, so make extra! Whether serving family or friends, this slow cooker white chicken chili will be a hit. Dive into cooking and share this recipe with others. Your culinary journey starts today!

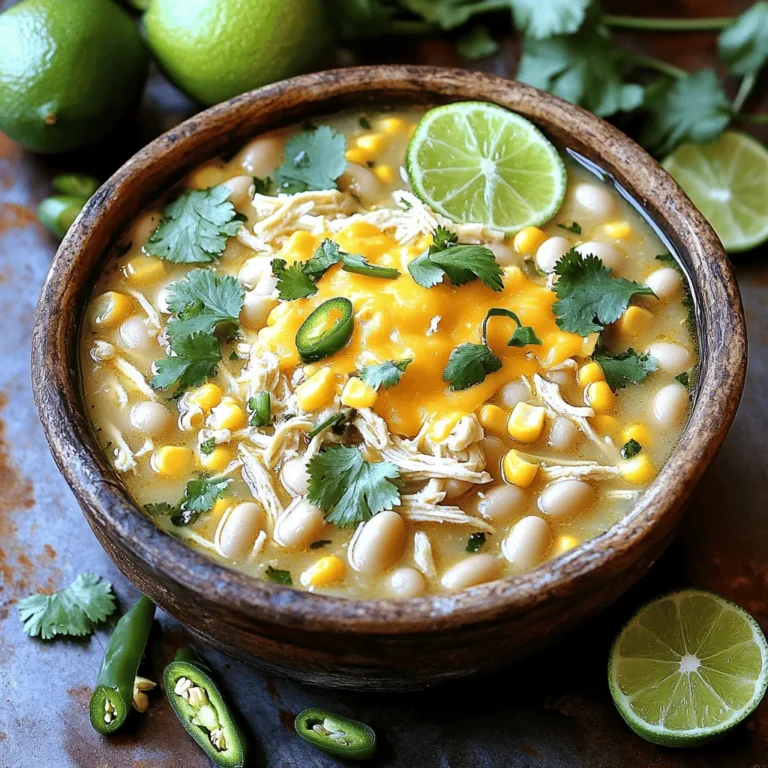
Savory Slow Cooker White Chicken Chili Easy Meal Idea

- 2 large chicken breasts - 1 cup fresh spinach, finely chopped - 1 cup canned artichoke hearts, thoroughly drained and coarsely chopped - 1/2 cup cream cheese, softened to room temperature - 1/4 cup creamy Greek yogurt - 1/2 cup shredded mozzarella cheese - 1/4 teaspoon garlic powder - 1/4 teaspoon onion powder - Salt and freshly cracked black pepper to taste - Fresh parsley or basil leaves for garnish (optional) - 2 tablespoons extra virgin olive oil To make spinach artichoke stuffed chicken, gather your ingredients first. Start with two large chicken breasts. These will be the stars of your dish. You want them fresh and plump. Next, chop one cup of fresh spinach. This adds both flavor and color. Use one cup of canned artichoke hearts, drained and chopped. This brings a tender and tangy taste. Now, let's add creaminess. You will need half a cup of cream cheese. Make sure it's softened. Then, use a quarter cup of creamy Greek yogurt for a twist. This adds a nice tang and makes the filling lighter. For flavor, gather half a cup of shredded mozzarella cheese. This will melt beautifully inside the chicken. You will also need a quarter teaspoon each of garlic powder and onion powder. These spices boost the overall taste. Don't forget salt and freshly cracked black pepper to season to your liking. Finally, for a touch of freshness, have some parsley or basil leaves on hand for garnish. You can use them at the end to brighten your dish. Now you have all the ingredients ready. This dish is not only tasty but also visually appealing. It’s a perfect dinner delight! {{ingredient_image_2}} - Preheat the oven to 375°F (190°C). - In a bowl, mix the spinach and artichoke filling. Combine: - 1 cup fresh spinach, finely chopped - 1 cup canned artichoke hearts, drained and chopped - 1/2 cup cream cheese, softened - 1/4 cup creamy Greek yogurt - 1/2 cup shredded mozzarella cheese - 1/4 teaspoon garlic powder - 1/4 teaspoon onion powder - Salt and pepper to taste. This mixture will be creamy and full of flavor. - Take each chicken breast and cut a pocket. - Be careful not to cut all the way through. - Now, stuff each chicken breast with the spinach and artichoke filling. - Press the filling gently to get as much inside as you can. - If the pocket opens, use toothpicks to seal it. This keeps all the goodness inside while cooking. - Heat 2 tablespoons of extra virgin olive oil in a skillet over medium-high heat. - Once the oil is hot, add the stuffed chicken breasts. - Sear them for 2-3 minutes on each side until golden brown. - After searing, transfer the skillet to the preheated oven. - Bake for about 20-25 minutes. The chicken is done when its internal temperature is 165°F (74°C). Let it rest for a few minutes after baking. This helps keep the chicken juicy. You can garnish it with fresh parsley or basil for a nice touch! To seal the chicken pocket, use toothpicks. After stuffing, push the pocket's edge together and insert the toothpicks to hold it. You can also wrap the chicken in kitchen twine for extra support. To keep chicken moist, avoid overcooking. Use a meat thermometer to check the inside temperature. The chicken is ready when it hits 165°F (74°C). Let it rest for a few minutes after cooking. This keeps the juices inside. For extra flavor, try adding spices like paprika or cayenne. You can also mix in different cheeses, like feta or Parmesan, for a unique taste. Serve this dish with a simple salad or roasted veggies. These sides add freshness and balance to the meal. A sharp knife is your best friend for cutting the chicken. Use a sturdy cutting board to keep things safe. A large oven-safe skillet works well for both searing and baking. This way, you can go from stovetop to oven without changing pans. A meat thermometer is a must for perfect cooking. Pro Tips Use Fresh Ingredients: Whenever possible, opt for fresh spinach and high-quality artichoke hearts. Fresh ingredients enhance the flavor and texture of the dish significantly. Don't Overstuff: While it's tempting to load the chicken with filling, overstuffing can cause the chicken to burst while cooking. Aim for a balanced amount of filling. Let It Rest: Allowing the chicken to rest after baking is crucial. This step ensures the juices redistribute, keeping the meat moist and flavorful. Experiment with Cheeses: Feel free to mix different types of cheese such as feta or parmesan for added flavor complexity. This can elevate the dish to a whole new level! {{image_4}} You can mix things up with different cheese options. Try using feta, goat cheese, or even cheddar. Each cheese brings its own taste and texture. Adding sun-dried tomatoes or olives can also boost flavor. These ingredients add a tangy twist that makes every bite exciting. Grilling the chicken gives it a smoky flavor. You can marinate the chicken before grilling for extra taste. Baking is a classic method that keeps the chicken juicy. If you want a faster method, use an Instant Pot. It cooks the chicken quickly and keeps it moist. A slow cooker is perfect for busy days. It allows you to set it and forget it while enjoying a tasty meal later. For gluten-free options, use gluten-free chicken broth or breadcrumbs in the stuffing. You can also swap the cream cheese with a dairy-free version. For a vegan take, replace chicken with tofu or portobello mushrooms. Use a plant-based cream cheese and add more veggies to the filling. These options ensure everyone can enjoy this dish. After you enjoy your spinach artichoke stuffed chicken, store any leftovers right away. Place them in an airtight container. This keeps the chicken fresh for up to three days in the fridge. Make sure to let the chicken cool down before sealing it. If you want to save it longer, freezing is a great option. Wrap each chicken breast in plastic wrap, then put them in a freezer-safe bag. You can freeze them for up to three months. When you reheat stuffed chicken, you want to keep it juicy. The best way is to use the oven. Preheat it to 350°F (175°C). Place the chicken in a baking dish, cover it with foil, and bake for about 15-20 minutes. This method helps keep the chicken moist and warm. You can also use a microwave, but be careful. Heat it in short bursts to avoid drying it out. Meal prepping makes dinner easy. Start by chopping your spinach and artichokes a day ahead. You can also mix the filling in advance. Store it in the fridge until you’re ready to stuff the chicken. When it comes to cooking, just take out the filling and stuff the chicken. This saves time on a busy day. Always label your containers with dates, so you know when to use them! How do I know when the chicken is fully cooked? You can check if the chicken is done by using a meat thermometer. The center should reach 165°F (74°C). If you don’t have a thermometer, cut into the chicken. The meat should be white, not pink. Can I make this recipe ahead of time? Yes, you can prepare the stuffing and stuff the chicken the day before. Store it in the fridge until you’re ready to cook. Just remember to add a few extra minutes to the cooking time. What can I use instead of cream cheese? If you want a lighter option, you can use ricotta cheese or cottage cheese. Greek yogurt can also work for a tangy flavor. Just make sure it’s thick enough to hold the stuffing together. What else can I stuff chicken with? You can get creative! Try using cheese and herbs, sun-dried tomatoes, or even bacon bits. Veggies like mushrooms or peppers can add extra flavor too. How can I modify this recipe for a larger crowd? To serve more people, simply double or triple the ingredients. Use larger chicken breasts or butterfly them for more stuffing space. Just make sure to check the cooking time. What is the best way to sear chicken? Start with a hot skillet and add olive oil. Place the chicken in the pan and don’t move it for a few minutes. This helps create a nice crust. Flip it gently to avoid tearing. How do I keep stuffed chicken from leaking? Make sure to cut a deep pocket, but not all the way through. Stuff it tightly, and use toothpicks to seal the opening. This will help keep the filling inside while cooking. This blog post covered how to make spinach artichoke stuffed chicken. We looked at the key ingredients and cooking steps. I shared tips for tasty variations and smart storage methods. Now, you have a delicious and easy recipe to try. Whether you want to impress guests or enjoy a cozy meal, this chicken dish does it all. Happy cooking!

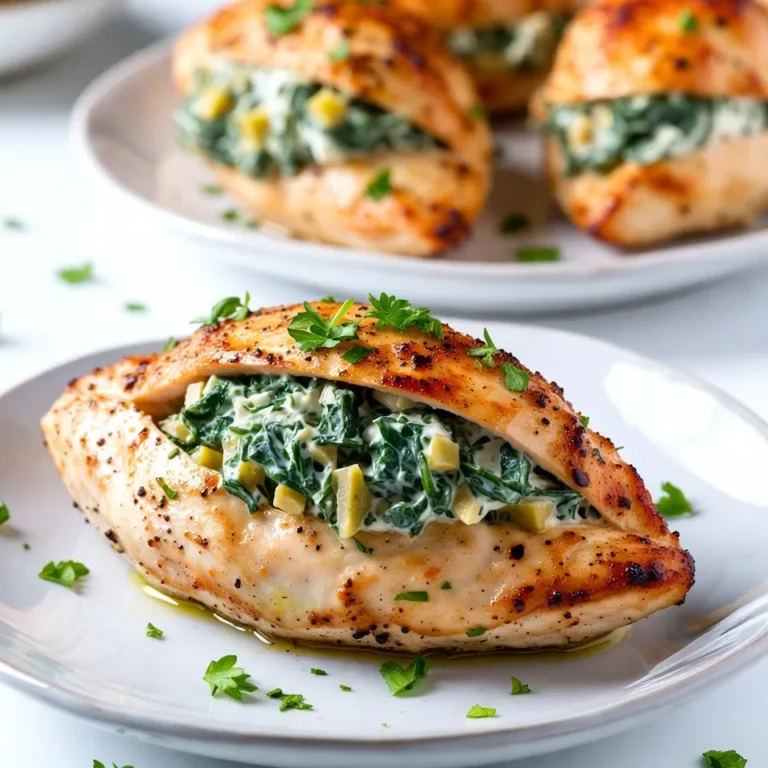
Spinach Artichoke Stuffed Chicken Flavorful Dinner Delight

To make these tasty brownies, you'll need these ingredients: - 1 cup unsalted butter, melted - 2 cups granulated sugar - 4 large eggs - 1 teaspoon vanilla extract - 1 cup all-purpose flour - 1 cup unsweetened cocoa powder - 1 teaspoon baking powder - 1/2 teaspoon salt - 1/2 teaspoon ground cinnamon - 1 cup pumpkin puree - 8 oz cream cheese, softened - 1/4 cup powdered sugar - 1/2 teaspoon pumpkin pie spice These ingredients create a rich and creamy texture, perfect for brownies. Choose high-quality ingredients for the best flavor: - Use fresh eggs for fluffiness. - Select unsweetened cocoa powder for a deep chocolate taste. - Pick pure vanilla extract instead of imitation for better flavor. - Choose local pumpkin puree if possible; it often tastes fresher. - Use full-fat cream cheese for a rich and creamy swirl. These tips enhance the overall taste and texture of your brownies. You can adapt the recipe to fit dietary needs: - Gluten-Free: Swap all-purpose flour with a gluten-free blend. - Dairy-Free: Use coconut oil instead of butter and a dairy-free cream cheese. - Lower Sugar: Replace sugar with a sugar substitute like stevia or monk fruit. - Egg-Free: Use flax eggs or applesauce as a binder. These substitutions help make the brownies suitable for various diets. First, set your oven to 350°F (175°C). Make sure to prepare a 9x13 inch baking pan. You can grease it lightly or line it with parchment paper. This step helps you remove the brownies easily later. In a large mixing bowl, add the melted butter and granulated sugar. Whisk these together until smooth. Next, add the eggs one by one. Make sure to whisk well after each egg. Then, stir in the vanilla extract until it blends well. In another bowl, sift your all-purpose flour, cocoa powder, baking powder, salt, and ground cinnamon. Now, combine this dry mix with your wet ingredients. Use a spatula or wooden spoon. Be careful not to overmix; this keeps your brownies fudgy and soft. Take a separate bowl and beat the softened cream cheese until creamy. Gradually mix in the powdered sugar and pumpkin pie spice. Make sure it is smooth. Finally, add the pumpkin puree. Mix until everything is creamy and well combined. Pour half of the brownie batter into your prepared pan. Spread it evenly across the bottom. Top this layer with spoonfuls of the pumpkin cream cheese mixture. Use a knife or spatula to swirl the cream cheese into the brownie layer. Pour the remaining brownie batter on top. Perform another swirl to create a nice marbled effect. Place the pan in the oven and bake for 30-35 minutes. To check if they are done, insert a toothpick into the center. It should come out with a few moist crumbs. Once baked, let the brownies cool in the pan for at least 15 minutes. After cooling, cut them into squares and serve. To make fudgy brownies, start with melted butter. This gives a rich texture. Use good quality cocoa powder. Sift your dry ingredients. This adds air and helps mix better. Mix the batter gently to keep it dense. Overmixing can lead to dry brownies. Lastly, bake just until a toothpick shows some moist crumbs. To create a perfect swirl, use a knife or spatula. After layering the brownie and cream cheese mix, make gentle figure-eight motions. Don’t overdo it! You want to see both layers. Aim for a marbled effect, not a full mix. This keeps the colors distinct and appealing. Serve these brownies warm for the best taste. A dollop of whipped cream adds a nice touch. You can sprinkle cinnamon on top for extra flavor. For a fun twist, add chocolate chips or nuts. This adds texture and a new flavor layer. Enjoy these brownies with a warm drink or scoop of ice cream for a delightful treat! {{image_4}} To make gluten-free brownies, swap the all-purpose flour with a gluten-free blend. Look for blends made from rice flour, almond flour, or coconut flour. Make sure the blend contains a binding agent, such as xanthan gum. This helps keep the texture nice. The rest of the recipe stays the same, so you can enjoy these treats without gluten. To make these brownies vegan, replace the eggs. Try using flax eggs or chia eggs. Mix one tablespoon of flaxseed meal or chia seeds with three tablespoons of water. Let it sit until it thickens. Use dairy-free butter instead of regular butter. Lastly, choose a vegan cream cheese for the swirl. These swaps keep the flavors rich while ensuring no animal products are used. You can get creative with flavors! Add nuts for crunch. Chopped walnuts or pecans work well. If you love chocolate, mix in chocolate chips. They add extra sweetness and richness. You might also try adding a swirl of caramel or peanut butter for a fun twist. Each option makes the brownies unique and delicious while keeping that pumpkin cream cheese flavor intact. To keep your Pumpkin Cream Cheese Swirl Brownies fresh, store them in an airtight container. This helps prevent them from drying out. If you have leftovers, let them cool completely. Then, cut them into squares. Place parchment paper between the layers to avoid sticking. Store them in the fridge for up to five days. They will taste great even after a few days! Freezing brownies is simple and a great way to save some for later. First, let the brownies cool completely. Cut them into individual squares. Wrap each square tightly in plastic wrap. Then, place all wrapped brownies in a freezer-safe bag or container. They can last in the freezer for up to three months. When you are ready to enjoy, just take one out and let it thaw in the fridge. Reheating brownies can bring back their delicious taste. To do this, preheat your oven to 350°F (175°C). Place a brownie on a baking sheet. Warm it in the oven for about 10 minutes. This method keeps the brownie moist and fudgy. You can also use a microwave. Heat the brownie for about 15-20 seconds. Check to make sure it doesn’t get too hot. Enjoy your warm, tasty treat! Yes, you can use fresh pumpkin. First, cook the pumpkin until soft. Then, mash it well until smooth. Make sure to drain any excess water. This will help keep the brownies from becoming too wet. The flavor will be fresh and tasty! You will know the brownies are done when a toothpick comes out with a few moist crumbs. If it comes out clean, the brownies may be overbaked. The edges will look set, but the center may still feel a bit soft. This will give you that perfect fudgy texture. These brownies are great on their own, but you can enhance them! Serve with a dollop of whipped cream for extra creaminess. A sprinkle of cinnamon adds a nice touch. You can also pair them with a scoop of vanilla ice cream for a warm and cold contrast. Enjoy experimenting! In this post, we explored how to make Pumpkin Cream Cheese Swirl Brownies. You learned about important ingredients and how to prepare them. We also shared tips to help you bake fudgy brownies with a perfect swirl. Plus, we covered variations for gluten-free and vegan options. These brownies are easy to make and sure to impress. Keep these tips in mind for your next baking adventure! Enjoy every bite of your delicious creation.

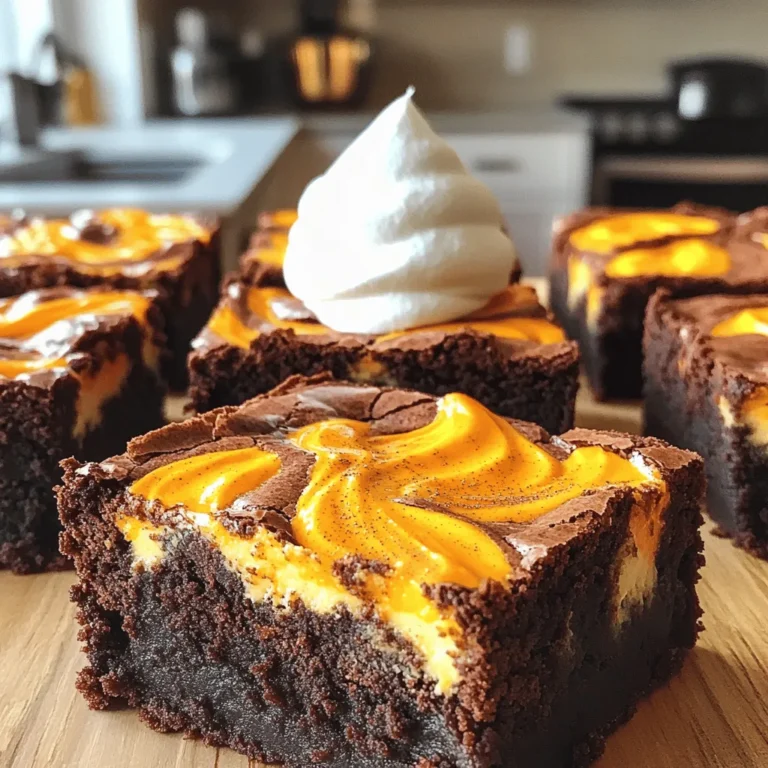
Pumpkin Cream Cheese Swirl Brownies Irresistible Treat

- 1 can (15 oz) chickpeas, thoroughly drained and rinsed - 2 tablespoons olive oil - 1 tablespoon smoked paprika - 1 tablespoon garlic powder - 1 tablespoon onion powder - 1 tablespoon brown sugar - 1 teaspoon salt - 1 teaspoon black pepper - 1 teaspoon cayenne pepper (or to taste for spice lovers) - 2 teaspoons apple cider vinegar Choosing the right chickpeas matters. Use high-quality canned chickpeas for the best taste. Look for brands without added preservatives. They should be firm and not mushy. Fresh spices also play a big role. Fresh spices give the best flavor. Old spices lose their kick and may taste bland. Buying whole spices and grinding them can add a rich taste. This small step makes your BBQ chickpeas shine. Quality ingredients lead to crispy, flavorful snacks that impress everyone. Preheating your air fryer is key. Set it to 400°F (200°C). Let it warm up for about 5 minutes. This helps the chickpeas get crisp all over. If the air fryer is not hot enough, your snack may turn out soggy. First, drain and rinse the chickpeas from the can. Use a colander to do this well. After rinsing, it is important to dry them. I recommend using a paper towel. Pat them gently to remove extra moisture. Drying helps achieve the perfect crunch. In a mixing bowl, combine the olive oil, smoked paprika, garlic powder, onion powder, brown sugar, salt, black pepper, cayenne pepper, and apple cider vinegar. Whisk until it is well blended. This creates a rich and tasty seasoning mix. Now, add the dried chickpeas to the bowl. Toss them well so they are evenly coated. Next, place the chickpeas in a single layer in the air fryer basket. Cook for 12-15 minutes. Shake the basket halfway through cooking. This ensures all the chickpeas get crispy. When they turn golden brown, they are ready. Remove them carefully and let them cool a bit. Adjust the seasoning if needed before serving. To get the crispiest BBQ chickpeas, start with drying them well. After draining and rinsing, use a paper towel to pat them dry. This step is key. Any moisture left will make them soggy. Next, preheat your air fryer to 400°F (200°C) for about 5 minutes. This helps create a perfect crust. When you cook, lay the chickpeas in a single layer. Overcrowding can lead to uneven cooking. Shake the basket halfway through cooking for even crispiness. Do you like it spicy? You can adjust the cayenne pepper to fit your taste. For a milder flavor, reduce the cayenne or leave it out. You can also add other spices. Consider chili powder, cumin, or even a pinch of cinnamon for a twist. Try it out to find your perfect mix. Serve these crunchy chickpeas in a fun way! You can use a rustic bowl or a stylish platter lined with parchment paper. This adds visual appeal. Pair them with drinks like iced tea or a fruity soda for a tasty snack. For a creative platter, add fresh veggies like carrots and cucumbers. This makes for a colorful display. You can also sprinkle the chickpeas over salads to give them extra crunch. The options are endless! {{image_4}} You can change the taste of your crispy BBQ chickpeas by using different seasonings. Try ranch seasoning for a creamy twist. Buffalo seasoning adds a spicy kick. You can even mix a dash of cumin and chili powder for a smoky flavor. These chickpeas fit many diets. They are gluten-free and vegan, making them perfect for everyone. You can enjoy these snacks without worrying about dietary restrictions. Just check your seasoning mixes to ensure they are also gluten-free. You can swap out ingredients easily. For oil, use avocado oil for a lighter flavor. If you prefer a sweeter taste, try maple syrup instead of brown sugar. Each change can create a new version of this tasty snack. Experimentation is key to finding your favorite! To keep your crispy BBQ chickpeas fresh, use an airtight container. A glass jar or a plastic container works well. Avoid using bags, as they may not keep air out. Make sure the chickpeas are completely cool before sealing. This helps prevent moisture build-up that can make them soggy. When you want to enjoy crispy chickpeas again, reheating is key. Place them in the air fryer at 350°F (175°C) for about 5 minutes. This method helps keep them crunchy. You can also use an oven. Spread them on a baking sheet and heat for the same time. Avoid using the microwave, as it makes them soft. Crispy BBQ chickpeas can last up to a week when stored properly. After that, they may lose their crunch and flavor. If you want to keep them longer, consider freezing them. However, freezing may change their texture. To enjoy the best taste, aim to eat them within a week. Yes, you can! If you don't have an air fryer, you can use your oven. Preheat your oven to 400°F (200°C). Spread the seasoned chickpeas on a baking sheet in a single layer. Bake for 25 to 30 minutes, stirring halfway through. This method will still give you crispy chickpeas, but it may take a bit longer. To make your BBQ chickpeas milder, skip the cayenne pepper. You can also reduce the black pepper. Instead, add more smoked paprika or garlic powder for flavor without the heat. If you want a sweet twist, try adding a bit more brown sugar. This will balance the flavors and keep them tasty. Absolutely! Chickpeas are super versatile. You can make hummus by blending them with tahini, lemon juice, and garlic. Roast them with different spices for a crunchy snack. You can even toss them in salads for added protein. Try adding them to soups or stews for a healthy boost. The options are endless! This post showed you how to make tasty air-fried chickpeas. We covered every step, from the key ingredients to cooking methods. Remember, using good-quality chickpeas and fresh spices makes a big difference. If you need more flavor, try different seasonings or make a creamy dip. Store leftovers in a tight container, so they stay fresh. Explore all the fun ways to enjoy chickpeas, whether in snacks or meals. Start cooking and enjoy your healthy bites!

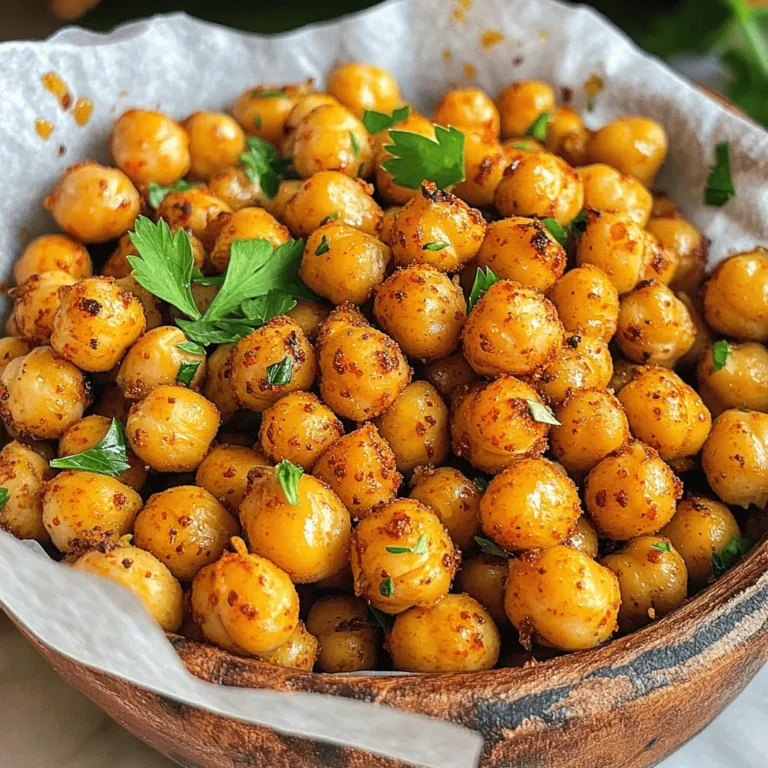
Air Fryer Crispy BBQ Chickpeas Snack Delightful Treat

PREV 1 … 12 13 14 … 44 NEXT
yummybiterecipes

explore

DessertsDinnerAppetizersDrinks

Our Policies

  • Cookie Policy
  • Copyright Policy
  • Disclaimer
  • GDPR Policy
  • Terms Of Use
Back to Top
  • About
  • Contact Us
  • Privacy Policy
© 2025 yummybiterecipes