FREE DINNER EBOOK! Get your copy!
  • Cookie Policy
  • GDPR Policy
  • Disclaimer
  • Terms Of Use
  • Visit my other site: Fun Cookie Recipes
yummybiterecipes
  • Home
  • Dinner
  • Desserts
  • Drinks
  • Appetizers
  • Contact
  • About
  • Privacy Policy
  • Home
  • Dinner
  • Desserts
  • Drinks
  • Appetizers
  • Contact
  • About
  • Privacy Policy
  • Cookie Policy
  • GDPR Policy
  • Disclaimer
  • Terms Of Use
Visit my other site: Fun Cookie Recipes

HOME / CATEGORIES /

Latest

- 1 cup rolled oats - 1/2 cup natural peanut butter (or almond butter) - 1/4 cup honey or maple syrup - 1/4 cup unsweetened cocoa powder - 1/2 cup shredded coconut - 1/4 cup chocolate protein powder - 1/4 cup mini chocolate chips (optional) - Pinch of salt - 1-2 tablespoons almond milk If you need nut butter alternatives, try sunflower seed butter or tahini. For sweeteners, agave syrup or stevia work well. You can swap in whey or plant-based protein powder based on your taste. Rolled oats give energy and fiber, which helps with digestion. Protein in snacks keeps you full longer and aids in muscle recovery. Nut butter adds healthy fats, which support brain health and provide sustained energy. To make chocolate coconut protein balls, start by mixing the base ingredients. In a large bowl, combine: - 1 cup rolled oats - 1/2 cup natural peanut butter (or almond butter) - 1/4 cup honey or maple syrup - 1/4 cup unsweetened cocoa powder - 1/2 cup shredded coconut - 1/4 cup chocolate protein powder - A pinch of salt Mix these well using a sturdy spatula. Make sure everything is blended nicely. If the mixture feels too dry, add 1-2 tablespoons of almond milk. This step helps adjust the consistency. Mix again until it’s moist and easy to mold. Next, it’s time to roll the protein balls. Scoop out about one tablespoon of the mixture. With clean hands, roll it into a compact ball. Continue this until you shape all the mixture into balls. Place them on a parchment-lined tray. Make sure they do not touch. Refrigeration is key for these protein balls. Chill them for at least 30 minutes. This step helps them firm up and hold their shape. To store your protein balls, keep them in an airtight container. They will stay fresh in the fridge for up to a week. Enjoy your healthy snack anytime! To make your chocolate coconut protein balls taste even better, consider adding spices or extracts. A dash of vanilla extract adds a warm note. You could also use a pinch of cinnamon for a cozy spice. The choice between sweetened and unsweetened coconut matters too. Sweetened coconut gives a richer taste, while unsweetened coconut keeps it light and healthy. If the mixture feels too dry, don't worry! You can easily fix this. Gradually add almond milk, one tablespoon at a time. Keep mixing until it becomes moist enough to shape. To prevent stickiness when rolling, wet your hands slightly. This trick stops the mixture from sticking to your fingers. When it comes to presentation, a decorative platter works wonders. Arrange the protein balls in a circle or in rows. For extra flair, sprinkle some shredded coconut on top. If you're feeling fancy, drizzle melted dark chocolate over them. Pair these tasty bites with a glass of almond milk or your favorite smoothie for a complete snack experience. {{image_4}} You can boost the taste of your protein balls by adding dried fruits. Try mixing in raisins or cranberries for a chewy texture. These fruits add natural sweetness and extra nutrients. You might also want to experiment with seeds. Chia seeds or flax seeds can give a fun crunch. They also add fiber and healthy fats. If you need gluten-free options, use certified gluten-free oats. This small change keeps your snack safe for those with gluten issues. For vegan adaptations, swap honey for maple syrup. Use a plant-based protein powder instead of regular protein powder. These swaps make your protein balls suitable for everyone. You can give your protein balls a seasonal flair. In the fall, try adding pumpkin spice for a cozy vibe. A little cinnamon or nutmeg can warm up the flavor. During winter, add peppermint extract for a fresh twist. These small changes can make your snacks fun and festive! To keep your chocolate coconut protein balls fresh, place them in an airtight container. Store them in the refrigerator. This helps maintain their texture and flavor. If you want to keep them longer, freezing is a great option. Just wrap each ball in plastic wrap, then place them in a freezer-safe bag. This protects them from freezer burn. In the fridge, these protein balls last about one week. If you freeze them, they can stay good for up to three months. Always check for signs of spoilage. If you see mold or if they smell off, it’s time to toss them. Freshness is key for the best taste. Thaw frozen protein balls in the fridge overnight. This keeps them soft and tasty. If you’re in a hurry, you can leave them at room temperature for about an hour. To refresh them after freezing, you can lightly reshape them with your hands. They’re ready to enjoy once they feel soft again! I enjoy using natural peanut butter for its rich flavor. It gives a nice creaminess. Almond butter also works well if you want a nutty twist. Both options add healthy fats and protein. Each nut butter brings a unique taste. Peanut butter is sweet and salty, while almond butter is more earthy. Choose based on what you like most. Yes, you can make these protein balls vegan. Just substitute honey with maple syrup. That way, you keep the sweetness without using animal products. For nut butter, stick with almond or other plant-based options. You can also use vegan protein powder. This makes it easy to enjoy a tasty treat while keeping it plant-based. To boost the protein, try adding more protein powder. You can also mix in chia seeds or flaxseeds. Both add protein and healthy fats. Greek yogurt is another great option if you're not strict vegan. Adding nuts or seeds can help too. These changes make your snack even more filling and nutritious. Absolutely! These protein balls are perfect for kids. They are packed with good nutrients. The oats and nut butter provide energy. Plus, kids love the chocolatey taste! Serve them as an after-school snack or a fun treat. Just make sure to watch for any nut allergies. In this article, you learned how to make delicious protein balls using simple ingredients. We discussed the benefits of each item and offered substitutes for different diets. The step-by-step instructions helped you create the perfect snack, and tips enhanced flavor and texture. Remember to store them properly for freshness. Enjoy experimenting with flavors and variations that suit your taste. These protein balls are not just tasty; they fit many needs, from kids to health-focused eaters. Now, go try making your own batch!

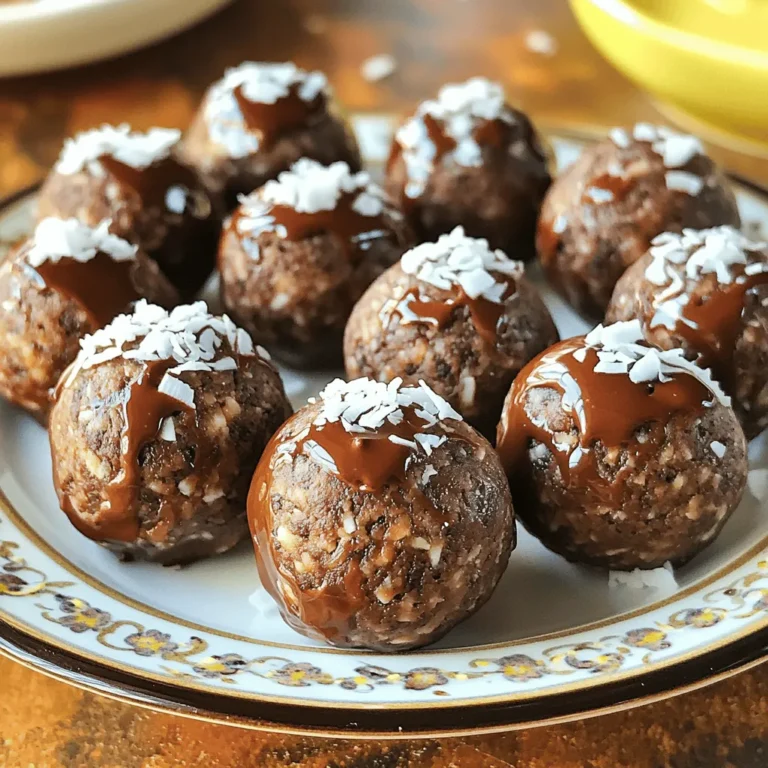
Chocolate Coconut Protein Balls Simple and Tasty Snack

To make Crockpot Creamy Chicken Spaghetti, gather these simple ingredients: - 1 lb (450g) boneless, skinless chicken breasts - 8 oz (225g) spaghetti - 1 can (10.5 oz) cream of mushroom soup - 1 cup chicken broth - 1 cup cream cheese, softened - 1 cup shredded mozzarella cheese - 1 cup diced tomatoes (fresh or canned) - 1 green bell pepper, chopped - 1 onion, finely diced - 3 cloves garlic, minced - 1 tsp Italian seasoning - Salt and pepper to taste - Fresh parsley or basil, chopped (optional garnish) These ingredients create a rich and creamy dish. The chicken will become tender, while the spaghetti absorbs all the flavors. Each component adds depth to the meal, making it satisfying for the whole family. The cream cheese and mushroom soup blend well, creating a smooth sauce. The garlic, onion, and bell pepper provide a nice crunch and flavor. You can also choose to add fresh herbs for a burst of color and taste. Having these ingredients on hand makes it easy to whip up a delicious meal any day of the week. {{ingredient_image_2}} 1. Layering the chicken Start by placing the boneless chicken breasts at the bottom of your crockpot. Spread them out evenly. This helps the chicken cook well and soak up all the flavor. 2. Mixing the sauce ingredients In a medium bowl, combine the cream of mushroom soup, chicken broth, and softened cream cheese. Whisk them until smooth. Add minced garlic, Italian seasoning, salt, and pepper. This mixture is creamy and rich, adding great taste to the dish. 3. Adding vegetables to the mix Pour the creamy sauce over the chicken. Then, add the chopped green bell pepper, diced onion, and diced tomatoes on top. Do not stir yet. This layering helps keep the flavors separate during cooking. 1. Cooking times and settings Cover the crockpot and set it to cook on low for 6-8 hours or on high for 3-4 hours. The chicken will be tender when done. Check it with a fork to make sure it’s cooked through. 2. Shredding the chicken After cooking, remove the chicken from the crockpot. Use two forks to shred it into bite-sized pieces. This step makes it easy to mix back into the sauce. 3. Incorporating spaghetti Break the spaghetti in half and stir it gently into the creamy mixture. Make sure the pasta is fully submerged. Cover again and cook on high for an additional 30 minutes, or until the spaghetti is cooked al dente. This recipe is simple but full of flavor. Enjoy the delightful dish with your family! To boost the taste of your dish, you can adjust the seasonings. Try adding more garlic or Italian seasoning. A splash of hot sauce can add a kick. If you want a richer flavor, mix in some grated Parmesan cheese. For garnishes, fresh parsley or basil adds color and freshness. You can also sprinkle some extra mozzarella on top before serving. For tender chicken, ensure you cook it on low heat. This helps keep the meat juicy. If you’re in a hurry, the high setting works too, but be careful not to overcook the chicken. To cook spaghetti perfectly, break it in half before adding. Stir it in gently after shredding the chicken. Cover the crockpot again to help it cook evenly. Check the pasta after 30 minutes to see if it’s al dente. If not, give it a bit more time. Pro Tips Use Frozen Chicken: For an even easier prep, you can throw frozen chicken breasts directly into the crockpot. Just adjust the cooking time to ensure they reach the proper temperature. Experiment with Veggies: Add more vegetables like mushrooms, spinach, or zucchini for extra nutrition and flavor. Just make sure any added veggies are cut into small pieces for even cooking. Choose Your Pasta Wisely: If you prefer, swap spaghetti for whole wheat or gluten-free pasta. Just note that cooking times may vary, so keep an eye on it! Leftover Magic: This dish makes for great leftovers! Store in an airtight container in the fridge for up to 3 days, and reheat gently on the stove or in the microwave. {{image_4}} You can switch up the pasta for variety. Penne or fusilli work great in this dish. These shapes hold sauce well, just like spaghetti. You can also use whole wheat or chickpea pasta for a healthier option. For vegetables, try mixing in what you have. Zucchini or spinach can add a fresh touch. You can even throw in some carrots or peas for color and texture. Just chop them small so they cook through. If you need gluten-free options, use gluten-free pasta. Many brands offer great choices that taste good too. Check the labels to ensure they fit your needs. For low-fat substitutions, use reduced-fat cream cheese. You can also pick a low-fat cream of mushroom soup. These swaps keep the dish creamy while cutting down on fat. You can enjoy your meal without the extra calories! To keep your Crockpot Creamy Chicken Spaghetti fresh, store the leftovers in an airtight container. Place the container in the fridge. This dish stays good for up to three days. If you want to keep it longer, freeze it instead. Just remember to use freezer-safe containers. It can last up to three months in the freezer. When it's time to enjoy your leftovers, there are a few best methods for reheating. The microwave works well. Heat it in short bursts, stirring in between. You can also use a stovetop. Just place it in a pan over low heat, stirring often until it's warm. If you freeze the meal, let it thaw in the fridge overnight before reheating. This makes sure it warms evenly. Can I use frozen chicken? Yes, you can use frozen chicken. Just add a bit more cooking time. It is best to cook it for about 8 to 10 hours on low. This way, the chicken stays juicy and tender. How do I make this recipe spicier? To spice things up, add red pepper flakes or hot sauce. You can also use spicy sausage instead of chicken. Adjust to your heat level for a nice kick. Can I make this dish vegetarian? Yes, you can make it vegetarian! Use a meat substitute, like tofu or tempeh. Swap the chicken broth for vegetable broth. This will keep all the creamy goodness. What can I serve with Crockpot Creamy Chicken Spaghetti? Pair this dish with a fresh salad or garlic bread. You can also serve steamed veggies to add color and nutrition. These sides balance the meal nicely. Can I prepare this ahead of time? Absolutely! You can prep the ingredients the night before. Just store them in the fridge. In the morning, place everything in the crockpot and start cooking. It’s a great time-saver! This blog post provided a simple guide for making Crockpot Creamy Chicken Spaghetti. We covered ingredient lists, step-by-step cooking instructions, and helpful tips to enhance flavor. You can easily adapt this dish, whether by changing pasta or making it gluten-free. Remember to store leftovers correctly for future meals. Enjoy this dish with family or friends. Cooking should be fun and stress-free. Dive into this recipe and make it your go-to meal!

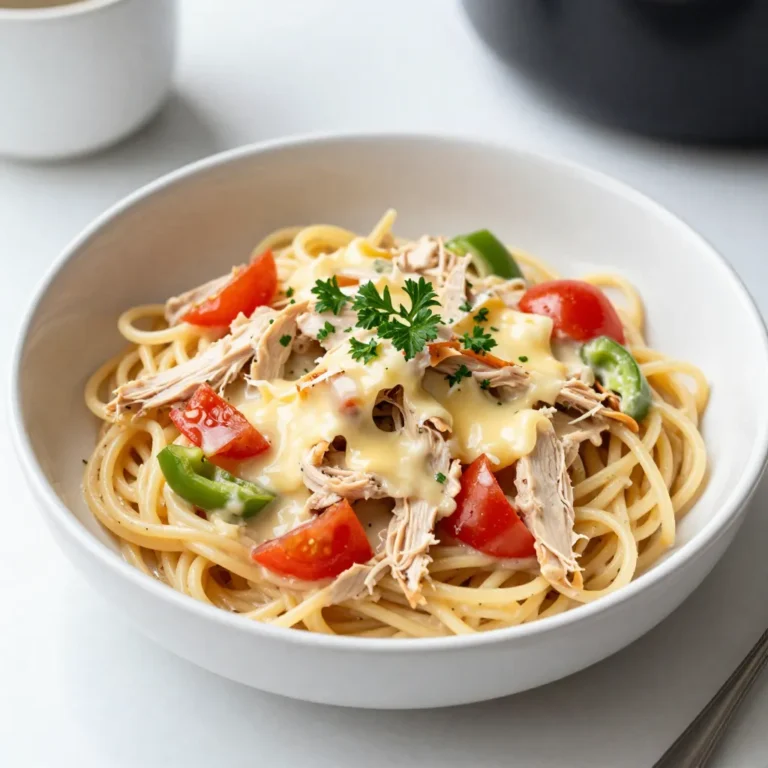
Crockpot Creamy Chicken Spaghetti Easy Family Meal

- 2 cups apple pie filling (store-bought or homemade) - 1 cup heavy cream - 1/4 cup powdered sugar - 1 teaspoon vanilla extract - 1 teaspoon ground cinnamon - 1 cup crushed graham crackers - 1/2 cup chopped walnuts (optional) - Fresh apple slices for garnish - Additional whipped cream (store-bought or homemade) for layering For the whipped cream, you need heavy cream. If you want a lighter option, use half-and-half. The powdered sugar adds sweetness. You can swap it with regular sugar if you prefer. For the apple pie filling, use homemade or a good store brand. They both work well. The cinnamon enhances flavor. You can try nutmeg for a twist. You can add chopped walnuts for crunch. If you want to skip nuts, use toasted coconut instead. For extra flavor, try adding a splash of caramel sauce between layers. If you love a fruity twist, include fresh berries with the apple slices. This makes your parfait unique and fun! To whip the cream, start with a clean mixing bowl. Add the heavy cream, powdered sugar, and vanilla extract. Using a hand mixer, whip the mixture on medium speed. Watch closely as soft peaks form. You want it light and fluffy, so avoid overwhipping. It should hold its shape but not be too stiff. In a small bowl, combine the crushed graham crackers with ground cinnamon. Mix well to spread the cinnamon evenly. This adds a warm flavor that pairs perfectly with the apple pie filling. Set this mixture aside for later use. It will create a nice base in the parfaits. Choose clear serving glasses or bowls. These will show off your layers. Start with a layer of the cinnamon graham cracker mixture at the bottom. Next, add a generous spoonful of apple pie filling, spreading it evenly. Then, dollop a layer of whipped cream on top. Repeat this process until you fill the glass. Finish with a lovely dollop of whipped cream at the top. For garnish, you can sprinkle chopped walnuts on top if you like. Fresh apple slices make a beautiful finishing touch. They add color and freshness. Once garnished, place the parfaits in the refrigerator for at least 30 minutes. This chilling time helps the flavors blend. Enjoy your delicious creation! To make fluffy whipped cream, start with cold heavy cream. Cold cream whips better, giving you a light texture. Add powdered sugar and vanilla to sweeten the cream. Mix on medium speed until soft peaks form. Be careful! Overwhipping makes the cream grainy. Stop mixing right when you see fluffy peaks. One common mistake is using warm cream. Warm cream won't whip well. Another mistake is overwhipping. This can lead to butter instead of cream. Avoid skipping the chilling step. Chilling the parfaits helps flavors blend. Finally, be sure to layer evenly. Uneven layers can make the parfaits hard to enjoy. Use clear glasses for serving. This shows off the beautiful layers. Top each parfait with a generous dollop of whipped cream. A sprinkle of cinnamon adds a lovely touch. For a fun twist, add chopped walnuts on top. Fresh apple slices also make a great garnish. Serve with a cute spoon for a special touch. {{image_4}} You can switch up the filling to create new tastes. Try using cherry pie filling for a tart twist. Peach pie filling brings a sweet and juicy flavor. For a fun seasonal option, use pumpkin pie filling in fall. Each fruit offers a unique flavor that pairs well with whipped cream. Instead of crushed graham crackers, mix it up with crushed cookies. Oreo cookies add a rich chocolate flavor. Shortbread cookies provide a buttery base. You can even use nuts for a crunchier texture. Each crust type will change the overall taste and texture of the parfaits. Making a vegan version of these parfaits is simple. Use coconut cream instead of heavy cream. It whips up well and tastes great. Opt for maple syrup or agave instead of powdered sugar for sweetness. Use dairy-free pie filling or make your own with fresh fruit. This way, everyone can enjoy a delicious treat! To store your parfaits, keep them in the fridge. Use airtight containers or cover them with plastic wrap. This keeps the parfaits fresh and tasty. Avoid stacking them to prevent spills. Always store the parfaits in the original serving glasses if you can, as it helps maintain their lovely look. These parfaits last about 2 to 3 days in the refrigerator. After this time, the flavors may start to fade. If you notice any changes in smell or texture, it’s best to discard them. Remember, the fresher, the better! You do not need to reheat these parfaits. They are best served cold. If they seem a bit flat, you can whip some extra cream to refresh the layers. Just add the new whipped cream on top for a light and airy touch. Enjoy your delicious dessert! Yes, you can make these parfaits ahead of time. Prepare them up to a day before serving. Just layer the ingredients in your glasses and store them in the fridge. This helps the flavors blend well. Just add your garnishes right before serving for the best look. If you want to avoid heavy cream, you have options. You can use coconut cream for a dairy-free version. Another choice is to use whipped topping. Both will give you a nice, fluffy texture. Your parfaits will still taste great with these substitutes. To make gluten-free parfaits, use gluten-free graham crackers. Many brands offer gluten-free options that work well. Just check the label to ensure they fit your needs. This way, everyone can enjoy your delicious dessert. Freezing these parfaits is not the best idea. The whipped cream and apple filling may not freeze well. They can lose their texture and flavor. Instead, enjoy them fresh or chilled for the best taste and experience. In this blog post, we explored making Apple Pie Whipped Cream Parfaits. You learned about key ingredients, measurements, and how to customize your recipe. I shared step-by-step instructions for whipping cream, layering, and serving. We covered tips for perfecting your parfaits and variations for different tastes. These treats are fun to make and easy to store. Try them today!

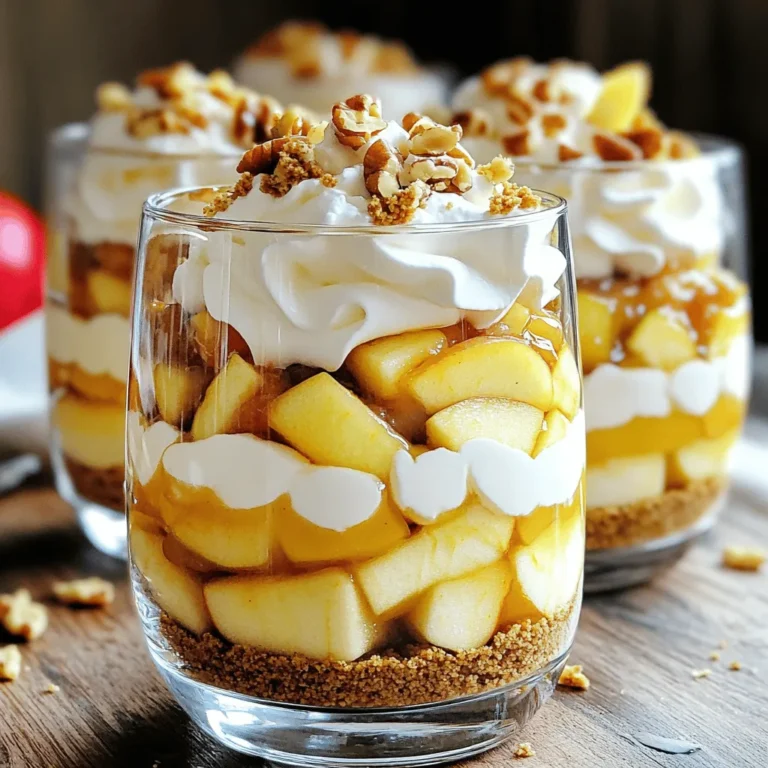
Irresistible Apple Pie Whipped Cream Parfaits Recipe

- 2 large onions - 1 cup buttermilk (or substitute) - 1 cup all-purpose flour - 1 cup panko breadcrumbs - 1 teaspoon garlic powder - 1 teaspoon onion powder - 1 teaspoon paprika - ½ teaspoon salt - ½ teaspoon ground black pepper - ½ cup sour cream - ¼ cup mayonnaise - Fresh dill (or dried) - Additional seasoning I love making crispy onion rings. The first step is to gather the right ingredients. You will need two large onions. Cut them into thick rings about half an inch wide. The next item is buttermilk, which adds flavor and helps the breading stick. If you don’t have buttermilk, mix regular milk with vinegar. You will also need flour and panko breadcrumbs for the crunch. For seasoning, garlic powder, onion powder, paprika, salt, and black pepper will give the rings a nice kick. Now, let’s not forget about the ranch dip! You will need sour cream and mayonnaise for a creamy base. Add fresh dill or dried dill for flavor, plus some extra seasoning to taste. Having these ingredients ready makes the process easy and fun. Now, let's get cooking! First, slice the onions into thick rings, about ½-inch thick. This size gives the best crunch and flavor. Next, soak the rings in buttermilk for at least 30 minutes. This step makes the onions tender and adds a nice taste. If you don’t have buttermilk, mix 1 cup of milk with 1 tablespoon of vinegar as a substitute. Grab two shallow bowls for the breading. In the first bowl, add 1 cup of all-purpose flour. In the second bowl, mix 1 cup of panko breadcrumbs with garlic powder, onion powder, paprika, salt, and black pepper. Stir well to blend the spices evenly. Now, take the soaked onion rings out of the buttermilk. Let any extra liquid drip off. First, coat each ring in the flour, ensuring it’s fully covered. Shake off any excess flour. Then, dip the rings into the breadcrumb mix. Press lightly to help the crumbs stick well. Preheat your air fryer to 375°F (190°C). Lightly spray the air fryer basket with cooking spray. Arrange the breaded onion rings in a single layer in the basket. This gives them room to cook evenly and stay crispy. Avoid overcrowding, as this can lead to soggy rings. Lightly spray the tops of the onion rings with cooking spray for extra crispiness. Air fry the onion rings for 10-12 minutes. Halfway through, flip them to ensure they cook evenly. They should turn golden brown and look delicious when done. Enjoy the crispy goodness! To make crispy onion rings, soak the rings in buttermilk. This step is key. Let them soak for at least 30 minutes. It adds flavor and helps the batter stick. For an even coating, dip each ring in flour first. Shake off any extra flour before moving to the breadcrumbs. Press the breadcrumbs on each ring. This helps them stick and creates a nice crunch. You can adjust the spices in the breadcrumb mix. Add more garlic powder or paprika for extra kick. If you love heat, try adding cayenne pepper. For dipping sauces, ranch is a classic, but you can also try barbecue sauce or spicy mayo. These options add different flavors to your dish. When serving, stack the onion rings on a plate. This makes them look more inviting. Place the ranch dip in a small bowl in the center. Garnish with a sprig of fresh dill for color and freshness. This simple touch makes your platter pop and looks great for guests. {{image_4}} You can change the flavor by using different onion types. Sweet onions, like Vidalia, give a milder taste. They caramelize well and add a hint of sweetness. Yellow onions are the classic choice for onion rings. They have a strong flavor and crisp texture. You can mix both types for a unique twist. Just remember to cut them into thick rings for best results. If you need a gluten-free meal, you can still enjoy these onion rings. Substitute all-purpose flour with almond flour or gluten-free flour. For the breadcrumbs, use gluten-free panko or crushed rice cereal. These swaps keep the crunch while making the dish safe for gluten-sensitive eaters. Just check the labels to ensure they are certified gluten-free. For a plant-based version of the ranch dip, use these ingredients: - ½ cup dairy-free sour cream - ¼ cup vegan mayonnaise - 1 tablespoon fresh dill (or 1 teaspoon dried) - 1 teaspoon garlic powder - 1 teaspoon onion powder - Salt and pepper to taste Mix all the ingredients until smooth. This dip tastes great with the crispy onion rings. You can enjoy the flavors without dairy! To keep your leftover onion rings fresh, first, let them cool. Place them in an airtight container. Make sure to layer them with parchment paper to avoid sticking. Store the container in the fridge. They will last for about 3 days. Avoid leaving them at room temperature for too long. To reheat onion rings while keeping them crispy, use the air fryer. Preheat it to 350°F (175°C). Arrange the onion rings in a single layer. Heat them for about 5 minutes. Check for crispiness and adjust time as needed. Avoid using the microwave, as it makes them soggy. For ranch dip, store it in a sealed container in the fridge. It will stay fresh for about one week. If you notice any separation, stir it well before serving. For longer storage, consider freezing the dip. Just thaw it in the fridge before use. Yes, you can make onion rings ahead of time. After you bread them, you can freeze them. Just place the rings in a single layer on a baking sheet. Once frozen, transfer them to a bag. They can stay in the freezer for up to three months. For reheating, air fry them straight from the freezer. Set the air fryer to 375°F and cook for about 10-12 minutes. This keeps them crispy and tasty! Yes, you can bake onion rings. Baking gives a different texture than air frying. To bake, preheat your oven to 425°F. Place the onion rings on a baking sheet lined with parchment paper. Bake for 20 to 25 minutes, flipping halfway. While they won’t be as crispy as air-fried ones, they’ll still taste good. If you want extra crunch, use more breadcrumbs. The best way to cut onions for frying is to slice them into thick rings. Aim for about ½-inch thick. First, peel the onion and cut it in half from root to tip. Then, slice each half into rings. Make sure to separate the rings gently. This helps them cook evenly. A sharp knife makes this task easier and safer. Onion rings are simple and fun to make. We covered the key ingredients, from onions to buttermilk and spices. You learned the steps to prepare, bread, and air fry perfectly crispy rings. Tips on flavor and presentation ensure tasty results every time. Whether you choose sweet onions or try a vegan dip, the options are endless. Store leftovers right to keep the taste fresh. With these guidelines, you can enjoy delicious onion rings whenever you want. Cook, share, and delight in every crispy bite!

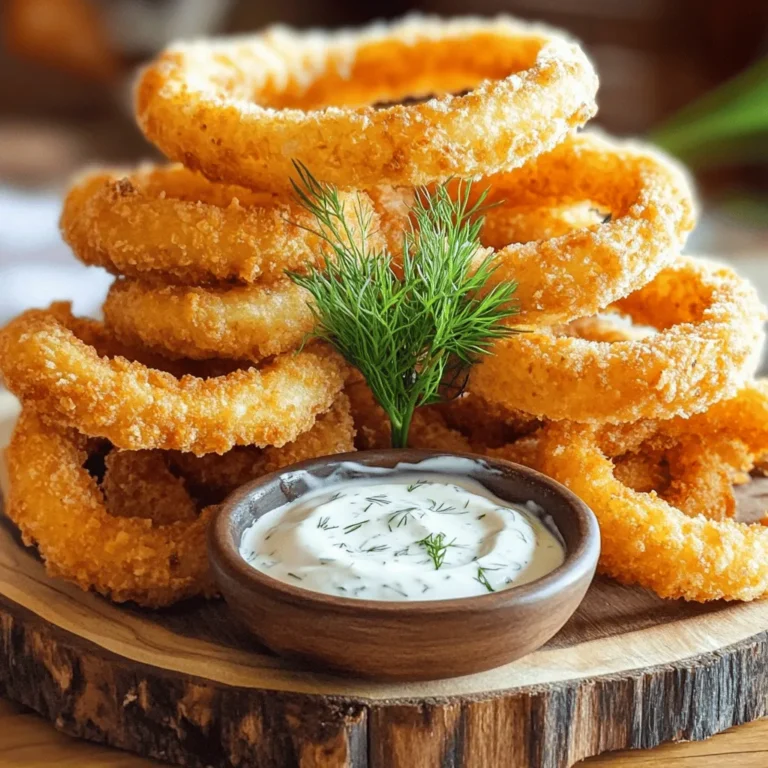
Crispy Air Fryer Onion Rings with Ranch Dip Recipe

- 2 cups freshly brewed coffee - 2 tablespoons hazelnut syrup - 1/2 cup steamed milk (or non-dairy alternative) To make hot hazelnut coffee, start with fresh coffee. Brew your favorite type. I love a strong blend for rich flavor. You need two cups for one big mug or two smaller cups. Next, hazelnut syrup adds a sweet, nutty taste. Use two tablespoons for a bold flavor. If you want creaminess, add half a cup of steamed milk. You can use dairy or a non-dairy option, like almond milk. - 1 tablespoon unsweetened cocoa powder - 1 tablespoon granulated sugar (or sweetener of choice) - Whipped cream For a twist, add cocoa powder. Just one tablespoon deepens the flavor. You can add sugar too, but only if you like sweetness. One tablespoon is enough, or skip it if you prefer. Whipped cream on top makes it feel fancy and indulgent. - Crushed hazelnuts - Ground cinnamon Garnishes make your coffee look great. Crushed hazelnuts add a nice crunch. A sprinkle of ground cinnamon gives warmth and spice. Both make every sip even better. Enjoy your hot hazelnut coffee! {{ingredient_image_2}} To start, choose your brewing method. You can use a coffee machine, French press, or pour-over. Each method brings out unique flavors in your coffee. For a balanced taste, use a coffee-to-water ratio of 1:15. That means for every ounce of coffee, use 15 ounces of water. Brew 2 cups of fresh coffee and pour it into a large mug or two smaller cups. Next, you’ll prepare the hazelnut mixture. In a small saucepan, mix 2 tablespoons of hazelnut syrup, 1 tablespoon of unsweetened cocoa powder, and 1 tablespoon of sugar if you want it sweeter. Heat this gently over low flame. Stir constantly until it warms and gets a bit frothy. This step adds depth to your coffee. Now it’s time to combine everything. Slowly pour in 1/2 cup of steamed milk while whisking. This makes the mixture smooth and creamy. Once that’s done, carefully pour the hazelnut milk mixture into your brewed coffee. Stir gently to blend the flavors. Top it with whipped cream for a delicious finish. Finally, sprinkle crushed hazelnuts and a pinch of ground cinnamon on the whipped cream. This adds crunch and a nice warm spice to each sip. Enjoy your rich hazelnut coffee! - Milk frothing techniques: To get that perfect froth, use a milk frother or a whisk. Heat your milk until it’s hot, but not boiling. Then, froth it until it’s light and airy. This adds a creamy touch to your coffee. If you don’t have a frother, a jar with a lid works too. Shake the jar until the milk expands, then heat it gently on the stove. - Sugar alternatives for health-conscious options: If you want to cut down on sugar, try sweeteners like stevia or monk fruit. These options give you sweetness without the calories. You can also use honey or maple syrup for a natural touch. Just remember, a little goes a long way! Serve your hot hazelnut coffee at a temperature around 150°F to 160°F. This is hot enough for comfort but cool enough to sip. For a lovely presentation, use clear mugs to show off the layers of creamy milk and coffee. Add a small plate of crushed hazelnuts or a cinnamon stick on the side. This not only looks nice but gives your guests a fun way to stir their drinks. If you have leftover coffee, store it in an airtight container in the fridge. It will stay fresh for up to three days. When you’re ready to enjoy it again, gently reheat it on the stove or in the microwave. Avoid boiling, as this can change the taste. If you want, add a splash of fresh hazelnut syrup or steamed milk to revive the flavor! Pro Tips Fresh Coffee is Key: Always use freshly brewed coffee for the best flavor. Pre-ground coffee can lose its aroma and taste over time. Customize Your Sweetness: Adjust the amount of granulated sugar or sweetener to suit your taste preferences. Start with less and add more if needed. Steaming Milk Techniques: If you don’t have a steamer, heat the milk in a saucepan and whisk vigorously to create froth. This will enhance the texture of your drink. Garnishing Wisely: For an extra touch, consider adding a drizzle of chocolate syrup over the whipped cream or a dash of vanilla extract to the coffee mixture. {{image_4}} You can add seasonal flavors to your hot hazelnut coffee. Pumpkin spice brings warmth in fall. Peppermint adds a fresh twist in winter. Just mix in a teaspoon of either spice while preparing your hazelnut mixture. This small change can create a cozy drink that fits the season perfectly. If you want to change up the milk, try non-dairy options. Almond milk adds a nutty taste. Oat milk gives a creamy texture. Coconut milk adds a hint of sweetness. Each choice will change the flavor a bit, making your coffee unique. Just steam your preferred milk and mix it into your coffee as usual. Adjusting sweetness is easy with hot hazelnut coffee. You can use natural syrups or sweeteners. Honey or maple syrup can add a nice touch. If you like it less sweet, skip the sugar or reduce the amount. Taste your coffee as you go, and find the perfect balance for your liking. You can find hot hazelnut coffee at many local cafes. Many coffee shops offer this warm drink. Look for popular chains like Starbucks or local favorites. These places often have their own unique twist on the classic recipe. Try asking the barista for their special hazelnut blend. You can buy hazelnut syrup and coffee online for home brewing. Brands like Torani and Monin offer great hazelnut syrup. They sell both regular and sugar-free options. Check retailers like Amazon, Walmart, or specialty food sites. You may also find coffee blends that pair well with hazelnut flavor. Specialty coffee shops often have unique hazelnut blends. These shops focus on high-quality beans and creative drinks. Explore local cafes that pride themselves on artisanal coffee. They may offer seasonal flavors, too. Don't hesitate to ask about their hazelnut options when you visit. Hot Hazelnut Coffee has about 150 calories per serving. Here’s a quick breakdown: - Freshly brewed coffee (2 cups): 0 calories - Hazelnut syrup (2 tablespoons): 60 calories - Steamed milk (1/2 cup): 40 calories (for whole milk; less for non-dairy) - Unsweetened cocoa powder (1 tablespoon): 12 calories - Granulated sugar (1 tablespoon): 49 calories (if used) - Whipped cream (optional): 50 calories per tablespoon This drink can be lower in calories with sugar-free syrup and non-dairy milk. Yes, you can easily make Hot Hazelnut Coffee dairy-free. Here are some great options: - Almond milk: A nutty flavor that pairs well with hazelnut. - Oat milk: Creamy and perfect for lattes. - Coconut milk: Adds a tropical twist to your coffee. Choose any of these non-dairy milks in place of regular milk. They will keep your drink rich and delicious. The best coffee for Hot Hazelnut Coffee is a medium to dark roast. Here are my favorites: - Colombian coffee: Good balance and smooth flavor. - Sumatra coffee: Bold and earthy notes. - Espresso: Strong and rich; perfect for a coffee kick. Using freshly brewed coffee will enhance the overall flavor of your drink. A good blend makes all the difference! Hot hazelnut coffee combines great flavors and comfort in a cup. You need fresh coffee and hazelnut syrup to start. Add steamed milk for creaminess, plus optional cocoa and sugar for flavor. By using milk frothing and proper brewing, you can perfect your drink. Consider seasonal flavors or alternate milks to make it unique. Explore local cafes or shop online for hazelnut supplies. Enjoy this flavorful drink daily, and impress friends with your barista skills!

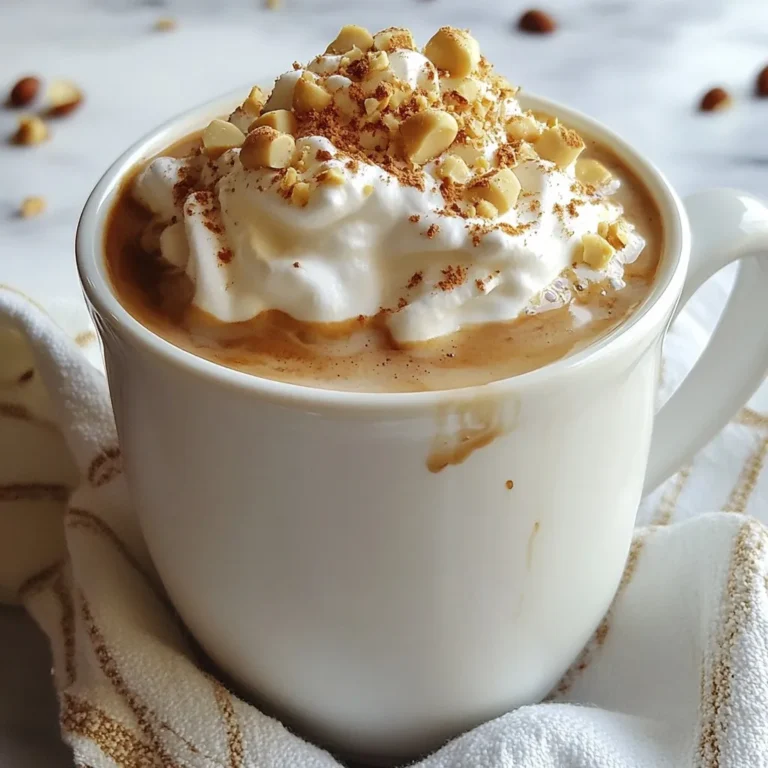
Hot Hazelnut Coffee Rich Flavorful Brew Recipe

- 2 cups cooked chicken, shredded - 2 medium sweet potatoes, peeled and diced into ½-inch cubes - 1 red bell pepper, diced - 1 green bell pepper, diced - 1 small onion, finely chopped - 3 cloves garlic, minced - 1 teaspoon dried thyme - 1 teaspoon smoked paprika - 1 tablespoon olive oil - Salt and pepper to taste - 4 large eggs (optional) - Fresh parsley, chopped (for garnish) You can add ingredients to enhance the flavor. Here are some choices: - Spinach or kale for extra greens - Cheese, like feta or cheddar, for creaminess - Hot sauce for a spicy kick If you have allergies or need alternatives, consider these options: - Use rotisserie chicken for a time saver. - Swap sweet potatoes for regular potatoes or squash. - For a vegan dish, replace chicken with chickpeas or tofu. - Use vegetable oil if you cannot use olive oil. This recipe is versatile and allows for many changes based on your tastes and needs. Enjoy customizing your dish! {{ingredient_image_2}} Start by gathering all your ingredients. You will need cooked chicken, sweet potatoes, and veggies. Dice the sweet potatoes into small cubes, about ½ inch. Chop the red and green bell peppers. Finely chop the onion. Mince the garlic. Heat 1 tablespoon of olive oil in a large skillet over medium heat. Once hot, add the diced sweet potatoes. Cook them for about 8 to 10 minutes. Stir occasionally until they soften. You want them to caramelize at the edges for flavor. Next, add the chopped onion, bell peppers, and minced garlic to the skillet. Sauté the mix for 5 to 7 minutes. Stir regularly until the veggies become tender and fragrant. The smell will make your kitchen feel warm and inviting. Once your veggies are ready, it’s time to add the chicken. Mix in 2 cups of shredded chicken to the skillet. Season with dried thyme, smoked paprika, salt, and pepper. Stir everything well to coat the chicken in flavor. Cook for 5 more minutes to let the flavors blend. If you want to add eggs, make small wells in the hash. Crack one egg into each well. Cover the skillet with a lid. Cook for 5 to 7 minutes. The whites should set while the yolks stay runny, or cook them as you like. Remove the skillet from heat once done. Sprinkle fresh chopped parsley on top for a pop of color. Serve the hash in shallow bowls. If you added eggs, nestle them right on top. For an extra touch, add a sprinkle of smoked paprika. Enjoy this hearty dish with your family! To make the best harvest chicken hash, start with the right heat. Use medium heat when cooking the sweet potatoes. This helps them soften and brown nicely. Stir them every few minutes to prevent burning. When you add the onions and peppers, sauté them until they are soft. This takes about 5-7 minutes. Cook everything together well. This allows the flavors to blend. If you want crispy edges, let the hash sit without stirring for a minute or two at the end. Serve your chicken hash in shallow bowls. Nestle the eggs on top for a nice look. Add a sprinkle of fresh parsley and smoked paprika for color. You can pair this dish with fresh fruit or a light salad. A side of toast or crusty bread also works well. For drinks, a cup of coffee or fresh juice complements the meal nicely. You can change the flavors in your hash. Try adding different spices like cumin or chili powder. Fresh herbs like cilantro or basil add a unique taste. You can also mix in other vegetables. Zucchini or kale can add more color and nutrition. For a richer flavor, use garlic powder or onion powder. Don’t be afraid to experiment! Each change can make your dish special and new. Pro Tips Use Fresh Herbs: Fresh herbs can elevate the flavor profile of your hash. Consider adding fresh thyme or parsley at the end for a burst of freshness. Perfectly Cooked Eggs: If adding eggs, cover the skillet while they cook to ensure even heat distribution and prevent the yolks from cooking too quickly. Customize Your Vegetables: Feel free to swap in seasonal vegetables like zucchini or kale to match your taste preferences or what you have on hand. Make it a Meal Prep: This dish is great for meal prepping! Store leftovers in the fridge and reheat for a quick, hearty meal throughout the week. {{image_4}} You can switch up the vegetables in your Harvest Chicken Hash. Try using zucchini, kale, or carrots. Each veggie brings its own flavor. If you want more color, add purple potatoes or corn. You can even mix in seasonal veggies for freshness. If you do not have chicken, use turkey or cooked sausage. These options work well with the spices in the dish. If you want to keep it lighter, try shredded rotisserie chicken. You can also use tofu for a different flavor profile. This way, you can enjoy the dish with what you have on hand. To make a vegetarian version, just skip the chicken. Instead, use black beans or chickpeas for protein. You can also add more eggs if you like. For a vegan version, replace eggs with silken tofu. Season the tofu well to add flavor. This way, you can enjoy Harvest Chicken Hash while keeping it plant-based. After making Harvest Chicken Hash, let it cool down. Transfer leftovers to a sealed container. Store it in the fridge for up to four days. Always check for any off smells before eating. To freeze, place the cooled hash in an airtight container. It can last for up to three months in the freezer. Make sure to label the container with the date. This helps you keep track of freshness. When you're ready to eat, just thaw it in the fridge overnight. To reheat, you have several options. You can use the stove for even heating. Just place the hash in a skillet over medium heat. Stir it every few minutes. Alternatively, you can use the microwave. Heat it in short bursts, stirring between each burst. This prevents hot spots. If you added eggs, you may want to cook them fresh for the best taste. Harvest Chicken Hash is a warm, hearty dish. It features cooked chicken, sweet potatoes, and colorful peppers. This tasty mix gives you a great balance of flavors and textures. You can also add eggs for extra protein. The dish is perfect for breakfast or brunch. Yes, you can make Harvest Chicken Hash ahead of time. Just follow the recipe and store it in the fridge. When you're ready to eat, simply reheat it in a skillet. You may need to add a splash of water to keep it moist. This dish stays tasty for up to three days in the fridge. Sweet potatoes are done when they are soft and slightly golden. You can test them by piercing a piece with a fork. If it goes in easily, they are ready. Typically, this takes about 8-10 minutes of cooking. Harvest Chicken Hash pairs well with many sides. You can serve it with fresh fruit or a simple salad. Toast is also a nice choice. For a heartier meal, add some whole grain toast or avocado on the side. This adds healthy fats and more flavor to your plate. To summarize, we explored the ingredients, steps, tips, variations, and storage for Harvest Chicken Hash. This dish is versatile and easy to customize. You can use different proteins or veggies to suit your taste. It’s also simple to store and reheat. Try making this meal ahead of time for easy weeknight dinners. You’ll enjoy a tasty dish that suits any diet. Give it a go, and have fun experimenting in the kitchen!

Harvest Chicken Hash Flavorful Breakfast Delight

- 4 cups powdered sugar - 3 large egg whites (or 1/4 cup meringue powder + 1/2 cup water) - 1 teaspoon vanilla extract (optional) - 1/2 teaspoon fresh lemon juice - Food coloring (optional) To make royal icing, you need just a few simple ingredients. First, you must use powdered sugar, which gives the icing its sweet taste and smooth texture. Three large egg whites are next. They help the icing hold its shape. If you prefer, use meringue powder mixed with water instead. This option works well too. Adding vanilla extract adds a lovely flavor, but it's not necessary. A bit of fresh lemon juice helps balance the sweetness. You can also use food coloring for fun designs. It adds color and makes your cookies pop! Gather these ingredients before you start. This way, you have everything ready to go. Enjoy the process of making your icing. It’s a fun way to express your creativity through food! {{ingredient_image_2}} - Start by sifting 4 cups of powdered sugar. This step is key. Sifting removes lumps and makes smooth icing. If you use meringue powder, mix it with 1/2 cup of water until dissolved. This creates a good base for your icing. - In a large mixing bowl, add the sifted powdered sugar and 3 large egg whites (or the meringue mix). Begin blending on low speed. This prevents a sugar cloud from forming. - After a minute, raise the mixer speed to medium-high. Beat for about 5 to 7 minutes. Look for stiff peaks. To test, dip a spatula into the icing. It should hold its shape and stand tall without drooping. - Now, gently fold in 1/2 teaspoon of fresh lemon juice and 1 teaspoon of vanilla extract. Mix for another minute. This adds a lovely flavor to your icing. - If you want color, divide the icing into small bowls. Add food coloring to each bowl. Mix until you reach your desired shade. Remember, you can always add more color. If the icing is too thick, add a few drops of water. If too thin, mix in more powdered sugar. To make perfect royal icing, you must get the right thickness. Start by testing the icing with a spatula. Dip it in and lift it out. The icing should hold its shape but still fall back into the bowl. If it does not hold, keep mixing. If it's too thick, add a tiny bit of water. If it's too thin, mix in more powdered sugar. This step is crucial for great decorating. There are two main ways to decorate with royal icing: flooding and outlining. Outlining uses thicker icing to create a border. This holds the flooding icing inside. Flooding fills the space inside the outline. Each method adds depth to your design. Allow drying time between each layer. Let the outline dry before flooding. This will help keep the colors separate and clean. Enjoy the process and have fun experimenting! Pro Tips Use Room Temperature Ingredients: Ensure your egg whites are at room temperature for better volume and stability in your icing. Test Icing Consistency: When adjusting the icing, remember the 10-second rule: it should take about 10 seconds for a line drawn through the icing to disappear. Color Mixing Tips: Start with a small amount of food coloring and gradually add more until you achieve your desired shade to avoid over-saturation. Use Piping Bags for Precision: For intricate designs, use piping bags with different sized tips to control the flow of icing accurately. {{image_4}} You can make royal icing without eggs. Use meringue powder instead. To do this, mix 1/4 cup of meringue powder with 1/2 cup of water. Stir until the powder dissolves. Then, combine this mix with 4 cups of powdered sugar as you would with egg whites. This option works great and lasts longer. You can add flavor by using extracts. Vanilla is a classic choice, but you can try others too. Almond, lemon, or even peppermint extracts can give your icing a unique taste. Just add about 1 teaspoon of your chosen extract into the icing. Mix it well to ensure the flavor spreads evenly. Color your royal icing for fun designs. You can try ombre effects by mixing different shades of the same color. To create a marbled look, add two colors on top of each other and swirl gently. Use a toothpick to create patterns. Experiment with color to make your cookies look amazing! To keep your royal icing fresh, store it in an airtight container. Press plastic wrap directly onto the icing surface to avoid air exposure. This helps prevent crusting. Royal icing can last for about two weeks if stored properly. To maintain its consistency, give it a good stir before using. If it has thickened, add a few drops of water. Mix it in slowly until you reach the right texture again. You can freeze royal icing for later use. First, place it in a freezer-safe container. Make sure to seal it tightly. It can stay fresh for up to three months in the freezer. When you are ready to use it, take it out and let it thaw in the fridge overnight. After thawing, stir it well. If it seems too thick, add water a little at a time. Mix until it's smooth and ready to decorate those sugar cookies! You can tell royal icing is ready when it forms stiff peaks. After mixing, dip a spatula into the icing. If it holds its shape and stands upright without drooping, you have the right consistency. It takes about 5-7 minutes of mixing to achieve this. Remember, if you see soft peaks, keep mixing. Stiff peaks are key for decorating. Yes, you can color royal icing easily! Start by dividing the icing into small bowls. Add a few drops of food coloring to each bowl. Mix until you reach your desired shade. Keep in mind that you can always add more color. Just be careful not to add too much at once. This can change the icing's texture. If your icing is too thick, add a few drops of water. Mix it in slowly until you reach the right consistency. If it’s too thin, add more powdered sugar bit by bit. Keep mixing until it thickens. Testing with a spatula can help you find the perfect texture for your cookies. Making royal icing is easy with the right steps and ingredients. You need powdered sugar, egg whites, and lemon juice. Mixing them at the right speed creates stiff peaks for perfect decorating. You can add flavors and colors to suit your taste. Remember to store your icing well to keep it fresh. You can even freeze it for later use. With practice and these tips, you will master royal icing. Enjoy decorating cookies and cakes, and get creative with your designs!

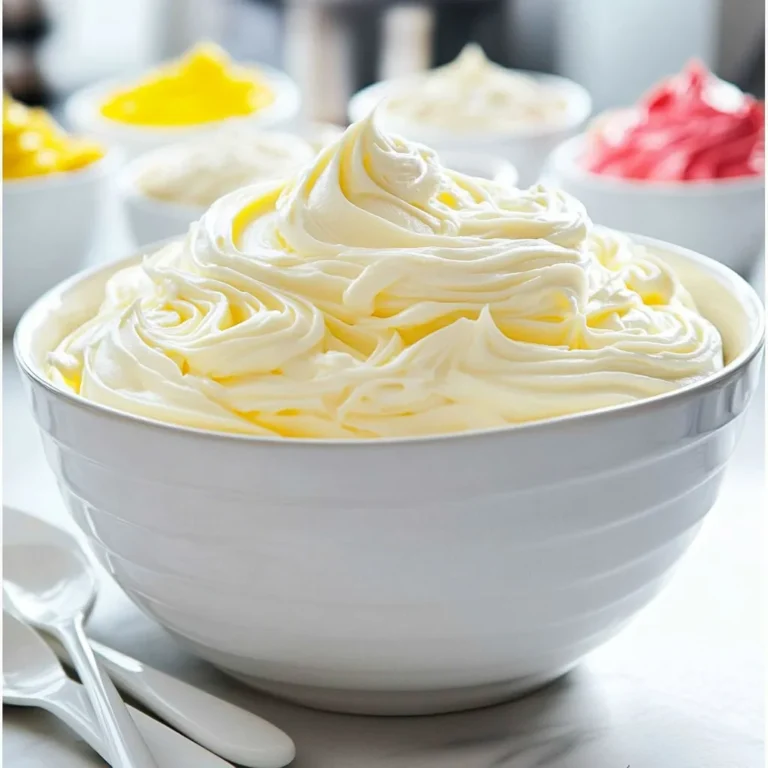
Royal Icing for Sugar Cookies Easy Decorating Tips

- 24 Oreo cookies, finely crushed - 1/2 cup unsalted butter, melted - 1 cup cream cheese, softened - 1 cup powdered sugar - 1 teaspoon peppermint extract - 1 cup whipped topping (like Cool Whip) - 1/2 cup chocolate chips (for topping) - 1/2 teaspoon vegetable oil - Crushed peppermint candies or candy canes (for garnish) To make these no-bake peppermint Oreo bars, you need simple ingredients. Start with 24 Oreo cookies. You will crush them into fine crumbs. The crumbs create a tasty crust that holds everything together. Next, you will need unsalted butter. The melted butter binds the cookie crumbs. This helps form a solid base for the bars. For the creamy filling, grab cream cheese. Make sure it’s soft, so it mixes well. You also need powdered sugar. It sweetens the cream cheese and gives it a nice texture. Add one teaspoon of peppermint extract. This gives the filling its minty flavor. You can’t have peppermint bars without this key ingredient! You will also use whipped topping like Cool Whip. This makes the filling light and fluffy. For the topping, gather half a cup of chocolate chips. You will melt these for a rich finish. Add half a teaspoon of vegetable oil to help the chocolate melt smoothly. Finally, you can use crushed peppermint candies or candy canes to garnish. They add a festive touch and extra crunch. With these ingredients, you’ll create a delicious holiday treat that is sure to impress! {{ingredient_image_2}} - First, take 24 finely crushed Oreo cookies and place them in a bowl. - Melt 1/2 cup of unsalted butter in the microwave or on the stove. - Pour the melted butter over the crushed Oreo cookies. - Mix these together until the crumbs are fully coated with butter. - Grab an 8-inch square pan and transfer the Oreo mixture. - Press the mixture down firmly using your hands or a measuring cup. - In a mixing bowl, beat 1 cup of softened cream cheese. - Keep mixing until it is smooth and creamy. - Gradually add in 1 cup of powdered sugar and 1 teaspoon of peppermint extract. - Continue mixing until it is well combined and fluffy. - Gently fold in 1 cup of whipped topping using a spatula. - Make sure it mixes well, creating a light and airy filling. - Carefully spread the cream cheese mixture over the Oreo crust. - Use a spatula to smooth it out evenly. - In a microwave-safe bowl, combine 1/2 cup of chocolate chips with 1/2 teaspoon of vegetable oil. - Heat in the microwave for 30 seconds, stirring until melted and glossy. - Drizzle the melted chocolate generously over the cream cheese layer. - For a festive touch, sprinkle crushed peppermint candies on top. - Cover the pan with plastic wrap and refrigerate for at least 4 hours. - Once set, cut into 16 bars and serve chilled for the best flavor. - Serve the bars chilled for the best taste. - Cut into 16 bars for easy sharing. - For a festive look, arrange them on a colorful platter. - Garnish with extra crushed peppermint candies for added flair. - For gluten-free options, use gluten-free Oreo cookies. - Substitute the cream cheese with a vegan cream cheese for a vegan option. - Use a plant-based whipped topping to keep it dairy-free. - Do not overmix the cream cheese mixture; it can become too soft. - Make sure to let the bars set in the fridge for at least 4 hours. - If they are too soft, they may fall apart when you cut them. - Always check that the chocolate is fully melted before drizzling. Pro Tips Use Room Temperature Ingredients: Make sure your cream cheese is softened to room temperature before mixing. This helps create a smoother and creamier filling without lumps. Chill for Best Results: For the best flavor and texture, allow the bars to chill for a full 6 hours if possible. This helps the layers set perfectly and enhances the taste. Customize Your Toppings: Feel free to get creative with toppings! Try adding different crushed candies or even drizzling white chocolate for a festive touch. Perfect Cutting Technique: To achieve clean cuts when slicing the bars, run a sharp knife under hot water, then dry it before cutting. This will help prevent sticking. {{image_4}} You can mix things up with different extracts. Try using vanilla or almond extract instead of peppermint. This change can give your bars a new twist. You can also switch the cookie base. Using Gingerbread Oreos instead of regular ones adds a warm, spicy flavor. This is great for holiday gatherings. For toppings, feel free to get creative. Instead of chocolate, you can use white chocolate or dark chocolate. Melt it just like you do with the regular chocolate. You can also add sprinkles or colorful candies on top. This makes your bars look festive and fun. Need a smaller or larger batch? It’s easy! To make smaller bars, cut the recipe in half. This works well for a quick treat. For a larger batch, simply double the ingredients. Just be sure to use a bigger pan. Adjust your chilling time if needed. To keep your No-Bake Peppermint Oreo Bars fresh, store them in the fridge. Place the bars in an airtight container. If you don’t have one, wrap the pan tightly with plastic wrap. This helps prevent odors from other foods. The bars will stay fresh for about 5 to 7 days in the fridge. Want to enjoy these treats later? You can freeze them! Cut the bars into pieces and place them in a single layer on a baking sheet. Freeze until solid, then transfer them to a freezer-safe container. They can last for up to 3 months in the freezer. To thaw, take them out and place them in the fridge for a few hours. This helps keep the texture nice and smooth. Check your bars before eating them. If they smell off or have a strange texture, they may be spoiled. Look for any mold or discoloration. If you see any of these signs, it’s best to toss them. Always trust your nose and eyes! Yes, you can use low-fat cream cheese. However, it will change the texture. Low-fat cream cheese can be thinner and less rich. Your bars may not be as creamy. If you prefer a lighter option, this is a good choice. Just know that the flavor may not be as full. You can keep these bars in the fridge for up to a week. Store them in an airtight container. They stay fresh and tasty for several days. If you want to keep them longer, they can last in the freezer for about three months. Just make sure to wrap them tightly. Yes, you can make these bars ahead of time. They are great for meal prep or parties. I suggest making them at least one day before you plan to serve them. This allows the flavors to blend well. Just remember to let them chill in the fridge for at least four hours before serving. This recipe guide covered all you need to create delicious peppermint Oreo bars. You learned about the needed ingredients, easy steps, and helpful tips. Remember to adjust for dietary needs and avoid common mistakes to ensure success. These bars are perfect for any celebration. Whether you freeze leftovers or make variations, you'll enjoy every bite. Keep them chilled, and watch for signs of spoilage. These treats are sure to impress friends and family, making your gatherings sweeter. Enjoy making these tasty bars!

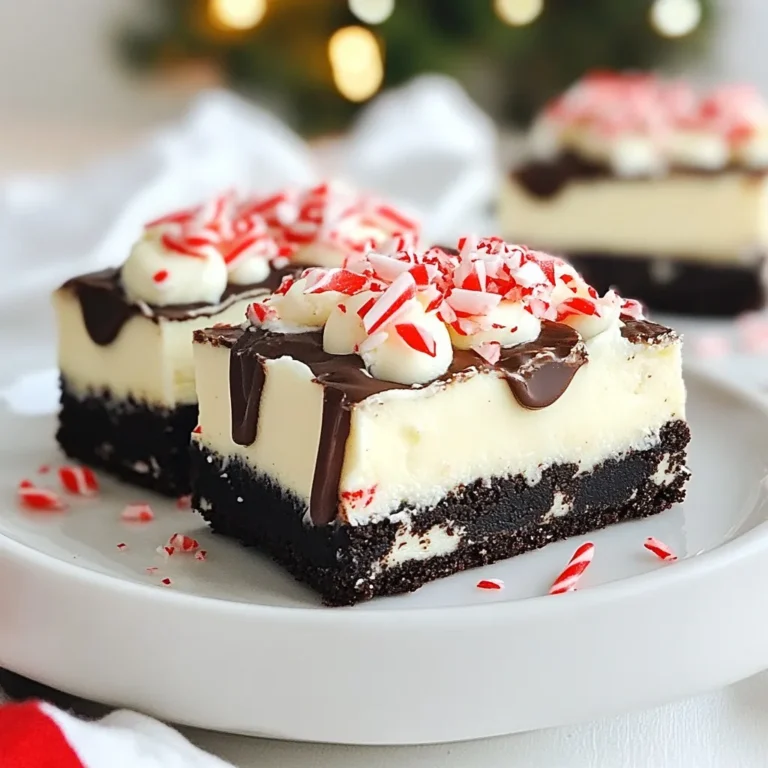
No-Bake Peppermint Oreo Bars Delightful Holiday Treats

- 1 pound boneless, skinless chicken thighs, diced into bite-sized pieces - 1 cup wild rice, thoroughly rinsed and drained - 1 medium onion, diced finely - 2 cloves garlic, minced - 3 medium carrots, sliced into thin rounds - 2 celery stalks, sliced into half-moons - 6 cups rich chicken broth (preferably low-sodium) - 1 cup heavy cream - 2 tablespoons olive oil - 1 teaspoon dried thyme - 1 teaspoon dried rosemary - Salt and freshly ground black pepper to taste - 2 tablespoons fresh parsley, finely chopped (for garnish) Using fresh herbs makes a big difference. Fresh thyme and rosemary add brightness. If you have the time, roast your chicken thighs before adding them to the soup. This adds depth. For a richer taste, consider using homemade chicken broth. It packs a flavor punch. You can swap chicken thighs for chicken breast if you prefer lean meat. For a dairy-free option, try coconut cream instead of heavy cream. If you want a vegetarian version, replace the chicken broth with vegetable broth and use mushrooms for a meaty texture. Brown rice can work in place of wild rice, but be mindful of cooking times. Start with one pound of boneless, skinless chicken thighs. Dice them into bite-sized pieces. In a large pot, heat two tablespoons of olive oil over medium heat. Add the chicken pieces and season with salt and pepper. Sauté the chicken for about 5-7 minutes. You want it golden brown all over. Once done, remove the chicken from the pot. Set it aside on a plate. In the same pot, add one medium diced onion, three sliced carrots, and two sliced celery stalks. If needed, raise the heat a bit. Sauté these vegetables for about 5 minutes. Stir them often until they soften and the onion turns translucent. Next, add two minced garlic cloves along with one teaspoon of dried thyme and one teaspoon of dried rosemary. Continue to sauté for another 1-2 minutes. The garlic should smell fragrant and soften up well. Now, stir in one cup of rinsed wild rice and pour in six cups of rich chicken broth. Bring this mix to a rolling boil. After it boils, reduce the heat to low. Cover the pot with a lid and let it simmer for about 45 minutes. The wild rice should become tender and start to split open. Once it’s ready, return the sautéed chicken to the pot. Pour in one cup of heavy cream and stir everything together. Heat it gently for another 5 minutes, but don’t let it boil. Finally, taste the soup and adjust the seasoning with extra salt and freshly ground black pepper if needed. To boost the taste of your chicken and wild rice soup, consider these tips: - Add a splash of lemon juice for freshness. - Stir in a tablespoon of soy sauce for umami. - Toss in some fresh herbs like dill or thyme. - Use homemade broth for deeper flavor. - Toast the wild rice in olive oil before adding broth. These simple tweaks can elevate your soup to new heights. The cooking time can change how your soup feels. For a thicker soup, let it simmer longer. Aim for 60 minutes if you want softer rice. If you prefer a bit of bite, stick to 45 minutes. Keep an eye on the rice. If it splits open, it’s ready. Adjust the heat if needed, so it doesn’t boil over. Avoid these common pitfalls to ensure success: - Don’t skip rinsing the wild rice; it removes grit. - Avoid overcooking the chicken; it can become dry. - Don’t rush the sautéing time; it builds flavor. - Skip adding salt too early; it can toughen the chicken. - Finally, don’t forget to taste and adjust the seasoning at the end. By steering clear of these mistakes, you’ll create a flavorful and comforting dish. {{image_4}} You can make this soup in a slow cooker for easy cooking. Start by sautéing the chicken and veggies in a pan. Then, put them into the slow cooker. Add the wild rice and broth. Cook on low for 6-8 hours or on high for 3-4 hours. Add the cream at the end to keep it rich. This method makes the chicken tender and full of flavor. If you want this soup fast, use an Instant Pot. Sauté the chicken and veggies in the pot first. Then, add the wild rice and broth. Seal the pot and cook on high pressure for about 25 minutes. Release the pressure, stir in the cream, and let it heat. This method cuts down cooking time but still delivers rich taste. For a vegetarian version, swap the chicken for chickpeas or tofu. Use vegetable broth instead of chicken broth. Keep the wild rice and veggies the same. You can also add in some mushrooms for extra umami flavor. This option is not only hearty but also full of plant-based goodness. To keep your chicken and wild rice soup fresh, let it cool first. Then, transfer it to an airtight container. Store it in the fridge if you plan to eat it within three days. Make sure to label it with the date. This way, you won't lose track of how long it has been there. When you're ready to enjoy your soup again, heat it gently on the stove over low heat. Stir it often to keep it from sticking. If the soup seems too thick, add a splash of chicken broth or water. Avoid microwaving, as it may heat unevenly. You want every spoonful to taste just as good as the first time. If you want to save your soup for later, freezing is a great option. Pour the cooled soup into freezer-safe bags or containers. Be sure to leave some space at the top, as liquids expand when frozen. Label the bags with the date. The soup can last up to three months in the freezer. To reheat, thaw it overnight in the fridge before warming it on the stove. You can use brown rice or white rice. Brown rice gives a nutty taste. White rice cooks faster but lacks that chewy texture. Quinoa is another option. It adds a nice protein boost. Just remember, cooking times may change. Adjust the liquid and simmering time as needed. Yes, you can make this soup ahead of time. It actually tastes better the next day. The flavors blend well overnight. Just let it cool and store in an airtight container. Reheat it gently on the stove. Add a splash of cream if it thickens too much. This soup lasts about 3-4 days in the fridge. Store it in a sealed container. Make sure it cools completely before putting it in the fridge. If you want to keep it longer, freeze it for up to 3 months. Just thaw it overnight before reheating. You learned about key ingredients for Chicken and Wild Rice Soup, tips for cooking, and variations. Each part helps create a delicious meal. Remember to use fresh ingredients and avoid common mistakes. Consider trying slow cooker or Instant Pot methods for ease. Proper storage keeps your soup tasty for later. Use this guide to enjoy tasty meals that fit your needs. Keep experimenting and make the recipe your own!

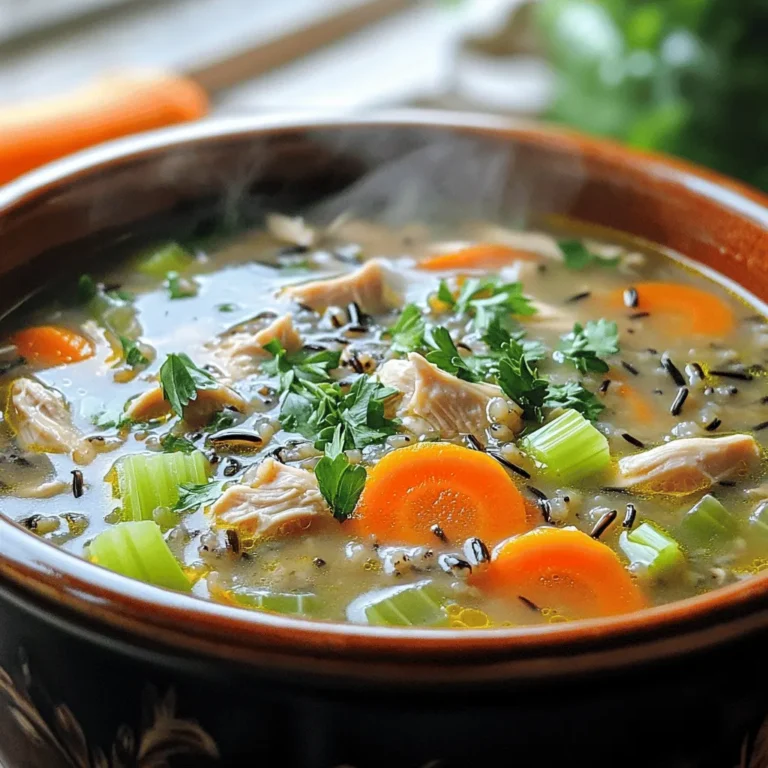
Chicken and Wild Rice Soup Flavorful Comfort Meal

To make Sweet Chili Garlic Noodles, gather these key items: - 8 oz (225g) rice noodles - 3 tablespoons sweet chili sauce - 2 tablespoons soy sauce - 2 tablespoons sesame oil - 4 cloves garlic, finely minced - 1 tablespoon fresh ginger, finely grated - 1 cup mixed bell peppers (red, yellow, and green), cut into thin strips - 1 cup snap peas, trimmed and halved if large - 2 green onions, thinly sliced - 1 tablespoon sesame seeds, toasted if desired - Salt and freshly ground black pepper to taste - Fresh cilantro leaves for garnish (optional) You can add a personal touch to your dish with these optional ingredients: - Carrots, julienned for extra crunch - Broccoli florets for a green boost - Peanuts or cashews for a nutty flavor - Lime juice for a zesty kick - Chili flakes for added heat If you have dietary needs, consider these substitutions: - Use gluten-free soy sauce for a gluten-free version. - Swap rice noodles for zucchini noodles for a low-carb option. - Replace sesame oil with olive oil if you have a sesame allergy. - Use agave syrup instead of sweet chili sauce for a vegan option. These ingredients and substitutions give you a lot of room to play with flavors. You can make this dish fit your taste and dietary needs while keeping it simple and tasty. To start, soak the rice noodles in a large bowl of hot water for about 15 minutes. This softens them but keeps them firm, which is key. After soaking, drain the noodles and set them aside. This step is crucial for a great texture in your dish. Next, grab a large skillet or wok. Heat the sesame oil over medium heat. Add the minced garlic and grated ginger. Stir them often for about 30 seconds until they smell amazing. Be careful not to let them brown, as that can make them taste bitter. Then, toss in the sliced bell peppers and snap peas. Cook this mix for 2-3 minutes, stirring occasionally. You want the veggies to be tender and bright. Now, it’s time to bring it all together. Gently add the drained noodles to the skillet. Pour in the sweet chili sauce and soy sauce. Use tongs or a spatula to mix everything well. Make sure the noodles are fully coated with the sauce and mixed with the veggies. Stir-fry for another 2-3 minutes. This helps the flavors meld. Taste your noodles and add salt and freshly ground black pepper to your liking. Once everything is hot and flavorful, you're ready to serve. To make the best rice noodles, soak them in hot water. Use a large bowl for this. Let them sit for about 15 minutes. This helps them soften but keeps their texture. Drain the noodles well to remove excess water. This step is key to getting the right bite in your dish. Use sweet chili sauce to add a nice kick. It pairs well with soy sauce and sesame oil. Minced garlic and fresh ginger also boost the taste. Make sure to sauté these for just 30 seconds. This way, you get all the flavor without bitterness. Adjust salt and pepper to your liking. A dash of lime juice can brighten the overall taste, too. To serve the noodles, use deep bowls. This adds height and makes the dish pop. Top with sliced green onions and toasted sesame seeds. For a fresh touch, add cilantro leaves. You can also include lime wedges on the side. Guests will love squeezing lime over their noodles for extra flavor. This small detail makes a big difference in how it looks and tastes! {{image_4}} You can make sweet chili garlic noodles vegetarian or vegan easily. Simply swap the soy sauce for a gluten-free option if needed. Use plant-based sweet chili sauce to keep it vegan. You can add more veggies like mushrooms or carrots for extra flavor. If you want to add protein, try chicken, tofu, or shrimp. For chicken, cut it into bite-sized pieces and sauté with the garlic and ginger. For tofu, use firm tofu, cut it into cubes, and pan-fry until golden. Shrimp cooks quickly, so add it to the skillet after the veggies. Each protein option brings its own taste and texture to the dish. Feel free to mix and match your veggies! Zucchini, broccoli, or bok choy work well. You can also try adding baby corn or mushrooms for extra crunch. Use what you have in your fridge. This recipe is flexible, and you can adjust it to your taste. To store your sweet chili garlic noodles, let them cool first. Place them in an airtight container. You can keep them in the fridge for up to three days. Make sure to seal the container tightly to lock in flavors. When you are ready to eat leftovers, you can reheat them in two ways. Use a microwave for quick heating. Place the noodles in a bowl and cover it with a damp paper towel. Heat in short bursts of 30 seconds, stirring in between. Alternatively, you can use a skillet on medium heat. Add a splash of water or oil to prevent sticking. Stir until heated through, about 5 minutes. You can freeze sweet chili garlic noodles for later use. Place cooled noodles in freezer-safe bags. Remove as much air as possible before sealing. They can last in the freezer for up to three months. To reheat, let them thaw in the fridge overnight. Then, follow the reheating guidelines above. This way, you can enjoy your tasty dish anytime! Sweet chili sauce is a thick, sweet, and spicy sauce. It blends red chili peppers, sugar, vinegar, and garlic. You can find it in most grocery stores. Look in the Asian foods aisle or the condiment section. It often comes in bottles or jars. Yes, you can use many types of noodles. If you prefer wheat noodles, try egg noodles or udon. Rice noodles work best for this recipe, but feel free to get creative! Just be sure to adjust the cooking time for different noodles. Sweet chili garlic noodles have a mild heat. The sweet chili sauce adds flavor without being too spicy. If you like more heat, add red pepper flakes or a splash of hot sauce. Taste as you go to find your perfect spice level. These noodles pair well with many dishes. You can serve them with grilled chicken, shrimp, or tofu. A side of steamed veggies or a fresh salad complements the meal nicely. Consider adding lime wedges for a zesty touch! To add protein, you have several options. Try cooked chicken, shrimp, or tofu. You can stir-fry the protein with the garlic and ginger. Alternatively, you can serve the noodles topped with your choice of protein for a hearty meal. This blog post covered everything you need for sweet chili garlic noodles. We explored essential and optional ingredients, plus dietary swaps. I shared step-by-step instructions to cook the dish and included tips for flavor and presentation. You learned variations for different diets and protein options. Lastly, we discussed storage and reheating methods. Remember, you can adjust the recipe to fit your taste. Enjoy your cooking journey and have fun experimenting!

Sweet Chili Garlic Noodles Flavorful and Easy Recipe

PREV 1 … 10 11 12 … 44 NEXT
yummybiterecipes

explore

DessertsDinnerAppetizersDrinks

Our Policies

  • Cookie Policy
  • Copyright Policy
  • Disclaimer
  • GDPR Policy
  • Terms Of Use
Back to Top
  • About
  • Contact Us
  • Privacy Policy
© 2025 yummybiterecipes