WANT TO SAVE THIS RECIPE?
Get ready to treat yourself to a deliciously easy dessert! This No-Bake Oreo Cheesecake is creamy, rich, and perfect for any occasion. You won’t need to turn on the oven, which makes it simple and fun to make. In this guide, I’ll show you every step, from the crunchy Oreo crust to the dreamy filling. Let’s dive into this treat that everyone will love!

Why I Love This Recipe
- Irresistible Flavor: This cheesecake combines the rich taste of cream cheese with the classic Oreo cookie flavor, making it a decadent treat.
- No-Bake Convenience: Perfect for warm days or when you want a quick dessert, this recipe eliminates the need for baking, saving time and energy.
- Easy to Prepare: With simple steps and minimal ingredients, even beginner bakers can successfully make this delightful cheesecake.
- Customizable Toppings: Feel free to get creative with toppings like fruit, crushed cookies, or drizzled chocolate to make it your own!
Ingredients
To make a no-bake Oreo cheesecake, you need simple ingredients. Here’s a list of what you will need:
– 24 Oreo cookies (plus 4 extra, crushed, for topping)
– 1/4 cup unsalted butter, melted
– 16 oz cream cheese, softened to room temperature
– 1/2 cup powdered sugar
– 1 teaspoon pure vanilla extract
– 2 cups heavy whipping cream, chilled
– 1/4 cup chocolate sauce for optional drizzling
This dessert is easy to prepare. It combines rich cream cheese with sweet Oreos. The buttery crust holds everything together. You can use chocolate sauce for extra flavor or skip it. The crushed Oreos on top add a nice crunch. Each ingredient plays a role in creating a creamy delight.
Step-by-Step Instructions
Preparing the Crust
To start, I take 24 Oreo cookies and place them in a food processor. I pulse them until they turn into fine crumbs. The texture should feel like sand. Next, I pour in 1/4 cup of melted butter. I pulse it again a few times until the mix sticks together.
Forming the Crust
Now, I transfer this cookie mixture to a 9-inch springform pan. Using the back of a flat-bottomed glass, I press the mix into the bottom. I make sure it is packed down tightly and evenly. After packing, I place the crust in the fridge for at least 15 minutes to set.
Making the Filling
For the filling, I grab a large mixing bowl. I add 16 oz of softened cream cheese and beat it with a hand mixer on medium speed. I mix until it looks smooth and creamy, which takes about 2 minutes. I then slowly add 1/2 cup of powdered sugar and 1 teaspoon of vanilla extract. I keep mixing until there are no lumps left.
Whipping the Cream
In a separate bowl, I pour in 2 cups of chilled heavy whipping cream. I whip it on high speed until stiff peaks form. This takes a little time, but it’s worth it. I carefully fold the whipped cream into the cream cheese mix, doing this in batches. I use a spatula and make sure not to deflate the whipped cream.
Combining Crust and Filling
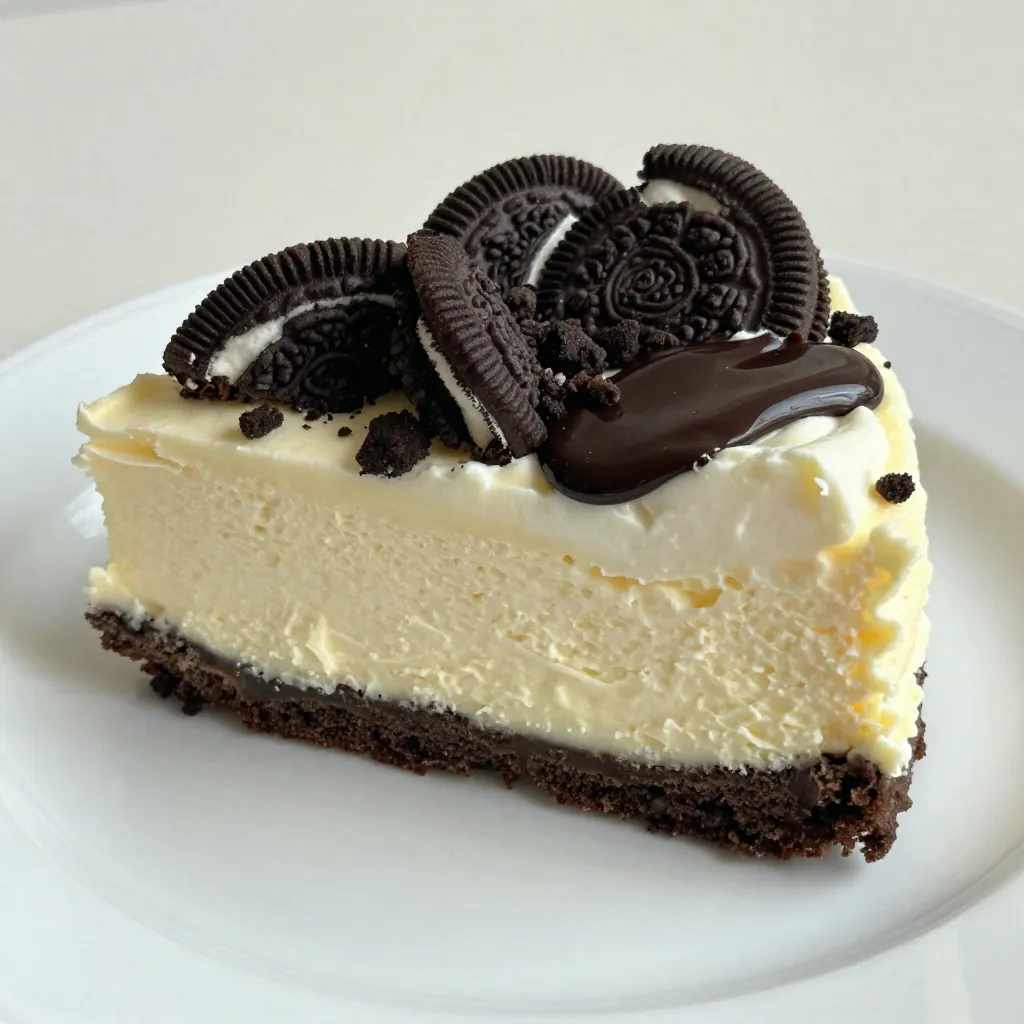
Next, I remove the crust from the fridge. I pour the cheesecake filling over the crust, spreading it out evenly. For an extra touch, I sprinkle 4 crushed Oreo cookies on top of the filling. This gives it nice texture and flavor.
Chilling the Cheesecake
I cover the cheesecake with plastic wrap and place it back in the fridge. I let it chill for at least 4 hours. For the best flavor, I recommend chilling it overnight. The longer it sits, the better it tastes!
Tips & Tricks
Perfecting Your Cheesecake Texture
Using room temperature ingredients is key. It helps the cream cheese blend smoothly. Cold cream cheese can cause lumps. Allow it to sit out for 30 minutes. This simple step makes a big difference.
To avoid lumps in the filling, mix slowly at first. Gradually add the sugar and vanilla. Always scrape down the bowl to catch any lumps. Lastly, fold in the whipped cream gently. This keeps the mixture light and airy.
Serving Suggestions
For an elegant serve, slice the cheesecake neatly. Use a sharp knife dipped in hot water. Wipe the knife between cuts for clean edges. Present the slices on decorative plates for a fancy touch.
Garnishing can enhance your cheesecake. Add a dollop of whipped cream on each slice. You can also place a whole Oreo on top. This makes it look extra special and inviting.
Enhancing Flavors
Drizzling chocolate sauce adds a rich touch. Pour it over each slice before serving. It adds sweetness and a nice look. You can use store-bought sauce or homemade.
If you want to mix it up, try other toppings. Fresh fruit like strawberries or raspberries works well. You can also use crushed nuts or caramel sauce. These options add fun textures and flavors.
Pro Tips
- Use Cold Cream Cheese: Ensure your cream cheese is at room temperature for easy mixing. If you forget to take it out in advance, you can cut it into small pieces and microwave it for about 10-15 seconds to soften it quickly.
- Chill the Whipping Cream: For the best results, make sure your heavy whipping cream is thoroughly chilled before whipping. This helps achieve stiff peaks more easily.
- Experiment with Flavors: Feel free to customize your cheesecake by adding different extracts like almond or coconut, or by folding in mini chocolate chips for extra texture and flavor.
- Longer Chill Time for Better Texture: Although you can serve the cheesecake after 4 hours, allowing it to chill overnight will enhance the flavors and improve the cheesecake’s overall texture.
Variations
Flavor Variations
You can easily change the flavor of your no-bake Oreo cheesecake. One fun way is to add fruit purees. Think strawberries, raspberries, or even mango. Just mix in about half a cup of the puree when you make the filling. This gives a fresh taste and bright color.
Another way to switch it up is by trying different cookie types. Instead of Oreos, use chocolate wafers, peanut butter cookies, or even vanilla cookies. Each type will give your cheesecake a new twist.
Dietary Modifications
If you need a gluten-free option, use gluten-free cookies. Many brands offer gluten-free versions that taste great. You can swap the regular Oreos for these without changing the recipe too much.
For a vegan cheesecake, you can replace cream cheese with a vegan cream cheese. Use coconut cream or whipped coconut milk in place of the heavy cream. This way, you can enjoy a creamy dessert without dairy.
Mini Cheesecake Versions
Making mini cheesecakes is a fun twist. Just use a muffin tin instead of a springform pan. Line each cup with cupcake liners to make serving easy.
When using a muffin tin, reduce the chilling time. Check them after about 2 hours. They should feel firm to the touch. Removing them from the tin can be tricky; let them chill completely to make it easier.
Storage Info
Best Storage Practices
To keep your no-bake Oreo cheesecake fresh, store leftovers in the fridge. Place the cheesecake in an airtight container. If you don’t have one, cover it tightly with plastic wrap. This helps keep it moist and tasty.
Freezing Instructions
You can freeze slices or the whole cheesecake. Wrap the cheesecake well in plastic wrap and then foil. This keeps out air and prevents freezer burn. For best results, thaw the cheesecake in the fridge overnight. This helps regain its creamy texture.
Shelf Life Information
Your cheesecake stays fresh for about 5 days in the fridge. Look for signs like a sour smell or mold. If you see either, it’s best to toss it. Always trust your senses to ensure your dessert is safe to eat!
FAQs
Can I use different cookies for the crust?
Yes, you can use other cookies for the crust. Here are some great options:
– Chocolate graham crackers
– Digestive biscuits
– Vanilla wafers
– Oreos with different flavors, like mint or peanut butter
Feel free to mix and match! Each cookie adds a unique taste.
How long does it take for the cheesecake to set?
The cheesecake needs at least 4 hours to chill. For the best taste and texture, let it sit overnight. This allows the flavors to blend nicely. Cover it tightly to keep it fresh while it chills.
Is it possible to make this cheesecake a day in advance?
Yes! Making this cheesecake a day ahead is a smart choice. It saves you time on the day you plan to serve it. Plus, the flavors become richer as they meld together. Store it in the fridge to keep it fresh.
What if I don’t have a springform pan?
No springform pan? No problem! You can use a regular pie pan or an 8×8 baking dish. Just press the crust firmly into the bottom. If using a pie pan, you may need to scoop out the cheesecake slices carefully. Enjoy the fun of making it your own!
You can make a great Oreo cheesecake with simple steps and easy ingredients. We covered how to prepare the crust, make the filling, and chill it properly. I shared tips for perfecting the texture and serving ideas to impress your guests. You can even try fun variations and storage methods to keep it fresh. Enjoy this sweet treat and feel free to experiment with flavors. Making this cheesecake brings joy to any gathering. You’ll impress everyone with your skills and tast
No-Bake Oreo Cheesecake Delight
A delicious and easy no-bake cheesecake made with Oreo cookies, perfect for any occasion.
Prep Time 20 minutes mins
Total Time 4 hours hrs 20 minutes mins
Course Dessert
Cuisine American
Servings 8
Calories 350 kcal
- 24 cookies Oreo cookies
- 4 cookies extra Oreo cookies, crushed for topping
- 1/4 cup unsalted butter, melted
- 16 oz cream cheese, softened to room temperature
- 1/2 cup powdered sugar
- 1 teaspoon pure vanilla extract
- 2 cups heavy whipping cream, chilled
- 1/4 cup chocolate sauce for optional drizzling
Prepare the Crust: Begin by placing the 24 Oreo cookies into a food processor. Pulse until they reduce to fine crumbs, resembling sand. Gradually pour in the melted butter and pulse a few more times until the mixture is well combined and resembles wet sand.
Form the Crust: Take the Oreo mixture and transfer it to a 9-inch springform pan. Using the back of a flat-bottomed glass or measuring cup, press the cookie mixture firmly and evenly into the bottom of the pan, ensuring there are no gaps. Once evenly packed, place the crust in the refrigerator for at least 15 minutes to set.
Make the Filling: In a large mixing bowl, beat the softened cream cheese using a hand mixer or stand mixer on medium speed until smooth and creamy, about 2 minutes. Gradually add the powdered sugar and vanilla extract, continuing to mix until fully incorporated and no lumps remain.
Whip the Cream: In a separate bowl, pour in the chilled heavy whipping cream. Using a hand mixer, whip the cream on high speed until stiff peaks form. Carefully fold the whipped cream into the cream cheese mixture in batches, using a spatula. Gently fold until there are no visible streaks, taking care not to deflate the whipped cream.
Combine Crust and Filling: Remove the crust from the refrigerator. Pour the cheesecake filling over the prepared Oreo crust, spreading it out evenly with a spatula. Sprinkle the reserved crushed Oreo cookies atop the filling for added texture and flavor.
Chill: Cover the cheesecake with plastic wrap or a lid and place it in the refrigerator. Allow it to chill for at least 4 hours, but overnight chilling yields the best results in terms of flavors melded and firmness.
Serve: Once thoroughly chilled and set, carefully release and remove the sides of the springform pan. Transfer the cheesecake to a serving platter. For an elegant finish, drizzle chocolate sauce over the top before slicing.
For best results, chill overnight.
Keyword cheesecake, dessert, no-bake, Oreo
WANT TO SAVE THIS RECIPE?