WANT TO SAVE THIS RECIPE?
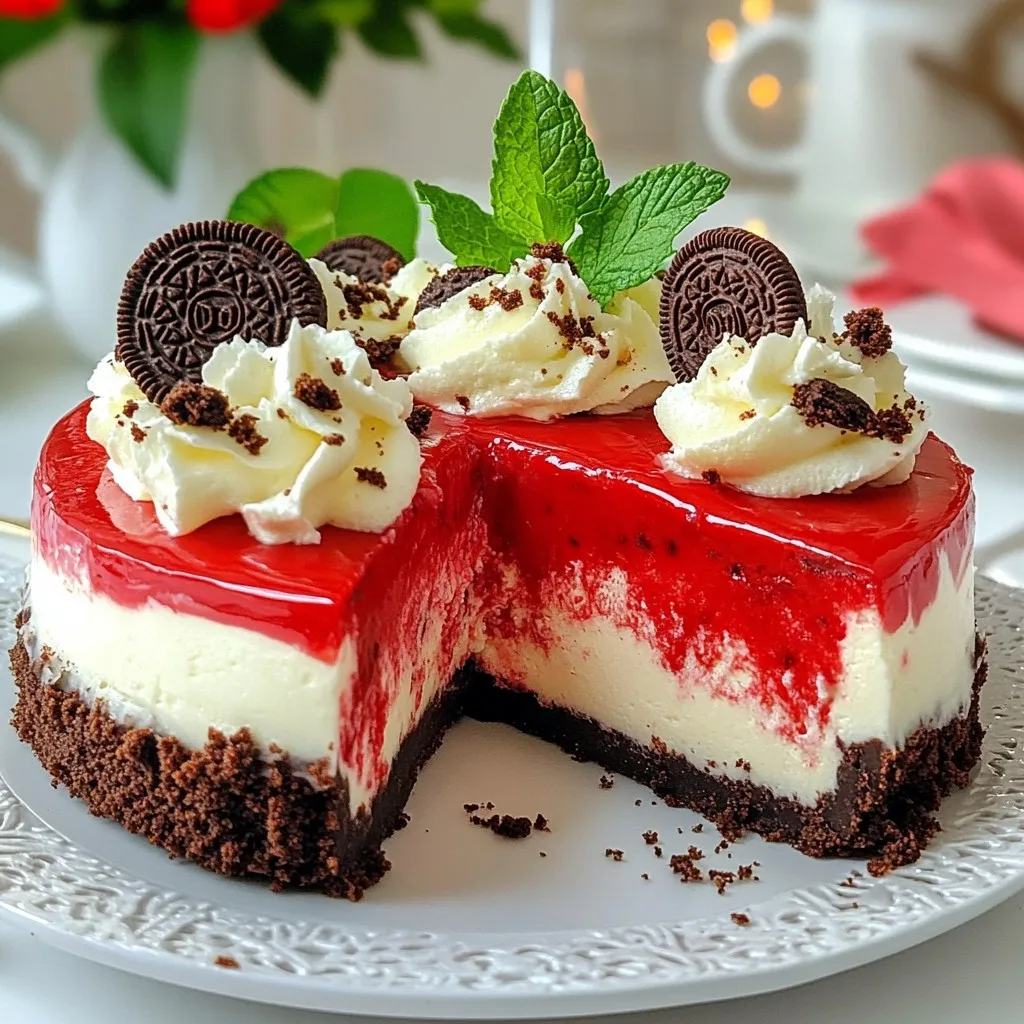
Craving a sweet treat that’s also a showstopper? The Red Velvet Oreo Cheesecake is just what you need! This delightful recipe combines rich flavors with a simple method, making it perfect for bakers of all skill levels. Join me as we explore the creamy layers and tempting Oreo crust that will wow your family and friends. Ready to dive in? Let’s make this delicious cheesecake together!

Why I Love This Recipe
- Decadent Flavor: This cheesecake combines the rich flavors of cream cheese and chocolate with the iconic taste of Oreos, making every bite a delightful experience.
- Eye-Catching Appearance: The vibrant red color of the cheesecake is visually stunning and perfect for special occasions or celebrations.
- Easy to Make: With straightforward steps and minimal ingredients, even novice bakers can achieve a delicious result without stress.
- Versatile Dessert: This cheesecake can be served at parties, holidays, or as a special treat, catering to both kids and adults alike.
Ingredients
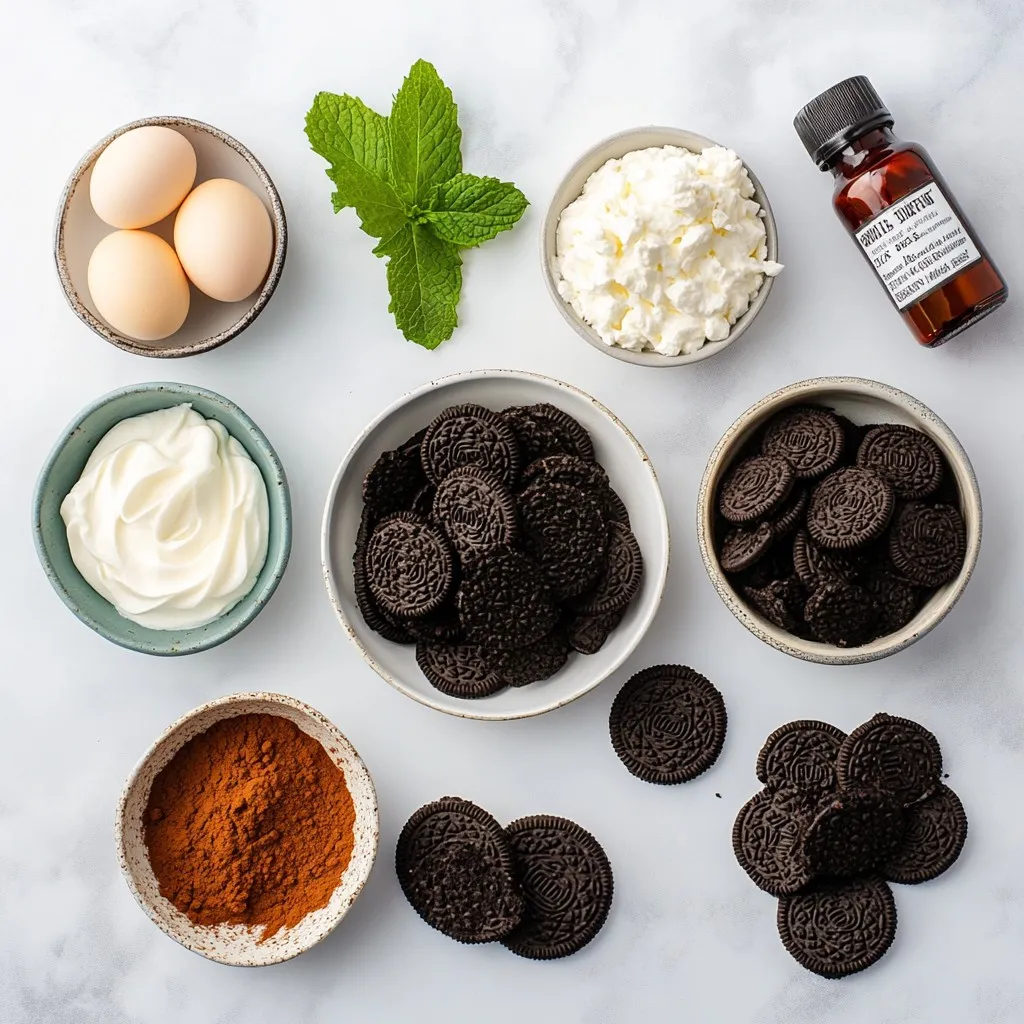
Main Ingredients List
– Oreo Cookie Crust
– 1 ½ cups Oreo cookie crumbs
– 5 tablespoons unsalted butter, melted
– Cheesecake Filling Components
– 2 cups cream cheese, softened
– 1 cup granulated sugar
– 1 teaspoon pure vanilla extract
– 2 large eggs, at room temperature
– ¼ cup sour cream
– 1 tablespoon unsweetened cocoa powder
– 1 teaspoon red food coloring
– Toppings and Garnishes
– 1 cup crushed Oreos (for topping)
– Whipped cream (for garnish)
– Fresh mint leaves (for garnish)
The ingredients shine in this Red Velvet Oreo Cheesecake. The Oreo crust gives a sweet and crunchy base. Next, the cheesecake filling uses creamy cheese for a rich texture. Sugar adds sweetness, while eggs help set the filling. The sour cream gives a nice tang, balancing flavors well.
The cocoa powder deepens the taste, and red food coloring makes it vibrant. Topping with crushed Oreos adds crunch. Whipped cream and mint leaves finish the dessert beautifully. Each layer comes together, creating a dessert that delights the eyes and the taste buds.
Step-by-Step Instructions
Preparing the Crust
To start, preheat your oven to 325°F (160°C). In a medium bowl, mix 1 ½ cups of Oreo cookie crumbs with 5 tablespoons of melted unsalted butter. Ensure all crumbs are coated well. Then, press this mixture firmly into the bottom of a 9-inch springform pan. This will be your crust. Bake it in the oven for about 10 minutes, then take it out and let it cool completely.
Making the Cheesecake Filling
In a large bowl, beat 2 cups of softened cream cheese with an electric mixer. Start on medium speed until it’s creamy and smooth. Gradually add in 1 cup of granulated sugar, mixing until there are no lumps left. Next, stir in 1 teaspoon of pure vanilla extract. Add 2 large eggs one at a time, mixing on low speed after each addition. Finally, mix in ¼ cup of sour cream gently.
Finalizing and Baking
Now, sift in 1 tablespoon of unsweetened cocoa powder into the cheesecake filling. Add 1 teaspoon of red food coloring to achieve that famous red hue. Mix until the color is even throughout. Then, fold in 1 cup of crushed Oreos with a spatula, spreading them evenly in the batter. Carefully pour the cheesecake filling over your cooled crust. Smooth the top with your spatula. Bake in the preheated oven for 45 to 50 minutes. The edges should be set, and the center will have a slight jiggle.
After baking, turn off the oven and crack the door open. Let the cheesecake cool in the oven for about 1 hour. Once cooled, move it to the fridge for at least 4 hours, or overnight for best results.
Tips & Tricks
Achieving the Perfect Texture
– Cream cheese temperature: Start with room temperature cream cheese. Cold cream cheese makes lumps.
– Mixing techniques: Use a mixer on medium speed. Mix until smooth, but don’t overmix.
Ensuring Even Baking
– Importance of cooling in the oven: After baking, turn off the oven. Crack the door open to cool slowly. This helps prevent cracks.
– Checking for doneness: Look for set edges and a jiggly center. The center should not be completely firm.
Presentation Tips
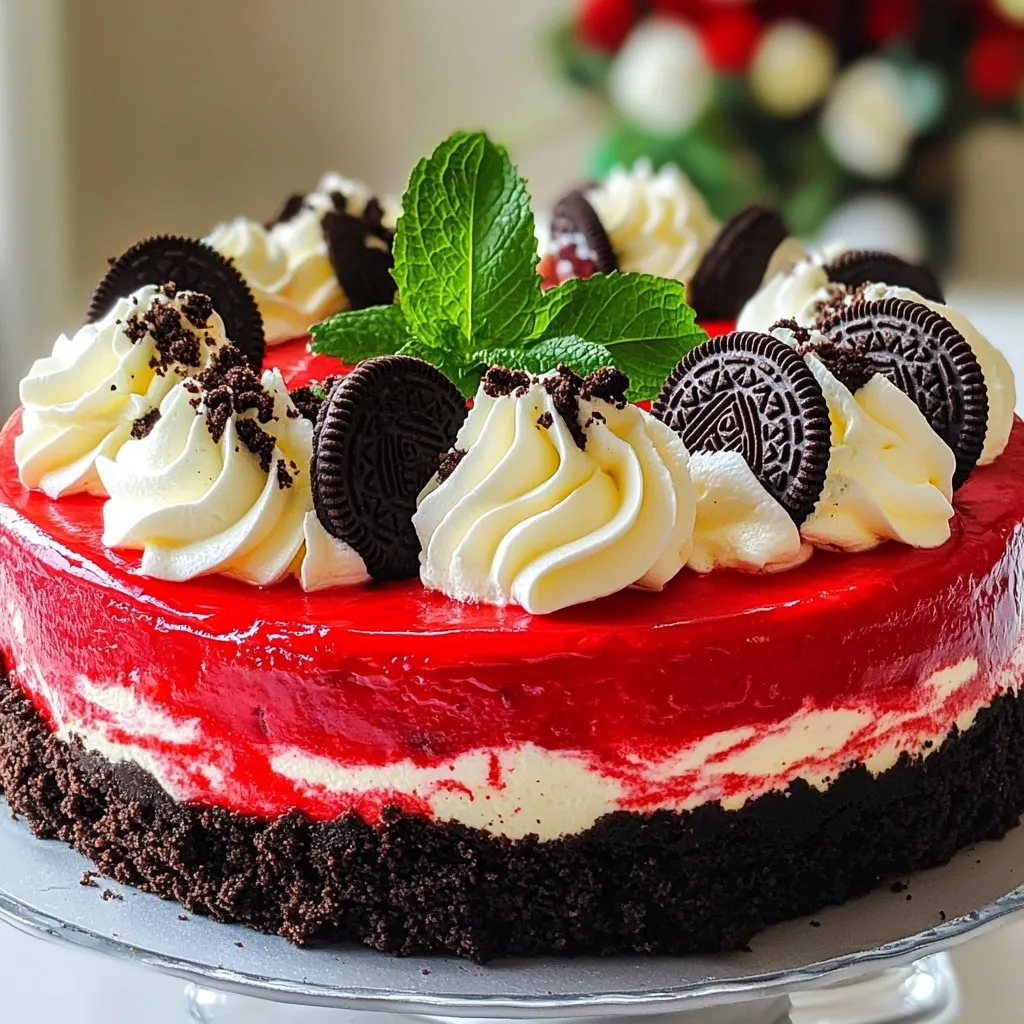
– Whipped cream application: Use a piping bag for neat dollops. This adds elegance to your cheesecake.
– Garnishing with mint: Add fresh mint leaves on top. They brighten the look and add color.
Pro Tips
- Use Room Temperature Ingredients: Make sure your cream cheese and eggs are at room temperature before mixing. This helps achieve a smooth and creamy cheesecake without lumps.
- Don’t Overmix: When adding the eggs and sour cream, mix just until combined. Overmixing can incorporate too much air, causing the cheesecake to crack during baking.
- Chill Thoroughly: For the best texture and flavor, allow your cheesecake to chill in the refrigerator for at least 4 hours, or overnight if possible. This helps it set properly and enhances the flavors.
- Garnish Wisely: Add whipped cream and crushed Oreos just before serving to maintain their texture. Fresh mint leaves not only add color but also a refreshing flavor contrast.
Variations
Flavor Enhancements
You can easily change the flavor of your Red Velvet Oreo Cheesecake. Here are some ways:
– Adding different extracts: Try using almond or mint extract for a twist. Each extract brings a new flavor. Start with a teaspoon and taste as you mix. This small change can make your cheesecake unique.
– Swapping Oreos for another cookie type: Instead of regular Oreos, use mint or peanut butter cookies. This swap changes the whole taste. You can even try gluten-free cookies for a fun option.
Dietary Adaptations
You can also adapt this cheesecake to fit your diet. Here’s how:
– Gluten-free options: Use gluten-free Oreo cookies for the crust. This way, everyone can enjoy your cheesecake. Make sure to check the label for gluten-free assurance.
– Dairy-free alternatives: Substitute cream cheese with dairy-free cream cheese. Use coconut cream instead of sour cream for a smooth texture. These swaps keep the cheesecake rich and creamy without dairy.
Storage Info
How to Store Cheesecake
To keep your Red Velvet Oreo Cheesecake fresh and tasty, try these tips:
– Refrigeration duration: Place the cheesecake in the fridge. It lasts about 5 to 7 days. Make sure to cover it well with plastic wrap or foil to prevent drying.
– Freezing options: You can freeze the cheesecake for up to 3 months. Slice it into pieces first. Wrap each slice in plastic wrap, then in foil. This helps keep it fresh and easy to thaw.
Reheating Tips
If you want to enjoy your cheesecake again, reheating is simple:
– Best methods for texture preservation: Use the oven for a gentle heat. Preheat it to 300°F (150°C). Place the cheesecake on a baking sheet. Warm it for about 10 to 15 minutes. This keeps the texture creamy and smooth. Avoid using the microwave, as it can make the cheesecake rubbery.
FAQs
Can I make this cheesecake ahead of time?
Yes, you can make this cheesecake early. It actually tastes better after chilling. I suggest making it a day before you plan to serve it. This gives the flavors time to meld. After baking, cool it completely. Then, wrap it tightly in plastic wrap and refrigerate. When you’re ready to serve, just add your toppings!
What can I substitute for red food coloring?
If you want a natural option, use beet juice. It gives a nice red color. You can also try pomegranate juice or raspberry puree. These options add flavor and color. Just remember to adjust the amount to get the right shade.
How long does Red Velvet Oreo Cheesecake last?
This cheesecake lasts about 5 to 7 days in the fridge. Store it in an airtight container to keep it fresh. If you want to keep it longer, you can freeze it. Just wrap it well and it can last for about 3 months in the freezer. When you’re ready to enjoy it, thaw it in the fridge overnight.
This blog post guides you through making a Red Velvet Oreo Cheesecake. We covered each step, from mixing the crust to baking your cheesecake. I shared tips for perfect texture and even baking. You can also explore fun flavor twists and dietary swaps. Remember, proper storage keeps your cheesecake fresh and tasty. Making this dessert is fun and rewarding. Try it out and enjo
Red Velvet Oreo Cheesecake
A delicious and visually stunning cheesecake featuring a red velvet flavor and Oreo cookie crust.
Prep Time 30 minutes mins
Cook Time 50 minutes mins
Total Time 5 hours hrs
Course Dessert
Cuisine American
Servings 12
Calories 350 kcal
- 1.5 cups Oreo cookie crumbs
- 5 tablespoons unsalted butter, melted
- 2 cups cream cheese, softened to room temperature
- 1 cup granulated sugar
- 1 teaspoon pure vanilla extract
- 2 large eggs, at room temperature
- 0.25 cup sour cream
- 1 tablespoon unsweetened cocoa powder
- 1 teaspoon red food coloring
- 1 cup crushed Oreos (for topping)
- to taste Whipped cream (for garnish)
- to taste Fresh mint leaves (for garnish)
Prepare the Crust: Preheat your oven to 325°F (160°C). In a medium-sized bowl, thoroughly combine the Oreo cookie crumbs with the melted butter, ensuring that all crumbs are evenly coated. Firmly press this mixture into the bottom of a 9-inch springform pan to create a solid, even crust. Place the pan in the oven and bake for approximately 10 minutes. Once done, remove it from the oven and allow it to cool completely.
Make the Cheesecake Filling: In a large mixing bowl, use an electric mixer on medium speed to beat the softened cream cheese until it achieves a creamy and smooth consistency. Gradually add the granulated sugar, continuing to mix until fully combined and there are no lumps.
Add Flavorings: Add the vanilla extract to the cream cheese mixture. Then, introduce the eggs one at a time, mixing on low speed after each addition until just combined. Finally, mix in the sour cream gently, taking care not to overmix the ingredients.
Incorporate Color and Flavor: Sift the unsweetened cocoa powder into the cheesecake filling and add the red food coloring. Blend the mixture until the color is uniformly distributed, resulting in a rich red hue throughout.
Combine with Oreo Crumbs: Gently fold the crushed Oreos into the cheesecake mixture using a spatula, ensuring they are evenly spread out within the batter.
Bake the Cheesecake: Carefully pour the cheesecake filling over the cooled crust in the springform pan. Use a spatula to smooth the surface. Bake in the preheated oven for 45 to 50 minutes, or until the edges are set and only the center has a slight jiggle when gently shaken.
Cool Down: After baking, turn off the oven and crack the door open to allow for a slow cooling process. Let the cheesecake cool in the oven for about 1 hour. Once the hour is up, remove it from the oven and let it cool completely to room temperature. Once cooled, refrigerate the cheesecake for at least 4 hours or preferably overnight to set firmly.
Serve: Just before serving, generously dollop the cheesecake with whipped cream and sprinkle the crushed Oreos on top for a crispy finish. Add fresh mint leaves as a vibrant garnish to enhance the presentation.
For best results, refrigerate overnight to allow the cheesecake to set firmly.
Keyword cheesecake, Oreo, red velvet
WANT TO SAVE THIS RECIPE?