
Ready for a rich and creamy treat? Pumpkin Cheesecake Truffles bring fall flavors to your dessert table. With a smooth, buttery base and a chocolate shell, these bites are simply irresistible. Plus, making them at home is easier than you think! Let’s explore the ingredients, steps, and tips to create your perfect truffle. You’ll impress friends and family with these sweet delights. Time to dive in!
Ingredients
Detailed ingredient list
– 1 cup cream cheese, softened
– 1/2 cup pumpkin puree
– 1/2 cup powdered sugar
– 1 teaspoon pumpkin pie spice
– 1/2 teaspoon vanilla extract
– 1 cup graham cracker crumbs (+ extra for coating)
– 1 cup white chocolate chips
– 1 tablespoon coconut oil (optional)
– Crushed pecans or walnuts for optional coating
Each ingredient plays a key role in the flavor and texture of the truffles. The cream cheese adds creaminess, while pumpkin puree gives that rich fall taste. Powdered sugar sweetens the mix, and pumpkin pie spice brings warmth. Graham cracker crumbs add a nice crunch, complementing the smooth, sweet chocolate coating.
Notes on ingredient substitutions
You can swap cream cheese for vegan cream cheese for a dairy-free option. If you don’t have pumpkin puree, mashed sweet potato works well. For a sugar-free treat, use a sugar substitute in place of powdered sugar. You can also leave out the coconut oil if you prefer a thicker coating.
Recommended brands for best results
I recommend using Philadelphia cream cheese for its smooth texture. Libby’s pumpkin puree is a great choice, as it has a consistent flavor. For white chocolate chips, Ghirardelli or Nestlé are reliable brands that melt well. If you choose to add nuts, look for fresh pecans or walnuts from Diamond or Fisher for the best crunch and flavor.
Step-by-Step Instructions
Mixing the cream cheese mixture
Start by softening your cream cheese. I use an electric mixer for this part. Beat it until it’s smooth and creamy. You want no lumps. Next, add the pumpkin puree. Then, mix in the powdered sugar, pumpkin pie spice, and vanilla extract. Blend until your mixture is creamy and well combined. Finally, gently fold in half a cup of graham cracker crumbs. This adds a nice texture to the filling.
Chilling the mixture
Once your mixture is ready, cover the bowl with plastic wrap. Place it in the refrigerator for about 30 minutes. Chilling helps firm up the mixture. This makes it easier to form the truffles later. You want it to be just firm enough to handle.
Rolling and coating the truffles
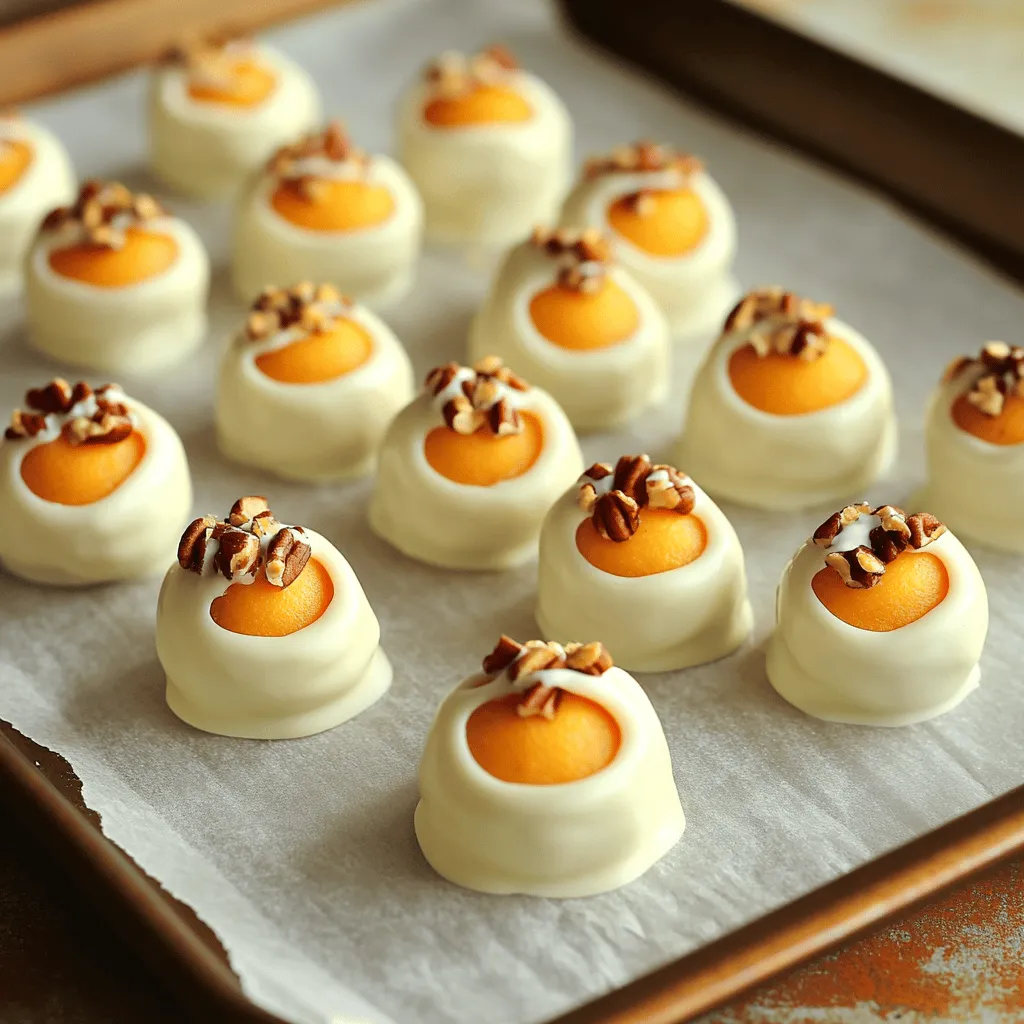
After chilling, take the bowl out of the fridge. Use a tablespoon to scoop out portions of the mixture. Roll each portion into a small ball in your hands. You should get about 12 truffles. Place these balls on a parchment-lined baking sheet. Once all the truffles are formed, put the baking sheet back in the fridge for another 15 minutes. This helps them hold their shape.
Melting the chocolate and finishing touches
While the truffles chill, it’s time to melt the white chocolate chips. If you want a smoother finish, add a tablespoon of coconut oil. Use a microwave-safe bowl for this. Heat in 30-second intervals, stirring in between. Stop when the chocolate is completely smooth. Now, dip each chilled truffle into the melted chocolate. Make sure they are fully coated. For a fun twist, roll them in crushed pecans or walnuts. Place the truffles back on the baking sheet and let them set in the fridge for at least 30 minutes. Enjoy your pumpkin cheesecake truffles once the chocolate hardens!
Tips & Tricks
How to achieve the perfect truffle texture
To get that creamy, dreamy texture, always start with room temperature cream cheese. This helps mix it smoothly with the other ingredients. After mixing, chill the mixture for about 30 minutes. This step helps firm it up, making it easy to roll into balls. When you roll the truffles, make sure your hands are slightly damp. This prevents sticking. If the mixture seems too soft, add a bit more graham cracker crumbs to help.
Best practices for melting chocolate
Melting chocolate can be tricky, but I have some tips to help. Use a microwave-safe bowl and heat the chocolate in short bursts, about 30 seconds at a time. Stir between each interval to ensure even melting. If you add coconut oil, it helps the chocolate become smooth and shiny. Avoid overheating the chocolate, as it can seize up. If it does, try adding a bit of vegetable oil to rescue it.
Troubleshooting common issues
If your truffles are too soft, try chilling them longer before rolling. If your chocolate coating is too thick, add more coconut oil when melting. If the chocolate doesn’t stick to the truffles, make sure they are cold before dipping. Also, rolling the truffles in crushed nuts can add great texture and flavor. If you notice any lumps in your cream cheese mixture, just blend it longer until smooth.

Variations
Flavor variations
You can change up the flavor of your pumpkin cheesecake truffles easily. Try adding chocolate to the mix. Just blend in some cocoa powder or melted chocolate. This adds a rich touch. You can also use different spices. Try cinnamon or nutmeg for a warm twist. These flavors pair well with pumpkin. You can even mix in some caramel for a sweet surprise.
Different coatings
Coating is key to making your truffles pop. While white chocolate is great, dark chocolate works too. It gives a bittersweet flavor that balances the sweetness. You can also roll your truffles in cocoa powder. This creates a nice dusting that adds a rich look. For crunch, use crushed nuts like pecans or walnuts. They add texture and flavor. Sprinkles can also add a fun touch for special occasions.
Serving suggestions
Presentation is important for making your truffles shine. Arrange them on a nice plate. You can sprinkle any leftover crushed nuts around them for flair. Drizzling melted chocolate on top adds a fancy touch. Serve the truffles chilled for the best flavor. Pair them with a warm drink like spiced cider or coffee. This balance of flavors makes for a cozy treat that everyone will love.
Storage Info
Best practices for storing truffles
Store your pumpkin cheesecake truffles in an airtight container. This keeps them fresh and tasty. Place wax paper between layers to avoid sticking. Keep them in the fridge where they stay cool and firm.
How long they last in the fridge/freezer
In the fridge, truffles last about a week. They stay safe and delicious for this time. If you freeze them, they can last up to three months. Make sure to wrap them well to prevent freezer burn.
Reheating or refreshing truffles before serving
No need to reheat truffles. They taste best cold and firm. If they seem soft, put them back in the fridge for a bit. This helps them regain their shape and texture before serving.
FAQs
Can I use cream cheese frosting instead?
Yes, you can use cream cheese frosting. It adds sweetness and creaminess. The truffles may be softer, so reduce the pumpkin puree. This helps keep the texture right.
What can I replace pumpkin puree with?
You can use butternut squash puree or sweet potato puree. Both have a similar taste and texture. They will also give a nice fall flavor to your truffles.
Are these truffles gluten-free?
Yes, these truffles can be gluten-free. Just choose gluten-free graham crackers. Make sure to check the labels on all other ingredients too.
Can I make these truffles ahead of time?
Yes, you can make these truffles ahead of time. They store well in the fridge for up to a week. You can also freeze them for longer storage. Just make sure to let them thaw in the fridge before serving.
Making truffles is a fun and easy process. We covered the ingredients, including swaps and brand tips. The step-by-step instructions will help you mix, chill, and coat your truffles with ease. I’ve shared tips for perfect texture and melting chocolate. You can try various flavors and coatings for a unique taste. Remember to store them properly for the best shelf life. Enjoy making these delightful treats that you can share or keep for yourself!
